Flash CS3 For Dummies PHẦN 2 ppsx
Bạn đang xem bản rút gọn của tài liệu. Xem và tải ngay bản đầy đủ của tài liệu tại đây (1.28 MB, 40 trang )
Following a timeline
The Timeline window divides your movie into frames. Each frame represents
a tiny stretch of time, such as
1
⁄12 of a second. Creating a movie is simply a
matter of assembling frames, which are then quickly played in order.
Chapter 9 explains in detail how to make using the Timeline completely pain-
less. For now, you should just understand the essentials. See Figure 1-2 for
the basic Timeline.
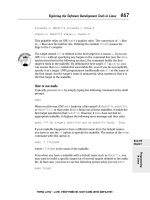
On the left side of the Timeline is the layer list. When you open a new movie,
you see only one layer, unimaginatively named Layer 1. A layer is like a sheet
of transparent acetate on which you draw objects. Layers help you keep
objects from running into each other, causing unfortunate, messy results. You
organize your entire movie by using layers. For example, if you want to keep
some text constant throughout the movie but animate a bouncing dot, you
would give the dot its own layer and animate it on that layer. The layer list
has room for more layers, and you can add as many layers as you want.
(Chapter 6 gives you the lowdown on layers.)
You can lower the bottom edge of the Timeline to make room for more layers.
Hover the mouse cursor over the bottom line until you see the two-headed
arrow and drag downward.
To the right of Layer 1, you see a bunch of rectangles, each representing a
frame. (Actually, before you start using the Timeline, they’re just potential
frames, like unexposed frames on a roll of film.) By default, each frame lasts
1
⁄12 of a second. Each layer has its own row of frames because you can have
different animations or objects on each layer.
A keyframe is a frame that defines some change in your animation. In some
animations, every frame is a keyframe. Other animations need keyframes for
only the first and last frames.
You don’t use the Timeline until you’re ready to animate. While you work,
however, you should organize your objects on separate layers. Don’t worry —
you can always move an object from one layer to another.
Figure 1-2:
The Timeline
is your key
to managing
animation.
20
Part I: A Blast of Flash
05_121009 ch01.qxp 4/10/07 6:15 PM Page 20
Getting Help in a Flash
This book is all that you need to start creating great animations, but we would
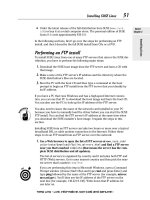
be remiss if we didn’t tell you about the Flash Help system. To use Flash Help,
choose Help➪Flash Help. You see a window like the one shown in Figure 1-3.
Help’s multiple manuals
Flash Help contains several sections:
ߜ Using Flash is the main Help manual.
ߜ Programming ActionScript 3.0 is a manual on the latest version of
ActionScript, Flash’s programming language. (See Chapter 10 to find
out more.)
You don’t need to program Flash to use it, if you are interested only in
graphics and animation.
ߜ Learning ActionScript 2.0 in Flash is a user’s guide for ActionScript 2.0,
Flash’s previous programming language. You can still use this language.
Several other Help sections offer more information on ActionScript 2.0.
ߜ Getting Started with Flash Lite 2.x and related help content explains
how to use Flash CS3 to develop Flash movies for mobile phones.
ߜ Getting Started with Flash Lite 1.x and related content explains how to
create Flash movies for the previous version of Flash Lite.
Figure 1-3:
The Flash
Help
window.
21
Chapter 1: Getting Acquainted with Flash CS3
05_121009 ch01.qxp 4/10/07 6:15 PM Page 21
To search for a term, click the Search button. Then type the term and click
Search. You can then choose from the list of topics.
Finding more help on the Web
Adobe offers support on its Web site. Choose Help➪Flash Support Center,
which takes you to www.adobe.com/support/flash. There you can search
the knowledge base and tutorials for answers to your questions.
Try It; You’ll Like It
Perhaps by now you’re getting impatient to try out Flash. Getting started is
easy. You collect a few ideas, put together some art, add animation, save your
movie, and publish it. Then you view it in a browser either online or offline.
That’s the gratifying part. In the following sections, you get to try out Flash
by working through a basic animation. The rest of the book explains these
concepts in more detail.
Conceiving your first animation
Suppose that you want to add an animated logo to a home page that you’ve
already set up. You want the animation to run when the page loads and then
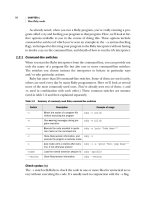
stop. Figure 1-4 shows the Rainbow Resources company logo — unanimated,
of course — that you can find on this book’s Web site, at www.dummies.
com/go/flashcs3.
Suppose that you want the word Rainbow to fly into your page from the right
and the word Resources to fly in from the left. At the same time, you want the
graphic to rotate 180 degrees. The following section shows you how to create
this animation.
Figure 1-4:
A company
logo that
could stand
some
animation.
22
Part I: A Blast of Flash
05_121009 ch01.qxp 4/10/07 6:15 PM Page 22
Creating flashy drawings
You can use Flash to create a company logo, but importing one from this
book’s Web site is simpler. Often, you import existing graphics (such as a
company logo) from a file rather than create them from scratch. (Chapter 3
explains how to import and manipulate graphics.)
If you’re going through the steps and make a mistake, choose Edit➪Undo (or
press Ctrl+Z or Ô+Z) and try again. You can use Undo repeatedly to undo sev-
eral steps, if necessary.
To import the Rainbow Resources logo into Flash, follow these steps. (The
steps might vary if you’re importing some other graphic in a different format.)
1. Start Flash.
See the instructions in the section “Starting Flash on a PC” or “Starting
Flash on a Mac,” earlier in this chapter, if you need help.
2. In the Create New section of the Startup screen, choose Flash File
(ActionScript 3.0).
You see a spanking-new movie on your screen.
3. Go to www.dummies.com/go/flashcs3 and download the rainbow.
gif image file.
You’ll need to unzip the file and extract the image file. Extract this image
file to the location where you plan to save your Flash movie.
4. Choose File➪Import➪Import to Stage.
The Import dialog box opens.
5. Browse the dialog box until you find rainbow.gif in the location
where you saved it, and then double-click the file to open it.
You see the logo on your screen. You need to break the logo into pieces and
make it a vector graphic so that you can animate sections of it separately.
6. Choose Modify➪Bitmap➪Trace Bitmap.
The Trace Bitmap dialog box appears.
7. In the Trace Bitmap dialog box, set the color threshold to 100, the
minimum area to 1, the curve fit to Pixels, and the corner threshold to
Many Corners. Click OK.
In our example, we chose to use settings that reproduce the bitmap as faith-
fully as possible. Flash creates a vector graphic and breaks up the graphic
into individual components. The entire graphic, however, is selected.
8. Click anywhere outside the graphic to deselect it.
You’ve got your logo! Now you need to set it up for animation.
23
Chapter 1: Getting Acquainted with Flash CS3
05_121009 ch01.qxp 4/10/07 6:15 PM Page 23
Turning your objects into symbols
In the logo that you imported in the preceding section, each letter is a sepa-
rate object, which can get pretty confusing. Each line in the logo’s design is
also separate. But you want your words — and the little design — to stay
together. So you must combine each word and the logo into a symbol. A symbol
helps keep objects together and is required for some kinds of animation. (See
Chapter 7 for the scoop on symbols.)
To turn the words and the logo into symbols, follow these steps:
1. To get a better view of your image, click the Zoom Control drop-down
list (at the upper-right corner of the Stage area) and choose 400%.
If you don’t see the Zoom Control drop-down list, choose Window➪
Toolbars➪Edit Bar to display it.
Use the scroll bar to scroll the words of the logo into view, if necessary.
2. Click the Selection tool on the Tools panel if it’s not already selected.
3. Click the upper-right corner of the word Rainbow (just above and to
the right of the w) and drag to the lower-left corner of the first letter, R.
Dragging from right to left makes it easier to avoid selecting the logo at
the same time. The entire word should be selected. If it isn’t, click out-
side the word and try again.
4. Choose Modify➪Convert to Symbol. In the Convert to Symbol dialog
box, click Graphic for the Type and then click OK.
It’s usually good practice to name the symbol, but doing so is not neces-
sary for this exercise. When you click OK, Flash places a box around the
word so you can see that it’s one object.
5. Repeat the procedure outlined in Steps 3 and 4 with the word
Resources.
In this case, you might want to start clicking and dragging from the upper-
left area of the word; then choose Modify➪Convert to Symbol again and
click OK. Now all the letters of the word Resources are a single object.
6. Click the Zoom Control drop-down list and choose 100% so that you
can see the entire logo.
7. Click above and to the left of the logo and drag to the lower right to
select the entire logo.
8. Hold down the Shift key and click each word to remove both words
from the selection.
Now the design portion of the logo is selected.
9. Press F8 (the keyboard shortcut to create a symbol) and then click OK
in the Convert to Symbol dialog box.
Flash creates a symbol from the lines of the logo’s design.
24
Part I: A Blast of Flash
05_121009 ch01.qxp 4/10/07 6:15 PM Page 24
See Chapter 7 to find out more about what symbols are and how to use them.
Symbols are important building blocks in Flash movies.
Putting your graphics on layers
You need to place different pieces on different layers when you’re animating.
You use layers to organize your movie and keep shapes separate so that they
don’t interfere with each other. (See Chapter 6 for the complete story on layers.)
To split your three symbols onto three separate layers, you can use a conve-
nient feature of Flash CS3: distribute to layers. Follow these steps:
1. Click the Selection tool on the Tools panel if it’s not already selected.
2. Drag diagonally across the entire logo, including the two words, to
select it.
You should see two rectangles inside one bigger rectangle. All three
objects in the logo are selected.
3. Choose Modify➪Timeline➪Distribute to Layers.
You now have three new layers, named Symbol 1, Symbol 2, and Symbol
3. The three objects of the logo have been distributed to Symbol 1
through 3 and removed from Layer 1.
4. Click outside the Stage to deselect any objects.
You’re now ready for the animation process.
Making graphics move
We explain earlier in this chapter that your goal is to have the word Rainbow
fly in from the right and the word Resources fly in from the left. You also want
the graphic to rotate 180 degrees at the same time. What you see now is how
the animation will end — the last frame of the movie.
Follow these steps to create the last frame of the movie and save the file:
1. For each of the three symbol layers, click frame 30 of the Timeline
and choose Insert➪Timeline➪Keyframe.
You may have to scroll down to access frame 30 on the lowest layer. You
can find out more about keyframes in Chapter 9.
2. Choose File➪Save and choose the same location you used for the
rainbow.gif image file.
We don’t recommend saving the file in the Flash CS3 program folder — it
might get lost among your Flash program files.
25
Chapter 1: Getting Acquainted with Flash CS3
05_121009 ch01.qxp 4/10/07 6:15 PM Page 25
3. Give your movie a name, such as Movie of the Year, and click Save.
Flash creates a file named Movie of the Year.fla. Flash adds .fla
for you because that’s the filename extension for Flash movies.
Go back and create the beginning of your movie. Flash can fill in all the
blanks in between. Follow these steps to create the beginning of the movie
and the animation:
1. If the Property inspector isn’t already open, choose Window➪
Properties➪Properties to open it.
If the Property inspector is open but collapsed, click its title bar to
expand the panel.
2. Select the word Rainbow. Click the first frame of the Timeline in the
highlighted row.
When you select the word Rainbow, you can tell which layer it is on by
looking at the highlighted layer.
3. Press and hold down the Shift key while you drag the word Rainbow
to the right, just off the Stage into the gray area.
You might need to use the horizontal scroll bar or choose a lower zoom
percentage in the Zoom drop-down list to see the gray area. Pressing
Shift keeps the object from moving up or down while you drag to the
right. By clicking the first frame and moving the word, you set its posi-
tion at the beginning of the animation.
4. Click the word Rainbow’s layer, anywhere between the 1st and the
30th frame.
5. On the Tween drop-down list of the Property inspector, choose Motion.
You now see a solid arrow on the Timeline between the 1st and 30th
frames. Choosing Motion in the Tween drop-down list creates animation
that moves the symbol from the position in the first frame to its position
in the next keyframe, which is frame 30 in this movie.
6. Repeat Steps 2 through 5 for the word Resources. However, in Step 3,
drag the word Resources to the left, just off the Stage.
7. Select the logo design and click the first frame of the Timeline in the
highlighted row.
8. Choose Modify➪Transform➪Rotate 90° CW to rotate the design 90
degrees clockwise.
9. Repeat the Modify➪Transform➪Rotate 90° CW command to rotate the
design a total of 180 degrees.
10. Click the logo’s highlighted layer, anywhere between the 1st and
30th frames, and choose Motion in the Tween drop-down list of the
Property inspector.
26
Part I: A Blast of Flash
05_121009 ch01.qxp 4/10/07 6:15 PM Page 26
11. If necessary, drag the horizontal scroll box until the Stage is in the
center of your screen.
Otherwise, you won’t be able to see the entire animation — and you
don’t want to miss this one!
12. Click the first frame of any layer.
This takes you to the start of your movie. Your screen should look like
the one shown in Figure 1-5.
13. Press Enter (Return) and watch the animation. (Start writing your
Academy Award acceptance speech.)
14. Save your movie again by choosing File➪Save.
Publishing your first animation
for posterity
You can’t watch the animation in a Web browser until you publish it and
insert it into an HTML document. To do so, follow these steps:
1. Click the Stage to change the display of the Property inspector.
You should see the Settings button next to the Publish label.
Figure 1-5:
Before you
run the
animation,
Rainbow
appears to
the right and
Resources
to the left,
and the line
logo is
rotated.
27
Chapter 1: Getting Acquainted with Flash CS3
05_121009 ch01.qxp 4/10/07 6:15 PM Page 27
2. Click the Settings button in the Property inspector.
The Publish Settings dialog box opens.
3. Click the HTML tab.
4. Deselect the Loop check box in the Playback section.
We want the animation to play only once.
5. Click the Publish button, and then click OK to close the dialog box.
With scarcely a blip, Flash publishes your movie and creates two files,
named Movie of the Year.swf (assuming you used that name) and
Movie of the Year.html. They’re in the same folder as your .fla
movie file. Movie of the Year.swf is the file your browser reads to
play the animation. Movie of the Year.html contains the HTML
code required to display your movie on a Web page.
6. Open your Web browser.
7. Choose File➪Open (or Open File) and find Movie of the Year.html
(or whatever you named your movie file).
You might need to click Browse and navigate to the file.
8. Double-click the file.
Your browser opens the HTML document and reads its instructions to
play the Flash movie.
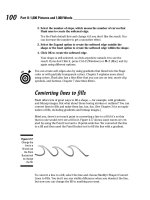
9. Sit back and watch it roll.
Don’t blink or you’ll miss it. (If you do miss it, click the Refresh or
Reload Current Page button in your browser.) You can see the movie in
Figure 1-6.
10. When you finish watching the movie, close your browser.
You can find the Movie of the Year files (.fla, .html, and .swf) on this
book’s Web site, www.dummies.com/go/flashcs3.
Exiting Flash
When you finish creating something in Flash, choose File➪Exit (Windows) or
Flash➪Quit (Mac).
28
Part I: A Blast of Flash
05_121009 ch01.qxp 4/10/07 6:15 PM Page 28
21
3 4
56
7
Figure 1-6:
The Movie
of the Year
animation
in detail.
29
Chapter 1: Getting Acquainted with Flash CS3
05_121009 ch01.qxp 4/10/07 6:15 PM Page 29
30
Part I: A Blast of Flash
05_121009 ch01.qxp 4/10/07 6:15 PM Page 30
Chapter 2
Your Basic Flash
In This Chapter
ᮣ Examining the big picture
ᮣ Setting movie properties
ᮣ Getting and managing graphics
ᮣ Using templates
ᮣ Printing your movie
T
his chapter starts with an overview of the process of creating animation
in Flash. We then discuss some tools and features that are fundamental to
using Flash efficiently.
As you find out in this chapter, you can set the screen size and color, frame rate,
and measurement units for the Flash movie as a whole. We also discuss the
Library and how it’s a storehouse for images, symbols, and sound. Templates
enable you to create great movies without much work. Finally, near the end of
this chapter, we explain how you can print a Flash movie.
Looking at the Big Picture
When you use Flash to create animation for your Web site, you generally go
through several steps of construction. The steps might vary in their order,
depending on your situation. After you know the basics, you can start getting
creative and make your Web site rock. Here’s a typical path to add animation
to an existing Web page:
1. Think about it. Noodle around, maybe make some doodles on a napkin,
collect a few ideas, and choose one or all of them.
2. Set up your movie. Flash lets you choose the size and color of the Stage,
the speed of animation (number of frames per second), and other general
06_121009 ch02.qxp 4/10/07 6:15 PM Page 31
parameters that affect the entire Flash movie. See the next section of
this chapter for details.
3. Add some graphics. You have to decide whether you want to create
graphics in Flash, create them in another graphics software package, or
import existing graphics. Your choice partly depends on how artistic
you are, whether you have other software available to you, and whether
you can find the right graphics elsewhere. You can also use a combina-
tion of sources, which is a common practice. (See Chapter 3 for some
suggestions on great places to get graphics.)
4. Lay out your graphics the way you want your animation to start.
Here’s where you might want to scale, rotate, or otherwise fiddle with
your graphics. (Chapter 4 has more on transforming your graphics.)
5. Add some text. Using Flash is a great way to get terrific text onto your
Web site. Add text (also called type); then reshape it, make it transparent
(if you don’t want to be too obvious), add other effects, and move it
where you want it. (Check out Chapter 5 for typography tips.)
6. Organize your text and graphics by using layers. Layers help you keep
track of what each graphic and text object does while you organize
everything into a powerful, coherent statement. Layers keep your anima-
tions from going bump in the night and getting entangled. Create as
many layers as you need and transfer your existing graphics and text to
those layers. (See Chapter 6 for further details on layers.)
7. Turn a graphic into a symbol and multiply it all over the Stage. Making
objects into symbols is a way to keep them from merging with other
objects while they merrily animate. You also use symbols to keep the file
size down, to enable animation, and for interactivity. (Turn to Chapter 7
for more info on symbols.)
8. Design some buttons. You know those buttons you click on Web sites all
the time? The coolest ones are made in Flash. You can even create ani-
mated buttons. (Chapter 8 has more on buttons.)
9. Animate! You can create your animation frame by frame or let Flash fill
in the animation between your first and last frames, which is called
tweening. Flash can tween motion, shapes, colors, and transparency,
which means that you can create some real magic. (See Chapter 9 for
more on animation and the section in Chapter 1 where we step you
through your first animation.)
10. Get interactive. You want to start a relationship with your Web viewers,
so you can create buttons, frames, and symbols that respond to your
viewers’ actions. This is probably the most complex functionality of
Flash, but we make most of it seem easy. (Turn to Chapter 10 for addi-
tional info on interactivity.)
11. Make it louder! Make it move! Who wants a quiet Web site? Add sound
to your movies or your buttons. You can also add a video file. (Check
out Chapter 11 for more on sound and video.)
32
Part I: A Blast of Flash
06_121009 ch02.qxp 4/10/07 6:15 PM Page 32
12. Publish your magnum opus. Flash makes getting your movie to your
Web site easy by creating both the Flash Player (.swf) file and the
HyperText Markup Language (HTML) code for your Web page. Flash has
other options, too, so you can publish to other formats if you want.
(Chapter 12 explains how to put all the elements together, and Chapter
13 shows you how to publish your animation.)
Congratulations! You’ve completed your first Flash Web animation — in fantasy,
at least. The following sections cover some details about how to get started.
Setting the Stage
Before you create graphics and animate them — all that fun stuff — you need
to make some decisions about the structure of your entire movie. You should
make these decisions before you start because changing midway can create
problems.
The first step is to decide on the size and color of your Stage and other fun-
damental settings. Make sure that the Property inspector is open (choose
Window➪Properties➪Properties). When the Stage is active (just click the
Stage), the Property inspector looks like Figure 2-1.
Choosing the Stage color
You can set the color of the Stage to create a colored background for your
entire movie. As with other settings, you need to consider the context of the
Web page that will contain the Flash movie. For example, you might want to
match the color of your Web page’s background. If your Flash movie will con-
stitute the entire Web page, set the Stage color to the color you want for the
Web page background.
To set the Stage color, click the Background Color swatch in the Property
inspector. Flash opens the Color palette. Click the color you want.
Figure 2-1:
You can
change
movie
properties in
the Property
inspector.
33
Chapter 2: Your Basic Flash
06_121009 ch02.qxp 4/10/07 6:15 PM Page 33
Specifying the frame rate
In the Frame Rate text box, specify how many frames that a Flash movie plays
each second, and then press Enter (Windows) or Return (Mac). A faster rate
allows for smoother animation but might present a performance problem on
slower computers. Chapter 9 explains more about this setting. The Flash default
is 12 fps (frames per second), which is a good starting point. Beware that chang-
ing the frame rate midstream in the creation process changes the rate of all the
animation in your movie, which might not give you the results you want.
Setting the Stage size
and adding metadata
The Size button displays the current size of the Stage. By default, Flash uses a
Stage size of 550 pixels wide by 400 pixels high. To determine the proper setting,
you need to know how your Flash movie will fit into your Web page or site. The
default fits on almost everyone’s browser screen. However, you might want to fit
your movie into a small corner of a Web page — for example, into an animated
logo in a top corner of a page. In that case, make the Stage smaller.
To change the Stage size, click the Size button to open the Document
Properties dialog box, as shown in Figure 2-2. Type the dimensions that you
want in the Width and Height text boxes.
Flash offers two shortcuts for setting the Stage size in the Document
Properties dialog box:
ߜ Match Printer: Click this option to set the Stage size according to the
paper size set in the Page Setup dialog box (choose File➪Page Setup). (For
the Mac, the Print Margins dialog box, which you access by choosing
Figure 2-2:
The
Document
Properties
dialog box
sets the
movie’s
overall
parameters.
34
Part I: A Blast of Flash
06_121009 ch02.qxp 4/10/07 6:15 PM Page 34
File➪Print Margins, also affects the paper size.) Flash sets the size of the
Stage to the maximum possible area of the paper minus the margins.
Later in this chapter, in the section “Printing Your Movie,” we cover this
dialog box in more detail.
ߜ Match Contents: Click this option to set the Stage size to the contents of
the Stage. Of course, for this to work, you need some objects on the Stage.
Flash creates a Stage size by placing equal space around all sides of the
entire contents of the Stage. If you want to create the smallest possible
Stage, place your objects in the upper-left corner and then click Match
Contents.
To change the units used for measuring the screen and objects, choose a unit
in the Ruler Units drop-down list.
You can add metadata to your movies. Metadata is information embedded in
the movie that search engines can find. In the Title text field, you can include
a title that describes your movie. In the Description text field, add keywords
and descriptions of your movie’s content that you would like to be available
when people search in a browser. For more information, see the section on
adding Web search information to your Flash movie in Chapter 12.
Click the Make Default button to make your settings the default for all your
new Flash movies. However, the Title and Description fields don’t become
defaults; you need to specify them individually for each movie.
When you’ve finished setting document properties, click OK to close the
dialog box.
Grabbing a Graphic
The first step when creating animation for your Web site is usually to create
or import graphics. Before you do that, however, you should know a little
about the different kinds of graphics you can use in a Flash movie.
Understanding vectors and bitmaps
If you know enough about graphics to understand the difference between
bitmap and vector graphics, feel free to skip this section. (We hope you
always feel free.)
Bitmaps are created with lots of dots. Put them all together, and you get a
picture. On-screen, they’re displayed as pixels. As you can imagine, it can
take a large file to store the information about all the dots in a bitmap. Another
problem with bitmaps is that they don’t scale up well. If you try to enlarge a
35
Chapter 2: Your Basic Flash
06_121009 ch02.qxp 4/10/07 6:15 PM Page 35
bitmap, it starts to look grainy because you see all those dots (as in the left
example shown in Figure 2-3).
Vector graphics are defined with equations that specify lines, shapes, and
locations. Blank space doesn’t have to be recorded, and the equations are
particularly efficient at storing information. As a result, file sizes are usually
smaller than bitmap file sizes.
Vector graphics are infinitely scalable, either up or down. No matter how big
you make your graphic, it always looks perfect, as shown in the right example
in Figure 2-3. In fact, your graphic might even look better when it’s larger
because the curves are smoother.
Flash creates vector-based graphics. The small size of the files means that Flash
Player files load and play super-fast on a Web page. As you undoubtedly know,
fast file loading means that your Web page viewers don’t have to wait a long
time to see your effects. That’s the advantage of Flash. Nevertheless, you can
create great graphics with bitmaps that you can’t duplicate with vector graph-
ics; we explain how to import bitmaps in Chapter 3.
You can now retain more of the original features of Photoshop and Illustrator
files when you import them.
Finding graphics
Okay, so you’ve doodled and played around with some ideas for your Flash
animation and perhaps jotted down a few notes or maybe even made a few
sketches. You’re ready to start building your Flash animation. A logical place
to start is to collect some of the graphics that will serve as building blocks in
this process.
Figure 2-3:
Bitmaps
lose focus
when
enlarged
(left); vector
graphics
remain
sharp and
clear (right).
36
Part I: A Blast of Flash
06_121009 ch02.qxp 4/10/07 6:15 PM Page 36
Where do you get them? You have several choices:
ߜ Create your graphics from scratch (if you feel artistic) by using the Flash
drawing tools that we describe in detail in Chapter 3.
ߜ Create graphics in another graphics software package, such as Fireworks,
FreeHand, Photoshop, or Illustrator.
ߜ Import graphics from archives of art available on this book’s Web site, from
other places on the Web, or from digital (or scanned) photographs —
perhaps your own.
ߜ Combine any or all of these approaches.
You can also import video files. If you want to add video to your Flash
movies, see Chapter 11 for detailed instructions.
Going to the Library
Every graphic that you create in Flash is precious and deserves to be
archived in style. Each movie file that you create has a Library. The Library
saves the following types of objects so that they never get lost:
ߜ Graphic, movie clip, and button symbols
ߜ Sounds
ߜ Imported bitmap graphics (but not vector graphics that you create
in Flash)
ߜ Imported video files
You’ll find yourself going to the Library often. Figure 2-4 shows a Library con-
taining several types of symbols plus a sound and a bitmap.
To go to the Library of the current movie file, choose Window➪Library. You
can also press Ctrl+L (Windows) or Ô+L (Mac). When you open the Library,
Flash creates a new window or adds the Library panel to the set of panels
that are already open.
To use any object in the Library, follow these steps:
1. Select the layer on which you want to put the object or create a new
layer for the object.
2. Click the point on the Timeline where you want the object to start
or appear.
The point that you click on the Timeline must be a keyframe. Chapter 9
explains keyframes in detail.
37
Chapter 2: Your Basic Flash
06_121009 ch02.qxp 4/10/07 6:15 PM Page 37
3. Click and drag the object from its listing in the Library to the Stage.
You can also drag an object’s image from the preview box.
You can drag items to the Pasteboard, the gray area around the edge of the
Stage, until you’re ready to use them.
Using folders
A Flash movie can contain dozens or even hundreds of symbols, so you need
to keep them organized. Flash provides several features to keep you from
tearing out your hair.
If you have more than a few symbols, you should organize them into folders.
To create a new folder, follow these steps:
1. Click the New Folder button at the bottom of the Library panel.
Flash creates a new folder.
Preview areaFolder Pin current Library
New Library panel
Toggle sorting order
Options menu
Trash can Narrow Library view
Wide Library view
New symbol
New folder
Button symbol
Graphic symbol
Bitmap
Movie clip symbol
Sound
View item properties
Figure 2-4:
You can
store
graphics,
animation,
buttons,
sounds, and
video files in
your current
movie file’s
Library.
38
Part I: A Blast of Flash
06_121009 ch02.qxp 4/10/07 6:15 PM Page 38
2. Type a name that describes the type of symbols that you want to put
into the folder.
For example, you could create a folder named Intro and another one
named Conclusion.
3. Press Enter (Windows) or Return (Mac).
To put symbols into a folder, drag them to the folder. You can also move
symbols from one folder to another — just drag them. Note that folders exist
just to help keep you organized. You can move symbols from one folder to
another without affecting your movie.
To keep your symbol list from getting unwieldy, you can collapse folders. A
collapsed folder doesn’t display its contents. As soon as you need to see
what’s inside, you can expand the folder. Double-click a folder to either col-
lapse or expand it.
To quickly see the structure of your folders, click the Library’s Options menu.
Choose Collapse All Folders. You can also choose Expand All Folders to see
everything in the Library.
More Library housekeeping
By default, Flash alphabetizes items in the Library by name. However, you
might have different ideas. You can sort from A to Z (ascending) or from Z to
A (descending). You can also sort by any of the columns in the Library. To
change the direction of sorting (for any column in the Library), click the
Toggle Sorting Order button in the upper-right corner of the list (Windows
only). To sort, click the heading of the column that you want to sort by. (On
the Mac, you can click the column heading again to change the sort order.)
You can resize the Library panel by dragging its lower-right corner. Or you
can click the Wide Library View or Narrow Library View button to grow or
shrink its width, respectively (refer to Figure 2-4). You can resize any column
by dragging the column heading’s divider to the left or right.
To rename any Library item, double-click the item’s name, type the new
name, and press Enter or Return. Don’t worry — the original filenames of
imported files remain unchanged at their original location.
To duplicate an item, select the item. Then right-click (Windows) or
Control+click (Mac) and choose Duplicate. To delete an item, select the item
and click the Trash can.
If you want to find out which items in the Library you aren’t using, look in the
third column (Use Count) for items with a zero use count. To make sure that
the use count is accurate, click the Library’s Options menu and choose Keep
Use Counts Updated or Update Use Counts Now. After you know which items
you aren’t using, you can delete them.
39
Chapter 2: Your Basic Flash
06_121009 ch02.qxp 4/10/07 6:15 PM Page 39
You can update imported bitmaps and sounds if the original files have
changed. Select the file and choose Update in the Options menu of the
Library panel.
Using the Libraries of other movies
After you place objects in a file’s Library, you can use those objects in any
other Flash movie that you create. Just open the movie and display its
Library panel, and its Library’s contents are available for you to use in your
current movie.
Choose File➪Import➪Open External Library to open the Library of another
Flash movie that isn’t open.
You can switch among the Libraries of open movies by using a drop-down list
at the top of the Library panel.
When you have libraries open from more than one Flash file, you can copy
symbols or anything else in a Library from one movie to another by simply
dragging them from one Library to another. Choose the Library that you want
to use, select an item, and drag it into the other Library. Easy!
To create a new symbol that goes directly into the Library (rather than on the
Stage), choose New Symbol in the Library Options menu in the upper-right
corner (refer to Figure 2-4). You’re transported to symbol-editing mode,
where you can create your symbol as you normally would. To return to your
main movie, choose Edit➪Edit Document. For more information on creating
and editing symbols, see Chapter 7.
Exploring the Flash stock Library
Flash comes with two Libraries that contain a basic assortment of button
symbols. They are well made, so they’re worth looking through. Choose
Window➪Common Libraries and choose Buttons.
Using a Template
To help you create Flash movies more easily, Flash CS3 comes with a few
templates for common types of movies. Instructions are included on the tem-
plates. To create a Flash movie from a template, choose File➪New and click
the Templates tab. In the New from Template dialog box (see Figure 2-5),
select a category, select one of the templates, and then click OK.
40
Part I: A Blast of Flash
06_121009 ch02.qxp 4/10/07 6:15 PM Page 40
You can choose from the following template categories:
ߜ Advertising: Contains a Stage of the ad size you choose.
ߜ BREW Handsets: Creates movies for wireless handsets that use the
BREW (Binary Runtime Environment for Wireless) software platform.
ߜ Consumer Devices: Creates movies for Chumby and iRiver devices. For
example, iRiver produces portable media players that can play suitable
Flash movies.
ߜ Global Handsets: Creates movies for Nokia, Sony Ericsson, and
Windows Mobile 5 phones.
ߜ Japanese Handsets: Creates movies for certain Japanese phones.
ߜ Photo Slideshows: Creates a slide show of photos.
ߜ Quiz: Creates a quiz, complete with several types of question formats
and answer feedback. This template’s instructions are fairly involved.
When you open a new movie from a template, you should save it as a movie.
This way, the template is unchanged, and you are free to make any changes
you want.
You can also save movies as templates. If you create a movie that you want to
reuse in many variations, choose File➪Save as Template to open the Save as
Template dialog box, as shown in Figure 2-6.
Type a name, choose a category, and enter a description for your template.
Then click Save. From now on, you can open your template like any of the
templates that come with Flash, just as we describe. Using templates can
save you lots of work!
Figure 2-5:
Use the
New from
Template
dialog box
to create a
Flash movie
from a
template.
41
Chapter 2: Your Basic Flash
06_121009 ch02.qxp 4/10/07 6:15 PM Page 41
To create your own category for templates, type a category name in the
Category list box instead of choosing one of the existing categories in the list.
Printing Your Movie
Usually, you don’t print your movies — you publish them on the Web. But
you might want to collaborate on a movie with others who don’t have Flash.
(How unenlightened of them!) Or you might just want to analyze a movie on
paper, tack your animation frames on the wall, and rearrange their sequence.
In this type of situation, you can print your animation frame by frame.
To print a movie, follow these steps:
1. To set page margins, choose File➪Page Setup (Windows) or File➪Print
Margins (Mac).
The Page Setup (Windows) or Print Margins (Mac) dialog box appears.
See Figure 2-7.
Figure 2-7:
Use the
Page Setup
dialog box
to specify
how to print
your Flash
movie.
Figure 2-6:
The Save as
Template
dialog box
saves your
movies as
templates.
42
Part I: A Blast of Flash
06_121009 ch02.qxp 4/10/07 6:15 PM Page 42
2. In the Margins section, set the margins.
You can probably keep the default margin settings.
3. Select the Center check boxes to center the printing horizontally and
vertically on the page.
4. (Windows only) In the Paper section, select the size of the paper;
define the paper source.
Usually you can leave this section as is because it’s based on your
printer’s default settings.
5. In the Layout section, click the Frames drop-down list and decide
whether to print only the first frame or all frames.
6. In the Layout section, click the Layout drop-down list to choose from
the following options:
• Actual Size: Lets you choose a scale. This option prints one frame
to a page.
• Fit on One Page: Fits one frame on a page, scaling it to fit the paper.
• Storyboard–Boxes: Places several thumbnail sketches of your
movie on a page. You can specify how many frames that you want
in a row in the Frames Across text box. You might need to experi-
ment to get the right result. In the Frame Margin text box, enter the
space in pixels between the boxes. The Storyboard–Boxes option
places each frame in a box.
• Storyboard–Grid: Creates a grid of lines for your storyboard
rather than individual boxes around the frames. This option is just
a matter of aesthetics — don’t get too hung up over these choices.
• Storyboard–Blank: Leaves out the boxes or grid and just prints all
your frames in the storyboard. You have the same Frames Across
and Frame Margin settings as for the other storyboard options.
7. (Windows only) If you chose a Storyboard option, select the Label
Frames check box to give each frame a number.
8. (Mac only) When you finish setting your options, click OK; then
choose File➪Page Setup.
In Windows, you skip this step because you already opened the Page
Setup dialog box in Step 1.
9. In the Orientation section, select Portrait (taller rather than wider) or
Landscape (wider rather than taller).
10. (Mac only) In the Format section, choose your printer in the drop-
down list.
11. (Mac only) In the Paper Size section, select the size of the paper.
43
Chapter 2: Your Basic Flash
06_121009 ch02.qxp 4/10/07 6:15 PM Page 43
12. When you finish setting your options, click OK.
13. To print, choose File➪Print.
Alternatively, you can press Ctrl+P (Windows) or Ô+P (Mac). In
Windows, you choose the printer in the Name drop-down list in the Print
dialog box.
Figure 2-8 shows an example of the storyboard with the grid option. The
storyboard shows four frames across with a portrait orientation. You can find
out more about the Flash Player’s special printing capabilities in Chapter 13.
Figure 2-8:
You can
print a
storyboard
of your
movie that
displays a
thumbnail
sketch of
each frame.
44
Part I: A Blast of Flash
06_121009 ch02.qxp 4/10/07 6:15 PM Page 44