Flash CS3 For Dummies PHẦN 7 docx
Bạn đang xem bản rút gọn của tài liệu. Xem và tải ngay bản đầy đủ của tài liệu tại đây (980.17 KB, 41 trang )
Actions panel, choose flash.events➪EventDispatcher➪Methods➪
addEventListener. In the Object text box, type myButton. In the Type
text box, type MouseEvent.CLICK. In the Listener text box, type
startMovie.
Now the code in the Script pane on the right of the Actions panel looks
like this:
import flash.events.EventDispatcher;
import flash.display.MovieClip;
this.stop();
function startMovie(event:MouseEvent):void {
this.gotoAndPlay(“products”);
}
myButton.addEventListener(MouseEvent.CLICK,
startMovie);
This adds an event listener to myButton that “listens” for a mouse click
and executes the startMovie function when it detects a mouse click on
myButton.
14. If you want to change the MouseEvent.CLICK parameter, click it in
the lower-right pane of the Actions panel. Then in the Parameters
area of the Actions panel, replace CLICK with another parameter,
such as MOUSE_OVER.
See Table 10-1 for more information on some of the event parameters
that you can use to define when a button action goes into effect.
15. Choose Control➪Test Movie.
When you click your button, your Flash movie jumps to the frame
labeled “products” in your Timeline.
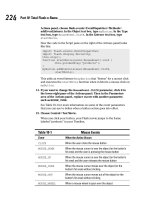
Table 10-1 Mouse Events
Event When the Action Occurs
CLICK When the user clicks the mouse button
MOUSE_DOWN When the mouse cursor is over the object (or the button’s
hit area) and the user is pressing the mouse button
MOUSE_UP When the mouse cursor is over the object (or the button’s
hit area) and the user releases the mouse button
MOUSE_OVER When the mouse cursor moves over the object (or the
button’s hit area) without clicking
MOUSE_OUT When the mouse cursor moves out of the object (or the
button’s hit area) without clicking
MOUSE_WHEEL When a mouse wheel is spun over the object
224
Part IV: Total Flash-o-Rama
17_121009 ch10.qxp 4/10/07 6:22 PM Page 224
The hit area of a button is the button’s active area — the area that responds
to mouse clicks and other user interactions. See Chapter 8 to find out all
about buttons.
Here’s a variation of the preceding ActionScript code. This version makes use
of different mouse events — the MOUSE_DOWN and MOUSE_UP events. With
this code, pressing the mouse button makes the movie on the current
Timeline play, and releasing the mouse button stops it.
import flash.events.EventDispatcher;
import flash.display.MovieClip;
this.stop();
function startMovie(event:MouseEvent):void {
this.play();}
function stopMovie(event:MouseEvent):void {
this.stop();}
myButton.addEventListener(MouseEvent.MOUSE_DOWN,startMovie
);
myButton.addEventListener(MouseEvent.MOUSE_UP,stopMovie);
Using ActionScript with Movie Clips
You use ActionScript with a movie clip in much the same way that you use it
with a button; both are instances of objects that you can control with
ActionScript.
You can use ActionScript with movie clips to do all kinds of things. You can
use ActionScript to start or stop a movie clip from playing and to replace one
movie clip with another. You can use ActionScript to make one movie clip
control a second movie clip — the ActionScript could set the second movie’s
properties, for instance, and change its size, visibility, and so on, based on
the user’s interaction with the first movie clip. For example, you might make
a movie clip that contains a cartoon of a dancing TV set, and add ActionScript
so that each time the user clicks the movie clip, the TV shows a different
cartoon.
In this section we look at two examples of how you can use ActionScript with
movie clips. In the first, you make one movie clip into an animated mask that
reveals another movie clip underneath it. In the second, you find out how to
make a movie clip draggable.
Creating animated masks with movie clips
Flash has loads of useful methods and properties built into its objects. One is
the DisplayObject class’s mask method, which you can use, for example, to
225
Chapter 10: Getting Interactive
17_121009 ch10.qxp 4/10/07 6:22 PM Page 225
create an animated mask. When a mask is animated, the mask reveals the
background beneath while it moves. (For more on masks, refer to Chapter 6.)
To use the mask property to make a movie clip into a mask, follow these steps:
1. Create a movie clip and place an instance of it on the Stage.
This instance will be the background movie clip behind the mask. For
example, you may want to make a wide movie clip a landscape. (If you
need to know how to create movie clips, check out Chapter 8.)
2. Choose Window➪Properties➪Properties to open the Property
inspector.
If necessary, expand the Property inspector to its full size.
3. In the text field near the upper-left corner of the Property inspector,
enter an instance name for the movie clip (such as background).
4. Create another movie clip and place an instance of it on a new layer
on the Stage. In the Property inspector, enter an instance name (such
as binoculars) for the second movie clip.
This instance will be the mask movie clip. Check out Chapter 6 for infor-
mation on creating new layers.
5. Create some animation for this movie clip so that it moves over the
background movie clip.
See Chapter 9 for information on creating animation.
6. Create a new layer in the Timeline, and select Frame 1 of the new
layer.
7. Choose Window➪Actions to open the Actions panel.
If necessary, click the Actions panel title bar to expand the panel.
8. Click the Script Assist button on the right side of the Actions window
if it isn’t already enabled. In the left pane of the Actions panel, choose
flash.display➪DisplayObject➪Properties, and double-click mask.
This code appears in the Script pane to the right of the Actions panel:
import flash.display.DisplayObject:
not_set_yet.mask();
The first line of code imports information about the DisplayObject class
into your Flash project so that your movie will have access to the pre-
built methods and properties of the DisplayObject class.
9. In the Expression text field at the upper-right pane of the Actions
panel, change not_yet_set to the first movie clip’s instance name
226
Part IV: Total Flash-o-Rama
17_121009 ch10.qxp 4/10/07 6:22 PM Page 226
(such as background). Before the ending semicolon, type an equal
sign and the mask movie clip’s instance name (such as binoculars).
If your mask movie clip’s instance name is binoculars and your other
movie clip instance is named background, the code in the Actions
panel should now look like this:
import flash.display.DisplayObject:
background.mask = binoculars;
10. Choose Control➪Test Movie and enjoy the new animation.
Dragging movie clips
Flash lets you create objects that your audience can drag around the screen.
Draggable objects are used for games, slider bars, and other fun purposes.
You can create draggable movie clips to use for games, drag-and-drop inter-
faces, or slider bars. Although creating draggable movie clips is an advanced
function, it’s too much fun to leave out of this book. To create a draggable
movie clip, follow these steps:
1. Choose Insert➪New Symbol to create a new symbol.
2. In the Create New Symbol dialog box that appears, name your new
symbol, select the option for the Movie Clip behavior, and click OK.
3. On the Stage, create an object that you want the viewer to be able
to drag.
4. Choose Edit➪Edit Document to return to the main Timeline.
5. Drag the movie clip that you created from the Library to the Stage.
An instance of the movie clip appears on the stage.
To open the Library, choose Window➪Library.
6. Choose Window➪Properties➪Properties to open the Property inspec-
tor if it’s not already open.
7. In the Property inspector, type in a name in the Instance Name text box.
Your instance now has a name — snowflake, for example.
8. Create a new layer in your movie, and select the first frame in the
new layer.
227
Chapter 10: Getting Interactive
17_121009 ch10.qxp 4/10/07 6:22 PM Page 227
9. Choose Window➪Actions to open the Actions panel if it’s not
already open.
If necessary, click the collapse arrow on the Actions panel’s title bar to
expand it.
10. Click the Script Assist button to turn it off if it is selected.
Now you can type your code directly, without interference from Script
Assist.
11. Type the following code in the right pane of the Actions panel:
import flash.events.EventDispatcher;
import flash.display.Sprite;
function dragMovie(event:MouseEvent):void {
snowflake.startDrag();
}
snowflake.addEventListener(MouseEvent.MOUSE_DOWN,
dragMovie);
function dropMovie(event:MouseEvent):void {
snowflake.stopDrag();
}
snowflake.addEventListener(MouseEvent.MOUSE_UP,
dropMovie);
If your instance isn’t named snowflake, substitute the name you gave
to your instance instead.
This code tells Flash to start dragging your movie clip instance when
you click it, and to stop dragging it when you release the mouse button.
You might have noticed that it’s similar to the code in the “Using
ActionScript with Buttons” section, earlier in this chapter.
12. Choose Control➪Test Movie and then click and drag your movie clip.
Your mouse drags the movie clip!
You can constrain the movement of the movie clip to certain areas. For exam-
ple, on a slider bar, you don’t want the movie clip going all over the page —
only along the bar. You can constrain the movement by specifying a constraint
rectangle for the movie clip. See startDrag in the ActionScript 2.0 Language
Reference for more details. (In the Actions window, select startDrag and
click the Help button next to the Script Assist button to view the discussion
of startDrag in the Help section.)
Exploring ActionScript Further
Flash contains approximately one zillion more ActionScript methods and
properties than the ones that we cover in this chapter. For more information,
choose Help➪Flash Help, and in the Help window that appears, browse through
228
Part IV: Total Flash-o-Rama
17_121009 ch10.qxp 4/10/07 6:22 PM Page 228
Programming ActionScript 3.0 or ActionScript 3.0 Language and Components
Reference. In the following sections, we briefly explain a few more aspects of
ActionScript programming to give you an idea of some of the possibilities.
Programming constructs
If you’re familiar with programming, you’ll recognize many commands
in ActionScript, such as For and While, which let you process certain
ActionScript statements repeatedly while certain conditions that you specify
are true. The If and Else statements create conditional expressions.
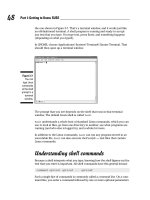
Making comments
To help make your ActionScript clear when you look back at it a few
months from now, you should add comments that explain the purpose of the
ActionScript. You can add comments when Script Assist is on by choosing
Language Elements➪Operators➪Comment➪// (or Language Elements➪
Operators➪Comment➪/* */) and then typing your comments in the Comments
text box, which is in the Parameters area in the upper-right pane of the
Actions panel.
It is definitely easier, though, to type your comments with Script Assist off.
Temporarily turn off Script Assist in the Actions panel by clicking the Script
Assist button. Then in the Script pane, type two slashes (//) and then your
comments. Anything on the line after the two slashes is ignored when run-
ning the animation. If you need more than one line for comments, type the
two slashes at the beginning of each comment line.
If you’re like we are, you love Script Assist and will want to turn it on again
(by clicking the Script Assist button) after typing your comments.
External scripting
You can keep your ActionScript in separate text files that your Flash movie
can load when needed. This makes it easier to reuse your beautiful ActionScript
code in multiple movies. You can create your ActionScript files with any text
editor that you like.
Adobe recommends that instead of adding ActionScript to frames all over the
place, you put all of your ActionScript code in a single place, making it easier
to find and debug all your code. To make your code easy to find and manage,
it’s probably best to put all your code in the first frame of the first layer of the
Timeline or in a separate text file.
229
Chapter 10: Getting Interactive
17_121009 ch10.qxp 4/10/07 6:22 PM Page 229
To create a separate new ActionScript file within Flash, choose File➪New and
then choose ActionScript File from the General tab of the New Document
dialog box. You can type your ActionScript code in this file and save it.
You can also create ActionScript files by using Dreamweaver or a separate
text editor, such as Notepad (Windows) or TextEdit (Mac). (In TextEdit,
choose TextEdit➪Preferences, and when the Preferences window appears,
select Plain Text rather than Rich Text in the New Document Attributes sec-
tion.) Be sure to save the file with the .as suffix, which stands for
ActionScript, of course.
To include the code from a separate ActionScript file in any part of your
movie, simply add this ActionScript into a frame:
include “your-filename-goes-here.as”
This specifies an ActionScript file in the same directory as your .fla or
.swf file.
Discovering more about ActionScript
ActionScript gives you tremendous power over your Flash movies. If you
enjoy using ActionScript, you might want to check out some of the great
resources we list in Chapter 15.
230
Part IV: Total Flash-o-Rama
17_121009 ch10.qxp 4/10/07 6:22 PM Page 230
Chapter 11
Extravagant Audio,
High-Velocity Video
In This Chapter
ᮣ Adding sounds to your movies
ᮣ Manipulating sounds
ᮣ Controlling sound properties
ᮣ Adding video to your movies
ᮣ Streaming video — in Flash!
S
ilent movies have been gone for a long time now. Why should your Flash
movies be silent? You can create music and sound effects that play con-
tinuously or are controlled by your animation Timeline. You can also add
sounds to buttons to liven things up a little. You can edit sounds and control
when they start and stop. But be aware that sound adds overhead to a movie,
which slows down loading on a Web site, and some audiences might not be in
the mood to hear any sound. If you’re careful about how you use sounds,
however, you can get great results.
You can also include video clips in your Flash animations. You can import
video clips in a variety of file formats and then scale them, rotate them, tween
them, stack them in layers, animate their transparency level, and do all the
other creative things that you’re used to doing in Flash, just as though the video
clips were regular Flash animations. And you can stream your video clips in
Flash so that your audience may view the clips while they’re downloading.
Acquiring Amazing Audio
To add some great sound to your Flash movie, you must first import the
sound. You can import AIFF, WAV, and MP3 sounds. Flash places these sounds
in your Library. (See Chapter 2 for more about the Library.)
18_121009 ch11.qxp 4/10/07 6:22 PM Page 231
Sounds vary in sample rate, bit rate, and channels. These statistics are impor-
tant because they affect the quality and size of the sound file. Of course, the
length of the sound also affects its size. Here’s what you need to know:
ߜ Sample rate: The number of times the recorder samples an audio signal
when it’s recorded in digital form. Measured in kilohertz (kHz). Try not
to use more than 22 kHz unless you want CD-quality music.
ߜ Bit rate: The number of bits used for each audio sample. Sometimes
called bit resolution. A 16-bit sound file is clearer with less background
noise, but use 8-bit sound if you need to reduce file size.
ߜ Channels: Typically one channel of sound (monophonic) or two chan-
nels (stereophonic). In most cases, mono is fine for Flash files and uses
half the amount of data that stereo uses.
Often, you need to take a sound as you find it unless you have software that
can manipulate sounds. Luckily, you can set the specs of sounds when you
publish your movie to an .swf file. You generally get the best results by
starting with high-quality sounds and compressing during publishing. (Turn
to Chapter 13 for details on settings for publishing Flash files.)
Audacity is an excellent program for recording and manipulating sound —
and it’s free. Download it from .
You can check a sound’s stats after you’ve imported the sound into Flash.
The next section explains how to import a sound.
Importing sounds
Importing a sound is easy. To import a sound, follow these steps:
1. Choose File➪Import➪Import To Library to open the Import dialog box.
2. Locate the sound that you want to import.
3. Click Import to Library.
Nothing seems to happen, but Flash has placed your sound in the Library.
Choose Window➪Library to check it out. To see the sound’s stats, click the
name of the sound in the Library window. Then click the Properties button
(with the little “ symbol) at the bottom of the Library window.
Placing sounds into a movie
After you import a sound into your movie’s Library, you need to place it and
set its parameters. To place sounds in a movie, follow these steps:
232
Part IV: Total Flash-o-Rama
18_121009 ch11.qxp 4/10/07 6:22 PM Page 232
1. Create and name a new layer for the sound.
Click the Add Layer icon in the lower-left corner of the layer list to add a
new layer. Each sound should have its own layer. Sounds are combined
(mixed) when the movie is played.
2. Choose Window➪Properties➪Properties to open the Property inspec-
tor, if it isn’t already open.
If necessary, expand the Property inspector to its full size.
3. Select the keyframe in the new layer where you want the sound to
start playing.
4. In the Sound drop-down list, select the sound that you want to place in
your movie.
The Sound drop-down list shows all sounds that you’ve imported. Below
the name of the sound, at the bottom of the Property inspector, the
sound’s stats are listed (sample rate, channels, bit rate, duration, and
file size), as shown in Figure 11-1.
Flash places the sound on the active layer. The image of the sound
waves appears in the Timeline between the keyframe you selected in
Step 3 and the next keyframe. If there isn’t a next keyframe, you can add
one to see the sound or you can add frames until the sound wave line
stops. (You can add frames by repeatedly pressing F5, which is equiva-
lent to repeatedly choosing Insert➪Timeline➪Frame).
5. If desired, select an effect in the Effect drop-down list.
These effects are self-explanatory. For example, Left Channel plays the
sound from only the left speaker. Fade In starts the sound softly and
gradually brings it up to full volume. The default setting is None.
6. In the Sync drop-down list, select one of the following synchroniza-
tion options:
• Event: Plays the sound when its first keyframe plays and continues
to play the sound until it’s finished, even if the movie stops. If Flash
plays the keyframe again before the sound is finished, Flash starts
the sound again. Use this setting for button sounds when you want
Figure 11-1:
You can set
sound
parameters
in the
Property
inspector.
233
Chapter 11: Extravagant Audio, High-Velocity Video
18_121009 ch11.qxp 4/10/07 6:22 PM Page 233
the sound to play each time that the button is passed over or
clicked. (Check out Chapter 8 for more information on adding
sounds to buttons.) This setting is the default.
• Start: Plays the sound when its first keyframe plays and continues
to play the sound until it’s finished, even if the movie stops. If the
keyframe is played again before the sound is finished, Flash doesn’t
start the sound again.
• Stop: Stops the sound.
• Stream: Synchronizes the sound to the Timeline. Flash skips ani-
mation frames if it can’t draw them fast enough to keep up with the
sound. The sound stops when Flash plays the last frame containing
the sound wave. Use this option when you want to match the
sound with a portion of the animation in your movie. You can
insert an ending keyframe before placing the sound to control
when the sound ends.
If your sound is set to Event, it will play to its finish even if not all the
sound is visible on the Timeline. If your sound is set to Stream, it will
only play for the frames on the Timeline where the image of the sound
waves is visible.
You may want to edit the sound (as described in the next section,
“Editing Sounds”) to add a fade out so the sound doesn’t end abruptly.
7. Choose Repeat or Loop in the Repeat/Loop drop-down menu. If you
choose Repeat, type the number of times you want to repeat the
sound.
If you set a stream sound to Repeat, your Flash Player movie’s file size is
increased by the number of times that the sound is repeated. So Adobe
recommends that you do not set stream sounds to Repeat.
If you choose Loop, the sound will repeat continuously.
If you choose Repeat, you can calculate the number of times that you
need to play a sound throughout an animation by knowing how many
seconds the sound is, how many frames your animation is, and the
frame rate. If your animation is 48 frames and the rate is 12 frames per
second (12 fps; the default), your animation is 4 seconds. If your sound
is 2 seconds long, loop it twice to play it throughout your animation.
If you don’t want to do the math, use a high number of loops, just to
make sure.
After you place the sound, press Enter (Windows) or Return (Mac) or use the
Controller to play your movie and hear the results.
234
Part IV: Total Flash-o-Rama
18_121009 ch11.qxp 4/10/07 6:22 PM Page 234
Editing Sounds
After you place a sound, you can edit the sound to fine-tune its settings. You
should delete unused or unwanted portions of a sound to reduce file size.
You can also change the volume while the sound plays.
To edit a sound, follow these steps:
1. Click a frame that contains a sound (or import a sound, as we describe
in the preceding section, “Placing sounds into a movie”).
2. Choose Window➪Properties➪Properties to open the Property inspec-
tor, if it isn’t already open.
If necessary, expand the Property inspector to its full size.
3. Click the Edit button to open the Edit Envelope dialog box (see
Figure 11-2).
Envelope line — left channel
Stop
Play Zoom in
Zoom out
Frames
Seconds
Envelope line — right channel
Figure 11-2:
Use the Edit
Envelope
dialog box
to edit your
sounds.
235
Chapter 11: Extravagant Audio, High-Velocity Video
18_121009 ch11.qxp 4/10/07 6:22 PM Page 235
To see a specific section of a sound in more detail, click the Zoom In button.
Zoom in when you want to edit small details of a sound.
To see more of a sound’s time frame, click the Zoom Out button. Zoom out to
edit the sound as a whole.
You can display sounds in terms of seconds or frames. Click the Seconds
button to show sounds in seconds. Click the Frames button to display sounds
by frames.
Deleting parts of a sound
Between the left (top) and right (bottom) channel display is a narrow strip
that controls the starting and ending points of a sound. By deleting the begin-
ning and end of a sound, you can eliminate unused portions of the sound.
Along this strip are two vertical bars: one at the beginning of the sound and
another at the end. These bars control when the sound starts and ends. Use
them to edit the sound as follows:
ߜ Time In control: This bar, on the left edge of the sound, specifies the
start of the sound. Drag the bar to the right to delete the beginning of
the sound.
ߜ Time Out control: This bar, on the right edge of the sound, specifies the
end of the sound. Drag the bar to the left to delete the end of the sound.
Changing the volume
On both the left and right channel displays, Flash shows an envelope line to
indicate the approximate direction of the sound’s volume (refer to Figure
11-2). Where the volume changes, Flash places small squares, called envelope
handles. To change the sound’s volume, drag an envelope handle up (to
increase the volume) or down (to decrease the volume). This is how you
create sound fade ins and fade outs.
You can click an envelope line to add a new envelope handle. This new
handle enables you to create a new direction for the sound’s volume at the
236
Part IV: Total Flash-o-Rama
18_121009 ch11.qxp 4/10/07 6:22 PM Page 236
handle’s location. To remove an envelope handle, click it and drag it out of
the Edit Envelope window.
When you finish editing a sound, click OK to close the Edit Envelope
dialog box.
Managing Sound
Sound can increase the size of your movie by such a great extent that you
need to pay attention to how you use it. You should make every effort to
compress the sound. You can also lower the sampling rate; however, your
sound’s quality is then reduced. Nevertheless, you should try out all the pos-
sibilities until you get the best results.
The sampling rate is the rate at which the computer measures sound and con-
verts it into numerical data. The computer makes these sample measure-
ments many thousands of times per second. A higher sampling rate provides
more information about the sound and, therefore, better audio quality. But all
those extra measurements make for a much bigger data file.
Flash offers two ways to control the properties of a sound:
ߜ Use the Publish Settings dialog box to specify properties for all the
sounds in a movie. If you have only one sound or a few similar sounds,
specifying settings this way is easy.
ߜ Use the Sound Properties dialog box to specify properties of specific
sounds. As long as you don’t specifically override these properties when
you publish, these settings stick. Use the Sound Properties dialog box
when you want to specify different properties for each sound.
Because you specify the publish settings when you publish a movie, we dis-
cuss those settings in Chapter 13. In this section, we explain how to fine-tune
sound properties in the Sound Properties dialog box.
To open the Sound Properties dialog box, open the Library (choose Window➪
Library) and double-click the icon of the sound that you want to work with.
Figure 11-3 shows the Sound Properties dialog box.
237
Chapter 11: Extravagant Audio, High-Velocity Video
18_121009 ch11.qxp 4/10/07 6:22 PM Page 237
At the top of the dialog box, Flash displays statistics for the sound — its
location, date, sample rate, channels, bit rate, duration, and file size. Use the
Export Settings section to specify how you want to export the file. For each
compression type, Flash displays the settings available for that type in the
drop-down list. When you choose settings, look at the bottom of the dialog
box, where Flash displays the new file size in kilobytes and in percentage of
original size. The file size reduction can be pretty amazing. Here are the
options available in the Compression drop-down list box:
ߜ Default: This option uses the compression settings specified in the Flash
tab of the Publish Settings dialog box when you publish your .swf file.
(Chapter 13 gives you more information on publishing to .swf files.)
ߜ ADPCM: You can convert stereo to mono to cut down file size. Available
sampling rates are 5, 11, 22, and 44 kHz. You can choose from 2, 3, 4, or
5 bits. Choose 5 bits for the best sound; the default is 4 bits. ADPCM is
short for Adaptive Differential Pulse Code Modulation. This compression
method produces files that take up less storage space than CD-quality
audio. In case you’re wondering what the heck this compression is, it’s
used to store music on Sony Mini Discs.
ߜ MP3: MP3 is a popular and efficient compression method. (To change
the settings of an imported MP3 file, be sure to deselect the Use Imported
MP3 Quality check box.) You can convert stereo to mono and choose a
bit rate measured in kilobits per second. You can choose from 8 Kbps
(poor quality) to 160 Kbps (near-CD quality). Generally, you want some-
thing between these two extremes. Try a bit rate between 20 and 84
Figure 11-3:
Use the
Sound
Properties
dialog box
to set the
properties
of individual
sounds,
including
their
compres-
sion and
quality.
238
Part IV: Total Flash-o-Rama
18_121009 ch11.qxp 4/10/07 6:22 PM Page 238
Kbps for a good balance of file size and quality. You can also choose the
quality — Fast, Medium, or Best. The Fast option optimizes the sound
for faster download from your Web site but with some quality compro-
mise. For music, MP3 provides the best compression, letting you keep
your quality as high as possible.
ߜ Raw: This option exports the sound with no sound compression. You
can convert stereo to mono and select the same sampling rates as for
ADPCM.
ߜ Speech: This option exports the sound with compression techniques
specially designed for speech. You can select the same sampling rates as
for ADPCM. A good choice for speech is 11 kHz.
After you specify a group of settings, click the Test button. This handy button
lets you hear how your sound file sounds with each setting.
The Sound Properties dialog box also lets you update the original sound after
you modify it with sound-editing software — just click the Update button. You
can also click Import to import a sound file. The Stop button stops playing a
sound that you’re previewing.
When you’re finished, click OK to finalize your settings and close the
dialog box.
Video Magic
The Flash Player has achieved more universal adoption than any other Web
video technology, so Flash can be a great way to deliver video over the Web.
Flash Player version 6 and later can play video, and (as of this writing) Adobe
claims that more than 98 percent of U.S. Web surfers have Flash Player 6 or
higher, compared with 83.2 percent for Windows Media Player, 66.9 percent
for Apple’s QuickTime Player, and 55.3 percent for Real Player. The Adobe
Web site provides more details — you can check it out at www.adobe.com/
products/player_census/flashplayer/.
Flash can use a variety of video formats. You can use Flash to create or import
Flash Video (FLV) files. (FLV is a file format developed by the Flash team for
video on the Web.) If you have QuickTime 7 installed on your Mac or QuickTime
6.5 for Windows on your PC, you can import files in the AVI, MPG/MPEG, MOV,
and DV formats. If you have DirectX 9 or higher installed on your Windows
PC, you can import files in the AVI, MPG/MPEG, and Windows Media File
(WMV and ASF) formats.
239
Chapter 11: Extravagant Audio, High-Velocity Video
18_121009 ch11.qxp 4/10/07 6:22 PM Page 239
Four ways to use video in Flash
You may include video in your Flash movie in various ways. For starters, you
may embed video in your SWF file and play it in the Timeline. This lets you
play your video from within your .swf file. This can work well for short
video clips (perhaps ten seconds or less), but longer video clips might make
your Flash file take a looooooong time to download, and these clips might
have problems with audio/video synchronization. For more information, see
the next sections in this chapter, “Preparing to embed video in Flash” and
“Embedding and editing a video.”
And using Flash CS3, you may also
ߜ Stream video from your Web server. You can connect to an .flv video
file from within your .swf file and play the video while it downloads
from a plain old Web server. This is a cool feature and definitely a good
idea if you have a video longer than around ten seconds. Your audience
can start to watch the video while it’s still downloading, and the audio
and video won’t get out of sync. For more information, see the
“Streaming a video” section, later in this chapter.
ߜ Stream video from a Flash video streaming service. You can play your
video from a Web hosting service provider that specializes in Flash video.
This can give you good performance if you want to do fancy things like
host video-on-demand applications, webcam chats, live-event broad-
casts, and real-time collaboration applications. But it’s not cheap, so if
you’re a new Flash user, you probably don’t need to think about this
option for now.
ߜ Stream video from a Flash Media Server. You can play your video from
a Flash Media Server that you host. This can give you good performance
for heavy-duty deployment of multiple Web video streams, as if you are
your own Flash video streaming service, but the Flash Communication
Server software is complex, and again it’s not cheap, with prices ranging
from free for a developer version to $4500 and up. So unless your boss is
investing zillions in a Flash video Web site, you again probably don’t
need to worry about this option.
Preparing to embed video in Flash
If you have a video file that you want to embed into your Flash file, you first
need to find out the frame rate of your video and make sure that your Flash
document has the same frame rate, to avoid erratic playback.
240
Part IV: Total Flash-o-Rama
18_121009 ch11.qxp 4/10/07 6:22 PM Page 240
On the Mac, you can do this by following these steps:
1. Click the Finder in the Dock. In a Finder window, open your
Applications folder and double-click the QuickTime Player.
The QuickTime Player starts, and the QuickTime Player menus appear.
2. In the QuickTime Player menus, choose File➪Open File, and in the file
dialog box that appears, locate and select your video, and then click
the Open button.
Your video appears.
3. Choose Window➪Show Movie Info.
The Movie Info window appears.
4. Make a note of the video’s frame rate (shown in the Movie Info
window as FPS — frames per second).
You might also want to note the normal size of the video. (A typical size
is 720 x 480 pixels.)
5. Choose File➪Quit.
The QuickTime Player closes.
6. Return to Flash (perhaps by clicking the Flash icon in the Dock),
open or create a Flash movie if one isn’t open, and choose Modify➪
Document.
The Document Properties dialog box appears, showing the document’s
dimensions, frame rate, and other properties.
7. To avoid unstable video playback, change the number in the Frame
Rate text box to match your video’s frame rate.
In Windows, you can match your Flash movie’s frame rate to your video’s
frame rate by following these steps:
1. If your video is not an .avi file or a .wmv file, skip to Step 2. If your
video is an .avi or a .wmv file, right-click the file and choose Properties.
In the Summaries or Details tab, note the number of fps (frames per
second) for your movie. Close the Properties window, and skip to Step 8.
You might also want to note the normal size of the video. (A typical size
is 720 x 480 pixels.)
2. From Windows, choose Start➪Programs➪QuickTime➪QuickTime
Player.
If you don’t have the QuickTime Player in your Start menu, point your
Web browser to www.apple.com/quicktime/download, follow the
241
Chapter 11: Extravagant Audio, High-Velocity Video
18_121009 ch11.qxp 4/10/07 6:22 PM Page 241
instructions there to download and install QuickTime, and then choose
Start➪QuickTime➪QuickTime Player.
3. In the QuickTime Player, choose File➪Open Movie in New Player.
The Open dialog box appears.
4. Locate and select your video, and then click the Open button.
Your video appears.
5. Choose Window➪Show Movie Info.
The Movie Info window appears.
6. If necessary, click the More Info disclosure triangle to see the detailed
information about the movie. Make a note of the video’s frame rate
(shown in the Movie Info window as Movie FPS — frames per second).
You might also want to note the normal size of the video. (A typical size
is 720 x 480 pixels.)
7. In the video window, choose File➪Exit.
The QuickTime Player closes.
8. In Flash, open (or create) a Flash movie if one isn’t open, and choose
Modify➪Document.
The Document Properties dialog box appears, showing the document’s
dimensions, frame rate, and other properties.
9. To avoid unstable video playback, change the number in the Frame
Rate text box to match your video’s frame rate.
If you downloaded QuickTime while Flash was running, you have to quit
Flash and restart Flash if you want to import a .mov file.
Embedding and editing a video
You can easily import video directly into your Flash animations. Flash’s
Import Video wizard walks you through the complexities of compressing and
embedding your video. The wizard even lets you split up your video clips
before importing them so that after they’re in Flash, it’s easy to rearrange dif-
ferent sections of them.
Embedding video in your Flash movie is convenient if your video is short —
perhaps ten seconds or less. If the video is longer, downloading your video
while the Flash movie plays is probably a better approach.
Before you embed video into Flash, first you should make sure that the frame
rate of your video and your Flash movie match, which we show you how to
242
Part IV: Total Flash-o-Rama
18_121009 ch11.qxp 4/10/07 6:22 PM Page 242
do in the preceding section, “Preparing to embed video in Flash.” After you’ve
done that, you can make video clips part of your Flash movie by following
these steps:
1. Click a keyframe where you want to put your video (or create a
keyframe by clicking a frame and choosing Insert➪Timeline➪
Keyframe).
2. Choose File➪Import➪Import Video.
The Video Import Wizard appears.
3. Select the On Your Computer option to import a video from your
computer.
4. Click the Choose button.
The Open File dialog box appears.
5. Find and choose a video file in the Open File dialog box and then
click the Open button. Then in the Import Video dialog box, click the
Next (Windows) or Continue (Mac) button.
The Import Video dialog box now gives you choices for deploying your
video, including Embed Video in SWF and Play in Timeline.
6. Select the Embed Video in SWF and Play in Timeline option, and then
click Next (Windows) or Continue (Mac).
7. You probably want to select Movie Clip from the Symbol Type drop-
down list, and you probably want to select Integrated from the Audio
Track drop-down list.
The Video Import Wizard gives you a choice of symbol type for your
embedded video. You can also decide whether to import your audio
track integrated with the video or as a separate track. Embedding your
video as a movie clip symbol and with the audio track integrated are
usually good choices. When you embed your video in a movie clip
symbol, the video’s Timeline is within the movie clip and plays indepen-
dently of the main Timeline. This gives you a lot of flexibility, and lets
you move your video around easily within your Flash movie. However, if
your Flash movie is mostly just going to play back the video on the main
Timeline without doing much else, Embedded Video in the Symbol Type
drop-down menu is an appropriate choice.
8. If you want to edit the video first, select the Edit the Video First
option. Otherwise, select the Embed the Entire Video option and skip
to Step 18.
You have a choice of importing the entire video or editing it first. If your
movie’s codec doesn’t support editing, the edit option is not available.
(The codec is the software that encodes the movie’s images and sound
into a computer file and then decodes it for playback. Many codecs
243
Chapter 11: Extravagant Audio, High-Velocity Video
18_121009 ch11.qxp 4/10/07 6:22 PM Page 243
exist, and they use different techniques with varying advantages and
disadvantages.)
9. Click Next (Windows) or Continue (Mac).
The Split Video pane in the Video Import Wizard appears, as shown in
Figure 11-4.
To view your video in the preview pane, click the Play button or drag the
playhead (the triangle above the scrubber bar). Click the Stop button to
stop playing the video. To zero in on a particular frame of video, you
might want to move backward or forward a frame at a time by clicking
the Backward or Forward button.
10. To change the beginning frame of a video clip, drag the leftmost trian-
gle below the scrubber bar, or move the playhead to the desired
frame and click the In button to set the new beginning frame. To
change the ending frame of a video clip, drag the rightmost triangle
below the scrubber bar, or move the playhead to the desired frame
and click the Out button, to set the new ending frame.
The beginning and ending frames are In and Out points, respectively.
11. To see your video with the new In and Out points, click the Preview
Clip button.
The video plays in the preview pane, starting at the new In point and
ending at the new Out point.
Figure 11-4:
In the Video
Import
Wizard, you
can split
your video
clip into
sections
while
bringing
them into
Flash.
244
Part IV: Total Flash-o-Rama
18_121009 ch11.qxp 4/10/07 6:22 PM Page 244
12. When you’re happy with the In and Out points that you’ve set, click
the + (Plus) button to create a video clip with the current In and Out
points.
The name of the clip appears in the scroll pane on the left side of the
Video Import Wizard. (The pane with the list of clip names is called a
scroll pane because if you fill it up with enough clip names, scroll bars
will appear so that you can scroll the list up and down.)
13. To rename the clip, click the name in the scroll pane and type a
new name.
The new name appears in the scroll pane.
14. Repeat Steps 10 through 13 to extract additional clips with new In and
Out points from the same file.
15. To change the In and Out points in one of the new clips in the scroll
pane, click the clip’s name in the scroll pane, move the In and Out
points as we describe in Step 10, and then click the Update Clip button.
16. To delete a clip from the scroll pane, click the name of the clip in
the scroll pane, and then click the – (minus) button at the top of the
scroll pane.
The selected clip disappears from the list.
17. Click Next (Windows) or Continue (Mac).
The Encoding pane in the Video Import Wizard appears, as shown in
Figure 11-5. This pane lets you select an encoding profile and advanced
settings.
Figure 11-5:
In the
Encoding
pane of the
Import
Video dialog
box, you can
select how
much com-
pression
to apply
to your
video clip.
245
Chapter 11: Extravagant Audio, High-Velocity Video
18_121009 ch11.qxp 4/10/07 6:22 PM Page 245
18. Click the Flash Video encoding profile drop-down list and select a suit-
able profile.
You can select profiles for users with modems or with the different
speeds (40–700 Kbps) of modems, local area networks, digital sub-
scriber lines (DSLs), or cable modems.
Higher-speed connections make it practical to use higher-quality video
that requires less compression.
19. Click Next (Windows) or Continue (Mac).
The Finish Video Import pane appears in the Video Import Wizard, sum-
marizing your choices.
20. If you want to change any of your choices, click Go Back. Otherwise,
click Finish.
The Flash Video Encoding Progress window appears. Encoding your
video may take quite a while. When Flash finishes encoding your video,
the window disappears, and the movie clip or clips (or embedded video
symbol or symbols) containing your video appear on your Stage and in
your library (which you can view by choosing Window➪Library, if it
isn’t visible).
Now your video segments are inside movie clips (if you choose that in Step
7), and as with any other movie clips, you can drag them around on the
Timeline, rearrange them, rotate them, motion tween them, paint on top of
them in other layers, and tween their brightness and transparency — you can
mangle them, destroy them, and bring them to life in all the usual Flash ways.
This is pretty amazing. (See Chapter 9 for lots more animation ideas.)
Streaming a video
You can set your Flash movie up to stream a video while the video appears
inside your Flash movie. That means that viewers can see the video play
fairly smoothly even while it’s still downloading from the Web — without
having to wait until the entire video has downloaded. This is a fantastic fea-
ture. You’ll certainly want to do this rather than embed your video in Flash if
your video is more than a few seconds long.
These streaming video files are in the .flv Flash video format. This is the
format of all the videos you see at www.youtube.com and video.google.
com.
To make an .flv video file to put online and then stream, follow these steps:
1. Click a keyframe (or create one by clicking a frame and choosing
Insert➪Timeline➪Keyframe).
Your video will start on this keyframe.
246
Part IV: Total Flash-o-Rama
18_121009 ch11.qxp 4/10/07 6:22 PM Page 246
2. Choose File➪Import➪Import Video.
The Video Import Wizard appears.
You’re about to import a video file into your Flash movie. Ultimately you
will put the file on a Web server, but first you need to create and publish
the .flv file.
3. Select the On Your Computer option if you want to import a video
from your computer. If you want to import an .flv video file from
the Web, select the Already Deployed to a Web Server, Flash Video
Streaming Service, or Flash Media Server option, type the Web address
of the video file into the URL text box, and skip to Step 11.
Importing a video file from the Web works only for video files that are
already in the .flv format.
4. Click the Choose button.
The Open File dialog box appears.
5. Find and choose a movie file in the file dialog box, and then click the
Open button.
6. In the Import Video dialog box, click the Next (Windows) or Continue
(Mac) button.
The Import Video dialog box now gives you choices for deploying your
video.
7. Select one of these options: Progressive Download from a Web Server,
Stream from Flash Video Streaming Service, or Stream from Flash
Communication Server.
You’re choosing the method that you’ll ultimately be using to stream the
video. Using a Flash Video Streaming Service or the Flash Communication
Server isn’t cheap, so if you’re just getting started, you undoubtedly want
to choose Progressively Download from a Web Server. This lets you upload
the .flv file to any Web server for streaming, which is really cool.
8. Click Next (Windows) or Continue (Mac).
The Encoding pane in the Video Import Wizard appears. This pane lets
you select an encoding profile and advanced settings.
9. Click the Flash Video encoding profile drop-down list and select a suit-
able profile.
You may choose between profiles for users with modems or with the dif-
ferent speeds (40–700 Kbps) of modems, local area networks, digital sub-
scriber lines (DSLs), or cable modems.
Higher quality video is less compressed and therefore requires a larger
file size and higher bandwidth for speedy delivery.
10. You may grab and drag the In point and Out point markers (the trian-
gles below the scrubber bar, below your video image in the Video
247
Chapter 11: Extravagant Audio, High-Velocity Video
18_121009 ch11.qxp 4/10/07 6:22 PM Page 247
Import Wizard) to give the video clip displayed there a new starting
and ending point, if you want.
This is convenient because sometimes you want to import only part of a
video clip. To facilitate this, you can grab and drag the playhead pointer
(the triangle above the scrubber bar) to preview different locations in
your video clip.
11. Click Next (Windows) or Continue (Mac).
The Skinning pane of the Import Video dialog box appears.
12. In the Skin drop-down list, select the style of play controls you want
for your video.
The skin is the graphic design of the video play controls. You can infer
the characteristics of some skins from their names. For example, the
skin named SkinOverPlaySeekMute.swf has the play controls placed
over the video and include Play, Seek, and Mute buttons. You are prob-
ably going to love fooling around choosing your skin — it’s so easy. The
skin you select in the drop-down list appears as a preview in the pane
above the drop-down list.
13. Click Next (Windows) or Continue (Mac).
The Finish Video Import pane appears in the Import Video dialog box,
summarizing what happens next, and you may want to make notes on
that, because unfortunately this information disappears when you click
Finish in Step 14. Among other things, this pane tells you where your
new .flv file will be located relative to your .swf file.
14. If you want to change any of your choices, click Go Back. Otherwise,
click Finish.
When you click Finish, the Flash Video Encoding Progress window
appears. When Flash finishes encoding your video, the window disap-
pears, and the encoded video and the player controls appear on the
Stage. You may find it interesting to compare the file size of your new
.flv file to the original video file size. (You can find the new .flv file in
the location shown in Step 13.)
15. Choose Window➪Component Inspector.
The Component inspector appears. If necessary, expand the inspector to
its full size.
16. Click the Parameters tab in the Component inspector, and click the
row labeled source.
The name of the .flv file is highlighted.
248
Part IV: Total Flash-o-Rama
18_121009 ch11.qxp 4/10/07 6:22 PM Page 248