Make a Joomla Template in 5 Easy Steps phần 2 doc
Bạn đang xem bản rút gọn của tài liệu. Xem và tải ngay bản đầy đủ của tài liệu tại đây (505.32 KB, 11 trang )
STEP ONE: GRAB THE RAW MATERIAL
Chapter 3: Step One - Grab the Raw Material
The worst place to start any project is with a blank page. So, to make things easier we are
going to get some raw materials to work with.
The first thing we need to do is create a folder on our PC where we can store the files. Let’s
call this folder duffer1 and create it anywhere on your PC you want.
Case sensitive
File and folder names are case sensitive, the convention is to use all lower case
letters for file and folder names and never have spaces in file or folder names.
7
Once we’ve got that created we can
download the files we need.
1. FTP to your Joomla web site
2. Go into the templates folder
3. Now move into the
rhuk_solarflare_ii folder
4. Select all of the files and folders
you can see and download them
to the duffer1 folder we created
earlier
Check to make sure you have all of the files, you should have the following files on your
PC:
• index.html
• index.php
• template_thumbnail.png
• templateDetails.xml
• images
o advertisement.png
o contenthead.png
o indent1.png
o indent4.png
o pdf_button.png
o rating_star_blank.png
STEP ONE: GRAB THE RAW MATERIAL
8
o subhead_bg.png
o arrow.png
o emailButton.png
o indent2.png
o index.html
o powered_by.png
o rating_star.png
o button_bg.png
o header_short.jpg
o indent3.png
o menu_bg.png
o printButton.png
o spacer.png
• css
o editor_content.css
o template_css.css
o index.html
So, you should have all of these files in your duffer1 folder.
Images Missing?
If you don’t have some of the images listed don’t worry, changes in Joomla meant
some newer versions don’t have the same image set. This tutorial will work just as
well no matter what standard images your version has.
Now that was easy enough wasn’t it? That’s step one complete, we now have the raw
material we need to start putting together our own template. The next step is to make a
home for the new template on our website.
STEP TWO: MAKE A HOME FOR OUR TEMPLATE
Chapter 4: Step Two – Make a Home for our Template
We’ve got the raw material to start making our template but now we need somewhere to
put it on our website and make sure Joomla can recognise it.
We are going to create this template for
and we are going to call it
duffer1
The first thing we need to do is FTP to our website and go
into the templates folder. Once we get there we need to
create a new folder called duffer1 notice all lowercase.
That’s the first part complete. We now have a place on our
web site where we can put our new template.
Next we have to move onto editing our raw material. So,
we need to open PHP Designer 2006 and then open
templateDetails.xml that we downloaded earlier in step one.
Important Don’t Skip This
The next part of this tutorial is important. By changing the details in
templateDetails.xml we make it visible to Joomla. If they are not changed you may
have problems further down the line.
Okay, so here we are face to face with our first real bit of work, editing the
templateDetails.xml file. As I wrote above this is necessary so that Joomla can recognise
our template as being different to the original rhuk_solarflare_ii.
The first line we edit is line 3, this one:
<name>rhuk_solarflare_ii</name>
We need to put here exactly the same as we called the folder we made on our website
above, so we change it to:
<name>duffer1</name>
Next we move to line 4, it looks like this:
9
STEP TWO: MAKE A HOME FOR OUR TEMPLATE
<creationDate>10/20/05</creationDate>
We need to change it to today’s date:
<creationDate>03/15/06</creationDate>
Next we move onto line 5 and change this to your name:
<author>Gary Reid</author>
Next we edit lines 7, 8 and 9, they look like this:
<authorEmail></authorEmail>
<authorUrl></authorUrl>
<version>2.2</version>
Change them to something like this, using your email and website:
<authorEmail></authorEmail>
<authorUrl></authorUrl>
<version>1.0</version>
The next line is the description of the template so change it to something like this:
<description>A template created from the duffer's tutorial, the template
uses a developed version of the CSS file from the rhuk_solarflare_ii
template developed by at
</description>
Notice we have credited the earlier work done by rhuk on the CSS file, even though we will
be using very little of it we will still be using a few of his images. That’s it, now we have
made the file show our unique details.
The next step is to upload all of the files we have
in our local duffer1 folder to the duffer1 folder
on our web site.
Your online duffer1 folder should look like the
figure opposite.
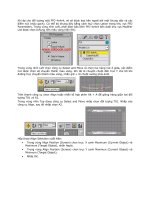
Next we need to make this the default template
for our site, so we can see the magic as we work
on it. To do this we need to login to the Joomla
administrator section and browse to:
site > template manager > site templates
10
STEP TWO: MAKE A HOME FOR OUR TEMPLATE
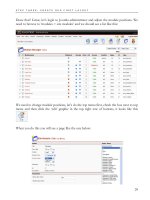
When we get there it should look like this, with our new duffer1 template showing in the
list with our details:
Check the radio button next to the duffer1 template and click ‘default’ this will set the
template as live and the one being used by Joomla. Your screen should now look like this:
Notice the green tick under the default column and in the duffer1 row. This means we are
now using the new template. However, at this stage it just looks exactly like the
rhuk_solarflare_ii template. But that’s going to change soon!
What we’ve done so far is got some raw material to work with, created a home on our
website for the new template, uploaded it and set it as default in Joomla. That’s the easy
stuff done. Now we need to do some thinking to move the design forward. We need to
create a layout to replace the rhuk_solarflare_ii layout. Let’s look at that next.
11
STEP THREE: CREATE OUR FIRST LAYOUT
Chapter 5: Step Three – Create Our First Layout
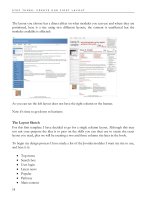
Before we dive right in I think it’s best that we understand exactly what we need to
consider when putting together a Joomla template. The first things are ‘modules’. Modules
are how the system presents itself to your visitors. They take information from the backend
and display it in a formatted manner on your website. Most of the modules are optional, so
you can decide which you want to use and those you don’t want to use.
Menus
The system comes with a powerful set of dynamic menus built from the administrator
section. You can decide where each link you create appears. You can choose to have it in
the main, top, other or user menu.
The menu’s are created dynamically, this means when you create a new menu item it is
automatically added to the menu and will show on every page. The order of each menu
item within the menu can be set from the administrator area.
Each menu can be set to appear on every page or just on certain pages.
In total there are four, we will look at each one in turn:
Main Menu
The main menu is as it appears the sites main menu, however if
you browse to site modules in the administrator section of the site
you can unpublish the whole of this menu, in this sense it is
optional.
The menu is ‘vertical’ in nature, this means that it fits best into
either the right or left positions on your web page.
By default the main menu is in the left position, but you can move
it to the right position from the administrator area under site
modules.
Top Menu
The top menu is optional, horizontal in nature and it’s positioning and state can be
controlled from the administrator area. By default it is at the top of your page.
12
STEP THREE: CREATE OUR FIRST LAYOUT
User Menu
The user menu is set to only appear to registered users that are
logged in, by default it appears in the left column and is vertical in
appearance.
The user menu has some default links but you can choose to
unpublish these if you wish
Other Menu
The other menu is an auxiliary menu for items you don’t want to put in the main or top
menu, optional and vertical in appearance.
You can use this menu effectively by having it appear on certain
pages with links to extra information regarding that page.
Pathway
The pathway shows visitors a breadcrumb path of where they are on your site in relation to
the home page. The pathway is horizontal in appearance and its width can be varied, it is
worth considering that it needs to be wide enough to display potentially long paths.
Login
The login box is optional, if your site doesn’t require user
registrations then you can omit it. By default the login box
appears in the left column. The title of the module can be turned
off and you can have the login box whilst stopping visitors from
registering. This would allow you to add site users manually.
Search Box
By default the search box is placed in the same row as the top
menu. It’s size and position however can be changed
Main Content
The main content obviously isn’t optional, this is where content you add to the site is
displayed, be default this is the middle column. The position and size of this area can be
changed but there are minimum widths that you are probably best observing.
The content is dynamically added to this area as visitors browse through your site.
13
STEP THREE: CREATE OUR FIRST LAYOUT
Banners
The banner module allows you to add advertising banners to your site, the module is
optional and takes a standard 468x60 banner. You can set the owner, redirect URL and
number of hits each banner can get. The system can rotate banners.
Newsflash
On the default template the newsflash module appears next to the
logo header on the right of the page. This module automatically
displays items from the category that you choose, such as latest
news, FAQ’s etc.
It can display items from any content category that you have
created. It is optional.
Popular
By default this section is placed next to the latest news module and above the main content
area, it is optional. It displays links to pages that have the most hits.
Syndicate
The syndicate module allows you to place links on your pages that
people can use to get an xml feed of your site into their news
reader. It is optional and by default is in the left column.
Who’s Online
The who’s online module by default is in the right column and displays how many guests
and registered users are on your site. The module is optional.
14
STEP THREE: CREATE OUR FIRST LAYOUT
Poll’s
The poll module allows you to put a poll on your site so visitors
can vote for things, by default it is on the frontpage in the right
column. It is optional.
Related Items
Related items is a versatile module that works using data set in the meta keywords part of
content pages. If enabled it will show links to similar pages that have the same keywords in
the meta keywords box.
By default its not published but is best placed in the right or left column.
Random Image
The random image module has been designed to go in either the
left or right column and randomly displays an image from a set
folder.
Latest News
By default this section is placed next to the popular module and above the main content
area, it is optional. It displays links to pages in the latest news category.
Roundup of the Modules
That’s the standard modules that come with Joomla, as you can see most are optional but
some by nature are needed, such as the menu’s. Some are also aligned in such a way that
they can only be displayed in a vertical or horizontal manner and this restricts where on a
page they can be displayed.
15
STEP THREE: CREATE OUR FIRST LAYOUT
Layout
Joomla’s layout determines where each of the above modules can be placed on your
webpages. However to make life easy many of the components are grouped into position
categories.
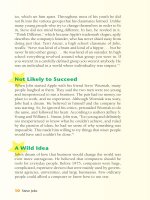
Let’s take a look at the standard page and see where the main positions are.
You can now see all of the various modules laid out on the page. As you can see certain
modules fit better into certain areas. Key to an effective layout is deciding exactly which of
16
STEP THREE: CREATE OUR FIRST LAYOUT
the modules you need on your site. You can then use these as a jigsaw to create the various
areas of your webpage and so the website.
A layout does not have to be three columns you can choose a two column or even one
column layout. At the very least the site needs a menu module and the content module.
Everything else is entirely optional.
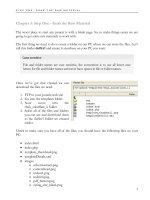
If you want to create a layout then knowing what modules your site requires is the first key
step to create a layout that suits the way your site will work. The positions on the page are
named and here is the above template with the position names highlighted:
17