Make a Joomla Template in 5 Easy Steps phần 4 docx
Bạn đang xem bản rút gọn của tài liệu. Xem và tải ngay bản đầy đủ của tài liệu tại đây (538.6 KB, 11 trang )
STEP THREE: CREATE OUR FIRST LAYOUT
Done that? Great, let’s login to Joomla administrator and adjust the module positions. We
need to browse to ‘modules > site modules’ and we should see a list like this:
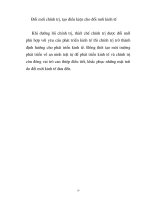
We need to change module positions, let’s do the top menu first, check the box next to top
menu and then click the ‘edit’ graphic in the top right row of buttons, it looks like this
When you do this you will see a page like the one below:
29
STEP THREE: CREATE OUR FIRST LAYOUT
From the drop down list next to the word ‘position’ select ‘user 1’ and then click save from
the top right row of buttons. Now you need to do this with each of the following:
• Search – user 2
• Login form – user 3 and also select ‘All’ from the right hand menu items/links
• Popular – user 4 and also select ‘All’ from the right hand menu items/links
• Latest news – user 5 and also select ‘All’ from the right hand menu items/links
Let’s leave user 6, the optional entry we made empty for now. The other task that needs to
be carried out before we take a look is to make sure no other modules are in positions we
are using. Once you’ve made those changes let’s visit the site and take a look.
What we should have is something that doesn’t look too pretty, but don’t worry yet, and
looks something like this:
Now we need to make some adjustments before we move onto the theme and get this
looking good.
30
STEP THREE: CREATE OUR FIRST LAYOUT
The first thing you will notice is the popular and latest news are not aligning at the top of
the table they are in, so let’s make an adjustment to solve that.
As you can see from the graphic above we have added this:
valign=”top”
Into the td tag on lines 26, 27 and 28 this will ensure the top of the three modules in this
table all align, if we save and upload the index.php file and take a look at the site it now
looks like this:
For now we will leave the index.php file and move onto the theme, we will need to come
back to it so leave it open in PHP Designer 2006. In the next section we will start to add
our own colour scheme and make the site look a bit more pleasing.
31
STEP THREE: CREATE OUR FIRST LAYOUT
32
STEP FOUR: ADJUST THE STYLE SHEET
Chapter 6: Step Four – Adjust The Style Sheet
Here’s where the fun really starts. Now we can start making this template look good. Even
though we are not using any graphics we still need a colour scheme. We need to decide
what colour links, borders, backgrounds etc are going to be.
So, before we dive into the style sheet let’s choose a colour scheme. If you have difficulty
choosing a colour scheme I would suggest visiting this site:
Colour Scheme generator
/>
For this project I am going to use a monochrome blue theme with a flash of orange, as blue
seems to be the most popular colour for our template downloads.
Here is the range of colours we will be using, you can however choose
your own colours to suit your site. We won’t be using all of them, just
those appropriate for our needs. If you are looking at this in black and
white you will need to use the colour codes after each block to get the
actual colours.
The first step for this section is to open the style sheet file, this is called
template_css.css and is found in the css folder that is in the duffer1
folder on your PC.
Open it using PHP Designer 2006 and if you scroll to the bottom of the
file you should see there is around 634 lines in this file. The majority we
won’t be using, but we will be adding some new styles to the file and
editing others.
You should also still have index.php open, because for some of the changes we make we
also need to make some small additions to this file.
So, let’s get on with it.
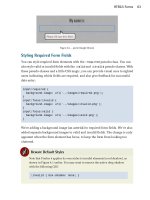
The Site Name
33
The first thing we need to look at is the site name. Let’s be honest it’s ridiculously small at
present. But there are other considerations. Firstly search engines like header text, that is
text set with H1 or H2 tags and chances are that this text will be used by search engines
STEP FOUR: ADJUST THE STYLE SHEET
because it’s first on your page. Secondly we want to frame the menu below the site name,
rather than just have it hanging there. It would also be good to have some space between
the top of the page and the site name. We don’t want it squashed against the roof of the
page.
The great thing is we can do all of this with the style sheet. But, before we do that we need
to wrap the site name tag with H1 tags. So, back to index.php and change line 13, which
looks like this:
So that it looks like this:
As you can see we have put <h1> before the Joomla tag and </h1> after it, this tag closes
the H1 formatting, if we didn’t do this the whole page would turn into H1. This means the
site name will be formatted as heading one text, in other words ‘big’. So, save and upload
the new index.php file and take a look, you’ll see the site name is now a bit bigger, but we
still need to do some more work.
To achieve the rest of our desired look we need to add some new code to the style sheet.
Back to PHP Designer 2006 and template_css.css. Scroll right to the bottom of the file.
What we are going to do is create a style for H1 tags. So, you should be looking at around
line 634 and the last thing you should see in this file is this:
span.article_seperator {
display: block;
height: 1.5em;
}
So we know what we’ve added, we are going to add a comment like this:
/*we will add our extra tags under here */
34
STEP FOUR: ADJUST THE STYLE SHEET
So add that just below the very last curly bracket }. You will notice this sentence starts with
/* and ends with */ this tells the browser to ignore what’s in between. It’s called
commenting out. So if later on I ask you to comment something out this is what you need
to do.
We are going to add our code below this. This is what we are going to add:
h1{
font-size: 17px;
font-weight: bold;
margin-top: 20px;
margin-bottom: 0;
border-bottom: 7px solid #0055B3;
padding-bottom: 3px;
}
Let’s go through each line just so we have some idea of what and why we are adding it.
• font-size: obviously this sets the size of the font
• font-weight: sets the font to bold
• margin-top: this sets a 20 pixel margin outside the font area
• margin-bottom: this sets a zero margin outside the font area at the bottom
• border-bottom: this puts a 7 pixel deep border along the bottom of the area and sets
the colour of the border
• padding-bottom: this sets a distance between the text and the border
So, cut and paste it into template_css.css then save the file and upload the new
template_css.css to:
/templates/duffer1/css/
This will overwrite the existing file. Browse to your web site and hold down Ctrl and while
holding it down hit F5, this will hard refresh the page causing your browser to re-read the
CSS file, your page should now look like this:
35
STEP FOUR: ADJUST THE STYLE SHEET
It’s starting to take shape, the site name looks better, a nice gap between it and the top of
the page and the border makes a good frame for the menu below it. feel free to make
changes, you can change the border colour and thickness, margin sizes, padding, font size
to whatever you want.
Next we are going to look at the top menu.
The Top Menu
The top menu is the horizontal menu right under the site name. There’s a couple of things
we want to do here. Firstly there is a 2 pixel gap between the border/background of each
menu item and the bottom border or the site name. We want these to touch to make it look
like the hover is dropping out of that border. We need to change the background colour
when we hover over a menu item and the text colour of the links. Finally we want to add a
bottom margin to give us some white space between the menu and the next items, below it,
on the page.
Let’s get started!
Again we need to open template_css.css and index.php in PHP Designer 2006. The first thing
we need to do is get rid of that white space between the menu and the bottom of the site
name border. If you are using Internet Explorer you won’t be seeing this small gap, it’s only
showing in FireFox browsers.
We must take two steps; first lets deal with index.php. Because we have two columns in this
table browsers will naturally place items aligned vertically in the middle, we want our menu
to be aligned at the top, flush with the bottom border of the site name. So, lets make a
small addition to the <td> tag for this column. Go to line 18 and add this in the <td> tag:
valign="top"
It should now look like this:
Save the index.php file and upload it to the duffer1 folder, that is at /templates/duffer1/
The next step is to edit template_css.css and we need to find line 328, take a look below to
locate it:
36
STEP FOUR: ADJUST THE STYLE SHEET
What we need to do is ‘comment out’ line 328, the one that refers to line height, to do this
use the /* at the beginning of the line and */ at the end of the line, it should look like this
once you have done it.
If you want to check and make sure that has worked save and upload the template_css.css
file.
Now we need to change the colour when you hover over a link and the border line between
each menu item, so scroll to line 96 in template_css.css and it looks like this:
Change the code for the background colour to #
0055B3 so it now looks like this:
Now scroll to line 78 and change the border-right colour to #0055B3 so it looks like this:
Save the file and upload it to check the changes are correct. If you want to make further
changes to this menu these four blocks:
• ul#mainlevel-nav
• ul#mainlevel-nav li
• ul#mainlevel-nav li a
• ul#mainlevel-nav li a:hover
Control the look of the top menu, so you can make changes here to the font size, font type
and colours. The final adjustment to this menu is to create some white space below it, this
will help frame it and the items below it on the page.
To do this we need to edit both index.php and template_css.css. So, let’s do index.php first.
Go to line 18, where we have the Joomla tag for the top menu, what we will do is wrap the
tag with a <div> tag. So it looks like this:
37
STEP FOUR: ADJUST THE STYLE SHEET
As you can see we have put this before the Joomla PHP tag:
<div class="duftopmenu">
And this after the Joomla PHP tag:
</div>
What this does is tells the browser to apply that style class to anything in-between those
tags. So now we need to set this class within the template style sheet, so back to
template_css.css and go right to the bottom of the file, we are going to add our new class
after the H1 style we added earlier.
We are going to add this:
.duftopmenu {
margin-bottom: 50px;
}
This will set a 50 pixel margin at the bottom of the menu and now the bottom of your
template_css.css file should look like this.
Save both the index.php and template_css.css files and upload them to the duffer1 folder
on your web site. Remember the index.php file goes in the duffer1 folder and the
template_css.css file goes in duffer1/css folder.
Go to your web site and do a hard refresh (Ctrl F5) and take a look. As you can see it’s
starting to take shape. Next we need to take a look at the search box.
38
STEP FOUR: ADJUST THE STYLE SHEET
The Search Box
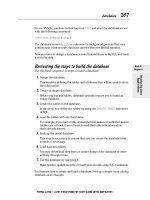
Our next task is to get the search box in position and looking right. What we want to do is
move it up to the top, about 2 pixels below the site name border, align it flush to the right
of the page and change the border colour to match our colour scheme.
Hopefully by now you are getting the hang of editing and uploading the files, once again we
need index.php and template_css.css open in PHP Designer 2006.
Let’s get started.
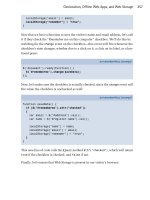
First task is to get it aligned at the top, so we edit index.php line 19 and we add the align
top command to the <td> tag.
valign="top"
It should look like this when you’ve done that:
save the index.php file and upload it to your web site, into the duffer1 folder. Next we edit
template_css.css and go to the bottom of the file, here we need to add this:
.search{
float: right;
margin-top: 2px;
}
This will move the search box to the right and add a small, 2 pixel gap at the top. The
bottom of your template_css.css file should now look like this:
Save the file and upload it to /templates/duffer1/css/
39