Make a Joomla Template in 5 Easy Steps phần 6 potx
Bạn đang xem bản rút gọn của tài liệu. Xem và tải ngay bản đầy đủ của tài liệu tại đây (903.62 KB, 11 trang )
STEP FOUR: ADJUST THE STYLE SHEET
So, we have called it ‘optional area’ set ‘show title’ to no, positioned it in the ‘user6’ slot and
set it to published. Now scroll down to the big text area at the bottom of the form and
enter some text. Enter anything you want but try to add a couple of sentences for now.
Now click save and browse to your web site. Scroll to the bottom of the page and you
should see our new module in position just above the footer, like this.
As you can see it’s not formatted very well, so we need to add a style to it. We are going to
do this the same we have for other areas on the index page by adding <div> tags around
the Joomla tag in the index.php file. So open up index.php and change line 39 so it looks
like this:
As you can see we have added this before the Joomla tag:
<div class="dufoptional">
And this after it:
</div>
50
STEP FOUR: ADJUST THE STYLE SHEET
Our next task is to create the style in template_css.css. We will add this at the very bottom
of the file. What we want to do is create an area for this text that highlights it and separates
it from the text above and footer below.
Add this:
.dufoptional {
margin-bottom: 20px;
margin-top: 20px;
border: 1px solid #0055B3;
padding: 3px;
background: #fff;
}
The bottom of your template_css.css file should now look like this:
And the bottom of your web page should look like this:
As you can see we have added a blue border, some white space above
and below and some padding inside the bordered area. You can create
modules for every page, which gives you great flexibility in what you
display in this area. To do this you need to adjust the settings of each
module and select which menu links you want your new module to show
up on.
Believe it or not that’s it. Your template is complete. All we need to do
now is package it.
51
STEP FOUR: ADJUST THE STYLE SHEET
W3C Validation
One thing we need to do is just make sure the template is W3C valid, by going to
we can enter the full URL of our site and see if it validates.
What you will see is this error:
PHP Designer 2006 has spelt ‘center’ with capital letters, we need to change this to lower
case and re-validate the page. When we do this we see the page is valid W3C XHTML
Transitional.
52
STEP FIVE: PACKAGE THE TEMPLATE
Chapter 7: Step Five – Package The template
In basic terms that’s everything done. You have created your first Joomla template and now
you know where everything it will be much easier to create another one. However, to finish
this off and allow you to pass your template onto other people you need to learn how to
package it.
If we package the template then others will be able to install it directly from their Joomla
administrator.
You will need WIN ZIP or a similar application to create the zip package.
Before we move onto that we need to make some adjustments to the templateDetails.xml
file. Because that still holds information about image files that we are not using anymore.
So, open this file in PHP Designer 2006 and remove the following lines:
<filename>images/arrow.png</filename>
<filename>images/button_bg.png</filename>
<filename>images/contenthead.png</filename>
<filename>images/header_short.jpg</filename>
<filename>images/menu_bg.png</filename>
<filename>images/powered_by.png</filename>
<filename>images/spacer.png</filename>
<filename>images/subhead_bg.png</filename>
<filename>images/title_back.png</filename>
Your templateDetails.xml file should now look like this:
53
STEP FIVE: PACKAGE THE TEMPLATE
Save templateDetails.xml. Next we need a screenshot of our template, to replace the one
called template_thunmbnail.png. Take a screenshot of the page and save it so as to
overwrite the current template_thumbnail.png in the duffer1 folder on your PC.
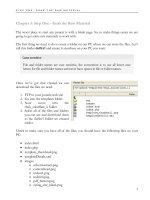
Save the file and open windows explorer. Navigate to your
duffer1 folder. It should look like this.
54
You can see the css and images folder and in the main duffer1
folder you have 4 files; index.html, index.php,
template_thumbnail.png and templateDetails.xml
Now navigate into the css folder and you should see the
following files; editor_content.css, index.html and
template_css.css.
Finally move up and then down into the images folder, it
should contain; advertisement.png, indent1.png, indent2.png,
indent3.png, indent4.png, index.html, rating_star.png,
rating_star_blank.png and spacer.png.
If you have all of these files you are ready to start packaging
the template for Joomla.
I’m going to use WIN ZIP to walk you through the process
which is very easy.
Open WIN ZIP and you should see this:
Click next and select ‘create new zip file’, it should look like this:
STEP FIVE: PACKAGE THE TEMPLATE
Click next and you will see a screen asking for a filename, type duffer1 into the box, like
this:
Click next and you will see a screen asking you to add files to this zip package. We click the
button that says ‘add folders’ and we browse to the duffer1 folder on our PC.
Once we have found it click ‘ok’ and you should now see this screen:
55
STEP FIVE: PACKAGE THE TEMPLATE
Now click ‘Zip Now’ and a zip file will be created in your default WIN ZIP folder, usually
‘My Documents’. That’s it, give that zip file to any Joomla user who doesn’t already have
the duffer1 template installed and it will self install. To install all they need do is go to their
Joomla administrator and navigate to ‘site > template manager > site templates’ Click ‘new’
and they will see this screen:
Click the browse button and they will be able to locate the duffer1.zip file on their PC, once
done click ‘upload and install’ and it will be installed and they will see this:
That’s it, we have just created a Joomla template package others can install. Best thing is it’s
just really simple.
You have reached the end of this duffer’s guide to creating a Joomla template, you’ve made
a template, found out about Joomla tags to hold content, found your way around the
Joomla css file and finally seen how easy it is to package it for distribution. Now you can
56
STEP FIVE: PACKAGE THE TEMPLATE
start making your own Joomla templates. Later in this book we will look at editing this
template to create a two column and a three column template in about 15 minutes. We will
also look at some advanced Joomla template techniques and how we can add some graphics
to our template.
Here’s what our final template looks like:
57
STEP FIVE: PACKAGE THE TEMPLATE
58
TWO AND THREE COLUMN TEMPLATE
Chapter 8: Two Column and Three Column Template
We’ve seen just how easy it is to create a Joomla template. And creating the next one is
even easier, because we’ve already done most of the hard work.
First let’s copy the duffer1 folder, so open windows explorer and make a copy of the whole
folder. It will probably end up named something like ‘copy of duffer1’, so we need to
rename it ‘duffer2’. Once this is done open the templateDetails.xml file in the ‘duffer2’
folder and change line 3 (name) to this:
<name>duffer2</name>
Save it and then upload the whole duffer2 folder to the templates folder on your website.
Now go to your Joomla administrator and navigate to ‘site > templates > site templates’
here you will see ‘duffer2’ under the duffer1 template we’ve just created. Select the radio
button next to ‘duffer2’ and click ‘default’. Now duffer2 is your sites default template. It
looks the same as duffer1 at present but that’s going to change.
Let’s do a really simple change first, open the index.php file in the duffer2 folder using
PHP Designer 2006. Scroll down to line 36 and you should see this:
<td><?php mosMainBody(); ?></td>
What we need to do is remove the Joomla tag for the main body, create a two column
single row table and place the Joomla main body tag in the right column and the Joomla left
tag in the left column. First let’s remove the Joomla tag:
<td></td>
Now click the create table button
and create a two column, single row table, it should
look like this in PHP Designer 2006:
59
TWO AND THREE COLUMN TEMPLATE
60
It should look something like this, with the original <td> tags highlighted for you so you
can see where the table should be:
<td>
<table width="100%" cellpadding="0" cellspacing="0">
<tr>
<td></td>
<td></td>
</tr>
</table>
</td>
Now we need to add the two Joomla tags, one for the left module position and one for the
main body text. They look like this:
<?php mosLoadModules ( 'left' ); ?>
<?php mosMainBody(); ?>
You need to place them in this newly created table as follows:
<td>
<table width="100%" cellpadding="0" cellspacing="0">
<tr>
<td><?php mosLoadModules ( 'left' ); ?></td>
<td><?php mosMainBody(); ?></td>
</tr>
</table>
</td>
I’ve highlighted them so you can see exactly where they go. Now we need to make a few
changes to the table to ensure it looks okay. The first thing is to ensure our left module gets
aligned at the top of the table cell, to do this we add this
valign="top"
Plus we need to set the width of the left column and to do this we add this:
width="200px"
So now the table looks like this: