practical liferay Java -based Portal Applications development apress phần 9 ppsx
Bạn đang xem bản rút gọn của tài liệu. Xem và tải ngay bản đầy đủ của tài liệu tại đây (1.45 MB, 39 trang )
CHAPTER 10 ■ PUBLISHING DYNAMIC CONTENT
270
This screen displays a list of existing templates at the bottom. This list is currently blank
becauseyouhaven’tyetdefinedanytemplates.We’llremedythatnow.
Adding a Template
To create a new template, follow the steps listed here:
1. ClicktheAdd Templatebutton.YouwillseethescreenshowninFigure10-12.
Figure 10-12. Creating a new template
2. Dothefollowingthingsonthedisplayedscreen:
a. Autogenerate ID:Markthischeckbox.TheapplicationwillnowautogeneratetheID
for the new template.
b. Name: Enter Announcement Template.
c. Description: Enter This is a page template for the announcement type of journal
article.
CHAPTER 10 ■ PUBLISHING DYNAMIC CONTENT
271
d. Cacheable:Leavethisboxchecked(thedefault).
e. Structure:Clicktheappropriatebuttontoselectorremovetheearlierselected
structures.
f. Language Type: You get three choices here:
i. VM: Velocity is a powerful Java-based template engine. It renders data from
plainJavaobjectstovarious formats.
ii. XSL:ExtensibleStylesheetLanguage(XSL)isalanguage for expressing style
sheets.LikeCSS,itcontainsinformationonhowtorenderanXMLdocument.
iii. CSS:CascadingStyleSheets(CSS)isawidely accepted standard for creating
style sheets to define how web-page information will be rendered.
g. Script: Specify the file that defines the template structure. Because you can create
thetemplatestructureinVM,XSL,orCSS,youshouldselecttheappropriatefile
based on the language selection in the Language Type field. To locate the file on the
system, use the Browse button. Alternatively, you can create a new file on the fly
using the Launch Editor button.
■Note As mentioned earlier, a template defines the formatting instructions for each field defined in the
structure. When the user views the article, these formatting instructions will be applied to the various fields
defined in the structure and the formatted output will be rendered in the user’s browser. You can specify
such formatting instructions in VM, XSL, or CSS, but describing the formatting instructions is beyond the
scope of this book.
h. Format Script:Markthischeckboxifyouwanttoformatyourscript.Youmustsave
the document by clicking the Save and Continue button or the Save button to see
the effects of this action. The opportunity to format the script is especially useful if
you created the script in an external editor and did not indent it properly.
i. Small Image URL: Specify the URL of the image to be used for identifying the
template.
j. Small Image: Alternatively, you can specify an image from the local disk. To locate
the image, use the Browse button.
k. Use Small Image: If you have populated the Small Image field, check this box.
l. Permissions: Use this section to set the various permissions for Regular and Com-
munity roles. For now, leave these at their default values.
3. ClicktheSave button to save your edits.
CHAPTER 10 ■ PUBLISHING DYNAMIC CONTENT
272
Viewing and Searching Templates
After you have created a template and saved it, it will appear in the list of templates on the
Templatesscreeninthemainapplicationview(seeFigure10-13).
Figure 10-13. View of predefined templates
As in the case of structures, the view screen has a search facility that lets you narrow down
the list of templates displayed. You can enter the search string in the Search edit box and click
the Search Templates button to locate the templates matching the search criterion.
Performing Actions on Templates
The actions you can perform on templates are similar to the actions you can perform on
structures:
• Edit: This allows you to edit the selected template. Selecting this action opens the tem-
plate in the editor, giving you the opportunity to edit any of the fields.
• Permissions: This action allows you to set user permissions on the selected template for
the Regular and Community roles.
• Copy:ThisoptionallowsyoutomakeacopyoftheselectedtemplateunderanewID.
• Add Article: This action allows you to add a new article based on the current template.
I’lldiscussaddingarticlesinthesection“CreatingJournalArticles.”
• View Articles: This option displays all the existing articles based on the currently
selected template.
CHAPTER 10 ■ PUBLISHING DYNAMIC CONTENT
273
• Edit Structure:Atemplateusesaparticularstructure.Withthismenuaction,youwill
be able to modify the structure that the current template is based on.
• Delete: This action deletes the currently selected template from the system.
Editing a Template
In addition to using the Edit option in the Actions menu, you can also open a template in
theeditorbyclickingitsnameinthetemplatelist(seeFigure10-13).Thenyoucanmake
modifications.
Deleting a Template
In addition to using the Delete option in the Actions menu, you can delete a template by
marking the check box to the left of the template name and clicking the Delete button (see
Figure10-13).
Now that we’ve completed the groundwork for article creation by setting up structures
andtemplates,wewilldelveintotheprocessofcreatinganewarticle.Inthe“CreatingJournal
Articles”section,youwilllearntocreateafree-formarticle;inthe“CreatingTemplate-based
Articles” section, you’ll learn to create an article based on a structure and template.
Creating Journal Articles
WhenyouselecttheArticles tab in the main application view, you will see the screen shown in
Figure 10-14.
Figure 10-14. The Articles screen
The Articles screen shows the list of currently available articles. This list is empty because
you haven’t yet created any articles.
CHAPTER 10 ■ PUBLISHING DYNAMIC CONTENT
274
Adding an Article
To add a new article, click the Add Articlebutton.Doingthispopsupaneditorthatofferssev-
eral options, each of which we’ll discuss individually.
Editing Content
The main portion of thescreenistheeditorforenteringarticledata(seeFigure10-15).
Figure 10-15. Creating a new article
On this screen, you would enter the following information:
• Name: Enter the article name here. This name will appear in the article list; it will also
prove useful when users search for an article.
• Body:Enterthebodyofthejournalarticleintherich-editcontrol.Youcanformatthe
text using the icons in the toolbar.
• Permissions: Use this section to set user permissions on the article for Regular and
Community roles. You’ll find it under the rich-edit control on the article-addition
screen.
Abstract
The Abstract option, under the Permissionssection,allowsyoutoaddanabstracttoyourjour-
nal article. The abstract subscreen is shown in Figure 10-16.
CHAPTER 10 ■ PUBLISHING DYNAMIC CONTENT
275
Figure 10-16. Adding an abstract and image to a new article
Perform the following tasks on this subscreen:
• Description: Enter General announcement from ISI.
• Small Image URL: Enter the URL of the image that will be used to identify the current
article in the article list.
• Small Image: Alternatively, enter the name of the image file from your local drive. You
can use the Browse button to locate the file.
• Use Small Image:MarkthischeckboxifyouhavepopulatedtheSmall Image field.
Workflow
The Workflow subscreen at the top-right corner of the article-addition screen simply displays
thecurrentstatusofthearticle(seeFigure10-17).
Figure 10-17. Workflow status display
Note that the status is Newbecausewearecurrentlycreatinganewarticle.Whenyou
open an existing article for editing at a later time, the status would be different.
■Note The four possible workflow-status values are New, Approved, Not Approved, and Expired. After the
administrator reviews and approves the article, it acquires the status Approved. If the article is rejected for
publication, it gets the status Not Approved. Finally, if an article has been set to expire after a certain date
and that date has passed, it acquires Expired status. The expiration date is generally set by the administrator
at publication time, but it can be changed later. You can make an expired article “live” again by changing the
expiration date to a future value.
CHAPTER 10 ■ PUBLISHING DYNAMIC CONTENT
276
Form and Presentation
The Form and Presentation subscreen, under the Workflow subscreen, allows you to select
whichstructureandwhichtemplateyou’dliketouseforthecurrentarticle(seeFigure10-18).
Figure 10-18. Selecting the structure and template for a new article
ClicktheSelect button to the right of the Templateoption.Doingthisdisplaysalistof
existingtemplatesonthescreen.Whenyouselectthedesiredtemplate,thecorresponding
structure used by the selected template would automatically display to the right of the Struc-
ture option.
■Note The editor on the left side of the screen automatically changes to display the fields defined in the
selected structure.
Categorization
You can set the articlecategoryonthesubscreenforcategorization(seeFigure10-19).
Figure 10-19. Selecting a category and tags for a new article
An article can belong to one of the following categories:
• Announcements
• Blogs
• General
• News
• Press Release
• Test
CHAPTER 10 ■ PUBLISHING DYNAMIC CONTENT
277
■Note The category type helps narrow down an article search. For example, the Journal Articles portlet
discussed in the “Using the Journal Articles Application” section uses article categories to limit the amount of
articles displayed in the list.
■Tip You can add more categories by modifying the portal.properties file. However, this is beyond the
scope of this book.
You will also be able to tag the article in this subscreen. You can tag the article with a pre-
existing tag or a newly created tag.
Schedule
The schedule subscreen, near the bottom-right of the article-addition screen, is shown in
Figure10-20.
Figure 10-20. Setting a publishing schedule for a new article
In the Display Date field, you can set the date and time at which the current article will be
made available to the portal members. The Expiration Date field allows you to set the date and
time after which the article will no longer be available for viewing. If you mark the Never Auto
Expire check box, the article will never expire and be available to members indefinitely. The
Review Datesetsthedateforarticlereview.MarkingtheNever Review check box indicates that
an article review is not required for approval and publication.
Saving a New Article
After you’ve entered thedesiredinformationonthearticle-additionscreen(seeFigure10-15),
you get several options for saving the edits:
• Save:Clickingthisbuttonsavestheedit,createsanewarticlewiththegivenID,and
adds it to the database of the existing articles.
• Save and Continue:Clickingthisbuttonsavesthecurrenteditsandkeepstheeditor
open for you to make further changes.
CHAPTER 10 ■ PUBLISHING DYNAMIC CONTENT
278
• Save and Approve:Clickingthisbuttonsavesthecurrenteditsandapprovesthecurrent
article for publishing.
■Note The administrator must approve an article before it is published, even if she has chosen to skip the
review process. An unapproved article does not appear in the articles list displayed to the user.
• Preview: This option gives you a preview of how the article will look to the user.
• Download: This option downloads the article from the server.
■Note The Preview and Download buttons appear only if your article is based on a template and a struc-
ture. This is obvious: if you don’t base the article on a template, you design it in the WYSIWYG editor and
thus preview it along the way. In the “Creating Template-based Articles” section, you will create a full journal
article based on a template. You will then appreciate the use of the Preview option.
• Cancel: This option cancels all the current edits and returns you to the main applica-
tion screen.
Viewing an Article
After you create and save a new article, you will return to the main application screen, where a
listofexistingarticleswouldbedisplayed(seeFigure10-21).
Figure 10-21. Viewing a list of articles
CHAPTER 10 ■ PUBLISHING DYNAMIC CONTENT
279
If you need to search for an article or articles matching a specific criterion, specify the
search string in the Search edit box and perform the search by clicking the Search Articles
button.
Performing Actions on an Article
You can perform the following actions on each of the articles displayed in the list:
• Edit: Selecting this menu option opens the article in the editor so you can make
changes.
• Permissions: This option allows you to set various user permissions on the current
article for Regular and Community roles.
• Preview: This option allows you to preview the article to see how it would be rendered
on the user’s screen.
• Copy:ThisoptionmakesacopyofthecurrentarticleunderanewID.
• Delete: This option deletes the article from the database.
Assigning an Expiration Date for an Article
Over time, articles might lose their importance. You can set expiration dates on such articles
sothey’renolongeravailableforviewing.Dothisbymarkingthecheckboxestotheleftofthe
desired articles in the displayed list and clicking the Expire button (see Figure10-21).
Deleting an Article
If you’d like to delete one or more articles, go the Articles screen and mark the check boxes to
theleftoftheunwantedarticles.ClicktheDelete button to remove them from the database
permanently.
Viewing Recent Articles
After adding several articles over a period of time, you might want to obtain a list of only the
recentlyaddedarticles.WhenyouclicktheRecent tab on the main application screen, you will
seethelistofrecentlyaddedarticles(seeFigure10-22).
You can also obtain the RSS feed of the articles by defining the feeds in the Feeds tab. (You
canfinddetailsonRSSfeedsinChapter6.)TheFeeds tab allows you to define feeds that will
expose the existing articles using a set of rules such as constraints and presentation settings.
CHAPTER 10 ■ PUBLISHING DYNAMIC CONTENT
280
Figure 10-22. Viewing recently added articles
Configuring the Journal Application
Now we will study the configuration settings for the Journal portlet at the application level.
Whenyouclicktheapplication-configurationicon,youwillseefourtabbed options:
• Setup: Lets you set various e-mail formats
• Permissions: Lets you set permissions for different user roles
• Export/Import: Facilitates the export and import of data
• Sharing: Facilitates application sharing
Wewillnowlookateachoftheseoptionsindetail.
Setup
Under the Setup option (seeFigure10-23),youcansetuptheformatsforvariouse-mailmes-
sages, such as these:
• Email From
• Article Denied Email
• Article Granted Email
• Article Requested Email
• Article Review Email
CHAPTER 10 ■ PUBLISHING DYNAMIC CONTENT
281
Figure 10-23. The Journal application setup screen
Email From
In the Email From tabbed option, you can set the sender information for all the application-
generatede-mailmessages.Inparticular,youenterthesender’snameande-mailID(see
Figure10-23).
Article Denied Email
The Article Denied Email tab allows you to set the format for the e-mail message that com-
municatesanarticlerejection.Ifyoudecidetorejectanarticlebecauseitscontentsare
unsuitable, the application sends an automated message to the author using the format
specifiedonthisscreen(seeFigure10-24).Themessageformatusesseveralpredefined
fields, which are listed at the bottom of the screen.
CHAPTER 10 ■ PUBLISHING DYNAMIC CONTENT
282
Figure 10-24. Defining the format for an article-rejection message
Article Granted Email
The Article Granted Email tab lets you define the format for the e-mail message that gets sent
to a user whose article has been accepted for publication. Its settings resemble those for the
Article Denied Email screen.
Article Requested Email
Whenausersubmitsanarticleforpublication,theapplicationgeneratesamessagefor
the portal administrator indicating that the user has requested an article approval. In the
CHAPTER 10 ■ PUBLISHING DYNAMIC CONTENT
283
notificationmessage,theauthorcanmentionthearticle’slocation(URL),ID,version,title,
and any other relevant information. You can define the format for this notification message in
the Article Requested Email tabbed option.
Article Review Email
You might want multiple reviewers to read and approve any submitted article. You use the
Article Review Email screen to set up the e-mail message requesting a review.
Permissions
In the Permissions tabbed option, you can set several permissions for the Regular and Com-
munity roles.
Regular Roles
Under the Regular roles, you have four types of users:
• Administrator
• Guest
• Owner
• Power User
• User
A guest user has only two types of permissions: View and Configuration. The View permis-
sion is granted by default. Granting the Configuration permission allows the user to perform
various configuration activities.
An administrator, owner, power user, and ordinary user can obtain several types of
permissions:
• Add Article: Allows the user to add a new article
• Add Feed: Allows the user to add an article feed
• Add Structure: Allows the user to create a new structure
• Add Template: Allows the user to create a new template
• Approve Article: Allows the user to approve a submitted article
• Configuration: Allows the user to perform various configuration tasks
• View: Allows the user to view articles
Community Roles
Under Community roles, there are three types of users:
• Administrator
• Member
• Owner
CHAPTER 10 ■ PUBLISHING DYNAMIC CONTENT
284
All three types of users have access to all the permissions discussed in the “Regular Roles”
section. These are Add Article, Add Feed, Add Structure, Add Template, Approve Article, Con-
figuration, and View.
Export/Import
The Export/Import tabbed option facilitatestheexportandimportofthejournal-articledata-
basepertainingtothecurrentcommunity.Whenyouclickthistabbedoption,youwillseethe
screenshowninFigure10-25.
Figure 10-25. Setting up fields for export
On this screen, you can select the various fields you wish to export to the external data-
base. The file name is specified in the LAR file-name edit box. By default, several fields are
CHAPTER 10 ■ PUBLISHING DYNAMIC CONTENT
285
marked for export; you can uncheck any fields you don’t want. You can also opt to export data
only in a specified date range.
The Import tab allows you to select fields you wish to import into the new instance of the
Journal application.Whileimportingthedata,youcanchoosetomirrorthedataorcopyitas
new data. Likewise, if a user is not defined in the new instance of the portal, you can choose to
useyourIDinplaceofthemissingperson’sID.Alternatively,youcandecidetouseyourIDin
all cases, irrespective of whether the user is defined in the new system.
■Note The data strategy and user ID strategy for data import are explained in depth in Chapters 8 and 9.
Sharing
The Sharing option produces the code that you can embed in other web sites so you can make
this application available elsewhere. It also allows Facebook sharing of the application.
Creating Template-based Articles
You fully explored the functionality of the Journal application in the previous two sections,
and you explored the creation of structures and templates in the two sections before that. Now
you’ll put that new knowledge to use by going through an example of creating a template-
based article. In the process, you’ll see why and where to use the templates and structures.
Suppose that your portal users would like to share their recommendations on whether to
buyorsellaparticularsecuritybasedonitsmarketpricefortheday,its52-weekhigh,andits
52-weeklow.You’llcreateanarticlestructurethatwillrequiretheauthortoinputthesecu-
rity’sname,itshighandlowpricesfortheday,anditshighandlowpricesovera52-week
period. The structure will also ask the author for his recommendations.
Creating the Structure
Use the following steps to create the new structure:
1. Open the Journal application.
2. Select the Structures tab and click the Add Structurebutton(seeFigures10-2and10-3).
3. MarktheAutogenerate ID check box.
4. Enter 52-week analysis data in the Name field.
5. Enter This defines the structure for the 52-week analysis report in the Description
field.
6. Leave the default settings in the Permissions section.
7. Using the Add Row button repeatedly, add several fields to the structure with the fol-
lowingnamesandcontenttypes(seeFigure10-4):
CHAPTER 10 ■ PUBLISHING DYNAMIC CONTENT
286
a. Name: Info; Type: Text
b. Name: Symbol; Type: Text
c. Name: High; Type: Text
d. Name: Low; Type: Text
e. Name: 52WeekHigh; Type: Text
f. Name: 52WeekLow; Type: Text
8. You can rearrange the rows by using the up and down arrows, if desired (see
Figure10-5).
9. ClicktheLaunch Editor button to verify that the structure you created matches the one
shown in Listing 10-1.
Listing 10-1. XML Document for the Created Structure
<root>
<dynamic-element name='Info' type='text'></dynamic-element>
<dynamic-element name='Symbol' type='text'></dynamic-element>
<dynamic-element name='High' type='text'></dynamic-element>
<dynamic-element name='Low' type='text'></dynamic-element>
<dynamic-element name='52WeekHigh' type='text'></dynamic-element>
<dynamic-element name='52WeekLow' type='text'></dynamic-element>
</root>
10. ClicktheSave button to save your edits.
Next, you will create the article template based on this structure.
Creating the Template
To create the new template, use the following steps:
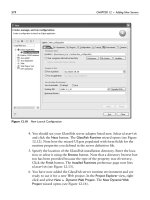
1. Return to the main screen of the Journal application, if you have not done so.
2. Select the Templates tab and click the Add Template button (see Figures 10-11 and
10-12).
3. MarktheAutogenerate ID check box.
4. In the Name field, enter 52-week article template.
5. In the Description field, enter This template defines the article structure for a 52-week
analysis report.
6. Leave Cacheablechecked(itsdefaultstate).
7. ClicktheSelect button to the right of the Structure label and select the previously
defined 52-week analysis data structure from the displayed list of structures.
CHAPTER 10 ■ PUBLISHING DYNAMIC CONTENT
287
8. Select XSL from the Language Type drop-down list. You will use the XSL transformation
to define the document formatting.
9. In the Script edit box, select the file called 52week.xsl by using the Browse button. Note
that you do not have this file on your machine yet; you must enter the code from List-
ing10-2inanyofyourfavoritetexteditorsandstoreitinafilecalled52week.xsl.
Listing 10-2. The XSL Transformation Document
<?xml version="1.0" encoding="UTF-8"?>
<xsl:stylesheet xmlns:xsl="
version="1.0">
<xsl:output method="html" omit-xml-declaration="yes"/>
<xsl:template match="/">
<xsl:value-of disable-output-escaping="yes"
select="root/dynamic-element[@name='Info']/dynamic-content"/>
<p/>
<table width="50%">
<tr>
<td width="200">
<font size="2" color="#0000FF">
<b>Symbol</b>
</font>
</td>
<td width="200">
<font size="2" color="#0000FF">
<b>High</b>
</font>
</td>
<td width="200">
<font size="2" color="#0000FF">
<b>Low</b>
</font>
</td>
<td width="350">
<font size="2" color="#0000FF">
<b>52 Week High</b>
</font>
</td>
<td width="350">
<font size="2" color="#0000FF">
<b>52 Week Low</b>
</font>
</td>
</tr>
CHAPTER 10 ■ PUBLISHING DYNAMIC CONTENT
288
<tr>
<td>
<xsl:value-of disable-output-escaping="yes"
select="root/dynamic-element[@name='Symbol']/
dynamic-content"/>
</td>
<td>
<xsl:value-of disable-output-escaping="yes"
select="root/dynamic-element[@name='High']/dynamic-content"/>
</td>
<td>
<xsl:value-of disable-output-escaping="yes"
select="root/dynamic-element[@name='Low']/dynamic-content"/>
</td>
<td>
<xsl:value-of disable-output-escaping="yes"
select="root/dynamic-element[@name='52WeekHigh']/
dynamic-content"/>
</td>
<td>
<xsl:value-of disable-output-escaping="yes"
select="root/dynamic-element[@name='52WeekLow']/
dynamic-content"/>
</td>
</tr>
</table>
<p/>
<xsl:value-of disable-output-escaping="yes"
select="root/dynamic-element[@name='Detail']/dynamic-content"/>
<p/>
</xsl:template>
</xsl:stylesheet>
10. Leave the rest of the fields at their default settings.
11. ClicktheSave button to save your edits.
12. ClicktheReturn to Full Page link to return to the main screen of the Journal
application.
Now,youandyourcommunityuserscanusethistemplatetocreatejournalarticles.
Creating Articles
To create a new article based on a template, use the following steps:
1. Navigate to the Journal application main screen, if required.
2. Select the Articles tab and click the Add Articlebutton(seeFigures10-14and10-15).
3. Enter IBM Stocks in the Name field.
CHAPTER 10 ■ PUBLISHING DYNAMIC CONTENT
289
4. ClicktheSelect button to the right of the Template item in the Form and Presentation
box on the right side of the screen.
5. Select 52-week article template from the list of displayed templates. This is the template
youjustcreated.
6. Note the changes on the left side of the screen. The default editor changes to the list
of fields you had defined in the 52-week analysis data structure associated with the
selected template.
7. Enter the following data in the displayed fields:
a. Info: My views on IBM stocks
b. Symbol: IBM
c. High: 90.20
d. Low: 86.33
e. 52WeekHigh:130.93
f. 52WeekLow:69.50
8. Leave all other fields on this screen at their default values.
9. Select the article’s category type from the Categorization box on the right side of the
screen.
10. ClicktheSave and Approve button to publish the article.
11. Note that the Status changes to Approved (see the Statuscolumninthelistofarticles).
12. To preview the article, click its Actions button and select Preview. You will see the
screenshowninFigure10-26.Thisiswhatyouruserswillseewhentheyopenthe
article in their portal window.
Figure 10-26. Previewing the journal article
In the next section, I will describe the Journal Articles application that you can use to view
articlesfromthejournaldatabasebasedontheircategory assignments.
CHAPTER 10 ■ PUBLISHING DYNAMIC CONTENT
290
Using the Journal Articles Application
The Journal Articles portlet allows the user to view articles of a certain type from the reposi-
tory, such as Announcements or Blogs. As an administrator, you will decide on what the user
will see. To use this portlet on our ISI portal, follow the steps listed here:
1. Log on using your Administrator account.
2. Navigate to the Dynamic public page you created earlier in this chapter, or move to any
other page where you wish to add this application.
3. Select the Add Application menu option.
4. Select the Journal Articles application under the CMS category.
5. Add the application to the portal page using the Add link. At this stage, your screen
shouldliketheoneshowninFigure10-27.
Figure 10-27. Adding the Journal Articles application
CHAPTER 10 ■ PUBLISHING DYNAMIC CONTENT
291
Before your users start using the Journal Articles application, an administrator needs to
set it up. To set up the application, follow these steps:
1. Clicktheapplication-configurationicon.Youwillseethesetupscreenasshownin
Figure10-28.
Figure 10-28. The application setup screen
2. Choosethefollowingoptionsonthesetupscreen:
a. Community: From this drop-down list, you need to select the community from all
the available communities on your portal. The articles pertaining to the specified
community will be displayed in the application portlet.
b. Article Type: Select the article type. Note that a user can define his own type, after
which it will appear in the selection list. Here are some examples of Liferay’s pre-
defined article types:
i. Announcements
ii. Blogs
iii. General
iv. News
v. Press Release
vi. Test
c. Display URL: Leave this as the default value of Maximized.
d. Display per Page: This option allows you to select the number of articles to be dis-
played in the list. The default value is 5.
CHAPTER 10 ■ PUBLISHING DYNAMIC CONTENT
292
e. Order By Column: Here you can decide the sort order for the list of articles. You can
sort the list by one of these parameters:
i. Display Date
ii. Create Date
iii. Modified Date
iv. Article Title
v. ID
f. Order By Type: This field determines whether the sort order is ascending or
descending.
3. Save the edits by clicking the Save button.
4. ClicktheReturn to Full Page link to go back to the main application screen.
You will now see the list of articles displayed in the application’s main window (see Fig-
ure10-29).Youcanviewanyarticlebyclickingits link.
Figure 10-29. List of articles in the Journal Articles application’s main screen
Using the Journal Content Application
WhereastheJournal Articles application facilitates the viewing of article lists according to
category, the Journal Contentapplicationfacilitatestheviewingofindividualjournalarticles.
(You were introduced to the Journal ContentportletinChapter2.)
■Note The primary function of the Journal Content portlet is to enable you to view an individual journal
article, but you can also use it to create an individual article, as you saw in Chapter 2. When you click the
Add Article icon within the Journal Content application, you’re actually accessing a pared-down version of
the Journal application. But if you want your portal to accommodate a lot of articles submitted by users, you
should use Journal instead of Journal Content for article creation because it offers more functionality.
Neither Journal Articles nor Journal Content Search allows you to create articles. These applications
facilitate viewing and searching only.
CHAPTER 10 ■ PUBLISHING DYNAMIC CONTENT
293
To use the Journal Content application on our ISI portal, follow the steps listed here:
1. Log on using your Administrator account.
2. Navigate to the Dynamic public page you created earlier in this chapter, or move to any
other page where you wish to add this application.
3. Select the Add Application menu option.
4. Select the Journal Content application under the CMS category.
5. Add the application to the portal page using the Add link. At this stage, your screen
should look like the one shown in Figure 10-30.
Figure 10-30. Adding the Journal Content application
6. At the bottom-left corner of the application screen, you will find two icons: one for
selecting an article to view, and one for adding a new article.
7. If you do not have any existing articles, click the Add Article icon to open the article
editor.
8. Createanewarticle,thenclicktheSave and Approve button.
CHAPTER 10 ■ PUBLISHING DYNAMIC CONTENT
294
9. Whenyoureturntothemainapplicationscreen,youcanselectthearticleforviewing
(seeFigure10-31).
Figure 10-31. Viewing an article
■Note The ratings stars and Post Reply link shown in Figure 10-30 appear based on the rights assigned to
the viewer. I’ll discuss these user rights later in this section.
10. You can edit the displayed article by clicking the Edit icon displayed at the bottom-left
corner of the application screen.
Now you’ll configure Journal Contentattheapplicationlevel.Whenyouclickthe
application-configurationicon,youwillseethesetupscreenasshowninFigure10-32.
You will see the list of articles displayed on the bottom of the setup screen. You will also
see a list of setup options in the center of the screen:
• Show Available Locales:Checkingthisboxresultsinthedisplayofalllocalesinwhich
the application is available.
• Enable Ratings: Selecting this option results in the display of ratings on the main appli-
cation screen.
• Enable Comments: Selecting this option enables the user to comment on the current
article.
• Enable Comments Ratings: This setting allows the user to rate the comments on the
article.