Linux smart homes for dummies - part 5 pps
Bạn đang xem bản rút gọn của tài liệu. Xem và tải ngay bản đầy đủ của tài liệu tại đây (1.4 MB, 35 trang )
Chapter 6
Building a Personal Video
Recorder with MythTV
In This Chapter
ᮣ Building your personal video recorder (PVR)
ᮣ Watching TV
ᮣ Managing your recordings
ᮣ Managing your media
O
ne of the things I like about running Linux as my operating system is the
availability of a large number of open source, free programs. One such
program I use is MythTV; with it, I have converted an old, rarely used PC to
a personal video recorder (PVR), and now it’s one of the most used PCs in
my house.
Most people know what a PVR is, and many people have commercial versions
such as TiVo or proprietary PVRs supplied by the cable or satellite compa-
nies. With a PVR, you can pause live TV and record whatever you desire
whenever you desire. Typically, you have to pay a subscription fee to TiVo or
your cable or satellite provider for the privilege of using its PVR. But, if you
have an old PC, you can build your own PVR for little or no cost — and you
won’t have to pay a subscription fee either — by downloading and installing
MythTV. MythTV lets you build your own PVR, download TV programming
information, watch, pause, and record live TV, as well as schedule recordings.
But MythTV can do so much more: With MythTV, you can gain complete con-
trol of all your online media content and access the Internet for news and
weather information. This chapter shows you how to build your MythTV
system.
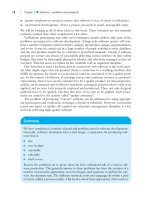
Note: The MythTV program is very complex and could fill an entire For
Dummies book alone. The information in this chapter tells you how to set up
and configure a basic MythTV system. I highly recommend that you do some
research on your own and explore the MythTV information that is available on
the Web. A good place to start is the MythTV official site at www.mythtv.org.
12_598236 ch06.qxp 6/27/06 7:42 PM Page 113
Building Your MythTV PVR
In the following sections, you find out how to set up your PC hardware to use
with MythTV. You must meet some specific hardware requirements before
you can install and configure MythTV. After you configure your hardware, you
download, install, and configure MythTV.
Selecting the hardware
The first consideration for using MythTV is choosing and configuring the hard-
ware that the system will use. Your hardware must meet some basic require-
ments, and I include a list of required hardware items and their purposes.
You can set up MythTV in several different configurations by using one PC as
the master backend unit (not connected to the TV) and another as the front-
end unit (connected to the TV). Or, you can use one PC for both the backend
and frontend units. In this chapter, you find out about using one PC for both
the backend and frontend units. Just about any recent PC that is capable of
running Linux should have enough processing power to run MythTV. The fol-
lowing list shows the basics. Following the list of generic hardware types, I
list the specific hardware I used when I set up my system.
Generic hardware types
This list shows generic types of hardware that you need to set up your
system with MythTV:
ߜ CPU: Pentium II class or higher CPU. (This includes AMD CPUs, as well.)
ߜ RAM: A 256MB minimum.
ߜ Hard drive: Any ATA 66/100/133, 30GB or larger for storing video.
ߜ Sound card: An onboard or a PCI card. (Nearly any card will work.)
ߜ Video card: An onboard or a PCI/AGP card. (The card must have a TV
out port to connect to TV.)
ߜ Optical drive: Required only if you want to play or record CD/DVDs.
ߜ Video capture card: Used to get the video into your PC. MythTV sup-
ports many kinds.
Because it isn’t possible for me to discuss every type of hardware that might
work with MythTV in this section, I recommend that you check out http://
mythtv.org/docs/mythtv-HOWTO-3.html#ss3.1 (to find more detailed
information about hardware requirements) and dfish.
org/tiki-pvrhwdb.php (to find a list of many hardware configurations
known to work with MythTV). You can save yourself a lot of time and aggra-
vation if you configure your system with hardware that is known to work with
MythTV.
114
Part III: Entertaining Your Brain with a Little Help from Linux
12_598236 ch06.qxp 6/27/06 7:42 PM Page 114
I followed my own advice and made sure that my hardware would work
before I downloaded, installed, and configured MythTV.
My system-specific hardware
Here’s the specific hardware I am using on my system:
ߜ Motherboard: Shuttle AK32A
ߜ CPU: AMD Athlon 1800
ߜ RAM: 1GB pc133
ߜ Hard drive: Seagate 7200rpm ATA100 80GB
ߜ Sound card: onboard AC97
ߜ Video card: XFX GeForce FX 256mb TV/DVI AGP
ߜ Video capture: Plextor PX-M402U
ߜ Optical drive: Generic DVD+/-RW, CD-RW, DVD-ROM, CD-ROM
ߜ NIC: onboard Realtek
Regardless of which hardware you decide to use, be sure to properly install
and configure it before you begin to install and configure MythTV. I can’t
know what hardware you’re using, so I leave it to you to be sure it’s working
properly. I can only repeat; be sure you select hardware that is known to
work with MythTV!
Installing MythTV
When you have hardware that is compatible with MythTV and you know it
is properly configured, you’re ready to install MythTV. My instructions are
based on using Fedora Core 4 (FC4) as the Linux distribution, but you can
also run MythTV with SUSE or Debian and Debian-based distributions such
as Knoppix or Linspire.
Note: If you’re running FC4 or SUSE, you can follow the instructions here
using yum for the installation. If you’re running Debian or a Debian-based dis-
tribution, you can use the apt-get command instead of yum to do your
installation.
Before you begin the installation, you have some prep work to do:
ߜ Install the drivers required by your specific hardware and be sure
your hardware is working properly. You are using hardware supported
by MythTV, aren’t you?
115
Chapter 6: Building a Personal Video Recorder with MythTV
12_598236 ch06.qxp 6/27/06 7:42 PM Page 115
ߜ Install the LIRC packages if you plan to use a remote control with your
system (perhaps one came with your capture device). Go to www.myth
tv.org/docs/mythtv-HOWTO-8.html for details. (You don’t need to
use a remote; you can use keyboard commands to control MythTV.)
ߜ Make sure that you have free space on your system hard drive. You
need this space to hold your TV recordings. You should probably have
at least 20GB free for this purpose. (The MythTV program will use about
100MB.)
ߜ Create a user on your system called mythtv. You will log in as this user
to configure and run MythTV.
ߜ Create a directory /mnt/store. This is where MythTV will save your
recordings.
ߜ Be sure that mysql is installed on your system. If it isn’t, you need to
install it.
ߜ Enable NTP on your system. This ensures that your system time will
always be accurate.
ߜ Be sure your system is updated with the most recent packages. You
can run yum upgrade to do this.
ߜ Set up the atrpms and freshrpms repositories for use with yum. You
can edit the /etc/yum/conf file, or you can place a configuration file
for each repository in /etc/yum.repos.d.
In the code examples, the first character indicates the command prompt.
A dollar sign ($)indicates a non-root user. A pound sign (#) indicates the
root user. You don’t type these characters — only the text following these
characters.
Now you’re ready to begin the installation; just follow these few steps:
1. Open a terminal window and log in as root.
2. At the command prompt, type
# yum install mythtv-suite
The installer searches the rpm repositories and will finds the necessary
packages and any required dependencies.
3. When you are asked whether you want to install the selected pack-
ages, answer Yes to continue.
When the installer says Complete! and the command prompt returns,
the installation is complete. The next step is to configure MySQL.
116
Part III: Entertaining Your Brain with a Little Help from Linux
12_598236 ch06.qxp 6/27/06 7:42 PM Page 116
Configuring MySQL
For MythTV to work properly, you must have MySQL installed, properly con-
figured, and running. If you haven’t already installed MySQL, do it now. If you
have it installed, go ahead and configure it. First, you want MySQL to start
whenever you start your PC. You can issue the following command as the
root user to ensure MySQL always starts:
# chkconfig mysqld on
Then you can start MySQL immediately by entering
# service mysqld start
Now you need to set the root password for MySQL by entering the following
command. Be sure to use your own password where it shows ‘Enter your
desired password here’. (The single quotes are required.)
# mysql -u root mysql
mysql> UPDATE user SET Password=PASSWORD(‘Enter
your desired password here’) WHERE user=’root’;
mysql> FLUSH PRIVILEGES;
mysql> quit
Then you must create the database that MythTV will use by entering the fol-
lowing command:
$ mysql -u root -p < /usr/share/doc/mythtv-
0.18.1/database/mc.sql
(When prompted, enter the password you just set previously.)
You are now ready to configure MythTV.
Configuring the MythTV backend server
To configure the MythTV backend server, you run a program called mythtv-
setup. Just follow these steps:
1. Log in as the mythtv user you create earlier. (Refer to the preparatory
tasks I list in the “Installing MythTV” section.)
2. From a terminal prompt, enter the following command:
$ mythtv-setup
117
Chapter 6: Building a Personal Video Recorder with MythTV
12_598236 ch06.qxp 6/27/06 7:42 PM Page 117
The program starts and opens to a window asking whether you want to
clear your capture card settings.
3. Highlight Yes and press Enter.
Next you are asked whether you want to clear channel settings.
4. Select Yes and press Enter.
The program opens to the main settings menu, which lists five options:
• General
• Capture Cards
• Video Sources
• Input
• Channel Editor
You’ve got the mythtv-setup program up and running.
Adjusting the main settings
In many cases, you don’t need to change the default settings. In the following
subsections, I briefly explain the five menu choices and explain in more detail
those settings that you need to change, providing illustration where neces-
sary. Use your up- and down-arrow keys to move through the menus and
additional pages; press Enter or the spacebar to select.
General
You use these settings to set the IP address and port numbers of your back-
end server as well as other settings. Because you’re setting up a PC that is
both the backend and frontend of your MythTV system, you don’t need to
change any settings here. Selecting General opens eight additional pages.
Feel free to open them and have a look at their purposes. Remember that
you don’t need to change any settings for your configuration here. Press
Esc to go back to the main settings menu.
Capture Cards
Choosing the Capture Cards option opens a page that shows your video cap-
ture cards. Because this is the first time running mythtv-setup, no cards
are configured and the highlight is on the (New capture card) option. Press
the spacebar to select this choice. When the Capture Card Setup window
(shown in Figure 6-1) opens, follow these steps to configure your card:
1. Use the up- or down-arrow keys to highlight the Card Type field and the
right- or left-arrow keys to move through the list of supported cards;
when you find your card, press Enter or the spacebar to select it.
The window returns to the Capture Card display window, and your cap-
ture card is listed.
118
Part III: Entertaining Your Brain with a Little Help from Linux
12_598236 ch06.qxp 6/27/06 7:42 PM Page 118
2. Press Enter when the card is highlighted to go back to the Capture
Card Setup window for your capture card and make any changes
needed.
Your video device should be listed in the Video Device field, typically as
/dev/video0, and your audio device should be listed as /dev/dsp.
You might need to set the default input type according to the signal
coming into the card. The signal might be either Composite or S-Video.
3. Press Enter or the spacebar to accept your changes and then press Esc
to return to the main settings menu.
Video Sources
Selecting the Video Sources option opens a window that displays the video
sources. Because this is your first time here, no video sources are set up yet,
and New video source is highlighted. Press the spacebar or the Enter key.
The Video Source Setup window appears. See Figure 6-2.
To configure the video source, follow these steps:
1. Use the up- or down-arrow keys to move the highlight to the Video
Source Name field and enter the name you want to give this video
source.
I called mine Dish Network because this is where I get my programming.
2. Enter your Zap2it username and password in the User ID and
Password fields, respectively.
Figure 6-1:
The Capture
Card Setup
window for
selecting
your
capture
card.
119
Chapter 6: Building a Personal Video Recorder with MythTV
12_598236 ch06.qxp 6/27/06 7:42 PM Page 119
If you don’t have an account, you need one so that you can retrieve your
TV listings. Here’s how to set up a Zap2it account:
a. Go to , and click the New User? Sign Up
link.
b. Click Accept to the terms of the subscription agreement if you want to
use this service.
c. Fill in the requested information on the next window (the sub-
scription registration); in the Certificate Code field, enter ZIYN-
DQZO-SBUT.
d. Fill in the survey and then click Subscribe.
e. Go to the program information area and select your location and TV
service provider. Then customize your channel listings.
3. After entering your user ID and password into the appropriate fields,
move the highlight to Retrieve Lineups and then press Enter.
4. Highlight Finish and then press Enter.
Your video source is now displayed in the list of video sources. Press
Esc to go back to the main settings menu.
Input
In the Input settings, you need to specify the type of input for the capture
device. This is one of the video sources. The highlight is on the card you just
configured, so press the spacebar or Enter to open the Connect Source to
Input window, as shown in Figure 6-3.
Figure 6-2:
The Video
Source
Setup
window for
selecting
your video
source.
120
Part III: Entertaining Your Brain with a Little Help from Linux
12_598236 ch06.qxp 6/27/06 7:42 PM Page 120
Use the up- or down-arrow keys to move the highlight to the Video Source
field and then use the right- or left-arrow keys to select the video source you
configured in the preceding section. Press spacebar or Enter to accept your
choice. The input connection now appears in the list of connections. Press
Esc to go back to the main settings menu.
Channel editor
You typically don’t need to make changes to your channel lineup because
these are imported into MythTV from the Zap2it service you signed up for
earlier. But you can make any changes you desire. Press the spacebar or
Enter to go into the Channels window. Move the highlight over the channel
you want to edit and press the spacebar or Enter. After you finish, be sure
to press the spacebar or Enter to apply your changes.
To exit the MythTV setup program, press Esc.
Populating the program guide
You need to fill the MythTV database with your settings and your program
guide information. From the command prompt, you start the MythTV back-
end server by issuing the following command:
$ mythbackend &
Figure 6-3:
The
Connect
Source to
Input
window.
121
Chapter 6: Building a Personal Video Recorder with MythTV
12_598236 ch06.qxp 6/27/06 7:42 PM Page 121
This starts the backend server and runs it in the background. When your
command prompt returns, issue the following command:
$ mythfilldatabase
This program fills the database with your program guide information from
the Zap2it database that you subscribed to in the “Video Sources” section.
This process takes a little while, so be patient. After a few minutes, the com-
mand prompt returns, and the configuration is almost complete. Next, you
need to start the MythTV frontend.
Configuring the MythTV frontend server
After you’ve configured the MythTV backend server and populated the pro-
gram guide with your TV listing information, you’re ready to start the
MythTV frontend server. You can start the MythTV frontend server by issuing
the following command:
$ mythfrontend
This command starts the frontend server and gives you your interface to the
MythTV system. If all has gone well so far, you should see a window similar to
the one in Figure 6-4.
Figure 6-4:
The MythTV
main
window
showing
your media
viewing
choices.
122
Part III: Entertaining Your Brain with a Little Help from Linux
12_598236 ch06.qxp 6/27/06 7:42 PM Page 122
This is the MythTV main menu, and from here you can select from the many
media options. Eleven choices are available to you from the MythTV main
menu. These choices are
ߜ TV: Select this option to see additional choices related to viewing and
recording TV.
ߜ Music: Select this option to see additional choices related to selecting
and playing music.
ߜ Videos: Choosing this option gives you additional options related to
videos stored on your system.
ߜ DVD: Selecting this option gives you control of your DVD player to play
or rip DVDs.
ߜ Images: Choosing Images displays any images you have stored on your
PC and lets you show slide shows.
ߜ Games: This menu choice is currently not supported by the MythTV
program.
ߜ Weather: Choosing Weather displays the current weather conditions in
your locality as well as the forecast for several days.
ߜ News Feeds: Choose this option to get news information from the
sources you have configured.
ߜ Web: Choose this option to browse the Internet to locations you
configured.
ߜ Phone: To use this service, you must be subscribed to an SIP server. If
you’re using VoIP service, you will know what this is. If not, you can’t use
this feature.
ߜ Setup: Choosing Setup gives you options for configuring the ten preced-
ing menu choices.
You can usually start using MythTV to watch TV without making any changes
to the MythTV frontend setup. But if you want to play music stored on your
system or watch videos or view slide shows, you must do a little more config-
uring. Just choose Setup from the MythTV main menu to open the MythTV
frontend Setup menu, as shown in Figure 6-5.
On the MythTV frontend Setup menu are 12 configuration options. The fol-
lowing list shows these options and describes what you can use them to
configure:
ߜ General: The configuration settings you can modify here include data-
base configuration settings and audio device settings. Also included are
system settings related to starting and stopping the system, automati-
cally running the mythfilldatabase program for TV program listings,
and system logging.
123
Chapter 6: Building a Personal Video Recorder with MythTV
12_598236 ch06.qxp 6/27/06 7:42 PM Page 123
ߜ Appearance: These settings control how MythTV appears on your dis-
play. You can choose from many different themes, as well as change font
sizes, languages, and time and date display formats.
ߜ TV Settings: Choosing this option lets you set parameters related to
viewing and recording TV. You can also set your preferences for the pro-
gram guide display and set recording profiles.
ߜ Music Settings: In this area, you can set the directory path to the loca-
tion of your music files. You can also configure the performance of your
music player and select music encoding options.
ߜ Video Settings: In this area, you can set the directory path to the loca-
tion of your video files. You can also configure the default video player
and select video file types and encoding options.
ߜ DVD Settings: The DVD Setup menu lets you configure your DVD device
and set the player settings. You can also configure DVD ripping and
transcoding options here.
ߜ Image Settings: In Image Settings, you can specify the path to your
image directory as well as the path to import images from connected
devices, such as a CD or digital camera. You can also set the slide show
delay here.
ߜ Game Settings: This menu option is not used by MythTV at this time.
ߜ Weather Settings: Here you can select the location to display its weather
data. You can also choose between imperial and metric unit display.
ߜ News Settings: In this area, you can choose from a list of news services
from which to receive information.
Figure 6-5:
The MythTV
frontend
Setup
menu for
configuring
your media
options.
124
Part III: Entertaining Your Brain with a Little Help from Linux
12_598236 ch06.qxp 6/27/06 7:42 PM Page 124
ߜ Web Settings: Here you can create bookmarks for Web sites you want to
view. You can also choose which browser to use to view the sites.
ߜ Phone Settings: Choosing this option lets you configure your SIP server
connection URL as well as other connection parameters.
Watching TV
By now you’re probably thinking, “I’ve done a lot of work configuring my
hardware and installing and configuring MythTV. When am I going to get to
watch some TV?” Well, your wait is over now. Go watch some TV:
1. From the MythTV frontend main menu, highlight TV and press the
spacebar or Enter to open the TV menu.
The first option on this menu is TV.
2. Press the spacebar or Enter while TV is highlighted.
Your system displays the default channel, which is typically the first (or
lowest) channel number in your program listing. If all has gone well, you
see the channel displayed. You can change channels by using the up-
and down-arrow keys.
If you’re using an external TV tuner box, such as one from your cable com-
pany or a satellite provider, you need to change the channel on that device.
It is possible to get MythTV to control an external tuner device, but such a
configuration is far too complicated to describe in this book. For a complete
guide to MythTV, refer to the MythTV Web site at www.mythtv.org.
Managing Your Recordings
If you want to see what programs are on in your area and at what times, you
can view the online schedule. The schedule information is downloaded and
placed in your database during the backend server configuration.
Scheduling your recordings
From the schedule, you can select the programs you want to record and set
the recording options. To enter the schedule, move the highlight to Schedule
and press the spacebar or Enter; then press the spacebar or Enter on the
Guide highlight. You see a listing similar to Figure 6-6.
125
Chapter 6: Building a Personal Video Recorder with MythTV
12_598236 ch06.qxp 6/27/06 7:42 PM Page 125
You use the left, right, up, and down arrows to navigate through the listing.
When the highlight is on a program you want to record, press the spacebar or
Enter to open a screen where you can set the record options. On this page,
you have many options from which to choose. Place the highlight over an
option and press the right- or left-arrow key to view additional choices for the
selected option. After you make your choices, be sure to click Save These
Settings. The main schedule reappears, and the program you selected to
record is marked to indicate it is scheduled to be recorded. You can schedule
to record as many programs as you like.
Watching your recordings
After you’ve recorded some programs, you probably want to watch them.
You do this by selecting TV from the MythTV main menu and then selecting
Watch Recordings. The Select a Recording to Watch window that appears
shows the recorded programs available for viewing. Use the arrow keys to
highlight your selection and then press the spacebar or Enter to begin view-
ing the program.
Deleting a recording
After you’ve recorded a few programs, you might want to get rid of some of
them. You do this by selecting TV from the MythTV main menu and then
clicking Delete Recordings. The Select a Recording to Permanently Erase
Figure 6-6:
The TV
listings
display in
MythTV.
126
Part III: Entertaining Your Brain with a Little Help from Linux
12_598236 ch06.qxp 6/27/06 7:42 PM Page 126
screen appears, showing the recorded programs available for deleting. Use
the arrow keys to highlight your selection and press the spacebar or Enter to
delete the recording. You will be prompted to confirm deleting the recording.
Choose Yes or No as you desire.
Managing Your Media
With MythTV, you can watch TV, pause and resume live TV, schedule record-
ings, and do everything that a typical PVR can do. However, you can do a lot
more than a typical PVR will let you do. You can use MythTV as the control
center for all the media on your system. You can organize and play all your
music files by using the MythTV Music menu. You can play videos stored on
your system by using the Video menu choices, and you can organize and dis-
play slide shows of all your images by using the Images menu. In this section,
I give you a quick look at these items.
Playing music with MythTV
MythTV gives you the ability to organize and play the music files you have
stored on your system; for instance, you can use it to play MP3 files that
you’ve ripped from your CDs. Before you can use the music player, though,
you must enter the directory location that contains the music files. Here’s
how:
1. From the MythTV main menu, choose Setup➪Music Settings➪General
Settings.
2. Enter the path to the music files in the Directory to Hold Music field.
3. Click Next, then Finish, and then press Esc twice to return to the main
menu.
4. From the main menu, choose Music➪Select Music.
5. Use the arrow keys to highlight the music you want to play and press
the spacebar to select it.
6. Press Esc when you’re finished to return to the Music menu.
7. Choose Play Music from the Music menu.
Your selected music begins to play.
8. To stop playing music, press Esc.
127
Chapter 6: Building a Personal Video Recorder with MythTV
12_598236 ch06.qxp 6/27/06 7:42 PM Page 127
Playing videos with MythTV
MythTV gives you the ability to organize and play the video files you have
stored on your system. Before you can use the video player, you need to
enter the directory location that contains the video files. Here’s how:
1. From the MythTV main menu, choose Setup➪Videos Settings➪General
Settings.
2. Enter the path to the video files in the Directory That Holds Videos
field.
3. Choose Next twice, then Finish, and then press Esc twice to return to
the MythTV main menu.
4. From the main menu, choose Videos➪Browse Videos.
5. Use the up- and down-arrow keys to find the video you want to play
and press the spacebar to select it.
6. Press Esc when you’re finished to return to the Video menu.
Viewing image slide shows with MythTV
MythTV gives you the ability to organize and view slide shows of image files
you have stored on your system. Before you can use the image viewer, you
need to enter the directory location that contains the image files. Here’s how:
1. From the MythTV main menu, choose Setup➪Images Settings.
2. Enter the path to the image files in the Directory That Holds Images
field.
3. Choose Finish then press Esc to return to the MythTV main menu.
4. Choose Images from the main menu to open the Images page, where
you can see your images.
5. Use the arrow keys to navigate through the images.
6. Press the spacebar or Enter to see a full-size view of the highlighted
image. Press Esc to return to the thumbnail view.
7. Press the M key to activate the menu on the left side of the screen.
8. Use the up or down arrows to highlight your menu choice and press
the spacebar or Enter to select it.
9. To stop the slide show, press Esc.
10. To exit the image viewer, press Esc from the thumbnail viewer page.
128
Part III: Entertaining Your Brain with a Little Help from Linux
12_598236 ch06.qxp 6/27/06 7:42 PM Page 128
Chapter 7
Streaming Music without
the Wires
In This Chapter
ᮣ Selecting the hardware and software
ᮣ Configuring your system
ᮣ Choosing your music format
ᮣ Ripping CDs
ᮣ Streaming audio
Y
ou could use several methods to stream music from a central server to
other locations in your house. In this chapter, you take a look at some of
the possibilities for streaming music throughout your house. I show you the
solution I chose and how to set it up. Oh, and did I mention that the music is
streamed across a wireless connection?
Selecting the Hardware and Software
The first consideration for wirelessly streaming your audio to different loca-
tions in your home is your wireless network. Obviously, you aren’t able to
stream your audio across a wireless network if you don’t have one set up. So
be sure that your network is set up and properly configured for wireless
access. For more about setting up a wireless network, check out Chapters 3
and 4.
Another consideration is where you want to stream your audio. It is possible
to set up a complete streaming solution that would send your music files to
anyone who has an Internet connection. But this isn’t what you will be doing
in this chapter. Here you will find out about streaming audio to your own
13_598236 ch07.qxp 6/27/06 7:41 PM Page 129
130
Part III: Entertaining Your Brain with a Little Help from Linux
home network, so the setup will be much easier. There are two sides to set
up: the server side and the client side. The server side consists of the hard-
ware and software that supplies the music stream to the network. I explain
the server side in the “Installing and configuring the media server” section.
The client side is the hardware device that receives the music stream from
the network. I cover the client side in the “Connecting and configuring the
D-Link media client” section.
Here’s a list of what you need to accomplish your goal:
ߜ A PC running Linux (the media server).
ߜ Media serving software.
ߜ Audio files in the proper format (typically MP3, WMA, or OGG).
ߜ A PC set up as a client, or a dedicated client system. A dedicated client is
typically a hardware media device such as a D-Link DSM-320 or Netgear
MP101.
ߜ A home stereo system.
My media server PC is a system that I built a few years ago. The system
specifics are
ߜ AMD Athlon 1800
ߜ 1GB pc133 RAM
ߜ 80GB Seagate Hard Drive
ߜ 10GB Seagate Hard Drive
ߜ DVD/CD burner
ߜ AC 97 Sound card
ߜ 10/100 Ethernet adapter
As you can see, the system doesn’t need to be the latest and greatest to per-
form as a media server. You could probably get good performance by using
any recent Pentium class PC with a PIII or greater processor.
The server is running media server software, called TwonkyMedia, that I
downloaded from the TwonkyVision Web site. The company makes available
a free music server as well as a complete media server that streams videos
and photo slide shows. I originally used the free music serving software but
upgraded to the full version to take advantage of the streaming video and
slide show features. The full version of the media server software cost €15,
or about $17 (USD). The Web site where you can download the software is
located at www.twonkyvision.de.
13_598236 ch07.qxp 6/27/06 7:41 PM Page 130
All my music files are in MP3 format for the greatest compatibility with
portable MP3 players. All portable music players can play MP3 files, and
some can also play OGG or WMA. I couldn’t find a player that would play all
three, only MP3 and OGG, or MP3 and WMA. To get the MP3 files, I ripped my
CDs to WAV files and then encoded them as MP3 by using a program called
Grip. (For more on Grip, check out the section “Ripping CDs and Encoding
Music Files with Grip,” later in this chapter.)
Always consider copyright issues whenever you’re copying CDs. Typically
the end user is allowed to make one copy of recorded material as an archival
copy. But I’m not a copyright expert, so if you have any questions about the
matter, do some searching on the Web for more information.
That’s all I have set up for the server side of my streaming music system.
Now you need to take a look at the client side, which is even easier to set up.
I decided to go with a dedicated media client that conforms to the Universal
Plug and Play (UPnP) standard for streaming media. Any software that also
conforms to this standard will work with this device. Some media clients
receive only audio, and some clients can receive video and still photos. The
price difference between these types of media clients is not that great, so I
recommend getting the media client with the additional features.
I chose the D-Link DSM-320 as my media client for two reasons:
ߜ It was listed as a supported device by the TwonkyVision Web site for use
with their Linux media software. Finding hardware that is clearly sup-
ported is always a good idea. You can save yourself a lot of time and
aggravation if you pick a device that is known to work with Linux.
ߜ It was on sale at my local electronics store. On top of the sale price, the
manufacturer offered a rebate, which made the cost only a few dollars
more than buying a music-only client. In addition to receiving streaming
audio, the D-Link media server can receive MPEG and AVI videos and
JPEG, GIF, and PNG slide shows. The cost of the D-Link media server
after the rebate was less than $160. The total cost of my media stream-
ing system, not counting the home stereo, was about $175.
If you want to have good-quality sound, you need an amplifier or receiver to
connect the audio output from the media client. The easiest solution is to
connect the audio to your home stereo system so that the sound can play
through your stereo just as though it were playing from a directly attached
CD player or other audio source.
131
Chapter 7: Streaming Music without the Wires
13_598236 ch07.qxp 6/27/06 7:41 PM Page 131
Configuring Your System
To configure your system, you need to download, install, and configure the
TwonkyVision media server on the PC that will hold the media files. Then
follow the steps required to connect the D-Link media client to the home
theater system and configure it to connect to my home network.
Installing and configuring
the media server
Getting the media server running on the Linux PC is relatively easy. But first,
you have to download and install it. To do so, follow these steps:
1. Open your Web browser and go to www.twonkyvision.de./UPnP/
download-trial.html.
2. Click the Linux x86 link to download the file to your PC.
3. Extract the contents of the ZIP file.
4. Using the cd command, change into the folder created during the
extraction and run the twonkymedia-trial script.
The TwonkyVision media server is now running, and you will use your
Web browser to continue to configure the server. You will specify the
paths to your files and set performance parameters for the server.
5. Enter http://127.0.0.1:9000 in the browser’s address bar.
The Status page for the TwonkyVision media server, as shown in Figure
7-1, appears. Along the left side of the page is a column of icons; clicking
these icons links you to configuration pages, which are respectively
named to the icons. Clicking an icon opens the page in the right frame
of the main page.
In brief, the following list explains the purpose of these icons, including some
detail on the icons that require immediate attention:
ߜ Status: When you log on to the media server Web page, the Status page
is the default page displayed. This page provides information about the
server, such as the server name, connected clients, content being
served, memory usage, and network interfaces used.
ߜ Content: This page is where you can specify the language to use for the
server. Even more importantly, though, this page is where you specify
the directory locations for your content. This information tells the
server where to look — or not to look — for the music, photos, and
videos you want to serve.
132
Part III: Entertaining Your Brain with a Little Help from Linux
13_598236 ch07.qxp 6/27/06 7:41 PM Page 132
In the Content Locations text box, be sure to enter the directories you
want scanned for content. You can enter multiple directory locations
separated by commas. You can safely leave the remaining settings on
this page unchanged, and your server will work properly. Be sure to
click Save Changes when you’re done.
If you place all your media in a single directory and then run the server
startup script from that directory, the media server will automatically
scan this directory and all its subdirectories looking for content. For
example, on my system, I created a directory called mymedia with three
subdirectories called music, photo, and video. I placed the media
server executable file twonkymedia-trial into the mymedia folder. I
placed my photos, music, and video files into their respective directo-
ries. Then when I start the server from the mymedia directory, the
server finds all the media files automatically.
ߜ Radio: The Radio icon opens a configuration page where you can enable
or disable Internet radio. You can also set a rescan time for the SHOUT-
cast Internet radio site and set a genre filter. Rescan time sets how often
the system should reload the page content.
ߜ Navigation Tree: On this page, you can set a name for your server. You
can also choose the names for your directories that appear in the navi-
gation tree displayed on the client.
Figure 7-1:
The Status
page for the
Twonky-
Vision
media
server.
133
Chapter 7: Streaming Music without the Wires
13_598236 ch07.qxp 6/27/06 7:41 PM Page 133
ߜ Tree builder: This page is where you can refine your navigation tree dis-
play. You can specify additional names for your tree, such as Artist,
Genre, Albums, and others.
ߜ Network: On the Network page, you can specify the IP number of the
server as well as other settings that affect the media server on your net-
work. Your server will typically work properly without changing any set-
tings on this page.
ߜ Clients: On the Clients page, you can specify the IP address of specific
clients that connect to your server. (On this page, I entered the IP
address of the D-Link client I’m using.)
ߜ Performance: The Performance page is where you can change the
streaming buffer size.
Be sure to click Save Changes on any page where you enter information into
the text boxes or change any settings. From the Status page, click the Restart
Server button to restart the server with any changes you made.
The media server is now configured and ready to serve content. You can
move on to setting up the client.
Connecting and configuring
the D-Link media client
You can follow these easy steps to connect your media server to your audio
and video devices and your home network. All that is necessary is to enter
the proper settings for your network to enable the D-Link unit to connect to
your network.
1. Remove the D-Link unit from the box, and turn it so the rear of the
unit is facing you.
2. Connect the appropriate cables for your audio and video connections.
You can use composite or component video connections and digital
coax, digital optical, or composite audio connections. The connection
types are labeled on the D-Link unit. Refer to the documentation for your
stereo and video components, and use the appropriate connections for
your system.
The unit has an RJ-45 jack, but you won’t be using it. You’re using wire-
less, right? So you don’t need the RJ-45 jack.
3. Be sure the antenna is attached to the back of the unit.
4. Plug in the power cord, and turn on the D-Link client.
A welcome screen appears with the setup wizard.
134
Part III: Entertaining Your Brain with a Little Help from Linux
13_598236 ch07.qxp 6/27/06 7:41 PM Page 134
5. Press the Enter key on the D-Link remote control.
6. Use the down-arrow key to highlight Next and then press Enter.
7. The Select Your Network Connection screen appears and displays
Wireless as the network type.
8. Use the down-arrow key to highlight Next and then press Enter.
The next screen shows the SSID for your network.
9. Use the up- and down-arrow keys on the remote to highlight your SSID
and then press Enter.
Your current wireless settings are shown (see Figure 7-2).
You might need to make changes on this page depending on how your
network is set up. For example, if you’re using WEP, you should enable
WEP on this page and enter the appropriate key for your network. To
enable WEP, highlight the WEP entry, press Enter on the remote, and use
the up- and down-arrow keys to change the setting; then press Enter.
10. After you make the changes necessary for connecting to your wireless
network, highlight Next and press Enter.
The next screen displayed is the Your Current Network Settings screen,
as shown in Figure 7-3. By default, the system uses DHCP to obtain IP
information for your network.
To see a small help window appear with information about the icon,
hover your cursor over the icons.
11. If you want to use DHCP, highlight Next and press Enter to continue.
If you don’t have a DHCP server or just want to set your own IP informa-
tion, you do it on this page:
a. Highlight the DHCP entry and press Enter on the remote.
Figure 7-2:
Checking
your
wireless
network
settings.
135
Chapter 7: Streaming Music without the Wires
13_598236 ch07.qxp 6/27/06 7:41 PM Page 135
b. Use the arrow keys to select Static IP and then press Enter.
c. Be sure to enter the appropriate IP information for your network into
the appropriate fields.
d. Highlight Next and press Enter when you’re finished.
The Please Select a Media Server screen appears. The last step is to
select your media server from the list.
12. Highlight Next and press Enter.
The last screen appears and indicates that the setup process is complete.
13. Press Done to exit the setup and go to the media server main menu, as
shown in Figure 7-4.
The media client is now configured to connect to your network and should
display the main menu shown in Figure 7-5. You can choose Music, Photo,
Video, or Online Media to show the content from those areas. In the next sec-
tion, you discover how to add some music content.
Figure 7-4:
The D-Link
media client
main menu.
Figure 7-3:
The Your
Current
Network
Settings
screen for
changing IP
information.
136
Part III: Entertaining Your Brain with a Little Help from Linux
13_598236 ch07.qxp 6/27/06 7:41 PM Page 136
Choosing Your Music Format
The music format you decide to use is largely determined by the types of for-
mats supported by the media client. Fortunately, the D-Link media client sup-
ports a large variety of formats:
ߜ MP3: The MP3 format is the most widely used format for distributing
audio across the Internet and for playing on portable music players.
This is the best choice for most users. Files in MP3 format end with the
extension .mp3.
ߜ WMA: The WMA format is used by Windows Media player and some
other music players. Files in WMA format end with the extension .wma.
ߜ WAV: This is the standard file type used by the majority of Windows
audio programs. CD music files that are ripped to PC are typically
saved as WAV files. Files in WAV format end with the extension .wav.
ߜ OGG Vorbis: OGG Vorbis is an open source audio format. Files in OGG
Vorbis format end with the extension .ogg.
Another consideration when selecting a music format is whether you will
use the files on another media player in addition to your home system. If
you will be using a portable music player, choose MP3 or WMA as the music
format because these types of players typically can play both formats. On my
system, I use the MP3 format and show you how I rip my CDs and create MP3
files.
Ripping CDs and Encoding
Music Files with Grip
A program called Grip allows you to rip CDs to WAV files and encode them
as MP3s. You can easily install the Grip program with Yum if you’re running
Fedora Core, Red Hat Enterprise Linux, or SUSE. If you’re using Debian or
one of its derivatives, you can use APT to do the install. For example, on my
system, I type at a root command prompt:
yum install grip
Yum searches for any dependencies and installs them as part of the Grip
installation. When the command prompt returns, Grip is installed and
ready to use. You can run it by entering grip at a command prompt or by
selecting it from the system menu. On my Fedora Core 4 system, I can choose
Applications➪Sound & Video➪Grip. No matter how you start the program,
the screen shown in Figure 7-5 appears.
137
Chapter 7: Streaming Music without the Wires
13_598236 ch07.qxp 6/27/06 7:41 PM Page 137