Ubuntu Linux Toolbox 1000+ Commands for Ubuntu and Debian Power Users phần 5 docx
Bạn đang xem bản rút gọn của tài liệu. Xem và tải ngay bản đầy đủ của tài liệu tại đây (479.69 KB, 35 trang )
PageDown, and the up arrow and down arrow keys to select channels. Use the right
or left arrow key to increase or decrease volume. Type m to mute the current channel.
Press the spacebar to select the current channel as the recording device. If a mouse is
available, you can use it to select volume levels, balance levels, or the current record-
ing channel.
Ripping CD Music
To be able to play your personal music collection from Linux, you can use tools such
as
cdparanoia to rip tracks from music CDs to WAV files on your hard disk. The
ripped files can then be encoded to save disk space, using tools such as
oggenc (Ogg
Vorbis),
flac (FLAC), or lame (MP3).
NOTE There are some excellent graphical tools for ripping and encoding CDs,
such as
grip and sound-juicer. Because they are CDDB-enabled, those tools
can also use information about the music on the CD to name the output files (artist,
album, song, and so on). This section, however, describes how to use some of the
underlying commands to rip and encode CD music manually.
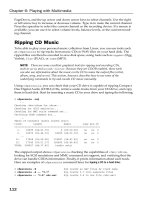
Using
cdparanoia, you can check that your CD drive is capable of ripping Compact
Disc Digital Audio (CDDA) CDs, retrieve audio tracks from your CD drive, and copy
them to hard disk. Start by inserting a music CD in your drive and typing the following:
$ cdparanoia -vsQ
Checking /dev/cdrom for cdrom
Checking for SCSI emulation
Checking for MMC style command set
Verifying CDDA command set
Table of contents (audio tracks only):
track length begin copy pre ch
===========================================================
1. 18295 [04:03.70] 0 [00:00.00] no no 2
2. 16872 [03:44.72] 18295 [04:03.70] no no 2
11. 17908 [03:58.58] 174587 [38:47.62] no no 2
12. 17342 [03:51.17] 192495 [42:46.45] no no 2
TOTAL 209837 [46:37.62] (audio only)
The snipped output shows cdparanoia checking the capabilities of /dev/cdrom,
looking for SCSI emulations and MMC command set support, and verifying that the
drive can handle CDDA information. Finally, it prints information about each track.
Here are examples of
cdparanoia command lines for ripping a CD to a hard drive:
$ cdparanoia -B Rip tracks as WAV files by track name
$ cdparanoia -B “5-7” Rip tracks 5-7 into separate files
$ cdparanoia “3-8” abc.wav Rip tracks 3-8 to one file (abc.wav)
112
Chapter 6: Playing with Multimedia
82935c06.qxd:Toolbox 10/29/07 1:00 PM Page 112
$ cdparanoia “1:[40]-” Rip tracks 1 from 40 secs in to end of the CD
$ cdparanoia -f “3” Rip track 3 and save to AIFF format
$ cdparanoia -a “5” Rip track 5 and save to AIFC format
$ cdparanoia -w “1” my.wav Rip track 1 and name it my.wav
Encoding Music
After a music file is ripped from CD, encoding that file to save disk space is usually
the next step. Popular encoders include
oggenc, flac, and lame, for encoding to Ogg
Vorbis, FLAC, and MP3 formats, respectively.
With
oggenc, you can start with audio files or streams in WAV, AIFF, FLAC, or raw
format and convert them to Ogg Vorbis format. Although Ogg Vorbis is a lossy for-
mat, the default encoding from WAV files still produces very good quality audio and
can result in a file that’s about one-tenth the size. Here are some examples of
oggenc:
$ oggenc ab.wav Encodes WAV to Ogg (ab.ogg)
$ oggenc ab.flac -o new.ogg Encodes FLAC to Ogg (new.ogg)
$ oggenc ab.wav -q 9 Raises encoding quality to 9
By default, the quality (-q) of the oggenc output is set to 3. You can set the quality to
any number from -1 to 10 (including fractions such as 5.5).
$ oggenc NewSong.wav -o NewSong.ogg \
-a Bernstein -G Classical \
-d 06/15/1972 -t “Simple Song” \
-l “Bernsteins Mass” \
-c info=”From Kennedy Center”
The command just shown converts MySong.wav to MySong.ogg. The artist name is
Bernstein and the music type is Classical. The date is June 15, 1972, the song title is
Simple Song and the album name is Bernsteins Mass. A comment is From Kennedy
Center. The backslashes aren’t needed if you just keep typing the whole command on
one line. However, if you do add backslashes, make sure there are no spaces after the
backslash.
The preceding example adds information to the header of the resulting Ogg file. You
can see the header information, with other information about the file, using
ogginfo:
$ ogginfo NewSong.ogg
Processing file “NewSong.ogg”
Channels: 2
Rate: 44100
Nominal bitrate: 112.000000 kb/s
User comments section follows
info=From Kennedy Center
title=Simple Song
113
Chapter 6: Playing with Multimedia
82935c06.qxd:Toolbox 10/29/07 1:00 PM Page 113
artist=Bernstein
genre=Classical
date=06/15/1972
album=Bernsteins Mass
Vorbis stream 1:
Total data length: 3039484 bytes
Playback length: 3m:25.240s
Average bitrate: 118.475307 kb/s
Logical stream 1 ended
Here you can see that comments were added during encoding. The -c option was used
to set an arbitrary field (in this case, info) with some value to the header. Besides the
comments information, you can see that this file has two channels and was recorded at
a 44100 bitrate. You can also see the data length, playback time, and average bitrate.
The
flac command is an encoder similar to oggenc, except that the WAV, AIFF,
RAW, FLAC, or Ogg file is encoded to a FLAC file. Because
flac is a free lossless
audio codec, it is a popular encoding method for those who want to save some
space, but still want top-quality audio output. Using default values, our encoding
from WAV to FLAC resulted in files one-half the size, as opposed to one-tenth the
size with
oggenc. Install the flac package to use the flac command. Here is an
example of the
flac command:
$ flac now.wav Encodes WAV to FLAC (now.flac)
$ sox now.wav now.aiff Encodes WAV to AIFF (now.aiff)
$ flac now.aiff -o now2.flac Encodes AIFF to FLAC (now.flac)
$ flac -8 top.wav -o top.flac Raises compression level to 8
The compression level is set to -5 by default. A range from -0 to -8 can be used, with
the highest number giving the greatest compression and the lower number giving
faster compression time. To convert files to MP3 format using the
lame command, you
must first install the lame package. Here are some examples of the
lame command
to encode from WAV and AIFF files:
$ lame in.wav Encodes WAV to MP3 (in.wav.mp3)
$ lame in.wav preset standard Encodes to MP3 with std presets
$ lame tune.aiff -o tune.mp3 Encodes AIFF to MP3 (tune.mp3)
$ lame -h -b 64 -m m in.wav out.mp3 High quality, 64-bit, mono mode
$ lame -q 0 in.wav -o abcHQ.mp3 Encodes with quality set to 0
With lame, you can set the quality from 0 to 9 (5 is the default). Setting the quality to 0
uses the best encoding algorithms, while setting it to 9 disables most algorithms (but
the encoding process moves much faster). As with
oggenc, you can add tag information
to your MP3 file that can be used later when you play back the file. Here’s an example:
$ lame NewSong.wav NewSong.mp3 \
ta Bernstein tg Classical \
ty 1972 tt “Simple Song” \
tl “Bernsteins Mass” \
tc “From Kennedy Center”
114
Chapter 6: Playing with Multimedia
82935c06.qxd:Toolbox 10/29/07 1:00 PM Page 114
Like the wav-to-ogg example shown earlier in this chapter, the command just shown
converts
MySong.wav to MySong.mp3. As before, the artist name is Bernstein and the
music type is Classical. The year is 1972, the song title is Simple Song, and the album
name is Bernsteins Mass. A comment is From Kennedy Center. The backslashes aren’t
needed if you just keep typing the whole command on one line. However, if you do
add backslashes, make sure there are no spaces after the backslash.
The tag information appears on the screen in graphical MP3 players (such as
Rhythmbox and Totem, when they have been enabled to play MP3 format). You can
also see tag information when you use command line players, such as the following
mpg321 example:
$ mpg123 NewSong.mp3
High Performance MPEG 1.0/2.0/2.5 Audio Player for Layer 1, 2, and 3.
Title : Simple Song Artist: Bernstein
Album : Bernsteins Mass Year : 1972
Comment: From Kennedy Center Genre : Classical
Playing MPEG stream from NewSong.mp3
MPEG 1.0 layer III, 128 kbit/s, 44100 Hz joint-stereo
Streaming Music
If your music is on one machine, but you’re working from another machine, setting up a
streaming music server is a quick way to broadcast your music so it can be picked up from
one or more computers on your network. The icecast streaming media server and ices
audio source client can be installed in Ubuntu by typing:
$ sudo apt-get install icecast2 ices2
Here’s a quick and dirty procedure for setting up icecast and ices to stream your
music. Perform this task on the computer that contains the music you want to serve:
1. Edit the /etc/icecast2/icecast.xml file to change all passwords listed. Search
for
hackme to find the current passwords. You probably want different user and
administrative passwords, especially if you allow others to stream music to the
server. Remember the passwords you set for later. You may want to change other
settings in this file as well, such as hostname:
$ sudo vi /etc/icecast2/icecast.xml
2. If you have a firewall, check that TCP port 8000 is accessible.
3. Start the icecast2 server as root user by typing the following (the server will actually
run as the icecast2 user), and verify with the
netstat command:
$ sudo /etc/init.d/icecast2 start
$ sudo netstat -topnavel | grep 8000
tcp 0 0 0.0.0.0:8000 0.0.0.0:* LISTEN
111 35790 21494/icecast off (0.00/0/0)
115
Chapter 6: Playing with Multimedia
82935c06.qxd:Toolbox 10/29/07 1:00 PM Page 115
4. Create the directories needed by the ices2 program, which provides the playlist
and music to the icecast2 server. Run the following commands:
$ sudo mkdir /var/log/ices
$ sudo mkdir /etc/ices2
$ sudo mkdir /etc/ices2/music
5. Create a playlist using any text edit or by directing a listing of your music to a file.
For example, if all your Ogg music files are in
/var/music subdirectories, type
the following:
$ find /var/music -name *.ogg > playlist.txt
6. The playlist.txt file must contain full paths to every music file, and the
files must be accessible to the icecast2 server. Then, copy the playlist file to the
/etc/ices2 directory:
$ sudo cp playlist.txt /etc/ices2
With the playlist file created, use any text editor to remove or add files or directo-
ries to make your playlist as you would like it. (If you want some files to try out
for your playlist, download some from
/>7. As root user, edit the /etc/ices2/ices-playlist.xml file so it will play from
your playlist and feed that music to your running icecast2 server. Start with the
example configuration file and then edit it. Run the following commands:
$ sudo cp /usr/share/doc/ices2/examples/ices-playlist.xml /etc/ices2
$ sudo vi /etc/ices2/ices-playlist.xml
8. In particular, you want to modify the metadata, input, and instance modules
(be sure to change
/etc/ices2/playlist.txt to the path where you put your
playlist.txt file):
<metadata>
<name>My Music Server</name>
<genre>Different music styles</genre>
<description>Mix of my personal music</description>
</metadata>
<input>
<module>playlist</module>
<param name=”type”>basic</param>
<param name=”file”>/etc/ices2/playlist.txt</param>
<! random play >
<param name=”random”>1</param>
</input>
<instance>
<hostname>localhost</hostname>
<port>8000</port>
<password>MIcePw</password>
<mount>/mymusic.ogg</mount>
</instance>
116
Chapter 6: Playing with Multimedia
82935c06.qxd:Toolbox 10/29/07 1:00 PM Page 116
Of the values just shown (in bold), the most critical are the location of your playlist
and the information about the instance of your icecast2 server. The password must
match the source password you added to your
/etc/icecast2/icecast.xml file.
9. Launch the ices audio feed by typing the following:
$ sudo ices2 /etc/ices2/ices-playlist.xml &
10. Test that you can play music from the local computer as follows:
$ ogg123 http://localhost:8000/mymusic.ogg
11. If that test works, try playing the icecast2 stream from another computer on your
network by replacing localhost with the server’s IP address or hostname.
12. If there are problems, check /var/log/icecast2 and /var/log/ices log files.
Recheck your passwords and locations of configuration files.
13. When you are done, just kill the icecast2 service:
$ sudo /etc/init.d/icecast2 stop
When the icecast and ices servers are running, you should have access to that stream-
ing music from any computer that can access your server computer. Use any music
player that can play from an HTTP address (
ogg123, Rhythmbox, XMMS, and so on).
Windows music players that can support the type of content you are serving should
work as well.
NOTE If you want to skip a song, type this from the server:
killall -HUP ices.
Converting Audio Files
The sox utility is an extremely versatile tool for working with audio files in different
freely available formats. Here are a few examples of things you can do with sox:
The following command concatenates two WAV files to a single output file:
$ sox head.wav tail.wav output.wav
This command mixes two WAV files:
$ soxmix sound1.wav sound2.wav output.wav
To use sox to display information about a file, use the stat effect as follows:
$ sox sound1.wav -e stat
Samples read: 208512
Length (seconds): 9.456327
Scaled by: 2147483647.0
Maximum amplitude: 0.200592
Minimum amplitude: -0.224701
Midline amplitude: -0.012054
117
Chapter 6: Playing with Multimedia
82935c06.qxd:Toolbox 10/29/07 1:00 PM Page 117
Mean norm: 0.030373
Mean amplitude: 0.000054
RMS amplitude: 0.040391
Maximum delta: 0.060852
Minimum delta: 0.000000
Mean delta: 0.006643
RMS delta: 0.009028
Rough frequency: 784
Volume adjustment: 4.450
Use trim to delete seconds of sound from an audio file. For example:
$ sox sound1.wav output.wav trim 4 Trim 4 seconds from start
$ sox sound1.wav output.wav trim 2 6 Keep from 2-6 seconds of file
The first example deletes the first 4 seconds from sound1.wav and writes the results
to
output.wav. The second example takes sound1.wav, keeps the section between
second 2 and second 6 and deletes the rest, and writes to
output.wav.
Transforming Images
With directories full of digital images, the ability to manipulate images from the com-
mand line can be a huge time saver. The ImageMagick package (use
apt-get install
imagemagick
to install the package on Ubuntu) comes with some very useful tools for
transforming your digital images into forms you can work with. This section shows
some commands for manipulating digital images, and provides examples of simple
scripts for making those changes in batches.
Getting Information about Images
To get information about an image, use the identify command, as follows:
$ identify p2090142.jpg
p2090142.jpg JPEG 2048x1536+0+0 DirectClass 8-bit 402.037kb
$ identify -verbose p2090142.jpg | less
Standard deviation: 61.1665 (0.239869)
Colors: 205713
Rendering intent: Undefined
Resolution: 72x72
Units: PixelsPerInch
Filesize: 402.037kb
Interlace: None
Background color: white
Border color: rgb(223,223,223)
Matte color: grey74
Transparent color: black
Page geometry: 2048x1536+0+0
Compression: JPEG
Quality: 44
118
Chapter 6: Playing with Multimedia
82935c06.qxd:Toolbox 10/29/07 1:00 PM Page 118
The first command in the preceding example displays basic information about the
image (its file name, format, geometry, its class, channel depth, and file size). The sec-
ond command shows every bit of information it can extract from the image. In addi-
tion to the information you see in the example, the verbose output also shows creation
times, the type of camera used, aperture value, and ISO speed rating.
Converting Images
The convert command is a Swiss Army knife of file converters. Here are some ways
to manipulate images using the
convert command. The following examples convert
image files from one format to another:
$ convert tree.jpg tree.png Convert a JPEG to a PNG file
$ convert icon.gif icon.bmp Convert a GIF to a BMP file
$ convert photo.tiff photo.pcx Convert a TIFF to a PCX file
Image types that convert supports include .jpg, .bmp, .pcx, .gif, .png, .tiff, .xpm, and
.xwd. Here are examples of
convert being used to resize images:
$ convert -resize 1024x768 hat.jpg hat-sm.jpg
$ convert -sample 50%x50% dog.jpg dog-half.jpg
The first example creates an image (hat-sm.jpg) that is 1024 × 768 pixels. The second
example reduced the image
dog.jpg in half (50%x50%) and saves it as dog-half.jpg.
You can rotate images from 0 to 360 degrees. Here are examples:
$ convert -rotate 270 sky.jpg sky-final.jpg Rotate image 270 degrees
$ convert -rotate 90 house.jpg house-final.jpg Rotate image 90 degrees
You can add text to an image using the -draw option:
$ convert -fill black -pointsize 60 -font helvetica \
-draw ‘text 10,80 “Copyright NegusNet Inc.”’ \
p10.jpg p10-cp.jpg
The previous example adds copyright information to an image, using 60 point black
Helvetica font to write text on the image. The text is placed 10 points in and 80 points
down from the upper left corner. The new image name is
p10-cp.jpg, to indicate that
the new image had copyright information added.
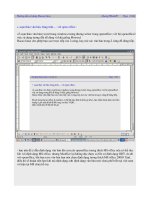
Here are some interesting ways to create thumbnails with the
convert command:
$ convert -thumbnail 120x120 a.jpg a-a.png
$ convert -thumbnail 120x120 -border 8 a.jpg a-b.png
$ convert -thumbnail 120x120 -border 8 -rotate 8 a.jpg a-c.png
All three examples create a 120 × 120–pixel thumbnail. The second adds the -border
option to put a border around the thumbnail, so it looks like a Polaroid picture. The
last example rotates the image. Figure 6-1 shows the results of these three examples.
119
Chapter 6: Playing with Multimedia
82935c06.qxd:Toolbox 10/29/07 1:00 PM Page 119
Figure 6-1: Use convert to create a thumbnail, add borders, and
rotate images.
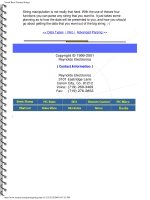
Besides the things you can do to make images useful and manageable, there are also
ways of making your images fun and even weird. Here are some examples:
$ convert -sepia-tone 75% house.jpg oldhouse.png
$ convert -charcoal 5 house.jpg char-house.png
$ convert -colorize 175 house.jpg color-house.png
The -sepia-tone option gives the image an Old West sort of look. The -charcoal
option makes the image look as if the picture was hand-drawn using charcoal. By
using the
-colorize option, every pixel in the image is modified using the colorize
number provided (175 in this case). Figure 6-2 shows the original house picture in the
upper-left corner, the Sepia Tone in the upper-right, the charcoal in the lower left, and
the colorized house in the lower right.
If you are looking for one more example of weird image conversions, try swirling
your image. For example:
$ convert -swirl 300 photo.pcx weird.pcx
Converting Images in Batches
Most of the image conversions described in this chapter can be done quite easily using
a graphical image manipulation tool such The GIMP. However, where the
convert
commands we described can really shine are when you use them in scripts. So, instead
of resizing, rotating, writing on, or colorizing a single file, you can do any (or all) of
those things to a whole directory of files.
You may want to create thumbnails for your duck decoy collection images. Or per-
haps you want to reduce all your wedding photos so they can play well on a digital
photo frame. You might even want to add copyright information to every image in a
directory before you share them on the Web. All these things can be done quite easily
with the
convert commands already described and some simple shell scripts.
120
Chapter 6: Playing with Multimedia
82935c06.qxd:Toolbox 10/29/07 1:42 PM Page 120
Figure 6-2: Start with a normal image and sepia-tone, charcoal, and colorize it.
Here’s an example of a script you can run to resize an entire directory of photos to 1024 × 768
pixels to play on a digital photo frame:
$ cd $HOME/myimages
$ mkdir small
$ for pic in `ls *.png`
do
echo “converting $pic”
convert -resize 1024x768 $pic small/sm-$pic
done
Before running the script, this procedure changes to the $HOME/myimages directory
(which happens to contain a set of high-resolution images). Then it creates a subdirec-
tory to hold the reduced images called
small. The script itself starts with a for loop
that lists each file ending in
.png in the current directory (you might need to make that
.jpg or other image suffix). Then, each file is resized to 1024 × 768 and copied to the
small directory, with sm- added to each file name.
121
Chapter 6: Playing with Multimedia
82935c06.qxd:Toolbox 10/29/07 6:23 PM Page 121
Using that same basic script, you can use any of the convert command lines shown
earlier, or make up your own to suit your needs. You might be able to convert a whole
directory of images in a few minutes that would have taken you hours of clicking in
the GUI.
Summary
The shell can provide a quick and efficient venue for working with your audio and
digital image files. This chapter describes ways of playing, ripping, encoding, con-
verting, and streaming audio files from the command line. As for digital images, we
provide many examples of using the
convert command for resizing, rotating, con-
verting, writing on, and otherwise manipulating those images.
122
Chapter 6: Playing with Multimedia
82935c06.qxd:Toolbox 10/29/07 6:21 PM Page 122
Administering
File Systems
File systems provide the structures in which files,
directories, devices, and other elements of the
system are accessed from Linux. Linux supports
many different types of file systems (ext3, VFAT,
ISO9660, NTFS, and so on) as well as many dif-
ferent types of media on which file systems can
exist (hard disks, CDs, USB flash drives, ZIP
drives, and so on).
Creating and managing disk partitions and the
file systems on those partitions are among the
most critical jobs in administering a Linux sys-
tem. That’s because if you mess up your file sys-
tem, you might very well lose the critical data
stored on your computer’s hard disk or remov-
able media.
This chapter contains commands for partitioning
storage media, creating file systems, mounting
and unmounting partitions, and checking file
systems for errors and disk space.
Understanding
File System Basics
Even though there are a lot of different file sys-
tem types available in Linux, there are not many
that you need to set up a basic Linux system. For
a basic Linux system, your computer hard disk
may contain only three partitions: a swap parti-
tion (used to handle the overflow of information
in RAM), a boot partition that contains the boot
loader and kernel, and a root file system parti-
tion. The boot and root file system partitions are
usually an ext3 file system type.
IN THIS CHAPTER
Understanding Linux
file system types
Partitioning disks with
fdisk and parted
Work with labels with
e2label and findfs
Create file systems
with mkfs
View file system
info with tune2fs/
dumpe2fs
Use swap areas with
mkswap, swapon, and
swapoff
Use fstab, mount, and
umount to mount and
unmount file systems
Check file systems
with badblocks
and fsck
View RAID information
with mdadm
Check disk space with
du and df
Logical Volume
Manager (LVM)
82935c07.qxd:Toolbox 10/29/07 1:01 PM Page 123
The ext3 file system type is based on the ext2 file system type, adding a feature called
journaling to its predecessor. Journaling can improve data integrity and recovery, espe-
cially after unclean system shutdowns. Time-consuming file system checks are avoided
during the next reboot after an unclean shutdown, because the changes that occurred
since the most recent write to disk are saved and ready to be restored.
Most of the examples in this chapter use ext3 files systems to illustrate how a file sys-
tem is created and managed. However, there are times when you might want to use
other file system types. Table 7-1 lists different file system types and describes when
you might want to use them.
Table 7-1: File System Types Supported in Linux
File System Type Description
ext3 Most commonly used file system with Linux. Contains journaling
features for safer data and fast reboots after unintended shutdowns.
ext2 Predecessor of ext3, but doesn’t contain journaling.
iso9660 Evolved from the High Sierra file system (which was the original
standard used on CD-ROM). May contain Rock Ridge extensions to
allow iso9660 file systems to support long file names and other infor-
mation (file permissions, ownership, and links).
Jffs2 Journaling Flash File System version 2 (JFFS2) that is designed for
efficient operations on USB flash drives. Successor to JFFS.
jfs JFS file system that IBM used for OS/2 Warp. Tuned for large file
systems and high-performance environments.
msdos MS-DOS file system. Can be used to mount older MS-DOS file sys-
tems, such as those on old floppy disks.
ntfs Microsoft New Technology File System (NTFS). Useful when file sys-
tems need to share files with newer Windows systems (as with dual
booting or removable drives).
reiserfs Journaling file system that used to be used by default on some SUSE,
Slackware, and other Linux systems. Reiserfs is not well-supported in
Ubuntu.
squashfs Compressed, read-only file system used on many Linux live CDs.
swap Used on swap partitions to hold data temporarily when RAM is not
currently available.
ufs Popular file system on Solaris and SunOS operating systems from
Sun Microsystems.
Chapter 7: Administering File Systems
124
82935c07.qxd:Toolbox 10/29/07 1:01 PM Page 124
Table 7-1: File System Types Supported in Linux (continued)
Besides the file system types listed in the table, there are also what are referred to as
network shared file systems. Locally, a network shared file system may be an ext3,
ntfs, or other normal file system type. However, all or part of those file systems can
be shared with network protocols such as Samba (smbfs or cifs file system type), NFS
(nfs), and NetWare (ncpfs).
Many available file system types are either not useful for creating new file systems or
not fully supported in every version of Linux. For example, file system types such as
minix (for Minix systems), befs (for BeOS systems), and affs (for Amiga systems) are
mostly useful if you need to mount and access old backup media from those systems.
Even popular file systems may not be fully supported. For example, reiserfs file sys-
tems isn’t fully supported, as of this writing, by the Kubuntu variant of Ubuntu.
Creating and Managing File Systems
Ubuntu gives you the option of either having the installer create a default partitioning
and file system scheme or letting you set that all up manually when you first install
Linux. The installer lets you choose to erase the entire hard disk, erase only Linux par-
titions, or only use free disk space to set up the partitions. To take the manual approach
instead, you must choose to create a custom layout.
With the manual approach, the disk-partitioning tool (formerly called Disk Druid)
lets you divide the hard disk into partitions as you choose. Later, there are a lot of
command-line utilities you can use to change and work with your disk partitions
and the file systems created on those partitions.
Partitioning Hard Disks
Historically, PC hard drives have used a 32-bit PC-BIOS partition table with a Master
Boot Record (MBR). This limits partition sizes to 2TB and only allows four primary
partitions per drive. The use of extended partitions is a way to overcome the four pri-
mary partition limit. In order to overcome the 2TB limit, PC-BIOS partition tables are
being replaced with GPT (GUID Partition Tables).
File System Type Description
vfat Extended FAT (VFAT) file system. Useful when file systems need to
share files with older Windows systems (as with dual booting or
removable drives).
xfs Journaling file system for high-performance environments. Can scale
up to systems that include multiple terabytes of data that transfer
data at multiple gigabytes per second.
125
Chapter 7: Administering File Systems
82935c07.qxd:Toolbox 10/29/07 1:01 PM Page 125
The old standard command for working with disk partitions is fdisk. Because fdisk
cannot work with GPT partitions, however, it is slowly being deprecated. A more pow-
erful and actively supported tool is the
parted command.
NOTE If you prefer to use graphical tools for partitioning, resizing, and otherwise
manipulating your hard disk, you can try
gparted or qtparted partitioning
tools. The command names and package names are the same for those two tools,
neither of which is installed by default.
Changing Disk Partitions with fdisk
The fdisk command is a useful Linux tool for listing and changing disk partitions.
Keep in mind that modifying or deleting partitions can cause valuable data to be
removed, so be sure of your changes before writing them to disk. To use the
fdisk
command to list information about the partitions on your hard disk, type the following com-
mand as root user:
$ sudo fdisk -l List disk partitions for every disk
Disk /dev/sda: 82.3 GB, 82348277760 bytes
255 heads, 63 sectors/track, 10011 cylinders
Units = cylinders of 16065 * 512 = 8225280 bytes
Device Boot Start End Blocks Id System
/dev/sda1 * 1 13 104391 83 Linux
/dev/sda2 14 9881 79264710 83 Linux
/dev/sda3 9882 10011 1044225 82 Linux swap
This example is for an 80GB hard disk that is divided into three partitions. The first
(
/dev/sda1) is a small /boot partition that is configured as a Linux ext3 file system
(
Id 83). Note the asterisk (*), indicating that the first partition is bootable. The next
partition is assigned to the root file system and is also ext3. The final partition is
Linux swap.
NOTE Since version 2.6.20 of the Linux kernel, both IDE and SCSI disks use
device names
/dev/sd?, where the ? is replaced by a letter (a, b, or c, and so
on). In older versions of Ubuntu, only SCSI disks and USB flash drives used
the
/dev/sd? names. IDE hard drives used /dev/hd? instead.
If multiple disks are present,
fdisk -l will list them all unless you indicate the specific
disk you want:
$ sudo fdisk -l /dev/sdb List disk partitions for a specific disk
To work with a specific disk with the fdisk command, simply indicate the disk you want
with no other options:
$ sudo fdisk /dev/sda Start interactive fdisk session with disk 1
Command (m for help): m Type m to list help text as shown
Command action
a toggle a bootable flag
126
Chapter 7: Administering File Systems
82935c07.qxd:Toolbox 10/29/07 1:01 PM Page 126
b edit bsd disklabel
c toggle the dos compatibility flag
d delete a partition
l list known partition types
m print this menu
n add a new partition
o create a new empty DOS partition table
p print the partition table
q quit without saving changes
s create a new empty Sun disklabel
t change a partition’s system id
u change display/entry units
v verify the partition table
w write table to disk and exit
x extra functionality (experts only)
Command (m for help):
With the prompt displayed, you can use any of the commands shown to work with
your hard disk. In particular, you can use
p (to print the same listing as fdisk -l), n
(to create a new partition), d (to delete an existing partition), l (to list known file sys-
tem types), or
t (to change the file system type for a partition). The following examples
show some of those
fdisk commands in action:
Command (m for help): d Ask to delete a partition
Partition number (1-4): 4 Type partition number to delete
Command (m for help): n Create a new disk partition
First cylinder (1-4983, default 1): 1 Select start (or Enter)
Last cylinder (default 4983): 4983 Select end (or Enter)
Command (m for help): a Make a partition bootable
Partition number (1-3): 1 Type bootable partition number
Command (m for help): t Select a file system type
Partition number (1-3): 3 Select partition to change
Hex code (type L to list codes): 82 Assign partition as swap
Unless you tell it otherwise, fdisk assumes the new partition is a Linux ext3 parti-
tion (
83). You could have typed L to see the same listing of file system types and hex
codes produced from the
l command. As noted above, 82 can assign the partition
as
swap. Other Linux partitions that may interest you include Linux extended (85),
Linux LVM (
8e), Linux software raid (fd), and EFI/GTP (ee).
For Windows partitions, you can assign a partition as HPFS/NTFS (
7), Windows 95
FAT32 (
b), FAT 16 (6), or Windows 95 FAT32 LBA (c). Other Unix-type file systems
include Minix (
be or bf), BSD/OS (e4), FreeBSD (ee), OpenBSD (ef), NeXTSTEP
(
f0), Darwin UFS (f1), and NetBSD (f4). Any of these file system types might be
useful if you have old backup media from those file systems you want to restore.
So far, you have not made any permanent changes to your partition table. If you are
now very sure that your new settings are correct, type
w to write those changes to the
partition table. To abandon your changes (or quit after writing your changes), type
q
to quit your fdisk session.
127
Chapter 7: Administering File Systems
82935c07.qxd:Toolbox 10/29/07 1:01 PM Page 127
Copying Partition Tables with sfdisk
To backup or replicate a disk’s partition table, use sfdisk:
$ sudo sfdisk –d /dev/sda > sda-table Back up partition table to file
$ sudo sfdisk /dev/sda < sda-table Restore partition table from file
$ sudo sfdisk –d /dev/sda | sfdisk /dev/sdb Copy partition table from disk to disk
Changing Disk Partitions with parted
As with fdisk, parted can be used to list or change disk partitions. However, parted
has a few other useful features as well. Here’s how to list partitions for a given disk, /dev/sda,
with parted:
$ sudo parted /dev/sda print
Model: ATA FUJITSU MPG3409A (scsi)
Disk /dev/sda: 41.0GB
Sector size (logical/physical): 512B/512B
Partition Table: msdos
Number Start End Size Type File system Flags
1 32.3kB 206MB 206MB primary ext3 boot
2 206MB 39.5GB 39.3GB primary ext3
3 39.5GB 41.0GB 1536MB primary linux-swap
This listing shows you if you have a classic msdos disk label (partition table), or a gpt
one. In this case, the partition table is msdos.
To run parted interactively, type
parted followed by the name of the storage device you
want to work with (such as
/dev/sda). Or, if you have only one storage device,
simply type
parted:
$ sudo parted
GNU Parted 1.7.1
Using /dev/sda
Welcome to GNU Parted! Type ‘help’ to view a list of commands.
(parted)
To use parted interactively, either type whole commands or start with a few letters
and use the Tab key to complete the command (as you would in the bash shell). And
if you’re really efficient, you can just type enough letters to allow
parted to guess
your input, as you would with Cisco IOS:
p for print, mkl for mklabel, and so on.
WARNING! Unlike
fdisk, parted immediately incorporates changes you
make to your partitions, without explicitly writing the changes to disk. So don’t
just assume you can back out of any changes by simply quitting
parted.
128
Chapter 7: Administering File Systems
82935c07.qxd:Toolbox 10/29/07 1:01 PM Page 128
With each command in a parted session, you also have the option to enter the com-
mand with all the arguments (for example,
mkpart logical ext3 10.7GB 17.0GB)
or just enter the command (
mkpart) and parted will guide you interactively:
(parted) mkpart Create a new partition
Partition type? [logical]? primary
File system type? [ext2]? ext3
Start? 17GB
End? 24GB
Avoid using mkpartfs. It cannot create ext3 partitions properly. Instead, mkpart an
ext3 partition (as shown) and format it later outside of
parted with the mkfs.ext3
command. In general, parted support for ext3 file systems is lacking. Resizing common
Linux partitions can be useful if you need to make space for a new partition. Here is an
example:
(parted) resize 2 Resize a partition
Start? [1.2GB] 1.2GB
End? [24GB] 10GB
WARNING! Unless you’re using LVM, this will typically destroy your file system.
To resize NTFS partitions, you can use the
ntfsresize command. In Ubuntu, that
command comes with the ntfsprogs package. That package also comes with com-
mands for creating (
mkfs.ntfs), fixing (ntfsfix), and getting information about
(
ntfsinfo) NTFS partitions.
Working with File System Labels
The term label, in regards to disk partitions, can refer to two different things. A disk
label can be used as another name for a partition table, as seen in
parted output. A
partition label can also be the name of an individual partition. To see a partition’s label,
use the
e2label command:
$ sudo e2label /dev/sda2
/home
To set the label on a partition:
$ sudo e2label /dev/sda2 mypartition
Bear in mind that /etc/fstab sometimes uses the partition label to mount the partition
as in the following example. Changing this label may render the system unbootable.
LABEL=/boot /boot ext3 defaults 1 2
129
Chapter 7: Administering File Systems
82935c07.qxd:Toolbox 10/29/07 1:01 PM Page 129
To find a partition when you know only the label, type the following:
$ sudo findfs LABEL=mypartition
/dev/sda2
Formatting a File System
With your disk partitions in place, you can build a file system of your choice on each
partition. Most Linux systems come with the commands needed to make and check
file systems that are commonly used in Linux. Commands for formatting and checking file
systems are
mkfs and fsck, respectively.
The
mkfs command serves as the front end for many different commands aimed at for-
matting particular file system types, such as
mkfs.ext2, mkfs.ext3, mkfs.cramfs,
mkfs.msdos, mkfs.ntfs, and mkfs.vfat. By adding packages that support other
file systems, additional
mkfs commands are available to seamlessly work with mkfs.
These include
mkfs.bfs, mkfs.minix, mkfs.xfs, and mkfs.xiafs. Use each com-
mand directly (as in
mkfs.vfat /dev/sdb1) or via the mkfs command (as in mkfs
-t vfat /dev/sdb1
).
Creating a File System on a Hard Disk Partition
Basic software packages you need in Ubuntu to do file system creation and checking
include util-linux (includes
mkfs and other general utilities) and e2fsprogs (ext2/ext3-
specific tools). Specific
mkfs commands for different file system types are included in
ntfsprogs (ntfs), dosfstools (msdos and vfat), xfsprogs (xfs), jfsutils (jfs), mtd-utils (jffs
and jffs2), and reiserfs-utils (reiserfs). The basic tools get installed with Ubuntu.
Here are examples of the mkfs command to create file systems (be sure to add
-t option first):
$ sudo mkfs -t ext3 /dev/sdb1 Create ext3 file system on sba1
$ sudo mkfs -t ext3 -v -c /dev/sdb1 More verbose and scan for bad blocks
$ sudo mkfs.ext3 -c /dev/sdb1 Same result as previous command
If you would like to add a partition label to the new partition, use the -L option:
$ sudo mkfs.ext3 -c -L mypartition /dev/sdb1 Add mypartition label
Creating a Virtual File System
If you want to try out different file system types or simply make a file system that is
more portable (in other words, not tied to a physical disk), you can create a virtual file
system. A virtual file system is one that sits within a file on an existing file system. You
can format it as any file system type you like, move it around, and use it from differ-
ent computers.
Virtual file systems are useful for such things as creating live CDs or running dedicated
virtual operating systems. In the example that follows, you create a blank 500MB
130
Chapter 7: Administering File Systems
82935c07.qxd:Toolbox 10/29/07 1:01 PM Page 130
disk image file, format it as a file system, and then mount it to access data on the file
system:
$ dd if=/dev/zero of=mydisk count=2048000 Create zero-filled 1GB file
$ du -sh mydisk Check virtual file system size
1001M mydisk
$ mkfs -t ext3 mydisk Create files system on mydisk
mydisk is not a block special device
Continue (y/n): y
$ sudo mkdir /mnt/image Create a mount point
$ sudo mount -o loop mydisk /mnt/image Mount mydisk on /mnt/image
In this procedure, the dd command creates an empty disk image file of 2048000 blocks
(about 1GB). The
mkfs command can create any file system type you choose (ext3 is
done here). Because the file is not a block special device, as is the case when format-
ting disk partitions,
mkfs will warn you before starting to make the file system. The
only other trick, after creating the mount point, is to indicate that you are mounting
the file (
mydisk) as a loop device (-o loop). Note that the mount command is the
only command shown above that requires root privilege.
When the virtual file system is mounted, in this example under
/mnt/image, you can
access it as you would any file system. When you are done with the file system, leave
it and unmount it:
$ sudo cd /mnt/image Change to the mount point
$ sudo mkdir test Create a directory on the file system
$ sudo cp /etc/hosts . Copy a file to the file system
$ cd Leave the file system
$ sudo umount /mnt/image Unmount the file system
With the virtual file system unmounted, you could move it to another system or burn
it to a CD to use a file system in another location. If you don’t want the file system
any more, simply delete the file.
Viewing and Changing
File System Attributes
Using the tune2fs or dumpe2fs commands, you can view attributes of ext2 and ext3 file
systems. The
tune2fs command can also be used to change file system attributes. Use the
swapfs command to create a swap partition. Here are examples (both commands produce
the same output):
$ sudo tune2fs -l /dev/sda1 View tunable file system attributes
$ sudo dumpe2fs -h /dev/sda1 Same as tune2fs output
dumpe2fs 1.39 (29-May-2006)
Filesystem volume name: /
Last mounted on: <not available>
Filesystem UUID: f5f261d3-3879-41d6-8245-f2153b003204
131
Chapter 7: Administering File Systems
82935c07.qxd:Toolbox 10/29/07 1:01 PM Page 131
Filesystem magic number: 0xEF53
Filesystem revision #: 1 (dynamic)
Filesystem features: has_journal ext_attr resize_inode dir_index filetype
needs_recovery sparse_super large_file
Default mount options: user_xattr acl
Filesystem state: clean
Errors behavior: Continue
Filesystem OS type: Linux
Inode count: 7914368
Block count: 7907988
Reserved block count: 395399
Free blocks: 5916863
Free inodes: 7752077
First block: 0
Block size: 4096
Fragment size: 4096
Reserved GDT blocks: 1022
Blocks per group: 32768
Fragments per group: 32768
Inodes per group: 32704
Inode blocks per group: 1022
Filesystem created: Fri Jun 15 12:13:17 2007
Last mount time: Tue Jul 24 06:47:35 2007
Last write time: Tue Jul 24 06:47:35 2007
Mount count: 2
Maximum mount count: 29
Last checked: Fri Jun 15 12:13:17 2007
Check interval: 0 (<none>)
Reserved blocks uid: 0 (user root)
Reserved blocks gid: 0 (group root)
First inode: 11
Inode size: 128
Journal inode: 8
First orphan inode: 988413
Default directory hash: tea
Directory Hash Seed: 4137d20d-b398-467b-a47a-a9110416b393
Journal backup: inode blocks
Journal size: 128M
The output shows a lot of information about the file system. For example, if you have
a file system that needs to create many small files (such as a news server), you can check
that you don’t run out of inodes. Setting the
Maximum mount count ensures that the
file system is checked for errors after it has been mounted the selected number of times.
You can also find dates and times for when a file system was created, last mounted,
and last written to.
To change settings on an existing ext2 or ext3 file system, you can use the
tune2fs command. The
following command changes the number of mounts before a forced file system check:
$ sudo tune2fs -c 31 /dev/sda1 Sets # of mounts before check is forced
tune2fs 1.39 (29-May-2006)
Setting maximal mount count to 31
132
Chapter 7: Administering File Systems
82935c07.qxd:Toolbox 10/29/07 1:01 PM Page 132
If you’d like to switch to forced file system checks based on time interval rather than number
of mounts, disable mount-count checking by setting it to negative 1 (
-1):
$ sudo tune2fs -c -1 /dev/sda1
tune2fs 1.39 (29-May-2006)
Setting maximal mount count to -1
Use the -i option to enable time-dependent checking. Here are some examples:
$ sudo tune2fs -i 10 /dev/sda1 Check after 10 days
$ sudo tune2fs -i 1d /dev/sda1 Check after 1 day
$ sudo tune2fs -i 3w /dev/sda1 Check after 3 weeks
$ sudo tune2fs -i 6m /dev/sda1 Check after 6 months
$ sudo tune2fs -i 0 /dev/sda1 Disable time-dependent checking
Be sure you always have either mount-count or time-dependent checking turned on.
Use the
-j option to turn an ext2 file system into ext3 (by adding a journal):
$ sudo tune2fs -j /dev/sda1 Add journaling to change ext2 to ext3
Creating and Using Swap Partitions
Swap partitions are needed in Linux systems to hold data that overflows from your sys-
tem’s RAM. If you didn’t create a swap partition when you installed Linux, you can cre-
ate it later using the
mkswap command. You can create your swap partition either on a regular
disk partition or in a file formatted as a swap partition. Here are some examples:
$ sudo mkswap /dev/sda1 Format sda1 as a swap partition
Setting up swapspace version 1, size = 205594 kB
To check your swap area for bad blocks, use the -c option to mkswap:
$ sudo mkswap -c /dev/sda1
If you don’t have a spare partition, you can create a swap area within a file:
$ sudo dd if=/dev/zero of=/tmp/swapfile count=65536
65536+0 records in
65536+0 records out
33554432 bytes (34 MB) copied, 1.56578 s, 21.4 MB/s
$ sudo chmod 600 /tmp/swapfile
$ sudo mkswap /tmp/swapfile
Setting up swapspace version 1, size = 67104 kB
The dd command above creates a 32MB file named swapfile. The chmod command
locks down the permissions on the file, to avoid getting a warning from the
swapon
command down the road. The mkswap command formats the /tmp/swapfile file to
be a swap partition.
133
Chapter 7: Administering File Systems
82935c07.qxd:Toolbox 10/29/07 1:01 PM Page 133
After you have created a swap partition or swap file, you need to tell the system to use
the swap area you made using the
swapon command. This is similar to what happens at
boot time. Here are examples:
$ sudo swapon /dev/sda1 Turn swap on for /dev/sda1 partition
$ sudo swapon -v /dev/sda1 Increase verbosity as swap is turned on
swapon on /dev/sda1
$ sudo swapon -v /tmp/swapfile Turn swap on for the /tmp/swapfile file
swapon on /tmp/swapfile
You can also use the swapon command to see a list of your swaps files and partitions:
$ swapon -s View all swap files and partitions that are on
Filename Type Size Used Priority
/dev/sda5 partition 1020088 142764 -1
/tmp/swapfile file 65528 0 -6
To turn off a swap area, you can use the swapoff command:
$ sudo swapoff -v /tmp/swapfile
swapoff on /tmp/swapfile
Swap areas are prioritized. The kernel will swap first to areas of high priorities, and
then go down the list. Areas of the same priority get striped between. You can specify
the priority of your swap area as you enable it using the
-p option:
$ sudo swapon -v -p 1 /dev/sda1 Assign top swap priority to sda1
Mounting and Unmounting File Systems
Before you can use a regular, non-swap file system, you need to attach it to a direc-
tory in your computer’s file system tree by mounting it. Your root file system (/) and
other file systems you use on an ongoing basis are typically mounted automatically
based on entries in your
/etc/fstab file. Other file systems can be mounted manu-
ally as they are needed using the
mount command.
Mounting File Systems from the fstab File
When you first install Linux, the /etc/fstab file is usually set up automatically to
contain information about your root file systems and other file systems. Those file
systems can then be set to mount at boot time or be ready to mount manually (with
mount points and other options ready to use when a manual mount is done).
Here is an example of a
/etc/fstab file:
/dev/VolGroup00/LogVol00 / ext3 defaults 1 1
LABEL=/boot /boot ext3 defaults 1 2
134
Chapter 7: Administering File Systems
82935c07.qxd:Toolbox 10/29/07 1:01 PM Page 134
tmpfs /dev/shm tmpfs defaults 0 0
devpts /dev/pts devpts gid=5,mode=620 0 0
sysfs /sys sysfs defaults 0 0
proc /proc proc defaults 0 0
/dev/VolGroup00/LogVol01 swap swap defaults 0 0
/dev/sda1 /mnt/windows vfat noauto 0 0
NOTE For clarity, the UUID listing for each hard disk file system was removed in
the above example. For each file system, you’ll normally see an entry like the fol-
lowing,
UUID=da2dbc48-862e-4fbe-9529-a88b57b15bac, prior to the file
system.
All the file systems are mounted automatically, except for
/dev/sda1 (as indicated by
the
noauto option). The root (/) and swap hard disk partitions are configured as logical
volume management (LVM) volumes. LVM volumes can make it easier to move or join
physical partitions, while still retaining the volume ID. Pseudo file systems (not asso-
ciated with a partition) include
devpts (an interface to pty pseudo terminals), sysfs
(information from 2.6 kernel), and proc (kernel information implemented prior to 2.6
kernel). The
/dev/sda1 disk partition was added manually in this example to mount
the Windows partition located on that device.
The
/etc/fstab file no longer typically holds information about removable media.
That’s because the Hardware Abstraction Layer (HAL) facility automatically detects
removable media and mounts those media in appropriate mount points in the
/media directory (based on such things as volume ID on the media).
Table 7-2 describes each field in the
/etc/fstab file.
Table 7-2: Fields in the /etc/fstab File
Continued
Field Description
1 The device name representing the file system. Originally, this contained the
device name of the partition to mount (such as /dev/sda1). It can now also con-
tain a LABEL or universally unique identifier (UUID), instead of a device name.
2 The mount point in the file system. The file system contains all data from the
mount point down the directory tree structure, unless another file system is
mounted at some point beneath it.
3 The file system type. See Table 7-1 for a list of many common file system types.
4
The mount command options. Examples of mount options include noauto (to
prevent the file system from mounting at boot time) and ro (to mount the file sys-
tem read-only). To let any user mount a file system, you could add the user or owner
option to this field. Commas must separate options. See the mount command man-
ual page (under the -o option) for information on other supported options.
135
Chapter 7: Administering File Systems
82935c07.qxd:Toolbox 10/29/07 1:01 PM Page 135
Table 7-2: Fields in the /etc/fstab File (continued)
You can create your own entries for any hard disk or removable media partitions you
want in the
/etc/fstab file. Remote file systems (NFS, Samba, and others) can also
contain entries in the
/etc/fstab file to automatically mount those file systems at
boot time or later by hand.
Mounting File Systems
with the mount Command
The mount command is used to view mounted file systems, as well as mount any local
(hard disk, USB drive, CD, DVD, and so on) or remote (NFS, Samba, and so on) file
systems. Here is an example of the
mount command for listing mounted file systems:
$ mount List mounted remote and local file systems
/dev/sda7 on / type ext3 (rw)
proc on /proc type proc (rw)
sysfs on /sys type sysfs (rw)
devpts on /dev/pts type devpts (rw,gid=5,mode=620)
/dev/sda6 on /mnt/debian type ext3 (rw)
/dev/sda3 on /mnt/slackware type ext3 (rw)
tmpfs on /dev/shm type tmpfs (rw)
none on /proc/sys/fs/binfmt_misc type binfmt_misc (rw)
sunrpc on /var/lib/nfs/rpc_pipefs type rpc_pipefs (rw)
Use the -t option to list only mounts of a specific file system type:
$ mount -t ext3 List mounted ext3 file systems
/dev/sda7 on / type ext3 (rw)
/dev/sda6 on /mnt/debian type ext3 (rw)
/dev/sda3 on /mnt/slackware type ext3 (rw)
To display partition labels with mount information, use the -l option:
$ mount -t ext3 -l List mounted ext3 file systems and labels
/dev/sda7 on / type ext3 (rw) [/123]
/dev/sda6 on /mnt/debian type ext3 (rw) [/mnt/debian]
/dev/sda3 on /mnt/slackware type ext3 (rw) [/mnt/slackware]
Field Description
5
Dump file system? This field is only significant if you run backups with dump.
A number 1 signifies that the file system needs to be dumped. A zero means that
it doesn’t.
6 File system check? The number in this field indicates whether or not the file sys-
tem needs to be checked with fsck. A zero indicates that the file system should
not be checked. A number 1 means that the file system needs to be checked first
(this is used for the root file system). A number 2 assumes that the file system can
be checked at any point after the root file system is checked.
136
Chapter 7: Administering File Systems
82935c07.qxd:Toolbox 10/29/07 1:01 PM Page 136