Flash CS5 THE MISSING MANUAL phần 8 pdf
Bạn đang xem bản rút gọn của tài liệu. Xem và tải ngay bản đầy đủ của tài liệu tại đây (1.34 MB, 71 trang )
500
F CS: T M M
Timeline Stop and
Go
Using ActionScript to Start a Timeline
As you saw in the previous steps, the stop() command stops an animation nicely. But
what about getting that Bearcat rolling again? You stopped the animation by putting
the stop() statement in the frame where you wanted to stop, but putting a play() state-
ment in the following frame, as logical as it sounds, will do you no good. The Flash
Player will never reach the next frame—it’s stopped. So you have a couple of choices,
depending on what you want to trigger the starting and stopping. If you want your
audience to control it, then you can give them clickable buttons or controls. If you
want the animation to resume on its own, then a TimerEvent is the best tool in your
toolbox. You can add a TimerEvent to the same frame where the stop() happened, as
shown in Figure 15-5. When the timer is complete, it can trigger a play() statement
for both the main timeline and the stutzBearcat movie clip. Modify the code on
Frame 25 of the actions layer to read as follows:
1 stop();
2 stutzBearcat.stop();
3
4 var carTimer = new Timer(400,1);
5 carTimer.start();
6
7 carTimer.addEventListener(TimerEvent.TIMER_COMPLETE, timerCompleteListener);
8
9 function timerCompleteListener(evt:TimerEvent):void
10 {
11 play();
12 stutzBearcat.play();
13 }
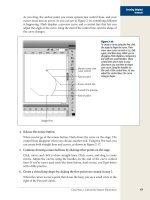
Figure 15-5:
The tab at the bottom
of the Actions panel
provides details about
the location of the
code shown. In this
case, the code resides
on the 25th frame of
the actions layer.
Frame icon Actions layer Frame 25
The first two lines were already in the code. Line 4 creates a new timer called
carTimer. The first number in parentheses (400) sets the timer to wait a little less
than half a second (400 thousandths of a second). The second number (1), sets the
timer to run once. Line 5 starts the timer. The remainder of the code sets up the
event handler.
501
C : C T A
Organizing Your
Animation
Line 7 registers the event listener to run the function timerCompleteListener() when
the timer runs out. (For more details on events and event listeners, see page 429.)
The code between the curly brackets (line 11 and line 12) are the statements that
start the main timeline and the stutzBearcat movie clip. For the completed exercise,
download 15-3_Timeline_Stop_Go_done.fla from the Missing CD (www.missing-
manuals.com/cds).
Note: In 1915, Erwin “Cannonball” Baker set a record driving from Los Angeles to New York in 11 days, 7
hours, and 15 minutes in a Stutz Bearcat.
Organizing Your Animation
As you see in a lot of the examples earlier in this book, you don’t have to do a thing
to your standard timeline, organization-wise. You can let Flash play your animation
sequentially, from Frame 1 right through to Frame 500 (or whatever number your
last frame is) with no problems.
If you need your animation to jump around and play out of sequence, though, there
are a few ways you can do it. Which method is best depends on what you’re trying to
do. Here are three methods, along with their pros and cons:
• Use labels to create bookmarks in the timeline. If you break an animation into
named chunks with frame labels, then you give your animations the potential
to be flexible and more interactive, because you can write ActionScript actions
that target (act on) each individual chunk. For example, you can let your audi-
ence decide whether to play the ralph_reacts scene first, last, or skip it alto-
gether. This method is one of the most popular, especially with the ActionScript
crowd. It’s easy to create labels and easy to use them in ActionScript. In short,
wherever you use a frame number to refer to a specific frame in a timeline, you
can also use a frame label.
• Divide your animation into separate .swf files and load them as needed. This
method is great if you have different teams working on a long animation. Team
members can create movie clips independently, and then a master movie clip
can load the other movie clips as needed. One of the advantages of this method
is that it’s faster, especially if you’re sending .swf files over the Internet. Your
audience needs to download only the .swf files they actually want to view.
• Create scenes within your Flash document. Scenes have more benefits for the
Flash designer than they do either the Flash coder or the Flash audience. If
you break an animation into scenes, then you can find what you’re looking for
quickly; you can also easily rearrange your animation, using the Scene panel.
Scenes make it easy to focus on a small section of your animation while you’re
creating and previewing it. You don’t have to preview an entire animation when
all you want to see is one small section. All the scenes are stored in a single .swf
file, so your audience has to download the complete file, even if they’re viewing
only one or two of the scenes.
502
F CS: T M M
Organizing Your
Animation
Tip: Both scenes and labeled frames are a natural fit for creating a website in Flash because they let you orga-
nize your content nonsequentially. Page 440 shows you an example of linking content to navigation buttons.
Working with Labeled Frames
Labeled frames are like named bookmarks. Once you label a frame, you can jump to
that specific point in the timeline using the label’s name. Labeled frames are great
tools to use when you want to give your audience an opportunity to interact with the
animation. For example, if you’re creating a series of lessons, you can create a label for
each lesson. You can then give your students a table of contents, where they can jump
to any lesson with the click of a button. Or, suppose you’re using Flash to build an
animated website and you want to display a different web page when someone clicks
a button on your navigation bar. If she clicks the Contact Us button, for instance, you
want to display a web page showing your company’s contact information.
Technically, you don’t have to label your frames in order to do this. You can create an
event listener for your Contact page button that uses code like this:
gotoAndPlay(15);
The problem with this approach is that if you go back and add frames to the begin-
ning of your timeline, it muffs up your code. If you add 10 frames to the beginning of
your animation, for example, the old Frame 15 is now the new Frame 25. So, to make
your button work again, you’d have to change the ActionScript code to this:
gotoAndPlay(25);
A much better approach is to give Frame 15 a meaningful label, like contact, and
write the ActionScript code this way:
gotoAndPlay("contact");
When you label a frame like this, Flash always associates the same frame with the
label—no matter what number that frame ends up being. So you can edit your time-
line to your heart’s content without ever having to worry that you’re breaking your
actions. As a significant side benefit, using words rather than numbers makes your
code easier to read and understand.
The following sections show you how to label frames, and how to reference those
labels in ActionScript code. This exercise uses a file called 15-4_Frame_Labels.fla,
which you can find at the Missing CD page at www.missingmanuals.com/cds. The
completed project is in a file named 15-5_Frame_Labels_done.fla.
Adding a Frame Label
Labeling a frame is easy. All you have to do is select a frame and then, in the Proper-
ties panel, type a name for the label.
Note: As with all content (images, sounds, actions, and so on), the label you attach to a keyframe stays in
force until the next keyframe.
503
C : C T A
Organizing Your
Animation
To label a frame:
1. Open 15-4_Frame_Labels.fla in Flash, and then press Enter to play the
animation.
This rather abbreviated movie is made up of three words: Intro, Main, and Cred-
its. Each word is animated using shape tweens. There are new words at Frame 1,
Frame 16, and Frame 46. The animation has three layers: words, buttons, and
labels. You can label any keyframe in a timeline, but if you place all your labels
in a single layer, they’re easier to find.
2. In the timeline, in the labels layer, click the first frame.
Flash highlights the selected frame, and the Properties panel shows prop-
erties associated with Frame 1. (If the Properties panel isn’t showing, go to
Window➝Properties.)
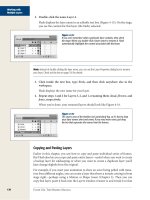
3. In the Properties panel, click the Label➝Name box (Figure 15-6), and then
type intro.
Your first label is complete. In the timeline, Flash displays a little red flag in the
frame you attached the label to, followed by the label itself. In the Properties
panel, you may need to click the triangle button next to Label to expand the
Label subpanel.
Figure 15-6:
Flash assumes a label type of Name, and that’s exactly
what you want in most circumstances. (The other label
types Flash has are Comment, which displays your
label in the timeline but doesn’t let you access it using
ActionScript, and Anchor, which lets you designate the
frame as a separate HTML anchor page that your
audience can return to using the browser’s Back
button.)
Expand/collapse
button
Label Name
Label Type
4. In the labels layer, click Frame 16, and then press F6.
A new keyframe appears at Frame 16. Only keyframes can have labels. So to
attach a new label to Frame 16, you need to create a keyframe first.
5. In the Properties panel, click the Label➝Name box, and then type “main.”
The second label named main appears in the labels layer.
504
F CS: T M M
Organizing Your
Animation
FreqUenTly ASked qUeSTion
The Difference Between Scenes and Labeled Frames
It sounds like scenes and frame labels do the same thing:
Both let me break up my animation into chunks and make
the chunks interactive, and both let me target a frame
using a name instead of just the frame number. So if they
both do the same thing, when do I use one over the other?
Using labeled frames is very similar to using scenes. But
there are three big differences between the two:
• Simply dragging scenes around in the Scene
panel rearranges the way Flash plays your anima-
tion. It doesn’t work that way with frame labels.
(You can rearrange the way your animation plays
using labeled frames, but you have to write the
ActionScript code to do it.)
• It’s harder to break up scenes than to add labels.
When you use scenes, you need to either add new
content for each scene as you build your animation,
or—if you’ve already created your animation and
want to break it into scenes after the fact—you need
to cut and paste frames from the original Scene 1
into your new scenes. Hardly rocket science, but it is
extra work. Adding or changing frame labels is much
quicker.
• As a designer, you see separate timelines when you
work with scenes. When you work with frames, you
see one big timeline. This difference is usually the
deal breaker: Some people love working with con-
tent in separate timelines; some people hate it. It’s
interesting to note that no matter which method you
use, Flash stores everything in one big timeline in the
published SWF file.
6. In the labels layer, click Frame 46, and then press F6.
A new keyframe appears at Frame 46.
7. In the Properties panel, click the Label➝Name box, and then type “credits.”
The third label named credits appears in the labels layer.
Targeting a frame label with ActionScript
After you’ve labeled a frame, you can reference that label in an ActionScript action.
This section shows you how to program three buttons that jump to a specific frame
label in the timeline.
Note: The example in this section is identical to the one on page 510 except for two differences: This ex-
ample shows ActionScript targeting labeled frames in a single timeline, while the one on page 510 shows
ActionScript targeting separate scenes.
To target a labeled frame:
1. Open the Flash file, and then move the playhead to Frame 1.
On the stage you see the word “Intro” and three buttons with the text “Play
Intro”, “Play Main”, and “Play Credits.”
505
C : C T A
Organizing Your
Animation
2. Test the animation by selecting Control➝Test movie.
In the test window, you see the word “Intro” recede, the word “Main” approach
and recede, and the word “Credits” approach. Clicking the Play Intro, Play Main,
and Play Credits buttons turns the buttons from red to yellow but has no other
effect on the animation.
3. Below Flash’s timeline, click the New Layer button. Then click the name and
type actions, as shown in Figure 15-7.
A new layer named actions appears in the timeline. You’ll use this layer to hold
all of your ActionScript code. As a rule of thumb, it’s best to keep your Action-
Script code as close together as possible. When snippets of code are tucked away
in different layers or movie clips, it’s harder to troubleshoot.
Figure 15-7:
When you place ActionScript
code in the timeline, it’s always
best to devote a specific layer
to the code, which makes it
easier to find and debug your
code later. It’s also a good
idea to keep both the labels
layer and the actions layer at
the top of the timeline.
Timeline labelsLabels layer
Actions layer
New layer
4. In the actions layer, create a keyframe at Frame 15 by selecting the frame and
then pressing F6.
An empty circle appears in Frame 15, indicating a keyframe.
5. With Frame 15 still selected, type the following ActionScript statement in the
Actions panel:
stop();
This statement stops the animation from playing when it reaches Frame 15.
This marks the end of the “intro” segment of the animation.
6. Create keyframes and stop() statements for Frames 44 and 60, similar to what
you did in steps 4 and 5.
At this point, each of the three animation segments (intro, main, credits) has
a stop() statement at the end. If you test your animation now, it will stop at the
end of the Intro. In the following steps, you’ll write code for each of the three
Play buttons.
7. Click the outside edge of the Play Intro button.
The button shows a selection box, and a button icon appears in the Properties
panel, as shown in Figure 15-8. If you see the letter T in the Properties panel, it
means you selected the Play Intro text, not the Play Intro button, so try again.
506
F CS: T M M
Organizing Your
Animation
Figure 15-8:
These buttons are made
up of two parts: a button
symbol, plus text placed over
the symbol. To select just the
button, click the edges outside
the text. You can tell whether
you’ve selected the button
symbol or the text by checking
the icon that shows in the
Properties panel.
Button selected Button icon
Text selected Text icon
8. In the Properties panel, name the button instance btnIntro.
There are three instances of buttons on the stage: Play Intro, Play Main, and Play
Credits. They’re all instances of the BullsEye button in the Library. Before you
can write ActionScript code for each button, you have to name them.
9. Repeat steps 7 and 8 to name the remaining two buttons.
Using a consistent naming convention, name the Play Main button btnMain,
and the Play Credits button btnCredits.
10. Click Frame 1 in the actions layer, and then type the following code to create
an event listener for btnIntro.
1 btnIntro.addEventListener(MouseEvent.CLICK, clickIntroListener);
2
3 function clickIntroListener(evt:MouseEvent)
4 {
5 gotoAndPlay("intro");
6 }
507
C : C T A
Organizing Your
Animation
Line 1 registers a MouseEvent listener for btnIntro. Lines 3 through 6 comprise
the function clickIntroListener(). This function holds the code that runs when
someone clicks the btnIntro button. (For more details on handling events and
event listeners, see page 429.) Line 5 holds the important action for the function.
The gotoAndPlay() statement tells the Flash Player to jump to the frame labeled
“intro” and to begin playing from that point forward. You can place either a
label, like “intro,” or a specific frame number, like “16,” inside the gotoAndPlay()
parentheses. As explained on page 502, labels are much more flexible than spe-
cific frame numbers.
11. Add event listener code for the remaining two buttons. When you’re through,
it should look like this (new code shown boldface):
btnIntro.addEventListener(MouseEvent.CLICK, clickIntroListener);
btnMain.addEventListener(MouseEvent.CLICK, clickMainListener);
btnCredits.addEventListener(MouseEvent.CLICK, clickCreditsListener);
function clickIntroListener(evt:MouseEvent)
{
gotoAndPlay("intro");
}
function clickMainListener(evt:MouseEvent)
{
gotoAndPlay("main");
}
function clickCreditsListener(evt:MouseEvent)
{
gotoAndPlay("credits");
}
When you have several similar statements, like these mouse event listeners, you
can save time by writing and testing one statement. Then, with a little copy, paste,
and modify magic, you can quickly create the similar statements. If things don’t
work as planned, double-check the way you modified the code. In this case, you’d
carefully examine all the code where “intro,” “main,” and “credits” appear.
12. Test your animation using Ctrl+Enter (c-Return).
If your code is working properly, the animation plays the “intro” and then stops.
When you click any of the Play buttons, Flash plays that segment and then stops.
If your code isn’t working quite right, compare your project with 15-5_Frame_
Labels_done.fla.
As this example shows, frame labels and gotoAndPlay() statements are powerful
tools for animations that play out of sequence. Labels give you an easy and con-
venient way to mark off segments in a timeline, and you can add as many of them
as you want. There’s another related statement, gotoAndStop(), which does exactly
what you imagine. It jumps to a specific frame and stops Flash Player from moving
on to the next frame. The next section of this chapter explains how to use scenes to
accomplish the same tasks.
508
F CS: T M M
Organizing Your
Animation
Working with Scenes
A scene in Flash is a series of frames to which you assign a name of your choosing.
When you’re working in Flash, each scene has its own timeline. In the preceding ex-
ample using labels, a single timeline was marked off into three parts: intro, main, and
credits. Each segment occupied frames in the same timeline. The first 15 frames made
up the “intro,” the next 30 frames were labeled “main,” and the final 15 frames were
labeled “credits.” You can use scenes to break a larger animation into smaller chunks
that can be targeted with ActionScript.
Each time you create a new scene, Flash displays a brand-new timeline for you to fill
with content. Then, when you play your animation, Flash plays each scene in top-
down order, beginning with the first scene listed in the Scene panel (Figure 15-9),
and ending with the last.
Figure 15-9:
Every animation you create has at least
one scene (named Scene 1, unless you tell
Flash differently). By using the Scene panel
to create and name new scenes, you can
organize long animations into manageable
chunks. Flash displays the timeline for each
scene separately, so it can be easy to forget
which scene you’re in at any given time. In
fact, your only cue is the scene name Flash
displays in the Edit bar. If you don’t see it
(along with the little clapper icon), choose
Window➝Toolbars➝Edit Bar.
Add
Scene
Duplicate Scene
Delete Scene
As the following sections show, after you create scenes, you can rename them and
reorganize them with the click of a button.
Tip: As an alternative to using scenes, you may want to consider publishing separate .swf files and loading
them into your main animation as needed. This method can be helpful when teams of animators produce
a long animation. Each team works with separate Flash documents and publishes their own .swf files.
Creating a scene
Flash automatically starts you out with one scene (cleverly named Scene 1) each time
you create a new Flash document.
To create additional scenes:
1. In the timeline, create content for the frames you want in your first scene.
If you’re using the example file 15-6_Scenes.fla, you see two layers, buttons and
words, each of which extends from Frame 1 through Frame 15. (You can download
this example file from the Missing CD page at www.missingmanuals.com/cds.)
509
C : C T A
Organizing Your
Animation
2. Choose Window➝Other Panels➝Scene.
The Scene panel appears.
3. Click the “Add scene” icon.
In the Scene panel, Flash creates a new scene and then places it directly
below Scene 1. Flash also displays a brand-new timeline and a clean, fresh
stage (Figure 15-10).
Figure 15-10:
Each time you create a new scene, Flash hides
the timeline for the previous scene and displays
a brand-new workspace. At this point, Flash
associates everything you add to the stage and
the timeline to the newly created scene—here,
Scene 7. (Flash names scenes sequentially; in
this figure, Scenes 2 through 6 were created and
then deleted.)
Scene icon Scene panel
New timeline
4. In the timeline, create content for the frames you want in your new scene.
When you’re done, you may want to rename the scene (as discussed in the next
section), and then test it by choosing Control➝Test Scene. Or, to create addi-
tional scenes, simply repeat steps 3 and 4.
Renaming a scene
The names Flash gives each scene you create—Scene 1, Scene 2, Scene 3, and so
on, as you see in Figure 15-10—aren’t particularly useful if you’re using scenes as a
way to find the frames you need quickly. Fortunately, Flash makes it easy for you to
rename scenes. Here are the steps:
1. Choose Window➝Other Panels➝Scene.
The Scene panel appears.
2. In the Scene panel, double-click the name of the scene you want to change.
Flash displays the scene name in an editable text box.
510
F CS: T M M
Organizing Your
Animation
3. Type the new name.
You’ll need to refer to this name in ActionScript code if you’re planning to make
your animation interactive, so short and meaningful is best. For example, you
might choose intro for an introductory scene, main for the meat of your anima-
tion, and credits for the last few wrap-up frames that display your company’s
name and contact info.
Reorganizing scenes
Flash always plays scenes in order from the scene that appears at the top of the Scene
panel down to the scene that appears in the bottom. To change the order in which
Flash plays your scenes:
1. Choose Window➝Other Panels➝Scene.
The Scene panel appears.
2. In the Scene panel, click the name of the scene you want to move, and then
drag it above or below the other scenes, as shown in Figure 15-11.
The instant you let up on your mouse, Flash reorders the scenes in the Scene
panel. The new order is the order in which Flash plays your animation when you
choose Control➝Test Movie.
Note: Another way to change the order in which Flash plays your scenes and frames is by using
ActionScript, as shown next.
Figure 15-11:
Dragging a scene to a new location in the Scene panel automatically reorganizes
the sequence in which Flash plays your animation—no ActionScript necessary. The
line that appears as you drag a scene lets you know where Flash will put the scene
when you let up on your mouse.
Changing scene sequence
Tip: To play just the scene currently on the stage, select Control➝Test Scene (instead of Control➝Test
Movie).
Targeting a scene with ActionScript
In Flash-speak, targeting a scene means writing ActionScript code that performs
some action on a scene. The example in this section shows how to program the but-
tons to jump to a new scene and begin playing the animation at that point. The tools
511
C : C T A
Organizing Your
Animation
you use are similar to those used with labels: event listeners and the gotoAndPlay()
statement. Figure 15-12 gives you a quick overview of how the finished example
looks.
Figure 15-12:
You’ll often want to break an
animation into scenes so that
you can give your audience
the ability to play the scenes
independently. Here, pressing
the Play Credits button plays
the credits scene, pressing the
Play Main button plays the
main scene, and pressing
the Play Intro button plays the
(you guessed it) intro scene.
To put together an interactive
animation, you have to first
create named scenes, and then
tie those scenes to buttons
using ActionScript code.
Note: For more information on creating button symbols, see page 264.
1. Open the file 15-7_Scenes_Actions.fla.
In the Scene panel (Window➝Other Panels➝Scene), notice that the animation
contains three scenes (intro, main, and credits). The stage has three correspond-
ing buttons labeled Play Intro, Play Main, and Play Credits.
Note: You can download the example files for this section from the Missing CD page at www.
missingmanuals.com/cds. The file 15-7_Scenes_Actions.fla is the starting point, and 15-8_Scenes_
Actions_done.fla is the completed animation with ActionScript.
2. Test the animation by selecting Control➝Test movie.
In the test window, the word “Intro” recedes; the word “Main” approaches and
recedes; and the word “Credits” approaches. The Play Intro, Play Main, and Play
Credits buttons turn from red to yellow when you move your mouse over them
and turn green when clicked. But none of the buttons affect the animation.
512
F CS: T M M
Organizing Your
Animation
3. Click the Edit Scene icon (Figure 15-13), and then choose “intro” if it’s not
already chosen.
The Edit bar displays “intro” to let you know you’re about to edit the intro scene.
On the stage, you see the three buttons shown in Figure 15-12.
Figure 15-13:
You can switch from scene to
scene in your animation using the
Scene panel, but you’ll probably
find clicking the Edit Scene icon
much handier, because the Edit
Scene icon doesn’t disappear
while you’re working.
Edit Scene icon
4. Below Flash’s timeline, click the New Layer button. Then click the name and
type “actions”, as shown in Figure 15-7.
A new layer named actions appears in the timeline. You use this layer to hold all
your ActionScript code. As a rule of thumb, it’s best to keep your ActionScript
code as close together as possible. When snippets of code are tucked away in
different layers or movie clips, it makes it hard to troubleshoot.
5. In the actions layer, create a keyframe at Frame 15 by selecting the frame and
then pressing F6.
An empty circle appears in Frame 15, indicating a keyframe.
6. With Frame 15, still selected, type the following ActionScript statement in the
Actions panel:
stop();
This statement stops the animation from playing when it reaches Frame 15.
Without a stop() statement here, the Flash Player automatically plays the next
scene.
7. Repeat steps 3 through 6 to create “action” layers, keyframes, and stop() state-
ments on the last frames of the “main” scene and the “credits” scene.
Use the Edit Scene icon to move from one scene to another.
8. Go back to the “intro” scene, and then click the first frame in the actions layer.
Flash displays the timeline for the intro scene.
513
C : C T A
Organizing Your
Animation
9. In the Actions window, type the following code:
1 btnIntro.addEventListener(MouseEvent.CLICK, clickIntroListener);
2 btnMain.addEventListener(MouseEvent.CLICK, clickMainListener);
3 btnCredits.addEventListener(MouseEvent.CLICK, clickCreditsListener);
4
5 function clickIntroListener(evt:MouseEvent):void
6 {
7 gotoAndPlay(1,"intro");
8 }
9
10 function clickMainListener(evt:MouseEvent):void
11 {
12 gotoAndPlay(1,"main");
13 }
14
15 function clickCreditsListener(evt:MouseEvent):void
16 {
17 gotoAndPlay(1,"credits");
18 }
If you’ve been following the ActionScript code sections in this and previous
chapters, the event listeners used in this code should look pretty familiar. If
you need to brush up on event listeners, check out page 429. The only differ-
ences between this code and the code used to target labels is in the way the
gotoAndPlay() method is used. In this example, gotoAndPlay() has two param-
eters inside the parentheses. The first parameter is a frame number, but it could
just as easily be a label like “start” or “intro.” The second parameter is the name
of a scene. Like labels, the name of the scene has to be inside quotes. Each of
the statements on lines 7, 12, and 17, tell Flash Player to go to a scene and begin
playing the animation at the first frame of that scene.
10. Select lines 1 through 3 in the Actions panel, and then press Ctrl+C
(c-C).
The three statements that register event listeners for the buttons are copied and
stored on your computer’s Clipboard.
11. Go back to the “main” scene, and click the first frame in the actions layer.
Flash displays the timeline for the main scene.
12. Click the first line in the Actions panel, and then press Ctrl+V (c-V).
You’ve just copied the three statements that register event listeners into the
Actions panel. Each scene is shown on a new timeline beginning with key-
frames at Frame 1 for each layer. The statements that register event listeners
in the “intro” scene don’t register event listeners for the other scenes. Note that
you don’t need to (and shouldn’t) copy the functions, just the code that uses the
addEventListener() method.
13. Go back to the “credits” scene, and click the first frame in the actions layer.
Flash displays the timeline for the main scene.
514
F CS: T M M
Looping a Series of
Frames
14. Click the first line in the Actions panel, and then press Ctrl+V (c-V).
The three statements that register event listeners are copied into the Actions
panel.
15. Test your animation using Ctrl+Enter (c-Return on a Mac).
If your code is working properly, the animation plays the Intro and then stops.
When you click any of the Play buttons, Flash plays that segment and then stops.
Note: With a long exercise like this, it’s super-easy to miss a step. To see a working example, check out
the finished file 15-8_Scenes_Actions_done.fla.
Looping a Series of Frames
Looping—replaying a section of your animation over and over again—is an efficient
way to create long-playing effects for a modest investment of effort and file size.
Say, for example, you want to create a repetitive background effect like sunlight glint-
ing off water, palm fronds waving in the breeze, or flickering lights. You can create
the frames necessary to show the effect briefly (a couple seconds’ worth or so), save
the frames as a movie clip, and place an instance of that movie clip in one of the layers
of your animation so that the effect spans your entire animation. Flash automatically
replays the movie clip until you tell it otherwise, so you get an extended effect for a
just a few frames’ worth of work—and just a few frames’ worth of file size, too. What
a deal! (For a more in-depth look at movie clip symbols, check out Chapter 7.)
Note: You’ve seen this kind of looping background effect in action if you’ve ever watched The Flintstones—
or just about any other production cartoon, for that matter. Remember seeing the same two caves shoot
past in the background over and over again as Fred chased Barney around Bedrock? Earlier in this chapter,
the car’s spinning wheels were made up of a two-frame movie clip that looped.
To loop a series of frames using a movie clip symbol:
1. Open the file 15-9_Loop_Frames.fla, which you can download from the Miss-
ing CD page at www.missingmanuals.com/cds.
On the stage, you see a sprinkling of white stars on a blue background. In the
Library, you see four symbols, including the blink_lights movie clip symbol
(Figure 15-14).
Since you’ve never seen this movie clip before, take a look at the preview.
Note: To loop a section of your main timeline, all you have to do is attach the following action to the last
frame of the section you want to loop: gotoAndPlay(1). (If you want your loop to begin at a frame other
than Frame 1, replace the 1 in the preceding ActionScript code with the number of the frame at which you
want Flash to begin looping.)
515
C : C T A
Reversing a Series of
Frames
2. In the Library, select the blink_lights movie clip. Then, in the Library’s
preview window, click the Play icon.
You see the lights on the cactus change from red to yellow, pink, and blue in
rapid succession.
3. Preview the main animation by selecting Control➝Test Movie.
In the test window, you see a lone shooting star streak across the background.
Figure 15-14:
Looping a series of frames using a
movie clip is super-easy because
Flash does all the work. In fact,
Flash always assumes you
want to loop the movie clips you
add to your animations. (If you
don’t want to loop them, you can
tell Flash to stop playing a movie
clip after the first time through
by attaching the stop() action to
the last frame of your movie clip
symbol.)
Movie clip symbol
4. Close the test window to go back to the workspace.
First stop: Add an instance of the blink_lights movie clip symbol to the
animation.
5. In the xmas_cactus layer, click the first keyframe (Frame 1) to select it. Then,
drag the blink_lights movie clip from the Library to the stage.
Choose Control➝Test Movie again to see the results. In the test window that
appears, you see the lights on the cactus blink repeatedly as the shooting star
moves across the screen. In the test window, you can stop the main timeline
from looping by choosing Control➝Loop. The shooting star on the main time-
line stops looping, but the lights on the cactus continue to blink because they’re
in a separate timeline in the blink_lights movie clip. If you don’t want your
embedded movie clip to loop, you need to tell Flash to stop playing the movie
clip after the first time through. To so instruct it, attach the stop() action to the
last frame of your movie clip symbol (not to the movie clip instance).
Reversing a Series of Frames
Reversing a series of frames is a useful effect. A basketball bouncing up and down, a
flag waving side to side, a boomerang advancing and receding: These things are all
examples of reversing a single series of frames.
516
F CS: T M M
Reversing a Series of
Frames
Instead of creating the two complete series of frames by hand—one showing a ball
falling, for example, and another showing the same ball bouncing back up—you can
copy the frame series, paste it, and use Modify➝Timeline➝Reverse Frames to re-
verse the pasted frames.
deSiGn TiMe
Power to the People
Early on, one of the beefs people had with Flash advertis-
ing and splash screens (intro pages) was the inability to
control the animations. It wasn’t easy to stop, start, bypass,
or control the sound on some of those pages. It gave Flash
a bad name.
Things have changed. You can use Flash to create entire
web-based environments with ingenious and creative navi-
gation systems. If you don’t, even though your audience
can right-click (or Control-click) your animation to view a
context menu that lets them interact with your animation,
context menus aren’t particularly useful when it comes to
providing consistent playback control. For one thing, few
audience members know about them. Also, Flash gurus
who also happen to be expert ActionScript coders can
modify, rearrange, add to, and delete menu options.
Don’t be one of them. Consider the Flash experience from
your audience’s point of view. You won’t go wrong by giv-
ing power to the people. Giving your audience as much
control as possible is always a good idea, but it’s crucial if
you’re planning to put your Flash animation on the Web.
You can’t possibly know your web audience’s hardware
configuration.
Say, for example, you create a splash page animation with
a stage size of 550 × 400 pixels, and a file size of 10 MB.
Someone accessing your animation on a handheld, over
a slow connection, or on a machine that’s already maxed
out running 10 other resource-hogging programs won’t be
able to see the animation you see on your machine.
But even if everyone on the planet had a high-speed con-
nection and the latest computer hardware, giving your au-
dience control would still be important. Why? Because no
matter how kick-butt your animation is, by the 23rd time
through, it’s going to wear a little thin. If you don’t offer at
least one of the options listed below, you risk turning away
repeat visitors:
• The ability to bypass intro splash screens and adver-
tising and go straight to the site’s home page.
• The ability to stop and restart the animation.
• The ability to turn off or turn down the audio.
• The ability to choose which sections of your anima-
tion to play.
• The ability to choose a low-bandwidth, reduced
length, or small-screen version of your animation.
You can accomplish these feats using a combination of
buttons, components, and some ActionScript code. So be
merciful to your audience and let them choose the Flash
experience that works on their end.
Reversing Frames in the Timeline
When you use Modify➝Timeline➝Reverse Frames in conjunction with Flash’s
copy-and-paste function, you can create the reverse of a series of frames quickly,
right in the timeline.
To create a reversed series of frames using Modify➝Timeline➝Reverse Frames:
1. Click the first frame in the series you want to reverse. Then Shift-click the last
frame in the series you want to reverse.
Flash highlights every frame in the series, from first to last.
517
C : C T A
Reversing a Series of
Frames
2. Select Edit➝Timeline➝Copy Frames. In the timeline, click the first frame
where you want to insert the reversed series of frames.
Flash highlights the selected frame.
3. Select Edit➝Timeline➝Paste Frames.
Flash pastes the copied frames onto the timeline, beginning at the selected
frame.
4. If the pasted frame series isn’t highlighted, select it (Figure 15-15, top).
5. Choose Modify➝Timeline➝Reverse Frames (Figure 15-15, bottom).
Flash reverses the frames in the timeline.
Tip: You can reverse the action in a motion tween by selecting the frames you want to change. Right-click
the selected frames and then choose Reverse Keyframes from the shortcut menu.
Figure 15-15:
Top: You don’t have
to begin a reverse
series directly after the
original series, but in most
cases—where you want a
seamless transition—you
do. After you paste the
series, make sure you select
the pasted frames if Flash
hasn’t done it for you.
Bottom: The Reverse
Frames option here ap-
pears grayed out if the
pasted frame series isn’t
highlighted.
Components for
Interactivity
C
reating common Flash elements like playback controls (Play and Pause
buttons), text fields, checkboxes, and buttons can add up to a lot of grunt
work. Since they pretty much look the same in every animation, some kind
Flash developers did the grunt work for you and put ready-made versions of these
Flash bits and pieces—called components—right into the program.
A component is a compiled, prebuilt movie clip that you can drag onto the stage and
customize. Flash comes with dozens of components (Figure 16-1). If you do a lot of
work in Flash, you’ll appreciate the time that components can save you. But another
great thing about components is the consistency they give. For example, the user
interface components discussed in this chapter all look like they belong together.
If you don’t like their style, Flash gives you some convenient ways to change their
appearance. So, if you’re working in a design shop, you can add time-tested compo-
nents to your projects and still give each client a look that matches her image and
brand.
There’s a consistency in the way you work with components, which also makes them
easy to use. This chapter starts off showing you how to add, modify, and write code
for the Button and ColorPicker components. By the time you’re done, you’ll not only
know how to work with Button components, but you’ll also be 90 percent of the way
to knowing how to use the other Flash components.
After you learn how to add, modify, and program a couple of components, you’ll
learn about the different types of components available and what they can do for
you. To wrap it all up, you’ll learn how to find and install components that come
from sources other than Adobe.
520
F CS: T M M
Adding Components
Figure 16-1:
Flash CS5 Professional comes with dozens of compo-
nents. Components for ActionScript 3.0 documents
include: User Interface controls to create interactive
buttons, boxes, and lists (similar to HTML form controls;
and Video controls, as discussed on page 393). The Flex
category is used to create components for use with the
Flex application development program.
User interface
components
Video
components
Note: Using components requires a fair amount of ActionScript knowledge. But creating your own
components is an even more ActionScript-intensive proposition. If you’d like to explore creating your
own components, check out both the ActionScript 3.0 and Components reference you find in Flash
Help (see page 434), and a good book that covers both ActionScript and object-oriented design. Colin
Moock’s Essential ActionScript 3.0, and ActionScript 3.0 Cookbook, by Joey Lott, et al. (both O’Reilly) are
two of the best on the market.
Adding Components
Adding a component to your animation is the first step in using that component. As
you’ll see in the following sections, adding an instance of a component to the stage
is similar to adding an instance of a symbol: All you have to do is drag and drop. But
instead of dragging components from the Library panel, you drag them from the
Components panel.
521
C : C I
Adding Components
To add a component to your animation:
1. Select Window➝Components.
The Components panel appears.
2. In the Components panel, click to a select the component you want, and then
drag it to the stage.
As Figure 16-2 shows, Flash displays an instance of the component on the stage.
It also places a copy of the component in the Library (Window➝Library).
Figure 16-2:
When you drag a
component from the
Components panel
to the stage, Flash
automatically adds
the component and
a Component Assets
folder to the Library.
Component Panel
Checkbox Component
on the Stage
Component Assets folder
Checkbox Component in the Library
Tip: Flash gives you another way to add a component: In the Components panel, double-click the
component. When you do, Flash immediately places an instance of the component on the center of
your stage.
In most cases, adding a component to the stage is just part of the process. After you
add the component, you still need to customize it and—depending on the compo-
nent you choose—add ActionScript code to make it work with the other parts of
your animation. That’s exactly what you’ll do in the following steps. In this example,
you’ll learn how to add buttons to an animation and then use those buttons to con-
trol both the main timeline and the timeline of a movie clip that’s added to the main
timeline.
This project uses a file, 16-1_Button_Component.fla, that you can download from
the Missing CD page (www.missingmanuals.com/cds). If you’d like to see the com-
pleted project, you can download 16-3_Map_Components_done.fla. The first steps
522
F CS: T M M
Adding Components
in this example set up the Flash document so it works with Button components and
the ActionScript code that makes the buttons work. That involves creating new lay-
ers for actions, labels, and buttons.
1. In Flash, open 16-1_Button_Component.fla.
There’s a layer named “words” containing five keyframes. In the last four key-
frames are the names of famous cities. There’s a second empty layer called
“maps.” In the Library, there’s a folder called “map jpgs” and a movie clip called
“Maps”.
2. Click the New Layer button in the lower-left corner of the timeline to add three
layers. From top to bottom, name them “actions,” “labels,” and “buttons.”
3. In the labels layer, click Frame 1, and then Shift-click Frame 5.
Flash selects all five frames.
4. With the frames selected, press F6.
Empty keyframes are created in each of the frames. You need to have keyframes
to create labels in each of the frames.
5. Add labels to each of the five keyframes by clicking each frame and then typ-
ing its name in the Properties➝Label➝Name box.
Name Frame 1 world; name Frame 2 paris; name Frame 3 london; name Frame 4
moscow; and name Frame 5 beijing. ActionScript uses these labels to find spe-
cific frames in the timeline. You won’t be using this layer again, so you can go
ahead and lock the contents by clicking the button under the padlock.
6. In the Library, double-click the Maps movie clip.
The movie clip opens in Flash.
7. Drag the playhead to inspect the individual frames in the movie clip, and then
click the Scene 1 button.
As you move the playhead, each frame shows a different map. The labels in
the timeline name the map. When you click the Scene 1 button, the movie clip
closes and brings you back to the main timeline.
8. Click the maps layer in the main timeline, and then drag the Maps movie clip
to the stage.
The Maps movie clip appears in all five frames of the main timeline because
there’s only one keyframe in the maps layer.
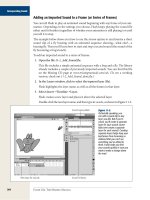
You don’t have to sweat positioning the movie clip by hand; you can do the job
with the Properties panel, as shown in Figure 16-3.
9. With the Maps movie clip selected, in the Properties panel, type the instance
name “maps.”
You have to name the instance of the Maps movie clip before you can control it
with ActionScript.
523
C : C I
Adding Components
Figure 16-3:
The Maps movie clip is
exactly the same size
as the Flash document,
550 × 400 pixels. Here,
the Maps movie clip
isn’t lined up with the
stage, but setting the
X/Y coordinates in Prop-
erties to 0,0 positions
it perfectly to cover the
entire stage. © 2008
Google Maps
Corner of stage Corner of maps movie clip
X/Y coordinates
Once the Maps movie clip is positioned and named, lock the maps layer so
you don’t accidentally move it when you’re repositioning other elements on the
stage.
If you test your animation at this point (Ctrl+Enter or c-Return on a Mac),
you’ll see the maps and city names flash by rapidly. So far, your steps have set
up a sort of a slideshow with labels that you can use as bookmarks for your
buttons and ActionScript code. In the next steps, you’ll add buttons and use
ActionScript to control both the main timeline and the Maps movie clip
timeline.
10. In the timeline, click the buttons layer.
You want to place all the new buttons in the buttons layer of the timeline.
11. Select Window➝Components to open the components panel, and then drag
the Button component to the stage.
The button appears on the stage, and two items appear in the Library: a button
symbol and a folder named Component Assets.
Note: When you add your first component to a Flash project, it increases the file size of the published
.swf file by about 20 to 50 kilobytes. This isn’t a whopping leap in file size by today’s standards, but it’s
good to know that if you add more components, they usually won’t increase your file size by the same
amount. They’ll add only a few more kilobytes for each component. That’s because most components
share a certain amount of underlying code. Once the basic code is added to the .swf file, it’s available to
any components that need it.
524
F CS: T M M
Adding Components
12. With the button selected, in the Properties panel, type the instance name
“ btnParis”.
When you select the button, the Instance Name box is at the top of the Proper-
ties panel. As with other symbols, you have to name the Button components
before ActionScript can work with them.
13. Select the button on the stage, and then in the Properties panel, if necessary,
expand the Component Parameters subpanel.
The Component Parameters subpanel shows the two parts of each parameter:
name and value, as shown in Figure 16-4. You customize components for your
project by changing the parameter values. Some parameters, like those with
true/false values, have drop-down menus. Other parameters, like the label pa-
rameter for buttons, have text boxes where you can type a new label.
Note: In earlier versions of Flash, you used the Components Inspector (Shift-F7) to set component
parameters. In Flash Professional CS5, those responsibilities have shifted to the Component Parameters
subpanel in the Properties panel. Not a bad move, since it puts all you property and parameter settings in
the same neighborhood, and you have one less window cluttering the screen.
Figure 16-4:
Use the Component Parameter subpanel to make
changes to the component parameters. The names of
parameters appear on the left. Use the text boxes and
menus on the right to change the parameter’s values.
Label parameter
14. Click the text box for the label parameter, and then type “Paris.”
What you type in this text box changes the word that appears on the button.
You don’t need to change any of the other parameters right now, but here’s a
rundown on their uses:
• emphasized. If this value is checked, or in programmer-speak true, it
changes the button’s appearance. Use it when you want to make one button
stand out from a group of buttons.
• enabled. If this value is deselected, the button won’t work. It’s helpful in
situations where you don’t want your audience to use a button but you still
want it to be visible.