Oracle XSQL combining sql oracle text xslt and java to publish dynamic web content phần 8 ppt
Bạn đang xem bản rút gọn của tài liệu. Xem và tải ngay bản đầy đủ của tài liệu tại đây (836.34 KB, 60 trang )
name, and price while the xsql:include-owa action is used to return the XML doc-
ument using the get_product_xml procedure used earlier.
<?xml version=”1.0”?>
<prod-details connection=”momnpup”
xmlns:xsql=”urn:oracle-xsql”>
<xsql:include-xsql href=”cat-nav.xsql”/>
<xsql:query rowset-element=”PRODUCT-SET”
row-element=”DETAILS”
product_id=”0”
bind-params=”product_id”>
SELECT id,name,price FROM product WHERE id=?
</xsql:query>
<xsql:include-owa product_id=”0” bind-params=”product_id” >
get_product_xml(?);
</xsql:include-owa>
</prod-details>
The last page for the public interface is the search results page. It uses the query
developed earlier and, like our other subordinate pages, includes the navigational ele-
ment on the left.
<?xml version=”1.0”?>
<prod-search connection=”momnpup”
xmlns:xsql=”urn:oracle-xsql”>
<xsql:include-xsql href=”cat-nav.xsql”/>
<xsql:query rowset-element=”PRODUCT_SEARCH”
row-element=”PRODUCT”>
SELECT id, name,
a.doc.extract(‘/product/summary/text()’).getStringVal() AS summary
FROM product a
WHERE contains(doc,’{@search_terms}’)>0
ORDER BY contains(doc,’{@search_terms}’)
</xsql:query>
</prod-search>
You have three XSQL pages for the price editor interface. The first displays the nec-
essary information in response to a lookup:
<?xml version=”1.0”?>
<prod-search connection=”momnpup”
xmlns:xsql=”urn:oracle-xsql”>
<xsql:query rowset-element=”PRICE_EDITOR_SEARCH”
row-element=”PRICE_EDITOR_PRODUCT”>
SELECT p.name AS product_name,
pc.name AS product_cat_name,
p.price
FROM product p, prod_cat_joiner pcj, product_category pc
WHERE p.id=pcj.product_id
AND
pcj.product_cat_id=pc.id
400 Chapter 14
AND
p.name like ‘%{@terms}%’
</xsql:query>
</prod-search>
Your second XSQL page is very similar to the product details page. The information
for this page will be used to fill the values for the fields of a particular editor.
<xsql:query connection=”momnpup”
xmlns:xsql=”urn:oracle-xsql”
rowset-element=”PRODUCT-SET”
row-element=”DETAILS”
product_id=”0”
bind-params=”product_id”>
SELECT id,name,price FROM product WHERE id=?
</xsql:query>
The last page to create is the page that handles the price change:
<price-editor xmlns:xsql=”urn:oracle-xsql” connection=”momnpup”>
<update>
<xsql:dml commit=”yes”
product_id=”0”
bind-params=”new_price product_id”>
UPDATE product
SET price=?
WHERE id=?
</xsql:dml>
</update>
<xsql:dml>COMMIT</xsql:dml>
<xsql:include-xsql href=”edit-prod-details.xsql”/>
</price-editor>
Now you have all of your XSQL pages created. You can test them using URLs to
make sure that you are getting the results you want back. In the next section, the
stylesheets are created to transform the raw data into something useful for your users.
Writing the Stylesheets
Earlier in this chapter, you developed the mock Web site. In the previous section, you
got the XSQL setup to pull the data from the database. Now you pull the two together
using XSLT stylesheets. The elements you’ll use were all covered earlier in this chapter.
What you’ll see here is how to fit the pieces together in a real application. As with the
preceding XSQL pages, you’ll see how to reuse and nest stylesheets. You’ll also see
techniques that are specific to XSQL.
You’ll start at the top of the site and develop the home page. Then you’ll handle the
two product listing pages—the search results page and the product-by-category page.
This section also includes the development of the product category navigational menu.
The last page of the public interface is the product details page, and then the two
Building XSQL Web Applications 401
stylesheets for the price editor will be developed. Two points of functionality are cov-
ered in later sections of this chapter: (1) the stateless paging of product result sets and
(2) parameter passing. In reality, you’ll probably want to solve those problems at the
same time as the stylesheet problems that you’ll be solving here. However, from a dis-
cussion standpoint, it is far easier to cover those topics in their own sections.
NOTE Before going any further, there is one fact of XSQL of which you should
be aware. Regardless of how you set the rowset and row element names in
your XSQL, they will be uppercase in your output. In the preceding examples
they were always set uppercase, so you won’t notice the difference. Because
XML is case sensitive, though, it’s important to be aware of this before you
start writing stylesheet code. If you specify lowercase rowset and row
element names in your XSQL and then write your stylesheets expecting those,
your stylesheets won’t work. The solution is simple—just uppercase the element
names in your stylesheet expressions.
First on the hit list is the home page. As with all of the XSQL pages, your first step is
to link to the stylesheet in your XSQL. For home.xsql, you should add the following
as the second line:
<?xml-stylesheet type=”text/xsl” href=”home2.xsl”?>
Now it’s time to create the stylesheet itself. The following code is the top of the doc-
ument and the main template that is invoked for the top-level element, “home”. There
are other templates to add, so you don’t have a closing stylesheet tag yet.
<?xml version = ‘1.0’?>
<xsl:stylesheet xmlns:xsl=” />version=”1.0”>
<xsl:include href=”banner.xsl”/>
<xsl:template match=”/home”>
<html>
<head>
<link rel=”stylesheet” type=”text/css” name=”catalogue”
href=”catalogue.css”>
</link>
</head>
<body>
<table width=”800” border=”0”>
<tr><td colspan=”2” height=”100”>
<! banner table >
<xsl:call-template name=”banner”/>
</td></tr>
<tr>
<td width=”600”>
<! product category table >
<xsl:apply-templates select=”PRODUCT_CATEGORIES”/>
</td>
<td valign=”top” width=”200”>
402 Chapter 14
<! promotion table >
<xsl:apply-templates select=”PROMOS”/>
</td>
</tr>
</table>
</body>
</html>
</xsl:template>
As promised, there are no problems integrating CSS with XSLT. We’ll use references
to CSS styles throughout the code examples. Working down through the example, the
next thing to notice is the xsl:include of banner.xsl. The banner.xsl stylesheet
contains a single template-named banner. It is called with an xsl:call-template
element. Notice that no parameters are passed to it. Here we are using XSLT for a sim-
ple purpose—HTML reuse. By separating the banner into its own file, it can be called
from all of our files. If we want to change it, we can change it once, and it will be
changed throughout the site. The fact that it doesn’t actually interpolate any of the
inputted XML data doesn’t actually matter. Here is the banner.xsl stylesheet:
<?xml version = ‘1.0’?>
<xsl:stylesheet xmlns:xsl=” />version=”1.0”>
<xsl:template name=”banner”>
<table width=”100%” height=”100” class=”banner-style” border=”0”>
<tr>
<td colspan=”2”>
<span class=”banner-title”>
Mom N’ Pup
</span>
</td>
</tr>
<tr>
<td align=”left” valign=”top”>
<i>
<span class=”banner-subtitle”>
Catalogue
</span>
</i>
</td>
<td align=”right” valign=”top”>
<form action=”prod-search.xsql” method=”post”>
<span class=”banner-subtitle”>
Search: <input name=”search_terms” size=”30”></input>
<input type=”submit” value=”go!”></input>
</span>
</form>
</td>
</tr>
</table>
</xsl:template>
</xsl:stylesheet>
Building XSQL Web Applications 403
The banner code itself isn’t particularly interesting. There aren’t even any XSLT
elements besides xsl:stylesheet and xsl:template. It could, of course, contain
any XSLT elements. However, because xsl:call-template is used to invoke the
template, you don’t know what the context node will be, and thus your XPath expres-
sions should be absolute. As discussed in Chapter 13, you can pass parameters to a
template that is invoked with xsl:call-template and have functionality similar to
a subroutine.
The one thing to note in the banner.xsl is the search field. It links to the prod
-search.xsql page using a post query. You’ll develop that stylesheet in another cou-
ple of pages. For now, it’s time to round out the home.xsl stylesheet that we started
earlier. Looking at the top-level template for home.xsql, you can see that two other
templates are invoked with apply-templates. These templates in turn invoke their
own templates. Let’s start with the “PROMOS” template and its associated template:
<xsl:template match=”PROMOS”>
<table border=”0”>
<xsl:apply-templates select=”PROMO”/>
</table>
</xsl:template>
<xsl:template match=”PROMO”>
<tr>
<td width=”200” height=”100”>
<a>
<xsl:attribute name=”href”>prod-details.xsql?product_id=<xsl:value-
of select=”PRODUCT_ID”/></xsl:attribute>
<img width=”200” height=”100”>
<xsl:attribute name=”src”>
<xsl:value-of select=”URL”/>
</xsl:attribute>
</img>
</a>
</td>
</tr>
</xsl:template>
Looking back at promo.xsql, you’ll see that it pulls two pieces of data on the
promo: (1) the product ID and (2) the URL for the promo image. The image is assumed
to be 200 x 100. A link is set around the image so that when you click on the image you
are taken to the product details page.
This template has the first of many uses of the xsl:attribute element to set the
value of an HTML attribute. You can’t use an XSLT element inside of an XML element,
like <a>, so you have to set the attribute separately. You may notice that the xsl:
attribute code isn’t nicely tabbed like the rest of the example. This is purposeful; If
you put the xsl:value-of element on its own line, then there will be white space
inside of your attribute value. You should always keep all of an xsl:attribute
element on one line.
The “PRODUCT CATEGORIES” template is the most complex in our entire applica-
tion. There are several challenges. First, the categories are separated into columns with
404 Chapter 14
the first categories appearing in the left-hand column and the later categories appear-
ing in the right-hand column. This is more complex than listing the columns in a left-
to-right ordering. To solve this, we have two separate tables nested into a higher-level
table consisting of only two cells. The xsl:apply-templates is called first on all
categories that are in the first half of the result set, and then a separate xsl:apply
-templates is called on all categories in the second half of the result set. If there is an
odd number of categories, the right-hand column will have the extra.
<xsl:template match=”PRODUCT_CATEGORIES”>
<table border=”0”>
<tr>
<td valign=”top”>
<! left hand table >
<table valign=”top” width=”300” border=”0”>
<xsl:apply-templates select=”CATEGORY[position() <= (last() div
2) ]”/>
</table>
</td>
<td valign=”top”>
<! right hand table >
<table valign=”top” width=”300” border=”0”>
<xsl:apply-templates select=”CATEGORY[position()>(last() div 2) ]”>
<xsl:with-param name=”align-val”>right</xsl:with-param>
</xsl:apply-templates>
</table>
</td>
</tr>
</table>
</xsl:template>
Notice that a parameter is passed for the right-hand categories. This is because the
mockup requires that the text in the left-hand column be left-adjusted, and the text in
the right-hand column be right-adjusted. You could develop two templates—one for
each column—but most all of the code would be redundant. Instead, you simply pass
a parameter and set the “align” attribute based on the parameter. Because the default
value of the parameter is “left”, it isn’t necessary to pass a parameter for the preceding
left-hand apply-templates. Here is the “CATEGORY” template that is invoked.
<xsl:template match=”CATEGORY”>
<xsl:param name=”align-val”>left</xsl:param>
<tr>
<td>
<xsl:attribute name=”align”><xsl:value-of select=”$align-
val”/></xsl:attribute>
<span class=”category”>
<a>
<xsl:attribute name=”href”>prod-cat.xsql?category_id=<xsl:value-
of select=”ID”/></xsl:attribute>
<! product name >
Building XSQL Web Applications 405
<b><xsl:value-of select=”NAME”/>. </b>
<! product description >
<xsl:value-of select=”DESCRIPTION”/>.
</a>
<i><xsl:apply-templates select=”PRODUCTS”/></i>
<a>
<xsl:attribute name=”href”>prod-cat.xsql?category_id=<xsl:value-of
select=”ID”/></xsl:attribute>
. . .
</a>
</span>
</td>
</tr>
</xsl:template>
For this template you pull the text values for the name and description elements for
the category and link them to the product category page. You also have to list the first
products in the category. The template for this follows. It solves two problems. First,
only the first three elements are pulled while the rest are ignored. Second, commas are
only inserted between elements 1 and 2 and elements 2 and 3. This is a common prob-
lem in XSLT and is easily solved with an xsl:if element along with the position
and last functions. The individual product names are linked to the product pages.
<xsl:template match=”PRODUCTS”>
<xsl:for-each select=”PRODUCTS_ROW[position() <= 3]”>
<a>
<xsl:attribute name=”href”>prod-details.xsql?product_id=<xsl:value-of
select=”./ID”/></xsl:attribute>
<xsl:value-of select=”./NAME”/>
<xsl:if test=”position() < last()”>, </xsl:if>
</a>
</xsl:for-each>
</xsl:template>
</xsl:stylesheet>
The last tag is the close of our stylesheet for the home.xsql. You’ll now have a
home page that looks like Figure 14.1 that appeared earlier in this chapter, but now all
of the data is database driven. What’s really neat is that all of the links and search func-
tionality work. You still get back the ugly XML, but you are getting back actual data
from the database. Now, it’s time to make the rest of the application pretty.
The search results page and the product category page present essentially the same
set of challenges. We might as well start with the product category page. On the left of
the page is the category directory. As with the banner template, the template for the
category directory will be separated into its own file. The main stylesheet along with
the stylesheet header is as follows:
406 Chapter 14
<?xml version = ‘1.0’?>
<xsl:stylesheet xmlns:xsl=” />version=”1.0”>
<xsl:include href=”banner.xsl”/>
<xsl:include href=”cat-nav.xsl”/>
<xsl:template match=”/prod-cat”>
<html>
<head>
<link rel=”stylesheet” type=”text/css” name=”catalogue”
href=”catalogue.css”>
</link>
</head>
<body>
<table width=”800” border=”0”>
<tr><td colspan=”2” height=”100”>
<! banner table >
<xsl:call-template name=”banner”/>
</td></tr>
<tr>
<td width=”200”>
<! product category list >
<xsl:apply-templates select=”product_categories”/>
</td>
<td valign=”top” width=”600”>
<table>
<tr><td>
<a href=”home.xsql”>Home</a>:
<xsl:value-of select=”//CATEGORY_NAME”/>
</td></tr>
<tr><td>
<! search results >
<xsl:apply-templates select=”PRODUCTS”/>
</td></tr>
</table>
</td>
</tr>
</table>
</body>
</html>
</xsl:template>
First, notice that the top-level template references a different element than
home.xsl. The top-level home.xsql page outputs “home” as the top-level element,
whereas the top-level element here is “prod-cat”. By having a different root element
for each XSQL page, you are able to build distinct templates for the different types of
data. If you ever need to intermingle the templates, it will be easier to do so.
Building XSQL Web Applications 407
As with the home page, the banner template is invoked to create the banner at the top
of the page. The product-categories template is in the cat-nav.xsl stylesheet
covered later. It handles the directory listing on the left-hand side of the page.
From there, the template precedes simply. The category name is pulled from the
XML, and then the template for the set of products is invoked. For the category name
we use the // to mean “child-or-descendant”. Because this axis appears at the begin-
ning of the expression, it means child or descendent of root. This syntax is a little dan-
gerous because it assumes that there is only one element of that name in the entire XML
document. In our case we know for certain that there is only one CATEGORY_NAME, so
it’s okay. The alternative would be to spell out multiple layers in order to access this one
data point. XSQL always expects there to be more than one row, so the XML is always
structured that way. However, if there really is only one row, it’s just another layer of
elements that needs to be navigated. Used with caution, the child-or-descendant axis
can make your code a little more readable when you are only pulling one row of data.
The products template and its child template, called”PRODUCT”, follow. These are
fairly straightforward. For each product in the result set, the product name and sum-
mary are listed. The product names are linked to the respective product details pages.
As this is the end of the stylesheet, the end tag is also included.
<xsl:template match=”PRODUCTS”>
<table class=”search-results” width=”100%”>
<th><span class=”search-results”>Product</span></th><th>Summary</th>
<xsl:apply-templates select=”PRODUCT”/>
</table>
</xsl:template>
<xsl:template match=”PRODUCT”>
<tr>
<td>
<a>
<xsl:attribute name=”href”>prod-details.xsql?product_id=<xsl:value-
of select=”PRODUCT_ID”/></xsl:attribute>
<xsl:value-of select=”PRODUCT_NAME”/>
</a>
</td>
<td><xsl:value-of select=”SUMMARY”/></td>
</tr>
</xsl:template>
</xsl:stylesheet>
Before moving onto the product search page, we need to back up and do the cat-
egory navigation page. It is a straightforward stylesheet that matches up with the
cat-nav.xsql page. The cat-nav.xsql page furnishes the XML as a top-level
element, and the cat-nav.xsl page takes that XML and formats into a list of linked
category names.
<?xml version = ‘1.0’?>
<xsl:stylesheet xmlns:xsl=” />version=”1.0”>
<xsl:template match=”product_categories”>
408 Chapter 14
<table valign=”top” width=”100%” height=”100%” class=”cat-directory”
border=”0”>
<tr><td><b>Categories</b></td></tr>
<xsl:apply-templates select=”category”/>
</table>
</xsl:template>
<xsl:template match=”category”>
<tr>
<td>
<a>
<xsl:attribute name=”href”>prod-cat.xsql?category_id=<xsl:value-of
select=”ID”/></xsl:attribute>
<xsl:value-of select=”NAME”/>
</a>
</td>
</tr>
<tr>
<td height=”10%”> </td>
</tr>
</xsl:template>
</xsl:stylesheet>
On to the search results page! The search results page is very similar to the product
category page and its full display follows. The one difference is that the linked category
name for a product is included in the results. The primary category for the product is
used.
<?xml version = ‘1.0’?>
<xsl:stylesheet xmlns:xsl=” />version=”1.0”>
<xsl:include href=”banner.xsl”/>
<xsl:include href=”cat-nav.xsl”/>
<xsl:template match=”/prod-search”>
<html>
<head>
<link rel=”stylesheet” type=”text/css” name=”catalogue”
href=”catalogue.css”>
</link>
</head>
<body>
<table width=”800” border=”0”>
<tr><td colspan=”2” height=”100”>
<! banner table >
<xsl:call-template name=”banner”/>
</td></tr>
<tr>
<td width=”200”>
<! product category list >
<xsl:apply-templates select=”product_categories”/>
</td>
<td valign=”top” width=”600”>
Building XSQL Web Applications 409
<table>
<tr><td><a href=”home.xsql”>Catalogue Home Page</a></td></tr>
<tr><td>Search Results For: </td></tr>
<tr><td>
<! search results >
<xsl:apply-templates select=”PRODUCT_SEARCH”/>
</td></tr>
</table>
</td>
</tr>
</table>
</body>
</html>
</xsl:template>
<xsl:template match=”PRODUCT_SEARCH”>
<table class=”search-results” height=”100%” width=”100%”>
<th><span class=”search-
results”>Product</span></th><th>Summary</th><th>Category</th>
<xsl:apply-templates select=”PRODUCT”/>
</table>
</xsl:template>
<xsl:template match=”PRODUCT”>
<tr>
<td>
<a>
<xsl:attribute name=”href”>prod-details.xsql?product_id=<xsl:value-
of select=”PRODUCT_ID”/></xsl:attribute>
<xsl:value-of select=”PRODUCT_NAME”/>
</a>
</td>
<td><xsl:value-of select=”SUMMARY”/></td>
<td>
<a>
<xsl:attribute name=”href”>prod-cat.xsql?category_id=<xsl:value-of
select=”CATEGORY_ID”/></xsl:attribute>
<xsl:value-of select=”CATEGORY”/>
</a>
</td>
</tr>
</xsl:template>
</xsl:stylesheet>
Now it’s time to finish the application by creating the product details stylesheet. It
includes the cat-nav.xsl and the banner.xsl as with the two previous
stylesheets. It also has a couple of tricks up its sleeve. The other stylesheets dealt with
pretty standard entities—names and short sentences. This page must render images of
varying sizes and XML documents of varying content. Though it is a little complex, the
prod-details.xsl stylesheet handles it all with elegance and shows you how pow-
erful XSLT can be. Here are the headers and the main template:
410 Chapter 14
<?xml version = ‘1.0’?>
<xsl:stylesheet xmlns:xsl=” />version=”1.0”>
<xsl:include href=”banner.xsl”/>
<xsl:include href=”cat-nav.xsl”/>
<xsl:include href=”product-xml.xsl”/>
<xsl:template match=”/prod-details”>
<html>
<head>
<link rel=”stylesheet” type=”text/css” name=”catalogue”
href=”catalogue.css”>
</link>
</head>
<body>
<table width=”800” border=”0”>
<tr><td colspan=”2” height=”100”>
<! banner table >
<xsl:call-template name=”banner”/>
</td></tr>
<tr>
<td width=”200”>
<! product category list >
<xsl:apply-templates select=”product_categories”/>
</td>
<td valign=”top” width=”600”>
<table>
<tr><td>
<a href=”home.xsql”>Home</a>:
<a href=”#”>
Category
</a>
</td></tr>
<tr><td>
<table width=”600”>
<! product details >
<xsl:apply-templates select=”PRODUCT-SET/DETAILS”/>
</table>
</td></tr>
</table>
</td>
</tr>
</table>
</body>
</html>
</xsl:template>
This template calls three templates. The first two are the old friends, banner and
product categories. The meat of the work is done in the “PRODUCT-SET/DETAILS”
template. Before examining that template, please note that one of our missing pieces of
Building XSQL Web Applications 411
functionality is on this page. The category from which this product was reached (or the
primary category if it was reached through a promo or the search engine) is missing.
This will be covered in the next discussion. For now, let’s look at the key template for
this page. The code follows:
<xsl:template match=”PRODUCT-SET/DETAILS”>
<tr>
<td align=”left”>
<span class=”product-name”>
<xsl:value-of select=”NAME”/>
</span>
</td>
<td align=”right”>
<span class=”product-price”>
$<xsl:value-of select=”PRICE”/>
</span>
</td>
</tr>
<tr><td colspan=”2”>
<xsl:choose>
<xsl:when test=”WIDTH>100”>
<xsl:apply-templates select=”IMAGE_URL”>
<xsl:with-param name=”align-var”>top</xsl:with-param>
</xsl:apply-templates>
</xsl:when>
<xsl:otherwise>
<xsl:apply-templates select=”IMAGE_URL”/>
</xsl:otherwise>
</xsl:choose>
<xsl:apply-templates select=”//product/*”/>
</td></tr>
</xsl:template>
The first thing to note is the match for this template. All of our other templates
matched an element one level down, but this one goes two levels down. The data we
want is two levels down, so we just skip a level. Once in the DETAILS element, we
have a couple of jobs to do. The name and the price need to be displayed at the top
level. Underneath that, an image needs to be displayed along with XML elements of
the product document.
The image is our first challenge because it can vary in size. If it is less than 300 pix-
els wide, then the text should be on the left. If it is over 300 pixels wide, then the text
should be underneath. An xsl:choose element is used to set a parameter to affect the
appropriate behavior. After the image is set up, the XML document from our database
is processed. Before getting to that, let’s look at the IMAGE_URL template.
<xsl:template match=”IMAGE_URL”>
<xsl:param name=”align-var”>right</xsl:param>
<xsl:if test=”$align-var=’top’”>
<xsl:text disable-output-escaping=”yes”><center></xsl:text>
412 Chapter 14
</xsl:if>
<img>
<xsl:attribute name=”align”><xsl:value-of select=”$align-
var”></xsl:value-of></xsl:attribute>
<xsl:attribute name=”height”><xsl:value-of
select=” /HEIGHT”/></xsl:attribute>
<xsl:attribute name=”width”><xsl:value-of
select=” /WIDTH”/></xsl:attribute>
<xsl:attribute name=”src”><xsl:value-of select=”.”/></xsl:attribute>
</img>
<xsl:if test=”$align-var=’top’”>
<xsl:text disable-output-escaping=”yes”></center></xsl:text>
</xsl:if>
</xsl:template>
Most of the code in this template sets up the img element. The align attribute is set
by the align-var variable that is passed in, or is set to “right” if no variable is
passed in. The width, height, and src attributes are also set. In the case where the image
should appear at top, it should be centered. The xsl:if element is used to determine
when the beginning center tag and the closing center tag should be used.
This is a ticklish case because we run into the old problem of inserting XML ele-
ments into the document. If we tried to do:
<xsl:if test=”$align-var=’top’”>
<center>
</xsl:if>
then our document isn’t valid XML, and the stylesheet processor will reject it. We
could do:
<xsl:choose>
<xsl:when test=”$align-var=’top’”>
<center>
. . . bunch o’ code
</center>
</xsl:when>
<xsl:otherwise>
. . . same bunch o’ code
</xsl:otherwise>
</xsl:choose>
but then we have a lot of redundant code. The workaround is to use the xsl:text ele-
ment with disable-output-escaping on. The burden is on us to make sure that the end
result is well-formed XML.
The last set of templates is in its own separate file. They don’t have to be, but it
allows our overall code to be a little neater. These templates match against the XML ele-
ments in the XML product document. The idea is that the elements of the XML docu-
ment can vary from product to product. Clothing has sizes, but soccer goals don’t. We
Building XSQL Web Applications 413
could do a lot of logical processing to handle all of the different permutations. Or, we
can take an XML push approach. Before explaining further, let’s look at the code:
<?xml version = ‘1.0’?>
<xsl:stylesheet xmlns:xsl=” />version=”1.0”>
<xsl:template match=”summary”>
<p class=”product-summary”>
<b>Summary:</b>
<br/>
<xsl:value-of select=”.”/>
</p>
</xsl:template>
<xsl:template match=”description”>
<p class=”product-description”>
<b>Description:</b>
<br/>
<xsl:value-of select=”.”/>
</p>
</xsl:template>
<xsl:template match=”dimensions”>
<p class=”product-dimensions”>
<b>Dimensions:</b>
<br/>
<xsl:value-of select=”long-val”/> <xsl:value-of select=”long-unit”/>
long
<xsl:value-of select=”wide-val”/> <xsl:value-of select=”wide-unit”/>
wide
<xsl:value-of select=”tall-val”/> <xsl:value-of select=”tall-unit”/>
tall </p>
</xsl:template>
<xsl:template match=”clothing-size-list”>
<p class=”clothing-size”>
Sizes:
<xsl:for-each select=”size”>
<xsl:value-of select=”.”/>
<xsl:if test=”position()<last()”>,</xsl:if>
</xsl:for-each>
</p>
</xsl:template>
<xsl:template match=”*”></xsl:template>
</xsl:stylesheet>
So far, all of our templates have been used. In the case of these product-specific XML
documents that are being passed to us, some of the templates won’t be used. We can
assume that summary and description will be present for all of the items. However,
you wouldn’t provide dimensions for a sweater, and you wouldn’t provide the cloth-
ing size for a dresser. Instead, the XML elements in a product’s document are matched
to the appropriate templates. If a new product comes along whose XML document has
a new element, you simply write up a template for it and put it in this document. You
414 Chapter 14
set up a style for it to be consistent with the rest of the templates, and you’re done. If
you have elements that you don’t want displayed, they won’t be because of the wild-
card element at the bottom.
What this approach doesn’t allow for is the complete reformatting of a page based
on the XML document. Also, the elements will be displayed in document order. If the
summary in a particular document appears at the bottom of an XML document in the
database, it will appear at the bottom of the page in our application. If you can’t
depend on the order, you can simply use individual xml:apply-templates to force
the order. Then you are back to requiring foreknowledge of all the XML documents’
structures and you lose the flexibility of our looser approach.
The public application is mostly complete. You can browse to your heart’s content.
If you stick new data into the database, then it should immediately appear in the appli-
cation. The following sections in this chapter, “Passing Parameters,” “Stateless Pag-
ing,” and “Error Handling,” will fullfill the rest of the requirements for the public
application.
Passing Parameters
HTTP was originally designed as a stateless protocol. An HTTP transaction performs a
single action, such as getting a file or posting HTML form data, and then it ends. This
is both a great strength and a great weakness. Because the transactions end immedi-
ately after the data is delivered back to the client, HTTP is very lightweight on the net-
work. Your HTTP-based applications can easily scale to large numbers of users
because very few transactions are alive at any given point in time.
When developing applications, though, the stateless nature of HTTP comes at a cost.
You have data on one page that needs to be passed to another page. A lot of the chal-
lenge of Web development is figuring out the best way to pass information between
two completely different transactions. The facilities that XSQL has for this were dis-
cussed in detail in Chapter 9. Now you’ll see how these can be applied in the real
world. In this section, you’ll mend up some of the holes of our application, and you’ll
learn some new lessons. You’ll immediately apply those lessons in this chapter—first,
when you solve the pagination problems, and then when you develop the price editor
part of the sample application.
For now, you’ll focus on the techniques of passing parameters. The first technique is
the simplest: You simply pass your parameter as part of an already existing SQL query.
Then you’ll look at the other two important techniques to setting parameters: (1) set-
ting stylesheet parameters and (2) using hidden-form variables. Later in this chapter,
you’ll also see how to set parameter values directly into JavaScript.
Passing Using SQL
The simplest way to move your parameters along to the next page of your application
is to have them hitch a ride. An XSQL page usually has at least one xsql:query, and
it often involves the very data that you wish to pass along to the next page. We already
Building XSQL Web Applications 415
used this technique on the product category page with the following XSQL on the
prod-cat.xsql:
<xsql:query rowset-elements=”CATEGORY_ROWSET”
row-element=”CATEGORY_ROW”
category_id=”0”
bind-params=”category_id”>
SELECT id AS category_id,
name AS category_name
FROM product_category WHERE id=?
</xsql:query>
If you look back at that page, you’ll see that it makes perfect sense to pull the cate-
gory name. We need it to display at the top of the page. But why pull the ID for the cat-
egory? It doesn’t need to be displayed anywhere. The reason is that it needs to be
passed to the prod-details.xsql page because the selected category name needs
to be displayed on the next page. Because the name will also be linked back to the
product home page, the ID needs to be passed. This allows you to change the product
template of the prod_cat.xsl stylesheet as follows:
<xsl:template match=”PRODUCT”>
<tr>
<td>
<a>
<xsl:attribute name=”href”>prod-details.xsql?product_id=<xsl:value-
of select=”PRODUCT_ID”/>&category_id=<xsl:value-of
select=”//CATEGORY_ID”/>&</xsl:attribute>
<xsl:value-of select=”PRODUCT_NAME”/>
</a>
</td>
<td><xsl:value-of select=”SUMMARY”/></td>
</tr>
</xsl:template>
Now, you’re passing the parameter in the simplest way possible: embedded in a
hyperlink. On the product details page, the following code changes so that you get the
name and link to the category at the top of the page:
<tr><td>
<a href=”home.xsql”>Home</a>:
<a>
<xsl:attribute name=”href”>prod-cat.xsql?category_id=<xsl:value-of
select=”//CATEGORY_ID”/>&</xsl:attribute>
<xsl:value-of select=”//CATEGORY_NAME”/>
</a>
</td></tr>
You certainly don’t have to have a SQL statement for your parameters to latch on to.
Before worrying with how to pass a parameter on from a page, however, you should
take a close look at the where clauses of the SQL statements already on that page. It’s
416 Chapter 14
the nature of database applications that the parameters you want to pass are already
being used in a where clause. In such cases, the simplest solution is to also specify them
as a field that is returned.
Setting Stylesheet Parameters
In the preceding example, you may have noticed that there was only one
CATEGORY_ID and one CATEGORY_NAME in our example. We used the child-or-
descendant axis to access these single values. As discussed earlier, this is somewhat
dangerous. Wouldn’t it be easier just to reference them as a parameter? That is what
stylesheet parameters are all about.
You learned in the last chapter that you can use parameters in conjunction with tem-
plates. When you invoke a template, you can pass a parameter to it, as you saw earlier
in this chapter. You can also set parameters at the top level and then set them at the
time the stylesheet is loaded by the XSLT processor. Let’s look at this in the context of
another lingering problem that we have with our sample application: The search terms
need to appear at the top of the search results page.
A quick review of the search functionality may be needed. The prod
-search.xsql page performs the search based on the search_terms parameter
passed to it from the search form. The search results are rendered by the prod
-search.xsl stylesheet. What you need to do is to pass the search terms to the
stylesheet so that the user can see what they just searched on.
If you look back at the SQL in the prod-search.xsql page, you’ll see that the
search terms could hitch a ride over to the page quite easily. For this example, however,
let’s use a different approach. Using the xsql:set-stylesheet-param action, you
can make the search terms available as an easy-to-use stylesheet parameter. In prod
-search.xsql, you add the following line anywhere in the page:
<xsql:set-stylesheet-param name=”search_terms” value=”{@search_terms}”/>
On the prod-search.xsl stylesheet, you need to add the following line. The
xsl:param should be a direct child of the root stylesheet element:
<xsl:param name=”search_terms”></xsl:param>
Further down in the stylesheet, you add the following code in order to get the search
terms:
<tr>
<td>
Search Results For: <xsl:value-of select=”$search_terms”/>
</td>
</tr>
As was covered in previous chapters, you can also set the value of stylesheet para-
meters based on SQL statements. They still can only hold a single value, though—if
your SQL statement returns multiple rows and columns, all but the first row and first
column are ignored.
Building XSQL Web Applications 417
Stylesheet parameters are ideal for when you have just a couple of pieces of infor-
mation that need to be passed onto the next page. You can easily reference the values
by using the $ operator. If they need to be passed onto another page, it is easy to embed
them in a link or put them in a form parameter. You’ll be making more use of stylesheet
parameters when you build the price editor.
Using Other XSQL Parameters
You’ll remember from previous chapters that there a couple of other types of parameters:
page-private parameters, session parameters, and cookie parameters. These are beyond
the parameters that arrive as part of the HTTP request. Page-private parameters are a
mechanism that is used inside an XSQL page and isn’t of interest to us here. Cookies
and session parameters can be of great interest to us.
Cookies and session parameters give you much better persistence. As long as the
user allows it, you can store a cookie on their machine for as long as you like. If you
have a particular value that needs to be stored for the duration of the user’s session,
then you can do that by setting a session parameter. You don’t have to pass it from one
page to another.
Let’s look at how you would use a session parameter or a cookie to solve the prob-
lem of referencing the category name. In the prod-cat.xsql file, you add the fol-
lowing actions:
<xsql:set-session-param name=”category_name_sess”
category_id=”0”
bind-params=”category_id”>
SELECT name FROM product_category WHERE id=?
</xsql:set-session-param>
<xsql:set-cookie name=”category_name_cookie”
category_id=”0”
bind-params=”category_id”>
SELECT name FROM product_category WHERE id=?
</xsql:set-cookie>
Unlike in the earlier solution, you don’t need to make any modifications to the
prod-cat.xsl stylesheet. With the previous approach, parameters are passed by
embedding them in the HTTP request. In the preceding case, they were passed in the
URL. In the case where a POST request is used, you can pass them as hidden-form vari-
ables. In these cases the parameters sit outside of the request. The cookie lives on the
user’s browser and is sent back to the server on each request, based on the domain
parameter of the xsql:set-cookie action. The session parameter actually lives on
the server but is tied to a cookie on the user’s browser. In either case, all you have to do
is ask for them when you need them. You can do this regardless of where you are in the
application. This is how you would get those values to pop up on the product details
page. First, put the following anywhere in your prod-details.xsql page:
<xsql:include-param name=”category_name_cookie”/>
<xsql:include-param name=”category_name_sess”/>
418 Chapter 14
The values will be placed in XML elements in the output named category_name_
cookie and category_name_sess, respectively. You can grab them using the
following code in your XSLT stylesheet:
category_name_cookie: <xsl:value-of select=”//category_name_cookie”/>
category_name_sess: <xsl:value-of select=”//category_name_sess”/>
You may look at this code and think, “That looks simple. Why not do that all the
time?” There are a couple of problems with this approach. First, both session and
cookie parameters assume that the user will accept cookies from you. A lot of applica-
tions assume this—there’s no big whoop in requiring this from your users.
The second problem requires more consideration. Sessions and cookies behave like
global variables in procedural programming. Global variables are generally frowned
upon—it’s hard making sure that all of the different modules are setting and unsetting
them as expected. In fact, our solution has such a problem. If someone goes to a product
category page and then doesn’t go on to a product details page, the category name is still
set. If they then access the page from a different route (e.g., through a promo or through
a search), the category name is still set. Then you have a different kind of problem.
In the previous example, you dealt with cookies and session parameters whose
names you know. It is sometimes good to deal with parameters more generally. For
instance, you may want to pass all of the parameters to a servlet and let the servlet fig-
ure out what to do with them. The following example shows you an easy way to deal
with all of the parameters without knowing any of their names at development time.
To demonstrate this, you first need an XSQL page that sets some parameters, though it
doesn’t matter what their names are:
<?xml version=”1.0”?>
<?xml-stylesheet type=”text/xsl” href=”params.xsl”?>
<page xmlns:xsql=”urn:oracle-xsql” connection=”demo”>
<xsql:set-cookie name=”long-living-cookie” max-age=”999999”
value=”To_Life” />
<xsql:set-cookie name=”cookie-deptno”>
select deptno from emp where ename=’{@ename}’
</xsql:set-cookie>
<xsql:set-session-param name=”session-sal”>
select sal from emp where ename=’{@ename}’
</xsql:set-session-param>
<xsql:include-request-params />
</page>
Now you want to be able to access all of these values in a stylesheet. Here’s a simple
stylesheet that will display all of your values:
<?xml version = ‘1.0’?>
<xsl:stylesheet xmlns:xsl=” />version=”1.0”>
<xsl:template match=”/page”>
<html>
Building XSQL Web Applications 419
<head></head>
<body>
<xsl:apply-templates/>
</body>
</html>
</xsl:template>
<xsl:template match=”request”>
<b>Request:</b>
<xsl:apply-templates select=”*”/>
</xsl:template>
<xsl:template match=”session”>
<b>Session:</b>
<xsl:apply-templates select=”*”/>
</xsl:template>
<xsl:template match=”cookies”>
<b>Cookies:</b>
<xsl:apply-templates select=”*”/>
</xsl:template>
<xsl:template match=”*”>
<p>
Name: <xsl:value-of select=”name(.)”/>
Value: <xsl:value-of select=”.”/>
</p>
</xsl:template>
</xsl:stylesheet>
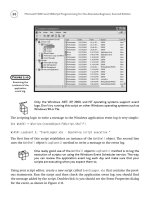
This will give you a listing of all of the parameters, regardless of their names. Exam-
ple output for this is shown in Figure 14.11.
From here, it is a simple matter to create a set of hidden-form parameters that hold
these values. Then you can use easily pass the values on as form submissions, or use
them in JavaScript. Here is how you do it:
<xsl:template match=”*”>
<input type=”hidden”>
<xsl:attribute name=”name”><xsl:value-of
select=”name(.)”/></xsl:attribute>
<xsl:attribute name=”value”><xsl:value-of
select=”.”/></xsl:attribute>
</input>
You’ll see more examples of hidden-form variables and the role they can play
in JavaScript and XSLT integration when you work with the price editor later in the
chapter.
420 Chapter 14
Figure 14.11 Output of all parameters.
Stateless Paging
So far, the product catalog doesn’t have a lot of data in it. A list of all of the products in
the catalog probably still wouldn’t necessitate a scroll bar in the browser window.
However, what if your queries could easily return thousands of rows? Even if your
queries are just returning tens of rows, you want your users to be able to navigate
through them in a reasonable manner. This is where paging comes in. Instead of show-
ing all of the results on one page, you see just a set of results, and then you can navi-
gate forward and backward to other sets of results. This section looks at the challenges
of pagination from a high level and then shows you how to apply paging to the search
screen of the catalog application.
Building XSQL Web Applications 421
The solution that will be provided here is a pure XSQL/XSLT solution. The example
uses a recursive technique and really stretches the capabilities of XSLT. However, when
you find yourself stretching too hard, it is often good to ask, “Is there a better way to
do this?” In this case, the answer is probably yes.
Challenges of Pagination
Paging offers a simple solution to a common problem. What do you do when you get
a lot of results back in your search? You don’t want to try to force them all into one
browser window. For particularly big searches the browser might run out of memory
first. Instead, you want to separate the queries over pages.
The next question is: How do you separate a query into a lot of different pages? You
definitely don’t want to keep a connection to the database server open. It doesn’t scale.
You’ll be keeping connections open for indefinite periods of time for all of the users
that come to the site. Besides, there isn’t a way to do it without a custom action handler,
anyway. Temporary tables are also a generally bad idea for this kind of thing. You
might be able to cobble a solution to the problem, but you’ll create big development
headaches for yourself. Not to mention, you’ll need some multiple of storage space to
keep all of the pages of results for the queries. As you get more queries, you’ll need
more storage space.
Fortunately, the xsql:query action offers an easy solution. You use the max-rows
and skip-rows attributes to describe your pages of a query. The max-rows attribute
sets the size of the page—how many rows you want the query to return. The skip
-rows attribute specifies where in the query result set you should start—the position
of the page.
This does mean, of course, that you will be doing the same query for each page. This
may seem expensive and redundant, but it is Oracle’s job to optimize queries and
make subsequent requests speedy. Besides, you simply can’t reasonably keep the data-
base connection open, and even if you tried to hack together a solution with temporary
tables, you still would be doing a query for every page.
Pure XSQL Stateless Paging
Now it’s time to attack stateless paging. As with most of the problems in this chapter,
it is both an XSQL and an XSLT problem. The XSQL code is fairly straightforward. You
need to set the skip-rows and max-rows attributes on the query and get the total
number of rows from the database. Then, you need to pass the information on the
stylesheet by setting stylesheet parameters. Not hard. The XSLT gets a bit more com-
plex. Because you don’t know how many pages you are going to have, you have to cal-
culate that using XSLT. This requires a recursive template. You’ll probably either love
422 Chapter 14
this technique or hate it. In either case, it is an interesting exercise in how you can solve
problems in XSLT that are usually solved in XSLT. First things first, starting with the
XSQL. You’ll need to change your query to use skip-rows and max-rows as follows:
<xsql:query rowset-element=”PRODUCT_SEARCH”
row-element=”PRODUCT”
max-rows=”{@max-rows}”
skip-rows=”{@skip-rows}”>
SELECT p.id AS product_id,
p.name AS product_name,
p.doc.extract(‘/product/summary/text()’).getStringVal() AS
summary,
pc.id AS category_id,
pc.name AS category
FROM product p, product_category pc
WHERE contains(doc,’{@search_terms}’)>0
AND pc.id=p.category_id
ORDER BY contains(doc,’{@search_terms}’)
</xsql:query>
This introduces a new parameter: skip-rows. Skip-rows, which is where a given
page should start, will be passed as part of the request. Max-rows, which is the maxi-
mum number of records that should be displayed for all of the pages, is really more of
a constant. It is made a parameter here so that if you wanted to dynamically change it,
you could. Maybe you let your users select how big they want their pages to be. For
this example, we set the value of this parameter inside the XSQL page with an
xsql:set-page-param action:
<xsql:set-page-param name=”max-rows” value=”4”/>
The skip-rows parameter still needs to be defined. It should be passed in on all
requests, including the initial search. This means you need to make a change in the
banner.xsl page where the search query form is defined. The new form should look
like this:
<form action=”prod-search.xsql” method=”post”>
<span class=”banner-subtitle”>
Search: <input name=”search_terms” size=”30”/>
<input type=”hidden” name=”skip-rows” value=”0”/>
<input type=”submit” value=”go!”></input>
</span>
</form>
Building XSQL Web Applications 423
Now your query will work for the first page. Regardless of the search, you should
get at most four results. The next challenge is giving the user a way to navigate to the
other results. This is where the real XSLT adventures start. All of these modifications
will take place in prod-search.xslt. Your first step is to create top-level parameters
so you can receive the values that you set in prod-search.xsql:
<xsl:param name=”search_terms”></xsl:param>
<xsl:param name=”row-count”></xsl:param>
<xsl:param name=”skip-rows”></xsl:param>
<xsl:param name=”max-rows”></xsl:param>
Now you need to create a template that recreates the initial form using all hidden
parameters:
<xsl:template name=”paging-form”>
<xsl:param name=”new-skip-rows”></xsl:param>
<xsl:param name=”button-text”></xsl:param>
<form method=”post” action=”prod-search.xsql”>
<input type=”hidden” name=”skip-rows”>
<xsl:attribute name=”value”><xsl:value-of select=”number($new-skip-
rows)”/></xsl:attribute>
</input>
<input type=”hidden” name=”search_terms”>
<xsl:attribute name=”value”><xsl:value-of
select=”$search_terms”/></xsl:attribute>
</input>
<input type=”submit”>
<xsl:attribute name=”value”><xsl:value-of select=”$button-
text”/></xsl:attribute>
<xsl:if test=”$new-skip-rows=-1”>
<xsl:attribute name=”disabled”>yes</xsl:attribute>
</xsl:if>
</input>
</form>
</xsl:template>
You call this template with two parameters, new-skip-rows and button-text.
The new-skip-rows parameter specifies the position in the query that the user
should go to on pressing the form’s Submit button. The button-text parameter
specifies the text for the button. If the new_skip_rows parameter is set to -1, then the
Form button is disabled.
You can get around the need to use a Form button with a little JavaScript, but it’s dif-
ficult to get around the need to use a form. The query needs to be a POST query
because search_terms may have spaces and other funny characters in it. If you tried
to pass it as part of a query string, the link would break. In the next section, you’ll see
a way to encode values using XSLT extensions.
Now that you have your form, you need to link it to some navigational elements.
We’ll start simply with just Previous and Next buttons. The problem here is determin-
ing what the Previous and Next pages are and whether it is valid to enable the buttons.
424 Chapter 14