oracle 8 database administration volume 1 instruction guide phần 3 ppt
Bạn đang xem bản rút gọn của tài liệu. Xem và tải ngay bản đầy đủ của tài liệu tại đây (285.01 KB, 40 trang )
3
Managing
an Oracle Instance
3-2 Oracle8: Database Administration
.
Lesson 3: Managing an Oracle Instance
Instructor Note
Topic Timing
Lecture 75 minutes
Practice 40 minutes
Total 115 minutes
Oracle8: Database Administration 3-3
.
Objectives
Objectives
3-2
Copyright Oracle Corporation, 1998. All rights reserved.
Objectives
• Setting up operating system and
password file authentication
• Creating the parameter file
• Starting up an instance and opening the
database
• Closing a database and shutting down
the instance
• Getting and setting parameter values
• Managing sessions
• Monitoring ALERT and trace files
3-4 Oracle8: Database Administration
.
Lesson 3: Managing an Oracle Instance
Overview
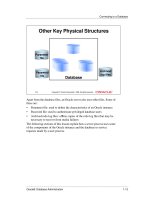
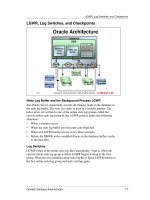
An Oracle database is not available to users until the database administrator
has started the instance and opened the database.
During a database startup, the following events occur that take the Oracle
database through various stages:
1 Start an instance.
2 Mount the database.
3 Open the database.
Every time an instance is started, Oracle uses a parameter file, which
contains initialization parameters, to allocate the SGA and to start the
background processes.
If an instance is started or a database is open, you can follow these steps to
shut down the database:
1 Close the database.
2 Dismount the database.
3 Shut down the instance.
When a database is closed, users cannot access it. Starting up and shutting
down are covered in detail later in this lesson.
3-3
Copyright Oracle Corporation, 1998. All rights reserved.
User
process
Server
process
PGA
Password
file
ALERT
file
Parameter
file
Overview
Control
files
Data files
Redo log
files
Instance
SGA
Shared pool
Oracle8: Database Administration 3-5
.
Validating Privileged Users
Validating Privileged Users
3-4
Copyright Oracle Corporation, 1998. All rights reserved.
Database Administrator Users
• Automatically created
• Granted the DBA role
The two database administrator users
SYS and SYSTEM are:
3-5
Copyright Oracle Corporation, 1998. All rights reserved.
User SYS and SYSTEM
SYS
• Password:
change_on_install
• Owner of the
database data
dictionary
SYSTEM
• Password:
manager
• Owner of additional
internal tables used
by Oracle tools
3-6 Oracle8: Database Administration
.
Lesson 3: Managing an Oracle Instance
The Database Administrator Users
Extra privileges are necessary to execute administrative duties in Oracle
such as creating users. These operations must be performed by database
administrators.
Two database user accounts, SYS and SYSTEM, are automatically created
with the database and granted the DBA role
—that is, a predefined role that is
automatically created with every database. The DBA role has all database
system privileges.
Note
This subject is covered in more detail in the lesson “Managing Privileges.”
SYS
When a database is created, the user SYS, identified initially by the
password CHANGE_ON_INSTALL, is automatically created and granted
the DBA role.
All of the base tables and views for the data dictionary are stored in the
schema SYS.
SYSTEM
When a database is created, the user SYSTEM, identified initially by the
password MANAGER, is also automatically created and granted the DBA
role privileges for the database.
In the schema SYSTEM, additional tables and views are created that contain
administrative information used by Oracle tools.
Note
You will probably want to create at least one additional administrator
username to use when performing daily administrative tasks.
Instructor Note
Briefly define the term schema as a synonym of user and explain that this
subject will be covered in more detail in the security lessons.
Oracle8: Database Administration 3-7
.
Validating Privileged Users
Connecting with Administrator Privileges
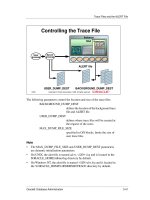
In some cases the database administrator needs a special authentication
method, because the database may not be open, especially for operations
like shutdown and startup.
Depending on whether you want to administer your database locally on the
same machine on which the database resides or to administer many different
database servers from a single remote client, you can choose either operating
system authentication or password files to authenticate database
administrators.
3-6
Copyright Oracle Corporation, 1998. All rights reserved.
Remote database
administration
Local database
administration
Yes Yes
No No
Do you
have a secure
connection?
Do you want
to use OS
authentication?
Use OS
authentication
Use a
password file
Authentication Methods
3-8 Oracle8: Database Administration
.
Lesson 3: Managing an Oracle Instance
Setting up the user to be authenticated by an operating system authentication
on a UNIX system is different from setting up a user for authentication on an
NT system.
UNIX
1 The user must be a member of the UNIX group, usually called dba, that
is created before the Oracle Server is installed. The installer assigns
Oracle database administrator and operator privileges to this UNIX
group.
2 View the files /etc/group and /etc/passwd to determine the members of
the UNIX group.
The following lines are an excerpt from the /etc/passwd file:
user15:x:1064:100::/home/disk3/user15:/bin/ksh
oracle:x:920:100::/export/home/oracle:/bin/ksh
vvijayan:x:1032:100::/users/vvijayan:/bin/ksh
The following line belongs to the /etc/group file:
dba::100:root,oracle,estrodac,tigger,jdiianni
3-7
Copyright Oracle Corporation, 1998. All rights reserved.
Operating System
Authentication
• Set up the user to be authenticated by
the operating system.
• Set REMOTE_LOGIN_PASSWORDFILE
to NONE.
• Use the following commands to connect
to a database:
CONNECT / AS SYSDBA
CONNECT / AS SYSOPER
Oracle8: Database Administration 3-9
.
Validating Privileged Users
3 Make sure that the REMOTE_LOGIN_PASSWORDFILE parameter is
NONE, which is the default value for this parameter.
4 Connect to the database with the privilege SYSDBA or SYSOPER—
these are special database administrator privileges. This implies
connecting in the schema owned by SYS:
CONNECT / AS {SYSDBA |SYSOPER }
Note
Using the privileges SYSDBA and SYSOPER is covered in the lesson
“Managing Privileges.”
NT
1 Create a new local Windows NT users’ group called ORA_<SID>_DBA
and ORA_<SID>_OPER that is specific to an instance, or ORA_DBA
and ORA_OPER that is not specific to an instance.
2 Add a Windows NT operating system user to that group. Once you
access this domain, you are automatically validated as an authorized
DBA.
3 Set the REMOTE_LOGIN_PASSWORDFILE to NONE.
4 Connect to the database with the privilege SYSDBA or SYSOPER:
CONNECT / AS { SYSDBA|SYSOPER }
Note
• To connect to a Windows NT server from a local, remote Windows NT
or Windows 95 client, NET8 must be installed on both the client and the
server.
• The use of the command CONNECT INTERNAL used with earlier
versions of Oracle has been replaced by the new syntax:
CONNECT INTERNAL/pw AS SYSDBA
CONNECT INTERNAL continues to be supported for backward
compatibility only.
• Oracle no longer supports setting DBA_AUTHORIZATION parameter
in the registry to BYPASS to enable connections without the use of a
password.
3-10 Oracle8: Database Administration
.
Lesson 3: Managing an Oracle Instance
Using Password File Authentication
Oracle provides a password utility that allows connection to the Oracle
Server using a standard username and password, but that connects the user
to the SYS schema instead of as the username provided. Access to the
database using the password file is provided by special GRANT commands
issued by privileged users (see the lesson “Managing Privileges.”)
Using a Password File on a UNIX and an NT Server
1 Create the password file using the password utility ORAPWD on UNIX
or ORAPWD80 on NT.
orapwd file=<fname> password=<password> entries=<entries>
where:
fname is the name of the password file
password is the password for SYS and INTERNAL
entries is the maximum number of distinct
database administrators
The following command creates a password file with the password
“admin” for the user SYS and INTERNAL and accepts up to five users
with different passwords:
$orapwd file=$ORACLE_HOME/dbs/orapwU15 password=admin entries=5
3-8
Copyright Oracle Corporation, 1998. All rights reserved.
Using Password File
Authentication
• Create the password file using the
password utility:
• Set REMOTE_LOGIN_PASSWORDFILE
to EXCLUSIVE or SHARED
• Use the following command to connect
to a database:
$orapwd file=$ORACLE_HOME/dbs/orapwU15\
password=admin entries=5
CONNECT INTERNAL/ADMIN
Oracle8: Database Administration 3-11
.
Validating Privileged Users
2 Set the REMOTE_LOGIN_PASSWORDFILE parameter to
EXCLUSIVE or SHARED.
where:
EXCLUSIVE indicates that only one instance can use the
password file and that the password file
contains other names than SYS and
SYSTEM
SHARED indicates that more than one instance can
use the password file (The only users
recognized by the password file are SYS
and INTERNAL.)
3 Connect to the database as follows:
SVRMGR> CONNECT internal/admin
Note
On UNIX:
• The password files are usually located in the $ORACLE_HOME/dbs
directory on UNIX.
On NT:
• The password file is a hidden file and is usually located in the
%ORACLE_HOME%\DATABASE directory.
• The password for INTERNAL is “oracle,” if Oracle is installed through
the Oracle8 Enterprise Edition option. You can set the password during
installation by using the Custom installation option.
3-12 Oracle8: Database Administration
.
Lesson 3: Managing an Oracle Instance
Changing the Internal Password
On UNIX and NT, delete the existing password file and create a new
password file using the ORAPWD utility.
In addition, on NT you can use the ORADIM80 utility to recreate the
password file.
C:\>ORADIM80 -NEW -SID sid [-INTPWD internal_pwd][SRVC svrcname]
[MAXUSERS n][STARTMODE auto, manual][-PFILE filename]
where:
sid specifies the instance name
internal_pwd is the password for the internal account
svrcname is the service name
n is the maximum number of entries of the
password file
auto or manual indicates whether the service start mode is
manual or automatic
filename allows a nondefault parameter file to be
used to configure the instance
3-9
Copyright Oracle Corporation, 1998. All rights reserved.
Changing the Internal Password
• Use the password utility on NT and UNIX
to delete and create the password file.
or
• Use the ORADIM80 utility on NT to delete
and create a new password file.
Oracle8: Database Administration 3-13
.
Validating Privileged Users
To change the INTERNAL password, follow the steps:
1 Delete the SID for the password you want to change:
C:\> ORADIM80 -DELETE -SID sid
where sid is the SID to delete.
2 Create the same SID again and specify a new INTERNAL password:
C:\> ORADIM80 -NEW -SID sid -INTPWD internal_pwd - MAXUSERS N
where SID is the same SID to recreate.
Instructor Note
For more information about the ORADIM80 utility see the manual Oracle8
Enterprise Edition Getting Started Release 8.0.4 for Windows NT.
3-14 Oracle8: Database Administration
.
Lesson 3: Managing an Oracle Instance
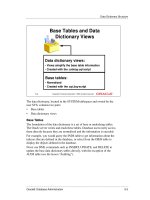
Creating a Parameter File
The parameter file, commonly referred to as the init<SID>.ora file, is a text
file that can be maintained using a standard operating system editor.
By default, it is located in the $ORACLE_HOME/dbs directory on a UNIX
machine and in the %ORACLE_HOME%\database directory on NT.
The parameter file is read only during instance startup. If the file is modified,
shut down and restart the instance to make the new parameter values
effective.
Note
Oracle Enterprise Manager must be able to read the parameter file to start an
instance of a database. Therefore starting a remote instance or database
requires the parameter file to be stored on the computer that is executing
Oracle Enterprise Manager.
However, Oracle Enterprise Manager can also store the parameter
configurations. This enables you to create multiple database startup
configurations without the need to track initialization parameter files. Stored
configurations exist in the registry and not as external files.
3-10
Copyright Oracle Corporation, 1998. All rights reserved.
The Initialization Parameter File
SVRMGR> CONNECT / AS SYSDBA
SVRMGR> STARTUP PFILE=/DISK1/
initU15.ora
initU15.ora
Instance
SGA
Shared pool
Library
cache
Redo log
buffer
PMONDBWR
SMON
LGWRCKPT ARCH
Database
buffer
cache
Data
dictionary
cache
Oracle8: Database Administration 3-15
.
Creating a Parameter File
To create or modify a stored configuration:
1 Use Instance Manager.
2 Select Initialization Parameters.
3 Choose Save on one of the property sheets.
4 Enter a configuration name in the Configuration property sheet.
Instructor Note
The parameter file can also reside on a device mounted by the computer, for
example, in a shared directory in an NFS mounted file system.
Uses of Parameters
The parameters in the init <SID>.ora file can have a significant effect on
database performance, and some need to be modified in the following ways
for production systems:
• Size the System Global Area (SGA) components to optimize
performance.
• Set database and instance defaults.
• Set database limits.
• Define (on database creation only) various physical attributes of the
database, such as the database block size.
• Specify control files, archived log files, and trace file locations.
Rules for Specifying Parameters
• Specify the values in the following format: keyword=value.
• All parameters are optional.
• The server has a default value for each parameter.
• Parameters can be specified in any order.
• Comment lines begin with the # symbol.
• Enclose parameters in double quotation marks to include character
literals.
• Additional files can be included with the keyword IFILE.
• If case is significant for the operating system, then it is also significant in
filenames.
• Multiple values are enclosed in parentheses and separated by commas.
Note
Develop a standard for listing parameters; either list them alphabetically or
group them by functionality.
3-16 Oracle8: Database Administration
.
Lesson 3: Managing an Oracle Instance
3-11
Copyright Oracle Corporation, 1998. All rights reserved.
Parameter File Example
# Initialization Parameter File: initU15.ora
db_name = U15
control_files = (/DISK1/control01.con,
/DISK2/control02.con)
db_block_size = 8192
db_block_buffers = 2000
shared_pool_size = 30000000
log_buffer = 64K
processes = 50
db_files = 100
log_files = 10
max_dump_file_size = 10240
background_dump_dest = (/home/disk3/user15/BDUMP)
user_dump_dest = (/home/disk3/user15/UDUMP)
core_dump_dest = (/home/disk3/user15/CDUMP)
rollback_segments = (r01,r02,r03,r04,r05,r06,r07,r08)
Oracle8: Database Administration 3-17
.
Creating a Parameter File
Parameters That Should Be Specified
Instructor Note
These are only a few examples; the following lessons cover more
initialization parameters. For a complete list, see the manual Oracle8
Reference, Release 8.0.
Parameter Description
BACKGROUND_DUMP_DEST Location where background process trace files
are written.
COMPATIBLE Version of the server with which this instance
should be compatible. The default is 8.0.0
CONTROL_FILES Names of the control files.
DB_BLOCK_BUFFERS NumberofblockscachedintheSGA.Thedefault
and the minimum is 50 buffers.
DB_NAME Database identifier of eight characters or fewer.
This is the only parameter that is required when
creating a new database.
SHARED_POOL_SIZE Size in bytes of the shared pool.
The default is 3500000.
USER_DUMP_DEST Location where user trace files are created.
3-18 Oracle8: Database Administration
.
Lesson 3: Managing an Oracle Instance
Commonly Modified Parameters
Parameter Description
IFILE Name of another parameter file to be
embedded within the current parameter
file. Up to three levels of nesting is
possible.
LOG_BUFFER Number of bytes allocated to the redo log
buffer in the SGA.
MAX_DUMP_FILE_SIZE Maximum size of the trace files, specified
as number of operating system blocks.
PROCESSES Maximum number of operating system
processesthatcanconnectsimultaneously
to this instance.
SQL_TRACE Enable or disable the SQL trace facility
for every user session.
TIMED_STATISTICS Enable or disable timing in trace files and
in monitor screens.
Oracle8: Database Administration 3-19
.
Stages in Startup and Shutdown
Stages in Startup and Shutdown
Starting Up in Stages
When starting the database, you choose the state in which it starts.
The following scenarios describe different stages of starting up an instance.
Starting the Instance
Usually you would start an instance without mounting a database, only
during database creation or the recreation of control files.
Starting an instance includes the following tasks:
• Reading the parameter file init<SID>.ora
• Allocating the SGA
• Starting the background processes
• Opening trace and ALERT files
The database must be named either with the DB_NAME parameter in the
init<SID>.ora file or in the STARTUP command.
3-12
Copyright Oracle Corporation, 1998. All rights reserved.
OPEN
MOUNT
NOMOUNT
SHUTDOWN
All files opened as
described by the
control file for this
instance.
Control file
opened for this
instance.
Instance
started.
SHUTDOWN
STARTUP
Startup and Shutdown in Stages
3-20 Oracle8: Database Administration
.
Lesson 3: Managing an Oracle Instance
Mounting the Database
To perform specific maintenance operations, you start an instance and mount
a database, but do not open the database.
For example, the database must be mounted but not open during the
following tasks:
• Renaming data files
• Enabling and disabling redo log archiving options
• Performing full database recovery
Mounting a database includes the following tasks:
• Associating a database with a previously started instance
• Locating and opening the control files specified in the parameter file
• Reading the control files to obtain the names and status of the data files
and redo log files (However, no checks are performed to verify the
existence of the data files and online redo log files at this time.)
Opening the Database
Normal database operation means that an instance is started and the database
is mounted and open; this allows any valid user to connect to the database
and perform typical data access operations.
Opening the database includes the following tasks:
• Opening the online data files
• Opening the online redo log files
If any of the s or online redo log files are not present when you attempt to
open the database, Oracle returns an error.
During this final stage, Oracle verifies that all the s and online redo log files
can be opened, and checks the consistency of the database. If necessary, the
background process System Monitor (SMON) initiates instance recovery.
Oracle8: Database Administration 3-21
.
Stages in Startup and Shutdown
Instance Recovery
An instance failure occurs when the instance cannot continue to work.
For example, if there is an operating system crash, the background process
SMON automatically performs instance recovery when the database is
reopened. That is, the online redo log file is used to recover the committed
data in the database buffer cache that was lost due to the instance failure.
Instance recovery consists of the following steps:
1 Rolling forward to recover data that has not been recorded in the data
files but that has been recorded in the online redo log
2 Opening the database instead of waiting for all transactions to be rolled
back before making the database available (Any data that is not locked
by unrecovered transactions is immediately available.)
3 Rolling back uncommitted transactions by SMON and by the individual
server processes as they access locked data
Shutting Down in Stages
There are three steps to shutting down an instance and the database to which
it is connected.
Closing the Database
The first step in shutting down a database is closing the database. When the
database is closing, Oracle writes the buffer cache changes and redo log
buffer cache entries to the s and online redo log files. After this operation,
Oracle closes all online s and online redo log files. The control files remain
open while a database is closed but still mounted.
Dismounting a Database
The second step is dismounting the database from an instance. After you
dismount a database, only an instance remains.
When a database is dismounted, Oracle closes its control files.
Shutting Down the Instance
The final step in database shutdown is shutting down the instance. When you
shut down an instance, trace and ALERT files are closed, the SGA is
deallocated, and the background processes are terminated.
3-22 Oracle8: Database Administration
.
Lesson 3: Managing an Oracle Instance
Starting Up
To start up an instance, use the following command:
STARTUP [FORCE] [RESTRICT] [PFILE=filename]
[
EXCLUSIVE | PARALLEL | SHARED]
[
OPEN [RECOVER][database]
|MOUNT
|NOMOUNT]
where:
OPEN enables users to access the database
MOUNT mounts the database for certain DBA
activities but does not allow user access to
the database
NOMOUNT creates the SGA and starts up the
background processes but does not allow
access to the database
EXCLUSIVE permits only the current instance to access
the database
3-13
Copyright Oracle Corporation, 1998. All rights reserved.
STARTUP Command
STARTUP PFILE=/DISK1/
initU15.ora
Start up the instance, and
open the database.
Oracle8: Database Administration 3-23
.
Starting Up
PARALLEL allows multiple instances to access the
database (used with Oracle Parallel Server)
SHARED offers an alternative term for PARALLEL
PFILE=parfile allows a nondefault parameter file to be
used to configure the instance
FORCE aborts the running instance before
performing a normal startup
RESTRICT enables only users with RESTRICTED
SESSION privilege to access the database
RECOVER begins media recovery when the database
starts
OEM
1 Use Instance Manager.
2 Choose Database—>Startup.
3 Choose the startup mode and give the pfilename information.
4 Click OK.
Note
The Oracle database on NT runs as a service, which avoids process
termination when a user logs out. A service must be registered by the service
subsystem of Windows NT.
On NT the database can be opened by starting the following two services:
OracleService<SID> Is created for the database instance <SID>.
OracleStart<SID> Starts the database automatically by running the
strt<SID>.cmd script.
Instructor Note
Show the strt<SID>.cmd script in the %ORACLE_HOME
%\DATABASE
directory.
Mention the need to start the OracleTNSlistener80 service for using
client-server connections.
3-24 Oracle8: Database Administration
.
Lesson 3: Managing an Oracle Instance
Note
• To start the Oracle Services at the startup time, use Control Panel in the
service dialog box and choose automatic as the startup type.
• On UNIX, automating database startup and shutdown can be controlled
by the entries in a special operating system file; for example, in the /var/
opt/oracle directory. (For more information, refer to the installation
guide for your operating system).
Troubleshooting
Attempting to start the Oracle Utilities without starting these services results
in one of the following error messages:
ORA-12547: TNS: lost contact
or
ORA-09352:Windows 32-bit two-task driver unable to spawn new
Oracle task
Changing Database Availability
To open the database from STARTUP NOMOUNT to a MOUNT stage or
from MOUNT to an OPEN stage, use the ALTER DATABASE command:
ALTER DATABASE { MOUNT | OPEN }
Oracle8: Database Administration 3-25
.
Shutting Down
Shutting Down
Shut down the database to make operating system offline backups of all
physical structures and to modify initialization parameters.
To shut down an instance, use the following command:
SHUTDOWN [NORMAL | TRANSACTIONAL | IMMEDIATE | ABORT ]
OEM
1 Use Instance Manager.
2 Choose Database—>Shutdown.
3 Choose the shutdown mode.
4 Click OK.
3-14
Copyright Oracle Corporation, 1998. All rights reserved.
Shutdown mode:
A Abort I Immediate
T Transactional N Normal
Shutdown Options
T
X
X
I
X
X
X
A
X
X
X
X
Shutdown Mode
Allow new connections
Wait until current sessions end
Wait until current transactions end
Force a checkpoint and close files
N
X
YES
NO