BeginningMac OS X Tiger Dashboard Widget Development 2006 phần 4 ppsx
Bạn đang xem bản rút gọn của tài liệu. Xem và tải ngay bản đầy đủ của tài liệu tại đây (1.02 MB, 34 trang )
How It Works
Normally in a browser, as the alert()statement in your JavaScript is executed, a dialog box pops up on
screen with the contents of the variable or the text statement displayed in it, and you would have to
respond to the alert to send it away. When you are running your widget in Dashboard, JavaScript alerts are
sent to the Console log. Having the alerts written to the log is less disruptive than responding to all of those
modal dialog boxes as they are generated and gives you a printed record of your trip through your code.
Using a Debugger
Sometimes you have to bring out the big guns. If you don’t see a logic problem as you are reading
through the source code and can’t isolate the problem with alert statements, you may have to resort to
using a debugger to find the problem. A debugger allows you to step through your widget’s code and
examine the variables as they change while the widget is running. Stepping through your code in a
debugger can be tedious, but you will have a better idea of how the data is flowing through your widget
and how your widget functions at the variable level when you are done.
Debugging Tools
At this writing, Widgetarium ( is the only widget
debugger available. From Gandraes Software, Widgetarium is more than just a debugger. An IDE for creat-
ing Dashboard widgets, it provides graphic tools for creating panels, a Dashboard emulator, syntax-aware
editing for HTML, CSS, and JavaScript, a DOM inspector for widgets, and a JavaScript source-level debug-
ger. It costs $29.00, but you can download the current version and use it in demo mode for one month.
Stepping Through a Widget
You can use Widgetarium to create your widget from the very beginning, but if you just want to take
advantage of its debugging tools for an existing project, that is also easy to do. You can create a new
empty project in Widgetarium and then add the files from an existing widget. If your widget has an
images folder inside of it, you will need create a subfolder in the project and add the image files to that
folder. Otherwise, you will have a number of broken links (Figure 5-4).
For purposes of demonstration, you can create an empty project and add the files from an Apple widget
like the Ski Report. You’ll notice in Figure 5-4 that Widgetarium has Dashboard emulation to speed up
the debugging process. As the widget runs inside of Widgetarium, it appears on the transparent pane in
the middle of the project window. A small version of the console log appears below the emulation win-
dow and a DOM inspector is to the right.
When you select the Debug command, the debugger window appears over the Project window
(Figure 5-5). The buttons along the top of the Debugger window allow you to step through each line of
JavaScript code and step into and out of functions. As you are stepping through the code, the relevant
sections of your JavaScript appear in the bottom pane of the window and the top-left pane shows you
the JavaScript filename. If you are stepping into functions, you may find yourself in the Apple JavaScript
files that you have referenced. The variables and their values appear in the top-right pane.
If you click the disclosure triangle next to <globals>, you are able to see all of the global variables
(Figure 5-6).
83
Debugging and Testing
09_778257 ch05.qxp 6/9/06 9:31 AM Page 83
Figure 5-4
Figure 5-5
84
Chapter 5
09_778257 ch05.qxp 6/9/06 9:31 AM Page 84
Figure 5-6
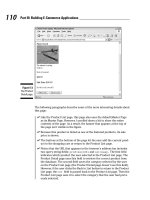
Once you have stepped through the JavaScript code to the point you are trying to examine, you can click
the Continue button to continue loading and run the widget in the Dashboard emulator (Figure 5-7).
Figure 5-7
85
Debugging and Testing
09_778257 ch05.qxp 6/9/06 9:31 AM Page 85
Testing Your Widget
First off, you shouldn’t be testing your widget. Testing isn’t the same as debugging. Debugging tries to
determine why a feature or command doesn’t work as expected or give the expected output. Testing
tries to find functionality errors that you didn’t anticipate while you were creating your widget. To put it
another way, debugging is a programming exercise and testing is a postprogramming exercise.
But don’t think you can just toss your widget over the wall to your testers; you should provide them
with a little context for what they are testing. Write up release notes that tell your testers what they
should concentrate their efforts on. Encourage them to ignore you and test everything. If you are send-
ing your testers a bug fix version, you should let them know what bugs were found and what you have
done to fix them.
Testing Tips
Testing is a discipline. At one time, software companies started new programmers in the testing group.
The rationale was that if they learned how to test, they would be better programmers. Maybe. Here are
three tips that will save you enormous amounts of time.
Don’t Test Your Own Stuff
You have just spent a week creating your widget. You know every line of the code by heart. You’ve ago-
nized over every pixel in the interface, how the preferences should be laid out, and the logic of your
JavaScript. You can’t test it, because you can’t see the problems. Someone besides you needs to test what
you’ve created because the problems will jump out at that person. Companies that follow an extreme
programming model are using this principle in programming teams.
Always hand your creation over to another person or persons.
Break Your Widget
But you aren’t testing the widget, right?
Testing starts from the point of looking for errors, not confirming the functionality. In other words, if
your testing just runs through all of the functions of your widget, you aren’t taking the right approach.
Testing should try to break your widget. Your testers should try to enter characters where numbers are
expected and vice versa. They should enter numbers in the wrong format. They should close the widget
when it is in the middle of a task. They should unplug the network connection while the widget is
updating. They should click everywhere. You will try to confirm that the widget does everything you
intended; they may also do that. But they should also try all of the things that you never intended to
make certain your widget can handle them.
Keep a Log
You should keep track of the results of testing. If you worked in a software house, this would be called a
bug stack and be the single point of coordination between the quality assurance effort and the program-
ming effort. You may not have a QA staff, but you probably have beta testers even if they are just your
friends. You probably don’t need to install Bugzilla, but you should keep track of what your friends find.
If they are really good friends, they will provide you with as much information as possible about repro-
ducing the bug they’ve found. Those steps should be captured in your log file.
86
Chapter 5
09_778257 ch05.qxp 6/9/06 9:31 AM Page 86
As important as the bugs and the steps to reproduce them are, the changes that you make to fix the bug
are just as important. As with the initial bug report, the more information that you include about how
you fixed the bug, the better. If you capture this information in your log, generating the “what’s been
fixed” section in your widget’s release notes is a piece of cake.
Finally, you should let your testers enter feature requests in your log. As you are finishing version 1.0 of
your widget, you may have ideas for version 2.0. There is a better than average chance that your testers
may have ideas for version 2.0 after an hour (or ten minutes) of testing. And those ideas may not be any-
thing you have thought of. Make certain you capture them for the next version.
What Now?
Testing isn’t entirely about finding and squashing bugs, though that is a big part of it. Testing can also
point out design problems. For example, if you aren’t validating the data a user is entering, you will find
a problem when the user enters text and should have entered numeric values. You may also discover
that your widget doesn’t behave properly when it can’t connect to the Internet. In these cases, the result
of testing is to modify your code so that the user’s entries are validated and he is alerted when he has
entered text instead of numbers. Or you add error checking to your widget and alert the user when there
is a network problem. The Stocks widget, for instance, lets you know when there’s a problem (Figure 5-8).
Figure 5-8
As much as you can, you should let the user know what is happening in a problem situation.
Fixing Bugs
Of course, you’ll need to fix the bugs that testing uncovers. When you are in bug fix mode, you may be
tempted to hack away at your widget until you fix the problem. A more effective approach is to identify
the solution, make only the change to fix the bug, and then test your change by trying to reproduce the
bug. Depending on the size of your testing and bug fix effort, you may want to keep track of the changes
you make to your widget as you work on it. As part of keeping track, you may want to record why you
made the change that you did, the expected result of the fix, and what the actual result of the fix is.
87
Debugging and Testing
09_778257 ch05.qxp 6/9/06 9:31 AM Page 87
Much more could be said about the process of fixing bugs, but following these simple pointers will keep
you on track and allow you to retrace your steps if you need to.
Summary
For most cases, these debugging and testing suggestions may be overkill for the kind of widget you are
working on. You will have to gauge the complexity of your widget and then apply the right amount of
testing and debugging effort. It isn’t always possible to find all of the bugs—and some of them may be
Dashboard bugs—but you should ask your friends and testers to look for the bugs, rather than allowing
users to stumble upon bugs during everyday use.
In this chapter, you learned:
❑ How to find problems in your widget using JavaScript alerts
❑ How to step through your widget with a debugger
❑ How to test your widget before you release it
Exercises
1. Why aren’t JavaScript alert dialog boxes displayed on screen from alert statements in your
widget?
2. What is the PID number?
3. What does a debugger allow you to do?
88
Chapter 5
09_778257 ch05.qxp 6/9/06 9:31 AM Page 88
Part II
Providing User
Interaction
Chapter 6: Giving a Widget Preferences
Chapter 7: Widget Events
Chapter 8: Adding to the Widget Interface
Chapter 9: Adding Cut, Copy, and Paste to Your Widget
Chapter 10: Adding Drag and Drop to the Widget
Chapter 11: Access Keys
Chapter 12: Using Plugins and Applets
10_778257 pt02.qxp 6/9/06 9:31 AM Page 89
10_778257 pt02.qxp 6/9/06 9:31 AM Page 90
6
Giving a Widget Preferences
In Chapter 4 you created a WeatherMaps widget from scratch using all of the knowledge that
you’d gathered about widgets and how they are constructed from the previous chapters. You were
able to incorporate JavaScript to switch between the weather maps that were displayed and add
the links through the use of
<div> tags in your HTML. You were able to use the CSS file to format
and structure your widget. In this chapter, you will extend the functionality of your widget and
make it more generalized for others to use.
By the end of this chapter, you will know:
❑ How to flip your widget to display the back side
❑ How to add preferences to your widget
❑ How to save and reload preferences
Adding Preferences to Your Widget
In WeatherMaps, you’ve created a widget for something you do every day —check the weather.
It’s based on the maps for your area and provides you with a quick way to check temperature and
forecast without having to load a browser. If you hand it around to your local friends, it may con-
tain the maps that they are interested in as well. If you send the WeatherMaps widget to your
friend in San Antonio, Texas, however, it probably doesn’t display the maps that she is interested
in. You could include instructions for showing the contents of the widget package, opening the
weathermaps.js file, and changing the URLs to maps that she is interested in, but the better
approach is to give her an interface for changing those URLs.
If you have noticed the way preferences are set in the widgets that ship with Tiger, you have prob-
ably noticed that they are simple and yet collect all of the necessary information. All widgets with
preferences have a small i that appears in the lower right hand corner of the widget whenever the
arrow passes over the widget. When you place the arrow over the i, a circle appears around this
info button, sometimes called a rollie (Figure 6-1).
11_778257 ch06.qxp 6/9/06 9:32 AM Page 91
Figure 6-1
Clicking the info button on the widget flips it over so you can change the preferences on the back side
(Figure 6-2).
Figure 6-2
You’ll notice that in addition to the info button on the front, the back side of widgets has logos or infor-
mation about them. They also have a Done button so the user can save the changes that they have
made. In keeping with the simple, one-function nature of any widget, your options are relatively few:
location for your forecast, whether to display in Fahrenheit or Celsius, and whether to display daily low
temperatures.
The Stock widget preferences are also simple (Figure 6-3). The text box at the top of the widget’s back
side lets you look up stock abbreviations and add them to the list. You can select a stock in the scrolling
list and remove it from the listing and you can switch between showing stock changes as points or
percentages.
Figure 6-3
92
Chapter 6
11_778257 ch06.qxp 6/9/06 9:32 AM Page 92
In addition to these configured settings, you may have also noticed hidden settings for most widgets.
For example, you can click the different stock symbols on the front of the Stock widget to display the
performance graph for the company. You can also toggle between the point and percentage changes of
the stock symbols without accessing the preferences by clicking the amount.
The Gmail Checker widget that you can download from
www.apple.com/downloads/dashboard has
one of the simplest widget interfaces (Figure 6-4). The widget checks your Google Gmail account and
displays the number of new messages in your inbox. If you click the widget, it opens a browser to your
Gmail account. The preferences are only your login name and password.
Figure 6-4
In the case of these three widgets, as well as many others, you are grabbing information from Internet
websites and databases. Sometimes the owners of those websites provide you with guides about how to
display their information on your website or they provide an XML feed of the information. Because a
widget is just a very specialized web page, you can use those guides to simplify building your widget’s
interface to the website. In the case of XML feeds, you may be able to use them or extract what you need
from them.
Sometimes you have to wade past several pages of information on a website as you build a query to
get to the information you want to display in your widget. Because this can be difficult to do in the
widget format and defeats the approach of making a widget as simple as possible, look for shortcuts.
In Chapter 5, for instance, you saw how it’s easier to collect the direct links to the maps on a website and
use those in your widget. You may also be able to copy a database query from the location field of your
browser and use it in your widget. If you are planning to distribute your widget, you will need to make
it easy for the user to change the query or look at the information he wants to by allowing him to adjust
the preferences.
How to Show Preferences
To add preferences to your widget, you need to create a back side panel, add the info and Done buttons,
and then add a way to change the maps that are displayed in the widget. To add the info and Done but-
tons, you need to modify your widget’s HTML, CSS, and JavaScript files to reference some of Apple’s
resources. Once you’ve added the basic functionality, you can add the preferences to your widget.
As you’ve seen from poking around in the contents of Apple’s widgets and any of the thousand avail-
able from the Dashboard Download web page, a widget has a different background image for its back
side than for its front. This makes it easy to distinguish and contrasts the front from the back so your
users won’t be confused about which side is the user interface.
93
Giving a Widget Preferences
11_778257 ch06.qxp 6/9/06 9:32 AM Page 93
Creating a Back Side Panel
Create the back side panel of the widget and make it the same size as the front panel. You can do this by
using the front panel as a template for the size and changing the fill pattern or shade. If you create the
panel in GraphicConverter, it has a micrometer tool for measuring the height and width of your images.
You can also show the Position window— the window floating over the title bar— as you create the
panel to get the size right (Figure 6-5).
Figure 6-5
If you’ve lost the dimensions of the front panel, you can measure it in GraphicConverter or another
graphics tool or you can open it in Preview and get the image size of the Default.png file (Figure 6-6).
Figure 6-6
94
Chapter 6
11_778257 ch06.qxp 6/9/06 9:32 AM Page 94
Widget Resources
You don’t have to create all of your graphics from scratch when you are creating a widget. Apple has
provided widget resources that you can use. For instance, Apple provides the info button graphics as
well as scripts that you can use for widget animation. You can find these scripts and graphic files in
/System/Library/WidgetResources (Figure 6-7).
Figure 6-7
In addition to the animation scripts, the AppleClasses folder contains JavaScripts for sliders and scroll-
bars if you are creating a widget with a scrolling area. The button and ibutton folders contain button
graphics and a JavaScript for creating generic buttons. The AppleParser folder contains a JavaScript for
fetching and parsing xml.
If you dip into any of Apple’s widgets, you’ll see references to these files and JavaScripts. You can see
how they are used as you add a back side to your WeatherMaps widget.
Flipping a Widget
Once you have created the panel for the back side of the WeatherMaps widget, you’ll need to make some
changes to the widget source files to reference that PNG file and add the flipping capability.
The Widget’s HTML File
You can start by making changes to the weathermaps.html file. Remember, as you found out in Chapter 3,
that you won’t be able to test the JavaScript for displaying the info button and flipping your widget in
Safari. Among the widget actions that Safari doesn’t support is access to the widget preferences. This
will require you to install your widget after you make the changes to the files to test the functionality. If
you are using BBEdit to edit the files, you can tweak them in place after you’ve installed the widget by
using the Open Hidden command. You will have to remove the widget from Dashboard and add it
again or reload the widget after your tweaks in order to see the changes you’ve made.
95
Giving a Widget Preferences
11_778257 ch06.qxp 6/9/06 9:32 AM Page 95
Try It Out Modify the HTML File
You can begin by making changes to the HTML file to add the JavaScripts. As you can see from the
HTML listing below, the code has been slightly reorganized to make it easier to see the changes and
read the file. All of the script references are moved into the HEAD section of the file.
1. Open the weather.html file in your text editor.
In addition to making the file easier to read, you should keep the contents of the widget front and back
together in their own
<div> tags. If you don’t, the info and Done buttons won’t display properly and
sometimes may show up on the wrong side of the widget.
2. Add references in the HEAD section to the AppleButton, AppleInfoButton, and
AppleAnimator JavaScripts in the AppleClasses folder. You can add these as full paths
(
/System/Library/WidgetResources/AppleClasses/) or as file URLs (file:///
System/Library/WidgetResources/AppleClasses/
).
If you are running OS X 10.4.2 or earlier, these files are not available. You will need to update to 10.4.3
or copy these files from the Goodbye World widget in the /Developer/Examples/Dashboard/ into your
widget. If you chose to copy the files, the file references will be relative to your widget’s root:
AppleClasses/AppleButton.js, for instance.
The AppleButton.js script creates a Done button based on the parameters that you give it. The
AppleInfoButton.js script creates an info button. The AppleAnimator.js script performs the ani-
mation of the widget flipping from front to back.
3. Add a JavaScript function to your weathermaps.js file. This runs the scripts whenever the wid-
get loads.
4. You will need to call the JavaScript function from the HTML file. You do this by adding
onload=’setup();’ to the BODY tag for the front of the widget. Your weathermaps.html
file should look something like the one below.
<!DOCTYPE html PUBLIC “-//W3C//DTD XHTML 1.0 Strict//EN”
“ /><html xmlns=” /><head>
<title>WeatherMaps</title>
<style type=”text/css”>
@import “weathermaps.css”;
</style>
<script type=”text/javascript” src=”weathermaps.js” charset=’utf-8’/>
<script type=”text/javascript”
src=”/System/Library/WidgetResources/AppleClasses/AppleButton.js” charset=’utf-8’/>
<script type=”text/javascript”
src=”/System/Library/WidgetResources/AppleClasses/AppleInfoButton.js” charset=’utf-
8’/>
96
Chapter 6
11_778257 ch06.qxp 6/9/06 9:32 AM Page 96
<script type=”text/javascript” src=”/System/Library/WidgetResources/AppleClasses/
AppleAnimator.js” charset=’utf-8’/>
</head>
<! Front Side of WeatherMaps >
<body onload=’setup();’>
<div id=”front”>
<img span=”backgroundImage” src=”Default.png”>
<div id=”radar” onclick=’replaceMap(“radar”)’>Radar</div>
<div id=”curTemp” onclick=’replaceMap(“curTemp”)’>Current Temps</div>
<div id=”nightTemp” onclick=’replaceMap(“nightTemp”)’>Overnight Temps</div>
<div id=”tomorrowHigh” onclick=’replaceMap(“tomorrowHigh”)’>Tomorrow’s Highs</div>
<img id=”mapImage” src=” “ width=”432” height=”290”>
<div id=’flip’></div>
</div>
<! Backside of WeatherMaps >
<div id=”back”>
<img span=”backgroundImage” src=”back.png”>
<div id=”doneButton”></div>
</div>
</body>
</html>
How It Works
The HTML file contains the <div> markers for the front and back of the widget and contains the IDs
within them for the buttons. These IDs tell the JavaScript which side to place the buttons on, for exam-
ple, but not where to place them. The CSS file has all of the structure and layout information. It specifies
exactly where the Done button will be placed on the back side of the widget, for instance. The JavaScript
handles drawing the buttons and placing them in the right location based on the rules in the CSS file,
and —when you click one of the buttons —the script handles flipping the widget.
The Widget’s CSS File
Now that you have made the necessary changes to the HTML file, you can make changes to weath-
ermaps.css for the
<div> tags you’ve added. You’ll need to add rules for the front and back side IDs
of the widget as well as for the IDs of the buttons.
/*
pfterry, WeatherMaps, 2005
*/
body {
97
Giving a Widget Preferences
11_778257 ch06.qxp 6/9/06 9:32 AM Page 97
margin: 0;
}
#radar {
font: 10px “Lucida Grande”;
font-weight: bold;
color: white;
position: absolute;
top: 20px;
left: 20px;
}
#curTemp {
font: 10px “Lucida Grande”;
font-weight: bold;
color: white;
position: absolute;
top: 20px;
left: 75px;
}
#nightTemp {
font: 10px “Lucida Grande”;
font-weight: bold;
color: white;
position: absolute;
top: 20px;
left: 170px;
}
#tomorrowHigh {
font: 10px “Lucida Grande”;
font-weight: bold;
color: white;
position: absolute;
top: 20px;
left: 280px;
}
#mapImage {
font: 20px “Lucida Grande”;
font-weight: bold;
text-align: center;
color: white;
position: absolute;
top: 55px;
left: 16px;
}
.backgroundImage {
position: absolute;
top: 0px;
left: 0px;
}
98
Chapter 6
11_778257 ch06.qxp 6/9/06 9:32 AM Page 98
#flip {
position: absolute;
top:340px;
right:25px;
}
#doneButton {
position:absolute;
bottom:20px;
left:400px;
}
#front {
display: block;
}
#back {
display: none;
}
You should double-check your spelling on each of the selector names that you’ve added. Verify that they
exactly match the
<div id>s in your weathermaps.html. Some of the most infuriating errors you will
encounter while developing widgets will result from simple typos.
The Widget’s JavaScript File
In the JavaScript file, you’ll need to add the functions to load the scripts and show and hide the prefer-
ences. As with the changes to the HTML file, you’ll want to group these functions together to make
working with them easier.
// pfterry, WeatherMaps, 2005
// Global variables for the info and Done buttons.
var glassDoneButton;
var whiteInfoButton;
// setup() calls the Apple classes in the AppleButton.js and AppleInfoButton.js
// scripts to create controls for the divs in weathermaps.html.
function setup()
{
glassDoneButton = new AppleGlassButton(document.getElementById(“doneButton”),
“Done”, hidePrefs);
whiteInfoButton = new AppleInfoButton(document.getElementById(“flip”),
document.getElementById(“front”), “white”, “white”, showPrefs);
}
// showPrefs() is called whenever you click on the info button.
function showPrefs()
{
99
Giving a Widget Preferences
11_778257 ch06.qxp 6/9/06 9:32 AM Page 99
var front = document.getElementById(“front”);
var back = document.getElementById(“back”);
if (window.widget)
widget.prepareForTransition(“ToBack”);
front.style.display=”none”;
back.style.display=”block”;
if (window.widget)
setTimeout (‘widget.performTransition();’, 0);
}
// hidePrefs() is called whenever you click on the Done button.
function hidePrefs()
{
var front = document.getElementById(“front”);
var back = document.getElementById(“back”);
if (window.widget)
widget.prepareForTransition(“ToFront”);
back.style.display=”none”;
front.style.display=”block”;
if (window.widget)
setTimeout (‘widget.performTransition();’, 0);
}
// simple script to switch between the different maps in the WeatherMaps widget
function replaceMap(mapLink)
{
if (mapLink == “radar”) {
var theImage = (src=’ />usen.jpg’);
} else if (mapLink == “curTemp”) {
var theImage = (src=’ />720x486.jpg’);
} else if (mapLink == “nightTemp”) {
var theImage = (src=’ />night1_3usc_enus_600x405.jpg’);
} else if (mapLink == “tomorrowHigh”) {
var theImage = (src=’ />3usc_enus_600x405.jpg’);
100
Chapter 6
11_778257 ch06.qxp 6/9/06 9:32 AM Page 100
}
document.getElementById(“mapImage”).src = theImage;
}
The functions for the info and Done buttons are grouped together at the bottom of the JavaScript. These
functions use the three JavaScripts from the WidgetResources folder. The setup function creates the
buttons whenever the widget loads and stores them in the global variables
glassDoneButton and
whiteInfoButton. The showPrefs function flips the widget, hides the front, and displays the back side
whenever you click the info button. The
hidePrefs function reverses the previous function; it flips the
widget, hides the back, and displays the front side whenever you click the Done button.
Testing Your Changes
As mentioned earlier, you will need to install the widget to test your changes. When you install the wid-
get in Dashboard and move the arrow over it, the info button appears in the lower-right corner. As you
pass the arrow over the i, the circle appears around it (Figure 6-8).
Figure 6-8
Clicking the info button flips the widget over and you can see the back of the widget with the Done but-
ton (Figure 6-9). Clicking the Done button flips the widget back to the front.
If the maps or the links for the temperature maps bleed through to the back side of the widget, you need
to make certain that they are not included in the back
<div>.
101
Giving a Widget Preferences
11_778257 ch06.qxp 6/9/06 9:32 AM Page 101
Figure 6-9
Adding Preferences
Once you have created the back panel, added the JavaScript for flipping the widget, and tested your new
features, you are ready to add the preferences user interface. You want to make it as easy as possible for
the user to select the maps she is interested in. You may want to use the maps on the weather.com web-
site, but you won’t be able to build a query interface to allow the user to look up these maps. However,
because you can get the URLs of the different maps, you can build a list of maps for the user.
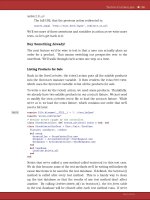
Perhaps the most concise way of presenting the maps to the user is through pop-up menus. You can
collect all the map URLs at weather.com and create a set of menus based on these URLs. Such a menu
allows the user to pick a map by its regional name.
Adding Preference Selection
A separate listing of maps is available in the weather map urls.txt file available with the WeatherMaps
widget source files for this chapter. The close radar maps are listed by city and follow the 300 and 100-
mile radius radar maps for the major cities around the United States. The overnight lows, tomorrow’s
highs, current temperatures, and severe weather alerts are maps grouped by nine regions around the
country: Central, East Central, North Central, South Central, West Central, Northeast, Northwest,
Southeast, and Southwest.
The URLs for these maps may have changed. While this widget was being developed, URLs for these
maps at weather.com changed three times.
102
Chapter 6
11_778257 ch06.qxp 6/9/06 9:32 AM Page 102
You can add the maps into the back side <div> in the weathermaps.html file as in the following listing,
which shows the Current Temperatures maps only. The highlighted section of the code is the listing for
the map pop-ups. Full source code including additional regional locations is available at
www.wrox.com/
dynamic/books/download.aspx
.
<! Back side of WeatherMaps >
<div id=”back”>
<img span=”backgroundImage” src=”back.png” />
<div id=’popupMenu2’>Current Temperatures</div>
<select id=’cTempMenu’ onChange=’cTempMap(this.value);’>
<option value=””>Select a regional temperature map </option>
<option value=” />.jpg”>Central</option>
<option value=” />.jpg”>East Central</option>
<option value=” />.jpg”>North Central</option>
<option value=” />.jpg”>Northeast</option>
<option value=” />.jpg”>Northwest</option>
<option value=” />.jpg”>South Central</option>
<option value=” />.jpg”>Southeast</option>
<option value=” />.jpg”>Southwest</option>
<option value=” />.jpg”>West Central</option>
</select>
<div id=’doneButton’></div>
</div>
</body>
</html>
You can see that each pop-up menu is based on a set of menu items contained within a <select> tag.
The URLs of the maps are the values in the pop-up menu with the region names providing the item for
the user to select. These additions add the names of the five kinds of maps to the back of the widget
(Figure 6-10).
With the exception of the Severe Weather Alerts maps, the names of the map groupings correspond to
the names on the front of the widget. The pop-up menus appear just below the name of the kind of map
(Figure 6-11).
103
Giving a Widget Preferences
11_778257 ch06.qxp 6/9/06 9:32 AM Page 103
Figure 6-10
Figure 6-11
The location of the pop-up menus and their connection to the map groups are controlled through rules
in the weathermaps.css file. The rules for the pop-up menu placement are grouped at the top of the
Cascading Style Sheet. You can see that the names of the map groups are evenly spaced from the top edge
of your widget and the top of each map is 9 points beneath the name. The rules also specify the font face,
weight, color, and drop shadow. The display names for pop-up menus, like popupMenu1, match the
<div>s in the HTML file, and the names for the menus match the names in the <select id> tags.
104
Chapter 6
11_778257 ch06.qxp 6/9/06 9:32 AM Page 104
#popupMenu1 {
font: 13px “Helvetica Neue”;
font-weight: Bold;
color: white;
text-shadow: black 0px 1px 0px;
position: absolute;
top: 25px;
left: 44px;
z-index: 19;
}
#radarMenu {
position:absolute;
top: 34px;
left: 50px;
width: 163px;
height: 30px;
opacity: 0.0;
z-index: 20;
}
#popupMenu2 {
font: 13px “Helvetica Neue”;
font-weight: Bold;
color: white;
text-shadow: black 0px 1px 0px;
position: absolute;
top: 75px;
left: 44px;
z-index: 19;
}
#cTempMenu {
position:absolute;
top: 84px;
left: 50px;
width: 163px;
height: 30px;
opacity: 0.0;
z-index: 20;
}
#popupMenu3 {
font: 13px “Helvetica Neue”;
font-weight: Bold;
color: white;
text-shadow: black 0px 1px 0px;
position: absolute;
top: 125px;
left: 44px;
105
Giving a Widget Preferences
11_778257 ch06.qxp 6/9/06 9:32 AM Page 105
z-index: 19;
}
#oTempMenu {
position:absolute;
top: 134px;
left: 50px;
width: 163px;
height: 30px;
opacity: 0.0;
z-index: 20;
}
#popupMenu4 {
font: 13px “Helvetica Neue”;
font-weight: Bold;
color: white;
text-shadow: black 0px 1px 0px;
position: absolute;
top: 175px;
left: 44px;
z-index: 19;
}
#hTempMenu {
position:absolute;
top: 184px;
left: 50px;
width: 163px;
height: 30px;
opacity: 0.0;
z-index: 20;
}
#popupMenu5 {
font: 13px “Helvetica Neue”;
font-weight: Bold;
color: white;
text-shadow: black 0px 1px 0px;
position: absolute;
top: 225px;
left: 44px;
z-index: 19;
}
#sWeatherMenu {
position:absolute;
top: 234px;
left: 50px;
width: 163px;
height: 30px;
opacity: 0.0;
z-index: 20;
}
106
Chapter 6
11_778257 ch06.qxp 6/9/06 9:32 AM Page 106
When the user selects one of the regional names from the pop-up menu, the onChange script passes the
value —the URL of the map — to the appropriate function in the weathermaps.js file.
<div id=’popupMenu2’>Current Temperatures</div>
<select id=’cTempMenu’ onChange=’cTempMap(this.value);’>
<option value=””>Select a regional temperature map </option>
Each pop-up menu has a corresponding JavaScript function. When an item is selected from one of the
menus, the selection is returned to the function through the
this.value variable.
// Functions for selecting menu items and setting the preferences
// radarMenu function
function radMap() {
var rMap = document.getElementById(‘radarMenu’).value;
if (rMap == ‘’) {
return;
}
widget.setPreferenceForKey(rMap,”radarMenu”);
}
// cTempMenu function
function cTempMap() {
var cTMap = document.getElementById(‘cTempMenu’).value;
if (cTMap == ‘’) {
return;
}
widget.setPreferenceForKey(cTMap,”cTempMenu”);
}
// oTempMenu function
function oTempMap() {
var oTMap = document.getElementById(‘oTempMenu’).value;
if (oTMap == ‘’) {
return;
}
widget.setPreferenceForKey(oTMap,”oTempMenu”);
}
// hTempMenu function
function hTempMap() {
var hTMap = document.getElementById(‘hTempMenu’).value;
if (hTMap == ‘’) {
107
Giving a Widget Preferences
11_778257 ch06.qxp 6/9/06 9:32 AM Page 107