BeginningMac OS X Tiger Dashboard Widget Development 2006 phần 7 pot
Bạn đang xem bản rút gọn của tài liệu. Xem và tải ngay bản đầy đủ của tài liệu tại đây (985.02 KB, 36 trang )
The PasswordPlugin also helps restore the user name and password.
function restoreUserLogin(){
backForm = document.backForm;
theForm = document.mainForm;
if (window.widget){
var savedUsername = widget.preferenceForKey(usernameKey);
if (savedUsername != undefined) {
backForm.username.value = savedUsername;
theForm.journals.options.length = 0;
addOptionToList(theForm.journals, backForm.username.value, ‘’);
theForm.journals.options.selectedIndex = 0;
changeList(“journals_list”, “journals_text”);
}
if (PasswordPlugin){
backForm.password.value =
PasswordPlugin.getPassword(backForm.username.value, “LiveWidgetPassword”);
}
if ((backForm.password.value.length > 0) & (backForm.password.value.length
> 0)){
startGetInfo();
}
}
}
As you saw in Chapter 6, JavaScript is the workhorse carrying the information from the form on the
back of the widget to the keychain and the preferences.
Using Java Applets
As we saw in Chapter 11, Dashboard includes an access key that allows you to incorporate a Java applet
into your widget. Because widgets are basically HTML pages, adding an applet to a widget is just like
adding an applet to a web page. As simple as this is, Apple suggests that you not use applets or Flash in
your widget because they are so memory heavy.
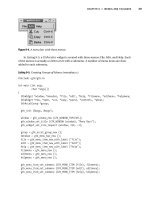
It is possible to grab a Java applet and incorporate it into a widget. For example, the 3D Clock applet
shown in Figure 12-6 is a Java applet available on the Free Java website
(www.javafile.com/clocks/
coolclock/coolclock.php
) or Bennet Uk’s website (www.dataway.ch/~bennet/). You can create a
simple widget to hold the Java class and display the clock.
Try It Out Add a Java Applet to Your Widget
To see how this would work, let’s create a simple widget to hold the Java applet.
1. Create a basic widget background panel (Figure 12-6).
2. Create a folder for the widget and drop all of the widget files in it (Figure 12-7). You can include
the AppleClasses directory for backward compatibility and the graphics files for the widget
back and icon.
190
Chapter 12
17_778257 ch12.qxp 6/9/06 9:34 AM Page 190
Figure 12-6
3. Drop the Clock3D.class in the root level of the widget.
Figure 12-7
4. Create an Info.plist file for the widget like the one that follows. Notice the
BackwardsCompatibleClassLookup key and the AllowJava key will enable
the widget to run the Java applet.
<plist version=”1.0”>
<dict>
<key>AllowJava</key>
<true/>
<key>BackwardsCompatibleClassLookup</key>
<true/>
<key>CFBundleDisplayName</key>
<string>3D Clock</string>
191
Using Plugins and Applets
17_778257 ch12.qxp 6/9/06 9:34 AM Page 191
<key>CFBundleIdentifier</key>
<string>com.deadtrees.widget.3dclock</string>
<key>CFBundleName</key>
<string>3D Clock</string>
<key>CFBundleShortVersionString</key>
<string>1.0</string>
<key>CFBundleVersion</key>
<string>1.0</string>
<key>CloseBoxInsetX</key>
<integer>14</integer>
<key>CloseBoxInsetY</key>
<integer>16</integer>
<key>MainHTML</key>
<string>3DClock.html</string>
</dict>
</plist>
5. In the HTML file for the widget, you must add the code to call the applet. If the applet has any
settings, those must be included. The section containing the applet code needs to be placed
inside of a
<div> tags so you can format it with a selector.
<html>
<head>
<style type=”text/css”>
@import “3DClock.css”;
</style>
<script type=’text/javascript’ src=’3DClock.js’ charset=’utf-8’/>
<! The Apple Classes are included at the top level of the widget for pre-10.4.3
compatibility >
<script type=’text/javascript’ src=’AppleClasses/AppleButton.js’ charset=’utf-8’/>
<script type=’text/javascript’ src=’AppleClasses/AppleInfoButton.js’ charset=’utf-
8’/>
<script type=’text/javascript’ src=’AppleClasses/AppleAnimator.js’ charset=’utf-
8’/>
</head>
<body onload=”setup();”>
<div id=”front”>
<img span=”backgroundImage” src=”Default.png”>
<div id=”applet”>
<applet code=”Clock3D.class” WIDTH=”180” HEIGHT=”180”>
<param name=”fps” value=”18”>
<param name=”a1” value=”12500”>
<param name=”pixd” value=”29”>
<param name=”pixangle” value=”5”>
<param name=”radius” value=”26”>
<param name=”roty” value=”-4”>
<param name=”rotx” value=”0”>
<param name=”rotz” value=”0.401”>
<param name=”irotx” value=”0”>
<param name=”iroty” value=”0”>
<param name=”irotz” value=”00”>
<param name=”style” value=”1”>
<param name=”color” value=”#00FF66”>
<param name=”bgcolor” value=”#2B2B2B”>
<param name=”12hour” value=”0”>
192
Chapter 12
17_778257 ch12.qxp 6/9/06 9:34 AM Page 192
</applet>
</div>
<div id=’infoButton’></div>
</div>
<div id=”back”>
<img span=”backgroundImage” src=”Back.png”>
<div id=”dtLink”>Widget<br><a href=”#”
onclick=widget.openURL(“ /></div>
<div id=”apLink”>Java Applet<br><a href=”#”
onClick=”widget.openURL(“ />bennet/</a></div>
<div id=”doneButton”></div>
</div>
</body>
</html>
6. The CSS file must include a selector to control the placement of the applet on the widget.
Without the
<div> in the HTML file and its selector in the CSS file, the applet will get loaded,
but you will not be able to see it on the widget.
body {
margin: 0;
}
.backgroundImage {
position: absolute;
top: 0px;
left: 0px;
}
#applet {
position:absolute;
top:15px;
left:20px;
}
#infoButton {
position:absolute;
bottom: 35px;
right: 30px;
}
#doneButton {
position: absolute;
bottom: 30px;
left: 90px;
}
#front {
display: block;
}
#dtLink {
position:absolute;
font: 12px “Helvetica Neue”;
193
Using Plugins and Applets
17_778257 ch12.qxp 6/9/06 9:34 AM Page 193
color:white;
bottom:100;
left:25;
}
#apLink {
position:absolute;
font: 12px “Helvetica Neue”;
color:white;
bottom:60;
left:25;
}
#back {
display: none;
}
How It Works
The widget is a container for the Java applet. In the case of the Distorter widget discussed in Chapter 11,
the widget contained a bare minimum of the elements that are typically used for a widget. The CSS
markup was included in the HTML file and the widget didn’t have a JavaScript file because it didn’t
have a back side. As you can see from the example here, the entry in the Info.plist file, the additions for
the applet in the HTML file, and the CSS formatting are all that are needed for the applet. In spite of the
simplicity of the 3D Clock widget, it weighs in with 40 megabytes of memory (Figure 12-8).
Figure 12-8
194
Chapter 12
17_778257 ch12.qxp 6/9/06 9:34 AM Page 194
Summary
Though you may not be ready to create your own Java applet or custom widget plugin, you can still get
the benefits by incorporating them into your widget.
In this chapter, you learned:
❑ Why you might want to use a widget
❑ How to incorporate a plugin into your widget
❑ How to incorporate a Java applet into your widget
Exercises
1. What differentiates widget plugins from WebKit plugins?
2. Do you have to add WebKit plugins to your Widget?
3. Why does Apple suggest that you not include Java applets or Flash in your widget?
195
Using Plugins and Applets
17_778257 ch12.qxp 6/9/06 9:34 AM Page 195
17_778257 ch12.qxp 6/9/06 9:34 AM Page 196
Part III
Example Widgets
Chapter 13: Easy Envelopes
Chapter 14: SecureCopy Widget
Chapter 15: Amazon Album Art
Chapter 16: Timbuktu Quick Connect
Chapter 17: iPhoto Mini
Chapter 18: iTunes Connection Monitor
Chapter 19: More Widgets
18_778257 pt03.qxp 6/9/06 9:34 AM Page 197
18_778257 pt03.qxp 6/9/06 9:34 AM Page 198
13
Easy Envelopes
More than one critic has commented that it would be quicker to open a browser with bookmarks
than Dashboard with the different widgets. That may be the case for most web pages, but some-
times you don’t want the whole web page and not everything that a widget accesses is a web page.
For instance, it is quicker to open a widget to get the particular map you want at weather.com
than to load the entire page. You could access system information from the command line with
Safari, but a widget is much lighter weight for that task. Sometimes you just can’t accomplish
in Safari what a widget will do.
Easy Envelopes
Take the Easy Envelopes by Andrew Welch of Ambrosia Software as an example. Several envelope
printing applications have been available for the Macintosh during its history and envelope print-
ing templates are available for most of the word processors. Easy Envelopes, however, captures all
of the functionality you need in a widget. Perhaps it is because all of the other envelope printing
utilities are full-blown applications that Easy Envelopes seems to stretch the idea of a widget a bit.
If a widget is supposed to do one thing well, however, Easy Envelopes is a widget. It may not be
a web page for Dashboard the way most widgets are, but it only prints envelopes and it does that
extremely well.
The Interface
Easy Envelopes has one of the cleverest interfaces of the 1,700-plus widgets on the Dashboard
Downloads site. Not only does it look like an envelope (Figure 13-1), but every graphic on the inter-
face has a use or provides information to the user. The version number of the widget appears above
the stamp, the printer name and the envelope size appear in the lower-left corner of the widget.
19_778257 ch13.qxp 6/9/06 9:35 AM Page 199
Figure 13-1
Clicking the printer postage stamp opens the print dialog. Once the widget is configured with the return
address, printer, and envelope size, you can print an envelope quickly by entering the address and then
clicking the postage stamp (Figure 13-2). The print dialog includes an additional warning to feed the
envelope face up.
Figure 13-2
200
Chapter 13
19_778257 ch13.qxp 6/9/06 9:35 AM Page 200
In addition to the functionality of the printer postage stamp, clicking the postmark minimizes Easy
Envelopes so it takes up less space on your screen (Figure 13-3).
Figure 13-3
The Info button gives you access to the font, envelope size, and other preferences (Figure 13-4). As with
the graphics on the front of the widget, each graphic on the back has a function. Clicking the wax seal
takes you to the Easy Envelopes page at the Ambrosia Software website. The Done button provides the
same function as other widgets with the added benefit that it looks like a post office stamp so it is consis-
tent with the overall interface.
Figure 13-4
Clicking the Change Envelope Size opens the Page Setup dialog box (Figure 13-5) where you can select
the size of the envelope that you are printing. The Paper Size pop-up menu includes choices for A4, JB5,
#10 Envelope, and Monarch Envelope in addition to US Letter and US Letter Small.
This Page Setup and the Print dialog (Figure 13-2) are indications that the widget is using more than the
typical resources available to a widget. In addition to these, the widget uses the Font selection dialog
when you click the Font button for the Mailing and Return addresses (Figure 13-6). You’ll see how this is
accomplished in the following pages.
201
Easy Envelopes
19_778257 ch13.qxp 6/9/06 9:35 AM Page 201
Figure 13-5
Figure 13-6
Besides displaying the Font and Print dialogs, the widget is also able to search the Address Book and
insert the found address (Figure 13-7).
202
Chapter 13
19_778257 ch13.qxp 6/9/06 9:35 AM Page 202
Figure 13-7
Easy Envelopes Internals
When you look inside the Easy Envelopes widget, you can see how access to system dialog boxes is
accomplished.
Info.plist
When you open the Info.plist file, you can see that the AllowFullAccess key at the top of the file is set
to true. This gives the widget access to the command line, filesystem, network, and WebKit and standard
plugins. Toward the bottom of the file, the plugin EEWPlugin.widgetplugin is included.
<?xml version=”1.0” encoding=”UTF-8”?>
<!DOCTYPE plist PUBLIC “-//Apple Computer//DTD PLIST 1.0//EN”
“ /><plist version=”1.0”>
<dict>
<key>AllowFullAccess</key>
<true/>
<key>CFBundleDisplayName</key>
<string>EasyEnvelopes</string>
<key>CFBundleGetInfoString</key>
<string>1.0.2 Copyright ©2005 by Ambrosia Software, Inc.</string>
<key>CFBundleIdentifier</key>
<string>com.ambrosiasw.widget.easyenvelopes</string>
<key>CFBundleName</key>
<string>EasyEnvelopes</string>
<key>CFBundleShortVersionString</key>
<string>1.0.2</string>
<key>CFBundleVersion</key>
<string>1.0.2</string>
<key>CloseBoxInsetX</key>
<integer>5</integer>
203
Easy Envelopes
19_778257 ch13.qxp 6/9/06 9:35 AM Page 203
<key>CloseBoxInsetY</key>
<integer>6</integer>
<key>MainHTML</key>
<string>EasyEnvelopes.html</string>
<key>Plugin</key>
<string>EEWPlugin.widgetplugin</string>
</dict>
</plist>
HTML/CSS
When you show the contents of the Easy Envelopes widget and look at the files it is composed of, you
see several concepts in use that you learned in the first half of the book. By examining the way these con-
cepts are employed, you may gain a better understanding of them.
In addition to what you would usually see included in the HTML file, that file also contains areas in the
front and back
<div>s that are defined as canvas drawing areas. Two of the areas are where the return
addresses can be drawn using JavaScript. The
returnAddressImage canvas specifies the width and
height of the drawing area.
<span id=”returnAddressText” ></span>
<canvas id=”returnAddressImage” width=”100” height=”70”>
If you look in the CSS file, you can see the position for the front return address specified as well as the
default text specifications for the return address.
#returnAddressText {
font: 12px “LucidaGrande” ;
font-weight: normal;
position: absolute;
top: 20px;
left: 25px;
}
#returnAddressImage {
position: absolute;
top: 20px;
left: 25px;
visibility: hidden;
}
#frontReturnAddressImage {
position: absolute;
top: 20px;
left: 25px;
visibility: hidden;
}
The back <div> contains the drawing area called the backReturnAddressImage along with its height
and width.
204
Chapter 13
19_778257 ch13.qxp 6/9/06 9:35 AM Page 204
<span id=”backReturnAddressText”></span>
<canvas id=”backReturnAddressImage” width=”155” height=”80”>
<textarea id=”backReturnAddressCustomText”
onblur=”changeCustomReturnAddress();”></textarea>
And the CSS file contains the canvas and text specifications.
#backReturnAddressText {
font: 12px “LucidaGrande” ;
font-weight: normal;
position: absolute;
top: 145px;
left: 250px;
width: 10000px;
clip: rect(0, 145, 70, 0);
}
#backReturnAddressCustomText {
position: absolute;
top: 140px;
left: 245px;
width: 145px;
height: 70px;
visibility: hidden;
}
#backReturnAddressImage {
position: absolute;
top: 135px;
left: 240px;
visibility: hidden;
}
The other area that has a canvas ID associated with it is in the back div. The three divs envelopeWidth,
envelopeHeight, and envelopeLabel open the Page Setup dialog box when the area is clicked in. The fol-
lowing image input is for the wax seal and executes the
canvasDown() function whenever it is clicked.
The canvas ID at the end of the section executes the
showPageSetup() function, among others, when-
ever it is clicked.
<div id=”envelopeWidth” onMouseDown=”canvasDown();” onmouseover=”canvasOver();”
onmouseup=”showPageSetup();”></div>
<div id=”envelopeHeight” onMouseDown=”canvasDown();” onmouseover=”canvasOver();”
onmouseup=”showPageSetup();”></div>
<div id=”envelopeLabel” style=”font: 10px ‘Lucida Grande’; position: absolute;
left: 46px; top: 205px;” onMouseDown=”canvasDown();” onmouseover=”canvasOver();”
onmouseup=”showPageSetup();”></div>
<input type=”image” style=” opacity: 0; clip: rect(0, 155, 83,0);
position:absolute; top: 135; left: 25;” onMouseDown=”canvasDown();”
src=”Images/wax_seal_normal.png”>
205
Easy Envelopes
19_778257 ch13.qxp 6/9/06 9:35 AM Page 205
<canvas id=”envelopeCanvas” onMouseDown=”canvasDown();”
onmouseover=”canvasOver();” onmouseout=”canvasUpOut();”
onmouseup=”showPageSetup();” width=”155” height=”83”/>
The envelopeWidth, envelopeHeight, and envelopeLabel divs along with the canvas ID envelopeCanvas
correspond to envelopeCanvas at the top of the CSS file.
#envelopeCanvas {
position: absolute;
top: 135;
left: 25;
}
The area on the left side of the widget back contains the envelope icon.
<div>
<input id=’recipientText’ type=search size=”30”/>
</div>
<textarea onkeydown=”handleManualEdit(event);” onfocus=”turnWhite();”
onblur=”exitAddressText();” id=”addressText” WRAP=OFF></textarea>
<script type=”text/javascript”>
document.getElementById(“addressText”).blur();
</script>
<form name=”namesForm”>
<select id=”listPoint” name=”namesList” onChange=”keepCursorAtEndOfInput()”
onMouseUp=”setAddressFromMenu(event)”>
</select>
</form>
JavaScript Functionality
The Easy Envelope JavaScript file is well organized so you can find the functions associated with the
features in the widget. The button functions are grouped together at the top of the file, and the canvas
functions are similarly grouped together. Easy Envelopes has a plugin that provides the application-like
functionality with the Print, Page Setup, and Font dialog boxes, but JavaScript links the widget to the
plugin. In addition to providing a bridge between the widget and the plugin, other functionality in the
widget is based on the use of JavaScript. For instance, the minimize feature is completely implemented
in JavaScript.
Minimize
The minimize functionality is produced by clicking the postmark. This behavior is established in the
HTML file. The img ID contains the reference to the postmark.png file and executes the
minimize(event)
function whenever the area around the postmark is clicked.
<img id=”postMark” src=”Images/postmark.png” onclick=”minimize(event)”>
<input type=”image” id=”printButtonImage” onmousedown=”printButtonDown();”
onmouseover=”printButtonOver();” onmouseout=”printButtonUpOut();”
onmouseup=”print();” src=”Images/print_btn_normal.png”>
206
Chapter 13
19_778257 ch13.qxp 6/9/06 9:35 AM Page 206
The minimize(event) function that the onclick method is calling is in the JavaScript file. You can see
that the function contains animation commands and has error checking so the minimized widget win-
dow doesn’t go off-screen.
// Minimize the widget down to a small icon. Invoked by the postmark image’s
onclick method.
function minimize(event)
{
var multiplier = 1;
if (event && event.shiftKey)
multiplier *= 10; // shift key down -> “slow-mo”
// Make sure minimizing doesn’t put the widget entirely offscreen
if (EEWPlugin.isPointOnscreenForXY(window.screenX, window.screenY))
{
resizeAnimation.startHeight = fullSize.height;
resizeAnimation.startWidth = fullSize.width;
resizeAnimation.endHeight = minSize.height;
resizeAnimation.endWidth = minSize.width;
resizeAnimation.startTime = (new Date).getTime() - 13; // set it back one
frame.
resizeAnimation.duration = 250 * multiplier;
// Disallow maximize-during-minimize to avoid concurrency bugs
minimized.onclick = null;
resizeAnimation.onfinished = finishMinimize;
EEWPlugin.call(“saveWidgetSnapshot”);
front.style.display = “none”;
EEWPlugin.toggleWithBool(“searchFieldVisible”, false);
EEWPlugin.call(“prepareForMinimize”);
resizeAnimation.timer = setInterval(animateResize, 13);
animateResize();
}
}
function finishMinimize()
{
minimizedIcon.src = EEWPlugin.finishMinimize();
minimized.style.display = “block”;
minimized.onclick = maximize;
widget.setPreferenceForKey(“minimized”, widget.identifier+”-size”);
}
If you’ve noticed that the minimized widget window looks like a miniature version of the original—
that is, it contains your mailing address—you can see that the plugin takes a snapshot of the widget
window with the EEWPlugin.call(
saveWidgetSnapshot).
Return Address
Several JavaScript functions take the addresses and draw them on the canvas areas that are set up in
HTML and CSS files. The
drawFrontStuff() function, for example, draws the return address on the
front of the envelope.
207
Easy Envelopes
19_778257 ch13.qxp 6/9/06 9:35 AM Page 207
//draws the return address image on the front
function drawFrontStuff() {
/************************/
/**** DRAW RETURN ADDRESS IMAGE ON FRONT ****/
if ( returnAddressIndex == kImageReturnAddress ) {
var image = new Image();
image.src = imageFilename;
var canvas = document.getElementById(“returnAddressImage”);
var context = canvas.getContext(“2d”);
context.clearRect(0, 0, canvas.width, canvas.height);
if ( image.width > canvas.width || image.height > canvas.height ) {
var displayRatio = canvas.width / canvas.height;
var imageRatio = image.width / image.height;
var scaleWidth, scaleHeight;
if( imageRatio > displayRatio ) {
var scale = canvas.width / image.width;
scaleWidth = canvas.width;
scaleHeight = image.height * scale;
} else if ( imageRatio < displayRatio ) {
var scale = canvas.height / image.height;
scaleWidth = image.width * scale;
scaleHeight = canvas.height;
}
context.drawImage(image, 0, 0, Math.floor(image.width),
Math.floor(image.height), 0, 0, Math.floor(scaleWidth), Math.floor(scaleHeight));
} else
context.drawImage(image, 0, 0);
}
/************************/
}
Page Setup and Font Panels
The JavaScript calls the plugin to display the Page Setup and Font dialog boxes through the
showPageSetup(), showAddressFontPanel(), and showReturnAddressFontPanel() functions
whenever you click their buttons in the widget. The Print dialog is displayed through a different call
to the plugin.
208
Chapter 13
19_778257 ch13.qxp 6/9/06 9:35 AM Page 208
//shows the page setup panel
function showPageSetup() {
if ( isCanvasButtonPressed ) {
if ( EEWPlugin && window.widget) {
EEWPlugin.call(“showPageSetup”);
drawBackStuff();
}
}
isCanvasButtonPressed = false;
}
//shows the font panel for the mailing address
function showAddressFontPanel() {
if ( isAddressFontButtonDown ) {
if ( EEWPlugin ) {
EEWPlugin.showFontPanel(1);
}
}
isAddressFontButtonDown = false;
}
//shows the font panel for the return address
function showReturnAddressFontPanel() {
if ( EEWPlugin ) {
EEWPlugin.showFontPanel(2);
}
isReturnAddressFontButtonDown = false;
}
function checkFonts() {
}
Each of these JavaScript functions gets the selections you make in the dialogs, uses them in the widget,
and stores them as preferences. This is a good example of how a plugin can be used to access functional-
ity in the Macintosh OS that is not available to JavaScript.
209
Easy Envelopes
19_778257 ch13.qxp 6/9/06 9:35 AM Page 209
Summary
Email being the primary form of communication for most computer users, you may not scrawl an
address on an envelope more than once a month. But if your constant typing has lead to the decline of
your penmanship, Easy Envelopes may ensure that your letters, bills, and birthday cards arrive at the
correct destination. Because Easy Envelopes can get your parents’ snail mail address from your Address
Book, you’ll never have to worry about forgetting the ZIP code or house address. While paper mail may
be falling out of favor, your postal correctness is provided by a widget whose form suggests its function
and can easily be minimized to save space.
210
Chapter 13
19_778257 ch13.qxp 6/9/06 9:35 AM Page 210
14
SecureCopy Widget
In addition to providing web content at your fingertips, widgets can serve as an interface to any of
the command-line utilities on your Macintosh. If you have trouble remembering the syntax for a
command-line utility, you can easily build a widget that calls the utility using the
widget.system
method and you won’t have to remember the syntax for those powerful but infrequently used
commands. This chapter looks at a widget that demonstrates building an interface for the scp util-
ity in Darwin.
SSH & scp
FTP may be the most familiar means of transferring files between two computers on the Internet,
but it is not the most secure. It sends your password and data in clear text that can easily be inter-
cepted and viewed by malicious users. A more secure means of transferring files is available using
SSH, or secure shell. SSH is both a set of command-line utilities and a protocol for gaining access
to a remote computer, already built in to the Mac OS. The SSH suite includes slogin, ssh, and scp
for securely connecting to a remote machine, running a remote shell, and copying files to a remote
machine, respectively. With SSH, client and server connections are authenticated using a digital
certificate and passwords. The digital certificate and passwords —and in fact the entire session —
are all protected by encryption. The security in SSH comes through RSA public key cryptography.
You may think that because you are copying files between machines within your own local network,
you probably don’t have need for such strong security. You may be right. But you are overlooking a
more mundane use of scp. If you want to copy files or directories between two Macs, your options
are burning the data to CD, swapping an external drive, personal file sharing, FTP, or scp. scp allows
you to copy files between two Macs without mounting filesystems and incurring the overhead of the
Finder dealing with another mounted filesystem.
In true Unix fashion, scp is a command-line utility. To copy a file from one Macintosh to the other
using scp, you pass the utility the file you want to copy, the Macintosh you want to copy it to, and
the file’s name on that computer, like so, using the Terminal application.
[offhook:~/.ssh] pfterry% scp traffic.tiff pfterry@desklamp:traffic.tiff
20_778257 ch14.qxp 6/9/06 9:35 AM Page 211
You will be prompted for your password on the computer to which you are copying. If this is your first
connection to the remote computer, you will be asked to accept its SSH key.
[offhook:~/.ssh] pfterry@desklamp’s password:
When you enter your password and press Return, the file is copied from your Macintosh to the other
Macintosh. In the terminal, the filename, percentage of the file copied, and the speed of the copy, and
time remaining until the copy is complete are displayed as the file is copied.
traffic.tiff 3% 30MB 1.7MB/s 07:48 ETA
If you substitute the path to a directory for the file and include a –r switch, scp copies the directory and
all of the directories or files in it recursively to the other Macintosh.
You can reverse the process if you know the path to a file or directory on a networked Macintosh that
you want copied to your Macintosh.
[offhook:~/.ssh] pfterry% scp pfterry@countzero:~/Desktop/traffic.tiff .
In this case, you are copying the traffic.tiff file from the desktop of your account on the networked
Macintosh to the current directory on your local Macintosh. The dot indicates that you are copying
the file to the current directory. You will be prompted for your password on the computer that you are
copying from.
[offhook:~/.ssh] pfterry@countzero’s password:
As the file is copied from the remote computer to the local computer, you can see the transfer statistics.
The SecureCopy Widget
The SecureCopy widget takes advantage of the widget.system method to perform the same function
as the scp command-line utility. It takes advantage of Dashboard’s drag-and-drop capabilities so you do
not have to enter the full path to the file that you want to copy to a networked Macintosh.
The Interface
The SecureCopy widget provides a Dashboard interface to the scp command-line utility. The interface is
a set of text boxes where you can enter the information that you would normally type in your terminal
(Figure 14-1). The Host field takes the name or IP address of the computer to or from which you are
copying the file. The Filename field takes the path to the file you want to copy. If you are copying the file
from your local Macintosh, you can drag the file to the Filename field. The Switches field takes the com-
mand-line switches that you would enter to copy a directory. You enter your user name on the remote
computer in the User Name field.
Once you have entered the information for the copy in the widget, you can click the Copy To button to
copy the local file to the remote computer. If you are copying the file from the remote computer to your
local computer, you click the Copy From button.
212
Chapter 14
20_778257 ch14.qxp 6/9/06 9:35 AM Page 212
Figure 14-1
The back of the widget contains help information about the switches that are available for scp (Figure 14-2).
Figure 14-2
SecureCopy Internals
Like most widgets, SecureCopy has the basic set of files required for the widget (Figure 14-3).
Figure 14-3
213
SecureCopy Widget
20_778257 ch14.qxp 6/9/06 9:35 AM Page 213
Info.plist
The widget has the AllowNetworkAccess, AllowSystem, and AllowFileAccessOutsideOfWidget
access keys set. It needs these three because it needs access to the network to copy the files and directo-
ries, and it needs access to the filesystem to run the scp command-line utility. The widget needs access
outside of the widget so you can copy files from anywhere on your hard disk.
<plist version=”1.0”>
<dict>
<key>AllowFileAccessOutsideOfWidget</key>
<true/>
<key>AllowNetworkAccess</key>
<true/>
<key>AllowSystem</key>
<true/>
<key>CFBundleDisplayName</key>
<string>SecureCopy</string>
<key>CFBundleIdentifier</key>
<string>com.apple.widget.securecopy</string>
<key>CFBundleName</key>
<string>SecureCopy</string>
<key>CFBundleShortVersionString</key>
<string>.5</string>
<key>CFBundleVersion</key>
<string>.5</string>
<key>CloseBoxInsetX</key>
<integer>6</integer>
<key>CloseBoxInsetY</key>
<integer>6</integer>
<key>MainHTML</key>
<string>scp.html</string>
</dict>
</plist>
HTML/CSS
The scp.html file isn’t very complicated. The text fields for user input are provided through a standard
text input form. The Apple Class JavaScripts to animate flipping the widget (for the info button and for
the Done button) are imported in addition to the scp.js widget JavaScript. The widget also has front and
back
<div>s, and the form and info button are placed in the front <div>.
<html>
<style type=”text/css”>
@import “scp.css”;
</style>
<script type=”text/javascript” src=”scp.js” />
<script type=”text/javascript” src=”AppleClasses/AppleButton.js” charset=”utf-
8”/>
<script type=”text/javascript” src=”AppleClasses/AppleInfoButton.js”
charset=”utf-8”/>
<script type=”text/javascript” src=”AppleClasses/AppleAnimator.js”
charset=”utf-8”/>
</head>
214
Chapter 14
20_778257 ch14.qxp 6/9/06 9:35 AM Page 214