BeginningMac OS X Tiger Dashboard Widget Development 2006 phần 8 docx
Bạn đang xem bản rút gọn của tài liệu. Xem và tải ngay bản đầy đủ của tài liệu tại đây (1.23 MB, 37 trang )
Figure 15-1
Amazon Album Art
As the name indicates, Simon Whitaker’s Amazon Album Art widget is able to retrieve album artwork
from Amazon for you. Moreover, it simplifies the manual process from the beginning by getting the
track listing from iTunes and searching Amazon for the album with just a button click. In practice, you
can display Dashboard when a track is playing that you know you don’t have the artwork for, click the
iTunes button, add the album art to the track, and close Dashboard.
The Interface
Like a couple of the other widgets that we’ve looked at, the Amazon Album Art widget has a minimized
interface (Figure 15-2) in addition to a full-sized view displaying the artwork that you are searching for
and a back side panel. The real advantage for small screens and laptop users is that you can leave the
widget open all of the time without it taking up too much screen real estate.
Figure 15-2
226
Chapter 15
21_778257 ch15.qxp 6/9/06 9:35 AM Page 226
Clicking the info button displays the preferences on the back side of the widget (Figure 15-3). The
options let you select from a Preferred Amazon store, that is, a store related to the country in which you
live. The Search for menu lets you select between popular and classical music. The Operate on menu
allows you to apply the “set as album art action” to the currently playing track, the whole album, or the
current selection. You can also choose to save small images (240 × 240) to iTunes and use a local proxy
server to connect to the iTunes Music Store.
Figure 15-3
You can query iTunes for the currently playing track by clicking the small iTunes icon (Figure 15-4).
Amazon Album Art gets the track information from iTunes and then searches Amazon to get the cover
art for the album.
Figure 15-4
When the widget finds the cover art, it expands to display the art in the lower portion of the widget
(Figure 15-5).
Figure 15-5
227
Amazon Album Art
21_778257 ch15.qxp 6/9/06 9:35 AM Page 227
If you want to set the cover art for the track that is currently playing or for the whole album, you can
click the “Set as album art in iTunes” banner at the bottom of the screen (Figure 15-6).
Figure 15-6
The widget also allows you to search Amazon for albums by an artist. You can enter the name of the
artist in the search field and press the Return key. When an album cover appears in the widget, clicking
the thumbnails icon in the upper-right corner of the album cover displays the covers of all of the artist’s
albums (Figure 15-7). Clicking one of the covers displays a large image of the cover, and then clicking the
cover takes you to the album’s page on Amazon.
Figure 15-7
If the Amazon Album Art widget can’t find the album on Amazon, it gives you the option of searching
Google for the cover art (Figure 15-8).
This option doesn’t automate inserting the cover art in iTunes, but it does provide the artwork if it can
be found.
228
Chapter 15
21_778257 ch15.qxp 6/9/06 9:35 AM Page 228
Figure 15-8
Amazon Album Art Internals
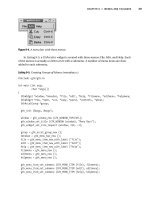
When you look inside the Amazon Album Art widget (Figure 15-9), you see that it looks like any of the
widgets that you’ve worked with. The main default images are at the root level of the widget with the
graphics for the logo, search box, back side, and the pieces that are used for the expanded window all
placed in an Images folder. Because the widget can search on any of the country-specific Amazon stores,
the localization strings are in separate folders for each language (German, French, Netherlands, and
Russian, in addition to English).
Figure 15-9
229
Amazon Album Art
21_778257 ch15.qxp 6/9/06 9:35 AM Page 229
You’ll notice a couple of different things about the Album Art widget. The Apple Classes contains the
AppleAnimator.js, AppleButton.js, and AppleInfoButton.js JavaScript files. You can also see two
AppleScript files at the root level of the widget.
Info.plist
In the properties list for the widget, you see that three access keys are set.
AllowFileAcessOutsideOfWidget is set because the widget needs to interact with iTunes. The
AllowNetworkAccess key is set because the widget needs to fetch the cover art from Amazon.
<?xml version=”1.0” encoding=”UTF-8”?>
<!DOCTYPE plist PUBLIC “-//Apple Computer//DTD PLIST 1.0//EN”
“ /><plist version=”1.0”>
<dict>
<key>AllowFileAccessOutsideOfWidget</key>
<true/>
<key>AllowNetworkAccess</key>
<true/>
<key>AllowSystem</key>
<true/>
<key>CFBundleDisplayName</key>
<string>Amazon Album Art</string>
<key>CFBundleIdentifier</key>
<string>com.widget-foundry.widget.albumart</string>
<key>CFBundleName</key>
<string>Amazon Album Art</string>
<key>CFBundleShortVersionString</key>
<string>2.0</string>
<key>CFBundleVersion</key>
<string>2.0</string>
<key>CloseBoxInsetX</key>
<integer>8</integer>
<key>CloseBoxInsetY</key>
<integer>4</integer>
<key>Height</key>
<integer>56</integer>
<key>MainHTML</key>
<string>amazonart.html</string>
<key>Width</key>
<integer>216</integer>
</dict>
</plist>
Finally, the AllowSystem key is included because the widget needs to run the GetSelectionDetails and
SetCoverArt AppleScripts in its bundle.
HTML/CSS
The HTML and CSS files for the Amazon Album Art widget are fairly standard. The HTML file imports
the CSS file and the JavaScripts for the buttons, localization strings, and the main JavaScript for the wid-
get. The portion of the script that controls the artwork display on the widget’s front is the
slidearea,
fbottom, and ftop <div>s.
230
Chapter 15
21_778257 ch15.qxp 6/9/06 9:35 AM Page 230
<html>
<head>
<title>Amazon Album Search</title>
<style type=”text/css”>
@import “amazonart.css”;
</style>
<script type=’text/javascript’ src=’AppleClasses/AppleInfoButton.js’ charset=’utf-
8’ />
<script type=’text/javascript’ src=’AppleClasses/AppleAnimator.js’ charset=’utf-8’
/>
<script type=’text/javascript’ src=’AppleClasses/AppleButton.js’ charset=’utf-8’ />
<script type=”text/javascript” src=”localisedStrings.js” charset=’utf-8’ />
<script type=”text/javascript” src=”amazonart.js” charset=’utf-8’ />
</head>
<body onLoad=”setup();”>
<div id=”front”>
<div id=”slidearea”>
<div id=”slide”>
<div id=”art_bg”></div>
<div id=”art”><p>No artwork requested yet</p></div>
<div id=”add_to_itunes_container”>
<div id=”add_to_itunes” onClick=”setAlbumArt()”><a href=”#”
id=”add_to_itunes_a”>Set as album art in iTunes</a></div>
</div>
<div id=”show_thumbnails”><a href=”#” id=”show_thumbnails_a”><img
src=”images/show_thumbnails.png” id=”show_thumbnails_img”/></a></div>
<div id=”thumbnails”></div>
</div>
<div id=”fbottom” onClick=”toggleSlide();”><img
src=”images/front_r3_c1.png”></div>
</div>
<div id=”ftop” onClick=”toggleSlide();”>
<img src=”images/front_r1_c1.png” />
<! <img src=”images/searchbox_bg.png” id=”searchbox_bg” /> >
</div>
<input id=”s” type=”search” name=”s” placeholder=”Album details” results=”5”
autosave=”amazonartwidgetsearch” onsearch=”doSearch();”>
<div id=”get_from_itunes” onClick=”getDetailsFromiTunes();”><a href=”#”
id=”get_from_itunes_a”><img id=”itunes_icon” src=”images/itunes_icon.png”
/></a></div>
<div id=’infoButton’></div>
</div>
The add_to_itunes div calls the setAlbumArt() function whenever you click the banner at the bot-
tom of the widget after it has found the album art. The
show_thumbnails div displays the small thumb-
nails icon in the upper-right corner of the artwork display. The
fbottom and ftop divs contain the
toggleSlide() function.
The CSS file contains the rules for the area that slides on the front of the widget. The slidearea at the top
of the section shows the size of the widget with the slide extended and album art displayed.
231
Amazon Album Art
21_778257 ch15.qxp 6/9/06 9:35 AM Page 231
/* SLIDING STUFF */
#slidearea /* defines area where slide is visible */
{
padding: 0px;
position: absolute;
height: 218px;
width: 216px;
overflow: hidden;
top: 38px;
left: 0px;
}
#slide /* The bit that slides up and down */
{
position: absolute;
top: 0px;
left: 0px;
width: 216px;
height: 0px;
overflow: hidden;
}
#art_bg /* The background image - to add drop shadow to album art */
{
background-image:url(images/front_r2_c1.png);
position: absolute;
top: 0px;
left: 0px;
width: 216px;
height: 200px;
}
#thumbnails
{
position: absolute;
top: 0px;
left: 8px;
width: 180px;
height: 180px;
background-color: #000000;
padding: 10px;
overflow: hidden;
visibility: hidden;
}
#thumbnails .thumbnail
{
float: left;
margin: 5px;
}
#thumbnails .selected
{
padding: 2px;
margin: 2px;
232
Chapter 15
21_778257 ch15.qxp 6/9/06 9:35 AM Page 232
border: 1px dashed #999999;
}
#art /* The bit where the album art goes */
{
position: absolute;
top: 0px;
left: 8px;
width: 200px;
height: 200px;
overflow: hidden;
}
#art p
{
padding: 5px 5px 10px 5px;
margin: 0px;
vertical-align: middle;
text-align: center;
}
#fbottom
{
padding: 0px;
position: absolute;
top: -1px;
left: 0px;
}
#add_to_itunes_container
{
position: absolute;
bottom: 5px;
left: 13px;
width: 190px;
height: 32px;
}
#add_to_itunes
{
visibility: hidden;
padding: 2px 5px 2px 5px;
width: 190px;
height: 32px;
background-image:url(images/add_to_itunes_bg.png);
text-align: center;
font-family: “Gill Sans”, “Helvetica Neue”, sans-serif;
text-shadow: 0px 1px 0px #000000;
color: #ffffff;
font-size: 11px;
font-weight: bold;
display: table-cell;
vertical-align: middle;
233
Amazon Album Art
21_778257 ch15.qxp 6/9/06 9:35 AM Page 233
}
#add_to_itunes a
{
color: #ffffff;
text-decoration: none;
}
#show_thumbnails
{
position: absolute;
top: 5px;
right: 13px;
visibility: hidden;
}
div
{
font-family: “Helvetica Neue”, sans-serif;
font-size: 11px;
}
The HTML and CSS files set up the slide area and provide the layout, but the amazonart.js script has a
section that controls when the widget slides to display the album artwork.
JavaScript Functionality
The portion of the amazonart.js script that controls sliding the widget to display the artwork is marked
in the code with a “slide stuff” comment.
// SLIDE STUFF
function goAmazon(ASIN)
{
if (window.widget)
{
var aa_url;
switch (gCountry)
{
case ‘uk’:
aa_url =
“ />=1634&creative=6738&path=ASIN%2F” + ASIN + “%2F”;
break;
case ‘ca’:
aa_url =
“ + ASIN +
“&tag=thewidgetfoun-20&camp=15121&creative=330641”;
break;
case ‘fr’:
aa_url =
“ + ASIN +
“&tag=thewidgetfoun-21&camp=1642&creative=6746”;
break;
234
Chapter 15
21_778257 ch15.qxp 6/9/06 9:35 AM Page 234
case ‘de’:
aa_url =
“ + ASIN +
“&tag=thewidgetfo05-21&camp=1638&creative=6742”;
break;
case ‘at’:
aa_url =
“ + ASIN +
“%3Fsite-redirect=at&tag=thewidgetfo05-21&camp=1638&creative=6742”;
break;
case ‘jp’:
aa_url = “ + ASIN;
break;
default: // us
aa_url =
“ + ASIN +
“&tag=chubbybat-20&camp=1789&creative=9325”;
}
widget.openURL(aa_url);
}
}
function toggleSlide()
{
if (gOpen)
{
slideClosed();
}
else
{
slideOpen();
}
}
function slideOpen()
{
gSlideOpenAnimator.stop();
gSlideClosedAnimator.stop();
gOpen = true;
if (window.widget)
window.resizeTo(216, 257);
gSlideOpenAnimator.start();
}
function slideClosed()
{
gSlideOpenAnimator.stop();
gSlideClosedAnimator.stop();
gSlideClosedAnimator.start();
}
function slideIt(animation, current, start, finish)
{
235
Amazon Album Art
21_778257 ch15.qxp 6/9/06 9:35 AM Page 235
gSlide.style.height = current + “px”;
o(“fbottom”).style.top = current + “px”;
}
function slideClosedCompleted()
{
if (window.widget)
window.resizeTo(216, 56);
o(“fbottom”).style.top = “-1px”;
gOpen = false;
}
In addition to the JavaScript functionality that controls the display of artwork, Amazon Album Art takes
advantage of the command line to run AppleScripts and control iTunes to add the cover art to the track
and get information about the current selection.
Get Details from iTunes
To get the details of the track that is currently playing or the track that is selected whenever you click the
iTunes button in the widget, the widget’s JavaScript calls the GetSelectionDetails script. When you look
in the JavaScript, you can see the AppleScript called using the osascript utility. The result is passed back
to the JavaScript using the
outputString.
// GET DETAILS OF CURRENT SELECTION FROM ITUNES STUFF
function getDetailsFromiTunes()
{
if (window.widget)
{
o(“s”).value = getLocalisedString(“Fetching ”);
var output = widget.system(“/usr/bin/osascript GetSelectionDetails.scpt “ +
gMode, null).outputString;
if (output && output.length > 0)
{
output = output.replace(/\s+$/, “”); // remove white space from end of string
- removes LF that Applescript writes
o(“s”).value = output;
doSearch();
}
else
{
o(“s”).value = “”;
}
}
}
The GetSelectionDetails script checks to see if iTunes is running. If it is, the script checks to see if the
mode is set for selection and if it is, to get the artist and album. If iTunes is playing music, the script gets
the artist and album of the currently playing track. When it has the information, it copies it to
stdout
where the JavaScript picks it up in the outputString.
on run argv
set mode to item 1 of argv
tell application “Finder”
236
Chapter 15
21_778257 ch15.qxp 6/9/06 9:35 AM Page 236
set iTunesRunning to process “iTunes” exists
end tell
if iTunesRunning then
tell application “iTunes”
try
if mode is “selection” and selection is not {} then
set theArtist to artist of item 1 of selection
set theAlbum to album of item 1 of selection
else if player state is not stopped then
set theArtist to artist of current track
set theAlbum to album of current track
end if
copy theArtist & “ “ & theAlbum to stdout
end try
end tell
else
copy “iTunes must be running, with one or more tracks selected” to stderr
end if
end run
With the information from the script, Amazon Album Art is able to find the album information on
Amazon and download the artwork.
Processing the Downloaded Image
In the amazonart.js script, the processDownloadedImage() function takes the cover art downloaded
from Amazon and adds it to the album in iTunes. The first part of the function sets up an error check
to make sure you have selected tracks in iTunes before trying to look them up on Amazon. The
widget
.system()
method uses the osascript command to run the SetCoverArt AppleScript and pass it the
gLocalJpeg, which contains the cover art, and specifies whether to use small images.
function processDownloadedImage(currentStringOnStdout)
{
if (currentStringOnStdout.length > 0)
{
// curl only outputs on error - so if there was output, something went wrong
gItunesLink.innerHTML = getLocalisedString(“Select iTunes tracks first”);
setTimeout(resetAddToiTunesImage, 5000);
}
else
{
if (window.widget)
{
var useSmallImages = o(“small_images”).checked ? “Yes” : “No”;
var output = widget.system(“/usr/bin/osascript SetCoverArt.scpt “ +
gLocalJpeg + “ “ + gMode + “ “ + useSmallImages, null).outputString;
if (output && output.substr(0,6) == “Error:”)
{
gItunesLink.innerHTML = getLocalisedString(“Select iTunes tracks first”);
setTimeout(resetAddToiTunesImage, 5000);
}
else
237
Amazon Album Art
21_778257 ch15.qxp 6/9/06 9:35 AM Page 237
{
gItunesLink.innerHTML = ‘<a href=”#” id=”add_to_itunes_a”>’ +
getLocalisedString(“Set as album art in iTunes”) + ‘</a>’;
}
}
}
}
The GetSelectionDetails AppleScript has global variables for the filename, mode, and use small images
settings. These are passed to the AppleScript from the JavaScript using the osascript utility.
The first part of the AppleScript has sections for locating iTunes and setting up the cache for the album
art in the user’s Library folder. It checks to see if iTunes is running and alerts the user if it is not. After
the setup, the script attempts to get a list of tracks from iTunes to operate on. The script then proceeds to
get the artwork from Amazon and set it for the tracks that are playing or for the selection.
global jpeg_filename, mode, use_small_images
on run argv
set jpeg_filename to item 1 of argv
set mode to item 2 of argv
set use_small_images to item 3 of argv
set jpeg_filename to “amazonart.jpg”
set mode to “selection”
set use_small_images to “no”
is iTunes running?
tell application “Finder”
set itunes_running to process “iTunes” exists
end tell
get path to image files
set jpeg_loc to ((path to home folder) as string) & “Library:Caches:com.widget-
foundry.widget.albumart:” & jpeg_filename
set pict_loc to convert_jpeg_to_pict(jpeg_loc)
if itunes_running then
set_artwork(pict_loc)
else
copy “Error: iTunes must be running, with one or more tracks selected” to
stdout
end if
end run
to set_artwork(pict_loc)
try
tell application “iTunes”
get list of tracks on which to operate
set t to {}
if mode is “selection” and selection is not {} then
set t to selection
else if mode is “current_track” and player state is not stopped then
set t to {current track}
238
Chapter 15
21_778257 ch15.qxp 6/9/06 9:35 AM Page 238
else if mode is “current_album” and player state is not stopped then
set alb to album of current track
set t to (file tracks of library playlist 1 whose album is alb)
end if
if t is not {} then
show warning if more than 30 tracks are to be processed
set proceed to “Yes”
if (count of t) is greater than 30 then
set r to display dialog “Set art on all “ & ((count of t) as string) & “
tracks - are you sure? This may take some time to complete.” buttons {“Yes”, “No”}
with icon 2
set proceed to button returned of r
end if
if proceed is “Yes” then
get contents of JPEG
set file_ref to open for access pict_loc
set ott to read file_ref from 513 as picture
close access file_ref
set album art image on tracks
with timeout of 600 seconds
repeat with a_track in t
try
set data of artwork 1 of (a_track) to ott
on error m
copy “Error: “ & m to stdout
end try
end repeat
end timeout
end if
else
copy “Error: You need to select some tracks in iTunes first!” to stdout
end if
end tell
on error m
copy m to stdout
return
end try
end set_artwork
to convert_jpeg_to_pict(orig_file)
try
set ext_index to (length of orig_file) - 3
set new_file to text from character 1 to character ext_index of orig_file &
“pict”
convert to PICT
239
Amazon Album Art
21_778257 ch15.qxp 6/9/06 9:35 AM Page 239
tell application “Image Events”
launch
open the image file
set this_image to open orig_file
if use_small_images is “Yes” then
resize if image is > 240 pixels wide - assume pic is more-or-less square
copy the dimensions of this_image to {xdim, ydim}
if xdim is greater than 240 then
scale this_image to size 240
end if
end if
tell application “Finder” to set new_item to new_file
save this_image in new_item as PICT
close this_image
end tell
return new_file
on error m number n
if n is -1728 then
copy “Error: Error when converting image for iTunes” to stdout
else
copy “Error: “ & m to stdout
end if
end try
end convert_jpeg_to_pict
The last handler in the AppleScript converts the JPEG artwork file to a PICT format for iTunes. As you
can see, it uses the Image Events utility for the conversion.
Summary
The Show Artwork command in iTunes is great for purchased music, but it doesn’t provide the same expe-
rience if your music library is built from your audio CDs. The Amazon Album Art widget provides a way
to add the album artwork to your ripped CDs by automating an otherwise manual process. To augment
iTunes, it takes advantage of two strengths of widgets: the abilities to retrieve information from a website
and to interact with applications.
240
Chapter 15
21_778257 ch15.qxp 6/9/06 9:35 AM Page 240
16
Timbuktu Quick Connect
Timbuktu is a screen-sharing program from Netopia that runs on both Macs and PCs and allows
you to control a remote computer from your Macintosh (Figure 16-1). Though Timbuktu is not
at feature parity on the two platforms yet, the Mac version includes file exchange, clipboard
exchange, and sending files and messages, and is very scriptable. To connect to another computer,
you open the New Connection window in Timbuktu, find the computer to which you want to con-
nect, and then log in to it.
Written by Nick Rogers of Netopia, the Timbuktu Quick Connect widget enables you to jump
directly to a connection with a remote computer without having to open the New Connection win-
dow in Timbuktu and look for the computer you want to connect to. If you have multiple subnets
with a number of computers in each, the Timbuktu Quick Connect widget can save you time
because you won’t have to look through the subnets to find the computer and you don’t have to
remember the IP to connect to it.
22_778257 ch16.qxp 6/9/06 9:36 AM Page 241
Figure 16-1
The Interface
The Timbuktu Quick Connect widget interface is straightforward. A prominently displayed text box
holds the IP address of the Macintosh to which you want to connect (Figure 16-2). As you type its IP
address, you’ll see that the widget types ahead if you’ve connected with that machine before.
Clicking the Connect button or pressing the Return key after you’ve entered the IP address closes
Dashboard, brings Timbuktu to the foreground, and prompts you for a name and password for the
kind of connection that you are making (Figure 16-3).
242
Chapter 16
22_778257 ch16.qxp 6/9/06 9:36 AM Page 242
Figure 16-2
Figure 16-3
Once you have provided your password and clicked OK, you are logged in to the remote machine.
When you move your cursor over the front of the widget, you see the Information button in the lower-
right corner. Clicking it flips the widget over (Figure 16-4) so you can see the preferences, instructions for
use, and a copyright notice.
In addition to user configurable preferences, the back side also provides information about how the wid-
get works. The preferences for the connection are the listed Timbuktu services. If the Control radio but-
ton is selected, entering the IP address of the remote machine and clicking the Connect button connects
you to the remote machine. If the Send radio button is selected, entering the IP address of the remote
machine and clicking the Connect button will prompt you for the password and then open a dialog
where you can select files or type a message to send to the remote machine (Figure 16-5).
243
Timbuktu Quick Connect
22_778257 ch16.qxp 6/9/06 9:36 AM Page 243
Figure 16-4
Figure 16-5
Timbuktu Quick Connect Internals
You can see the files that make up the Timbuktu Quick Connect widget by Control-clicking or right-
clicking the widget and selecting Show Package Contents (Figure 16-6).
244
Chapter 16
22_778257 ch16.qxp 6/9/06 9:36 AM Page 244
Figure 16-6
Like the Amazon Album Art widget, Timbuktu Quick Connect has an AppleScript as part of its bundle.
Info.plist
Because the widget needs to run the tb2connect AppleScript to connect with Timbuktu, the AllowSystem
access key is set. This might seem to be unnecessary because the AppleScript is inside of the widget bun-
dle, but the osascript command-line utility in the JavaScript that runs the AppleScript is part of the system.
Setting the
AllowSystem key gives the widget access to that utility.
<plist version=”1.0”>
<dict>
<key>AllowSystem</key>
<true/>
<key>CFBundleIdentifier</key>
<string>com.netopia.timbuktu.pro.widget.quickconnect</string>
<key>CFBundleName</key>
<string>Timbuktu Quick Connect Widget</string>
<key>CFBundleDisplayName</key>
<string>Timbuktu Quick Connect Widget</string>
<key>CFBundleVersion</key>
<string>1.0.2</string>
<key>CFBundleShortVersionString</key>
<string>1.0</string>
<key>CloseBoxInsetX</key>
<integer>12</integer>
<key>CloseBoxInsetY</key>
245
Timbuktu Quick Connect
22_778257 ch16.qxp 6/9/06 9:36 AM Page 245
<integer>12</integer>
<key>MainHTML</key>
<string>TimbuktuQuickConnect.html</string>
</dict>
</plist>
HTML/CSS
The HTML file contains the usual import of the CSS file and references to the JavaScript files. If you
look below the front
<div>, you see references to the Timbuktu Quick Connect functions: the
checkInput(theKeyPressed), the ipAddressAutoComplete(theKeyPressed), the launchTB2(),
and the
startTB2Connection().
<html>
<head>
<title>
Timbuktu Quick Connect
</title>
<style type=”text/css”>
@import “TimbuktuQuickConnect.css”;
</style>
<script type=”text/javascript” src=”TimbuktuQuickConnect.js” charset=”utf-
8”></script>
<script type=”text/javascript”
src=”/System/Library/WidgetResources/AppleClasses/AppleButton.js” charset=”utf-
8”></script>
<script type=”text/javascript”
src=”/System/Library/WidgetResources/AppleClasses/AppleInfoButton.js” charset=”utf-
8”></script>
<script type=”text/javascript”
src=”/System/Library/WidgetResources/AppleClasses/AppleAnimator.js” charset=”utf-
8”></script>
</head>
<body onLoad=”setup();”>
<div id=”front”>
<img id=”backgroundImage” src=”Default.png”></img>
<img id=”tb2Icon” src=”tb2icon.png” onClick=”launchTB2();”
onMouseover=”highlightTB2Icon();” onmouseout=”resetTB2Icon();”></img>
<div id=”title”>Timbuktu Quick Connect</div>
<div id=”ipAddressFields”>
<table cellpadding=”3”>
<tr>
<td class=”ipAddressLabel”>
IP Address:
</td>
<td>
<input id=”ipAddress” size=”14” length=”15” onKeyDown=”return
checkInput(event);” onKeyUp=”return ipAddressAutoComplete(event);”>
</td>
<td>
<div id=”connectButton”></div>
</td>
</tr>
246
Chapter 16
22_778257 ch16.qxp 6/9/06 9:36 AM Page 246
</table>
</div>
<div id=”infoButton”></div>
</div>
Clicking the tb2Icon.png, for instance, executes the launchTB2() function, which launches Timbuktu if
it isn’t already running. If you look at the Default.png background image, you see that the tb2Icon.png
overlays it. This selector in the CSS file sets its height and width to 50 × 50 pixels and positions it on the
top and right edges of the Default.png.
#tb2Icon {
position: absolute;
top: 0px;
right: 0px;
height: 50px;
width: 50px;
}
In addition to the launchTB2() function, the checkInput(theKeyPressed), the ipAddressAuto
Complete(theKeyPressed)
, and the findAddress(anAddress) functions support the launchTB2()
function. The checkInput(theKeyPressed) function validates the text as you enter it in the text box.
The
findAddress(anAddress) function tries to find an address from previous connections. The
ipAddressAutoComplete(theKeyPressed) function uses the previous IP addresses and tries to
autocomplete the address as you enter it.
The back
<div> contains the information for the back side of the widget and preferences. The instruc-
tions are laid out using a table to create the hanging indent formatting. Each of the service buttons is
incorporated as an input type=radio.
<div id=”back”>
<img id=”backgroundImage” src=”Default_reverse.png”></img>
<div id=”mainContents”>
<table>
<tr valign=”top”>
<td>
<font class=”preferencePaneFontLabel”>
Instructions:
</font>
</td>
<td>
<font class=”preferencePaneFontText”>
Enter the IP address of a remote machine in the
"IP Address" field on the front of
this widget and click the "Connect"
button.
</font>
</td>
</tr>
<tr valign=”top”>
<td>
<font class=”preferencePaneFontLabel”>
Choose the Timbuktu service to start:
</font>
247
Timbuktu Quick Connect
22_778257 ch16.qxp 6/9/06 9:36 AM Page 247
</td>
<td>
<table>
<tr valign=”top”>
<td>
<input type=”radio” name=”serviceType” id=”sendButton”
value=”send” onClick=”setDefaultService(this.value);”>
<label for=”sendButton”
onClick=”selectDefaultService(‘sendButton’);”>
Send
</label>
</td>
<td>
<input type=”radio” name=”serviceType” id=”exchangeButton”
value=”exchange” onClick=”setDefaultService(this.value);”>
<label for=”exchangeButton”
onClick=”selectDefaultService(‘exchangeButton’);”>
Exchange
</label>
</td>
</tr>
<tr valign=”top”>
<td>
<input type=”radio” name=”serviceType” id=”controlButton”
value=”control” onClick=”setDefaultService(this.value);”>
<label for=”controlButton”
onClick=”selectDefaultService(‘controlButton’);”>
Control
</label>
</td>
<td>
<input type=”radio” name=”serviceType” id=”chatButton”
value=”chat” onClick=”setDefaultService(this.value);”>
<label for=”chatButton”
onClick=”selectDefaultService(‘chatButton’);”>
Chat
</label>
</td>
</tr>
<tr valign=”top”>
<td>
<input type=”radio” name=”serviceType” id=”notifyButton”
value=”notify” onClick=”setDefaultService(this.value);”>
<label for=”notifyButton”
onClick=”selectDefaultService(‘notifyButton’);”>
Notify
</label>
</td>
<td>
<input type=”radio” name=”serviceType” id=”intercomButton”
value=”intercom” onClick=”setDefaultService(this.value);”>
<label for=”intercomButton”
onClick=”selectDefaultService(‘intercomButton’);”>
Intercom
248
Chapter 16
22_778257 ch16.qxp 6/9/06 9:36 AM Page 248
</label>
</td>
</tr>
<tr valign=”top”>
<td>
<input type=”radio” name=”serviceType” id=”inviteButton”
value=”invite” onClick=”setDefaultService(this.value);”>
<label for=”inviteButton”
onClick=”selectDefaultService(‘inviteButton’);”>
Invite
</label>
</td>
<td>
<input type=”radio” name=”serviceType” id=”profileButton”
value=”profile” onClick=”setDefaultService(this.value);”>
<label for=”profileButton”
onClick=”selectDefaultService(‘profileButton’);”>
Profile
</label>
</td>
</tr>
</table>
</td>
</tr>
<tr valign=”top”>
<td colspan=”2”>
<font class=”preferencePaneCopyright”>
Timbuktu Pro and its icon are copyright Netopia,
Inc.
</font>
</td>
</tr>
</table>
</div>
<div id=”doneButton”></div>
</div>
</body>
</html>
The different font sizes for the label, the instructions, and the copyright notice on the back are all format-
ted in the CSS file. Each font style has its own selector.
/* Back elements */
#back {
display: none;
}
#mainContents {
position: absolute;
top: 20px;
left: 20px;
bottom: 30px;
right: 20px;
249
Timbuktu Quick Connect
22_778257 ch16.qxp 6/9/06 9:36 AM Page 249
}
.preferencePaneCopyright {
font: 8px “Lucida Grande”;
color: white;
font-weight: bold;
}
.preferencePaneFontLabel {
font: 10px “Lucida Grande”;
color: white;
font-weight: bold;
}
.preferencePaneFontText {
font: 10px “Lucida Grande”;
color: white;
}
#doneButton {
position: absolute;
bottom: 20px;
right: 17px;
}
The <div id=”mainContents”> in the HTML file is the container for the content on the back side of the
widget and is formatted using the
mainContents selector in the CSS file.
JavaScript Functionality
The launchTB2() function that runs Timbuktu with a click on its icon uses the
widget.openApplication() method and Timbuktu is listed in application identifier
format for the defaults domain.
function launchTB2() {
widget.openApplication(“com.netopia.timbuktu.pro”);
}
The widget’s main function is the startTB2Connection(), which attempts to connect to Timbuktu
whenever you enter an IP address and click the Connect button. The IP address is taken from the text
box and passed to the tb2connect.scrpt.
The launchTB2() function called in the middle of this startTB2Connection() function starts Timbuktu
if it isn’t already running. This saves time because the application doesn’t have to wait while Timbuktu
starts up.
function startTB2Connection() {
var theAddress = document.getElementById(“ipAddress”).value;
if (theAddress.length > 0) {
// Add the address if it is not in the previous connections and a valid
// key was pressed:
if ((findAddress(theAddress) == false) && (validKeyPressed == true)) {
250
Chapter 16
22_778257 ch16.qxp 6/9/06 9:36 AM Page 250