Brushes iPhone and iPod touchUser’s Guide phần 2 docx
Bạn đang xem bản rút gọn của tài liệu. Xem và tải ngay bản đầy đủ của tài liệu tại đây (1.25 MB, 11 trang )
When painting near the edge of the screen, it can be helpful to pull the canvas away from the
screen edge. To do this, just pan, or set the zoom to 70%.
When the zoom is 100% and the canvas gets close to the edge of the screen, the canvas will
automatically snap back, making it easier to get back to normal.
To quickly switch between 100% and your preferred zoom level, double tap on the canvas. If
you do not like this behavior, you can disable it by going to the Settings app and turning off
the Zooming > Double Tap option:
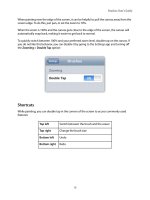
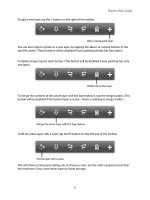
Shortcuts
While painting, you can double tap in the corners of the screen to access commonly used
features:
Top left
Switch between the brush and the eraser
Top right
Change the brush size
Bottom left
Undo
Bottom right
Redo
Brushes User’s Guide
10
Brush Settings
To change your brush settings, tap the brush button in the toolbar.
Show the brush panel.
This shows the brush panel, where you can choose your brush’s shape, size, spacing, and
opacity.
Adjust the brush
size by dragging
this slider. Tap the
minus and plus
buttons to change
the brush size one
step at a time.
Tap or swipe here
to choose your
brush.
Tap here to choose
between the brush
and the eraser.
Adjust the paint
opacity or the
transparency of
the eraser by
dragging this
slider.
Tap to quickly
switch to the
color panel.
Tap to accept
the brush and
return to your
painting.
Adjust the
brush spacing
by dragging
this slider.
Brushes User’s Guide
11
Erasing
The eraser is just like the brush, except it erases instead of drawing a color. To switch to the
eraser, tap the eraser button in the upper left of the brush panel. The brush preview will
display a checkerboard pattern to indicate that the eraser is active. Also, the brush icon in the
toolbar will switch to the eraser icon.
When erasing, the opacity slider at the bottom of the brush panel controls the transparency of
the eraser. When it is all the way to the right, the eraser will knock out everything below it.
Move the slider to the left to reduce the power of the eraser (for more subtle effects).
TIP: After using the eyedropper to pick a color, Brushes automatically switches back to the
brush.
Brushes User’s Guide
12
Paint Color
The current paint color is shown in the color well at the right of the toolbar:
The current
paint color
To change the paint color, tap the color well. The Color panel will appear.
Tap to quickly
switch to the
brush panel.
Tap to accept
the paint color
and return to
your painting.
The brightness
slider. Drag to
change the
brightness of
the paint color.
The color
wheel allows
you to choose
the hue and
saturation of
the paint color.
The opacity
slider. Drag to
change the
transparency of
the paint color.
The Color panel uses the hue/saturation/brightness model. To change the hue and saturation
of your color, drag the knob within the color wheel. The angle of the knob determines the
hue, and the distance from the center determines the saturation. The closer to the center, the
less saturated the color.
Brushes User’s Guide
13
At the top of the Color panel there is a row of color swatches. Two of the swatches are presets
that make it easy to choose black or white as your paint color. The other two display the
original color (“old”) and the current color (“new”).
The white swatch.
Tap to quickly
choose white as
your paint color.
The black swatch.
Tap to quickly
choose black as
your paint color.
The current color. This
swatch reects the
active settings in the
Color panel.
The original color. This
swatch shows the color
you started with when
you opened the panel.
Tap it to reset.
Since the old color and new color are displayed side by side, you can use the old color to help
you choose your new color. For example, it’s easy to compare changes in darkness, hue, etc.
Transparency is indicated by black and white triangles that are displayed behind the color
swatch. The more opaque the color, the less visible the triangles. If you don’t see the triangles
at all, then the color is 100% opaque.
Brushes User’s Guide
14
Eyedropper
The eyedropper lets you pick up colors from your painting and paint with them. To use it, tap
the eyedropper button:
Activate the
eyedropper tool.
The eyedropper is shown as a colored ring on the canvas. Drag it around the canvas to pick up
a color. When you release your nger, the color in the ring is transferred to your brush.
TIP: To quickly access the eyedropper while painting, touch the canvas for half a second
without moving your nger. After the eyedropper appears, move your nger to pick a color.
Brushes User’s Guide
15
The eyedropper tool will not change the opacity of your paint color. When the opacity is low,
the eyedropper uses a split display to indicate both the fully opaque color under your nger
and the same color with the current opacity:
TIP: When you start a painting, choose your palette of colors, and paint a little blob of each
one on the canvas. You can then quickly choose colors from your palette by tapping and
holding on the blobs.
Brushes User’s Guide
16
Blending
You can take advantage of the fact that the eyedropper does not modify your paint opacity to
more easily blend between two colors. For example, let's say you've painted two colored
regions like this, and you want a smoother blend between them:
1. Set your paint opacity relatively low.
Tap the color well to show the Color panel, set the opacity to something low (around 40%),
and dismiss the Color panel by tapping Done.
2. Pick up one of the colors.
Tap and hold over one of the color regions for a moment to bring up the eyedropper and then
release to set the paint color:
Brushes User’s Guide
17
3. Blend.
To blend, paint over the border between the two regions:
4. Repeat.
Repeat steps 2 and 3, picking up intermediate shades within the blended area, and blending
until you get a satisfyingly smooth result:
Brushes User’s Guide
18
Layers
A painting is made of layers. Think of each layer as a transparent sheet with paint on it. Stack
the layers on top of each other, and you see the nal painting. Layers that are higher in your
painting will obscure lower layers, completely or partially, depending on their contents.
The painting may have up to 4 layers, but only one layer is active at a time. Painting and
erasing affects only the active layer.
Layers can be used to separate the elements of your painting. For example, one layer could be
used for the background, another for the foreground, and a third for line work. Since you can
edit the contents of any layer at any time, you could draw a foreground element rst, and later
ll in the background by painting in a lower layer.
The layer button, on the left side of the toolbar, shows the state of your layers. Each layer is
represented by a horizontal bar. Layers that are in use are white, and layers that are unused
are gray. The active layer has a longer bar.
In the example below, two out of four layers are being used, and the topmost of the two
layers is active:
Show the layers panel.
To work with your painting’s layers, tap the Layer button. The Layers panel will appear.
Brushes User’s Guide
19
Import a photo
as a new layer.
Return to the
painting.
Add a new
transparent
layer.
Fill the active
layer with a color.
Merge the active layer
with the layer below it.
Delete the
active layer.
Undo. Redo.
The layers of your
painting, ordered
bottom to top. The
active layer has a
blue highlight.
Drag to rearrange.
A preview of
your merged
painting.
Adjust layer
transparency.
The layers of your painting are fanned out like a hand of cards. The leftmost layer is at the
bottom of your painting, and the rightmost is at the top. Transparent areas in a layer are
indicated by a checkerboard pattern.
The active layer has a blue highlight around it. To make a different layer become active, just
tap on it.
TIP: You can quickly dismiss the layers panel by double-tapping a layer or the painting
preview.
Working with Layers
To rearrange your layers, simply select one and drag it into the position that you would like.
You can also change the transparency of the active layer using the opacity slider. The preview
at the top of the panel shows the new result, immediately.
Brushes User’s Guide
20