Designing and Implementing Linux Firewalls and QoS using netfilter, iproute2, NAT, and filter phần 6 pps
Bạn đang xem bản rút gọn của tài liệu. Xem và tải ngay bản đầy đủ của tài liệu tại đây (635.44 KB, 29 trang )
Chapter 5
[ 133 ]
router:~/ipp2p-0.8.0# cp ipt_ipp2p.ko /lib/modules/2.6.12.5-home.made/
kernel/net/ipv4/
router:~# depmod -a
router:~# modinfo ipt_ipp2p
filename: /lib/modules/2.6.12.5-home.made/kernel/net/ipv4/
ipt_ipp2p.ko
author: Eicke Friedrich/Klaus Degner <>
description: An extension to iptables to identify P2P traffic.
license: GPL
vermagic: 2.6.12.5-home.made preempt PENTIUMIII gcc-3.3
depends: ip_tables
Next, we need to load the module, and it's all set.
router:~/ipp2p-0.8.0# modprobe ipt_ipp2p
Using IPP2P
IPP2P provides another match option for iptables; so the syntax is:
iptables … -m ipp2p –-option
where option can be:
Option P2P network Protocol Quality
edk
eDonkey, eMule, Kademlia TCP and UDP very good
kazaa KaZaA, FastTrack TCP and UDP good
gnu
Gnutella TCP and UDP good
dc
Direct Connect TCP only good
bit
BitTorrent, extended BT TCP and UDP good
apple
AppleJuice TCP only (need feedback)
winmx
WinMX TCP only (need feedback)
soul
SoulSeek TCP only good (need feedback)
ares
Ares, AresLite TCP only moderate (DROP only)
Another possibility is to use as option ipp2p, which matches all the protocols
stated earlier.
This new match option has the same rules as the L7-lter project, and it's basically
the same. Let's make some tests and compare the results between IPP2P and L7-lter.
Layer 7 Filtering
[ 134 ]
IPP2P versus L7-lter
In order to test the results of L7-lter and IPP2P matches, we will set up accounting
rules and see the results. We will use three of the most popular P2P applications:
DirectConnect (DC++), BitTorrent, and eDonkey.
Let's set up a script like this:
iptables -I FORWARD -m layer7 l7proto directconnect
iptables -I FORWARD -m ipp2p dc
iptables -I FORWARD -m layer7 l7proto bittorrent
iptables -I FORWARD -m ipp2p bit
iptables -I FORWARD -m layer7 l7proto edonkey
iptables -I FORWARD -m ipp2p edk
After a few minutes, we pick up the results:
router:~/ipp2p-0.8.0# iptables -L FORWARD -n -v
Chain FORWARD (policy ACCEPT 25M packets, 18G bytes)
pkts bytes target prot opt in out source destination
2797 253K all * * 0.0.0.0/0 0.0.0.0/0
ipp2p v0.8.0 edk
1533 434K all * * 0.0.0.0/0 0.0.0.0/0
LAYER7 l7proto edonkey
6665 1069K all * * 0.0.0.0/0 0.0.0.0/0
ipp2p v0.8.0 bit
7375 1273K all * * 0.0.0.0/0 0.0.0.0/0
LAYER7 l7proto bittorrent
192 36558 all * * 0.0.0.0/0 0.0.0.0/0
ipp2p v0.8.0 dc
693K 640M all * * 0.0.0.0/0 0.0.0.0/0
LAYER7 l7proto directconnect
The results conrm our expectations that there are a lot of differences between these
two applications.
For example, for eDonkey, IPP2P matched more packets (but less data) than L7-lter.
That doesn't mean that IPP2P matches edk better; it means that IPP2P and L7-lter
don't match the same packets. The explanation is found in the edonkey.pat le in
/etc/l7-protocols:
edonkey
# />#
Chapter 5
[ 135 ]
# In addition to \xe3, \xc5 and \xd4, I see a lot of \xe5
#
# God this is a mess. What an irritating protocol.
# This will match about 1% of streams with random data in them!
^[\xe3\xc5\xe5\xd4].?.?.?.?([\x01\x02\x05\x14\x15\x16\x18\x19\x1a\x1b\
x1c\x20\x21\x32\x33\x34\x35\x36\x38\x40\x41\x42\x43\x46\x47\x48\x49\
x4a\x4b\x4c\x4d\x4e\x4f\x50\x51\x52\x53\x54\x55\x56\x57\x58\x5b\x5c\
x60\x81\x82\x90\x91\x93\x96\x97\x98\x99\x9a\x9b\x9c\x9e\xa0\xa1\xa2\
xa3\xa4]|\x59 ?[ -~]|\x96 $)
# matches everything and too much
# ^(\xe3|\xc5|\xd4)
# ipp2p essentially uses "\xe3 \x47", which doesn't seem at all
right to me.
# bandwidtharbitrator uses
# e0.*@.*6[a-z].*p$|e0.*@.*[a-z]6[a-z].*p0$|e.*@.*[0-
9]6.*p$|emule|edonkey
# no comments to explain what all the mush is, of course
Well, they all use different patterns, which explains the difference.
BitTorrent values are closer between IPP2P and L7-lter, but we can't tell which one
is closer to the truth. To be able to make such an afrmation, we have to set up a test
lab and I really don't think it's worth the trouble.
DC++ data, however, has the most differences. In this case, I'm 90% sure that
L7-lter was way more accurate that IPP2P, because I saw a few of the users behind
that Linux router on our DC++ hub during the time that I waited for these values.
Summary
In this chapter we saw two ways of ltering Layer 7 (Application) trafc in a network.
The most popular and most stable project is L7-lter, which has pretty good
matching patterns for quite a large number of protocols.
Using Layer 7 ltering with Linux is a very nice feature, but it is CPU intensive, and
might not be suitable for high-trafc conditions. Dedicated, specialized hardware
solutions have existed for Layer 7 ltering for quite some time now, and some of
them deliver good performance.
Layer 7 Filtering
[ 136 ]
L7-lter is a smart and ambitious project aimed at small to medium networks that
need bandwidth optimization. The advantage of L7-lter over the specialized
hardware solutions is, of course, the cost.
To conclude this chapter, there are two important ideas to be drawn from it, and
those are:
Use L7-lter if it doesn't affect the network performance and doesn't
overload the router's CPU. The decision whether to use L7-lter must be
based on the machine performance (mainly CPU speed) and the type of
trafc passing through it (mainly datarates in PPS).
L7-lter is recommended to be used for marking packets in order to queue
them, and should not be used to drop or reject packets as there might be
many false matches. In case of false matches, it's better to have that data
slower than not to have it at all.
•
•
Small Networks Case Studies
In this chapter we will see some live examples about rewalls for small networks. By
small networks we mean networks with a small number of users (up to 10) that can
be usually found in homes or small ofces.
We will try to cover some of the most common situations encountered in small
networks. However, there might be some scenarios that you will face when
administering a small network that cannot be found here, especially if there are some
other devices in the network (like IP phones, for example). Therefore, even if your
interest is only in small networks, we recommend reading the following chapters
also, where we might cover the usage of such (or similar) devices.
Now, let's try to build two scenarios that can be encountered in small networks.
Linux as SOHO Router
SOHO stands for Small Ofces and Home Ofces, and usually refers to situations
where there exists just one computer at home to a few computers in a small ofce.
There is a very large offer of SOHO routers on the market nowadays from various
manufacturers, but from what I've tested, most of them do the same basic things
(NAT, DHCP, and some port ltering). They are less expensive than any computer,
but if you have an old computer that you are about to throw away, you can easily
install Linux on it and make it your own SOHO router having the advantage of
higher exibility at zero cost.
Usually, a SOHO router has a WAN port that is an Ethernet port where the provider
connection must be plugged in. The Provider's CPE (Customer Premises Equipment)
can be of any type (xDSL modem, wireless bridge, cable modem, ber optic media
converter) that can provide an Ethernet connection. SOHO routers usually have four
to eight Ethernet ports for the LAN. This is basically a small four-to-eight-port switch
Small Networks Case Studies
[ 138 ]
that's built in the SOHO router. Some SOHO routers also have a wireless access point
chipset that is bridged to the built-in switch.
Our computer that will run Linux and act as SOHO router must have two Ethernet
cards, one for the WAN function of a SOHO router into which the provider's CPE
is plugged, and one for the LAN. If you want the LAN to be wired and wireless,
the Ethernet interface for the local network will be plugged into an access point
with a built-in switch. However it is, everything is basically a LAN (wired,
wireless, bridged, or switched); so, from the rewall point of view, it doesn't really
matter what we use at the rst and second layers of the OSI model (access points,
hubs, switches).
A typical SOHO conguration looks like this:
Chapter 6
[ 139 ]
The provider usually assigns us a public IP address that can be either statically
assigned or dynamically assigned using DHCP or PPPoE. Linux has support for
PPPoE; this can be downloaded from
It is not the purpose of this book to teach how to set up the
internet connection, mainly because usually this is provider
specic, and providers have a HowTo on this when you
buy the service. The main idea is that you will have an
Ethernet connection to the Internet and a public IP address.
Setting Up the Network
When setting up the local network, we must use a range of private IP addresses. In
this example, we will use the private class C network 192.168.1.0/24; so, the best
thing to do would be to assign the IP address 192.168.1.1 on the Ethernet interface
eth1 on our Linux router.
router:~#ifconfig eth1 192.168.1.1 netmask 255.255.255.0 up
In order to create a proper rewall for all devices behind NAT, we should assign them
static IP addresses. However, we might want to use DHCP for the gaming device
and for the laptop. To do that, rst, we need to install the DHCP server. This is a
distribution-specic task. For example, on Debian we run the following commands:
router:~# apt-get install dhcp
Reading Package Lists Done
Building Dependency Tree Done
The following NEW packages will be installed:
dhcp
Next, we need to set up the DHCP server. We want to let the laptop acquire IP
addresses from 192.168.1.2 to 192.168.1.10, for example. We set up a range just in case
we have some friends visiting with their laptops. In the /etc/dhcpd.conf le, we
need to enter the following text:
subnet 192.168.1.0 netmask 255.255.255.0 {
range 192.168.1.2 192.168.1.10;
option domain-name-servers provider.assigned.me.one;
option routers 192.168.1.1;
option subnet-mask 255.255.255.0;
option broadcast-address 192.168.1.255;
default-lease-time 600;
max-lease-time 7200;
}
Small Networks Case Studies
[ 140 ]
For the printer, desktop computer, and the children's computer, we want to assign
them the same IP addresses every time. We nd out the MAC addresses for each one,
and, based on their MAC address, we assign them IP addresses by writing in the
/etc/dhcpd.conf the following lines:
host children {
hardware ethernet 02:03:04:05:06:07;
fixed-address 192.168.1.55;
option name-servers provider.assigned.me.one;
option routers 192.168.1.1;
option subnet-mask 255.255.255.0;
option broadcast-address 192.168.1.255;
}
host desktop {
hardware ethernet 02:03:04:05:06:08;
fixed-address 192.168.1.11;
option name-servers provider.assigned.me.one;
option routers 192.168.1.1;
option subnet-mask 255.255.255.0;
option broadcast-address 192.168.1.255;
}
host printer {
hardware ethernet 02:03:04:05:06:09;
fixed-address 192.168.1.100;
option name-servers provider.assigned.me.one;
option routers 192.168.1.1;
option subnet-mask 255.255.255.0;
option broadcast-address 192.168.1.255;
}
host Xbox {
hardware ethernet 02:03:04:05:06:10;
fixed-address 192.168.1.200;
option name-servers provider.assigned.me.one;
option routers 192.168.1.1;
option subnet-mask 255.255.255.0;
option broadcast-address 192.168.1.255;
}
Now, we need to edit the /etc/init.d/dhcp script and set the interface to eth1:
# Defaults
INTERFACES="eth1"
and start the DHCP server by running the /etc/init.d/dhcp script with the
start argument.
Chapter 6
[ 141 ]
At this point, we have:
The Linux router has a public IP address on eth0, the private IP address on
eth1 192.168.1.1, and DHCP running.
The laptop acquires a private IP address from the range 192.168.1.2-
192.168.1.10.
The desktop computer always acquires the private IP address 192.168.1.11.
The children's computer always acquires the private IP address 192.168.1.55.
The network printer always acquires the private IP address 192.168.1.100.
The gaming device always acquires the private IP address 192.168.1.200.
Dening the Security Policy
Before building up any rewalls, we have to decide what the rewall must do by
creating a security policy that can be from a document (recommended) to a piece of
paper, or some thoughts in our heads.
For the simple and very common network just discussed, we can decide the
following simple rules:
The gaming device can access anything on the Internet. Also, we want to host
games on it using GameSpy Arcade.
The network printer must be accessed only from inside our network.
The children must use the computer to browse the Internet and use
Yahoo! Messenger. We don't want them to be able to access porn content
or download viruses. We also don't want to let them use P2P software; so
basically we limit their access to the Web and Yahoo! messenger.
The laptop and guests laptops can access anything on the Internet (we don't
want to be rude and deny them access to xxx sites, for example).
The desktop can access anything. Also, we want to be able to log in on the
desktop computer from outside using VNC (Virtual Network Computing).
The Linux router must run SSH so that we can log in to it from the internal
network and from the ofce.
The most difcult thing from our list is to perform all those restrictions for the
children's computer. To be able to block porn sites and viruses, we must use a proxy
server and make it transparent.
•
•
•
•
•
•
•
•
•
•
•
•
Small Networks Case Studies
[ 142 ]
Building the Firewall
First, we need to set up Squid proxy server to be able to perform transparent proxy
for the children's computer and deny access to porn sites and some viruses.
Squid can be found at www.squid-cache.org, and is the most widely used
proxy server under Linux—most distributions have packages for Squid. The best
documentation for Squid is the conguration le itself, which is heavily commented.
We will run Squid on its default port, 3128. To be able to use Squid as transparent
proxy, we have to add the following information in the conguration le (usually
/etc/squid/squid.conf):
httpd_accel_host virtual
httpd_accel_port 80
httpd_accel_with_proxy on
httpd_accel_uses_host_header on
Next, we need to dene Squid access lists for the internal network to have access
to Squid and to deny porn sites and dangerous les. We will do this for our entire
internal network, but we will use the transparent proxy only for the children's
computer. Any le can be a virus, and the le extensions that follow are just as an
example; so please feel free to add any le extension you consider dangerous. In the
squid.conf le, we add the following lines:
acl all src 0.0.0.0/0.0.0.0
acl our_network src 192.168.1.0/24
acl porn url_regex -i sex adult porn hardcore fetish
acl downloads urlpath_regex \.exe$ \.rar$ \.zip$ \.pif$ \.scr$
http_access deny porn
http_access deny downloads
http_access allow our_network
http_access deny all
The ACL named "porn" contains a list of names that are not allowed in the URL; so
you won't be able to access a site that has one of those words in its name using the
proxy server.
The ACL named "downloads" contains a list of le types that are not allowed to be
accessed; so you won't be able to download les with the extensions in that list using
the proxy server.
Now that we have set up the proxy server, let's implement the rewall to match the
security policy we just built. First of all, because we will use NAT, we might want to
load some of the connection tracking helpers described in Chapter 4:
Chapter 6
[ 143 ]
modprobe ip_nat_ftp
modprobe ip_nat_irc
For the gaming device, we need to nd out how it works when we host GameSpy
Arcade games on it. We go to their websites and we see that we need to forward the
following ports to the gaming device:
6500 UDP: for GameSpy Arcade
6700 UDP: for GameSpy Tunnel
Let's forward those ports:
iptables –t nat –A PREROUTING –p udp –-dport 6500 –j DNAT –-to
192.168.1.200
iptables –t nat –A PREROUTING –p udp –-dport 6700 –j DNAT –-to
192.168.1.200
For the gaming device to work, we also have to perform NAT for it, which will be
included in the NAT rule for our entire network, which will be at the end.
Next, we need to deny access for the network printer to the Internet. Normally, we
don't do ltering in the NAT table, but we don't want to do masquerading for the
printer IP address. Since the printer has a private IP address, it won't be accessible
from outside and also we will drop packets going out of eth0 in the POSTROUTING
chain of the nat table so that the printer's IP address doesn't get NATed.
iptables –t nat –A POSTROUTING –o eth0 –s 192.168.1.100 –j DROP
For the children's computer, we will perform transparent proxy, meaning that the
computer will use the proxy server without conguring the web browser. We have
already set up the proxy server, so now we need to redirect all the trafc for port 80
TCP to the proxy server. We also want the children's computer to access port 443
TCP, which is HTTPS:
iptables -t nat -A PREROUTING -s 192.168.1.55 -p tcp dport 80 -j
REDIRECT to-port 3128
iptables -t nat -A POSTROUTING –o eth0 -s 192.168.1.55 -p tcp dport
443 -j MASQUERADE
Now, requests from 192.168.1.55 to any host having the destination port 80 or 443
will go to our proxy server; so everything is done locally and we don't have to
masquerade 192.168.1.55 for those requests.
Next, we need to masquerade the children's computer when it sends DNS requests to
our provider:
iptables –t nat –A POSTROUTING –o eth0 –s 192.168.1.55 –p udp –-dport
53 –j MASQUERADE
•
•
Small Networks Case Studies
[ 144 ]
DNS requests use port 53 UDP; so now the children's computer can access any
DNS servers.
We want to allow them to use Yahoo! Messenger only for chatting (not voice or le
transfer). Reading the Yahoo! Messenger help, we see that Yahoo! Messenger uses
ports 20, 23, 25, 80, 119, 5050, 8001, and 8002. Also, we see that the hosts needed for
instant messaging using Yahoo! Messenger are:
scs.msg.yahoo.com
scsa.msg.yahoo.com
scsb.msg.yahoo.com
scsc.msg.yahoo.com
So it's better to masquerade the children's computer IP address when accessing those
hosts; we should do like this:
iptables –t nat –A POSTROUTING –o eth0 –s 192.168.1.55 –d scs.msg.
yahoo.com –j MASQUERADE
iptables –t nat –A POSTROUTING –o eth0 –s 192.168.1.55 –d scsa.msg.
yahoo.com –j MASQUERADE
iptables –t nat –A POSTROUTING –o eth0 –s 192.168.1.55 –d scsb.msg.
yahoo.com –j MASQUERADE
iptables –t nat –A POSTROUTING –o eth0 –s 192.168.1.55 –d scsc.msg.
yahoo.com –j MASQUERADE
When using a canonical name instead of an IP address in
the syntax of iptables, the Linux router will resolve the IP
address(es) of the canonical name and insert the rules in the
kernel using those IP addresses. If one canonical name is
resolved to multiple IP addresses, then iptables will insert
in the kernel a number of rules equal to the number of IP
addresses resolved, each line having one of the resolved
IP addresses.
Now that we have set up access for the children's computer, we have to deny access
to other ports and hosts. We do that in the POSTROUTING chain of the nat table:
iptables –t nat –A POSTROUTING –o eth0 –s 192.168.1.55 –j DROP
The laptop and desktop computer must be able to access anything, and so, no special
rules are inserted for them, except the MASQUERADE rule for our network, which we
will append now:
iptables –t nat –A POSTROUTING –o eth0 –s 192.168.1.0/24 –j MASQUERADE
•
•
•
•
Chapter 6
[ 145 ]
One more conguration must be done in the nat table to provide the ability to log
in remotely to the desktop computer using VNC. We set up VNC server to use TCP
port 9112 on the desktop computer, so we have to perform DNAT for this port as
follows:
iptables –t nat –A PREROUTING –p tcp –-dport 9112 –j DNAT –-to
192.168.1.11
This is all the conguration that we need for the local network. We need to set up
some rewall rules to secure the Linux router.
First, we need SSH to run on the Linux router so we can administer it remotely.
To secure the SSH access, it is best to create a chain called SSH in which we permit
or deny access to SSH. If a vulnerability is discovered in OpenSSH, it's very likely
that worms scanning for OpenSSH servers on port 22 will appear in a few hours.
Therefore, we might want to run the SSH server on another port than the standard
one (for example, 1234). The SSH chain is created by:
iptables –N SSH
Next, we insert a rule that tells the kernel to look up the SSH chain for all incoming
TCP connections on port 1234:
iptables –A INPUT –p tcp –-dport 1234 –j SSH
We must insert rules in the SSH chain to allow access only from trusted hosts. Let's
say that the IP address at our ofce is 1.2.3.4:
iptables –A SSH –s 1.2.3.4 –j ACCEPT
iptables –A SSH –s 192.168.1.0/27 –j ACCEPT
iptables –A SSH –s 0/0 –j DROP
The rst rule accepts connections from our ofce IP address 1.2.3.4. The second
rule allows incoming SSH connections only from 192.168.1.0/27, which contains IP
addresses from 192.168.1.1 to 192.168.1.32, as we don't want to allow SSH access from
the children's computer, the printer, and the gaming device. The third rule drops all
other incoming connections to port 1234.
The proxy server (Squid) has its own security by using access lists. However, the best
way to secure it and the router is to drop TCP SYN packets from the Internet in the
input chain. This way, no incoming connection to the Linux router can be made from
the Internet, except SSH on port 1234 from 1.2.3.4, which is matched before this rule.
We also want to accept all packets on the loopback interface (lo) for IPC (internal
process communications).
iptables –A INPUT –i lo –j ACCEPT
iptables –A INPUT –i eth0 –p tcp –-syn –j DROP
Small Networks Case Studies
[ 146 ]
Dropping SYN packets offers a good protection for processes that might have bugs.
However, this only drops incoming TCP connections with the SYN ag set (the
request to set up a TCP connection), and will not offer any protection to software that
opens UDP ports.
Setting Up the Firewall Script
On our Linux router, we create the script to contain all the rules above in the order
we need to add them. We present the rules in this order, which is the order in which
the kernel will analyze them.
#!/bin/bash
#define where iptables is
IPT=/sbin/iptables
############# Begin the NAT table operations ######
#Flush all the rules in the nat table
$IPT -t nat -F
#Load some modules needed for NAT
/sbin/modprobe ip_nat_ftp
/sbin/modprobe ip_nat_irc
#DNAT the gaming device ports 6500 and 6700 UDP for hosting games
$IPT –t nat -A PREROUTING -p udp dport 6500 -j DNAT to
192.168.1.200
$IPT –t nat -A PREROUTING -p udp dport 6700 -j DNAT to
192.168.1.200
#Deny printer access to the internet
$IPT -t nat -A POSTROUTING -o eth0 -s 192.168.1.100 -j DROP
#Transparent Proxy for the children's computer
$IPT -t nat -A PREROUTING -s 192.168.1.55 -p tcp dport 80 -j
REDIRECT to-port 3128
#Masquerade HTTPS for children's computer
$IPT -t nat -A POSTROUTING –o eth0 -s 192.168.1.55 -p tcp dport 443
-j MASQUERADE
#Masquerade the children's computer for DNS requests
$IPT -t nat -A POSTROUTING -o eth0 -s 192.168.1.55 -p udp dport 53
-j MASQUERADE
Chapter 6
[ 147 ]
#Masquerade the children's computer to access yahoo messenger servers
$IPT -t nat -A POSTROUTING -o eth0 -s 192.168.1.55 -d scs.msg.yahoo.
com -j MASQUERADE
$IPT -t nat -A POSTROUTING -o eth0 -s 192.168.1.55 -d scsa.msg.yahoo.
com -j MASQUERADE
$IPT -t nat -A POSTROUTING -o eth0 -s 192.168.1.55 -d scsb.msg.yahoo.
com -j MASQUERADE
$IPT -t nat -A POSTROUTING -o eth0 -s 192.168.1.55 -d scsc.msg.yahoo.
com -j MASQUERADE
#Drop everything else for the children's computer
$IPT -t nat -A POSTROUTING -o eth0 -s 192.168.1.55 -j DROP
#Masquerade all our network
$IPT -t nat -A POSTROUTING -o eth0 -s 192.168.1.0/24 -j MASQUERADE
#DNAT port 9112 TCP for VNC into the desktop computer
$IPT –t nat -A PREROUTING -p tcp dport 9112 -j DNAT to
192.168.1.11
############# End the NAT table opperations ######
#Flush all the rules in INPUT, FORWARD and OUTPUT
$IPT -F
#Allow everything on the loopback interface
$IPT -A INPUT -i lo -j ACCEPT
#Delete the SSH chain if it exists and create it again
$IPT -X SSH
$IPT -N SSH
#Pass all tcp packets to port 1234 to the SSH chain
$IPT -A INPUT -p tcp dport 1234 -j SSH
#Append the allow and drop rules for the SSH chain
$IPT -A SSH -s 1.2.3.4 -j ACCEPT
$IPT -A SSH -s 192.168.1.0/27 -j ACCEPT
$IPT -A SSH -s 0/0 -j DROP
#DROP all incoming TCP SYN packets on eth0
$IPT -A INPUT -i eth0 -p tcp syn -j DROP
Verifying the Firewall Conguration
After running the script, we want to see how our tables and chains look. First, let's
check the nat table and see how our kernel analyses our rules:
Small Networks Case Studies
[ 148 ]
We verify the conguration using iptables –t nat –L –n –v.
router:~# iptables -t nat -L -n -v
Chain PREROUTING (policy ACCEPT 201 packets, 26363 bytes)
pkts bytes target prot opt in out source destination
0 0 DNAT udp eth0 * 0.0.0.0/0
0.0.0.0/0 udp dpt:6500 to:192.168.1.200
0 0 DNAT udp eth0 * 0.0.0.0/0
0.0.0.0/0 udp dpt:6700 to:192.168.1.200
0 0 REDIRECT tcp * * 192.168.1.55
0.0.0.0/0 tcp dpt:80 redir ports 3128
0 0 DNAT tcp eth0 * 0.0.0.0/0
0.0.0.0/0 tcp dpt:9112 to:192.168.1.11
Chain POSTROUTING (policy ACCEPT 47 packets, 8648 bytes)
pkts bytes target prot opt in out source destination
0 0 DROP all * eth0 192.168.1.100 0.0.0.0/0
0 0 MASQUERADE udp * eth0 192.168.1.55 0.0.0.0/0
tcp dpt:443
0 0 MASQUERADE udp * eth0 192.168.1.55 0.0.0.0/0
udp dpt:53
0 0 MASQUERADE all * eth0 192.168.1.55
216.155.193.136
0 0 MASQUERADE all * eth0 192.168.1.55
216.155.193.137
0 0 MASQUERADE all * eth0 192.168.1.55
216.155.193.138
(… some lines missing here …)
0 0 DROP all * eth0 192.168.1.55 0.0.0.0/0
0 0 MASQUERADE all * eth0 192.168.1.0/24 0.0.0.0/0
Chain OUTPUT (policy ACCEPT 3 packets, 250 bytes)
pkts bytes target prot opt in out source destination
router:~#
When an IP packet arrives into the Linux router, in the nat table the PREROUTING
chain is analyzed rst. If the packet arrives on eth0 and has the destination UDP
port 6500, the rst rule is matched and the destination IP address is rewritten to
192.168.1.200. If the packet doesn't match the rst rule, the kernel will try to analyze
the second rule, and so on.
After the PREROUTING chain is analyzed, the kernel does the routing process and
analyzes the POSTROUTING chain rule by rule.
Chapter 6
[ 149 ]
At the risk of repeating, you must keep in mind that when a
chain is analyzed, the kernel analyzes the rules in the order
they are seen with iptables –L, and if it matches one rule
in the chain, no other rule in that chain will be analyzed. For
example, if we had the rule that did MASQUERADE for the
entire network 192.168.1.0/24 before the rule in which we
drop all packets for the children's computer (192.168.1.55),
then the last rule would have no effect.
After verifying the nat table, we verify the Netlter table with iptables –L –n –v:
router:~# iptables -L -n -v
Chain INPUT (policy ACCEPT 86 packets, 6206 bytes)
pkts bytes target prot opt in out source
destination
0 0 ACCEPT all lo * 0.0.0.0/0 0.0.0.0/0
0 0 SSH tcp * * 0.0.0.0/0 0.0.0.0/0
tcp dpt:1234
0 0 DROP tcp eth0 * 0.0.0.0/0 0.0.0.0/0
tcp flags:0x16/0x02
Chain FORWARD (policy ACCEPT 0 packets, 0 bytes)
pkts bytes target prot opt in out source destination
Chain OUTPUT (policy ACCEPT 3775 packets, 776K bytes)
pkts bytes target prot opt in out source destination
Chain SSH (1 references)
pkts bytes target prot opt in out source destination
0 0 ACCEPT all * * 1.2.3.4 0.0.0.0/0
0 0 ACCEPT all * * 192.168.1.0/27 0.0.0.0/0
0 0 DROP all * * 0.0.0.0/0 0.0.0.0/0
The FORWARD and OUTPUT chains are empty and have the default policy ACCEPT. The
rst rule in the INPUT chain tells the kernel to accept all incoming packets on the
loopback interface. If the packet doesn't arrive on the loopback interface, the second
rule is tested, which tells the kernel that if the destination port is 1234 TCP, it should
check the SSH chain to see if it should accept or drop the packet. The kernel next
looks up the SSH chain and accepts or drops the packet.
If the packet is not matched by the second rule in the INPUT chain, then the kernel
doesn't look up the SSH chain at all, and it checks the third rule, which states that the
kernel must drop TCP SYN packets.
Small Networks Case Studies
[ 150 ]
QoS—Bandwidth Allocation
At this point our network is protected by a rewall and we have a SOHO router that
we built from a PC running Linux. With Linux we can do a lot more than this; so it's
time to congure it to do more for us.
Let's say that we have a 1Mbps connection (download speed) that we want to share
between the devices in this home so that everyone is happy. First, we need to decide
how to split this bandwidth.
The gaming device needs a maximum of 128kbps when playing online; so we
must allocate at least 128kbps for it, but we want to allow it to use the maximum
bandwidth available when downloading updates, etc.
We want the children's computer and the desktop to have a 256kbps each, and
we also want to leave them the possibility to use the entire bandwidth when it's
available; and for the laptop and friends, we will allocate the remaining 384kbps,
along with the possibility of reaching 1Mbps.
For SOHO applications, usually we don't need to do upload bandwidth allocation; so
we'll just limit the download speeds.
For teaching purposes we will use HTB in this section of the
chapter and CBQ in the following section.
So, what we need is to create an HTB class of 1Mbit and four child classes for
the devices.
First, we need to attach the root qdisc to the interface eth1 and create a root class
with the speed of the interface—100Mbps in our case:
tc qdisc add dev eth1 root handle 1: htb
tc class add dev eth1 parent 1:0 classid 1:10 htb rate 100Mbit
Next, we need to create our 1Mbps class that we'll share between the all devices:
tc class add dev eth1 parent 1:10 classid 1:20 htb rate 1Mbit
This line creates an HTB class with the ID 1:20 and the parent 1:10, which is the
root class.
Chapter 6
[ 151 ]
For the gaming device, we will create an HTB class with the ID 1:100 as a child class
to 1:20:
tc class add dev eth1 parent 1:20 classid 1:100 htb rate 128Kbit ceil
1Mbit
We need to attach a queuing discipline to this class. We will use sfq in this section:
tc qdisc add dev eth1 parent 1:100 sfq quantum 1514b perturb 15
Now we need to add a tc lter to specify which packets belong to this class:
tc filter add dev eth1 protocol ip parent 1:0 prio 5 u32 match ip dst
192.168.1.200 flowid 1:100
This is all for the gaming device. For the other HTB classes, we will do the same thing.
For the children's computer:
tc class add dev eth1 parent 1:20 classid 1:200 htb rate 256Kbit ceil
1Mbit
tc qdisc add dev eth1 parent 1:200 sfq quantum 1514b perturb 15
tc filter add dev eth1 protocol ip parent 1:0 prio 5 u32 match ip dst
192.168.1.55 flowid 1:200
For the desktop:
tc class add dev eth1 parent 1:20 classid 1:300 htb rate 256Kbit ceil
1Mbit
tc qdisc add dev eth1 parent 1:300 sfq quantum 1514b perturb 15
tc filter add dev eth1 protocol ip parent 1:0 prio 5 u32 match ip dst
192.168.1.11 flowid 1:300
For the laptop and friends, we will create a class just like the others, but we want to
lter all the IP addresses in the 192.168.1.0/24 network. Since we have already created
the earlier classes, IP packets for 192.168.1.200, 192.168.1.55, and 192.168.1.11 will match
those classes and not this one, even if the lter contains the whole network:
tc class add dev eth1 parent 1:20 classid 1:400 htb rate 256Kbit ceil
1Mbit
tc qdisc add dev eth1 parent 1:400 sfq quantum 1514b perturb 15
tc filter add dev eth1 protocol ip parent 1:0 prio 5 u32 match ip dst
192.168.1.0/24 flowid 1:400
The QoS Script
We need to put all the QoS lines in a script running at boot time, after the network is
initialized. Also, we need to delete the root qdisc rst in case we run it again manually
if we make some modications. Deleting the root qdisc will destroy all classes.
Small Networks Case Studies
[ 152 ]
#!/bin/bash
#delete root qdisc (this will destroy all classes)
tc qdisc del dev eth1 root
#attach root qdisc and create the 100Mbps root class
tc qdisc add dev eth1 root handle 1: htb
tc class add dev eth1 parent 1:0 classid 1:10 htb rate 100Mbit
#create the 1Mbps class for the whole bandwidth
tc class add dev eth1 parent 1:10 classid 1:20 htb rate 1Mbit
#Xbox - 128kbit
tc class add dev eth1 parent 1:20 classid 1:100 htb rate 128Kbit ceil
1Mbit
tc qdisc add dev eth1 parent 1:100 sfq quantum 1514b perturb 15
tc filter add dev eth1 protocol ip parent 1:0 prio 5 u32 match ip dst
192.168.1.200 flowid 1:100
#children - 256kbit
tc class add dev eth1 parent 1:20 classid 1:200 htb rate 256Kbit ceil
1Mbit
tc qdisc add dev eth1 parent 1:200 sfq quantum 1514b perturb 15
tc filter add dev eth1 protocol ip parent 1:0 prio 5 u32 match ip dst
192.168.1.55 flowid 1:200
#desktop - 256kbit
tc class add dev eth1 parent 1:20 classid 1:300 htb rate 256Kbit ceil
1Mbit
tc qdisc add dev eth1 parent 1:300 sfq quantum 1514b perturb 15
tc filter add dev eth1 protocol ip parent 1:0 prio 5 u32 match ip dst
192.168.1.11 flowid 1:300
#all other IPs from this class - 384kbit
tc class add dev eth1 parent 1:20 classid 1:400 htb rate 256Kbit ceil
1Mbit
tc qdisc add dev eth1 parent 1:400 sfq quantum 1514b perturb 15
tc filter add dev eth1 protocol ip parent 1:0 prio 5 u32 match ip dst
192.168.1.0/24 flowid 1:400
Verifying the QoS Conguration
We need to verify the conguration we created by looking at the HTB classes. This is
done with tc class show:
Chapter 6
[ 153 ]
root@router:~# tc class show dev eth1
class htb 1:10 root rate 100000Kbit ceil 100000Kbit burst 126575b
cburst 126575b
class htb 1:100 parent 1:20 leaf 8081: prio 0 rate 128000bit ceil
1000Kbit burst 1759b cburst 2849b
class htb 1:20 parent 1:10 rate 1000Kbit ceil 1000Kbit burst 2849b
cburst 2849b
class htb 1:200 parent 1:20 leaf 8082: prio 0 rate 256000bit ceil
1000Kbit burst 1919b cburst 2849b
class htb 1:300 parent 1:20 leaf 8083: prio 0 rate 256000bit ceil
1000Kbit burst 1919b cburst 2849b
class htb 1:400 parent 1:20 leaf 8084: prio 0 rate 256000bit ceil
1000Kbit burst 1919b cburst 2849b
So we see the root class 1:10, and the 1000Kbit (1Mbit) class 1:20 having the parent
1:10, and the other classes with their bandwidths having the parent 1:20.
We need to see if packets match our classes. In case of zero trafc, we will verify
that by pinging their IP address and seeing if they made a match for the
corresponding class:
root@router:~# ping -f -c 10 192.168.1.200
PING 192.168.1.200 (192.168.1.200) 56(84) bytes of data.
192.168.1.200 ping statistics
10 packets transmitted, 10 received, 0% packet loss, time 3ms
rtt min/avg/max/mdev = 0.198/0.210/0.300/0.033 ms, ipg/ewma
0.394/0.230 ms
root@router:~# tc -s class show dev eth1 | fgrep -A 4 1:100
class htb 1:100 parent 1:20 leaf 808d: prio 0 rate 128000bit ceil
1000Kbit burst 1759b cburst 2849b
Sent 980 bytes 10 pkts (dropped 0, overlimits 0)
lended: 10 borrowed: 0 giants: 0
tokens: 40962 ctokens: 12387
What we did was to send a ood ping with 10 packets to 192.168.1.200, and then
check at the 1:100 class for the gaming device to see if those packets matched the
class for the gaming device, and, as we expected, they did.
Small Networks Case Studies
[ 154 ]
Linux as Router for a Typical Small to
Medium Company
In a typical small to medium business, using Linux as a router has a number of
advantages, including low cost and exibility; also, a Linux router can be used to do
a lot more than just routing.
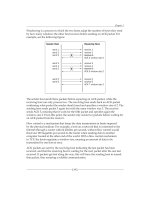
Let's analyze the following example of a typical small to medium company:
Setting Up the Router
The network above is built for a small to medium company with sales, accounting,
executive, and IT departments as illustrated in the diagram.
Chapter 6
[ 155 ]
For easy understanding of the network, we've placed three switches belonging to
three separate networks, one for the sales and accounting departments, one for the
executive ofces, and one for the IT department. Usually, a managed switch is used
in this case to create three separate VLANS.
What we have here in this network is:
A broadband internet connection. The provider assigned us the IP 1.1.1.1 for
our router and routed the class C network 1.1.2.0/24 through our router's
IP address (1.1.1.1). The modem is inserted into Eth0, which is statically
congured with the IP address 1.1.1.1, netmask 255.255.255.252, and default
gateway 1.1.1.2, which is the provider's directly connected router.
The Linux router has four fast Ethernet cards. Besides routing IP packets, it
also runs Apache for our intranet application and Samba server; so it acts like
a router, intranet server, and le server.
The IT department has, besides the IT manager, one or more network
administrators. They have a separate network and the web server and mail
server (which is a single Linux machine) resides in the same network. The
web and mail server needs a public IP address, and all the IT department
employees have static public IP addresses. With the thought of adding more
servers in the future, we reserve a 64-host subnet, the rst in our class C,
1.1.2.0/26; so we assign to Eth1 on our Linux router the IP address 1.1.2.1,
netmask 255.255.255.192, and congure the web and mail server to have
1.1.2.2, netmask 255.255.255.192, and default gateway 1.1.2.1. If you want, we
will call this network the DMZ zone .
The executive department network contains the computers for all the
managers in the company. They expressed their need to have the least
restriction possible for special chat applications and so on (and also le
sharing). We assign a 32-hosts subnet from our class C for them, the
1.1.2.64/27 network. We assign the static public IP address 1.1.2.65, netmask
255.255.255.224 on Eth2 of our Linux router, and statically assign to them IP
addresses from 1.1.2.66 to 1.1.2.94 using netmask 255.255.255.224 and default
gateway 1.1.2.65.
Sales and accounting departments have one big network, as the company has
a large number of sales agents. This is the part of the network that requires
the most of our attention since usually sales is the department with the most
IT problems :-). We will run DHCP on our Linux router to serve clients on
Eth3. We set up the private IP address 192.168.1.1 with netmask 255.255.255.0
on Eth3 and give our clients, through DHCP, private IP addresses from
192.168.1.2 to 192.168.1.254, netmask 255.255.255.0, and default gateway
192.168.1.1.
•
•
•
•
•
Small Networks Case Studies
[ 156 ]
This is our company now, with three smaller networks. It is time to dene the
security policy.
Dening the Security Policy
The IT department network is our DMZ zone because the IT guys are experienced
computer users and they know how to secure their computers. The web and mail
server must be accessed from anywhere; so we need to open port 80 TCP for web
access, ports 110 and 25 TCP for mail, and also need SSH. We need to be able
to access both Linux servers in the network using SSH from the IT department
computers as well as from some public IP addresses we have at home.
The intranet server must be accessed only from computers in the ofce, and so must
the leserver too. The two servers are on the same machine, but we are referring here
to the services when we say "server".
The executive department must be able to access anything on the Internet; so it
somehow resembles the DMZ zone, but we might want to create some restrictions
for them:
Deny access from people outside the executive network to see their le
shares (NetBIOS le shares, shared folders, etc.)
Use a transparent proxy for them to deny access to .pif and .scr les.
Sales and accounting departments' computers are allowed to do the following:
Browse the Web, but not to download .pif, .scr, .exe, .zip, and .rar les,
and also not to visit sex sites
Access HTTPS port 443 TCP for internet banking
Send and receive email using the company mail server
Access the intranet and le servers
A Few Words on Applications
We described earlier in this chapter how to set up Squid for transparent proxy
and how to set up access lists. In our case, the same Squid proxy server must do
the following:
Be used as transparent proxy
Deny dangerous les (.pif and .scr) for the managers, but allow everything
else for them
Deny dangerous les and sex sites for sales and accounting, but allow
everything else
•
•
•
•
•
•
•
•
•
Chapter 6
[ 157 ]
The solution to this problem is the order of the access lists in the squid.conf le.
First, to be able to use Squid as transparent proxy, we have to set:
httpd_accel_host virtual
httpd_accel_port 80
httpd_accel_with_proxy on
httpd_accel_uses_host_header on
in the squid.conf le. Next, we need to set up ACLs for the managers, sales, and
accounting, and the ACLs to deny malicious les, downloads, and sex sites:
acl all src 0.0.0.0/0.0.0.0
acl managers src 1.1.2.64/27
acl sales_accounting src 192.168.1.0/24
acl malicious urlpath_regex \.pif$ \.scr$
acl downloads urlpath_regex \.exe$ \.rar$ \.zip$
acl porn url_regex -i sex adult porn hardcore fetish
Now, to match our security policy, we have to set http_access to those ACLs in the
following order:
http_access deny malicious
http_access allow managers
http_access deny downloads
http_access deny porn
http_access allow sales_accounting
http_access deny all
The intranet server is usually a web server that runs an application that, in most
cases, is a database interface. If the intranet application uses MySQL or PostgreSQL,
which can be installed on the same machine, both of them can be congured using
their conguration les (my.cnf for MySQL and pg_hba.conf for PostgreSQL) to
allow access only from localhost. However, we want to protect ourselves against
possible bugs of this database server software by ltering the ports that listen for
incoming connections, which we can nd out by examining the conguration les.
Using Samba as a le server can be done in multiple ways. For the above
conguration, it is recommended to use Samba as WINS server. We can see that by
starting the Samba service only, we will have the following output of netstat –anp:
router:~# netstat -anp
Active Internet connections (servers and established)
Proto Recv-Q Send-Q Local Address Foreign Address State
tcp 0 0 0.0.0.0:139 0.0.0.0:* LISTEN 3950/smbd
tcp 0 0 0.0.0.0:445 0.0.0.0:* LISTEN 3950/smbd
udp 0 0 0.0.0.0:137 0.0.0.0:* 3948/nmbd
udp 0 0 0.0.0.0:138 0.0.0.0:* 3948/nmbd