Hacking Windows XP 2004 phần 10 pdf
Bạn đang xem bản rút gọn của tài liệu. Xem và tải ngay bản đầy đủ của tài liệu tại đây (745.08 KB, 37 trang )
320
Part III — Securing Your System
If you do not want your computer to accept third-party cookies so that marketing companies
cannot identify what ads they have shown you, or if you just want to adjust your cookie accep-
tance settings, then follow these steps:
1.
Open up a copy of Internet Explorer.
2.
Click the Tools menu bar item and select Internet Options.
3.
When Internet Options loads, click the Privacy tab.
4.
You will see the up-and-down slider that allows you to select different levels of cookie
security. I recommend that you bypass this and just click the Advanced button
instead.
5.
Once you click the Advanced button and see the Advanced Privacy Settings window,
check the box that says Override Automatic Cookie Handling.
6.
Your settings for first- and third-party cookies will now be available for adjustment, as
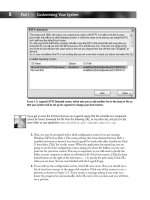
shown in Figure 14-3. I recommend that you always accept first-party cookies. You can
decide if you want to block or select the prompt to accept third-party cookies. Prompt
will pop up a dialog box notifying you that a cookies request has been received.
7.
Once you are finished with your settings, click the OK button to save your changes and
return to Internet Options.
8.
Click OK once more to close Internet Options.
F
IGURE
14-3: Adjusting the cookie privacy settings.
WY026-P14[315-334].qxd 23/6/2004 5:47 PM Page 320 Quark09 Quark09:Books:WY026-Sinchak:Chapter:
321
Chapter 14 — Protecting Your Privacy
Now that you have set the cookie privacy setting manually, you can eliminate cookies from
being stored on your hard drive in the first place. Doing so will allow you to protect your
privacy and still be able to use Web sites that need cookies.
Saying no to encrypted Web pages
If you manage your finances or shop online, then you have probably had experience with using
secure Web connections, otherwise known as SSL. These secure connections encrypt the data
that is transferred from a Web server to your computer. Once the data gets to your computer,
your browser has a special key that decrypts the information and displays it on your computer.
During this process, when the file is decrypted, it is saved in the Temporary Internet Files
directory so that the browser can display it.
This default appears to be harmless because the Web page is only saved on your computer. If
no one has remote access to your computer, the data would be safe, right? Not necessarily,
because your data is now vulnerable to anyone who has physical local access to your computer.
If that person is clever and lucky enough, he or she can sort through your Temporary Internet
Files directory to find confidential information, such as your online banking information. All
of this information is saved by default on your hard drive for anyone to look at. They do not
even need to know your password or even log into your account on the bank’s Web site, because
a snapshot of the Web page is stored locally on your computer.
What can you do to protect your computer from this vulnerability besides setting up better
computer security such as complex passwords? There is a cool feature of Internet Explorer that
you just have to turn on that will eliminate the problem completely. Simply called Do Not Save
Encrypted Pages to Disk, this feature, when enabled, will solve your problems. To enable it,
follow these steps:
1.
Open up a copy of Internet Explorer.
2.
Click Tools and select Internet Options.
3.
Then, select the Advanced tab.
4.
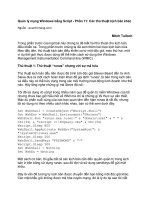
Scroll down through the list toward the bottom of the window until you see the Security
section, as shown in Figure 14-4.
5.
Locate Do Not Save Encrypted Pages to Disk, and check the box to the left of it.
6.
Click OK to save and activate your changes.
Now you will no longer have to worry about pages that were encrypted being saved to your
drive for anyone who has access to your computer to see.
Disabling AutoComplete
You already know about AutoComplete from the address bar. We have taken care of that pri-
vacy problem by clearing the file that stored the information, as was shown in the section
about removing the address bar suggestions. However, that is not the only situation where
AutoComplete attempts to provide assistance. Another situation where AutoComplete tries to
WY026-P14[315-334].qxd 23/6/2004 5:47 PM Page 321 Quark09 Quark09:Books:WY026-Sinchak:Chapter:
322
Part III — Securing Your System
give a helping hand is when you are filling in text boxes on Web pages. AutoComplete in this sit-
uation works exactly the same as AutoComplete with the address bar. As you begin to fill in the
text box, several suggestions will appear, based on information that you have already typed in.
To get an idea how this works in action, visit a search site such as Google (
www.google.com)
and start to type in words for which you want to search. When you do so, words similar to the
ones you have typed in the box on other visits to the site will appear. This capability allows
anyone that uses your computer to be able to see what other users of the computer have
searched for on the site, even if the browser history was cleared.
Clearly, having this feature enabled would be a big concern if you were concerned about your
privacy. Disabling the AutoComplete feature is not very difficult and will completely take care
of this privacy concern. Follow these steps to put an end to AutoComplete:
F
IGURE
: 14-4: Changing IE’s security settings.
WY026-P14[315-334].qxd 23/6/2004 5:47 PM Page 322 Quark09 Quark09:Books:WY026-Sinchak:Chapter:
323
Chapter 14 — Protecting Your Privacy
1.
Open up an instance of Internet Explorer.
2.
Click Tools and select Internet Options.
3.
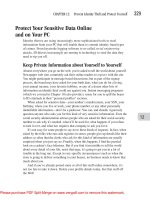
Select the Content tab and click the AutoComplete button, as shown in Figure 14-5.
4.
Once the AutoComplete Settings window has loaded, just uncheck all of the boxes that
are listed under Use AutoComplete For. This will disable this privacy concern completely.
5.
Although you have the AutoComplete window open, you can also click the two clear but-
tons at the bottom of the window to clear any data that is in the file stores for this data.
6.
When you are finished, just click the OK button to save your changes.
7.
Select OK once more to close Internet Options and activate your changes.
F
IGURE
14-5: Adjusting the AutoComplete settings by entering AutoComplete settings.
WY026-P14[315-334].qxd 23/6/2004 5:47 PM Page 323 Quark09 Quark09:Books:WY026-Sinchak:Chapter:
324
Part III — Securing Your System
AutoComplete is now a thing of the past. You will not have to worry about people using your
computer being automatically shown all of the things that you type into your address and text
boxes.
Clearing Temporary Internet Files automatically
Earlier, you learned how to clear your Temporary Internet Files so they will not be a privacy
concern. Over time, your Temporary Internet Files folder will fill up again and once again
become a privacy concern. One easy way to fix this is to use an interesting hidden feature of
Internet Explorer that will automatically delete these files every time you close Internet
Explorer. This way, you will not have to worry about clearing all of the files every time you use
IE. Follow these steps to activate this great feature:
F
IGURE
14-6: Setting up IE to automatically clear the Temporary Internet Files.
WY026-P14[315-334].qxd 23/6/2004 5:47 PM Page 324 Quark09 Quark09:Books:WY026-Sinchak:Chapter:
325
Chapter 14 — Protecting Your Privacy
1.
Open up a copy of Internet Explorer.
2.
Click the Tools menu bar item and then select Internet Options.
3.
Select the Advanced tab and scroll down to the bottom of the screen.
4.
Locate and check Empty Temporary Internet Files Folder When Browser Is Closed, as
shown in Figure 14-6.
5.
Click OK to close Internet Options and activate your changes.
Enabling Automatic Empty is a great way to easily maintain a clean PC. Keep in mind that
this will only delete your Temporary Internet Files and not your cookies. You will still have to
delete the cookies using the method mentioned previously in this chapter.
Windows Interface
Once you have Internet Explorer under control, you can move on to cleaning the rest of the
Windows interface. Just like Internet Explorer, Windows Explorer keeps track of the applica-
tions that you run and files that you open. It does this so it can tailor your computer to your
personal use with features such as the frequently run programs list on the Start panel. Features
like this are designed to speed up the use of your computer. However, the side effect of the
convenience is a loss of privacy. These next few sections will show you how to recover your
privacy, albeit at the expense of convenience.
Clearing Frequently Run Programs list
One of the great new features of Windows XP can also be a pain when you are concerned
about your privacy. Being able to select the program that you use frequently directly on
the Start panel instead of navigating through the entire Start Menu can save you some
time. However, over time, this list can become cluttered with programs that you do not
want. Additionally, anyone who uses your computer can easily see what programs you
use.
If you are concerned about your privacy or just want to clear the list and start fresh, follow
these steps :
1.
Right-click the Start button and select Properties.
2.
Click the Customize button next to Start Menu.
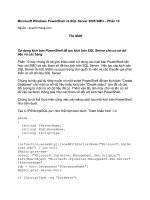
3.
Under the Programs section, click the Clear List button, as shown in Figure 14-7.
4.
Once you click the button, nothing seems to have happened. Don’t worry; it has cleared
your list so you do not need to keep clicking the button. Click OK when you are finished
to close the Customize Start Menu window.
5.
Then, click OK once more to close Taskbar and Start Menu Properties.
WY026-P14[315-334].qxd 23/6/2004 5:47 PM Page 325 Quark09 Quark09:Books:WY026-Sinchak:Chapter:
326
Part III — Securing Your System
The program list is now clear and you can start from fresh building your list of frequently run
programs.
Clearing the recently opened document list
Windows XP monitors all of the files that you open on your computer so it can construct the
recently opened document list. This is designed to allow you to easily open up files that you
have been working on. All types of documents are listed in this list. Every time you open up a
Word document or a digital image, an entry is created within the list. Although this feature
exists, I never find myself using it and the only value that it adds to my computer is a privacy
concern.
Clearing the recently opened document list every once in a while is a good idea, so your docu-
ments are kept confidential and your privacy high. Clearing the list is very easy. Just follow
these steps:
F
IGURE
14-7: Clearing the program list on the Start panel.
WY026-P14[315-334].qxd 23/6/2004 5:47 PM Page 326 Quark09 Quark09:Books:WY026-Sinchak:Chapter:
327
Chapter 14 — Protecting Your Privacy
1.
Right-click the Start button and select Properties.
2.
Then click the Customize button next to the Start Menu radio button.
3.
Once the Customize Start Menu window appears, click the Advanced tab.
4.
Under the Recent Documents section, click the Clear List button, as shown in Figure 14-8.
5.
Once you have cleared the list, click the OK button to close the Customize Start Menu
window.
6.
Then, click OK once more to close Taskbar and Start Menu Properties.
Removing temporary files from your hard drive
Over time, your hard drive can become cluttered with temporary files left behind from applica-
tions and the operating system. These files not only take up space, but they can be tracks of
F
IGURE
14-8: Clearing the recently opened document list.
WY026-P14[315-334].qxd 23/6/2004 5:48 PM Page 327 Quark09 Quark09:Books:WY026-Sinchak:Chapter:
328
Part III — Securing Your System
activity on your computer. Removing the temporary files is a great way to clean up any garbage
information that was left behind; you’ll then increase your privacy and also free up some disk
space.
Windows has advanced greatly over the course of its existence. Back in the early versions of
Windows, there was just one temp folder that all temp files were located in. With Windows
XP, there are temp folders all over the place. To remove the files, you could go to all of the dif-
ferent folders and manually erase the files. This would work, but there is a better way.
To clear my temporary files from my hard drive, I like to use a program called TempCleaner.
TempCleaner is a free application, written by Paul Wesson, that will automatically detect your
temporary directory and delete all the files. With TempCleaner, you do not have to worry
about where to navigate on your hard drive to delete the files. Instead, just execute the pro-
gram. To get started using TempCleaner to clean your hard drive of temporary files, follow
these directions:
1.
Visit TempCleaner’s Web site, located at www.ipaw.net/product_tempcleaner.php
and download a copy.
2.
Expand the archive and run the installer.
3.
Once the installer has finished, just start up TempCleaner by clicking the Start Menu,
expanding All Programs, and expanding the TempCleaner folder.
4.
TempCleaner has a very simple interface. When it is running, you will just see a simple
window that says Cleaning Up Your Temp Folder, as shown in Figure 14-9.
5.
Once TempCleaner has finished, the screen will disappear. If you would like
TempCleaner to remove files from other folders, such as the temp folder used by certain
applications, this can be done within TempCleaner’s options. The TempCleaner Options
screen can be viewed by using the TempCleaner Options shortcut in the TempCleaner
Start Menu folder.
6.
Once the TempCleaner Options screen is loaded, just click the Folder button next to
Add Folder and select the folder in which you want the files to be deleted. Click OK
when you are finished.
7.
Click OK and the TempCleaner Options window will close.
The next time you run TempCleaner, the folder(s) that you added will also be cleaned on top
of the Windows temp folders. If you like to keep your computer clear of temp files for
F
IGURE
14-9: TempCleaner removing temp files.
WY026-P14[315-334].qxd 23/6/2004 5:48 PM Page 328 Quark09 Quark09:Books:WY026-Sinchak:Chapter:
329
Chapter 14 — Protecting Your Privacy
maximum privacy and disk space, add the TempCleaner shortcut to your startup folder in the
Start Menu so that it is run every time you turn your computer on.
Removing saved passwords
When you visit a Web site that requires authentication or attempt to connect to remote com-
puters, you are given the option to save your password so that the next time you visit the page
or attempt to access a remote resource, you do not have to reenter your password.This feature
can be a huge convenience, especially if you access a particular Web site or resource frequently.
The downside to this convenience is the potential for horrible security and privacy problems.
Essentially, you are taking the password off all of the sites and resources for which you saved a
password. Anyone who has physical access to your computer can get in using your username
and password, even if they do not know your password.
Removing your saved passwords from your computer is a very good idea, because doing so will
protect your accounts and also increase your accounts privacy. Removing the password is a little
tricky in Window XP because there is no easy way to access a list of all the accounts that have
passwords stored for them within Control Panel or any other user interface element. Fortunately,
there is a great hack that will do just that.
Hidden away in the
keymgr.dll system file is an interface for viewing stored usernames and
passwords. To use this interface, follow these steps:
1.
Click the Start Menu and select Run.
2.
Type in rundll32.exe keymgr.dll,KRShowKeyMgr.
3.
The Stored User Names and Passwords window will load, showing you a list of all of the
accounts that are saved on your computer, as shown in Figure 14-10.
4.
To remove a saved password, select the account on the list and click the Remove
button.
5.
Click OK on the Confirm screen and the account will be removed from the list, erasing
your stored password.
6.
Repeat the previous steps for any other accounts that you want to remove.
7.
When you are finished, just click Close.
You can also use the Stored User Names and Passwords window to add more usernames and
passwords to your computer. If you have a Web site or resource and you do not care about
your privacy, such as some news Web site, and you are running Windows XP Professional,
then just click the Add button when the Stored User Names and Passwords window is
loaded.
Setting file and folder permissions
Windows XP Professional boxes running the NTFS file system have the capability to set indi-
vidual file permissions on both files and folders. File and folder permissions allow you to
WY026-P14[315-334].qxd 23/6/2004 5:48 PM Page 329 Quark09 Quark09:Books:WY026-Sinchak:Chapter:
330
Part III — Securing Your System
specify exactly who will be able to read, write, execute, and even list or access a folder. So, file
and folder permissions can be a very powerful tool to protect your data from others’ eyes.
If your file system is FAT32, then you will not be able to set permissions. Fortunately, an easy way
exists for you to convert your FAT32 file system to NTFS. Do a search in the Windows Help and
Support Center for Convert to NTFS and you will be shown directions on how you can go about
converting your drive’s file system.
Setting the permissions on with a lot of control requires you to disable simple file sharing and
security. To do so, follow these steps:
1.
Open up any folder on your computer and expand the Tools menu and select Folder Options.
2.
Click the View tab and scroll to the bottom of the Advanced Settings box.
3.
Uncheck the Use Simple File Sharing option at the bottom of the list.
4.
Click OK, and you are finished restoring full control over your file permissions.
Now that you have disabled simple file sharing, you can proceed and easily configure the per-
missions on any file or folder that you desire. Setting the permissions is very easy once you do it
a few times. Follow these directions to set the permissions to maximize your privacy:
F
IGURE
14-10: The Stored User Names and Passwords administration screen.
WY026-P14[315-334].qxd 23/6/2004 5:48 PM Page 330 Quark09 Quark09:Books:WY026-Sinchak:Chapter:
331
Chapter 14 — Protecting Your Privacy
1.
Right-click any file or folder for which you want to modify permissions and select Properties.
2.
Then, click the Security tab. (When simple file sharing was enabled, this tab did not exist.)
3.
First, remove all users from the group or username list to whom you do not want to give
access. It is a good idea to remove the Everyone group because this does include every-
one that can access your computer. However, make sure that you do not accidentally
remove your username from the list. Also watch out for the SYSTEM account. This is
one account that the operating system uses to access files. Removing it may cause unex-
pected results. But, fortunately, if the system actually does need it, you can always add it
again if you remove it and it causes problems.
If you are having difficulties removing users from the username list, this could be because the
user is inherited from a parent folder. Permissions are passed down to all subfolders and files. If
you want a user to have access to a folder but not its subfolders, then you will have to click the
Advanced button on the security tab of the Properties window. Once the Advanced Security
Settings window loads, uncheck the option that says Inherit from Parent the Permission Entries
that Apply to Child Objects. A Security notification box will pop up. Click the Remove button to
remove all of the inherited permissions so that you can have full control of the folder.
4.
Now that you have the list of users and groups taken care of, set the specific permissions
that the user has on the file or folder. Select the name of the user that you want to mod-
ify, then check the corresponding boxes in the Permissions For list for the activities that
you want them to be able to do, as shown in Figure 4-11.
5.
When you have finished setting the permissions for all of the users, click OK to exit the
Permissions screen.
Once you have set the permissions for all of sensitive directories, you will have greatly
increased your security and privacy. Also keep in mind that file permissions are inherited.
Every folder within a folder inherits the permissions of the parent folder unless they are
specifically removed. Therefore, if you set the file permissions for a folder, all of the
subfolders and files will be automatically set with the same permissions. File and folder
permissions can be very useful. If you have a program on your computer that you do not
want anyone else running, simply set the permissions on that folder so that only you can
read and execute.
Encrypting Files
Another cool feature of Windows XP Professional’s NTFS file system is its ability to encrypt
files. Permissions on files and folders work well to protect them when the operating system is
running. However, if special software and hardware are used, the raw data can be accessed on
the hard drive. With the absence of the operating system running to protect its data, anyone
can very easily lift the data off the drive no matter what permissions were set on the file. Such
software and hardware is usually expensive and primarily used by data recovery companies and
law enforcement agencies.
To protect your computer’s files and folders from conventional recovery methods, you can
encrypt the files. Doing so will scramble and encode the data within the files so that the only
WY026-P14[315-334].qxd 23/6/2004 5:48 PM Page 331 Quark09 Quark09:Books:WY026-Sinchak:Chapter:
332
Part III — Securing Your System
data lifted off the hard drive with recovery tools when the operating system is not running will
be scrambled garbage.
Encrypting files is not just for personal use. If you work for a company that has very sensitive
information on their computers and laptops, you would be wise to encrypt the folders and files
that contain important and confidential data. If you do so, the confidential information is a lot
less likely to get out in the open should the hardware ever be stolen.
Before I go any further, I should mention that encrypting files is not always 100 percent secure.
All files that are encrypted can eventually be cracked. It is only a matter of time before a high-
speed computer that is trying every possible encryption key finds the correct key. Nevertheless,
F
IGURE
14-11: Adjusting the permissions for Jason. Jason now only has
permission to read files in the incoming folder.
WY026-P14[315-334].qxd 23/6/2004 5:48 PM Page 332 Quark09 Quark09:Books:WY026-Sinchak:Chapter:
333
Chapter 14 — Protecting Your Privacy
there are millions, if not billions, of possible keys. As you can imagine, even with the fastest
computers in the world, cracking the key will take some time (several, if not hundreds of
years). But there always is the chance that someone could randomly pick the correct key,
although the odds of that happening are about equal to winning the lottery twice in your
lifetime.
Now that you know about how encrypting files can help your privacy and security, get started
encrypting files. Encrypting a file is as simple as changing a file attribute. Follow these steps to
tell Windows to encrypt a file:
1.
Right-click a file or folder and select Properties.
2.
Then, click the Advanced button next to Attributes.
3.
The Advanced Attribute window will load. Check the box to enable encryption, as
shown in Figure 4-12.
4.
Click OK to return to save your change.
5.
Select OK once more to close the Properties window and activate encryption.
Once all of your sensitive files are encrypted, your privacy and security are greatly increased.
Setting your file permissions and enabling encryption is the perfect combination for protecting
your sensitive files.
F
IGURE
14-12: Enabling encryption.
WY026-P14[315-334].qxd 23/6/2004 5:48 PM Page 333 Quark09 Quark09:Books:WY026-Sinchak:Chapter:
334
Part III — Securing Your System
Summary
Throughout this chapter, you found out how to increase your privacy with Internet Explorer.
Because Internet Explorer records so many pieces of your browsing experience, that informa-
tion can leave yourself open to huge threats to your privacy. To fight that, you need to remove
histories of sites browsed and addresses entered, as shown earlier in the chapter. Then, you
learned how to delete cookies, as well as how to set up Internet Explorer to clean itself.
The second part of the chapter addressed the privacy concerns of the Windows interface. Just
like Internet Explorer, Windows records many of our computer activities. Clearing those
records has become an essential part of protecting your privacy. First, you found out how to
clean up Windows. Then, you learned about ways to protect your privacy further with the help
of permissions and encryption. If you follow all of the tips outlined in this chapter, you will
have no problem creating a secure system.
You have now finished Hacking Windows XP. You were shown how to customize everything
that can be customized in Windows XP in Part I. Now you know how to make your computer
look and feel completely different. In Part II, you were shown how to speed up all the different
stages of Windows XP. From the boot up to the speed of your applications, you were given tips
to optimize the performance of your computer. Part III shifted into the hot topic of securing
Windows XP. You learned how to protect your computer from attackers, defend against spy-
ware, adware, and viruses, and protect your privacy. Now that you are done with this last chap-
ter, you have finished the most complete guide ever written to fully optimize and improve your
Windows XP experience.
WY026-P14[315-334].qxd 23/6/2004 5:48 PM Page 334 Quark09 Quark09:Books:WY026-Sinchak:Chapter:
What’s on the
CD-ROM
This appendix provides you with information on the contents of
the CD that accompanies this book. For the latest and greatest
information, please refer to the ReadMe file located at the root
of the CD. Here is what you will find:
Ⅲ System requirements
Ⅲ Using the CD with Windows XP
Ⅲ What’s on the CD
Ⅲ Troubleshooting
System Requirements
Make sure that your computer meets the minimum system
requirements listed in this section. If your computer doesn’t
match up to most of these requirements, you may have a prob-
lem using the contents of the CD.
Ⅲ A PC running Windows XP Professional or Windows XP
Home edition.
Ⅲ At least 128 MB of total RAM installed on your com-
puter; for best performance, we recommend at least 256
MB.
Ⅲ An Ethernet network interface card (NIC) or modem
with a speed of at least 28,800 bps.
Ⅲ A CD-ROM drive.
Using the CD with Windows XP
To install the items from the CD to your hard drive, follow these
steps:
appendix
WY026-AppA[335-342].qxd 24/6/2004 1:38 AM Page 335 Quark09 Quark09:Books:WY026-Sinchak:Final Correction:APPENDIX-A:
336
Appendix A — What’s on the CD-ROM
1.
Insert the CD into your computer’s CD-ROM drive.
2.
The CD-ROM interface will appear. The interface provides a simple point-and-click
way to explore the contents of the CD.
If the CD-ROM interface does not appear, follow these steps to access the CD:
1.
Click the Start button on the left end of the taskbar and then choose Run from the
menu that pops up.
2.
In the dialog box that appears, type d:\setup.exe. (If your CD-ROM drive is not drive d,
fill in the appropriate letter in place of d.) This brings up the CD Interface described in
the preceding set of steps.
What’s on the CD
The following sections provide a summary of the software and other materials you’ll find on
the CD.
Author-created materials
All author-created material from the book, including registry files, are organized on the CD in
chapter folders.
Applications
The following applications are on the CD:
AVG Anti-Virus, from Grisoft USA
Freeware version for Windows XP.
Description: AVG Anti-Virus is a great AV application that will protect your computer from
viruses for free. Chapter 13 will show you how to get this application up and running on your
box. For more information, check out
www.grisoft.com/us/us_dwnl_free.php.
Bitstrip
Freeware version for Windows XP.
Description: Bitstrip is a cool app that will allow you to convert an animated GIF image file
into a framed bitmap file that you can use to change the internet explorer animated logo as
shown in chapter 6. For more information, visit
www.virtualplastic.net/redllar/bitstrip.html.
O&O Defrag Professional, from O&O Software
Shareware version for Windows XP.
Description: O&O defrag is a great file system defragmentation utility that will help you opti-
mize the location of the files on your hard drive including optimization of the boot files as is
discussed in chapter 8. For more information, visit
www.oo-software.com.
WY026-AppA[335-342].qxd 24/6/2004 1:38 AM Page 336 Quark09 Quark09:Books:WY026-Sinchak:Final Correction:APPENDIX-A:
337
Appendix A — What’s on the CD-ROM
PCMark04, from Futuremark Corporation
Free feature-limited version for Windows XP.
Description: PCMark 04 is one of the most popular benchmarking programs for the PC. It
will run various tests on your computer simulating everyday activities and will then assign an
overall score that you can compare to other computers on the web. Chapter 7 will help you get
PCMark 04 running on your computer. For more information, visit
www.futuremark.com.
Sandra Standard, from SiSoftware
Free feature-limited version for Windows XP.
Description: Sandra Standard is a benchmarking and information suite. It provides several
different benchmarking tests as well as boatloads of system stats. Chapter 7 will show you
how to use Sandra Standard. Visit
www.sisoftware.co.uk for more information.
Spybot Search & Destroy
Freeware version for Windows XP.
Description: Spybot S & D is one of the most popular applications for detecting and removing
spyware from your computer. Chapter 13 will show you how you can use this great app to
remove spyware from your computer. For more information, visit
www.safer-network-
ing.org.
Style Builder, from TGT Software
30-day trial version for Windows XP.
Description: Style builder is used to create visual styles for use with Windows XP’s built-in
visual style engine. Directions on its use can be found in Chapter 4. For more information, visit
www.tgtsoft.com/prod_sxp.php.
Style XP, from TGT Software
30-day trial version for Windows XP.
Description: Style XP provides an easy way to use visual styles without having to patch
Windows XP’s visual style engine. Directions on its use can be found in Chapter 4. For more
information, check out
www.tgtsoft.com/prod_sb.php.
WinTasks 4 Professional, from Uniblue Systems Ltd.
Trial version for Windows XP.
Description: WinTasks 4 Professional is a task manager on steroids. It provides normal run-
ning process information as well as the ability to increase and decrease performance, profiles,
priorities, and respond to system events. Chapter 11 shows how to use WinTasks. For more
information, visit
www.liutilities.com/products/wintaskspro/.
Bonus Applications
The following bonus applications provided by Joel Diamond and Howard Sobel of the
Windows Users Group Network (
www.WUGNET.com) are on the CD in the bonus folder.
These bonus applications will help you get even more out of Windows XP by providing you
with useful tools to hack your computer and add cool new features and effects that will make
WY026-AppA[335-342].qxd 24/6/2004 1:38 AM Page 337 Quark09 Quark09:Books:WY026-Sinchak:Final Correction:APPENDIX-A:
338
Appendix A — What’s on the CD-ROM
Title Filename
3DNA Screensaver 3DNA.exe
3DNA Screensaver software provided courtesy of 3DNA.
AccountLogon
Password Manager Account_Logon.exe
AccountLogon Password Manager software provided courtesy of Rhodes Software Pty Ltd.
Advanced System Optimizer AdvancedSystemOptimizer.exe
AlphaXP Transparency Effects AlphaXP.exe
AlphaXP Transparency Effects software provided courtesy of ZeroHero Software.
AutoFTP Manager AutoFTP.exe
AutoPilot XP AutopilotXP.exe
AutoPilot XP software provided courtesy of Sunbelt Software.
BoostXP BoosterXP.exe
Cache Boost Pro CacheBoostPro.exe
CompreXX Comprexx.exe
CompreXX software provided courtesy of MimarSinan International.
CyberScrub ES Pro CyberScrubPro.exe
CyberScrub software provided courtesy of CyberScrub LLC. CyberScrub is a registered trademark of
CyberScrub LLC. All rights reserved.
Digital Media Converter DigitalMediaConvertor.exe
DiskTriage Free Space Manager DiskTriage.exe
DiskTriage Free Space Manager software provided courtesy of TimeAcct Information Systems.
Downshift Download Manager Downshift.exe
Downshift software provided courtesy of Rose City Software.
ExplorerPlus ExplorerPlus.exe
ExplorerPlus software provided courtesy of Novatix Corporation.
Fantasy Moon 3D Screensaver FantasyMoon3D.exe
Fantasy Moon 3D Screensaver software provided courtesy of 3PlaneSoft.
FeedDemon RSS Reader FeedDemon.exe
FeedDemon RSS Reader software provided courtesy of Bradbury Software, LLC.
FolderMatch FolderMatch.zip
FolderMatch software provided courtesy of Salty Brine Software.
™
™
WY026-AppA[335-342].qxd 24/6/2004 1:38 AM Page 338 Quark09 Quark09:Books:WY026-Sinchak:Final Correction:APPENDIX-A:
339
Appendix A — What’s on the CD-ROM
Title Filename
FTP Voyager FTPVoyager.exe
FTP Voyager software provided courtesy of Rhino Software, Inc.
Galleon 3D Screensaver Galleon.exe
Galleon Screensaver software provided courtesy of 3PlaneSoft.
GhostSurf Pro Privacy Protector GhostSurfPro.exe
MoveMe File Transfer Wizard MoveMe.exe
MoveMe File Transfer Wizard software provided courtesy of Spearit Software, Inc.
Multi Desktop 2003 MultiDesktop2003.exe
Multi Desktop 2003 software provided courtesy of Gamers Tower, Inc.
Nautilus 3D Screensaver Nautilus.exe
Nautilus 3D Screensaver software provided courtesy of 3PlaneSoft.
Open+ OpenPlus.exe
Open+ software provided courtesy of Capio Corporation.
PC Booster PCBooster.exe
PC Booster software provided courtesy of inKline Global, Inc.
Registry Compactor RegComp.exe
Registry Compactor software provided courtesy of Rose City Software.
Registry First Aid RegistryFirstAid.exe
Registry First Aid software provided courtesy of Rose City Software.
Registry Mechanic RegistryMechanic.exe
Registry Mechanic software provided courtesy of GuideWorks Pty Ltd.
SOS Data Protection Recovery SOS_Data_Protection_Recovery.zip
SOS Data Protection Recovery software provided courtesy of DataTex Engineering.
SnagIT Screen Capture SnagIT.exe
Spirit of Fire 3D Screensaver SpiritofFire3D.exe
Spirit of Fire 3D Screensaver software provided courtesy of 3PlaneSoft.
Sticky Notes StickyNotes.exe
System Mechanic SystemMechanic.exe
System Mechanic software provided courtesy of iolo technologies, LLC.
Continued
WY026-AppA[335-342].qxd 24/6/2004 1:38 AM Page 339 Quark09 Quark09:Books:WY026-Sinchak:Final Correction:APPENDIX-A:
340
Appendix A — What’s on the CD-ROM
XP look and act better. Howard and Joel worked very hard to get the permissions together for
distributing this software last minute. Without them, the bonus applications would not exist.
Thanks guys!
Shareware programs are fully functional, trial versions of copyrighted programs. If you like
particular programs, register with their authors for a nominal fee and receive licenses, enhanced
versions, and technical support. Freeware programs are copyrighted games, applications, and
utilities that are free for personal use. Unlike shareware, these programs do not require a fee or
provide technical support. GNU software is governed by its own license, which is included
inside the folder of the GNU product. See the GNU license for more details.
Trial, demo, or evaluation versions are usually limited either by time or functionality (such
as being unable to save projects). Some trial versions are very sensitive to system date
changes. If you alter your computer’s date, the programs will “time out” and will no longer
be functional.
eBook version of Hacking Windows XP
The complete text of this book is on the CD in Adobe’s Portable Document Format (PDF).
You can read and search through the file with the Adobe Acrobat Reader (also included on
the CD).
Troubleshooting
If you have difficulty installing or using any of the materials on the companion CD, try the
following solutions:
Title Filename
System Sentry SystemSentry.exe
System Sentry software provided courtesy of Easy Desk Software, Inc.
Tuneup Utilities 2004 Tuneup_Utilities.exe
TweakMaster Pro TweakmasterPro.exe
TweakMaster Pro software provided courtesy of Rose City Software.
Watermill 3D Screensaver Watermill3D.exe
Watermill 3D Screensaver software provided courtesy of 3PlaneSoft.
WinGuide Tweak Manager WinGuideTweakManager.exe
Your Uninstaller 2004 Pro YourUninstaller2004Pro.exe
Your Uninstaller 2004 Pro software provided courtesy of URSoft, Inc.
WY026-AppA[335-342].qxd 24/6/2004 1:38 AM Page 340 Quark09 Quark09:Books:WY026-Sinchak:Final Correction:APPENDIX-A:
341
Appendix A — What’s on the CD-ROM
Ⅲ Turn off any anti-virus software that you may have running. Installers sometimes
mimic virus activity and can make your computer incorrectly believe that it is being
infected by a virus. (Be sure to turn the anti-virus software back on later.)
Ⅲ Close all running programs. The more programs you’re running, the less memory is
available to other programs. Installers also typically update files and programs; if you
keep other programs running, installation may not work properly.
Ⅲ Reference the ReadMe: Please refer to the ReadMe file located at the root of the
CD-ROM for the latest product information at the time of publication.
If you still have trouble with the CD, please call the Wiley Customer Care phone number:
(800) 762-2974. Outside the United States, call 1 (317) 572-3994. You can also contact Wiley
Customer Service on the web at
www.wiley.com/techsupport. Wiley will provide techni-
cal support only for installation and other general quality control items; for technical support
on the applications themselves, consult the program’s vendor or author.
WY026-AppA[335-342].qxd 24/6/2004 1:38 AM Page 341 Quark09 Quark09:Books:WY026-Sinchak:Final Correction:APPENDIX-A:
WY026-AppA[335-342].qxd 24/6/2004 1:38 AM Page 342 Quark09 Quark09:Books:WY026-Sinchak:Final Correction:APPENDIX-A:
A
access controlling
managing user accounts, 299
overview of, 298
Active Desktop, fun with, 86
Active Server Page, 87
active user data, 170
ActiveX installation, steps for, 311
ad-aware for checking updated files, 308
ad-aware using steps, 308
additional Windows XP skins for WindowBlinds,
installing, 114
address bar command, creating, 142
address bar suggestions, removing, 315
address box history, 316
Administrator account
disabling, 300
renaming, 300
adware, overview of, 307
alert for specific performance counter, setting up, 162
all icons from the desktop, removing, 74
alternative IP addresses, assigning, 225
analyzing and detecting problems
Memory
Available MBytes & Paging File % Usage, 165
Paging File % Usage & % Usage Peak, 165
Physical Disk
Disk Read Bytes/sec & Disk Write
Bytes/sec, 164
Processor % Processor Time, 165
analyzing your system, 159
animated GIFs, 138
anti-aliasing. See fine-tuning ClearType
anti-spam applications
Cloudmark SpamNet, 306
K9, 306
McAfee SpamKiller, 306
SAproxy Pro, 306
Spam Inspector, 306
antivirus program, using, 313
appearance of the Windows interface,
customizing, 91
AppLaunchMaxNumPages, 249
AppLaunchMaxNumSections, 249
Apple OS X Visual styles, 103
application priorities, adjusting, 264
application service, 178
applications with a user set priority, starting, 265
ASCII code, 78
auto startup programs, identifying, 216
AutoComplete disabling steps, 322
AutoComplete feature, 315
AutoComplete settings, adjusting, 323
AutoComplete, disabling, 321
auto-expanding pop-up menu feature, 44
automatic logon, enabling, 210
AVG antivirus software, 314
AVG running steps, 314
B
.bootskin file extension, 6
background image for the logon screen, setting, 31
balloon help, 61
bare minimum services
Com ϩ Event System, 202
Cryptographic Services, 202
DCOM Server Process Launcher, 202
DHCP Client, 202
DNS Client, 202
Event Log, 202
IPSEC Services, 202
Network Connections, 202
Plug ϩ Play, 202
Print Spooler, 202
Protected Storage, 202
Remote Procedure Call, 202
Secondary Logon, 202
Security Accounts Manager (SAM), 202
Shell Hardware Detection, 202
System Event Notification, 202
Workstation, 202
basic input/output system (BIOS), 183
behavior of the Desktop, customizing, 83
benchmark your system, methods to, 174
benchmarking with PCMark04, 179
BIOS (basic input/output system), 183
BIOS setup screen, 184
BIOS, working with, 183
bitmaps, 101
boot defragmentation process, 204
boot defragmenter, 203
boot disk, 184
boot order of drives, changing, 184
boot screen system file, 4
Index
Index[343-354].qxd 24/6/2004 1:43 AM Page 343 Quark09 Quark09:Books:WY026-Sinchak:Final Correction:Index:
boot screen, changing, 3
boot screens for BootSkin
Skinbase, 5
Win Customize, 5
boot time defrag with O&O Defrag, 205
boot time system defrag with Diskeeper, 205
boot.ini file, creating, 190
BootMaxNumPages, 249
BootMaxNumSections, 249
boot-screen-changing programs, 5
BootSkin app, 5
Bootskin app, advantages of using, 6
BootSkin files, 5, 6
BootSkin format, 7
BootSkin to change your boot screen, using, 5
boot-up process, 204
Bootvis
features of, 170
installing, 166
starting, 167
Bootvis application, 166
Bootvis to analyze your system start, using, 166
Bootvis to benchmark, using, 178
Bootvis trace file, analyzing, 168
browser history, clearing, 318
browsers for downloading boot screens
Belchfire, 7
EZ Skins, 7
ThemeXP, 7
XP Theme, 7
buffer, 313
built-in boot defragmenter
Diskkeeper, 204
O&O Defrag, 204
built-in Visual style engine, 113
built-in Windows XP defragmenter, 263
C
CableNut program, 272
CableNut to adjust settings, using, 274
Cache & Memory Benchmark, 176
calculating settings for CableNut, 272
CD drive, 184
CD-ROM/DVD Benchmark, 176
changing any File Types default launch app,
steps for, 118
changing boot screen, methods for, 5
changing the mode of Prefetcher, steps
for, 249
changing the Welcome screen, manually, 18
CHKDSK utility, 205
classes of devices which are frequently disabled
Fire wire, 193
Modems, 193
Multimedia devices, 193
Network Adapters, 193
PCMCIA, 193
classic logon screen, working with, 28
classic logon, switching to, 29
classic Start Menu back on, turning, 54
classic Start Menu, customizing, 54
classic Windows interface, 92, 97, 101
ClearType font smoothing engine, 150
ClearType, features of, 34, 151
ColorName property, 34
ColorName values
Homestead (olive green look), 33
Metallic (silver), 33
NormalColor (default blue look), 33
columns to the detailed view, adding, 131
comctl32.ocx component, 8
common services, disabling
Background Intelligent Transfer
Service, 202
Distributed Link Tracking Client, 202
Error Reporting Service, 203
Fast User Switching Compatibility, 203
Help and Support, 203
Indexing Service, 203
Machine Debug Manager, 203
Messenger, 203
Network Location Awareness (NLA), 203
Portable Media Serial Number Service, 203
Remote Registry (only included with
Windows XP Pro), 203
SSDP Discovery Service, 203
Task Scheduler, 203
Terminal Services, 203
WebClient, 203
Windows Image Acquisition (WIA), 203
Windows Time, 203
Wireless Zero Configuration, 203
Common Tasks pane
disabling, 134
features of, 134
common Windows services in use
Automatic Updates, 196
Background Intelligent Transfer Service, 196
Com ϩ Event System, 196
Computer Browser, 196
Cryptographic Services, 196
DCOM Server Process Launcher, 197
DHCP Client, 197
Distributed Link Tracking Client, 197
344 Index
■
B–C
Index[343-354].qxd 24/6/2004 1:43 AM Page 344 Quark09 Quark09:Books:WY026-Sinchak:Final Correction:Index: