Introducing Microsoft Windows Vista phần 5 pdf
Bạn đang xem bản rút gọn của tài liệu. Xem và tải ngay bản đầy đủ của tài liệu tại đây (798 KB, 10 trang )
Chapter 9: Protecting User Accounts and Using Parental Controls 133
■ Consolidator Performs automated consolidation of the computer’s event logs.
■ AutomaticDefrag Performs automatic defragmentation of the computer’s hard disks.
■ AutomaticBackup Performs automatic backup of the computer (once configured).
In earlier versions of Windows, nonadministrators couldn’t easily tell whether they were
allowed to perform an action. To make it easier for users to determine whether they can per-
form a task, Windows Vista uses a shield icon to identify tasks that require administrator
privileges.
In Figure 9-1, two tasks are preceded by a shield icon: Change Settings and Change Product
Key. These tasks require administrator privileges.
Figure 9-1 The shield icon indicates tasks that require administrator privileges
From the experts
Only legacy applications need the Power Users group
The terms legacy application and legacy operating systems take on new meanings with the
introduction of Windows Vista. In Windows Vista, legacy application refers to an appli-
cation developed for Windows XP or an earlier version of Windows, and legacy operat-
ing system refers to an operating system using Windows XP or an earlier version of
Windows.
In earlier versions of Windows, the Power Users group was designed to give users
specific administrator privileges to perform basic system tasks while running
C09622841.fm Page 133 Wednesday, May 17, 2006 9:26 AM
134 Part III: Securing Windows Vista
applications. As standard user accounts can now perform most common configuration
tasks, Windows Vista does not require the use of the Power Users group.
Further, while Windows Vista maintains the Power Users group for legacy application
compatibility, applications written for Windows Vista do not require the use of the
Power User mode. Legacy applications that require administrative privileges use file and
registry virtualization; compliant applications use standard user mode and adminis
trator mode, as discussed previously. For more information about legacy application
compatibility, refer to the Microsoft Windows Vista Administrator’s Pocket Consultant
(Microsoft Press, 2006).
William Stanek
Author, MVP, and series editor for the Microsoft Press Administrator’s Pocket Consultants
Understanding File System and Registry Virtualization
Windows Vista uses application security tokens to determine whether elevated privileges are
required to run applications or processes. With applications written for Vista, applications
either have an “administrator” token or a “standard” token. If an application has an “adminis-
trator” token, it requires elevated privileges. If an application has a “standard” token, it doesn’t
require elevated privileges.
The token is a reflection of the required level of privileges. A standard user mode–compliant
application should write data files only to nonsystem locations. If the application requires
administrator privileges to perform a specific task, the application should request elevated
privileges to perform that task. For all other tasks, the application should not run using
elevated privileges.
Applications not written for the Windows Vista new user account architecture are considered
legacy applications. Windows Vista starts these applications as standard user applications by
default and uses file and registry virtualization to give legacy applications their own
“virtualized” views of resources they are attempting to change. When a legacy application
attempts to write a system location, Windows Vista gives the application its own private copy
of the file or registry value so that the application will function properly. All attempts to write
to protected areas are logged by default as well.
Note
Virtualization is not meant to be a long-term solution. As applications are revised to sup-
port Windows Vista’s new user account architecture, the revised versions should be deployed to
ensure compliance with User Account Control and to safeguard the security of the computer.
C09622841.fm Page 134 Wednesday, May 17, 2006 9:26 AM
Chapter 9: Protecting User Accounts and Using Parental Controls 135
Handling User Account Control
Applications written for Windows Vista use User Account Control to reduce the attack surface
of the operating system. They do this by reducing the basic privileges granted to applications
and by helping to prevent unauthorized applications from running without the user’s con-
sent. User Account Control makes it harder for malicious software to take over a computer by
ensuring that existing security measures are not unintentionally disabled by standard users
running in administrator mode. By helping to ensure that users do not accidentally change
settings, User Account Control reduces the cost of managing computers and provides a more
consistent environment that should also make troubleshooting easier. User Account Control
also helps to control access to sensitive files and data by securing the Documents folder so
that other users cannot change, read, or delete files created by other users of the same
computer.
Applications that have been certified as compliant with the new Windows Vista architecture
will have the Windows Vista–Compliant logo. Although the logo indicates that the program
has been written to take advantage of User Account Control, it doesn’t mean that the program
will run only in standard user mode. Compliant applications run in the mode appropriate for
the functions that they perform and elevate privileges to perform tasks as necessary. Admin-
istrators can modify the way User Account Control works as required.
Understanding and Setting Run Levels
In Windows Vista, an application can indicate the specific permission level it needs to func-
tion so that it will perform only authorized functions, making the code less vulnerable to
exploits by malicious users or malicious software. A new feature in Windows Vista, called
Windows Vista Trust Manager, can use this information prior to installing an application to
determine whether to allow the application to be installed. If the application’s required per-
missions are determined to pose no risk, the application can be installed without generating
security alerts. However, if the application’s installer writes to sensitive areas or performs
tasks that could potentially harm the computer, Windows Vista displays security alerts
describing the potential dangers of installing the application and asking for confirmation
before proceeding.
Application Manifests and Run Levels are used to help track required privileges. Application
Manifests allow administrators to define the application’s desired security credentials and to
specify when to prompt users for administrator authorization to elevate privileges. If privileges
other than those for standard users are required, the manifest should contain runLevel
designations. These runLevel designations identify the specific tasks that the application
needs to elevate with an “administrator” token.
C09622841.fm Page 135 Wednesday, May 17, 2006 9:26 AM
136 Part III: Securing Windows Vista
With User Account Control and Admin Approval Mode, you are prompted for consent prior
to performing any task that requires elevated permission, and the Windows Security dialog
box allows you to run the application on a one-time basis using elevated credentials. In the
Windows Security dialog box, click Allow to start the application using an administrator
account, or click an account, type the account’s password, and then click Submit to start the
application using a standard account.
Another way to use elevation is to mark an application or process to always run using elevated
credentials without prompting the user for consent. To do this, follow these steps:
1. Log on to the computer as a member of the local Administrators group.
2. By using the Start menu, locate the program that you want to run always using elevated
credentials.
3. Right-click the application’s shortcut icon, and then click Properties.
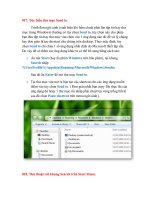
4. In the Properties dialog box, select the Compatibility tab, as shown in Figure 9-2.
Figure 9-2 Marking an application to always run elevated
5. Under Privilege Level, select the Run This Program As An Administrator check box.
6. Click OK.
Note
If the Run This Program As An Administrator option is unavailable, it means that the
application is blocked from always running elevated, the application does not require admin-
istrative credentials to run, or you are not logged on as an administrator.
C09622841.fm Page 136 Wednesday, May 17, 2006 9:26 AM
Chapter 9: Protecting User Accounts and Using Parental Controls 137
Modifying User Account Control and Admin Approval Mode
Administrators can change the way User Account Control and Admin Approval Mode work in
several different ways. They can:
■ Disable running all users as standard users.
■ Disable prompting for credentials to install applications.
■ Change the elevation prompt behavior.
Each of these tasks is configured through Group Policy and can be configured on a per-com-
puter basis through Local Group Policy or on a per-domain, per-site, or per-organizational-unit
basis through Active Directory Group Policy. The sections that follow focus on configuring
the related settings by using Local Group Policy.
Disabling Admin Approval Mode
By default, Windows Vista uses Admin Approval Mode to run programs for all users, includ-
ing administrators, as standard users. This approach serves to better safeguard the computer
from malicious software by ensuring that any time programs need administrator privileges,
they must prompt the user for approval. To bypass the safety and security settings, you can
modify this behavior so that administrators run programs as administrators and standard
users run programs as standard users.
You can use the following procedure to disable Admin Approval Mode:
1. Log on to the computer as a member of the local Administrators group.
2. Click Start, point to All Programs, Accessories, and then click Run.
3. Type secpol.msc in the Open text box, and then click OK.
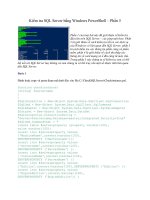
4. In the console tree, under Security Settings, expand Local Policies, and then select Secu-
rity Options.
5. Double-click User Account Control: Run All Administrators In Admin Approval Mode.
6. Click Disabled, as shown in Figure 9-3, and then click OK.
Figure 9-3 Disabling Admin Approval Mode
C09622841.fm Page 137 Wednesday, May 17, 2006 9:26 AM
138 Part III: Securing Windows Vista
Disabling Credential Prompting for Application Installation
By default, Windows Vista prompts users for consent or credentials prior to installing appli-
cations using elevated permissions. If you don’t want users to have access to this prompt, you
can disable User Account Control: Detect Application Installations And Prompt For Elevation
under Security Options, and in this way block users from using this feature to install appli-
cations as administrators. This doesn’t, however, block users from using other techniques to
install applications as administrators.
You can use the following procedure to disable the User Account Control: Detect Application
Installations And Prompt For Elevation feature:
1. Log on to the computer as a member of the local Administrators group.
2. Click Start, point to All Programs, Accessories, and then click Run.
3. Type secpol.msc in the Open text box, and then click OK.
4. In the console tree, under Security Settings, expand Local Policies, and then select Secu-
rity Options.
5. Double-click User Account Control: Detect Application Installations And Prompt For
Elevation.
6. Click Disabled, and then click OK.
Changing the Elevation Prompt Behavior
By default, Windows Vista handles security prompts for standard users and administrator
users in different ways. Standard users are prompted for credentials. Administrators are
prompted for consent. Using Group Policy, you can change this behavior in several ways:
■ If you don’t want standard users to have access to this prompt, you can specify that
users shouldn’t see the elevation prompt, and in this way block users from using this
feature to run applications with elevated privileges. However, this doesn’t block users
from using other techniques to run applications as administrators.
■ If you want to require administrators to enter credentials, you can specify that adminis-
trators should be prompted for credentials rather than consent.
■ If you don’t want administrators to have access to this prompt, you can specify that
administrators shouldn’t see the elevation prompt, and in this way block administrators
from using this feature to run applications with elevated privileges. This doesn’t,
however, block administrators from using other techniques to run applications with
elevated permissions.
You can use the following procedure to configure the elevation prompt for standard users:
1. Log on to the computer as a member of the local Administrators group.
2. Click Start, point to All Programs, Accessories, and then click Run.
C09622841.fm Page 138 Wednesday, May 17, 2006 9:26 AM
Chapter 9: Protecting User Accounts and Using Parental Controls 139
3. Type secpol.msc in the Open text box, and then click OK.
4. In the console tree, under Security Settings, expand Local Policies, and then select Secu-
rity Options.
5. Double-click User Account Control: Behavior Of The Elevation Prompt For Standard
Users.
6. You can now:
❑ Block the elevation prompt by selecting No Prompt in the drop-down list.
❑ Enable the elevation prompt by selecting Prompt For Credentials in the drop-
down list. (The default setting is Prompt For Credentials.)
7. Click OK.
You can use the following procedure to configure the elevation prompt for administrators:
1. Log on to the computer as a member of the local Administrators group.
2. Click Start, point to All Programs, Accessories, and then click Run.
3. Type secpol.msc in the Open text box, and then click OK.
4. In the console tree, under Security Settings, expand Local Policies, and then select Secu-
rity Options.
5. Double-click User Account Control: Behavior Of The Elevation Prompt For Administra-
tors In Admin Approval Mode.
6. You can now:
❑ Block the elevation prompt by selecting No Prompt in the drop-down list.
❑ Enable the elevation prompt to use consent by selecting Prompt For Consent in
the drop-down list. (The default setting is Prompt For Consent.)
❑ Require the elevation prompt to obtain credentials by selecting Prompt For Cre-
dentials in the drop-down list.
7. Click OK.
Introducing Parental Controls
Computer and Internet safety are major concerns. Many parents don’t want their children to
play certain types of games or access certain types of materials on the Internet. To help with
this issue, Windows Vista includes parental controls. Parental controls help keep your family
safe whether they are using the computer to play games or browsing the Web.
Getting Started with Parental Controls
The term parental controls is somewhat of a misnomer. Children and young adults use com-
puters at home, in school, at the library, and elsewhere, and keeping them safe in all of these
C09622841.fm Page 139 Wednesday, May 17, 2006 9:26 AM
140 Part III: Securing Windows Vista
environments is what parental controls are all about. If you don’t want children and young
adults to play certain types of games or access certain types of materials on the Internet, you
can use parental controls to help control their access to the computer and to mature content.
You can set parental controls for standard user accounts on the local computer only. You can-
not set parental controls for administrators, and you cannot set parental controls for domain
user accounts. Any user designated as an administrator on the local computer can configure
parental controls and view activity reports for users subject to parental controls.
You can access parental controls by completing the following steps:
1. Click Start, and then click Control Panel.
2. In a workgroup setting, click Set Up Parental Controls under the User Accounts And
Family Safety heading. In a domain setting, click Set Up Parental Controls under
the User Accounts heading.
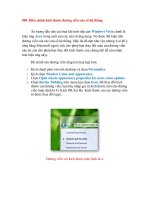
3. On the main Parental Controls page, shown in Figure 9-4, you can now set up parental
controls.
Figure 9-4 Accessing parental controls
Parental controls are configured using general settings for the computer as a whole as well as
specific settings for individual users. General computer settings:
■ Control whether activity reports are active for specific users and how often you are
reminded to read activity reports.
■ Determine whether an icon is displayed in the system tray when parental controls are
running.
■ Determine the games rating system to use on the computer.
C09622841.fm Page 140 Wednesday, May 17, 2006 9:26 AM
Chapter 9: Protecting User Accounts and Using Parental Controls 141
Individual user settings:
■ Control allowed Web sites and allowed types of content.
■ Set time limits for when the computer can be used.
■ Determine the types of games that can be played according to rating, content, or title.
■ Block specific programs by name.
Selecting a Games Rating System
Games rating systems, such as those used by the Entertainment Software Ratings Board
(ESRB), are meant to help protect children and young adults from specific types of mature
content in computer games and on the Internet. You can learn more about the available rating
systems and configure a default rating system to use by following these steps:
1. Click Start, and then click Control Panel.
2. In Control Panel, click Set Up Parental Controls under the User Accounts And Family
Safety category heading.
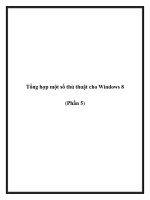
3. In the left panel of the main Parental Controls page, click Select A Games Rating System.
4. As Figure 9-5 shows, you can now review the games rating systems available. The default
rating system used might depend on the country or region settings for the computer.
Figure 9-5 Viewing and setting the games rating system to use
Tip When you click one of the links provided, the home page for the designated orga-
nization appears in Microsoft Internet Explorer. If you have questions about a rating
system, the organization’s Web site can answer them.
C09622841.fm Page 141 Wednesday, May 17, 2006 9:26 AM
142 Part III: Securing Windows Vista
5. If you want to change the default rating system, click the rating system you want to use,
and then click OK. Otherwise, click the Back button to go back to the Parental Controls
page in Control Panel.
Configuring Notifications for Parental Controls
By default, when you configure parental controls, you are reminded weekly to read activity
reports, and users subject to parental controls see an icon in the system tray when parental
controls are running. If you want to change the way notification is handled, follow these steps:
1. Click Start, and then click Control Panel.
2. In Control Panel, click Set Up Parental Controls under the User Accounts And Family
Safety category heading.
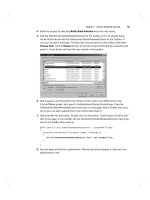
3. In the left panel of the main Parental Controls page, click Notifications.
4. As Figure 9-6 shows, you can now specify how often you would like to be reminded to
read activity reports. You can specify that you want to be notified weekly, every two
weeks, monthly, or never.
Figure 9-6 Setting general notifications
5. If you want to hide the parental controls icon rather than display it in the system tray,
clear the Display An Icon In The System Tray When Parental Controls Are Running
check box.
6. Click OK.
Configuring Parental Controls for User Accounts
Any standard user account can be configured to use parental controls. Parental controls can
be used to control allowed Web sites and allowed types of content, set time limits for when the
C09622841.fm Page 142 Wednesday, May 17, 2006 9:26 AM