mastering sql server 2000 security PHẦN 3 potx
Bạn đang xem bản rút gọn của tài liệu. Xem và tải ngay bản đầy đủ của tài liệu tại đây (1.04 MB, 47 trang )
workload of the failed system. That means that the load of both servers will
be running on one server. If either of the two servers was at a high utiliza-
tion rate before the failover, the failover process will most likely result in
decreased performance. With active/active clustering you are typically
choosing to have a fault-tolerant solution at the expense of performance.
When the system performs a failover, the performance may be slower,
but all of the data will be available to users. If you opt for the active/active
cluster configuration, you should generally document the configuration of
the cluster and inform users and other support staff that a failover will
result in a decrease in performance.
The next step when you are configuring SQL Server for a cluster is to
check and possibly change several SQL Server settings. The next three
sections examine these three settings.
Setting the Recovery Time
In tuning SQL Server, previously you may have set the configuration
parameter recovery interval to something other than the default value of 0.
Changing this setting will increase the time between checkpoints and
improve performance but will also increase recovery time. (The system
must recover after it has failed over.) While this is appropriate in some
cases, it is not appropriate when you are working with a clustered server.
In a clustered system, the default value of 0, which specifies automatic con-
figuration, should not be changed. Keeping the default at 0 may result in
decreased performance due to the ongoing checkpoints, but the purpose of
the Clustering service is fault tolerance. If you have not changed this set-
ting, don’t worry about it. The default of 0 is the suggested setting for SQL
Server with the Clustering service. This default setting of 0 will cause a
checkpoint and recover to occur about every minute. This will speed up
the failover process and make the data available to users more quickly.
Configuring Min Server Memory
To create an active/passive cluster configuration, you might have to
change one setting in SQL Server. If your secondary server is identical to
the primary server, no change is necessary. If the secondary server has
fewer resources than the primary server, you should set the SQL Server
configuration parameter min server memory to 0. This setting instructs
SQL Server to allocate memory based on available system resources, allow-
ing for the dynamic allocation of memory. It is necessary for the system to
control the memory when the two servers are not identical from a hard-
ware standpoint.
60 Chapter 2
In an active/active cluster configuration, you must set the SQL Server
configuration parameter min server memory to 0. By doing so you enable
the server to reconfigure the memory for each instance after the failover. If
this setting is not configured at 0, the server instance that has failed over to
the other server will not be allocated any memory, or the system will force
everything the new instance does to the paging file, negatively affecting
performance.
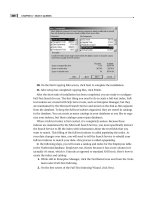
Installing SQL Server for Clustering
When installing SQL Server for clustering you should follow steps that are
similar to those for a normal installation of SQL Server 2000. When you see
the screen that asks you to identify whether the installation is for a local or
remote server, you will have an option to select Virtual Server as shown in
Figure 2.5.
The only other installation issue is your file paths. You will be prompted
for the location of the program files and system database file path as shown
in Figure 2.6. You will want to make sure that both of the paths are pointed
to a drive located on the shared network storage device. By doing so you
will ensure that the files are not kept local and that the failover process can
be successful.
Figure 2.5 When installing SQL Server for clustering, you will need to install a virtual
instance. In this case Virtual Server is grayed out because Cluster service was not configured
first.
Designing a Successful Security Model 61
Figure 2.6 When installing a virtual instance of SQL Server you will want to store your files
on the shared storage device.
Documentation
Documentation is the key to making this chapter work for you. You should
have a clear picture of each of the items described in this chapter. The fol-
lowing suggestions for diagramming will help you get a clear picture of all
the issues defined in this chapter and assist you in presenting them to
others. If you don’t document these items effectively, others may not grasp
their context or meaning. After you have planned to address the previously
defined issues, it is paramount that you document your analysis of the sit-
uation and the choices you have made for deployment. This documentation
can serve as a reference point for you and others who need to interact with
SQL Server. Based on the previous sections you will need a minimum of
three sets of documentation to define your security strategy:
■■ You should have a document that defines your server architecture.
■■ You should have a document that clearly defines the roles of the
developer and DBA within your organization.
■■ You should have a document that details the physical implementa-
tion issues that have already been introduced in this chapter.
The following sections provide more detail about the information that
should be stored within each set of documentation.
62 Chapter 2
Server Architecture
Your server architecture documentation should define your servers and
the role they play within the organization, including details about the fol-
lowing items:
■■ The relationship of production, test, and development servers.
■■ The physical location of each of the servers.
■■ The system administrators of each of the servers.
■■ The number of instances of SQL Server installed on each server.
■■ The version of SQL Server and Windows 2000 Server installed on
each machine.
■■ The level of testing required at the test server. Do you need to use
benchmarking or load simulation software?
■■ The Personal Edition of SQL Server on developers’ personal com-
puters. You could either centralize your developers to a develop-
ment server or you could give them their own desktop edition.
Giving them their own instance of SQL Personal Edition increases
the number of instances you have to support. On the other hand, it
also enables the developer to travel and not have to be connected to
the network.
■■ The method of moving objects from one server to another.
■■ The role that Transact-SQL scripts play in your installation and
change management strategy.
Roles and Responsibilities
Although the documentation outlining roles and responsibilities may seem
to be the most obvious of the three sets of documentation, it is probably the
most critical. Regardless of how good a product SQL Server 2000 is, the
success of your applications will depend on the people who implement
and support your applications. Following is a list of questions that should
be answered by the documentation that defines the roles and responsibilities
within your organization:
■■ Who will design the application security model?
■■ Who will perform the server-level security and configuration (server
roles and sp_configure options)?
Designing a Successful Security Model 63
■■ Who is responsible for user management at the database level?
■■ Who manages the object permissions?
■■ Who will develop the application?
■■ Who will deploy the application to test and production servers?
■■ Who supports application-related issues after the application has
been deployed in production?
■■ Who is responsible for maintaining object ownership chains?
NOTE All of the items listed in the roles and responsibilities section are
related to security, given the context of this book. But you should also consider
expanding this document to deal with all issues of the application, including
items such as backup and restore, server installation, and data transformation
packages.
Physical Implementation
The last area of documentation related to security is physical implementa-
tion. Keep in mind that although this is the last level of documentation for
designing your security system as a whole, each application should have its
own security design, which should include some documentation as well.
More information about application security design is found in Chapter 6,
“Designing Application Security.” There are several considerations for
physical implementation:
■■ The versions of SQL Server and Windows 2000 should be documented.
■■ The number of instances of SQL Server should be well documented.
There should be a diagram showing the number of instances on each
server and the names of each of the servers and instances.
■■ The purpose of all applications and databases should be documented.
All individuals who need to interact with the database should know
the role of each database and application.
■■ The documentation should be clear on which systems are OLTP,
OLAP, and batch processing systems as discussed in their respective
sections earlier in this chapter.
■■ If clustering is used, the configuration should be documented and
diagrammed.
64 Chapter 2
NOTE The items referenced for physical implementation reference only security
concerns. You should consider expanding your documentation to address other
physical concerns such as the location of the transaction log and data file, backup
strategies and tape solutions, and management of SQL services.
Best Practices
■■ The test and production server should match in security configura-
tion to help prevent inconsistencies when the application goes live.
■■ The development server should allow developers to create all the
objects they need for their applications.
■■ Use Transact-SQL scripts to move objects from development to test.
Scripts are fast and, if they are executed by a system administrator,
you will not lose your DBO object ownership.
■■ Define the roles of the DBA versus those of the developer. Everyone
will appreciate knowing what each person is responsible for.
■■ Strive to decrease the lines of accountability. To help prevent finger-
pointing when a problem occurs and help increase the chance that
the task will be accomplished, make sure that your production and
test servers have few system administrators.
■■ Choose versions of Windows 2000 and SQL Server 2000 appropriately.
Use the same versions for test and production servers.
■■ Use multiple instances of SQL Server to assist in security management
and to isolate applications.
■■ Know the purpose of each application and database. When appro-
priate, use tools such as DTS and Analysis Services to enhance your
applications.
■■ Use Clustering services when the application is mission-critical.
Clustering services are appropriate when the cost of potential
downtime is greater than the cost of running and maintaining
additional servers and network storage devices.
■■ Document! Document! Document! The key to making a security model
last is documenting the decisions you have made. The documentation
should be clear and concise.
Designing a Successful Security Model 65
66 Chapter 2
REVIEW QUESTIONS
1. Why do you need a test server?
2. Why is it important that the test and production servers have a matching
security configuration?
3. What is the purpose of the Clustering service?
4. As a DBA, why is it important to know the role of each database and
application?
5. Why would you use multiple instances of SQL Server on a single server?
6. What is the difference between the Enterprise Edition of SQL Server and
the Standard Edition of SQL Server?
7. Why is documentation of your security design so important?
67
After planning for your deployment of SQL Server, you are ready to shift
focus to the initial security concerns related to SQL Server installation. At
this point, as discussed in Chapter 2, “Designing a Successful Security
Model,” you have determined the number of instances you will need to
install. You also have a solid plan about the individuals who will adminis-
ter each server. You will need to be comfortable with the security accounts
you have chosen for your SQL Server and SQL Server Agent services. These
services are the key to SQL Server working for you. Many of the features of
SQL Server use the security context of these services when performing
their functions.
This chapter addresses the security concerns related to the initial instal-
lation and configuration of the server. It also addresses the role of Enter-
prise Manager and Query Analyzer as tools for using and administering
SQL Server. By the end of this chapter you should feel confident about
using the security properties of these tools to define your connection to
SQL Server.
First, this chapter outlines the purpose and creation of the service
account. The security context of your service account is the key to several
features, such as replication and email integration, working properly. Next,
Exploring Initial
Security Parameters
CHAPTER
3
CHAPTER
the chapter tackles the security requirements for the installation process.
The chapter then moves to the files, folders, and Registry settings that are
added to SQL Server by the installation. Finally, this chapter demonstrates
the registration of a server instance with Enterprise Manager and SQL
Query Analyzer. When an instance is registered with one of these tools,
you will have to supply the security context (username and password) to
be used when the connection is made to SQL Server.
SQL Services Account
Microsoft SQL Server and SQL Server Agent are started and run as Win-
dows services. The security context in which these services run controls the
security context of your server. Replication, email integration, scheduled
tasks, and multiserver jobs all use the services’ security context to perform
their functions. The SQL services appear in the list of installed services
along with all other Windows services in the Services dialogue box. The
Services dialogue box is available from the Control Panel.
The two most important services to Microsoft SQL Server are the SQL
Server service and the SQL Server Agent service. The SQL Server service
handles all query processing and server configuration. The SQL Server
Agent service manages all of the automated processes, which can include
jobs, operators, alerts, and replication.
In addition to managing automated processes, the SQL Server Agent
service account is used as the security context for executing the scheduled
processes. If the account is not configured with the appropriate level of
security, the jobs you schedule will not execute properly. The SQL Server
Agent service account should be a local administrator for the machine on
which SQL Server is installed. More information about the role of the SQL
Server Agent service can be found in Chapter 9, “Introducing the SQL
Server Agent Service.”
For Microsoft SQL Server and SQL Server Agent to run as services in
Windows, each service must be assigned a Windows user account to use
when the service starts. This account is used so that the service can log on
to the system. Typically, both SQL Server and SQL Server Agent are
assigned the same user account. But it is possible to customize the settings
for each service separately. You have two choices for configuring the
service account: as a local system account or as a domain user account.
NOTE Microsoft Windows 9x does not support Windows services. The
Personal Edition of SQL Server that runs on Windows 9x simulates the SQL
Server and SQL Server Agent services. In these environments, you need not
68 Chapter 3
configure the user account for the service startup. You also must have the SQL
Server open and running in order for the data to be accessed.
Using a Local System Account
A local system account can be configured to use at service startup and does
not require the username or password to be configured by the DBA. A local
system account does not have the network access required for most server-
to-server activity. Using a local system account restricts an instance of SQL
Server from interacting with other servers over the network for the pur-
poses of replication, multiserver jobs, and email integration. Using the
local system account as the SQL service account is generally not an option
if you plan to use SQL Server replication, multiserver jobs, or email inte-
gration with SQL Server. If you choose to use the local system account as
your service account, the features available to you will be limited.
Using a Domain User Account
A domain user account uses Windows Authentication—that is, the same
username and password used to connect to the operating system is also
used to connect to SQL Server. The domain user account is generally pre-
ferred because it does not limit your interaction with other servers. When
you use a domain user account, the following items are available:
■■ Multiserver jobs.
■■ Replication.
■■ Backing up to network drives.
■■ JOIN statements that involve multiple server data sources.
■■ SQL Server Agent mail features and SQL Mail services. SQL Server
Agent mail is used by the SQL Server Agent service and is the feature
that is used to notify users of critical system alerts and the status of
scheduled jobs. The SQL Mail service is integrated with the SQL
Server service and allows the xp_sendmail stored procedure to be
used to send email from Transact-SQL. Most email systems, including
Microsoft Exchange, depend on the SQL services to be running with
a domain user account as the security context.
NOTE All servers running SQL Server can share the same user account. If the
account is created on a domain that all SQL Servers can access, all servers
can be configured consistently. This is important when you are setting up
Exploring Initial Security Parameters 69
replication. It is recommended that a Publisher and all its Subscribers share the
same service account for the SQL Server Agent service. For more information on
replication and the SQL Server Agent service, refer to Chapter 9, “Introducing
the SQL Server Agent Service.”
Requirements for Domain User Account
If the domain account you are using is a member of the local administrators
group, the considerations mentioned in this section are already inherited.
If you don’t want the account to use a local administrator, you should eval-
uate the following considerations:
■■ The account must be able to access and change the SQL Server direc-
tory (\Program Files\Microsoft SQL Server\Mssql).
■■ The account must have access to read and change the .mdf, .ndf, and
.ldf database files.
■■ The account must be assigned the Log On As a Service user right.
■■ The account must also be able to read and write Registry keys at and
under the following:
■■ HKEY_LOCAL_MACHINE\Software\Microsoft\
MSSQLServer—also for any additional named instance,
HKEY_LOCAL_MACHINE\Software\Microsoft\Microsoft
SQL Server)
■■ HKEY_LOCAL_MACHINE\System\CurrentControlset\
Services\MSSQLServer—also for any named instance, HKEY_
LOCAL_MACHINE\System\CurrentControlset\Services\
MSSQL$Instancename
■■ HKEY_LOCAL_MACHINE\Software\Microsoft\Windows NT\
CurrentVersion\Perflib
■■ The user account must be able to read and write corresponding
Registry keys for these services: SQLAgent$InstanceName (for
each named instance on the server), MSSearch, and MSDTC.
Additional permissions may be required to gain added functionality in
SQL Server. Most of this additional functionality enables SQL Server to
access and use services outside SQL Server. For example, you may want to
configure integration with Exchange Server so that you have the option of
using the xp_sendmail stored procedure to send email messages. Table 3.1
identifies the additional functionality options and the permission required
to perform the additional action.
70 Chapter 3
Table 3.1 Additional Functionality and Permissions Required with SQL Server Services
ADDITIONAL FUNCTIONALITY PERMISSION REQUIRED
Use xp_sendmail to send email The service account needs a mailbox
messages from your Transact-SQL code that has permission to send messages.
Run xp_cmdshell to execute shell The ct as Part of the Operating System
commands from your Transact-SQL code and Replace a Process Level Token user
rights need to be assigned to the service
account. These user rights are assigned
through Windows 2000.
Create CmdExec and ActiveScript job The SQL Server Agent service account
steps in a job owned by a non-sysadmin must be a local administrator.
Add and delete SQL Server objects in SQL Server Agent service account must
Windows 2000 Active Directory be a member of the local power users
group.
NOTE It is generally easiest to add the service account to the local
administrators group of the SQL Server. Doing so results in all permissions
requirements being met. This may result in the account having access to some
things that it doesn’t need, but the administration will be much easier.
Changing User Accounts
After the service account has been defined, it is easy to change the pass-
word or assign the service to use another account. You can use either Enter-
prise Manager or the Services icon from the Control Panel to make the
change. To change the SQL Server service user account or password at any
time after installation, you should perform the following steps using Enter-
prise Manager:
1. Open Enterprise Manager.
2. Click to expand the server instance you want to manipulate.
3. Right-click the server instance and select Properties.
4. Select the Security tab, which leads to the dialogue box page shown
in Figure 3.1.
5. Type the new username or new password.
6. You will be prompted to restart the service.
Exploring Initial Security Parameters 71
Figure 3.1 Use the Security tab of the Server Properties dialogue box to change the
service account used by a SQL Server service.
NOTE Changes to the service account used for the SQL Server service and the
SQL Server Agent service require restarting the service. This process will take a
couple of minutes and may affect connected users. It is best to either schedule
this procedure during offline hours or to inform all users that the server will be
down for a couple of minutes. You can use the current activity window in
Enterprise Manager to send a message to a connected user. More information
on the current activity window can be found in Chapter 13, “Managing Current
Connections.”
As noted, alternatively you can use the Services icon from the Control
Panel to reconfigure the service account for one of the SQL Server services.
This option is beneficial if you are having difficulties with Enterprise
Manager and need to test the service to see if the service may be the cause
of your problems. Often a stalled or misconfigured SQL Server service will
cause Enterprise Manager to stop responding. Perform the following steps
to modify service account information for the SQL Server service.
72 Chapter 3
Figure 3.2 SQL Server services can be reconfigured from the Services option in the
Control Panel using the MSSQLSERVER Properties dialogue box.
1. From the Control Panel, double-click on the Services icon.
2. Scroll down to the SQL Server service and double-click it to open the
Service Properties dialogue box.
3. Click the Log On tab, which leads to the dialogue box page shown
in Figure 3.2.
Change the account information as appropriate.
Installation Security
This section introduces the permissions required for performing a SQL
Server installation. This section then identifies the files and folders that are
added to your system during installation. This information is beneficial if
you encounter errors related to missing or corrupted files. It is also useful
if you have tried to perform the installation and it did not complete. SQL
Server may be partially installed on your system, and the files and Registry
Exploring Initial Security Parameters 73
keys may have to be cleaned up before you can try the installation again.
The Rebuild Registry option is also described as a method for resetting
your Windows Registry values.
Installation Permissions
It is necessary to determine the number of instances you will be installing
on the server. Multiple instances and the decision to install multiple
instances are described in more depth in Chapter 2, “Designing a Successful
Security Model.”
Whether you are installing the first instance or an additional instance,
you need the same permissions. Local administrator permissions are
required to install an instance of SQL Server on a machine. The SQL Server
installation will add files to the hard drive, settings to the Registry, and ser-
vices to Windows 2000. If you are not a local administrator, the process will
fail quickly. You will receive an error message notifying you that you do
not have the required permissions.
Locating Files and Folders and Rebuilding Registry Keys
During installation, you have the option of determining the path of the
files that will be added to your system. Table 3.3 shows a list of default
paths, which may vary if locations were changed during installation. Both
program and data file locations can be changed, but the location of shared
tools cannot be changed. The security to these files should be set automat-
ically for you by the SQL Server installation process. It is not typically rec-
ommended that you change the permission settings to these files. You
should control security through the SQL Server security model, which can
be used to control who has access to various features of SQL Server.
NOTE Do not delete any of the following directories or their contents: Binn,
Data, Ftdata, HTML, or 1033. If you delete these directories, you may not be
able to retrieve any lost functionality or data without uninstalling and
reinstalling SQL Server 2000. Additionally, do not delete or modify any of
the .htm files in the HTML directory. They are required for SQL Server
Enterprise Manager and other tools to function properly.
Shared Files for All Instances of SQL Server 2000
Although each instance on a single machine maintains its own autonomy,
some files are shared between instances of SQL Server. Table 3.2 introduces
the files that are shared for all instances of SQL Server on a single machine.
74 Chapter 3
Table 3.2 Installation Files That Are Shared on a Single Machine
LOCATION DESCRIPTION
\Program Files\Microsoft SQL Server\ Dynamic-link libraries (DLLs) for the COM
80\Com objects.
\Program Files\Microsoft SQL Server\ Resource files (RLLs) used by the DLLs in
80\Com\Binn\Resources\1033 this COM directory. (Note: 1033 is for
U.S. English; localized versions use
different directory numbers.)
\Program Files\Microsoft SQL Server\ Client executable files.
80\Tools\Binn
\Program Files\Microsoft SQL Server\ SQL Server Books Online.
80\Tools\Books
\Program Files\Microsoft SQL Server\ Header files, library files, and sample files.
80\Tools\DevTools\
\Program Files\Microsoft SQL Server\ Microsoft Management Console (MMC)
80\Tools\Html and SQL Server HTML files.
\Program Files\Microsoft SQL Server\ SQL script templates to help you create
80\Tools\Templates objects in the database.
Program and Data Files for the Default
Instance of SQL Server 2000
Each instance of SQL Server also has its own set of data files. Table 3.3
shows the locations of the program and data files for the default instance of
SQL Server 2000. These are the default file locations, which can be changed
during installation.
Table 3.3 Program Data Files for the Default Instance of SQL Server 2000
LOCATION DESCRIPTION
\Program Files\Microsoft SQL Server\ Default location for backup files
Mssql\Backup
\Program Files\Microsoft SQL Server\ Microsoft Windows NT server executable
Mssql\Binn files and DLL files for extended stored
procedures
\Program Files\Microsoft SQL Server\ Binn directory for resource files used by
Mssql\Binn\Resources\1033 the DLLs
(continues)
Exploring Initial Security Parameters 75
Table 3.3 Program Data Files for the Default Instance of SQL Server 2000 (Continued)
LOCATION DESCRIPTION
\Program Files\Microsoft SQL Server\ System and sample database files
Mssql\Data
\Program Files\Microsoft SQL Server\ Full-text catalog files
Mssql\Ftdata
\Program Files\Microsoft SQL Server\ Scripts run during setup and resulting
Mssql\Install output files
\Program Files\Microsoft SQL Server\ Storage location for temporary job output
Mssql\Jobs files
\Program Files\Microsoft SQL Server\ Error log files
Mssql\Log
\Program Files\Microsoft SQL Server\ Working directory for replication tasks
Mssql\Repldata
\Program Files\Microsoft SQL Server\ Files used for version upgrade from SQL
Mssql\Upgrade Server version 6.5 to SQL Server 2000
All subsequent instances of SQL Server have a similar path. The MSSQL
folder is replaced with an MSSQL$namedinstance folder, where named
instance is the name of the installed instance of SQL Server.
In addition to the files and folders that were referenced previously,
following is a list of Registry keys that are added during a SQL Server
installation:
■■ HKEY_LOCAL_MACHINE\Software\Microsoft\MSSQLServer
■■ HKEY_LOCAL_MACHINE\Software\Microsoft\Microsoft SQL
Server
■■ HKEY_LOCAL_MACHINE\System\CurrentControlset\
Services\MSSQLServer
■■ HKEY_LOCAL_MACHINE\System\CurrentControlset\
Services\MSSQL$Instancename (for each named instance of
SQL Server)
■■ HKEY_LOCAL_MACHINE\Software\Microsoft\Windows NT\
CurrentVersion\Perflib
It is possible to use the installation procedure to rebuild the SQL Server
settings in the Registry. The Rebuild Registry option is available only
76 Chapter 3
through the installation process. Rebuilding the Registry is very beneficial
if you feel that the Registry is corrupted or has been updated incorrectly.
This procedure can also be used if the security settings to your Registry
keys have been unsuccessfully changed. The Advanced Options Setup
screen allows you to rebuild the Registry for a corrupted Microsoft SQL
Server installation. This process fixes only the Registry; it does not fix data
errors or rebuild the system databases.
NOTE To rebuild the Registry, you must enter setup information using the
same choices that you entered during the initial installation. If you do not know
or are unsure of this information, do not use this Registry rebuild process.
Instead, to restore the Registry, uninstall and reinstall SQL Server.
Registering Servers
It is important to remember that Enterprise Manager and SQL Query Ana-
lyzer tools are not SQL Server. They are simply tools that enable you to con-
nect to the server in order to perform some action involving the server and
its databases. This is the reason that the tools need to be refreshed to reflect
new changes you have made. When you provide the security credentials
for your connection to SQL Server, you are supplying the credentials that
Enterprise Manager or Query Analyzer should use when you request a
connection to SQL Server. If you choose Windows Authentication, your
current Windows logon credentials will be used for the connection.
When you begin using each of these tools, the server that you want to
configure must be registered with the tool. During registration you provide
the user account and other required and optional information that is used
when you are connecting to the server. The security information you sup-
ply here is used as your security credentials while you are connected to
SQL Server. You will be limited in functionality based on the security infor-
mation you supply. The registration process is what keeps access to the
server through the management tools secure. You must register a local or
remote server before you can administer and manage it by using SQL
Server Enterprise Manager. When you register a server, you must specify:
■■ The name of the server.
■■ The type of security used to log on to the server.
■■ Your login name and password, if appropriate. (You could alterna-
tively use Windows Authentication. When you use Windows
Exploring Initial Security Parameters 77
Authentication, Windows 2000 Active Directory performs the autho-
rization of your username and password.)
■■ The name of the group where you want the server to be listed after it
is registered. The group is used to organize servers logically within
Enterprise Manager. This feature is useful in large environments
when you have to manage multiple servers. You can group the
servers logically to keep them organized in your management
interface. This grouping has no effect on the performance or
stability of the server.
NOTE When you register a server in Enterprise Manager, the SQL Server
service is automatically started and the status of the server is displayed.
When you run SQL Server Enterprise Manager for the first time, it auto-
matically registers all instances of a local SQL Server. The registrations are
set up with Windows Authentication as the connection property. If you are
a member of the system administrator’s server role, you will have access to
all of the features of SQL Server. If you have one instance of SQL Server
registered and then install more instances of SQL Server, only the original
instance of SQL Server will be registered. Multiple instances of SQL Server
can be registered after installation by performing the following steps:
1. From Enterprise Manager, right-click on a server or a server group
and then click New SQL Server Registration. This starts the Server
Registration Wizard.
NOTE If you selected the From Now on I Want to Perform This Task without
Using a Wizard checkbox the last time you used the Register Server Wizard, SQL
Server Enterprise Manager displays the Registered SQL Server Properties
dialogue box. Otherwise the Server Registration Wizard will begin.
2. In the Server box, type the name of the instance you want to register.
3. Select either Use Windows Authentication or Use SQL Server
Authentication. Windows Authentication will use your current
Windows login credentials. The SQL Server Authentication requires
a username and password. Click Next after making your selection.
4. In the Server Group list, click the server group where you want this
registration to be placed.
78 Chapter 3
NOTE If the server group you need does not exist yet, create it by clicking the
Build ( ) button and then completing the Server Groups dialogue box. Server
groups are used to organize the server registrations within Enterprise Manager.
5. You have the option of selecting one or more of the following, as
shown in Figure 3.3:
■■ Select the Display SQL Server State in Console checkbox to turn
on Service Polling.
■■ Select the Show System Databases and System Objects checkbox
to show all system databases and objects.
■■ Select the Automatically Start SQL Server when Connecting
checkbox to start an instance of SQL Server automatically.
When you connect to SQL Query Analyzer, you are not asked to register a
server; you are just presented with a login screen. Similar to Enterprise Man-
ager, you have the option to log in using Windows Authentication or SQL
Server Authentication, as shown in Figure 3.4. After connecting to the server,
you can use the Query Analyzer to type in your Transact-SQL statements.
Figure 3.3 You can use the Registered SQL Server Properties wizard to determine
whether to show your system databases in Enterprise Manager.
Exploring Initial Security Parameters 79
Figure 3.4 You must log in to the server before you can use SQL Query Analyzer.
Removing Registered Servers
Removing a registered server is easy. Remember, Enterprise Manager is
just a tool to connect to SQL Server. When you remove a server from Enter-
prise Manager, you are not affecting the server. You are removing the object
from your Enterprise Manager interface and disconnecting from SQL
Server. When you remove the server object from Enterprise Manager, your
connection and security settings of that server are removed. You are not
physically removing the server and you don’t affect anybody else who is
connected to the server.
80 Chapter 3
If you plan to re-register the server, you will need to supply your secu-
rity and connection settings again. You can perform the following steps to
remove a registered server running SQL Server.
1. From Enterprise Manager, click on SQL Server Group and then
right-click the server you want to remove.
2. Click Delete SQL Server Registration as shown in Figure 3.5.
3. Confirm the deletion.
Figure 3.5 A registered server can be removed from Enterprise Manager.
Exploring Initial Security Parameters 81
Best Practices
■■ Create a domain account to use for your SQL services account. The
local system account is very limited in network access.
■■ Use the same account for the SQL Server service and the SQL Server
Agent service in order to decrease confusion and minimize the
configuration of email integration.
■■ Use the same service account for all SQL Servers that need to inter-
act with others. Doing so will help ensure that replication and other
tasks will not fail in the future.
■■ Add the domain user account you are using for the service account
to the local administrators group on all SQL Servers. By doing so
you will have all the required permissions for the services to run
properly. This is also easier than configuring each folder and
Registry key with the appropriate security settings.
■■ Register the servers you need in Enterprise Manager. This makes it
easy to administer multiple servers from your desktop.
82 Chapter 3
Exploring Initial Security Parameters 83
REVIEW QUESTIONS
1. What is the purpose of the SQL Server Agent service?
2. What is a service account?
3. Why should you use a domain user account for your service account?
4. What is the purpose of a server group in Enterprise Manager?
5. What permissions are required in order to install a SQL Server instance?
6. Why would you want to create multiple instances of SQL Server on a
single machine?
7. What is the purpose of the SQL Server service?