Tài liệu MASTERING SQL SERVER 2000- P3 ppt
Bạn đang xem bản rút gọn của tài liệu. Xem và tải ngay bản đầy đủ của tài liệu tại đây (1.04 MB, 50 trang )
DB-Library Options Tab
One of the features that makes SQL Server such a powerful tool is the variety of meth-
ods that you can use to retrieve data from it. You can execute Transact-SQL code using
tools such as Query Analyzer or the OSQL command line tool, or you can write your
own custom programs. DB-library is one of the tools available for writing custom pro-
grams using a language like C++ or Visual Basic. DB-library is an application program-
ming interface (API), which is a collection of functions and commands that
developers can access through their own code.
Using APIs, developers do not need to rewrite code that Microsoft has already writ-
ten. This makes the developer’s job much easier. As Microsoft makes changes and
updates to the code in SQL Server, the DB-library API gets upgraded, which means
that you may occasionally need to get a new copy from the Microsoft Web site. To
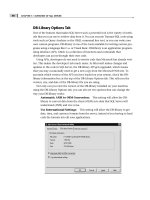
ascertain which version of the API you have loaded on your system, check the DB-
library information box at the top of the DB-Library Options tab. This tells you the
version, size, and date of the DB-library file you are using.
Not only can you view the version of the DB-library installed on your machine
using the DB-Library Options tab, you can also set two options that can change the
way your DB-library works:
Automatic ANSI to OEM Conversion: This setting will allow the DB-
library to convert data from the client (OEM) into data that SQL Server will
understand (ANSI) and vice versa.
Use International Settings: This setting will allow the DB-library to get
date, time, and currency formats from the server, instead of you having to hard
code the formats into all your applications.
CHAPTER 3 • OVERVIEW OF SQL SERVER
70
2627ch03.qxt 8/22/00 9:57 AM Page 70
Please purchase PDF Split-Merge on www.verypdf.com to remove this watermark.
71
Network Libraries Tab
The sole function of the Network Libraries tab is to display the version number and
date of the network library files that you have installed on your local system. If your
files are out of date, you can upgrade them by installing the latest service pack (dis-
cussed in Chapter 1). The best way to tell whether these files are out of date is to
check your version numbers on the Network Libraries tab and compare them with the
version numbers that Microsoft posts in the service pack readme file. A readme file
will contain information on all of the fixes and new file versions that come with the
service pack.
Server Network Utility
The Server Network Utility, located in the Microsoft SQL Server 2000 group in the Pro-
grams group on the Start menu, works much the same as the Client Network Utility in
that it is used to configure the net-libraries on which the server listens. The biggest dif-
ference that you may notice is the addition of the WinSock Proxy information. With
this proxy information, you can configure SQL Server to listen for client calls over the
Internet through a Microsoft Proxy Server. All you need to do is check the Enable
WinSock Proxy checkbox and supply the IP address or computer name of the proxy
server as well as the port number for the proxy server to listen on. The Network
Libraries tab here performs the same function as the Network Libraries tab in the
Client Network Tool.
PROGRAMS INSTALLED WITH SQL SERVER
Introducing SQL
Server
PART
I
2627ch03.qxt 8/22/00 9:57 AM Page 71
Please purchase PDF Split-Merge on www.verypdf.com to remove this watermark.
Service Manager
Having only one function, the Service Manager is a simple tool compared to the rest.
The Service Manager exists to start, stop, pause, and monitor the status of your SQL
Server services. The easiest way to get to this tool is by double-clicking the small
server icon in your Taskbar tray—or you can get to it from the SQL Server 2000 group
in Programs on the Start menu. Once opened, this tool can be used to start, stop, or
pause any of the four SQL Server services.
Distributed Transaction Coordinator: Primarily used to control trans-
actions that are distributed between multiple servers, this service is covered in
Chapter 8.
MSSQLServer: This service is the heart of SQL Server, because it performs
such functions as executing queries, managing access to data, and allocating
system resources (such as RAM and CPU).
SQLServerAgent: This service will be discussed in detail in Chapter 14, but
it controls automation. This service will execute tasks (such as backing up a
database) and send e-mail in the event of a problem.
Microsoft Search: This service creates and maintains full-text search
indexes. These indexes allow users to perform faster searches on fields of the
text datatype. We’ll discuss full-text search in Chapter 6.
CHAPTER 3 • OVERVIEW OF SQL SERVER
72
2627ch03.qxt 8/22/00 9:57 AM Page 72
Please purchase PDF Split-Merge on www.verypdf.com to remove this watermark.
73
NOTE
When you look at the icon in the system tray, you will notice a green arrow,
which means your service is running. If the arrow is red, your service is stopped. Yellow
means paused.
TIP
You can also perform Service Manager operations by right-clicking the Service Man-
ager icon in the system tray.
Profiler
Once you have successfully designed and deployed your databases, and your users are
accessing them on a regular basis for inserting, updating, and deleting data, you need to
monitor the server to make sure it is running the way it is supposed to. You need to know
such things as how fast the server is running, what sort of data the users are accessing,
and whether anyone is trying to hack into your server. In the SQL Server 2000 group in
the Programs group on the Start menu, you will find Profiler, a powerful monitoring tool
that can show you all of this information and a great deal more.
Using Profiler involves setting up event-monitoring protocols, called traces. An
event is anything that happens to a running system, such as a failed or successful
login, a query being properly routed and the results retrieved, or a report being run.
You can design each trace to look at specific aspects of the system, which you’ll get a
PROGRAMS INSTALLED WITH SQL SERVER
Introducing SQL
Server
PART
I
2627ch03.qxt 8/22/00 9:57 AM Page 73
Please purchase PDF Split-Merge on www.verypdf.com to remove this watermark.
chance to do in Chapter 26. By monitoring events, you can tell how the system is
being used and whether anything needs tweaking for greater efficiency.
NOTE
For more information on using SQL Profiler, see Chapter 24.
Query Analyzer
In Start ➣ Programs ➣ SQL Server 2000, you will find Query Analyzer, a graphic tool
that allows you to execute collections of Transact-SQL statements, called queries. Most
of the queries executed in Query Analyzer will be SELECT queries, designed to display
data stored in your database tables. Other examples of queries that you can execute
here might be DELETE queries, designed to remove data from your database, or
INSERT queries, which add data. Some of the queries you execute with this tool will
not modify your data; rather, they will modify the structure that holds your data.
These types of queries are referred to as data definition statements, and they are used to
accomplish such tasks as creating tables, indexes, views, users, etc. Any Transact-SQL
code that you need to run can be executed using this tool. However, that is only half
of what it does.
CHAPTER 3 • OVERVIEW OF SQL SERVER
74
2627ch03.qxt 8/22/00 9:57 AM Page 74
Please purchase PDF Split-Merge on www.verypdf.com to remove this watermark.
75
NOTE
Throughout this book, you will see the term query, which is a term used to
describe a request for data from SQL Server. This request is made using Transact-SQL state-
ments, usually a SELECT statement (which is designed specifically for the purpose of
retrieving data).
Query Analyzer not only executes Transact-SQL queries, it analyzes them as well
(thus the name). The analysis will tell you such things as how much CPU time the
query took to run, how much time it spent reading from the hard disk, etc. Once you
know how much time and resources your queries take to run, you can tune them
accordingly. If your queries run too slowly, you can rewrite them to make them run
faster (that discussion is in Chapter 6). If you take a look at Figure 3.1, you will see a
picture of Query Analyzer displaying the results of a query for all of the records in the
Authors table of the pubs database. The top half of the screen contains the actual
SELECT query, and the bottom half of the screen contains the results of that query,
called the result set.
FIGURE 3.1
Query Analyzer is
used to execute
Transact-SQL code
and display the
results.
PROGRAMS INSTALLED WITH SQL SERVER
Introducing SQL
Server
PART
I
2627ch03.qxt 8/22/00 9:57 AM Page 75
Please purchase PDF Split-Merge on www.verypdf.com to remove this watermark.
NOTE
When you first open Query Analyzer, you will see the Object Browser. We have
closed it for many of the examples in this book for the sake of simplicity.
You’ll learn how to use Query Analyzer in more detail in Chapter 5.
OSQL
OSQL is a command line tool that executes Transact-SQL code and displays the
results, just like Query Analyzer. Aside from the fact that Query Analyzer is graphical
and OSQL is a command line tool, there is only one small difference between the two:
OSQL does not have the ability to analyze queries and display statistics on speed of
execution. Other than that, the two tools perform much the same function, executing
Transact-SQL code. This begs the question, “Why use OSQL if you have Query Ana-
lyzer?” The answer is scheduling.
Suppose that you have a sales manager who needs to see daily figures on sales.
Because you cannot schedule Query Analyzer to run a command automatically, you
would need to instruct the manager how to execute a query in Query Analyzer so that
they could manually extract the data every night. Not many managers out there have
this kind of time on their hands, though. Another method you could consider is creating
a job to automate the task. A job is a series of steps that can be executed automatically by
SQL Server. One of those steps could be the query that extracts the data your manager
needs, but there is no way to get that data from a job to the manager. OSQL can be used
to run the query and save the data to a text file. The command can also be scheduled
(using such tools as the Windows NT AT command or a SQL Server job) to run automati-
cally. The manager can then read the text file whenever they want.
NOTE
OSQL runs in one of two modes: interactive or batch. Interactive mode func-
tions much like Query Analyzer in that it allows you to enter commands at a prompt, and
when you finish, you type EXIT. Batch mode sends a single command to the server and
returns a result set. Batch mode is used for automation.
Several arguments can be used to control the behavior of the OSQL program. All of
them are case-sensitive, which means that an uppercase E means something entirely
different than a lowercase e. The arguments that you can use are listed here:
-Uusername: To send queries to a SQL Server, you must gain access by log-
ging in. There are two ways to log in. One way is by using a trusted connection,
CHAPTER 3 • OVERVIEW OF SQL SERVER
76
2627ch03.qxt 8/22/00 9:57 AM Page 76
Please purchase PDF Split-Merge on www.verypdf.com to remove this watermark.
77
which means that SQL Server trusts Windows NT to verify your username and
password. The second way is by establishing a nontrusted connection, which
means that SQL Server must verify your username and password. The -Uuser-
name parameter tells SQL Server which user to log you in as using a nontrusted
connection. Therefore, if you want to log in as a user named Bob, the -U para-
meter would look as follows: -Ubob.
-Ppassword: This specifies the case-sensitive password to be used in con-
junction with the -U parameter. If you are logging in as Bob and your password
is doughnut, the -P parameter would look as follows: -Pdoughnut.
-E: This specifies a trusted connection, where SQL Server trusts Windows NT to
verify your username and password. This requires no username or password to be
entered because OSQL will detect the username and password you used to log on
to your computer, and use that same information to log you in to SQL Server.
-Sserver_name: This specifies the name of the server that you want to con-
nect to in order to perform queries. The -Slondon parameter, for example,
would connect you to a server named london.
-L: If you cannot remember the name of the server you want to connect to in
order to query, the -L parameter detects all of the SQL Servers on the network
and displays a list for you.
-e: This parameter will repeat (or echo) the commands that you type. If you
enter a query, for example, it will be repeated on the first line of the result set.
-p: This parameter will print performance statistics about the query executed. It
displays execution time, extracted records per second, and network packet size.
-n: In interactive mode, you normally see line numbers before each line of
text that you type as well as a > symbol. The -n parameter removes the line
numbers and the > symbol.
-ddb_name: This sets the database with which you will be working. If you
want to query one of the tables in the pubs database, for example, this parame-
ter would be -dpubs.
-Q“query”: This will execute the query encased in quotation marks and
immediately exit the OSQL program. Note that queries must be encased in
double quotes.
-q“query”: This also executes the query in quotes, but does not exit OSQL
after execution. Once the query is finished, you remain in interactive mode.
-ccmd_end: Ordinarily, when working in interactive mode, you must enter
the word GO on a line by itself to tell OSQL that you have finished entering
PROGRAMS INSTALLED WITH SQL SERVER
Introducing SQL
Server
PART
I
2627ch03.qxt 8/22/00 9:57 AM Page 77
Please purchase PDF Split-Merge on www.verypdf.com to remove this watermark.
code and it should be executed now. This is called a command terminator. Using
this parameter, you can set a different command terminator.
-hheaders: By default, you will see the names of the columns in the result
set printed only once, at the top of the result set. If this is not enough, you can
use the -h command to print the header more often. The -h5 parameter
reprints the names of the columns (the headers) every five lines.
-wcolumn_width: The default number of characters that are displayed on a
single line of output is 80. The -w parameter changes that to be more or fewer
characters. For example, -w70 would display only 70 characters on a line of
output.
-scol_separator: The default method of separating columns on the screen is
to use a blank space. Because this may be difficult for some people to read, you
can change the separator using the -s parameter. For instance, -s> would sepa-
rate your columns from one another using the > symbol.
-ttimeout: If a command fails while it is running (for example, the SQL
Server goes down), the command will run indefinitely by default. To change
that behavior, you can specify a timeout parameter. For example, -t5 would
instruct OSQL to time out after waiting 5 seconds for a response.
-merror_level: SQL Server recognizes several levels of error severity from 1 to
25; 1 is the lowest (reserved by SQL Server), 10 is informational (something
happened, but it’s not too bad), and 25 is the highest (your server is having a
stroke). The -m parameter tells OSQL which levels to display; for instance,
-m10 displays all level 10 errors and higher, but nothing lower.
-I: In interactive mode, you ordinarily place strings of text inside single
quotes (‘’). With this option set, you can encase text strings in double quotes
instead (“”).
-r {0 | 1}: Because not all error messages are printed to the screen, you can
use this parameter to redirect them to the screen. The parameter -r0 will display
error messages of 17 or higher, and -r1 will display all messages on the screen.
-Hwksta_name: With this parameter, you can specify the name of the com-
puter from which you are connecting. The default for this is the computer
name. However, if you are on a Windows NT machine that has both a com-
puter name (used by other Microsoft machines) and a hostname (used by Unix
machines and other TCP/IP hosts), you can instruct OSQL to connect as your
hostname rather than your machine name.
CHAPTER 3 • OVERVIEW OF SQL SERVER
78
2627ch03.qxt 8/22/00 9:57 AM Page 78
Please purchase PDF Split-Merge on www.verypdf.com to remove this watermark.
79
-R: Various settings control the process of converting currency, date, and
time values into character data to be displayed on the screen. The -R setting
instructs OSQL to use the client settings rather than the server settings to per-
form this conversion.
-iinput_file: SQL Server can accept a text file as an input parameter by using
the -i parameter. This means that you can enter all of your settings and your
query in a text file (using something like Notepad), and then, instead of enter-
ing all of the information on the command line every time, you can specify an
input file.
-ooutput_file: This will copy the result set to a text file, as opposed to the
screen (which is the default). The -oc:\output.txt parameter, for instance,
copies the result set from your query to a file named output.txt.
-u: This is used in conjunction with the -o parameter to specify that the out-
put file be stored as Unicode data rather than ASCII (the standard character set
that displays 256 characters). This is useful for companies that store data in
multiple languages.
-apacket_size: This specifies the amount of data (in kilobytes) that SQL Server
will send to or receive from OSQL at a time, called a packet of data. The default
size is 512KB, which works fine for most transfers, but if you are performing a
bulk insert of data from a large text file into a table, you may want to increase
this to 8192 (Microsoft recommends this based on their testing).
-b: This parameter instructs OSQL to exit to DOS and return a DOS error
level of 1 when a problem arises. DOS error levels can be used in batch files for
troubleshooting.
-O: This forces OSQL to behave more like its precursor, ISQL. This parameter
sets the default DOS ERRORLEVEL value to –1 and specifically turns off the fol-
lowing features:
EOF batch processing
Automatic console width scaling
Wide messages
-ltimeout: This specifies the amount of time that OSQL will wait for a login
to be verified. If this parameter is not specified, OSQL will wait indefinitely.
-?: This parameter will display a list of all the available switches to be used
with OSQL.
PROGRAMS INSTALLED WITH SQL SERVER
Introducing SQL
Server
PART
I
2627ch03.qxt 8/22/00 9:57 AM Page 79
Please purchase PDF Split-Merge on www.verypdf.com to remove this watermark.
Fortunately, you do not need to specify every parameter listed here to make OSQL
work. Let’s look at using OSQL to run a query and save the results to a text file:
1. To get to the command prompt, click your Start button, select Programs, and
click the Command Prompt icon.
2. To execute a query with OSQL, type the following command at the command
prompt:
OSQL –Sserver_name –dpubs –Q”select * from authors” –Usa –Ppassword
–ooutput.txt
3. Open output.txt with a text editor such as Edit. The result set should display
all of the records in the Authors table in the pubs database.
Another command line tool that may come in handy is BCP, the Bulk Copy Program.
Bulk Copy Program (BCP)
Once you have created databases in SQL Server, you will need to fill them with data. A
popular way to do this is by importing text files into your tables. If you opt for this
route, you can use the Bulk Copy Program (BCP), which is a command line tool
designed solely for the purpose of importing and exporting text files to and from tables
at the rate of about 2000 rows per second (for you Trekkies, that’s about WARP 9.9).
This program is still here to provide backward compatibility and is being replaced by
faster methods of import, such as the Bulk Import Transact-SQL command. This com-
mand will be discussed in more detail in Chapter 14.
Enterprise Manager
Many of the administrative tasks you perform with SQL Server will be accomplished
using Enterprise Manager. Using this tool, you can create databases and all of their
associated objects (tables, views, etc.). You can perform maintenance tasks such as
database backups and restorations. Server and database security can be maintained
from this tool, error logs can be viewed, and much more. When you first open Enter-
prise Manager, you should see something that looks like Figure 3.2.
CHAPTER 3 • OVERVIEW OF SQL SERVER
80
2627ch03.qxt 8/22/00 9:57 AM Page 80
Please purchase PDF Split-Merge on www.verypdf.com to remove this watermark.
81
FIGURE 3.2
Enterprise Manager is
used for many admin-
istrative tasks.
The tool that you are seeing in Figure 3.2 is actually the Microsoft Management
Console with an Enterprise Manager snap-in. The Microsoft Management Console
(MMC) is designed to conglomerate your applications so that you can manage all of
them from a single interface.
The application-specific tools that MMC hosts are called snap-ins. To manage a new
application with MMC, all you need to do is insert a snap-in. The snap-in is the most
basic part of the MMC, allowing you to access your programs. What you are seeing
when you look at the Enterprise Manager is the Enterprise Manager snap-in for the
Microsoft Management Console.
There are two panes in the Enterprise Manager, the contents pane on the right and
the tree pane on the left. By clicking the + icons next to the container objects in the
tree pane on the left, you can drill down to greater levels of detail. By examining the
contents pane, you will be able to see the objects contained in the container objects.
For example, if you click the + icon next to Microsoft SQL Servers, and then on SQL
Server Group, and finally on your server, you will see the same thing as in Figure 3.2.
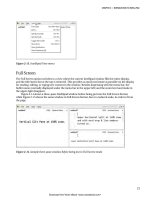
By expanding Databases, expanding pubs, and then clicking the Tables icon, you will
see the contents pane fill with the names of all available tables in the pubs database,
as shown in Figure 3.3.
PROGRAMS INSTALLED WITH SQL SERVER
Introducing SQL
Server
PART
I
2627ch03.qxt 8/22/00 9:57 AM Page 81
Please purchase PDF Split-Merge on www.verypdf.com to remove this watermark.
FIGURE 3.3
Displaying the pubs
database tables in
Enterprise Manager
As we journey through the rest of this book, you will be exposed to Enterprise
Manager on an ongoing basis and will gain a great deal of experience with it. Now
that you have a general overview of the tools available to you, you’ll need to under-
stand what you will be creating with those tools. Let’s take a look at the various parts
of a database.
NOTE
For more information on the capabilities of SQL Server Enterprise Manager, see
Chapter 9.
Parts of a Database
As Microsoft describes it, a database is an object that contains tables and other objects
that are combined to facilitate data retrieval. In essence that is true, but you can think
of a database as being more like a toolbox. If you own any amount of tools, you prob-
ably don’t just have them scattered about your property. If you did, you would have
no way of finding them when you needed them. Rather, you put them all in a tool-
box. Your wrenches go in the wrench drawer, screwdrivers in the screwdriver drawer,
CHAPTER 3 • OVERVIEW OF SQL SERVER
82
2627ch03.qxt 8/22/00 9:57 AM Page 82
Please purchase PDF Split-Merge on www.verypdf.com to remove this watermark.
83
and so on. When your tools are organized that way, you know exactly where to look
when you want a particular tool.
A database is like a toolbox in that it is useless by itself, but when you fill it with
other objects (tables, views, etc.), it serves a purpose by keeping those objects orga-
nized. Now when you want data, you know exactly where to go to get it. If, for
instance, you want accounting data, you go to the Accounting database and dig
through the accounting tables to find your data.
Because a database is primarily a conglomeration of objects, you need to under-
stand those objects before you can successfully use a database. Let’s look at some of
those now, starting with tables.
Tables
Tables are the objects in the database that actually store the data. Because all other
objects in the database depend on their existence, tables can be considered the build-
ing blocks of the database. The data stored in tables is organized further into fields
and rows. A field can be thought of as a vertical element in the table and contains
information of the same type, such as last name or zip code. Fields are organized into
columns. A record can be thought of as a horizontal element and contains informa-
tion that spans all of the fields in the table within a single row. One record in an
employee database, for example, might contain the last name, first name, address,
Social Security number, and hire date of a single employee. A spreadsheet, such as that
shown in Figure 3.4, may help you to visualize fields and records a little better.
FIGURE 3.4
Tables are organized
into fields and records.
Lastname
Varchar(25)
Jorden
Gunderloy
Spiller
Last Name
Field
Varchar
datatype
Firstname
Varchar(15)
Joe
Mike
Melanie
Joe Jorden Record
Address
Char(30)
12 Main St.
156 South 3rd
9087 Marina Parkway
Hiredate
Datetime
1/1/99
2/7/95
8/9/87
PARTS OF A DATABASE
Introducing SQL
Server
PART
I
2627ch03.qxt 8/22/00 9:57 AM Page 83
Please purchase PDF Split-Merge on www.verypdf.com to remove this watermark.
Each of the fields in a table can contain only one type of data, such as character or
numeric data. This aspect of the field is referred to as the column’s datatype. In the
example presented in Figure 3.4, you’ll notice that the address column has a datatype
of char (30), which means that this column holds 30 characters. If any numbers are
stored here, you will not be able to perform any mathematical functions on them
(such as adding or subtracting) without first converting the values stored in the field
to numeric data.
Once you have tables created in your database (which we’ll discuss in more detail
in Chapter 11), you can start creating other objects that depend on them, such as
views or stored procedures.
Views
Much like tables, views are comprised of fields and records. Unlike tables, views do not
contain any data. Views are always based on tables and are used to provide a different
perspective of the data stored in those tables. For example, suppose that you have a
human resources database that contains employee names, addresses, phone numbers,
Social Security numbers, and pay rates. The names, addresses, and phone numbers are
usually public information, but the Social Security numbers and pay rates are not
meant for the general populace. One way to secure this data so that only authorized
people can see it is by creating a view that does not contain the latter two columns and
setting permissions on the table and view. This way, only people with the proper
authority can read from the table itself, and everyone else can read from the view. You
can use the view method to store the data only once (in the table), but still have two
ways of looking at it. Figure 3.5 ought to help you visualize this a little better.
FIGURE 3.5
Views can display
select fields from a
single table.
Lastname
Jorden
Gunderloy
Spiller
Firstname
Joe
Mike
Melanie
Address
12 Main St.
156 South 3rd
9087 Marina Parkway
SSN
555-66-7777
666-77-8888
888-99-0000
Payrate
1.00
1.00
1.00
Lastname
Jorden
Gunderloy
Spiller
Firstname
Joe
Mike
Melanie
Address
12 Main St.
156 South 3rd
9087 Marina Parkway
CHAPTER 3 • OVERVIEW OF SQL SERVER
84
2627ch03.qxt 8/22/00 9:57 AM Page 84
Please purchase PDF Split-Merge on www.verypdf.com to remove this watermark.
85
Another valuable service provided by views is the combining of data from two or
more separate tables into one easy-to-read format. For instance, suppose that you
have two tables, one that contains customer information such as name, address, and
so on, and a separate table that contains information about what those customers
have ordered from you. If you want to see your customers’ names, addresses, and
details about what they have ordered, you can create a view that combines the two
tables and presents the data all at once, rather than executing two separate queries to
get the data. Figure 3.6 should help you visualize the concept.
FIGURE 3.6
View based on
multiple tables
TIP
Why not just store the data in the format that you’d like to view it in later? Because
the organization that makes the most sense to human beings may not make the most
sense for quick and error-free data storage and retrieval. The name for this notion is nor-
malization, and you can read much more about it in Chapter 4.
Stored Procedures
You already know that data is stored in tables and that you need to execute queries to
read the data in the tables. But where should those queries be stored? One place to
store them is in a database on the server. Such stored queries are called stored proce-
dures. You could also store the queries in the code on the client machines, or you
could allow the users to generate these queries themselves using Query Analyzer;
CustID
1
2
3
Name
Bob Smith
John Doe
Sam Jones
QTYordered
27
32
56
CustID
1
2
3
Product
Screws
Bolts
Wingnuts
QTYordered
27
32
56
CustID
1
2
3
Name
Bob Smith
John Doe
Sam Jones
Address
12 First
17 Main
145 3rd
This view pulls data
from multiple tables
and presents it all in
one place
PARTS OF A DATABASE
Introducing SQL
Server
PART
I
2627ch03.qxt 8/22/00 9:57 AM Page 85
Please purchase PDF Split-Merge on www.verypdf.com to remove this watermark.
these are called ad hoc queries. Stored procedures are generally preferred because of the
problems that are inherent with the spontaneity of ad hoc queries.
The first problem is that all of your users will be performing queries to get the data
out of the tables, all of those queries will be traversing the network, and all will cause
network traffic. If all of those queries contain several lines of text, you can imagine
the havoc that would be wreaked on your bandwidth.
Another problem caused by ad hoc queries is that they can also slow SQL Server
down. When an ad hoc query is sent to SQL Server the first time, it cannot be exe-
cuted right away; it must first be compiled. To compile a query, SQL Server must read
the query and figure out the fastest way to execute it by comparing the query to the
available indexes. The process of compiling takes system resources (such as CPU time
and RAM) and slows the system down.
NOTE
To accelerate query processing speed, SQL Server uses indexes. Indexes speed
up data access by keeping a list of all the values in one or more fields of a table and point-
ers to where the records that contain those values are located. Indexes are discussed in
detail in Chapter 12.
An interesting fact about users is that most of them want to see the same data as
everyone else, which means that all of your users are sending the exact same queries
to the SQL Server over the network. Instead of having each of your users send the
same query a bunch of separate times over the network, you can store the query on
the server (called a stored procedure) and have the users send a simple command to
have SQL Server run the stored procedure. This way, instead of sending several lines
of text over the network and wasting bandwidth, your users send a simple, one-line
command: execute stored_procedure. These stored procedures are also precompiled,
which means that you are saving system resources as well.
NOTE
For a detailed discussion of stored procedures, please see Chapter 14.
Diagrams
When you looked at the tables container in the pubs database earlier in this chapter,
chances are that you did not find it very easy to look at. That is a natural reaction for
most people: People don’t like staring at long lists trying to find what they need. That
is why there are database diagrams.
CHAPTER 3 • OVERVIEW OF SQL SERVER
86
2627ch03.qxt 8/22/00 9:57 AM Page 86
Please purchase PDF Split-Merge on www.verypdf.com to remove this watermark.
87
A database diagram is a graphical representation of a database that shows all of the
objects in the database and how they relate to one another. Using a diagram, you can
change table structure (for example, adding fields), relate them to other tables, and
even create new indexes for them (all of which are discussed later). Without these dia-
grams, you would need to find each object individually in its own container and try
to work with each separately, a mind-numbing task indeed. The following graphic
shows what a diagram of the pubs database might look like.
NOTE
You’ll learn more about creating and using database diagrams in Chapter 11.
Database User Accounts
As mentioned earlier, most companies store data that is not meant for the general
populace of the company. Not everyone is privy to pay rates and Social Security num-
bers, for instance. So how do you keep prying eyes out of places they don’t belong?
With database user accounts.
PARTS OF A DATABASE
Introducing SQL
Server
PART
I
2627ch03.qxt 8/22/00 9:57 AM Page 87
Please purchase PDF Split-Merge on www.verypdf.com to remove this watermark.
To access SQL Server, users must have what is called a login account. There are two
types of login accounts that you can give to your users: standard and integrated. An
integrated account is also referred to as a trusted connection, because with this type of
login, SQL Server trusts Windows NT to verify the username and password. This type
of login can be used only for Microsoft clients, such as Windows 98 or Windows NT.
Standard accounts do not trust Windows NT to verify account information and there-
fore are useful for clients that do not have a Windows NT account, such as Macintosh
or Unix clients. Either type of login account will let your users access SQL Server as a
whole, but not the individual databases.
To give users access to individual databases, you must create a database user account
for them in each database where they require access. For example, suppose that you
have a user named Bob who requires access to the Accounting database, but is not
allowed to access the Sales database for any reason. To grant Bob access to the Account-
ing database, you would create a database user account in the Accounting database.
This database user account will allow Bob access to the Accounting database. Because
you do not want Bob to access the Sales database, if you don’t create a database user
account for him in the Sales database, he won’t be able to get in without it. This is just
an overview, of course. Security will be discussed at length in Chapter 18.
Database Roles
Many large companies have thousands of users, assigned organizationally into vari-
ous departments. Each of the people in the various departments requires access to the
same segments of information. For instance, accounting personnel all need access to
the accounting data, sales personnel need access to the sales data, and so on. There
are two ways to get users the access they need. The first way is to create user accounts
for each and every one of the users (which you have to do anyway) and then individ-
ually grant permissions to each user. The second and much easier way is to create the
user accounts and assign the accounts to roles in the database.
A role is a predefined set of permissions to which you can add users. Once the user
is a member of a role, they inherit the permissions of that role, and you need not
individually assign them permissions. For example, if everyone in your accounting
department needs to be able to read data from the accounting tables, you could assign
the individual users’ accounts to a role that already has the appropriate permission—
and voila, they are able to read the data.
CHAPTER 3 • OVERVIEW OF SQL SERVER
88
2627ch03.qxt 8/22/00 9:57 AM Page 88
Please purchase PDF Split-Merge on www.verypdf.com to remove this watermark.
89
User-Defined Datatypes
As discussed earlier, each of the fields in a table can contain only data of a certain
type referred to as the datatype. SQL Server has several built-in datatypes, including:
bit: Integer data with either a 1 or a 0 value.
int: Integer (whole number) data from –2
31
(–2,147,483,648) through 2
31
– 1
(2,147,483,647).
smallint: Integer data from –2
15
(–32,768) through 2
15
– 1 (32,767).
tinyint: Integer data from 0 through 255.
decimal: Fixed precision and scale numeric data from –10
38
– 1 through
10
38
– 1.
numeric: A synonym for decimal.
money: Monetary data values from –2
63
(–922,337,203,685,477.5808)
through 2
63
– 1 (922,337,203,685,477.5807), with accuracy to a 10,000th of a
monetary unit. This monetary unit can be set by adding any one of the follow-
ing units of measure:
• Dollars
• Pounds
•Yen
• Bengali Rupee
• Thai Baht
• Euro-Currency
• Cruzeiro
• Franc
• Lira
• Nira
• Peseta
•Won
• New Sheqel
• Dong
smallmoney: Monetary data values from –214,748.3648 through
214,748.3647, with accuracy to a 10,000th of a monetary unit. This uses the
same monetary units as money.
float: Floating precision number data from –1.79E + 308 through 1.79E + 308.
PARTS OF A DATABASE
Introducing SQL
Server
PART
I
2627ch03.qxt 8/22/00 9:57 AM Page 89
Please purchase PDF Split-Merge on www.verypdf.com to remove this watermark.