mastering sql server 2000 security PHẦN 8 pdf
Bạn đang xem bản rút gọn của tài liệu. Xem và tải ngay bản đầy đủ của tài liệu tại đây (1.12 MB, 47 trang )
Figure 12.3 Members of the OLAP Administrators group can fully administer your Analysis
Server.
The administrative security model of Analysis Server is not very
detailed, but you should keep the following considerations in mind:
■■ The user account that was used to install Analysis Server is automat-
ically part of the OLAP Administrators group.
■■ All administrators are given the same privileges.
■■ Analysis Server security depends on Windows Authentication.
■■ Administrators have full access when connecting through Analysis
Manager or any other client.
User Authentication Security
Users can connect to Analysis Server through two different means. The
client can either directly connect to Analysis Server or the client can use
Internet Information Server (IIS) to connect to the server. Adirect connection
is made when the user attempts to connect to an Analysis Server by inter-
facing without using a middle tier. The client access completely depends
Exploring Analysis Services Security 295
on Windows Authentication. You don’t have a choice to supply anything
else. If your connection string offers a username and password that is not
the current Windows login information, the connection string is ignored. If
the user has not logged on to the Windows domain, the user will not have
access to Analysis Server.
A connection is made through IIS when the user request is first made to the
IIS server using an HTTP request. When the user connects through IIS,
Analysis Server relies on the authentication of the Web server. If the user
connection to IIS is unsuccessful, then binding to Analysis Server fails. IIS
has several different authentication modes, which are addressed in more
detail in Chapter 15, “Managing Internet Security.”
Roles
Database roles in Analysis Server are not the same objects as database roles
in SQL Server. Both types of roles are similar in that they group users.
However, Analysis Server database roles can only have Windows 2000
users and groups as members. For the remainder of this section, the context
of roles is the Analysis Server. Roles in Analysis Server have the following
characteristics:
■■ Roles can be created at the database and cube levels.
■■ Roles are used to grant Windows users and groups access to a data-
base or cube. The following section details the differences between
the two types of roles.
■■ Roles must be manually created. There are no default database or
cube roles.
■■ Roles that are created at the cube level are automatically added at
the database level. All roles that are configured for a cube can also
be used with other cubes in the same OLAP database.
■■ Roles are database specific. You cannot use the same role for multi-
ple databases. The role is created as an object within the database,
making it inaccessible to other OLAP databases.
Database Roles
Database roles give Windows users and groups access to an OLAP data-
base. Within the Database Role Manager utility, you can specify the
following properties.
296 Chapter 12
■■ The Role name is the identifier for the role. It can be up to 50 charac-
ters in length. This name can’t be changed after the role is created.
The only option for changing names is removing the role and
recreating it.
■■ The Enforce On property determines where the roles should be
enforced. You can set a role to be enforced at the server or client
level. The default is to enforce the role at the client. Client enforce-
ment increases the performance by decreasing the number of round
trips to the server. Server enforcement, while slower, is more secure
because it guarantees that the client checks the current server settings.
■■ The Membership adds the Windows users and groups that will be
part of the role.
■■ The Cubes option tab identifies the cubes at which this role is
assigned.
■■ The Mining Models tab identifies the data mining models at which
this role is defined.
■■ The Dimensions tab restricts access to specific dimensions and their
members. This section only displays shared dimensions. Although
this setting allows you to set security at a very granular level, it also
increases the complexity to your security configuration. Whenever
possible, it is best to limit your security to the cube level.
NOTE If you need to limit access to specific dimensions, consider creating
virtual cubes to assist with security. When you create the virtual cube, don’t
include the dimensions that you need to restrict access to. Assign the role to
the virtual cube and not the regular cube. By using this strategy, virtual
cubes can assist you in decreasing the administrative overhead of security
management. Virtual cubes are discussed in the Introduction to Cubes section
earlier in this chapter.
Database roles are created and managed through Analysis Manager. You
should perform the following steps to create a new database role:
1. Open Analysis Manager.
2. Expand your server.
3. Expand the database for which you want to create the role.
4. Right-click Database Roles and choose Manage Roles. The Database
Role Manager dialogue box should appear as shown in Figure 12.4.
Exploring Analysis Services Security 297
Figure 12.4 The Database Role Manager dialogue box creates and manages OLAP
database roles.
5. Click New to create a new role, and then supply the name and other
properties of the role.
6. Click the OK button to create the new role.
Cube Roles
The purpose of the cube role is to define user and group access to a cube.
Cube roles can be created for normal or virtual cubes. The process of creat-
ing cube roles is similar to that of creating database roles. You need to start
the role creation configuration process from the cube instead of the data-
base. The dialogue box is similar, and most of the properties are the same.
The following additional properties define a cube role:
■■ Cell security can be defined from a cube role. More information on
cell security is found in the next section Dimension and Cell Security.
■■ Cube roles allow you to define drillthrough, cube linking, and SQL
query permissions. Drillthrough allows users of this role to drill
through the cube. Drillthrough is the process of requesting data at a
more detailed level of the cube and the request being processed by
298 Chapter 12
the source data warehouse database. Cube linking allows role mem-
bers to link to this cube from a remote machine. Linking provides a
mechanism to store and access cubes across multiple servers. SQL
query permissions allow the cube to be queried via Transact-SQL
statements.
■■ The Cube Role Manager can be used to define security for both
private and shared dimensions. Private dimensions can only be
used in the cube in which they are created. All cubes in an OLAP
database can access shared dimensions. Shared dimensions are then
managed once for all cubes that use them. Roles created and modi-
fied at the database level only allow for security control over shared
dimensions.
Dimension and Cell Security
After you have defined the security model for your OLAP databases and
cubes, you have the choice of implementing dimension and cell security
options. Dimensions and cells are more granular than databases and cubes,
and therefore setting security at this granular level adds complexity to
your system. You should document all cases in which you define addi-
tional security options (dimension or cell.) The following sections detail
the options you have available through dimension and cell security.
Dimension Security
Dimension security can be implemented as a property of either a database
role or a cube role. Therefore the property is viewed through the role edi-
tor for either a database or cube. The dimension options are more detailed
than that of cube security and are modified through the Custom Dimen-
sion Security dialogue box as shown in Figure 12.5. The following options
are available from the Custom Dimension Security dialogue box:
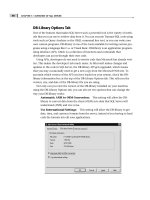
■■ Select Visible Levels determines the top and bottom levels that will
appear for the members of the role. When a dimension is defined,
you configure the levels at which the dimension can be analyzed.
For instance, a time dimension may include year, quarter, month,
and day as levels. The visible levels security option allows you to
determine what appears as the top and bottom levels to the members
of this role. To extend the example, you could configure this role to
see quarter as the top level and month as the bottom level.
Exploring Analysis Services Security 299
Figure 12.5 The Custom Dimension Security dialogue box controls the levels and
members that a role can access.
■■ Select Members limits the members that can be viewed from the
dimension of the cube. A member is the value of a level. For our
time example, the members of year may be 1997, 1998, 1999, 2000,
and 2001. In this case you could further restrict this role to only see
the member 2001. Although this option is beneficial in some cases,
member-level security can be time-consuming because of the
number of members you may have to account for.
■■ The MDX builder is available from the advanced tab. You will notice
that as you add dimension and member-level security options the
multidimensional expressions (MDX) statements are being built
for you.
NOTE MDX is the statement language used to query data from your cubes. It
is multidimensional in nature, which provides additional flexibility over
Transact-SQL. More information about MDX can be found in SQL Server Books
Online.
300 Chapter 12
■■ Visual Totals is available from the Common tab and affects the way
that the data is calculated. By default, all member values are calcu-
lated regardless of whether the role can view the member information.
When you enable this setting the members that are not visible are
not included in your aggregation.
■■ Default Member is also available from the Common tab. This setting
configures the default member for this role. If the user doesn’t spec-
ify a member, the default member will be displayed automatically.
Cell Security
Cell-level security is the most granular level available for security configura-
tion. The cell security is configured through the Cells tab in the Edit a Cube
Role dialogue box as shown in Figure 12.6. There are three types of cell
security: Read permission, Read Contingent permission, and Read/Write
permission. The following items define these permission options:
Figure 12.6 Cell security is the most detailed level of security available in Analysis Server.
If you change the default values, document the changes you implement to assist in
troubleshooting later.
Exploring Analysis Services Security 301
■■ Read permission is used to determine the cells that are viewable by
this role. The valid settings are Unrestricted, Fully Restricted, and
Custom. Unrestricted leaves the cells with no security restrictions.
All data can be viewed by the users. Fully Restricted denies access
to all cells. Custom allows you to write an MDX statement to
determine the cells that are viewable.
■■ Read Contingent permission has the same options for configuration as
the Read permission. Read Contingent tells Analysis Server to check
the access to the source cells of the cell you are trying to view. If you
have access to the source cells you will be able to view the cell. If
you don’t have access to the source cells you are restricted from
access to the target cell. A source cell is a piece of data that is stored
directly from a fact or dimension table. A target cell is a calculated
cell based on one or more source cells, and possibly other mathemat-
ical equations.
■■ Read/Write permission is used to determine whether the role can read
and write to the cube. This depends on whether the cube was first
enabled for write-back. If the cube that the cell resides in is not
configured for write-back, then this permission doesn’t matter.
NOTE Write-back allows modifications to the cube. These modifications do
not update the data source; they are stored in a write-back table. This feature
must also be supported by your client application. Excel and Web browsers do
not support write-back; so unless you purchase a third-party product that is
write-back enabled, write-back is not a viable option. Many third-party
vendors use the write-back table to create what-if scenarios.
302 Chapter 12
Best Practices
■■ Spend an appropriate amount of time designing your data ware-
house. Your design is the key to an efficient OLAP database.
■■ Define an appropriate level of grain for your fact table. An overly
detailed grain results in an overload of data, which results in the use
of more hard drive space and slower response times. However, if
you don’t choose the grain at a level that is detailed enough, the
users won’t have access to the data they need to analyze. Your grain
should match user analysis requirements.
■■ Strive to design a star schema. All of the dimension tables should be
one step away from the fact table. This is not possible in all cases,
but you should strive to make it happen where possible.
■■ Use MOLAP for your cube storage. MOLAP is fast and efficient for
user queries. MOLAP requires more drive space, so plan your hard-
ware accordingly. The other storage options should be used when
lack of drive space is an issue.
■■ Create partitions to separate your data that is most often queried.
Partitions allow you to physically separate your data so that queries
only have to traverse the data that is meant for them.
■■ Try to set security options at the database and cube level. Dimension
and cell-level security increase the complexity and are not appropri-
ate for most cases. Keep in mind that the more complex your secu-
rity design is, the tougher it will be to troubleshoot when you have
problems.
■■ Use virtual cubes to limit user access to dimensions. Virtual cubes
can be a subset of a cube. If you don’t want a role to see certain
dimensions, create a virtual cube that does not include the dimen-
sion you want to hide. You should then give the role access to the
virtual cube instead of the regular cube.
■■ Limit access to the OLAP Administrators group. All members of this
group have full access to everything within Analysis Server. There
are no multiple levels of administration.
Exploring Analysis Services Security 303
304 Chapter 12
REVIEW QUESTIONS
1. What are the core components of Analysis Server?
2. What is the purpose of data mining?
3. What is the difference between a data warehouse and OLAP?
4. Why should you use a star schema instead of a snowflake schema when
designing your data warehouse?
5. Why is the grain of the fact table so important?
6. What is a cube?
7. What are the differences between ROLAP and MOLAP?
8. Why should you consider partitions when designing a cube?
9. At what levels can roles be defined in Analysis Server?
10. What are the advantages and disadvantages of dimension-level and
cell-level security?
305
The current connections to your SQL Server affect the stability and perfor-
mance of your server. Every connection is given its own execution context,
which is a section of memory dedicated for the connection to exercise its
statements. SQL Server manages these connections for you automatically.
Each transaction performed by a connection is also managed by the trans-
action log-writing architecture of SQL Server. Within Enterprise Manager
you can use the Current Activity window to view and manage the current
connections to your server. You can also use Enterprise Manager to view
the locks that have been set by SQL Server to avoid concurrency problems.
In most cases the default methods of managing transactions are appropri-
ate. This chapter focuses on the architecture that SQL Server uses to man-
age current user connections.
This chapter first tackles security concerns related to current activity.
This topic has to be discussed first because, when addressing current activ-
ity, it is more important to know what is not available to you than to under-
stand the features that are available. The chapter next provides a
transaction log overview. The transaction log is used to write transactions
before they are written to the data files. Within this section the checkpoint
process and the Recovery models of SQL Server are introduced, among
Managing Current Connections
CHAPTER
13
other architecture issues. The chapter then moves to a description of SQL
Server’s concurrency architecture, specifically the locking methods that are
used to protect data from being modified by multiple users at the same
time. The integrity of your data depends on the concurrency architecture of
SQL Server. Locking is SQL Server’s method of protecting the data that a
user is modifying.
The chapter then addresses the options for monitoring the current activ-
ity of your SQL Server. This section includes the options that are available
in Enterprise Manager as well as the system-stored procedures that can be
used for monitoring. Throughout this chapter, the architecture is described
to help explain the current activity options in SQL Server. Additionally, the
chapter identifies the items that are not available in SQL Server 2000.
Knowing what is not available is beneficial in planning and setting expec-
tations for the system. Effective security management depends on know-
ing what is not available as well as the features that are available. After you
read this chapter you will have a clear understanding of the transaction log
architecture of SQL Server as well as the options you have for controlling
the current connections on your SQL Server.
Security Concerns
When addressing the current activity of your SQL Server, it is important to
note that most of your security considerations are set up for in the design
and planning phase. You don’t have as much control as you may like. You
should know the architecture and what the system can do as you set your
expectations. The following security considerations should be evaluated
with regard to the current activity of SQL Server:
■■ Without a third-party utility you can’t view the logical structure of the
transaction log. Although you can see the files that are in use, you can’t
view the user transactions in the order in which they are logically writ-
ten in the log. But several third-party products enable you to analyze
the log. More information on some of these products can be found in
Appendix B, “Third-Party SQL Server Security Management Tools.”
The fact that you can’t directly view the transaction log is a security
concern more from the standpoint of what you can’t do than what you
can do. For example, if a user performs a transaction that updates
records to values that are incorrect, you have no recourse for rolling
back that transaction if the transaction has already been committed to
the log. Instead you have to manually change the data back or restore
your database to the time just before the faulty transaction occurred.
306 Chapter 13
■■ The locking architecture of SQL Server enforces security by pre-
venting users from updating data that is currently in use by another
user. The default locking mechanisms of SQL Server are appropri-
ate for most cases. You should consider manually overriding the
locking options only when you are not getting the results you want.
To avoid deadlocks you should access the tables of your database in
the same order for all transactions. For example, if you have cus-
tomers, sales, and inventory tables on your system, you should
determine the order in which all transactions should interact with
the tables. If all transactions interact with tables in the same order,
you will minimize locking problems with your data. Deadlocks are
described in more depth later in this chapter in the Locking Architec-
ture section.
■■ You can use the Current Activity window of Enterprise Manager to
view current processes and connections. Doing so can be valuable in
verifying user connections that are not wanted on the system. You
can also send a message to a user or kill a user process to disconnect
a user from a resource. The process of killing a user process is
described later in this chapter in the Current Activity section.
■■ When the user connected to SQL Server is part of a group that has
been granted access to SQL Server, the name that appears in Enter-
prise Manager is the group name. If you want to track information
back to the Windows account, you will need to use the SQL Profiler
utility. More information on SQL Profiler can be found in Chapter
14, “Creating an Audit Policy.”
■■ Sp_who, sp_lock and KILL Transact-SQL statements can be used to
view and manage current activity on SQL Server. More information
on the implementation of these statements is found in the Current
Activity section.
Transaction Log Overview
Each SQL Server database has a transaction log that records the transac-
tions that take place and the modifications performed in each transaction.
As a user performs work against the database, the record of the work is
first recorded into the transaction log. Once the user has successfully writ-
ten the data to the transaction log, the user is allowed to perform addi-
tional actions. The record of the modifications within the transaction log
has three purposes:
Managing Current Connections 307
Recovery of single transactions. If an application issues a ROLL-
BACK statement or if SQL Server detects an error in the processing of
a transaction, the log is used to roll back the modifications that were
started by the transaction. The developer can maintain consistency
throughout the entire transaction regardless of the number of SQL
statements that are included in the transaction.
Recovery of all uncommited transactions when the SQL Server ser-
vice is started. When SQL Server is stopped in a friendly manner, a
checkpoint is performed on every database to ensure that all com-
mited transactions are written to the database. More information on
the checkpoint process is addressed later in this chapter in the section
titled Checkpoint Process. If SQL Server is not stopped in a friendly
manner and fails immediately (power failure, hardware failure, and
so forth), the checkpoint doesn’t have time to run. As a result the sys-
tem can be left with transactions in the transaction log that are com-
pleted by the user but have not been written to the data file. When
SQL Server is started, it runs a recovery of each database. Every mod-
ification recorded in the log that was not written to the data files is
rolled forward (written to the database). A transaction that was not
completed by the user but is found in the transaction log is then
rolled back to ensure the integrity of the database.
Rolling a restored database forward to the point of failure. After the
loss of a database owing to a hardware failure or corrupted data files,
you can restore your backups. After you have restored the appropri-
ate full, differential, and transaction log backups, you can recover
your database. When the last log backup is restored, SQL Server then
uses the transaction log information to roll back all transactions that
were not complete at the point of failure.
The transaction log is implemented on the hard drive. These files can be
stored separately from the other database files. The log cache is managed
separately from the buffer cache for data pages. This separation facilitates
a speedy response time for the user. You can implement the transaction log
on a single file or across several files. You can also define the files to auto-
grow when they fill up. The autogrow feature avoids the potential of run-
ning out of space in the transaction log.
This section first introduces the architecture of the log file, detailing both
the logical and physical architecture of the transaction log. The section then
introduces the write-ahead log features and the checkpoint process. Next
the section identifies the Recovery models of SQL Server. Finally, this sec-
tion addresses the maintenance of the transaction log file.
308 Chapter 13
Transaction Log Architecture
Each database in SQL Server has its own transaction log. Each log needs to
be monitored and maintained to ensure optimal stability and performance
from your SQL Server databases. The transaction log is responsible for the
integrity of each transaction that is performed against your server. Addi-
tionally, the transaction log provides a backup copy of the transactions that
are made to your database. With the transaction log and the database files,
you have two copies of each modification that is made to your database.
The transaction log helps to provide fault-tolerant protection against sys-
tem failure.
The transaction log architecture is made up of two separate views, or
architectures: logical and physical. The logical architecture of the log pre-
sents the individual transactions that are performed against the data.
Regardless of where the transaction is physically stored, the logical view
presents all transactions serially. The physical architecture of the log consists
of the files that reside in the operating system. These files are used to write
the data and assist in presenting the data to the logical view. The following
sections introduce the characteristics of the logical and physical views.
NOTE At the current time Microsoft does not ship a utility that enables you to
view the contents of the transaction log. You can view the size of the log and the
number of transactions currently in the transaction log, but the actual statements
that have been performed against the log are not available. You can purchase
third-party utilities that allow you to open and view the transaction log. You can
use these log analyzer utilities to roll back individual user transactions that have
already been committed to the database. The log analyzer utilities provide you
with a level of security management that is unavailable with the tools included
with SQL Server. More information about these utilities can be found in Appendix
B, “Third-Party SQL Server Security Management Tools.”
Logical Archictecture
The transaction log records in serial fashion modifications that are made to
the data. Logically the first record is recorded as being at the beginning of
the log, and the most recent modification would be stored at the end of the
log. A log sequence number (LSN) identifies each log record. Each new log
record is written to the logical end of the log with an LSN higher than the
LSN of the record before it.
A log record may not be just a single statement. Log records for data
modifications record either the logical operation performed or the
Managing Current Connections 309
before-and-after images of the modified data. Before-and-after images are
used in instances where the data has been updated. A “before” image is a
copy of the data before the update is applied, and an “after” image is a
copy of the data after the operation is applied.
Every transaction that is sent to the SQL Server can result in many items
being written to the log. The types of events that are stored in the log include:
■■ The start and end of each transaction
■■ Every INSERT, UPDATE, and DELETE statement
■■ All OBJECT creation statements
Transactions are written to the log in sequential order. Along with the
transaction, the ID of the transaction and the date and time the transaction
was performed are stored in the transaction log. These data allow the
transaction log to maintain a chain of all the events that are associated with
a single transaction. If necessary, the system can use the chain of events for
a transaction to roll back the transaction. If a single step within the transac-
tion fails, the system can use the transactional information from the log to
roll back the transaction. A transaction rollback erases the events of the
transaction as though it never existed. The transaction log secures your
system by guaranteeing the consistency of your transactions. For example,
if you have a transaction that transfers data from your checking account to
your savings account, the transaction would have to include two update
statements. One of the update statements has to subtract money from the
checking account record. The other update statement has to add money to
the savings account record. The integrity of your entire system depends on
this process happening completely. If one of the updates fails, you want
both of them to be erased. The transaction log is used to help guarantee this
transactional consistency and protect your system from partially commit-
ted (incomplete) actions.
As a transaction is written to the log, it must also reserve space within
the transaction log to store the information needed to roll back the transac-
tion. All events involved in a rollback are also written to the transaction
log. In general, the amount of space needed to roll back a transaction is
equivalent to the amount of space taken for the transaction.
Physical Architecture
The transaction log is a physical file or a set of files. The files that are used
for a database are defined when the database is created or altered. The
information that is written to the log has to be physically stored in the log
files. SQL Server 2000 segments each physical log file internally into a
number of virtual log files. As an administrator or developer you typically
310 Chapter 13
do not see the virtual log files. Virtual log files are not a fixed size. SQL
Server dynamically allocates the space for each virtual log file based on the
size of the log and the intended rate of usage. SQL Server attempts to main-
tain a small number of virtual log files.
Transaction log files can be configured to autogrow when the transaction
log fills up. The amount of growth can be set in kilobytes (KB), megabytes
(MB), gigabytes (GB), terabytes (TB), or a specified percentage. The auto-
grow properties can be set when a database is created or altered. You can
set the parameters by either using the ALTER DATABASE command in
Transact-SQL or entering the values in Enterprise Manager. The following
steps can be taken to modify the autogrow parameters of a database from
Enterprise Manager:
1. Open Enterprise Manager.
2. Click to expand your server group.
3. Click to expand the server where your database resides.
4. Click to expand the Databases container.
5. Right-click on the database you want to alter and select Properties.
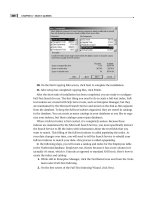
6. Click the Transaction Log tab. This should appear as shown in
Figure 13.1.
7. In the bottom left-hand corner you can alter the Automatically
Grow File parameters.
8. Click OK to set the new parameters.
Figure 13.1 Enterprise Manager can alter the properties of a database’s transaction log.
Managing Current Connections 311
Write-Ahead Transaction Log
SQL Server uses a write-ahead transaction log. This means that all modifi-
cations are written to the log before they are written to the database.
All modifications have to perform their action against a piece of data that
is stored in the buffer cache. The buffer cache is an area of memory that stores
the data pages that users have retrieved to modify or analyze. The modifi-
cation of a record is performed first on a copy of the data that is stored in the
buffer cache. The modifications are stored in cache and are not written to
the data files until either a checkpoint occurs or the modifications have to be
written to disk because the area of memory that is caching the modifications
is being requested for a new data page to be loaded. Writing a modified data
page from the buffer cache to disk is called flushing the page. A page modi-
fied in the cache but not yet written to disk is called a dirty page.
At the time a modification is made to a page in the buffer, a log record is
built into the log cache and records the modification. The log record must
be written from the log cache to the transaction log before the data page is
flushed. If the dirty page were flushed before the log record, the transac-
tion log would not have a complete record of the transaction and the trans-
action could not be rolled back. The SQL Server service prevents a dirty
page from being flushed before the associated log record is written from
cache to the log file. Because log records are always written ahead of the
associated data pages, the log is referred to as a write-ahead log.
Checkpoints
Checkpoints are used to verify that the transactions that have been com-
pleted in the log are written to the database. A checkpoint keeps track of all
the transactions that have been written to the database and all the transac-
tions that were not completed at the time of the checkpoint. The checkpoint
process is used to help maintain a reference point to track the data that has
been written to the database file. Checkpoints are used to minimize the
portion of the log that must be processed during the recovery of a database.
When a database is in recovery, it must perform the following actions:
■■ The log might contain records that were written to the log but not
written to the data file yet. These modifications are rolled forward
(applied to the data file).
■■ All transactions that were partially completed when the service
stopped are rolled back (erased as though they never existed).
Checkpoints flush dirty data and log pages from the buffer cache to the
data files. A checkpoint writes to the log file a record marking the start of
312 Chapter 13
the checkpoint and stores information recorded for the checkpoint in a
chain of checkpoint log records. Checkpoints occur automatically in most
cases, including under the following scenarios:
■■ A CHECKPOINT statement is executed by a user or application.
■■ An ALTER DATABASE statement is performed.
■■ The services of a SQL Server instance are shut down appropriately
by shutting down the machine or performing the SHUTDOWN
statement against the server.
■■ Checkpoints occur as transactions are performed. By default, check-
points are carried out every minute or so based on the resources and
transactions that are currently in use.
NOTE SQL Server 2000 generates automatic checkpoints. The interval
between automatic checkpoints is based on the number of records in the log,
not on an amount of time. The time interval between automatic checkpoints
can vary greatly. The time interval can be long if few modifications are made in
the database. Automatic checkpoints occur frequently if a considerable amount
of data is modified.
SQL Server Recovery Models
SQL Server provides three Recovery models (Full, Bulk-Logged, and Sim-
ple) to simplify backup and recovery procedures, simplify recovery plan-
ning, and define trade-offs between operational requirements. Each of
these models addresses different needs for performance, disk and tape
space, and protection against data loss. For example, when you choose a
Recovery model, you must consider the trade-offs between the following
business requirements:
■■ Performance of a large-scale operation (for example, index creation
or bulk loads)
■■ Data loss exposure (for example, the loss of committed transactions)
■■ Transaction log space consumption
■■ The simplicity of backup and recovery procedures
Depending on what operations you are performing, more than one
Recovery model may be appropriate. After you have chosen a Recovery
model or models, you can plan the required backup and recovery proce-
dures. The following sections discuss the three Recovery models separately.
Managing Current Connections 313
Full Recovery
The Full Recovery model uses database backups and transaction log back-
ups to provide complete protection against media failure. If one or more
data files are damaged, media recovery can restore all committed transac-
tions. In-process transactions are rolled back.
Full Recovery provides the ability to recover the database to the point of
failure or to a specific point in time. To guarantee this degree of recover-
ability, all operations, including bulk operations such as SELECT INTO,
CREATE INDEX, and bulk loading data, are fully logged.
Full Recovery provides the maximum amount of recovery available. It is
also the slowest of the models, because all transactions are fully written
and stored in the transaction log.
Bulk-Logged Recovery
The Bulk-Logged Recovery model provides protection against media fail-
ure combined with the best performance and minimal log space usage for
certain large-scale or bulk copy operations. The following operations are
minimally logged; that is, the fact that they occurred is stored in the log file,
but the details of the work performed are not stored in the log:
SELECT INTO. The SELECT INTO is used to create a temporary or
permanent table from the results of a SELECT statement.
Bulk load operations (bcp and BULK INSERT). BULK INSERT and
bcp are used to mass-load data into a table.
CREATE INDEX (including indexed views). CREATE INDEX is
used to create indexes for the columns you want to search frequently.
Text and image operations (WRITETEXT and UPDATETEXT).
These operations are used to write text and image data directly to the
data file and bypass the log.
In the Bulk-Logged Recovery model, the data loss exposure for these
bulk copy operations is greater than in the Full Recovery model. Whereas
the bulk copy operations are fully logged under the Full Recovery model,
they are minimally logged and cannot be controlled on an operation-by-
operation basis under the Bulk-Logged Recovery model. Under the Bulk-
Logged Recovery model, a damaged data file can result in having to redo
work manually.
In addition, the Bulk-Logged Recovery model allows the database to be
recovered only to the end of a transaction log backup when the log backup
contains bulk changes. Point-in-time recovery is not supported.
314 Chapter 13
In SQL Server you can switch between Full and Bulk-Logged Recovery
models easily. It is not necessary to perform a full database backup after
bulk copy operations are completed under the Bulk-Logged Recovery
model. Transaction log backups under this model capture both the log and
the results of any bulk operations performed since the last backup. To
change the current Recovery model you should perform the following
steps:
1. Open Enterprise Manager.
2. Click to expand your server group.
3. Click to expand the server that maintains the database you want
to alter.
4. Click to expand the Databases container.
5. Right-click on your database and select Properties.
6. Select the Options tab to review your Recovery model as shown
in Figure 13.2.
7. Click the drop-down list to choose the appropriate Recovery
model.
8. Click OK.
Figure 13.2 You can change the Recovery model to control the amount of data that is
stored in the transaction log.
Managing Current Connections 315
Simple Recovery
In the Simple Recovery model, data is recoverable only to the most recent
full database or differential backup. Transaction log backups are not used,
and minimal transaction log space is used. After a checkpoint occurs, all
transactions that have been successfully written from the log to the data
file are truncated, and the space is reused. The Simple Recovery model is
easier to manage than are the Full and Bulk-Logged models, but there is a
higher risk of data loss exposure if a data file is damaged.
Log Maintenance
The transaction log is critical to the database. Maintenance and monitoring
of the log are required to ensure that the transaction log is kept at an opti-
mal size. The key issues for log maintenance are truncating the log to pre-
vent it from growing uncontrollably and shrinking the log if it has grown
to an unacceptable level. The following sections will more fully describe
each of these options.
Truncating the Transaction Log
If log records were never deleted from the transaction log, the logical log
would grow until it filled all of the available space on the disks that hold
the physical log files. So at some point you need to truncate the log to help
manage your disk space. The transaction log is truncated when you back
up the log. Therefore it is a good idea to have regularly scheduled transac-
tion log backups.
The active portion of the transaction log can never be truncated. The active
portion is needed to recover the database at any time, so you must have the
log images needed to roll back all incomplete transactions. The log images
must always be present in the database in case the server fails, because the
images are required to recover the database when the server is restarted.
Shrinking the Transaction Log
You can shrink the size of a transaction log file to free up hard drive space
to the operating system. There are three different methods for physically
shrinking the transaction log file:
■■ The DBCC SHRINKDATABASE statement is executed against the
database.
■■ The DBCC SHRINKFILE statement is executed against the transac-
tion log file.
316 Chapter 13
■■ An autoshrink operation occurs. Autoshrink is a database option
that is not configured by default.
NOTE You must be a member of the system administrators server role or the
db_owner database role to shrink the transaction log file.
Shrinking a log depends first on truncating the log. Log truncation does
not reduce the size of a physical log file; instead it reduces the size of the
logical log and marks as inactive the virtual logs that do not hold any part
of the logical log. A log shrink operation removes enough inactive virtual
logs to reduce the log file to the requested size. To truncate the log, you
must be at least a member of the db_owner database role. System adminis-
trators can also truncate transaction log files.
The unit of size reduction is a virtual log. For example, if you have a 600
MB log file that has been divided into six 100 MB virtual logs, the size of
the log file can only be reduced in 100 MB increments. The file size can be
reduced to sizes such as 500 MB or 400 MB, but it cannot be reduced to
sizes such as 433 MB or 525 MB.
Virtual logs that hold part of the logical log cannot be freed. If all the vir-
tual logs in a log file hold parts of the logical log, the file cannot be shrunk
until a truncation marks one or more of the virtual logs at the end of the
physical log as inactive.
When any file is shrunk, the space freed up must come from the end of
the file. When a transaction log file is shrunk, enough virtual logs from the
end of the file are freed to reduce the log to the size that the user requested.
The target_size specified by the user is rounded to the next higher virtual
log boundary. For example, if a user specifies a target_size of 325 MB for
our sample 600 MB file with 100 MB virtual log files, the last two virtual log
files are removed. The new file size is 400 MB.
In SQL Server, a DBCC SHRINKDATABASE or DBCC SHRINKFILE
operation attempts to shrink the physical log file to the requested size
immediately (subject to rounding) if the following conditions are met:
■■ If no part of the logical log is in the virtual logs beyond the
target_size mark, the virtual logs after the target_size mark are freed
and the successful DBCC statement is completed with no messages.
■■ If part of the logical log is in the virtual logs beyond the target_size
mark, SQL Server 2000 frees as much space as possible and issues
an informational message. The message tells you what actions you
need to perform to get the logical log out of the virtual logs at the
end of the file. After you perform this action, you can then reissue
the DBCC statement to free the remaining space.
Managing Current Connections 317
In the following statement, DBCC SHRINKFILE is used to reduce the
TestDB_Log file in the TestDB database to 1 MB:
USE TestDB
GO
DBCC SHRINKFILE (TestDB_Log, 1)
GO
Concurrency Architecture
When many people attempt to modify data in a database at the same time,
a system of controls must be implemented so that modifications made by
one person do not adversely affect those of another person. This process is
referred to as concurrency control.
Two classifications exist for instituting concurrency control:
Pessimistic concurrency control. A system of locks prevents users
from modifying data in a way that affects other users. After a user
performs an action that causes a lock, other users cannot perform
actions that would conflict with the lock until the owner releases it.
This process is called pessimistic control because it is mainly used in
environments where there is high contention for data.
Optimistic concurrency control. In optimistic concurrency control,
users do not lock data when they read it. When an update is per-
formed, the system checks to see whether another user changed the
data after it was read. If another user updated the data, an error
occurs. Typically, the user who receives the error rolls back the
transaction and starts again. This situation is called optimistic
because it is mainly used in environments where there is low
contention for data.
SQL Server 2000 supports a wide range of optimistic and pessimistic
concurrency control mechanisms. By default, SQL Server implements opti-
mistic concurrency. Users can override the default by choosing an alterna-
tive type of concurrency, specifying a transaction isolation level for a
connection and concurrency options on cursors. Altering the transaction
isolation level is generally not necessary and may result in SQL Server
locking your data for much longer than is necessary. For more information
about the various isolation levels that can be implemented, refer to SQL
Server Books Online. Alternatively, concurrency attributes can be defined
in the properties of the database application programming interfaces
318 Chapter 13
locks in SQL Server are shared locks, exclusive locks, update locks, intent
locks, and schema locks.
■■ Shared locks are applied when the user is reading data. Shared locks
can coexist with other shared locks, meaning that another user may
read the data that you are currently reading. Shared locks are not
compatible with exclusive locks.
■■ Exclusive locks are applied to records that are being modified. Exclu-
sive locks are not compatible with shared locks.
■■ Update locks are used for large update operations. The update lock
is a combination of a shared lock and an exclusive lock. The entire
set of records that will be affected by the update are locked with a
shared lock. The record that is currently being updated is then
locked using an exclusive lock. Update locks prevent large update
operations from having to apply exclusive locks to large amounts
of data.
■■ Intent locks are used to prevent locks from layers that would affect a
currently locked record. For instance, if a user was locking an indi-
vidual record, an intent lock is placed on the data page that stores
the record. The intent lock prevents a different user from locking the
data page that the record is stored on.
■■ Schema locks are used to lock a table or database when the design of
the table is being modified. Schema locks prevent users from adding
data while the design of the table is under modification.
If a connection attempts to acquire a lock that conflicts with a lock held
by another connection, the connection attempting to acquire the lock is
blocked until one of the following events occurs:
■■ The conflicting lock is freed, and the connection acquires the lock
that it requested.
■■ The time-out interval for the connection expires. By default, there is
no time-out interval, but some applications set a time-out interval to
prevent an indefinite wait.
■■ If several connections become blocked while waiting for conflicting
locks on a single resource, the locks are granted on a first-come,
first-served basis as the preceding connections free their locks.
■■ SQL Server has an algorithm to detect deadlocks, a condition in
which two connections have blocked each other. If an instance of
SQL Server detects a deadlock, it will terminate one transaction,
allowing the other to continue.
320 Chapter 13