Advanced 3D Game Programming with DirectX - phần 2 doc
Bạn đang xem bản rút gọn của tài liệu. Xem và tải ngay bản đầy đủ của tài liệu tại đây (345.54 KB, 71 trang )
72
adapter. If you have one of these older cards, it is definitely time to get out of the Stone Age and go out
and purchase a new one, especially if you are interested in development.
The Direct3D object lets you do things you could never do with only the standard Windows API. For
example, you can change the bit depth and the resolution of the display to any mode the card supports.
You can ask the object for a list of available resolutions and select from among them. The Direct3D
device object is created by the Direct3D object, which I will show you shortly.
Windowed vs. Full-screen
The two main modes of operation of Direct3D are windowed rendering and full-screen rendering. In
windowed rendering, your application draws its graphics to the client rectangle of a regular old window,
sharing space with other running applications. When your window is resized, you need to take care to
resize your internal structures to adapt to the new size. The same applies when the window is moved
around the screen. In addition, windowed rendering makes use of a Direct3D concept called a clipper. A
clipper object keeps track of any windows that are on top of your window, so that when you draw your
surface to the screen only the pixels that actually belong to the application's client rectangle are drawn.
Luckily the process of handling clipping is completely handled by Direct3D, so you never have to touch
it.
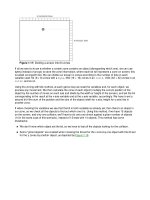
Figure 2.8
shows the kind of issue I'm talking about. If you just drew arbitrarily to the client rectangle,
you would overwrite the top left part of the Notepad application floating over the window.
Figure 2.8: You can't draw just anywhere!
The Direct3D Object
The IDirect3D9 interface is the first interface that you will interact with when you are using DirectX
Graphics. It does basically nothing except for creating the Direct3D device object, which I talked about
previously. It is the device that is used to interact with the graphics hardware. Well, I kind of lied;
73
IDirect3D9 does have some functionality, but to tell you the truth in all the time I have used Direct3D, I
have rarely used any of its functionality since most of it is replicated in the device object anyway.
IDirect3D9 is created with the Direct3DCreate9() function, which I will show you shortly. Now, before I
bring all this stuff together, let me take a moment to show you how to create surfaces.
Creating Direct3D Surfaces
Creating surfaces used to be a total pain before version 9.0 came out. You had to fill out massive
annoying structures that contained an unbelievable amount of entries and substructures. Couple that
with poor, badly structured documentation, and it was no wonder that so many people found the
learning curve for DirectX Graphics so steep.
Luckily these days all that is gone and all you have to do is make a simple call to a function called
IDirect3DDevice9::CreateOffscreenPlain- Surface().
HRESULT CreateOffscreenPlainSurface (
UINT Width,
UINT Height,
D3DFORMAT Format,
D3DPOOL Pool,
IDirect3DSurface9** ppSurface
HANDLE* pHandle
);
Table 2.5: CreateOffscreenPlainSurface parameters
Width
The width that you want the new surface to be, in pixels.
Height
The height that you want the new surface to be, in pixels.
Format
A member of the D3DFORMAT enumerated type, specifying the format for the
surface. You can see the full list of possible values for this parameter earlier in the
chapter in the table for D3DSURFACE_DESC structure. However, you will usually
want to set this to D3DFMT_ A8R8G8B8 for 32-bit surfaces. For more information,
see DirectX 9.0 C++ Documentation/DirectX Graphics/Direct3D C++
Reference/Enumerated Types/D3DFORMAT.
74
Pool
The type of surface pool to use
ppSurface
Takes the address of a pointer that will be filled with the address of the newly
created surface.
pHandle
Reserved. Set this parameter to NULL.
So if you wanted to create a simple 32-bit ARGB, 640x480 surface, you could use the following code:
Listing 2.1: Creating a new image surface
HRESULTr=0; LPDIRECT3DSURFACE9 pSurface = 0;
r = g_pDevice->CreateOffscreenPlainSurface( 640, 480, D3DFMT_A8R8G8B8,
D3DPOOL_MANAGED, &pSurface, NULL );
if( FAILED(r))
{
// Error
}
// Success!
When you are finished with a surface that uses a large amount of resources, don't forget to release it
using the IDirect3DSurface9::Release() function, like this:
pSurface->Release();
pSurface = 0;
More on Direct3D Devices
There are two pieces of code running in Direct3D applications. The first is the extremely thin layer that
takes requests to blit surfaces, for example, and converts those into hardware instructions for the video
75
card to perform. This thin layer that wraps the hardware, abstracting it away, is called the hardware
abstraction layer (HAL).
In the event that a desired effect in Direct3D is not supported by the HAL, usually it is handled by a
larger piece of code that emulates what the hardware would do, actually performing the work with the
CPU. This layer is called the hardware emulation layer (HEL). The HEL can be considerably slower than
the HAL, both because it isn't asynchronous and because it needs to use the CPU to do its dirty work,
which isn't specialized for graphics operations.
Any piece of hardware that can accelerate 3D graphics will support the subset of Direct3D (which,
essentially, is just surface blits and filled blits). If you plan on using more esoteric features, you should
check the device capabilities. This can be done using IDirect3DDevice9::GetDeviceCaps(). There isn't
space to cover the function or the structure of capability bits it fills up because it is literally massive.
However, if you are feeling motivated, you can check this bad boy out in DirectX 9.0 C++
Documentation/ DirectX Graphics/Reference/Direct3D C++ Reference/Interfaces/IDirect3D-
Device9/GetDeviceCaps in the online documentation.
Implementing Direct3D with cGraphicsLayer
To implement Direct3D I'm going to create a class called cGraphicsLayer. Like cApplication, it is a class
that can only have one instance. In creating this class, there are several abilities that it should possess:
Initialization of full-screen Direct3D should be automatic.
It should be easy to get access to the Direct3D objects if need be, but that need should arise as
rarely as possible.
You should be able to initialize Direct3D with the primary display adapter.
Let's dive into the code. First, have a look at the header file DxHelper.h, which helps simplify some of
the programming tasks.
Listing 2.2: DxHelper.h
/*******************************************************************
* Advanced 3D Game Programming using DirectX 9.0
* * * * * * * * * * * * * * * * * * * * * * * * * * * * * * * * * *
* Desc: Sample application for Direct3D *
* copyright (c) 2003 by Peter A Walsh and Adrian Perez
* See license.txt for modification and distribution information
******************************************************************/
76
#ifndef _D3DHELPER_H
#define _D3DHELPER_H
#include <memory.h>
/**
* This class takes care of the annoying gruntwork
* of having to zero-out and set the size parameter
* of our Windows and DirectX structures.
*/
template <class T>
struct sAutoZero : public T
{
sAutoZero()
{
memset( this, 0, sizeof(T) );
dwSize = sizeof(T);
}
};
/**
* The Right Way to release our COM interfaces.
* If they're still valid, release them, then
* invalidate them and null them.
*/
template <class T>
inline void SafeRelease( T& iface )
{
if( iface )
{
iface->Release();
iface = NULL;
77
}
}
#endif // _D3DHELPER_H
The interface for the graphics layer appears in GraphicsLayer.h, which is given in Listing 2.3.
Listing 2.3: GraphicsLayer.h
/*******************************************************************
* Advanced 3D Game Programming using DirectX 9.0
* * * * * * * * * * * * * * * * * * * * * * * * * * * * * * * * * *
* Desc: Sample application for Direct3D
*
* (C) 2003 by Peter A Walsh and Adrian Perez
* See license.txt for modification and distribution information
******************************************************************/
#ifndef _GRAPHICSLAYER_H
#define _GRAPHICSLAYER_H
#include <list>
#include <string>
using std::string;
using std::list;
#include "GameTypes.h"
#include "DxHelper.h"
#include <d3d9.h>
class cApplication;
78
class cGraphicsLayer
{
protected:
HWND m_hWnd; // The handle to the window
LPDIRECT3D9 m_pD3D; // The IDirect3D9 interface
LPDIRECT3DDEVICE9 m_pDevice; // The IDirect3DDevice9 interface
LPDIRECT3DSURFACE9 m_pBackSurf; // Pointer to the back buffer
RECT m_rcScreenRect; // The dimensions of the screen
cGraphicsLayer( HWND hWnd ); // Constructor
static cGraphicsLayer* m_pGlobalGLayer; // Pointer to main global gfx
object
public:
void DestroyAll();
~cGraphicsLayer();
/**
* Initialization calls.
*/
void InitD3DFullScreen( GUID* pGuid, int width, int height, int bpp );
/**
* This function uses Direct3DX to write text to the back buffer.
* It's much faster than using the GDI
*/
79
void DrawTextString( int x, int y, DWORD color, const char * str );
//========== Accessor functions
// Gets a pointer to the IDirect3D9
LPDIRECT3D9 GetD3D()
{
return m_pD3D;
}
// Gets a pointer to the device
LPDIRECT3DDEVICE9 GetDevice()
{
return m_pDevice;
}
// Gets a pointer to the back buffer LPDIRECT3DSURFACE9 GetBackBuffer()
{
return m_pBackSurf;
}
// Gets the screen width int Width() const
{
return m_rcScreenRect.right;
}
// Gets the screen height int Height() const
{
return m_rcScreenRect.bottom;
}
// Presents the back buffer to the primary surface
void Flip();
// Gets a pointer to the main gfx object
static cGraphicsLayer* GetGraphics()
{
return m_pGlobalGLayer;
}
80
// Initializes this object
static void Create(
HWND hWnd, // handle to the window
short width, short height, // width and height
GUID* pGuid ); // Device guid
};
inline cGraphicsLayer* Graphics()
{
return cGraphicsLayer::GetGraphics();
}
#endif //_GRAPHICSLAYER_H
GraphicsLayer.cpp is pretty long, so I'll show it to you step by step. There are a few functions that don't
deal with initialization, which I'll list here. The first is a helper function used to draw text onto a Direct3D
surface (such as the back buffer). It uses the D3DX utility COM object ID3DXFont to display the text.
Listing 2.4: cGraphicsLayer::DrawTextString
void cGraphicsLayer::DrawTextString( int x, int y, DWORD color, const char
*
str )
{
HRESULTr=0;
if( !m_pBackSurf )
return;
// Get a handle for the font to use
HFONT hFont = (HFONT)GetStockObject( SYSTEM_FONT );
LPD3DXFONT pFont = 0;
81
// Create the D3DX Font
r = D3DXCreateFont( m_pDevice, hFont, &pFont );
if( FAILED(r))
return;
// Rectangle where the text will be located
RECT TextRect={x,y,0,0};
// Inform font it is about to be used
pFont->Begin();
// Calculate the rectangle the text will occupy
pFont->DrawText( str, -1, &TextRect, DT_CALCRECT, 0 );
// Output the text, left aligned
pFont->DrawText( str, -1, &TextRect, DT_LEFT, color );
// Finish up drawing
pFont->End();
// Release the font
pFont->Release();
}
The other function not covered by the initialization code is Flip(). It is called when you are finished
rendering the frame to the back buffer. Flipping is accomplished with a call to
IDirect3DDevice9::Present(), which takes no parameters.
Listing 2.5: cGraphicsLayer::Flip
void cGraphicsLayer::Flip()
82
{
HRESULTr=0;
// Make sure the device has been created.
assert( m_pDevice );
// Blit the back buffer to the primary surface
r = m_pDevice->Present( NULL, NULL, NULL, NULL );
if( FAILED(r))
{
OutputDebugString( "Flipping Failed!\n" );
}
}
Creating the Graphics Layer
In a moment I'm going to dive into the code that initializes Direct3D for full-screen rendering. The way
the code actually gets called is in cApplication::InitGraphics. That code calls the static function
cGraphicsLayer:: Create, which appears in the following listing.
Listing 2.6: cGraphicsLayer::Create
void cGraphicsLayer::Create(HWND hWnd, short width, short height, GUID*
pGuid )
{
new cGraphicsLayer( hWnd ); // construct the object.
// Init Direct3D and the device for fullscreen operation
Graphics()->InitD3DFullScreen( pGuid, width, height, 32 );
}
83
Now that you know how the initialization code will be called, let's dive in and see how it works.
Full-screen Initialization
Initializing Direct3D for full-screen mode is easier than windowed mode. The set and order of things to
do is fairly consistent, so it's easy to hide it away into an initialization function. I'll go through the process
step by step.
Step 1: Create the Direct3D object.
The first step in Direct3D initialization is to create an instance of the Direct3D object and acquire an
interface to it. Instead of using the standard COM construction technique, which is a total pain, you can
use a pleasantly wrapped-up function called Direct3DCreate9():
IDirect3D9* Direct3DCreate9( UINT SDKVersion );
Table 2.6: Direct3DCreate9 parameters
SDKVersion
An identifier specifying the version of Direct3D that you are using. You should
always specify D3D_SDK_VERSION for this parameter, which automatically
contains the correct version.
// Create the Direct3D object
m_pD3D = Direct3DCreate9( D3D_SDK_VERSION );
if( !m_pD3D )
{
throw cGameError("Could not create IDirect3D9");
}
Step 2: Set the present parameters.
The new word for moving the contents of the back buffer to the primary surface is present. So when you
are done messing with the back buffer and want to display it, you present it to the primary surface. Keep
that in your head because it pops up a lot in this section. The first thing you need to do when initializing
Direct3D is to fill in what are called the present parameters. This is basically just a structure that
contains information about the size and bit depth of the back buffer and primary surface, which is
84
important because in version 9.0, Direct3D manages these two surfaces for you. The structure looks
like this:
typedef struct _D3DPRESENT_PARAMETERS_ {
UINT BackBufferWidth, BackBufferHeight;
D3DFORMAT BackBufferFormat;
UINT BackBufferCount;
D3DMULTISAMPLE_TYPE MultiSampleType;
DWORD MultiSampleQuality;
D3DSWAPEFFECT SwapEffect;
HWND hDeviceWindow;
BOOL Windowed;
BOOL EnableAutoDepthStencil;
D3DFORMAT AutoDepthStencilFormat;
DWORD Flags;
UINT FullScreen_RefreshRateInHz;
UINT PresentationInterval;
} D3DPRESENT_PARAMETERS;
Table 2.7: D3DPRESENT_PARAMETERS structure members
BackBufferWidth
Width of the back buffer, in pixels.
BackBufferHeight
Height of the back buffer, in pixels.
BackBufferFormat
A D3DFORMAT enumeration member specifying the format
for the back buffer, which can be any of the flags in Listing
2.1. You will usually set this to D3DFMT_A8R8G8B8 for 32-
bit surfaces or D3DFMT_R5G6R5 for 16-bit surfaces.
BackBufferCount
The number of back buffers that you want to associate with
the primary surface. You normally want this to be 1.
85
MultiSampleType
A member of the D3DMULTISAMPLE_TYPE enumeration,
specifying the type of multisampling, if any, that you want to
use. Just set this parameter to D3DMULTISAMPLE_NONE.
MultiSampleQuality
Set this value to between 0 and the result of
IDirect3D9::CheckDeviceMultiSampleType.
SwapEffect
A D3DSWAPEFFECT enumeration member specifying the
semantics that you want to use when presenting the back
buffer to the primary surface. You will normally set this to
D3DSWAPEFFECT_COPY.
hDeviceWindow
A handle to the window that you want to use as the rendering
target.
Windowed
A Boolean value specifying whether the application runs in
full-screen or windowed mode. Specify FALSE for full-screen
operation.
EnableAutoDepthStencil
A Boolean value specifying whether you want Direct3D to
manage the depth and/or stencil buffer for you. This is
usually a good thing so you should specify TRUE.
AutoDepthStencilFormat
Takes a member of the D3DFORMAT enumeration that
specifies the format of the depth buffer that you want
Direct3D to manage. D3DFMT_16 is a good choice; it
creates a 16-bit depth buffer for you.
Flags
Set this to its only possible value,
D3DPRESENTFLAG_LOCK ABLEBACKBUFFER. If you will
not be messing with the back buffer, set this to 0 for a slight
performance improvement.
FullScreen_RefreshRateInHz
The refresh rate that you want the monitor to run at. Set this
86
to D3DPRESENT_RATE_DEFAULT to allow Direct3D to use
what it thinks is the best rate.
PresentationInterval
Specifies how quickly you want the back buffer to be
presented to the primary surface. Specify
D3DPRESENT_INTERVAL_IMMEDIATE to allow the
process to complete as quickly as possible.
It is not as hard as it looks since most of the entries can be set to default values that you never have to
look at again. Have a look at the code snippet below as an example of how to fill in the structure to
create a standard, full-screen, 640x480, 32-bit application:
Listing 2.7: Filling in the D3DPRESENT_PARAMETERS structure
D3DPRESENT_PARAMETERS d3dpp;
ZeroMemory( &d3dpp, sizeof( d3dpp ) );
// The width and height for the initial back buffer
d3dpp.BackBufferWidth = width;
d3dpp.BackBufferHeight = height;
// Set the flags for the bit depth - only supports 16-, 24-, and 32-bit
formats
if( bpp == 16 )
d3dpp.BackBufferFormat = D3DFMT_R5G6B5;
else if( bpp == 24 )
d3dpp.BackBufferFormat = D3DFMT_X8R8G8B8;
else if( bpp == 32 )
d3dpp.BackBufferFormat = D3DFMT_A8R8G8B8;
else
{
OutputDebugString( "Invalid surface format - defaulting to 32bit");
d3dpp.BackBufferFormat = D3DFMT_A8R8G8B8;
}
87
// Only have one back buffer associated with the primary surface
d3dpp.BackBufferCount = 1;
// No multisampling
d3dpp.MultiSampleType = D3DMULTISAMPLE_NONE;
// The quality of the multisampling
d3dpp.MultiSampleQuality = 0;
// Copy the back buffer to the primary surface normally
d3dpp.SwapEffect = D3DSWAPEFFECT_COPY;
// The handle to the window to render in to
d3dpp.hDeviceWindow = m_hWnd;
// Full-screen operation
d3dpp.Windowed = FALSE;
// Let Direct3D look after the depth buffer
d3dpp.EnableAutoDepthStencil = TRUE;
// Set the depth buffer depth to 16 bits
d3dpp.AutoDepthStencilFormat = D3DFMT_D16;
// Use the default refresh rate
d3dpp.FullScreen_RefreshRateInHz = D3DPRESENT_RATE_DEFAULT;
// Update the screen as soon as possible (don't wait for vsync)
d3dpp.PresentationInterval = D3DPRESENT_INTERVAL_IMMEDIATE;
// Allow the back buffer to be locked
d3dpp.Flags = D3DPRESENTFLAG_LOCKABLE_BACKBUFFER;
And that's it. After the structure is filled in it is very simple to create the device, which I am just about to
show you.
Step 3: Create the device.
The Direct3D rendering device is created with a call to IDirect3DDevice9:: CreateDevice(). Recall that
the device is Direct3D lingo for the COM object that communicates your rendering requests to the actual
physical display adapter in your PC. The function is prototyped in the following:
HRESULT CreateDevice(
UINT Adapter,
88
D3DDEVTYPE DeviceType,
HWND hFocusWindow,
DWORD BehaviorFlags,
D3DPRESENT_PARAMETERS* pPresentationParameters,
IDirect3DDevice9** ppReturnedDeviceInterface
);
Table 2.8: CreateDevice parameters
Adapter
Integer identifying which display device you want to render
with. Specify 0 to use the primary display adapter.
DeviceType
A D3DDEVTYPE enumeration member specifying the type of
device that you want to create. Use D3DDEVTYPE_HAL for a
hardware accelerated device, D3DDEVTYPE_SW for a
software device, or D3DDEVTYPE_REF for a reference
device. You'll almost always want to go with a hardware
device. Only use reference devices for debugging; they
contain all possible hardware features emulated in software,
but they are extremely slow.
hFocusWindow
Handle to the window that you want to use as the default
rendering target. This should match the handle that you
specified in the present parameters structure.
BehaviorFlags
Takes flags that define the behavior of the device; most of
these are superfluous and you will probably want to stick with
just D3DCREATE_SOFTWARE_VERTEXPROCESSING. If
you have a newfangled hardware transform and lighting card
you can specify
D3DCREATE_HARDWARE_VERTEXPROCESSING.
pPresentationParameters
Address of the D3DPRESENT_PARAMETERS structure that
you filled with information about the device.
89
ppReturnedDeviceInterface
Address of a pointer that will be filled with the address of the
newly created device.
So if you were going to create a standard hardware accelerated device with software vertex processing
you could use the following code:
Listing 2.8: Creating the device
// Create the device using hardware acceleration if available
r = m_pD3D->CreateDevice( D3DADAPTER_DEFAULT, D3DDEVTYPE_HAL,
m_hWnd, D3DCREATE_SOFTWARE_VERTEXPROCESSING,
&d3dpp, &m_pDevice );
if( FAILED(r))
{
throw cGameError( "Could not create IDirect3DDevice9" );
}
In previous versions of DirectX you had to program a million other things like creating clippers, setting
the cooperative level, setting the screen resolution, and on and on. These days you are lucky because
Direct3D does it all for you. That one call to CreateDevice() handles all the grunt work and you can
pretty much start rendering as soon as it is created. However, before I start getting ahead of myself, let
me show you in the next step a function I created that automates this whole process.
Step 4: Put it together.
Now that you know what you need to do, you can write a full-screen initialization routine. It takes as
input a GUID to use for the device, a width, a height, and a depth, and then it does the rest. The GUID
can be set to NULL to use the primary display device.
Listing 2.9: Direct3D full-screen initialization in cGraphicsLayer
void cGraphicsLayer::InitD3DFullScreen (GUID* pGuid, int width,
int height, int bpp )
{
90
HRESULTr=0;
// Create the Direct3D object
m_pD3D = Direct3DCreate9( D3D_SDK_VERSION );
if( !m_pD3D )
{
throw cGameError( "Could not create IDirect3D9" );
}
// Structure to hold the creation parameters for the device
D3DPRESENT_PARAMETERS d3dpp;
ZeroMemory( &d3dpp, sizeof( d3dpp ) );
// The width and height for the initial back buffer
d3dpp.BackBufferWidth = width;
d3dpp.BackBufferHeight = height;
// Set the flags for bit depth - only supports 16, 24, and 32 bit
formats
if( bpp == 16 )
d3dpp.BackBufferFormat = D3DFMT_R5G6B5;
else if( bpp == 24 )
d3dpp.BackBufferFormat = D3DFMT_X8R8G8B8;
else if( bpp == 32 )
d3dpp.BackBufferFormat = D3DFMT_A8R8G8B8;
else
{
OutputDebugString( "Invalid surface format - defaulting to 32bit" );
d3dpp.BackBufferFormat = D3DFMT_A8R8G8B8;
}
// Only have one back buffer associated with the primary surface
91
d3dpp.BackBufferCount = 1;
// No multisampling
d3dpp.MultiSampleType = D3DMULTISAMPLE_NONE;
// The quality of the multisampling
d3dpp.MultiSampleQuality = 0;
// Copy the back buffer to the primary surface normally
d3dpp.SwapEffect = D3DSWAPEFFECT_COPY;
// The handle to the window to render in to
d3dpp.hDeviceWindow = m_hWnd;
// Full-screen operation
d3dpp.Windowed = FALSE;
// Let Direct3D look after the depth buffer
d3dpp.EnableAutoDepthStencil = TRUE;
// Set the depth buffer depth to 16 bits
d3dpp.AutoDepthStencilFormat = D3DFMT_D16;
// Use the default refresh rate
d3dpp.FullScreen_RefreshRateInHz = D3DPRESENT_RATE_DEFAULT;
// Update the screen as soon as possible (don't wait for vsync)
d3dpp.PresentationInterval = D3DPRESENT_INTERVAL_IMMEDIATE;
// Allow the back buffer to be locked
d3dpp.Flags = D3DPRESENTFLAG_LOCKABLE_BACKBUFFER;
// Create the device using hardware acceleration if available
r = m_pD3D->CreateDevice( D3DADAPTER_DEFAULT, D3DDEVTYPE_HAL, m_hWnd,
D3DCREATE_SOFTWARE_VERTEXPROCESSING,
&d3dpp, &m_pDevice );
if( FAILED(r))
{
throw cGameError( "Could not create IDirect3DDevice9" );
}
// Keep a copy of the screen dimensions
92
m_rcScreenRect.left = m_rcScreenRect.top = 0;
m_rcScreenRect.right = width;
m_rcScreenRect.bottom = height;
// Get a copy of the pointer to the back buffer
m_pDevice->GetBackBuffer( 0, D3DBACKBUFFER_TYPE_MONO, &m_pBackSurf );
}
Shutting Down Direct3D
After the application has finished its rendering, it must properly shut down Direct3D before terminating
the application. This is just a matter of releasing the back buffer, Direct3D device interface, and finally
the IDirect3D9 interface. By the way, you should always try to release the interfaces to COM objects in
the opposite order of the way they were created.
The code to shut down Direct3D appears in cGraphicsLayer::Destroy- All. The destructor calls
DestroyAll, but other modules may call it if need be.
Listing 2.10: cGraphicsLayer::DestroyAll
void cGraphicsLayer::DestroyAll()
{
SafeRelease( m_pBackSurf );
SafeRelease( m_pDevice );
SafeRelease( m_pD3D );
/**
* Prevent any further access to the graphics class
*/
93
m_pGlobalGLayer = NULL;
}
Changes to cApplication
A new member variable was added to cApplication class to modify the behavior of the graphics layer
when it is initialized. The new variable is given below:
int m_bpp; // Desired depth (may not be possible)
The m_bpp variable is set to be 32 bits by default in the constructor—you can change this if you find it
necessary.
Using the members in cApplication, cApplication::InitGraphics sets up the graphics subsystem. At the
end of the function you can see the cGraphicsLayer::Create function I discussed earlier. At the moment
it just sets up Direct3D with the call to cGraphicsLayer::Create, but if you needed to do any other
graphics initialization you could put the code here, away from the Direct3D messiness.
Listing 2.11: Graphics initialization code
void cApplication::InitGraphics()
{
cGraphicsLayer::Create(
MainWindow()->GetHWnd(),
m_width, m_height,
NULL );
}
Application: Direct3D Sample
To give an idea of how you might use the graphics layer in a regular application, I'll go through a bare-
bones Direct3D application with just 2D graphics for now. In every frame, it fills the screen with pseudo-
random pixels and then uses a color blit to copy a filled rectangle to the screen. It also flashes text
around random locations.
94
Warning
Almost all of the sample applications in this book depend on the GameLib library
(and the Math3d library, which I'll show you in Chapter 5
). To make them compile
correctly, make sure that the dependencies are set up correctly (this can be
checked by selecting the Project|Dependencies menu option). GameLib, for this
sample and any others that use it, should be listed as a dependency of your project.
Since the program is so short, I'll include all of the source code for it. This appears in Listing 2.12
.
Listing 2.12: DDSample.cpp
/*******************************************************************
* Advanced 3D Game Programming using DirectX 9.0
* * * * * * * * * * * * * * * * * * * * * * * * * * * * * * * * * *
* Desc: Sample application for Direct3D
*
* copyright (c) 2003 by Peter A Walsh and Adrian Perez
* See license.txt for modification and distribution information
******************************************************************/
#include "stdafx.h"
#include <string>
using namespace std;
class cD3DSampleApp : public cApplication
{
public:
//========== cApplication
virtual void DoFrame( float timeDelta );
95
cD3DSampleApp() :
cApplication()
{
m_title = string( "Direct3D Sample" );
}
};
cApplication* CreateApplication()
{
return new cD3DSampleApp();
}
void cD3DSampleApp::DoFrame( float timeDelta )
{
HRESULT hr;
if( !Graphics() ) return;
// Clear the previous contents of the back buffer
Graphics()->GetDevice()->Clear( 0, 0, D3DCLEAR_TARGET |
D3DCLEAR_ZBUFFER,
D3DCOLOR_XRGB( 0,0,0), 1.0f, 0 );
// Structure to hold information about the locked back buffer
D3DLOCKED_RECT LockedRect;
// Get a local pointer to the back buffer
LPDIRECT3DSURFACE9 pBackSurf = Graphics()->GetBackBuffer();
// Lock the back buffer
pBackSurf->LockRect( &LockedRect, NULL, NULL );
96
// Get a pointer to the back buffer
DWORD* pData = (DWORD*)LockedRect.pBits;
// Convert the pitch to work with 32-bit (4 byte) surfaces
int Pitch32 = LockedRect.Pitch / 4;
int x, y; // Holds the location of the random pixel
DWORD Color; // Holds the color of the pixels and rectangles
// PART 1: Draw 10,000 randomly colored pixels
for( inti=0;i< 10000 ; i++ )
{
// Get a random location for the pixel
x = rand()%639;
y = rand()%479;
// Get a random color for the pixel
Color = D3DCOLOR_XRGB( rand()%255, rand()%255, rand()%255 );
// Set the pixel at x,y to the color
pData[ Pitch32*y+x]= Color;
}
// PART 2: Draw 10 random rectangles
RECT Rect; // Structure to hold the dimensions of the rectangles
for( intj=0;j<10;j++)
{
// Create a random sized rectangle
SetRect( &Rect, rand()%639, rand()%479,
rand()%639, rand()%479 );