Linux For Dummies 6th Edition phần 3 potx
Bạn đang xem bản rút gọn của tài liệu. Xem và tải ngay bản đầy đủ của tài liệu tại đây (1.13 MB, 46 trang )
6. Click Next.
The initial disk partitioning screen appears. The options you see here
depend on what the partitioning program (DrakX) finds on your hard
drive(s), so you may see something different than what I’m seeing.
7. Select the partitioning option you want to use.
Do not select Use Existing Partitions — if this option is even available —
unless you went ahead and set up the machine’s partitions ahead of
time. Typically, you want one of the other options. If you’re giving over
an entire hard drive to Linux, then select Erase Entire Disk. If your Linux
install has to share a drive with another operating system (or you know
you want to set up your partitions a certain way) then select Custom
Disk Partitioning or select Use Free Space if you have free space avail-
able. Other options may also appear, depending on what’s currently on
your system. For example, you may see Erase Entire Disk, which lets you
wipe your Windows installation. If you choose Erase Entire Disk, accept
the default partitioning and skip to Step 10.
8. Click Next.
The Partitioning screen appears. You can choose existing partitions
by clicking the partitions in the graphical listing. Each has a suggested
mount point (see Chapter 3 for more on mount points) already attached.
You can delete or resize a particular partition by clicking the appropri-
ate button below the partition graphics. If you already have a bunch of
free, unallocated space, you can click the Auto Allocate button to have
Mandrake suggest a set of new partitions for you. To create a new one,
click the empty space and then click Create. You can see an example
layout in Figure 4-5.
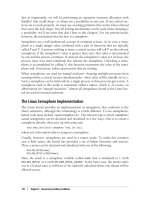
9. After you’re finished laying out your partitions, click Done.
As the warning that appears says, the changes are made to your hard
drive when you click Done. After the formatting is complete, the installer
scans through its list of software. Then, the installation media dialog box
appears.
10. Only three CD ISOs are available for download, so if you downloaded
those three, unselect CDs 4 and 5 in the list and then click OK. If you
do have a CD 4 and 5, just click OK.
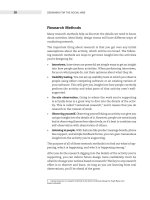
The Package Group Selection screen appears (see Figure 4-6).
11. Choose the groups of packages that you want to install.
For a desktop, you might include each of the items in the Workstation
section, plus both KDE and GNOME in the Graphical environments if you
have the room. These items give you lots of software to play with.
74
Part I: Getting Your Feet Wet
08_579371 ch04.qxd 12/27/04 8:04 PM Page 74
Figure 4-6:
The Man
drake 10.1
Package
Group
Selection
dialog box.
Figure 4-5:
The
Mandrake
10.1 Custom
Partitioning
dialog box
with an
example
disk layout.
75
Chapter 4: Installing Other Linux Distributions
08_579371 ch04.qxd 12/27/04 8:04 PM Page 75
12. Select the Individual Package Selection box if you want to look inside
each group and choose what you want.
I assume that you clicked this option.
13. Click Next.
The Choose The Packages You Want To Install dialog box appears.
14. Select and remove packages according to your needs.
In the left column, you can click a right-facing arrow to expand a cate-
gory and see all the groups beneath it, or you can click a down-facing
arrow to compress the category and clean up the list. A checkmark next
to a group means that you selected that group, and a checkmark next to
the category means you selected the whole category.
You also find arrows next to groups. Expand a group, and you can see on
the left all the software that will and won’t be installed — you won’t get
everything from the group by default. You can then click any package in
the list to see a description on the right. If you find that a package that
you want isn’t being installed, click the empty box next to its name to
check it. If you don’t want to install something that’s checked, click the
checkmark to unselect it.
15. After you’re ready to move on, click Install.
The installation begins. You’re given a projection of how much time it
will take. Keep in mind that if you need to swap CDs, you won’t know
until it asks you for the next one, so don’t just walk away and ignore the
system expecting it to be finished when you get back. You can click the
Details button to see the progress for each individual package.
As with most mainstream Linux distributions, Mandrake has tasks to take
care of after the main installation, before you start using the system. After the
main files are placed onto your system (but before rebooting), you’re asked
to do things like enter your root (administrative) password. (See Chapter 3
for how to select a strong root (administrative) password and why you want
to do so.)
After you choose your root password, you’re asked to create a regular user
account. When you do so, click the icon image and have fun selecting a pic-
ture to go with your user account. Speaking of users, do not configure the
computer to automatically log in any account unless no one else could possi-
bly have access to the machine. It’s not a very secure practice, and it’s a
great way to set yourself up for some annoying practical jokes.
When you reach the Summary screen — which isn’t entirely a Summary
because it lets you configure things that you haven’t looked at yet — make
sure that everything is set properly. In particular, the Graphical Interface
entry refers to your monitor and video card. If these devices aren’t config-
ured, then you’ll definitely want to change that. In the Security section, click
Configuration next to Firewall, uncheck the Everything checkbox, and add
76
Part I: Getting Your Feet Wet
08_579371 ch04.qxd 12/27/04 8:04 PM Page 76
checks only next to the services you’ll run on this computer. For example,
you may want to check SSH, FTP, and Echo (ping).
Finally, when given the chance to download updated packages, select Yes if
you are already on a network that’s connected to the Internet. Otherwise, you
can do it later.
After you finish this part of the configuration process, you’re asked to reboot.
Then, believe it or not, there’s a few more configuration tasks to take care of.
First you’ll see a user survey. If you want to fill it out, fine, otherwise skip it by
just clicking Next. In the Choose Desktop dialog, click the dropdown list box and
play with the various desktops and themes. Selecting something shows you
what it will look like. After this, you can register for the Mandrake Club (
www.
mandrakeclub.com
), and then finally you’re done and can use the machine!
About the various Mandrake versions
Mandrake offers both server and desktop solutions, but I focus on the desktop
here — which is considered by many to be Mandrake’s real strength. You can
see Mandrake’s full range of commercial products by going to
www.mandrake
soft.com/products
, and you can see the full range of download options by
following the instructions available in the earlier section, “Maxin’ Out the Fun
with Mandrake.” I also focus only on items, as usual, that include the desktop
itself rather than also covering add-ons.
At the time of this writing, you can purchase and/or download Mandrake for
the desktop in the following versions:
ߜ Mandrake 10.1: The full download version included with this book. You
can use it for desktop, server, and everything in between.
ߜ MandrakeMove: The LiveCD version of Mandrake, which allows you to
pop the CD-ROM into any PC, boot the PC with this CD-ROM, and find
yourself in a fully functional Mandrake environment without having to
install anything.
ߜ Mandrake 10.1 Discovery: A commercial package for people brand new
to Linux. This package includes MandrakeMove.
ߜ Mandrake 10.1 PowerPack: The “regular” full-featured commercial desk-
top package.
ߜ Mandrake 10.1 PowerPack+: The power-user commercial desktop
offering.
Mandrake also has commercial and/or free versions available for a number of
other hardware architectures, such as AMD64, PowerPC, and SPARC. In addi-
tion to this, if you’re a bleeding edge kind of person — which is how geeks refer
to the “very latest and greatest that most people haven’t started using” — you
77
Chapter 4: Installing Other Linux Distributions
08_579371 ch04.qxd 12/27/04 8:04 PM Page 77
may enjoy downloading the Mandrake Cooker (www.mandrakelinux.com/en/
cookerdevel.php3
), which is the development (“beta”) version. Most people,
though, are better off sticking with the main version of Mandrake, because
betas, in general, are more full of bugs — hence, the term beta test.
Starting off with SuSE
The SuSE (“SOO-za”, www.suse.com) company and Linux distribution
were founded in 1992 and were purchased by Novell (
www.novell.com)
in 2004. The distribution is named after a German acronym for Software und
Systementwicklung (Software and System Development). One SuSE claim to
fame is its international support (most major distributions provide a level of
support for users around the globe, but some have better language integra-
tion for particular groups than others; SuSE understandably excels in the
German and western European space).
SuSE is primarily a commercial distribution, though it has a limited free
option that I discuss in the section “About the various SuSE versions.” Rather
than compare a limited free version against other people’s full versions, I
walk you through the installation of the full SuSE Linux Professional 9.2. Also,
while most distributions have one form or another of integrated configura-
tion setup, SuSE’s YaST is particularly extensive, and is equally so without a
GUI — an unfortunate rarity. The manuals that come with the boxed versions
are also nice and thick, serving as a nice add-on for this book, online help,
user forums, and so on.
A Live CD containing SuSE 9.2 with KDE is included as an ISO file within the
distros folder on the DVD-ROM that comes with this book. No install is
required, so you can just burn the ISO onto a CD-ROM, put the CD into your
drive, and boot your machine to experience this version of SuSE Linux.
Installing SuSE
The SuSE Linux 9.2 Professional boxed set comes with two thick manuals,
five CDs, and two DVDs (for those who want to install instead from DVD). In
Chapter 2, I mention that SuSE can resize your existing Windows partitions, so
you don’t need to do this step ahead of time. If you’re using the version of SuSE
included with this book, then you don’t need to go through this installation
procedure. I cover it here for those who purchased the full version of SuSE.
To install this distribution:
1. Put either CD 1 or DVD 1 (the one on the left) in your CD-ROM or DVD-
ROM drive.
If you’re using the DVDs, make sure that Side A is facing up.
78
Part I: Getting Your Feet Wet
08_579371 ch04.qxd 12/27/04 8:04 PM Page 78
2. Reboot your machine.
The Welcome screen appears, followed by the installer’s menu.
3. Choose Installation from the menu and press Enter.
A progress bar appears as the installer launches. After that, the initializ-
ing hardware screen appears. The process of figuring out what hardware
you have on your computer can be a bit slow, so just be patient.
Finally, the Welcome To YaST2 (the system’s installer and administration
program) screen appears.
4. Select the primary language you want to use on this computer and
then click Accept to proceed.
The Installation Settings screen appears (see Figure 4-7). It can take a
minute or so for the system to complete its auto-detection routine and
fill out all the entries.
5. Look at the values beneath System and determine whether (to the best
of your knowledge) they’re correct. If not, click the System link and
wait while SuSE autodetects all the hardware on your system in more
detail. When it has finished, look through the list and then click OK.
6. If you’re not using a U.S. layout keyboard (if you’re in North America
and have no idea, you’re using a U.S. layout keyboard), click the
Keyboard Layout link and select the appropriate setting. When you’re
ready to proceed, click Accept.
Figure 4-7:
The
SuSE 9.2
Installation
Settings
screen in
text mode
(there is
also a
graphical
installer).
79
Chapter 4: Installing Other Linux Distributions
08_579371 ch04.qxd 12/27/04 8:04 PM Page 79
You can click in the Keyboard Test text box and then type to make sure
that your keyboard is being recognized properly. If you like to heavily
customize how your keyboard works, then click the Expert Settings
button to do so.
7. Look at the item listed under Mouse. If it is blatantly incorrect (it has
chosen the best match it can find for your particular hardware), such
as choosing a USB mouse when you have a PS/2, then click the Mouse
link to go to the Mouse configuration screen.
Be sure to click the Test button to then test your new mouse setting if
you change it.
A USB mouse has a (around half-inch) wide but flat connector and a PS/2
mouse has a round one. A serial mouse is much bigger than both, being
over an inch wide.
8. In the Partitioning section, if you aren’t happy with what you’re being
offered, click the Partitioning link. Otherwise, skip to Step 13.
Clicking the link brings you to the Suggested Partitioning screen.
9. If you want to just make some adjustments, click the Base Partition
Setup on this Proposal radio button. If you want to completely change
the recommended partitioning setup, select the Create Custom
Partition Setup button.
Because the last option is really for more advanced users, I assume that
you chosen Base Partition Setup on this Proposal, to adjust what you
were already assigned.
10. Click Next to make your changes.
The Expert Partitioner dialog box opens (see Figure 4-8).
Figure 4-8:
The SuSE
9.2 Expert
Partitioner
dialog box in
text mode,
rather than
graphical
mode.
80
Part I: Getting Your Feet Wet
08_579371 ch04.qxd 12/27/04 8:05 PM Page 80
11. Make your changes.
You can change the size of a partition by clicking it in the list (ignore
the whole drive entry, such as /dev/hda, focus instead on the partitions,
such as /dev/hda1) and then clicking the Edit button to open the Edit
Existing Partition dialog box. If you want to resize one of your NTFS or
FAT32 partitions, then click that partition in the list and click the Resize
button to get the job done.
12. Once you’re finished with your changes, click Next to return to the
Installation Settings dialog box.
13. Click the Software link.
You probably do want to pick and choose what programs to install! This
action brings you to the Software Selection screen.
14. Click Detailed Selection.
Because I’m focusing on a point-and-click desktop setup, it’s safe to
assume here that you don’t want Minimum system (no GUI at all) or
Minimum graphical system (a very bare-bones, old-time GUI that doesn’t
take up much RAM but lacks many of the nice desktop bells and whistles
many have grown to love). Clicking Detailed Selection takes you to the
individual software selection screen (see Figure 4-9).
15. Spend as much time here as you want, surfing through the options
and selecting items to add.
Here’s a recommended technique for working through this dialog box as
a first timer. Start by looking to the left, under Selection, and picking the
big groups you want to use. As a desktop user, you may want to add All
Of KDE, GNOME system (picking both of these groups lets you have both
GUIs to choose from and play with), Games, and Multimedia. Choosing
these groups adds big chunks of programs to your list. You can look in
the lower left to see how much of your disk all your selections take up.
Figure 4-9:
The
SuSE 9.2
Individual
Software
Selection
screen in
text mode,
rather than
graphical
mode.
81
Chapter 4: Installing Other Linux Distributions
08_579371 ch04.qxd 12/27/04 8:05 PM Page 81
From there, to make it easier on yourself, click the Filter drop-down list
box and select Package Groups. This action changes the listing on the
left to software types. You can click the + marks to expand lists and –
marks to shrink them. Then, on the right, you can look at the individual
programs in the group selected on the left and then check them to add
them to your installation list or uncheck them to remove them.
16. When you think you’re done, look on the bottom of the screen and
select Check Dependencies.
17. If the response is All Package Dependencies Are OK, then click OK
and proceed to Step 18. Otherwise, say yes to anything needed to fix
dependency problems, and when you’ve got it all sorted out, then you
can proceed to Step 18.
18. Click Accept when you’re happy with your software selections.
You may be told that extra packages have been added to fix dependen-
cies, even if you were told the dependencies are okay. Click Continue if
this happens.
19. If you know that you don’t want to boot directly to the Linux-added
boot menu, where you can choose what operating system and version
to boot into, click the Booting link. Most people will want to leave the
boot loader setting alone, so if you don’t want to change these values,
go to Step 20.
If you do click the Booting link, you see the Boot Loader Setup screen.
To change a particular entry, click it and then click Edit to open the
appropriate editing dialog box. Items of interest include
• Boot Loader Location: If you want to use a different boot menu
generator, you have to change the boot loader location to a differ-
ent partition (a good spot is the /boot partition, so if you put /boot
in /dev/hda1, that’s what you’d select). However, you have to make
sure to then tell your boot menu program where to find the Linux
boot loader!
• Default Section: This is the one you’re most likely to want to
change. Click this item and then choose Edit, and you see the
screen where you can tell SuSE which option you want to boot into
if you don’t make a selection before the boot loader times out and
starts booting automatically.
• Available Sections: If you want to add a new boot menu option,
click this one, choose Edit, and then click Add from the Boot
Loader Setup – Sections Management screen.
If you chose to make changes, once you’re ready to move on, click Finish
to return to the main Installation Settings screen.
82
Part I: Getting Your Feet Wet
08_579371 ch04.qxd 12/27/04 8:05 PM Page 82
20. If your time zone is not set correctly, click the Time zone entry and
change it.
Choose your region on the left and then the time zone on the right.
21. If you want your default language to be something other than U.S
flavored English, click the Language entry and make your changes.
22. If you want your machine to boot into command line mode, click
Default Runlevel and select Full Multiuser With Network.
23. Finally, click Accept to open the Confirm Package License: flash-
player dialog box.
24. Read the license and then click I agree to proceed to the Confirm
Installation dialog box.
25. If you’re sure you want to keep going, click Install. If you’ve changed
your mind, click No to go back to the Installation Settings dialog box.
Let the installation begin! The SuSE installer shows you which disks it
needs, how much material it needs from them, and a progress bar for
each as it goes through the install.
After the install is finished, remove the CD or DVD and reboot. SuSE continues
with its post-installation setup routine. The cool thing is that if you forget to
pop out the CD or DVD, the system boots properly regardless — just remem-
ber to remove the CD or DVD before you reboot again, for good measure!
Because I don’t have infinite space in this book, I give you some quick notes
on how to walk through this initial boot setup routine. (Keep in mind that you
can change the configuration for any of these items later if you need to.)
ߜ See Chapter 3 on how to choose a solid password for the root (adminis-
trative) user.
ߜ In the Network Configuration section, first check to see that your Ethernet
card (Network Adapter), DSL modem, ISDN adapter, dial-up modem, or
whatever you’re using is properly detected. If it is, you see the make and
model of the card. If not, you see Not Detected. If it’s not detected, click
the link for that section to go to its configuration section and under
Available, select the Other (Not Detected) option. Click Configure to open
the configuration interface. There, you can tell the interface the details of
your device. You may need information from your ISP or hardware docu-
mentation in order to do so. (See Chapter 7 for coverage of the technology
and issues you run into when setting up networking.) If the process gets
overwhelming, just click Back until you return to the main Network
Configuration section and select the Skip Configuration radio button so
that you can go to Chapter 7 to set things up.
I also suggest in Network Configuration that you change ssh to enabled.
You can find out learn more about this option in Chapter 13.
83
Chapter 4: Installing Other Linux Distributions
08_579371 ch04.qxd 12/27/04 8:05 PM Page 83
ߜ When you reach Test Internet Connection, select Yes (if you’re able to
access the Internet right now) and then Next. If your attempt fails, try
connecting a few more times. Sometimes the tester just doesn’t wait
long enough for the connection to get through, so don’t be discouraged
if you need to give up and move on.
ߜ When asked whether you want to get online updates, say Yes (if you’re
able to access the Internet right now.) That way, you’ll be starting with a
fully up-to-date system. In the Installation Source drop-down list box,
select the physically closest site to you. Then, click the Manually Select
Patches box so that it’s empty; that way, it automatically updates every-
thing and doesn’t ask you annoying questions every few seconds. If you
want, go ahead and click Configure Fully Automatic Update while you’re
at it so that you can make sure that your system keeps itself current on
its own. (I look at how to do this in Chapter 12 as well.) This update can
take a while, and sometimes it needs to ask you questions. If it says it’s
running into an error getting a patch, keep telling it to try again for a bit.
Usually, the error corrects itself within five attempts or so. If you’ve tried
ten times or more and it still doesn’t go through, tell it to skip that fix.
Again, if your Internet connection doesn’t work, don’t worry; you can
update later using Chapter 12.
ߜ One of the more confusing sections is the User Authentication Method
(login) screen. Leave this setting as Stand-Alone machine unless you
know for a fact that your machine is part of an NIS or LDAP network.
Someone has to have set up NIS or LDAP, so if it’s your network and you
didn’t, you’re not using it.
ߜ In the Add A New Local User screen, the User Login box is where you
define the name of your login account. The Full User Name is where you
put your full name so that it appears right in your e-mail From headers
and all that fun stuff. Because you want to avoid the root account when
possible (see Chapter 3), if the account you’re creating now is the one
that you’ll use most of the time you’re logged in, select the Receive
System Mail box to put an X in it. This way, you get all the system warn-
ings and whatnot here and don’t have to log in as root to see them. On
the other hand, I don’t recommend leaving Auto Login checked. You
should have to actually log into the machine, or it’s too easy for people
to use your account.
ߜ The Release Notes can be worth reading just to see what little things
crop up that might apply to you, and what tips you might find useful for
dealing with your personal setup needs.
ߜ The Hardware Configuration section works just like the others. If you
want to fuss with something, click the appropriate link, and you can
always just leave it as is and look at it later. I deal with sound (see
Chapter 18) and printing (see Chapter 7) later, in particular.
After you’re finished setting up things, you’re brought to a login screen. Go
ahead and start exploring! When you log in, the Welcome To SuSE Linux 9.2
84
Part I: Getting Your Feet Wet
08_579371 ch04.qxd 12/27/04 8:05 PM Page 84
dialog box opens. You can browse through its options by clicking the links or
click the Close link to get rid of it and start playing with your new setup.
About the various SuSE versions
SuSE has a broad range of server and desktop products, from the home user
to the enterprise. As usual, I focus on the desktop. You can examine the full
range of SuSe offerings at its Web site,
www.suse.com, if you’re interested in
finding out more information. The desktop versions available from SuSE
include
ߜ SuSE Linux LiveEval: The SuSE LiveCD. You can download this version
from
www.suse.com/us/private/download/ftp/live_eval_int.
html
, burn it to CD, and boot into a SuSE environment without having to
install. An ISO for this version is included in the
distros folder of this
book’s DVD-ROM. The LiveCD, however, comes in two versions: the KDE-
based version (see Chapter 6), which is the default GUI in SuSE, and a
GNOME version.
ߜ SuSE Linux 9.2 Personal: The SuSE baseline desktop product. Comes
with the LiveEval. You can purchase a boxed set with manuals or down-
load the CD-ROM image from
www.suse.com/us/private/download/
ftp/personal_iso_int.html
.
ߜ SuSE Linux 9.2 Professional: A far more extensive version of SuSE, with
five CDs’ and two DVDs’ worth of material. Useful for both desktop and
server. This is the version of SuSE covered in this chapter.
ߜ SuSE Linux Download: You can download and install SuSE free of charge
beyond the Personal edition, but you’re getting something in between
the Personal and Professional, as some of the software included in the
boxed sets requires license fees to other companies and so cannot be
freely given away without significant cost to Novell. The installation
process in this case isn’t particularly simple, so I don’t typically recom-
mend it to beginners. If you want to find out more about this version, go
to
www.suse.com/us/private/download/suse_linux/ and read the
installation guidelines for the FTP install.
Zapping Frustration with Xandros
Xandros (www.xandros.com) is another commercial distribution especially
designed for people coming over from the Windows world to Linux and is in
particular designed to integrate well with existing Windows networks in the
workplace. It’s another Debian-based distribution that is not meant for those
who want to become Linux geeks and is instead focused on people who just
want to get their work done. An ISO of the free version of this distribution is
included in the
distros folder of this book’s DVD-ROM.
85
Chapter 4: Installing Other Linux Distributions
08_579371 ch04.qxd 12/27/04 8:05 PM Page 85
If you decide to purchase Xandros, you have a number of options:
ߜ Purchase it online and have a physical box shipped.
ߜ Purchase a boxed set in a store. You can find a list of places that carry
Xandros by going to www.xandros.com/partners/channelpartners.html.
ߜ Purchase a computer with Xandros pre-installed (
www.xandros.com/
partners/oempcs.html
).You also have a free option. See the section
“About the various Xandros versions” for more information. Xandros is
also particularly designed to make the transition from Windows to Linux
as simple as possible. As such, you can expect to find the layout and other
issues to be similar to those in Windows XP. One handy item Xandros has
introduced is the Xandros Networks tool, which is accessible from the
desktop as an icon you can double-click. Xandros Networks lets you see
the latest news from Xandros, browse through an online store for soft-
ware, some of which is free to registered users. Downloading and installa-
tion through Xandros Networks requires just a few clicks.
You can purchase, through Xandros Networks, a Premium Membership to get
access to discounts, early access to software, and more.
Installing Xandros
Again, because I cover the full versions of everything else, I cover the full
Deluxe Xandros Desktop OS Version 2.5 installation here. To install this version:
1. Place the CD-ROM into your CD-ROM drive.
2. Reboot your computer.
If your computer ignores the CD, then you need to change your BIOS so
that it looks at the CD-ROM drive before your hard drive(s). (See
Chapters 2 and 3 for more information.) If your computer sees the CD
but seems to have problems launching the installation program, reboot
and press the Shift key as the Xandros screen comes up to see your trou-
bleshooting options.
3. When you reach the Welcome dialog box, click Next.
The End User License Agreement displays.
4. Read the agreement, click I Accept This Agreement and then click
Next.
The Installation Selection screen appears.
5. Choose either Express or Custom Install and then click Next.
I assume that you’ve chosen Custom, because it’s the more complex
option. When you click Next, the Software Selection screen appears
(see Figure 4-10).
86
Part I: Getting Your Feet Wet
08_579371 ch04.qxd 12/27/04 8:05 PM Page 86
6. Select the software group you want to install.
Unless you’re short on space, you might enjoy choosing the Complete
Desktop because it gives you all the software — if you want, choose
Complete to start with and then start removing items by clicking their
checkmarks. Or choose Custom and then start adding things. When you
click an item in the lower list, you see a description on the bottom of the
screen.
If you do choose Complete, do look in the Servers section and remove
Apache (the Web server) from the list, along with FTP Server — unless
you know for a fact that you intend to use an FTP server to let people
get files.
7. After you finish choosing your software, click Next.
The Disk Configuration screen appears.
8. Select the disk configuration option that best represents what you
need to do.
Handily, in some versions, you can resize Windows partitions, even
NTFS ones. I assume that you have a free hard drive that you want to use
for Linux, just to be different from the other sections in this chapter, so I
assume that you selected Take Over Disk Or Partition.
9. When you’re ready to proceed, click Next.
The Disk Configuration dialog box appears, as shown in Figure 4-11.
Figure 4-10:
The
Xandros 2.5
Software
Selection
screen.
87
Chapter 4: Installing Other Linux Distributions
08_579371 ch04.qxd 12/27/04 8:05 PM Page 87
10. If you want to give a partition over to Xandros, then click that parti-
tion in the listing.
For an entire hard drive, you see them listed as IDE2, IDE2, and so on (or
SCSI1, SCSI2, and so on).
11. Click Next to proceed.
The Disk Configuration Summary dialog box appears.
12. Examine the summary and click Back if something’s wrong, or Next if
you’re ready to move on.
The Network Connection Configuration dialog box appears.
13. Select the network device you want to use.
Typically, a desktop machine has only an Ethernet card, modem, or wire-
less card.
14. If you’re supposed to use DHCP, just click Next and skip to Step 18.
Otherwise, click Edit.
The Edit Interface dialog box opens.
15. If you’re using a dial-up modem, select Do Not Configure Network
Interface, click OK, and skip to Step 17. Otherwise, select Static
Address if you were told an IP address to use.
Modem setup is covered in Chapter 8.
16. Fill in the IP Address and Subnet Mask fields as they were given to
you by your ISP and then click OK.
Figure 4-11:
The
Xandros 2.5
Disk Con-
figuration
dialog box.
88
Part I: Getting Your Feet Wet
08_579371 ch04.qxd 12/27/04 8:05 PM Page 88
17. Click Next to continue your installation.
The Administration Configuration dialog box appears.
18. Type your Administrator (root) password in both of the password text
boxes.
See Chapter 3 for a discussion on safe use of the root account.
19. In case your computer needs to integrate with a Windows network,
enter a name for it in the Computer Name text box.
You’re typing the NETBIOS name if you’re familiar with those. Follow the
rules specified in that part of the dialog box. Traditionally, a NETBIOS
name is in all capital letters.
20. Click the Make User Home Folders Private checkbox.
This feature not only make it easier for each user to keep data private,
but helps the layout conform to what Red Hat uses in Fedora, making it
easier for this book to make sense for you.
21. Click Next to proceed.
The User Account Configuration screen appears.
22. Click the Add button to create a normal user’s account.
The Add/Edit User Account dialog box appears (see Figure 4-12).
Because you want to avoid the Administrator (root) account as much as
possible (see Chapter 3), this regular account is the one you use most of
the time.
23. Enter your login name in the User Name text box.
Your login name might be something like
bob.
Figure 4-12:
The
Xandros 2.5
Add/Edit
User
Account
dialog box.
89
Chapter 4: Installing Other Linux Distributions
08_579371 ch04.qxd 12/27/04 8:05 PM Page 89
24. Enter your full name in the Full Name text box.
This name will, for example, as the full name field in your e-mail.
25. Enter your password in both password text boxes and click OK to
create the account.
26. Click Next to proceed.
The Installation Summary dialog box appears.
27. Inspect the summary. If everything is as it should be, click Finish.
Otherwise, click Back as much as you need to in order to fix things
and then work forward to this step once again.
Up until this point, nothing has been changed on your computer. When
you click Finish, your installation actually begins. After it’s done, the
Installation Complete dialog box appears.
28. If you want to create a boot floppy disk (recommended), then put a
floppy disk in your floppy drive and click Create. Otherwise, go to
Step 29.
29. Click Exit once you’re ready to reboot the computer into Xandros.
30. Eject the CD when prompted and press Enter to reboot.
When the Xandros boot screen appears, you can either select the
Xandros option and press Enter, or wait until it starts up on its own.
As with the other distributions covered in this book, Xandros has a number
of post-installation setup tasks for you to walk through. When you reach the
login prompt, use your regular user account, which should automatically be
selected. Type your password and click Login (or press Enter) to log into the
account and start the First Run Wizard. Some notes for walking through this
process:
ߜ Under Regional Settings, Locale is just for your language issues. It doesn’t
have anything to do with your time zone and whatnot. Also, unless you
know for a fact that you want a particular item in Character set, just stick
with what you’re assigned. It’s chosen based on your language, because a
character set is literally the characters you have available to type. It’s the
same with keyboard layout.
ߜ You don’t have to set up your printers right now, but if you want to, go
ahead in the Printers dialog box. I look closer at printers in Chapter 6.
ߜ Under System Behavior, you’re choosing a combination of look and feel
elements (will it look like Microsoft Windows, MacOS, Linux — referred
to as KDE here rather than Linux, you find out more about KDE in
Chapter 6 —, and so on?) along with how the system actually behaves.
My coverage of Xandros in this book sticks to the default Xandros
setting unless otherwise stated, but feel free to play with yours!
90
Part I: Getting Your Feet Wet
08_579371 ch04.qxd 12/27/04 8:05 PM Page 90
ߜ Under Registration, it’s up to you whether you want to register immedi-
ately. You can always register later. You need to register in order to get
technical support, so you’ll probably want to register before you run into
trouble. Registration also lets you download some of the programs avail-
able in Xandros Networks (see the section “Recognizing some Xandros
special features”) for free!
ߜ When you reach the Finish screen, if you’re on a network that’s already
connected to the Internet, click the Xandros Networks icon to update
your system. This action makes sure that you’ve got all the latest secu-
rity and bug fixes. The updater is automatic.
When your update is complete, you’re left with the Xandros Networks screen
in the foreground and the First Run Wizard in the background. Click the First
Run Wizard icon on your lower panel to pull this dialog box to the front and
then click Finish to complete your first run process. You may get a message
that your desktop has to be restarted. Click Yes, which logs you out of your
account and restarts the GUI, bringing you back to a login prompt.
About the various Xandros versions
Xandros focuses on the desktop and has offerings for both home and busi-
ness users. The free and commercial versions from Xandros include (at the
time of this writing):
ߜ Xandros 2.5 Open Circulation Edition: A free version, slightly different
from the main commercial version, available through bittorrent, a P2P
filesharing network popular with legitimate software distributors as a
way to get CD and DVD images quickly to their users. See
www.xandros.
com/products/home/desktopoc/dsk_oc_download_windows.html
for instructions.
ߜ Xandros Desktop OS Version 2.5 Standard Edition: The primary home
use version of the Xandros desktop.
ߜ Xandros Desktop OS Version 2.5 Deluxe Edition: Includes additional
software for interoperating with Windows and Windows software, includ-
ing the ability to resize NTFS partitions.
ߜ Xandros Desktop Version 2.5 Business Edition: Includes extra software
on top of what you would get with the Deluxe Edition, which allows
Xandros to better integrate as a desktop on a Windows network, along
with Sun’s StarOffice, the commercial product behind the
OpenOffice.
.000.org
suite covered in Chapter 17. However, Xandros 3 may well be
available by the time you purchase this book. If so, it’s well worth check-
ing out.
91
Chapter 4: Installing Other Linux Distributions
08_579371 ch04.qxd 12/27/04 8:05 PM Page 91
Using LiveCDs
As I mention throughout this chapter (and book), LiveCDs (or bootable distri-
butions) are versions of Linux that you can launch directly by rebooting a com-
puter using a Live CD-ROM (or DVD-ROM). The beauty of these versions, from a
Linux newbie’s point of view, is that you can try something out without having
to actually install anything on your system. Old-timers love LiveCDs, too. If a
system is broken into, rebooting it with a LiveCD is a way of giving yourself a
“known good” (undamaged) system to work from while repairing the damage
on the computer itself. Also, many bootable distributions offer highly special-
ized environments for particular tasks . . . but I’m getting ahead of myself.
You also need to keep in mind that LiveCDs tend to be slower than a tradi-
tionally installed system. Everything has to run directly from the CD or DVD-
ROM, after all.
Make sure, too, that you’re able save things if you need to. Doing so can
require some planning, or at least a bit of thought — see Chapter 21 for how to
accomplish this. When all else fails, I quickly configure the mail client and just
e-mail attachments to myself. That’s how I got those NTFS resizing images (see
Chapter 2) from Knoppix over to my Fedora machine while writing this book!
You also can usually access your real hard drive space from a bootable distri-
bution, though whether it supports NTFS or not depends on the version.
Knoppix does support NTFS, though it’s best to use it as read-only.
Another popular option with LiveCDs is to use portable storage like USB key-
chains. That way, you can carry around your keychain and your bootable dis-
tribution and have access to your preferred environment and your data at the
same time. The important thing to know about USB storage is that Linux sees
these items as SCSI drives, so if you have to access them manually (see
Chapter 11) you’ll access them as SCSI partitions. For example, if you’ve got
your USB keychain plugged into the first SCSI slot, it would probably be
/dev/sda1.
Finally, not all LiveCDs work with all PCs. The cool thing is that if one doesn’t
work with yours, you just shrug and download another!
Finding Even More Linux
More than 200 different Linux distributions are available today, with new
ones being created every year while others fade from existence as the initial
enthusiasm or funding behind them dwindles away. Many of these distribu-
tions are general purpose, or at least similar purpose (full desktop, full
server, and so on), and so provide similar base software and surrounding
92
Part I: Getting Your Feet Wet
08_579371 ch04.qxd 12/27/04 8:05 PM Page 92
tools to one another with different configurations, documentation, GUI trap-
pings, installation procedures, and other bells and whistles. Even then, some
general-purpose distributions serve some markets better than others. For
example, TurboLinux is popular in Japan, Red Flag Linux is the official choice in
China, and Conectiva is popular in Spanish-speaking countries. More special-
purpose distributions exist as well. LiveCDs fall under this category, but even
they fall into subcategories, with some of them (like Knoppix) serving the
general-purpose segment, while others are fine-tuned as multimedia centers,
system-rescue environments, and other cool specialist toys. To dig through the
many distributions available, check out DistroWatch (
www.distrowatch.org)
and let your mouse do the walking through over three-hundred distributions. If
you can’t find enough to choose from here, go to this site’s Related Links sec-
tion, and you can find plenty more.
If you don’t want to download and burn all this stuff and don’t know any help-
ful Linux geeks, you may want to look up a local Linux Users Group (LUG).
You can find a list of LUGs worldwide, listed by geographic region, on the
GLUE (Groups of Linux Users Everywhere) Web site:
www.ssc.com:8080/
glue/groups
. These folks are always happy to help the technologically chal-
lenged. These user groups also regularly sponsor events, called demo days or
install-fests, where you can bring your computer and get all the help you need.
These events are usually lots of fun for computer enthusiasts — hot- and
cold-running caffeine and enough know-how to do just about anything with a
computer.
93
Chapter 4: Installing Other Linux Distributions
08_579371 ch04.qxd 12/27/04 8:05 PM Page 93
94
Part I: Getting Your Feet Wet
08_579371 ch04.qxd 12/27/04 8:05 PM Page 94
Chapter 5
Booting and Stopping Linux
In This Chapter
ᮣ Understanding what happens when you turn on your Linux machine
ᮣ Identifying and isolating boot problems
ᮣ Shutting down safely
I like work; it fascinates me. I can sit back and look at it for hours.
— Jerome K. Jerome
I
f you came here from Chapter 3 or 4, you likely just survived the first gaunt-
let of the Linux world: installing the operating system. I hope that booting
for the first time worked well. If it did and you decide that most of this chapter
isn’t for you, at least skip to the last section in this chapter, “Don’t Just Turn
Off the Machine!” Otherwise, if you’re interested in learning about what your
machine does as it boots (this chapter can get pretty geeky!), read on.
Your Linux installation failing to boot properly is not necessarily an emer-
gency. Much of this chapter is designed to help you deal with any problems
you might run into. Before you curse Linux, remember that installing an oper-
ating system is no small task and that, because many technical variables are
associated with such an installation, many computer manufacturers insist on
performing the task at the factory. Companies such as Hewlett Packard and
Wal-mart (believe it or not) have been offering Linux pre-installed, so if you’re
too discouraged at this point or are reading ahead and are too nervous to
give it a shot, you can either use Knoppix (see Chapter 4 for how to use
Knoppix without having to install it) or purchase a pre-installed machine
from a vendor or a local computer builder.
To unravel the mystery of a Linux system that won’t boot requires a bit of
understanding of how your computer starts up.
09_579371 ch05.qxd 12/27/04 8:04 PM Page 95
Giving Linux the Boot
Let’s face it: As enjoyable as the experience of staring at a dormant computer
is, the real fun starts when you turn on the computer. As with any electronic
device, opening the electron floodgate is the first step to fun. A computer,
however, has much more stuff to do than your toaster oven. Rather than act
as a simple heating element, your computer has to check all those gizmos
that you (or the manufacturer) plugged into your computer’s motherboard.
After the initial power-up, the computer performs some simple hardware
tests (called the POST, or Power-Up Self Test) to determine whether those
various components are working properly.
Checking all your hardware is just the beginning. Between the time you turn
the computer on and the moment the glowing phosphor on your monitor
prompts you for a login name, the computer is building itself an empire. If
you listen and watch carefully, your computer and monitor show signs of the
boot process through bleeps, buzzes, whirring motors, clicks, messages on
the monitor, and blinking lights.
Although you have heard the cliché “Rome wasn’t built in a day,” the boot
process goes fairly quickly. This is pretty amazing, considering that the archi-
tecture of an operating system makes Rome’s look like a stack of cardboard
boxes and that each time you power up your computer, it must build its
whole operating system in memory. (Remember that an operating system is
the core software that makes your computer work.) This process can be
broken into four main steps, which I discuss in the following sections.
Step 1: Power-On Self-Test
(POST) leads to BIOS
The POST process really has nothing to do with the operating system. Your
computer performs this step whether you’re running Linux or another oper-
ating system such as Windows XP.
Some symptoms of a failed POST include
ߜ An unusual series of long and short beeps.
ߜ Nothing displayed on the monitor.
ߜ No apparent activity other than the whirring fan on the power supply.
ߜ A puff of smoke or the pungent smell of burning electrical components
from your computer case.
ߜ An error message, displayed on the monitor, indicating a hardware failure.
If you encounter any of these problems, you have hardware troubles that
need to be resolved before you can proceed. Chances are, if your computer
96
Part I: Getting Your Feet Wet
09_579371 ch05.qxd 12/27/04 8:04 PM Page 96
was running properly before you began your Linux installation, your com-
puter should be getting through the POST just fine — POST problems don’t
tend to be caused by installing a new operating system; they’re far more fun-
damental to the computer itself.
For all but the last of these errors, it’s time to question your nephew Mortimer,
who was last seen lurking around your computer with a screwdriver. (Or take
your computer into a computer repair shop!) If you see an error message indi-
cating a hardware failure, you might have a shot of fixing the problem in the
BIOS. As the POST does its thing and finishes up, it briefly displays (usually at
the bottom of the screen) instructions on how to enter “setup.” Typically, these
instructions mention pressing the DEL key or a function key such as F1. When
you press this key, if all goes well, you usually see a blue screen with black and
white text. From here, if you’re familiar with your hardware, you can try to
figure out and fix the problem. However, many people would rather have a root
canal with no anesthesia than mess with this stuff, so you may want to grab the
nearest teenager or computer repair shop to take a look.
The good news is that if you can get to the BIOS at all, the problem may be
easier to fix than one where the computer fails before you reach the BIOS.
Step 2: The BIOS passes the
baton to the boot loader
After the BIOS gives the okey-dokey with a successful POST, the BIOS locates
the first hard drive in your system and reads the first sector of that disk, which
is often referred to as the MBR (Master Boot Record). On that first chunk of
disk is a small program called a boot loader. The boot loader doesn’t know
much about anything, except how to start loading your operating system.
Two boot loader programs understand how to load a Linux operating system:
LILO (LInux LOader) and GRUB (GRand Unified Boot loader). LILO has been a
tried-and-true boot loader for as long as Linux has been a gleam in a geek’s
eyeball. GRUB is a newer and much more sophisticated boot loader program
than LILO. Many distributions allow you to choose your boot loader. Typically,
most people just stick with the defaults, which are as follows for the five dis-
tributions discussed in this book:
Distribution Default Boot Loader
Fedora Core GRUB
Linspire LILO, with its own special routines on top of it.
Mandrake LILO
SuSE GRUB
Xandros LILO, with its own special routines on top
97
Chapter 5: Booting and Stopping Linux
09_579371 ch05.qxd 12/27/04 8:04 PM Page 97
Sometimes “bad things” can happen to your boot loader. One common symp-
tom of boot loader problems is a message saying that the operating system
could not be found. Another hint that the problem is your boot loader is if you
never see your boot menu, which is a screen that comes up during the boot
process that lets you choose what operating system and version to boot.
The boot menu will look different from distribution to distribution.
If you suspect a boot loader problem, see the section “Entering Rescue
Mode,” later in this chapter. For another option, see the sidebar “Custom
Boot Disks.”
Step 3: The boot loader (GRUB or LILO)
loads the system kernel into memory
Every computer (and electronic device) requires an operating system to run.
The technical term for this operating system, or at least the core of it, is the
kernel. If the kernel is your maestro, orchestrating all the components of your
computer and delegating resources in a logical and cooperative manner, the
boot loader is the red carpet on which the maestro arrives.
Many Linux distributions today actually put up a GUI progress screen during
the kernel loading and system initialization phase (after the kernel finishes
loading, when it finishes up the boot process). If you want to see what hap-
pens, you can typically click an icon or press a key. Just look for instructions
on how to “see details.”
98
Part I: Getting Your Feet Wet
Custom boot disks
You can protect against boot loader failures after
you get your installation working by making a
custom boot floppy disk, which you can use to
boot the system if the boot loader on your hard
drive gets corrupted. Many distributions have
special programs or tools available to make
custom boot disks for you, and some will offer to
make the disks during installation. The programs
to make a disk manually are mkbootdisk for
Fedora Core and Mandrake, drakfloppy for
Mandrake as well, yast for SuSE, and build-boot-
floppy for Xandros. However, a custom boot disk
won’t help you if something goes wrong with the
later boot steps. It’s only good for boot loader
problems. After you manage to boot with the
floppy, open a terminal window (see Chapter 14),
type
su - to become the root (administrative)
user, and then double-check which boot loader
your distribution uses. For LILO, type
lilo -v
to try to repair your boot loader on your hard
drive. For GRUB, look in the file
/boot/grub/
menu.lst
and look for a line in the beginning
with the text “boot=” — for example, it may say
boot=/dev/hde. Then, type grub-install
bootdrive
, where bootdrive is the hard drive
listed in the boot line, such as
grub-install
/dev/hde
. Now you can try rebooting without
the floppy in the floppy drive.
09_579371 ch05.qxd 12/27/04 8:04 PM Page 98