Linux For Dummies 6th Edition phần 7 pptx
Bạn đang xem bản rút gọn của tài liệu. Xem và tải ngay bản đầy đủ của tài liệu tại đây (1.13 MB, 46 trang )
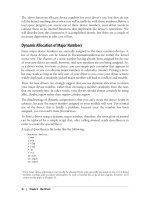
6. When you’re ready to add all the software you’ve selected, click
Install.
If some of the software comes from your Mandrake CDs, you’re asked to
insert the appropriate CD when it’s needed.
7. Once you’re finished, click Quit.
Adding the software in this book
To add the particular programs discussed in this book, add the following
packages using the Installation Manager:
ߜ Firefox: mozilla-firefox (search on mozilla)
ߜ Thunderbird: mozilla-thunderbird (search on mozilla)
ߜ Flash plugin: swfdec-mozilla (search on mozilla)
For RealPlayer and browser support for Java, however, see the Fedora sec-
tion for how to add these items by hand.
Sassing with SuSE
SuSE’s boxed sets come with an amazing amount of software. Just navigating
the maze of what’s included can be enough to make you tear your hair out if
you don’t know how to use the software management tools. Don’t worry. I
Figure 12-15:
The Man
drake 10.1
Software
Packages
Installation
dialog box.
258
Part III: Getting Up to Speed with Linux
18_579371 ch12.qxd 12/27/04 8:37 PM Page 258
don’t want to see any of you go bald (or more bald than you already are!) So,
here’s how you use it.
As with most SuSE administration functions, start by choosing System➪YaST
to pull up the SuSE administration tool. From there:
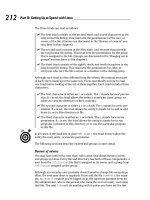
1. Choose Software➪Install And Remove Software.
The software management dialog box appears, as shown in Figure 12-16.
2. Under Search in, click Description to make sure that you’re searching
in program descriptions for your keywords.
3. Enter your keyword in the Search text box.
For example, maybe you want to see what SuSE offers involving the
quicktime movie format.
4. Click Search.
A progress bar probably appears to let you know that SuSE is searching
through all the program names and descriptions. When the search is
complete, a list of possibilities appears in the top right of the dialog box.
5. Click a program to learn more about it.
More information appears on the lower right portion of the window.
Figure 12-16:
The SuSE
YaST
software
manage-
ment dialog
box.
259
Chapter 12: Adding Software to Linux
18_579371 ch12.qxd 12/27/04 8:37 PM Page 259
6. For the programs you want to install, click the box next to the item to
add a checkmark.
7. Continue searching and selecting software.
8. When you’re ready to proceed, click Accept.
If there are no dependencies, then the installation begins. If other pro-
grams need to be added in order to satisfy dependencies, the Changed
Packages dialog box appears. Click Continue to accept these additional
packages.
9. Insert the appropriate CDs as they’re requested.
After everything is installed, SuSE rebuilds the necessary configuration
files, and then the software installation tool closes.
Prefer to use the DVDs? When you first enter YaST, choose Software ➪Change
Source Of Installation. In the Software Source Media dialog box, choose Add➪
DVD to add the DVDs to the list. Then select the DVD entry in the listing and
click Up so that it’s in the list before the CDs. Click Finish, and you’re ready to
move on!
After you’ve added the software, because you’re adding it from the installa-
tion media, you will probably want to update your system so that you get the
latest versions of what you just added.
Adding the software in this book
To add the various programs discussed in this book, open up the YaST soft-
ware management tool as discussed in the previous section, and then, in the
Filter drop-down list box, choose Package Groups. Now you can see on the
left a list of all the major package groups; and on the right are the contents of
the selected group. You can find the programs you’re looking for in the fol-
lowing Package Groups locations:
ߜ Macromedia Flash plug-in: Choose Productivity➪Networking➪Web➪
Browsers➪flash-player.
ߜ Java support: Development➪Languages➪Java➪java2-j2re.
ߜ Firefox: Productivity➪Networking➪Web➪Browsers➪MozillaFirefox.
Xipping with Xandros Networks
Just as Linspire users can use the CNR Warehouse to add software, Xandros
users can use Xandros Networks. To add software using this tool:
1. Double-click the Xandros Networks icon on your desktop.
The Xandros Networks dialog box opens.
260
Part III: Getting Up to Speed with Linux
18_579371 ch12.qxd 12/27/04 8:37 PM Page 260
2. Click the plus next to New Applications to expand that section of the
menu.
3. Browse through the categories.
4. When you find a program you want to install, click the Install Product
link next to it.
The Install Software dialog box appears.
5. Click OK in the dialog box to download and install the program.
You may be asked to enter your root (Administrator’s) password. Then,
the software is downloaded and added to your machine. No muss, no
fuss! When the update is complete, the Updating System dialog box
stays open.
6. Click Close to close the Updating System dialog box.
7. If you want to add more software, return to Step 3. If you’re finished,
choose File➪Quit.
Adding the software in this book
Many of the programs discussed in this book are either already installed
(such as the Flash and Java plugins) or aren’t offered through Xandros
Networks. You can find Kmail by choosing Internet➪KDE Mail in the New
Applications section. To add more software to your system, see the section
“Finding More Software.”
Finding More Software
What if you can’t find what you’re looking for through the official (and not so
official) sources discussed in the previous section? Those aren’t your only
options. While I can’t anticipate every situation you might find yourself in, I
can at least give you some tips for how to find extra software and how to
install much of it.
The general steps for finding new software involve
1. Find out what you want by opening your favorite Web search engine
and searching on a feature and the word
linux.
For example, maybe you want something comparable to the program
irfanview from the Windows world, so you would search on
irfanview
linux
.
2. Sort through the search results and see whether a particular program
is suggested. If not, then add the word
equivalent to your search and
search again.
261
Chapter 12: Adding Software to Linux
18_579371 ch12.qxd 12/27/04 8:37 PM Page 261
So, to continue the example, you would search again but this time using
irfanview linux equivalent. Now you start to see a program called
xnview mentioned. It wouldn’t hurt to turn around and look and see
whether your distribution’s software installation manager offers this
program, before you bother installing it by hand.
3. Do a Web search on the Linux program you’re interested in.
You more often than not find the program’s home page.
4. Click through to that program’s home page.
5. Click through the Download link on that page.
6. Locate and download the most specific version matching your
distribution.
You may be offered, say, Windows, Unix, and Linux options. You would
choose Linux in that case. If offered Linux x86 versus Linux ppc, choose
x86 unless you’re using Linux on an Apple Macintosh computer (which
is not covered in this book). If you’re offered an RPM or a tarball (see the
beginning of this chapter for more information on these), then choose
an RPM if you’re using Fedora, SuSE, or Mandrake, and a tarball if you’re
using Linspire or Xandros — or if you tried the RPM on your Fedora,
SuSE, or Mandrake system and it didn’t work.
7. Once you have the program downloaded, install it as follows:
• If it’s an RPM, open your file manager and double-click the down-
load in order to install it.
• If it’s a tarball, open your file manager and double-click the file in
order to open it up and look at its contents. There should be a file
in there called README or INSTALL. This file contains instructions
on what you need to do, and there may be more instructions avail-
able on the Web site itself. Working with tarballs just requires prac-
tice; it gets easier over time, so extract the file and get to it!
Upgrading Your OS
When a new version of your Linux distribution comes out, you may find that
you want to upgrade to it. Typically, you can upgrade by downloading or pur-
chasing the new version, starting it just as you would start a new installation
but choosing Upgrade instead of Install. That’s it!
262
Part III: Getting Up to Speed with Linux
18_579371 ch12.qxd 12/27/04 8:37 PM Page 262
Chapter 13
A Secure Linux Box Is
a Happy Linux Box
In This Chapter
ᮣ Implementing strong passwords
ᮣ Keeping your system up to date
ᮣ Plugging security holes
ᮣ Using the System Logs Viewer
ᮣ Securing your system by using best practices
I am Inspector Clouseau, and I am on official police business.
— Inspector Clouseau
Y
ou don’t leave the front door of your house open when you go to work,
do you? How about leaving it shut and locked but with a few nice, big
windows open? The problem is that many people do this every day with their
computers, and they don’t even know it! In this chapter, I take a look at where
your open doors and windows are and what you can do to secure them.
Every user’s actions affect your overall system security. If your family mem-
bers or officemates need access to your Linux machine, take the time to sit
down and explain the facts of secure life to them. They can then apply this
information to the other computers they use, because these issues aren’t
specific to Linux.
Choosing Secure Passwords
The first line of defense from intruders is the collection of passwords used
on your system. For each account you have set up on your system, the pass-
words must be strong and difficult to figure out. If even one of the accounts
has a weak password, you may be in for some trouble. Amazingly enough,
in 70 percent of the cases where unauthorized individuals gained access to
19_579371 ch13.qxd 12/27/04 8:35 PM Page 263
systems, the password for an account was the word password itself! When
choosing good passwords, follow these rules:
ߜ Don’t use any part of your name.
ߜ Don’t use the names of friends, loved ones, or pets.
ߜ Don’t use birthdays, anniversaries, or other easily guessed dates.
ߜ Don’t use dictionary words.
ߜ Don’t keep your password written down near your computer, unless it’s
buried in something else, such as writing it into an address.
ߜ Don’t tell anyone your password. If someone needs to access specific
files, give the person an account and set up permissions and groups
properly so that they can do so.
ߜ Do use a mix of lowercase letters, capital letters, and numbers.
ߜ Do ensure that your password contains a minimum of eight characters.
ߜ Do use acronyms made from sentences, such as having the password
M8yodniT to stand for “My eight-year-old dog’s name is Tabby.”
Every person on your system needs to follow these rules, including you!
Consider keeping a sheet of paper with these rules on it next to the machine.
I can’t stress this advice enough: Never give out your password. Make sure
that the people using your machine understand this rule. You can always find
alternative methods to accomplish a task without giving out your password.
If someone wants to use your machine, make an account for that person.
Then they can have their own password!
Updating Software
All users can download and install new software. Of course, the programs
they install are limited to the user’s own permissions. The thing to be careful
of here — with any operating system — is that you don’t get a version of a
program that has been tampered with or is even an all-out fake trying to trick
folks into installing it.
Most Linux applications and other Linux software programs are distributed
by way of the Internet. In fact, the development cycle of new (and updates
to) Linux software revolves around the Internet for file exchange, e-mail, and
forum or newsgroup discussions. Make sure that you and other users of your
Linux system are comfortable with the Web sites that are used and visited.
You need to develop a list of trusted sites that provide you with the informa-
tion you need and are not misleading in their presentation. As a starting
point, you can trust all the Web sites referenced in this book because I have
accessed them all. If either you or a user of your Linux system is unsure
264
Part III: Getting Up to Speed with Linux
19_579371 ch13.qxd 12/27/04 8:35 PM Page 264
whether you can trust a particular Web site, do some research and perhaps
ask others for their opinions.
Chapter 12 details how to keep your distribution and its software up to date.
Please, please, please, do so! After all, as the person in charge, your job is to
make sure that this computer stays intruder-free. In addition to making sure
that you do all the same things a user would do for both your user accounts
and the superuser (root) account, no matter which Linux distribution you’re
running, you must keep up-to-date with security problems.
Network holes
On a Linux server or workstation — or any computer at all, using any operat-
ing system — you should not have any network services running that you
don’t intend to use. Think of each network program running as a glass
window or sliding glass door in your house. Each network service is a weak
spot, and many nasty folks are out there on the Internet who like to go up to
all the houses and make note of how many windows and glass are on them,
what kinds they are, and how easy they are to breach.
Controlling your services
The more flexible your distribution — as far as its ability to run desktops and
many types of servers — the more services it may have running in the back-
ground by default. To open the network service management program for
your distribution:
ߜ Fedora: Choose Applications➪System Settings➪Server Settings➪
Services (see Figure 13-1).
ߜ Knoppix: From the main menu, choose KNOPPIX➪Services. There is no
central service control unit, but because this distribution is designed as
a desktop, few services are available. This menu contains each service
you have access to.
ߜ Linspire: There is no central service configuration point, but this distri-
bution is designed to be purely desktop, so there is little to do here
anyway.
ߜ Mandrake: From the main menu, choose System➪Configuration➪
Configure Your Computer➪System➪Services.
ߜ SuSE: From the main menu, choose System➪YaST➪Network Services.
There is no central service control unit, but in this section, you can
select each service individually to see whether it’s on and find out more
about it. If you’re asked to install software when selecting a service, say
no if you don’t intend to use it! Clicking Cancel does the trick.
ߜ Xandros: Choose Launch➪Control Center➪System Administration➪
Services. There are few services here to deal with, however, because this
system is designed strictly as a desktop.
265
Chapter 13: A Secure Linux Box Is a Happy Linux Box
19_579371 ch13.qxd 12/27/04 8:35 PM Page 265
Services you may be interested in turning on or off include
ߜ apmd: This service may not be necessary in anything but a laptop. It’s
used for monitoring battery power.
ߜ iptables: This service is your firewall (more on the firewall in the section
“Controlling and adjusting your firewall” later in this chapter). If you
need to momentarily shut it down, you can do so using the service con-
trol dialog box.
ߜ isdn: This daemon is typically on by default in some distributions “just
in case,” but if you’re not using ISDN networking (see Chapter 8) you
don’t need it.
ߜ kudzu: If you’re using Fedora and keep getting bugged about hardware
stuff at boot time, shutting off this service will stop those messages. You
can run it manually as root if you change hardware later.
ߜ lisa: Discussed earlier in Chapter 11 in conjunction with network brows-
ing in certain distributions.
ߜ mDNSresponder: Shut this service off unless you’re a Howl (
www.porch
dogsoft.com/products/howl
) devotee. The nifd service should also
be on or off (matching) with this one since it’s related.
ߜ mdmonitor: Shut this service off unless you implemented software RAID
during your installation. (You had to go out of your way to do so, so if
you don’t know, you probably didn’t!) If you change this service to on or
off, make sure that mdmpd is also on or off (matching) as well.
Figure 13-1:
The Fedora
Service Con-
figuration
dialog box.
266
Part III: Getting Up to Speed with Linux
19_579371 ch13.qxd 12/27/04 8:35 PM Page 266
ߜ pcmcia: You only need this on laptops. It’s for PCMCIA card support.
ߜ sendmail: Even though you’re probably not in need of a full-fledged mail
server, shutting this service off can have unintended consequences
since it’s used to even handle internal mail on your system. Leave it on.
ߜ smartd: If you’re getting errors for this one at boot time, shut it off. It
only works with certain IDE hard drives, so if you’re not using that type
of drive, it gives a (harmless) error.
ߜ spamassassin: If you want to use this program in conjunction with your
mail program, go for it! This program is used by default with Evolution in
Fedora (see Chapter 9), so if you’re using this combination of tools leave
this service on.
ߜ yum: On Fedora, lets you run a nightly automatic update for those
whose machines are connected overnight.
In Fedora, when you check or uncheck a service, you make sure that it does
or doesn’t turn on when you reboot. You need to use the Start and Stop but-
tons to deal with it immediately. Use the bottom right part of the dialog to
see whether Fedora is running right now.
Controlling and adjusting your firewall
Even better (but just as essential) than turning off unnecessary services is to
make sure that you have a firewall in place. A firewall is like putting a big
bunker around your house. It would then have openings that only fit people
wanting to do certain kinds of things. Friends could fit in through one door,
family another, and package deliveries to another.
In computer networks, each of the services discussed earlier always comes in
through the same door (port, in computer-world lingo). You use firewalls to
prevent anyone from being able to so much as touch a door, or port, unless
you’ve explicitly set it up so that they can do so. This technique is especially
important if you’re on a cable network (see Chapter 8), where there’s always
some overactive jerk out there using his computer to knock on every other
computer on the network’s doors to see where it can get in.
You probably already did some basic firewall setup during installation. If you
ever want to make changes, do the following:
ߜ Fedora: Choose Applications➪System Settings➪SecurityLevel (see
Figure 13-2).
ߜ Knoppix: None. But, then, what could they change on a system running
from CD-ROM? Not much.
ߜ Linspire: From the main menu, choose Programs➪Utilities➪CNR More➪
Firestarter. This tool helps you set up your firewall and is installed under
the Utilities menu.
267
Chapter 13: A Secure Linux Box Is a Happy Linux Box
19_579371 ch13.qxd 12/27/04 8:35 PM Page 267
ߜ Mandrake: From the main menu, choose System➪Configuration➪
Configure Your Computer➪Security➪Firewall. Uncheck the first box
and when asked if you want to install Shorewall, say yes.
ߜ SuSE: From the main menu, choose System➪YaST➪Security and Users➪
Firewall.
ߜ Xandros: Go to the Xandros Networks tool (see Chapter 12) and choose
New Applications➪System➪Administrator Tools➪Firestarter. This tool
helps you set up your firewall and is installed under Launch➪
Applications➪System➪Administrator Tools➪Firestarter.
Your options are typically something like Enable Firewall and Disable Firewall.
If you have your computer directly connected to the Internet — and most com-
puters are — make sure to use Enable Firewall. The only time that you should
not have this firewall in place is when your machine(s) are behind a strong fire-
wall already, or you have a critical application that won’t work otherwise. For
just one application, though, that’s one huge risk! You can find out how to open
up the proper doors in the firewall for that one program instead.
Firewall lingo you may find handy includes
ߜ eth0: Your first Ethernet (network) card.
ߜ ppp0: Your first modem.
ߜ HTTP and HTTPS: Web stuff; only needed if you’re running a Web
server.
Figure 13-2:
The Fedora
firewall
control
dialog box.
268
Part III: Getting Up to Speed with Linux
19_579371 ch13.qxd 12/27/04 8:35 PM Page 268
ߜ FTP and FTPS: FTP server stuff; you don’t need it if you’re not running
an FTP server.
ߜ SSH: Select this one to keep open. I explain it in the next section.
Additional “security” products from Linspire include (in their Click And Run
Warehouse under Services) SurfSafe parental controls and VirusSafe antivirus
software.
The Secure Shell game (SSH)
One cool thing about Linux is that you can use the command line to connect
to your account from anywhere, as long as you have the right software (and
the machine you’re connecting to isn’t behind some kind of blocking soft-
ware). Some people tell you to use the
telnet program to do this, but I beg
you not to. Do not open the Telnet port in the security tool and do not use
the
telnet program. It sends information across the Internet in nice, raw text
that anyone can snoop through.
First, you need to make sure that you enable SSH in your firewall. (See the
section “Controlling and adjusting your firewall,” earlier in this chapter). In
Linspire, you need to add the program to connect out from your machine
using SSH:
1. Open the CNR Warehouse (see Chapter 12).
2. Choose Install CNR Warehouse➪Utilities➪Security & Encryption➪
Secure Shell.
In some other distributions, you need to do the following to let people
ssh
into the machine (the distributions not mentioned here are set up to do so by
default):
ߜ Knoppix: From the main menu, choose KNOPPIX➪Services➪
Start SSH Server.
ߜ Mandrake: Use the software installer (see Chapter 12) to add the
openssh-server program. Then, use the services control interface (see
the section “Controlling your services,” earlier in this chapter) to acti-
vate
sshd.
ߜ Xandros: Do the following:
1. Choose Control Center➪Services.
2. Click the Administrator button and enter your root (administra-
tor) password.
3. Select ssh in the list.
4. Click Properties.
269
Chapter 13: A Secure Linux Box Is a Happy Linux Box
19_579371 ch13.qxd 12/27/04 8:35 PM Page 269
5. In Start Mode, select System Startup.
6. Click OK.
7. If in the Status column, the ssh row doesn’t say Running, click
Start to start the server.
8. Choose File➪Quit.
Installing a Windows SSH program
If you want to connect to your SSH-enabled Linux box — or, actually, to any
computer set up to accept SSH connections, not just a Linux one — from a
Windows computer, go to
www.siliconcircus.com/penguinet/ and get
the PenguiNet telnet and SSH client for Windows (please don’t use this for
telnet, just SSH). A 30-day trial version is available, and if you like it, the full
version is only around $25.
To install PenguiNet under Windows after downloading
PN2setup.exe, just
follow these steps:
1. Open your file manager (such as Windows Explorer), browse to where
you saved the download, and double-click the
PN2setup.exe program.
This action opens the PenguiNet Setup Wizard.
2. Click Next to proceed.
The License Agreement dialog box opens.
3. After you read the agreement (something you should always do), click
I Accept This Agreement and then click Next to proceed.
The Select Destination Directory dialog box opens. I usually just stick
with the defaults.
4. After you select the directory in which to install PenguiNet, click Next.
The Select Start Menu Folder dialog box appears.
5. After you select the proper folder, click Next.
The Select Additional Tasks dialog box appears. If you want to create a
desktop icon or Quick Launch button, select the appropriate check boxes.
6. After you have chosen your additional tasks, click Next.
The Ready To Install dialog box appears.
7. Click Install to begin your PenguiNet installation.
An installation progress dialog box appears. When the installation is fin-
ished, the final installation screen appears.
8. Select one or both of the final items.
I recommend that you check at least Run PenguiNet. You may also want
to select View The PenguiNet Documentation if you like to get familiar
with programs by reading their manuals.
270
Part III: Getting Up to Speed with Linux
19_579371 ch13.qxd 12/27/04 8:35 PM Page 270
9. Click Finish.
The PenguiNet window appears (if you checked Run PenguiNet), as
shown in Figure 13-3.
Setting up and making your SSH connection in Windows
Either you have PenguiNet open from having installed it, or you need to open
it now from your desktop shortcut or the Start menu. After you have done so,
follow these steps:
1. Choose Session➪Connection Profiles.
The Connection Profiles dialog box opens, as shown in Figure 13-4.
Figure 13-4:
The
PenguiNet
Connection
Profiles
dialog box.
Figure 13-3:
The
PenguiNet
connection
program in
Windows.
271
Chapter 13: A Secure Linux Box Is a Happy Linux Box
19_579371 ch13.qxd 12/27/04 8:35 PM Page 271
2. Click Add to open a new profile.
3. Enter the name for this profile in the Profile Name text box.
4. Enter your Linux box’s IP address in the Host text box.
5. Enter your Linux login name in the Username text box.
You cannot use the root account here. Doing so is terribly bad for security.
6. Enter your Linux login password in the Password text box.
7. Click Connect to make the connection to your Linux machine.
The Host Key Not Found dialog box opens the first time you connect
this way. Click Connect and save the host key. You don’t have to do this
step again from this Windows machine. Check out Figure 13-5 to see a
Linux command-line interface window on a Windows box! (I’m not sure
why this default font is so “freehand”; you can change it for all your
sessions by choosing Format➪Change Font or per Connection Profile
in the Preferences menu by selecting the profile and clicking the
Appearance tab.)
When you’re finished, type logout at the command line, and your connection
closes.
Figure 13-5:
Your Linux
command
line in
Windows!
272
Part III: Getting Up to Speed with Linux
19_579371 ch13.qxd 12/27/04 8:35 PM Page 272
Connecting to your Linux box from another Linux box with SSH
Yes, you can connect from another Linux box, too. This task is a bit less com-
plicated. Open a terminal window (see Chapter 14) and follow these steps:
1. Type
ssh username@ipaddress to open the connection.
For example, type
ssh After you do this step, the
following text appears:
The authenticity of host ‘192.168.1.6 (192.168.1.6)’
can’t be established.
RSA key fingerprint is
ed:68:0f:e3:78:56:c9:b3:d6:6e:25:86:77:52:a7:66.
Are you sure you want to continue connecting (yes/no)?
2. Type yes and press Enter.
You now see these lines:
Warning: Permanently added ‘192.168.1.6’ (RSA) to the
list of known hosts.
’s password:
3. Enter your login password and press Enter. Now you’re in!
Close the connection by logging out of the account (type logout).
Connecting to your Linux box from a
Macintosh running OS X with SSH
The process from a Macintosh is similar to that under Linux. Go to
Applications➪Utilities➪Terminal.app, which opens a command line window
for you. Then type
ssh IPaddress
to access the same user account on the remote machine, or type
ssh login@IPaddress
if you want to access the account login instead of the same account you’re
using on the Mac.
Software holes
When someone is already in your system — whether or not they’re allowed
to be there — you have additional security concerns to keep in mind. One of
these involves what software you have on the machine. Believe it or not, each
piece of software is a potential security hole. If someone can get a program to
crash in just the right way, they can get greater access to your system than
they should. That’s a very bad thing!
273
Chapter 13: A Secure Linux Box Is a Happy Linux Box
19_579371 ch13.qxd 12/27/04 8:35 PM Page 273
One way to close software holes is to remove all programs you don’t need.
You can always add them later, if necessary. How exactly you do this task
depends on the package-management scheme your distribution runs:
ߜ Fedora: You can use yum at the command line or gyum’s Remove tab
(see Chapter 12).
ߜ Knoppix: You run it off CD, so it’s hard to remove anything!
ߜ Linspire: Open the CLICK and Run client (Chapter 12), click the My
Products tab, select the program you want to remove from the list, and
then click Uninstall Selected.
ߜ Mandrake: From the main menu, choose System➪Configuration➪
Packaging➪Remove Software. In the dialog box, check the boxes for the
programs you want to remove. When you’re ready to proceed, click
Remove.
ߜ SuSE: Choose System➪YaST➪Software➪Install And Remove Software.
Locate the program you want to remove (see Chapter 12). Installed soft-
ware has a checkmark next to it. Click the mark until it becomes a trash
can and then click Accept.
ߜ Xandros: Open the Xandros Networks client as discussed in Chapter 12.
Choose Installed Applications, browse to the program you want to
remove, and click the Remove link.
If it turns out that, as a result of dependencies, you lose other software that
you want to keep, make sure to cancel the removal.
Introducing SELinux
SELinux, or Security-Enhanced Linux (www.nsa.gov/selinux/index.cfm)
was developed by the National Security Agency (NSA) in the United States to
add a new level of security on top of what’s already available in Linux. To use
SELinux in your distribution:
ߜ Fedora: Open the firewall control tool (see the section “Controlling and
adjusting your firewall,” earlier in this chapter) and click the SELinux
tab. If you want to just see what SELinux would do, check the Enabled
check box (if it isn’t already checked). If you want to enforce the policies
you’ve created, check the Enforcing Current check box. To completely
deactivate it (which will probably speed up your boot time), make sure
that both boxes are unchecked. My best advice for playing with this
advanced feature is to go and read the site mentioned at the beginning
of this section and then the Fedora-specific FAQ at
hat.com/kwade/fedora-docs/selinux-faq-en/
.
ߜ Knoppix: Not available.
274
Part III: Getting Up to Speed with Linux
19_579371 ch13.qxd 12/27/04 8:35 PM Page 274
ߜ Linspire: If you open the CNR client (see Chapter 12) and search for
selinux, you find a number of options. These packages are still in devel-
opment as of this writing.
ߜ Mandrake: Use the software installation tool (see Chapter 12) and install
the program libselinux — this step requires you to have added external
repositories (see Chapter 12). However, utilizing this tool has been left a
fairly advanced exercise for the truly curious.
ߜ SuSE: Installed by default.
ߜ Xandros: Not available.
SELinux is overkill for the average desktop user, but using it on your desktop
can be useful when it comes to learning how SELinux works.
Keeping an Eye on Your Log Files
with the System Log Viewer
One other security issue you may want to configure concerns log files. Your
network programs, kernel, and other programs all run log files, which contain
records of what has been happening on your system. You may be amazed at
just how much information gets put in them! They’re mostly in
/var/log;
take a look sometime.
Fortunately, tools are available that can help mere mortals sift through the
wheat to look for the chaff of bugs and intruders.
To find your distribution’s System Logs viewer:
ߜ Fedora: Choose Applications➪System Tools➪System Logs (see
Figure 13-6).
ߜ Knoppix: None.
ߜ Linspire: From the CNR Warehouse (see Chapter 12), choose Utilities➪
XWatch.
Sometimes the fastest way to find a program in the CNR Warehouse is to use
the Search text box.
ߜ Mandrake: Using Chapter 12, install swatch. Then, from the main menu,
choose System➪Monitoring➪System Log.
ߜ SuSE: Use Chapter 12 to install kwatch, and then start it by choosing the
main menu➪System➪Monitor➪kwatch.
ߜ Xandros: None.
275
Chapter 13: A Secure Linux Box Is a Happy Linux Box
19_579371 ch13.qxd 12/27/04 8:35 PM Page 275
Locating Security Resources
You can find a plethora of information on the Internet about desktop, net-
work, and Linux security. Because of the massive volume of information avail-
able, I list some Web sites I like for security issues:
ߜ
www.sans.org: One of the major security-related sites on the Internet.
ߜ
Provides some interesting tools, such as
tools to test which ports are open on a system. Also, this site features
many excellent articles dealing with system and network security.
ߜ
Contains the Linux Administrator’s
Security Guide.
ߜ
www.linux-firewall-tools.com/linux/: Offers tips for firewalls and
security on Linux systems.
ߜ
www.linuxsecurity.com/: Presents a plethora of information from
Linux Security.com.
ߜ
www.securityspace.com/sspace: Has lots of information about secu-
rity issues and tools for different operating systems
Figure 13-6:
The Fedora
System
Logs
watcher.
276
Part III: Getting Up to Speed with Linux
19_579371 ch13.qxd 12/27/04 8:35 PM Page 276
Chapter 14
Working without the GUI
In This Chapter
ᮣ Understanding the user shell environment
ᮣ Customizing the bash environment
ᮣ Working with commands
ᮣ Tinkering with variables
ᮣ Using redirection and pipes
ᮣ Using yet more wildcards
ᮣ Using a variety of commands
Whom computers would destroy, they must first drive mad.
— Anonymous
M
any computing old-timers speak fondly of the command line. Others
who developed their skills by pointing and clicking refer to the com-
mand line as some antiquated tool used by crusty old-timers. The truth is
that most skilled computing professionals recognize the merits of both the
graphical user interface (GUI) and the command-line interface (CLI). You
must understand that the command line provides a powerful lever for operat-
ing your computer. If you ever watch over the shoulder of a skilled Linux
geek, you notice that, after logging in, he doesn’t take long to start tapping
out seemingly cryptic instructions on a command line.
In this chapter, I explore the Linux program that provides the CLI, which is
called the
bash shell. Although many shells are available for Linux, bash is
the most common, and for good reason. Basically, the creators of
bash rolled
many good features of other shells into one terrific package.
Each shell has its own way of handling commands and its own additional set
of tools. I start by explaining what a shell really is, and when you understand
that, you’re ready to get down and dirty with
bash. I cover specifically
what you can do with some of the best features of the
bash shell. Then, I con-
tinue with working at the command prompt and get into
bash shell interior
decorating.
20_579371 ch14.qxd 12/27/04 8:33 PM Page 277
Shells come equipped to perform certain functions. Most of these features
have evolved over time to assist the command-line jockey with myriad
tasks. Although I only scratch the surface here, you’re encouraged to read
the
man page for bash because it’s likely one of the more complete and read-
able
man pages in existence. You can read all about how to use man pages
(the online Help system in Linux) in the “Help!” section, later in this chapter.
Playing the Shell Game
You need a way to tell the computer what you want it to do. In Linux, one of
the ways to communicate with the computer is through something called the
shell. A shell isn’t a graphical thing; it’s the sum total of the commands and
syntax you have available to you to do your work.
The shell environment is rather dull and boring by graphical desktop stan-
dards. When you start the shell, all you see is a short prompt, such as a
$,
followed by a blinking cursor awaiting your keyboard entry. (Later in this
section, I show you a couple of methods for accessing the shell.)
The default shell used in Linux is the
bash shell. This work environment is
based on the original Unix shell, which is called the Bourne shell and is also
referred to as
sh. The term bash stands for the Bourne again shell. The bash
shell comes with most Linux distributions.
If you installed your Linux distribution to log in to a graphical desktop, such
as GNOME or the KDE environment, you’re likely not looking at a shell prompt.
Rather, you interact with your computer via a mouse. You can start a
bash
session from within the GUI desktop in a couple ways.
The quickest method to activate a
bash session is to:
ߜ Fedora: Right-click on your desktop and choose Open Terminal from the
context menu that pops up.
ߜ Mandrake: Click the Terminal Program icon on your Panel. (It looks like
a computer monitor.)
ߜ SuSE: Click the Terminal Program icon on your Panel. (It looks like a
computer monitor with a shell on it — get it? shell?)
Notice that not all the distributions covered here offer a shortcut on the panel
or desktop. Instead, you can also choose commands from each program’s
main menu unless otherwise specified:
ߜ Linspire: Choose Programs➪Utilities➪Console.
ߜ Fedora: Choose Applications➪System Tools➪Terminal.
278
Part III: Getting Up to Speed with Linux
20_579371 ch14.qxd 12/27/04 8:33 PM Page 278
ߜ Mandrake: Choose System➪Terminals➪Konsole.
ߜ SuSE: Choose System➪Terminal➪Konsole.
ߜ Xandros: Choose Applications➪System➪Console.
Often, your shell prompt includes helpful information. For example, if you’re
logged in as
evan on the machine deepthink in Fedora Core 3, your prompt
looks like this:
[evan@deepthink evan]$
Before surveying a few of the shell capabilities, I need to tell you about another
method for starting a shell session. First of all, notice that your shell prompt
is merely inside a window that is part of your GUI desktop. Suppose that you
want to start a shell session in a character-only or text environment.
To switch to a text environment, press Ctrl+Alt+F2. Don’t be alarmed when
your familiar graphical desktop disappears. It’s still running in the background,
and you can get back to where you left off in a moment. But first, a few words
about the boring text screen you’re looking at now (I hope).
You’re looking at a virtual terminal, one of several available with your default
installation. You probably see something like this:
deepthink login:
Go ahead and type your username and password, which you’re prompted for.
You see a message indicating your last login date followed by the
bash prompt:
[evan@deepthink evan]$
Notice the similarity between this prompt and the open window you left
behind in the GUI desktop. Both prompts are an indication that you have a
bash session open. Note that, although it’s accurate to say they’re both the
results of using the
bash shell, they’re distinct and separate instances of the
same program. In other words, the environment you’re working with here is
exclusive of the
bash environment you still have open in the GUI terminal
window.
Are you wondering where your GUI desktop has gone? Just to settle your
nerves a bit, do some jumping around. The GUI desktop is located at virtual
terminal (VT) number 7 by default. You now have VT-2 open. Position your
piano-playing fingers and strike the chord Ctrl+Alt+F7. Within a second or
two, your screen should flash and return you to your graphical desktop. Neat,
huh? And guess what? The
bash session you left open on VT-2 is still there;
you never logged out. Go back again by pressing Ctrl+Alt+F2. Voilà! — right
where you left it. Feel free to jump back and forth a few times and try some
other VTs (F1 through F6). Whoopee! This virtual terminal stuff rocks.
279
Chapter 14: Working without the GUI
20_579371 ch14.qxd 12/27/04 8:33 PM Page 279
Okay, when you have grown weary and bored with this little trick, exit (liter-
ally, type
exit) to log out from each VT you may have opened and return to
the graphical desktop and your
bash prompt. Then you can explore what all
the fuss is about with this shell doohickey.
Understanding bash Command
Syntax and Structure
Many people happily skip through their Linux use without understanding the
fundamentals of commands in the
bash shell. Note that this approach makes
you lose out on some cool capabilities available in
bash. The more you know
about how this shell’s “language” works, the more interesting things you can
do with it.
The basics of using
bash at the command prompt often involve typing a com-
mand and any of its flags and values. For example, you enter the
ls -la ~
command to see a long-format listing of all files in your home directory, includ-
ing those that start with a dot (.), which are hidden files. That other mysteri-
ous squiggle character is technically called a tilde. The tilde is a
bash shortcut
character that points to a user’s home directory. For this example, I merely
list the contents of my home directory.
You can break a command into three distinct components:
ߜ The command name
ߜ The options or flags
ߜ The arguments
Consider this example.
Start with a simple command. The
du command lists the contents of the
directory you’re now in, and its subdirectories, and how much hard drive
space each item takes up, with a total at the end. Try typing just the
du
command by itself:
du
That’s neat, but it probably raises more questions than it answers. The
output gives you a long listing of data, but of what? Are those numbers in
bytes, kilobytes, or messages from outer space? To clarify, try adding a
simple option to your command:
du -h
280
Part III: Getting Up to Speed with Linux
20_579371 ch14.qxd 12/27/04 8:33 PM Page 280
You’re still issuing the same command, but now you’re providing additional
direction on what you want displayed. The
-h option tells du to show you the
information in terms that humans can read more easily. Now Ms, Ks, and Gs
appear next to the numbers so that you can see how big these numbers actu-
ally are. But, wait — there’s more. What if you just want to know the total
amount of disk space this directory and its subdirectories are taking up?
That calls for the
-s flag:
du -s
What if you want the total for a different directory? Or just one of your subdi-
rectories? In my case, I keep a Music subdirectory for the items I have copied
from my CDs into Oggs (see Chapter 18). I can type the following command to
see how much hard drive space that directory takes up in a human-readable
way rather than have to count zeroes:
du -sh ~/Music
In this example, du is the command name, -sh indicates the flags (options),
and
~/Music is an argument. The -sh flags can be accompanied by many
more flags that provide various options applicable to the command.
Are you wondering where to find all the available options and arguments of a
particular command? Most commands offer
man pages, which are discussed
in the “Help!” section, later in this chapter. Another good place to turn is
the
help option, available with many commands. Note that help dis-
plays a terse list of options, but it’s nice and quick if you already know about
an option but just can’t remember exactly which one it is. Try it by entering
the following command:
du –-help
Cool, huh?
Starting Programs from the Shell
The most obvious, but perhaps not so apparent, use of the shell is to start
other programs. Most utilities you use in Linux are separate and distinct exe-
cutable programs. Users need a method to start these programs. In the GUI,
you can associate an icon with a particular program, and the graphical envi-
ronment contains the intelligence to start the program. Note that programs
often require information drawn from environment variables, which are a
part of the shell environment. (I discuss environment variables in more detail
in the section “Working with Variables,” later in this chapter.) For this reason,
the GUI often calls the intended program via the
bash shell. So you see, even
the GUI finds the shell a necessity — although the GUI does its best to hide
this detail from users.
281
Chapter 14: Working without the GUI
20_579371 ch14.qxd 12/27/04 8:33 PM Page 281
For example, in the GUI after you have a terminal window open, type the fol-
lowing command at the prompt:
mahjongg
After a few seconds, the Mahjongg game is displayed. You can start any pro-
gram at a command prompt that you can click from the GNOME menu if you
know what the underlying program name is. Note that if you’re in a virtual
terminal (press Alt+F1) instead of the GUI, you may see an error message.
Some programs require a graphical environment in which to run, which a
character-based terminal obviously doesn’t have.
Putting Wildcard Expansion to Good Use
Computing life would be tedious if you had to repeat the same command on
multiple files. After all, aren’t repetitive tasks what the computer was designed
to do? Wildcard expansion refers to the ability of one command to be executed
against many files. The asterisk (*) and the question mark (?) are two wildcard
characters that are used to match any filename, or a portion of a filename. For
example, you can use the following command to see a long directory listing
that includes only files that end with a
.doc filename extension:
ls -l *.doc
The files listed may include resume.doc, cover_letter.doc, and
to_editor.doc, for example.
Working with Long Commands
As you become used to the command line, you should learn some shortcuts
to ease your typing chores. In this section, I show you some features of the
bash shell designed to make your life on the command line as pleasant as
possible. These features include command-line completion, editing, and using
the history of previously entered commands.
Asking Linux to complete a command
or filename for you
Considering that you do much more typing on the command line in Linux
than you may normally do in a GUI environment, a feature that provides
typing shortcuts wherever possible is great. Command completion is a
function of the shell that completes filename and system commands.
282
Part III: Getting Up to Speed with Linux
20_579371 ch14.qxd 12/27/04 8:33 PM Page 282