VMware View Installation Guide phần 4 ppsx
Bạn đang xem bản rút gọn của tài liệu. Xem và tải ngay bản đầy đủ của tài liệu tại đây (340.31 KB, 10 trang )
Add an ODBC Data Source to SQL Server
After you add a View Composer database to SQL Server, you must configure an ODBC connection to the new
database to make this data source visible to the View Composer service.
These instructions assume that you are configuring the ODBC data source on Windows Server 2003 SP1. Some
steps are different if you configure the ODBC data source on Windows XP Professional SP2.
Prerequisites
Complete the steps described in “Add a View Composer Database to SQL Server,” on page 30.
Procedure
1 On the vCenter Server computer, select Start > Administrative Tools > Data Source (ODBC).
2 Select the System DSN tab.
3 Click Add and select SQL Native Client from the list.
4 Click Finish.
5 In the Create a New Data Source to SQL Server setup wizard, type a name and description of the View
Composer database.
For example: ViewComposer
6 In the Server text box, type the SQL Server database name.
Use the form host_name\server_name, where host_name is the name of the computer and server_name is the
SQL Server instance.
For example: VCHOST1\SQLEXP_VIM
7 Click Next.
8 Make sure that the Connect to SQL Server to obtain default settings for the additional configuration
options check box is selected and select an authentication option.
Option Description
Windows NT authentication
Select this option if you are using a local instance of SQL Server. This option
is also known as trusted authentication. Windows NT authentication is
supported only if SQL Server is running on the vCenter Server computer.
SQL Server authentication
Select this option if you are using a remote instance of SQL Server. Windows
NT authentication is not supported on remote SQL Server.
9 Click Next.
10 Select the Change the default database to check box and select the name of the View Composer database
from the list.
For example: ViewComposer
11 Finish and close the Microsoft ODBC Data Source Administrator wizard.
What to do next
Install the new View Composer service on the vCenter Server computer. See “Install the View Composer
Service,” on page 34.
Chapter 4 Installing View Composer
VMware, Inc. 31
Create an Oracle 11g or 10g Database for View Composer
View Composer can store linked-clone desktop information in an Oracle 11g or 10g database. You create a
View Composer database by adding it to an existing Oracle 11g or 10g instance and configuring an ODBC data
source for it.
Add a View Composer Database to Oracle 11g or 10g
You can add a new View Composer database to an existing Oracle 11g or 10g instance to store linked-clone
data for View Composer.
Prerequisites
Verify that a supported version of Oracle 11g or 10g is installed on the vCenter Server computer. For details,
see “Database Requirements for View Composer,” on page 10.
Procedure
1 On the vCenter Server computer, start the Database Configuration Assistant.
Database Version Action
Oracle 11g
Select Start > All Programs > Oracle-OraDb11g_home > Configuration and
Migration Tools > Database Configuration Assistant.
Oracle 10g
Select Start > All Programs > Oracle-OraDb10g_home > Configuration and
Migration Tools > Database Configuration Assistant.
2 On the Operations page, select Create a database.
3 On the Database Templates page, select the General Purpose or Transaction Processing template.
4 On the Database Identification page, type a Global Database Name and an Oracle System Identifier (SID)
prefix.
For simplicity, use the same value for both items.
5 On the Management Options page, click Next to accept the default settings.
6 On the Database Credentials page, select Use the Same Administrative Passwords for All Accounts and
type a password.
7 On the remaining configuration pages, click Next to accept the default settings.
8 On the Creation Options page, verify that Create Database is selected and click Finish.
9 On the Confirmation page, review the options and click OK.
The configuration tool creates the database.
10 On the Database Creation Complete page, click OK.
What to do next
Follow the instructions in “Add an ODBC Data Source to Oracle 11g or 10g,” on page 32.
Add an ODBC Data Source to Oracle 11g or 10g
After you add a View Composer database to an Oracle 11g or 10g instance, you must configure an ODBC
connection to the new database to make this data source visible to the View Composer service.
These instructions assume that you are configuring the ODBC data source on Windows Server 2003 SP1. Some
steps are different if you configure the ODBC data source on Windows XP Professional SP2.
VMware View Installation Guide
32 VMware, Inc.
Prerequisites
Complete the steps described in “Add a View Composer Database to Oracle 11g or 10g,” on page 32.
Procedure
1 On the vCenter Server computer, select Start > Administrative Tools > Data Source (ODBC).
2 From the Microsoft ODBC Data Source Administrator wizard, select the System DSN tab.
3 Click Add and select the appropriate Oracle driver from the list.
For example: OraDb11g_home
4 Click Finish.
5 In the Oracle ODBC Driver Configuration dialog box, type a DSN to use with View Composer, a
description of the data source, and a user ID to connect to the database.
NOTE You use the DSN when you install the View Composer service.
6 Specify a TNS Service Name by selecting the Global Database Name from the drop-down menu.
The Oracle Database Configuration Assistant specifies the Global Database Name.
7 To verify the data source, click Test Connection and click OK.
What to do next
Install the new View Composer service on the vCenter Server computer. See “Install the View Composer
Service,” on page 34.
Create an Oracle 9i Database for View Composer
View Composer can store linked-clone desktop information in an Oracle 9i database. You create a View
Composer database by adding it to an existing Oracle 9i instance and configuring an ODBC data source for it.
Add a View Composer Database to Oracle 9i
You can add a new View Composer database to an existing Oracle 9i instance to store linked-clone data for
View Composer.
Prerequisites
Verify that a supported version of Oracle 9i is installed on the vCenter Server computer. For details, see
“Database Requirements for View Composer,” on page 10.
Procedure
1 On the vCenter Server computer, select Start > All Programs > Oracle-OraHome92 > Configuration and
Migration Tools > Database Configuration Assistant.
2 On the Operations page, select Create a database.
3 On the Database Templates page, select the General Purpose template.
4 On the Database Identification page, type a Global Database Name and an Oracle System Identifier (SID)
prefix.
For simplicity, use the same value for both items.
5 On the Database Connection Options page, select Dedicated Server Mode.
6 On the remaining configuration pages, click Next to accept the default settings.
7 On the Creation Options page, verify that Create Database is selected and click Finish.
Chapter 4 Installing View Composer
VMware, Inc. 33
8 On the Summary page, review the options and click OK.
The configuration tool creates the database.
9 Set passwords for the SYS and SYSTEM administrator accounts.
You use the SYSTEM account to set up the data-source connection.
What to do next
Follow the instructions in “Add an ODBC Data Source to Oracle 9i,” on page 34.
Add an ODBC Data Source to Oracle 9i
After you add a View Composer database to an Oracle 9i instance, you must configure an ODBC connection
to the new database to make this data source visible to the View Composer service.
These instructions assume that you are configuring the ODBC data source on Windows Server 2003 SP1. Some
steps are different if you configure the ODBC data source on Windows XP Professional SP2.
Prerequisites
Complete the steps described in “Add a View Composer Database to Oracle 9i,” on page 33.
Procedure
1 On the vCenter Server computer, select Start > Administrative Tools > Data Source (ODBC).
2 From the Microsoft ODBC Data Source Administrator wizard, select the System DSN tab.
3 Click Add and select the appropriate Oracle driver from the list.
For example: Oracle in OraHome92
4 Click Finish.
5 In the Oracle ODBC Driver Configuration dialog box, type a DSN to use with View Composer, a
description of the data source, and a user ID to connect to the database.
NOTE You use the DSN when you install the View Composer service.
6 Specify a TNS Service Name by selecting the Global Database Name from the drop-down menu.
The Oracle Database Configuration Assistant specifies the Global Database Name.
7 To verify the data source, click Test Connection and click OK.
What to do next
Install the new View Composer service on the vCenter Server computer. See “Install the View Composer
Service,” on page 34.
Install the View Composer Service
To use View Composer, you must install the View Composer service on the vCenter Server computer. View
Manager uses View Composer to create and deploy linked-clone desktops in vCenter Server.
You install the View Composer service on the Windows Server computer on which vCenter Server is installed.
Prerequisites
n
Verify that your installation satisfies the View Composer requirements described in “View Composer
Requirements,” on page 9.
n
Verify that you have a license to install and use View Composer.
VMware View Installation Guide
34 VMware, Inc.
n
In vCenter Server, create a resource pool on the ESX host or cluster on which you want to store linked-
clone desktops.
n
If Windows firewall is running on the vCenter Server computer, make sure that the port the View
Composer service uses to communicate with View Connection Server is accessible. You can add this port
to the exception list or deactivate the local firewall service. You specify this port when you install the View
Composer service.
n
Verify that you have the DSN, domain administrator user name, and password that you provided in the
ODBC Data Source Administrator wizard. You enter this information when you install the View Composer
service.
Procedure
1 Download the VMware View Composer installer file from the VMware product page at
to the Windows Server computer on which vCenter Server is
installed.
The installer filename is VMware-viewcomposer-
xxxxxx
.exe, where xxxxxx is the build number. This
installer file installs the View Composer service on 64-bit and 32-bit Windows Server operating systems.
2 To start the View Composer installation program, double-click the installer file.
On Windows Server 2008 computers, you might have to right-click the installer file and select Run As
Administrator.
3 Accept the VMware license terms.
4 Accept or change the destination folder.
5 Type the DSN for the View Composer database that you provided in the Microsoft or Oracle ODBC Data
Source Administrator wizard.
For example: VMware View Composer
NOTE If you did not configure a DSN for the View Composer database, click ODBC DSN Setup to
configure a name now.
6 Type the domain administrator user name and password that you provided in the ODBC Data Source
Administrator wizard.
7 Type a port number or accept the default value.
View Connection Server uses this port to communicate with the View Composer service.
8 Provide an SSL certificate.
Option Action
Create default SSL certificate
Click this radio button to create a default SSL certificate for the View
Composer service.
Use an existing SSL certificate
Click this radio button if you have an SSL certificate you want to use for the
View Composer service. Select an SSL certificate from the list.
9 Click Install and Finish to complete the View Composer service installation.
The VMware View Composer service starts on the vCenter Server computer.
Chapter 4 Installing View Composer
VMware, Inc. 35
Configuring Your Infrastructure for View Composer
You can take advantage of features in vSphere, vCenter Server, Active Directory, and other components of
your infrastructure to optimize the performance, availability, and reliability of View Composer.
Configuring the vSphere Environment for View Composer
To support View Composer, you should follow certain best practices when you install and configure vCenter
Server, ESX, and other vSphere components.
These best practices let View Composer work efficiently in the vSphere environment.
n
After you create the path and folder information for linked-clone virtual machines, do not change the
information in vCenter Server. Instead, use View Administrator to change the folder information.
If you change this information in vCenter Server, View Manager cannot successfully look up the virtual
machines in vCenter Server.
n
If you create more than 120 virtual machines as linked-clone desktops, edit the vSwitch settings on the
ESX host to increase the number of ports that are used for the virtual machines. By default, ESX is
configured for 120 ports.
n
When you deploy linked-clone desktops in a resource pool, make sure that your vSphere environment
has enough CPU and memory to host the number of desktops that you require. Use vSphere Client to
monitor CPU and memory usage in resource pools.
n
A cluster can contain at most eight ESX hosts. In a large View Composer environment, you might have to
configure many eight-host clusters.
n
Use vSphere DRS. DRS efficiently distributes linked-clone virtual machines among your hosts.
NOTE Storage vMotion is not supported for linked-clone desktops.
Additional Best Practices for View Composer
To make sure that View Composer works efficiently, check that your dynamic name service (DNS) operates
correctly, and run antivirus software scans at staggered times.
By making sure that DNS resolution operates correctly, you can overcome intermittent issues caused by DNS
errors. The View Composer service relies on dynamic name resolution to communicate with other computers.
To test DNS operation, ping the Active Directory and View Connection Server computers by name.
If you stagger the run times for your antivirus software, performance of the linked-clone desktops is not
affected. If the antivirus software runs in all linked clones at the same time, excessive I/O operations per second
(IOPS) occur in your storage subsystem. This excessive activity can affect performance of the linked-clone
desktops.
VMware View Installation Guide
36 VMware, Inc.
Installing View Connection Server 5
To use View Connection Server, you install the software on supported computers, configure the required
components, and, optionally, optimize the components.
This chapter includes the following topics:
n
“Installing the View Connection Server Software,” on page 37
n
“Configuring User Accounts for vCenter Server and View Composer,” on page 51
n
“Configuring View Connection Server for the First Time,” on page 54
n
“Configuring View Client Connections,” on page 57
n
“Sizing Windows Server Settings to Support Your Deployment,” on page 59
Installing the View Connection Server Software
Depending on the performance, availability, and security needs of your View deployment, you can install a
single instance of View Connection Server, replicated instances of View Connection Server, and security
servers. You must install at least one instance of View Connection Server.
When you install View Connection Server, you select a type of installation.
Standard installation
Generates a View Connection Server instance with a new View LDAP
configuration.
Replica installation
Generates a View Connection Server instance with a View LDAP configuration
that is copied from an existing instance.
Security server
installation
Generates a View Connection Server instance that adds an additional layer of
security between the Internet and your internal network.
Installation Prerequisites for View Connection Server
Before you install View Connection Server, you must verify that your installation environment satisfies specific
prerequisites.
View Connection Server requires a valid license key for View Manager. The following license keys are available:
n
View Manager
n
View Manager with View Composer and Local Mode
VMware, Inc.
37
You must join the View Connection Server host to an Active Directory domain. View Connection Server
supports the following versions of Active Directory:
n
Windows 2000 Active Directory
n
Windows 2003 Active Directory
n
Windows 2008 Active Directory
The View Connection Server host must not be a domain controller.
NOTE View Connection Server does not make, nor does it require, any schema or configuration updates to
Active Directory.
Do not install View Connection Server on systems that have the Windows Terminal Server role installed. You
must remove the Windows Terminal Server role from any system on which you install View Connection Server.
Do not install View Connection Server on a system that performs any other functions or roles. For example,
do not use the same system to host vCenter Server.
The system on which you install View Connection Server must have a static IP address.
To install View Connection Server, you must use a domain user account with administrator privileges on the
system.
Install View Connection Server with a New Configuration
To install View Connection Server as a single server or as the first instance in a group of replicated View
Connection Server instances, you use the standard installation option.
When you select the standard installation option, the installation creates a new, local View LDAP configuration.
The installation loads the schema definitions, Directory Information Tree (DIT) definition, and ACLs and
initializes the data.
After installation, you manage most View LDAP configuration data by using View Administrator. View
Connection Server automatically maintains some View LDAP entries.
Prerequisites
n
Verify that you can log in as a domain user with administrator privileges on the Windows Server computer
on which you install View Connection Server.
n
Verify that your installation satisfies the requirements described in “View Connection Server
Requirements,” on page 7.
n
Prepare your environment for the installation. See “Installation Prerequisites for View Connection
Server,” on page 37.
n
Familiarize yourself with the incoming TCP ports that must be opened on the Windows Firewall for View
Connection Server instances. See “Firewall Rules for View Connection Server,” on page 41.
Procedure
1 Download the View Connection Server installer file from the VMware product page at
to the Windows Server computer.
The installer filename is VMware-viewconnectionserver-4.5.
x
-
xxxxxx
.exe or VMware-
viewconnectionserver-x86_64-4.5.
x
-
xxxxxx
.exe, where xxxxxx is the build number.
2 To start the View Connection Server installation program, double-click the installer file.
3 Accept the VMware license terms.
4 Accept or change the destination folder.
VMware View Installation Guide
38 VMware, Inc.
5 Select the View Standard Server installation option.
6 Accept the Microsoft Software Supplemental License Agreement for Microsoft Active Directory
Application Mode (ADAM).
7 If you install View Connection Server on Windows Server 2008, choose how to configure the Windows
Firewall service.
Option Action
Configure Windows Firewall
automatically
Let the installer configure Windows Firewall to allow the required incoming
TCP protocol connections.
Do not configure Windows Firewall
Configure the Windows firewall rules manually.
If you install View Connection Server on Windows Server 2003, you must configure the required Windows
firewall rules manually.
8 Complete the installation wizard to finish installing View Connection Server.
The VMware View services are installed on the Windows Server computer:
n
VMware View Connection Server
n
VMware View Framework Component
n
VMware View Message Bus Component
n
VMware View Script Host
n
VMware View Security Gateway Component
n
VMware View Web Component
n
VMware VDMDS, which provides View LDAP directory services
For information about these services, see the VMware View Administrator's Guide.
What to do next
Perform initial configuration on View Connection Server.
If you plan to include replicated View Connection Server instances and security servers in your deployment,
you must install each server instance by running the View Connection Server installer file.
If you are reinstalling View Connection Server on a Windows Server 2008 operating system and you have a
data collector set configured to monitor performance data, stop the data collector set and start it again.
Install View Connection Server Silently
You can use the silent installation feature of the Microsoft Windows Installer (MSI) to perform a standard
installation of View Connection Server on several Windows computers. In a silent installation, you use the
command line and do not have to respond to wizard prompts.
With silent installation, you can efficiently deploy View components in a large enterprise.
Prerequisites
n
Verify that you can log in as a domain user with administrator privileges on the Windows Server computer
on which you install View Connection Server.
n
Verify that your installation satisfies the requirements described in “View Connection Server
Requirements,” on page 7.
n
Prepare your environment for the installation. See “Installation Prerequisites for View Connection
Server,” on page 37.
Chapter 5 Installing View Connection Server
VMware, Inc. 39
n
Verify that the Windows computer on which you install View Connection Server has version 2.0 or later
of the MSI runtime engine. For details, see the Microsoft Web site.
n
Familiarize yourself with the MSI installer command-line options. See “Microsoft Windows Installer
Command-Line Options,” on page 48.
n
Familiarize yourself with the silent installation properties available with a standard installation of View
Connection Server. See “Silent Installation Properties for a View Connection Server Standard
Installation,” on page 40.
Procedure
1 Download the View Connection Server installer file from the VMware product page at
to the Windows Server computer.
The installer filename is VMware-viewconnectionserver-4.5.
x
-
xxxxxx
.exe or VMware-
viewconnectionserver-x86_64-4.5.
x
-
xxxxxx
.exe, where xxxxxx is the build number.
2 Open a command prompt on the Windows Server computer.
3 Type the installation command on one line.
For example: VMware-viewconnectionserver-4.5.
x
-
xxxxxx
.exe /s /v"/qn VDM_SERVER_INSTANCE_TYPE=1"
The VMware View services are installed on the Windows Server computer. For details, see “Install View
Connection Server with a New Configuration,” on page 38.
Silent Installation Properties for a View Connection Server Standard Installation
You can include specific View Connection Server properties when you perform a silent installation from the
command line. You must use a
PROPERTY
=
value
format so that Microsoft Windows Installer (MSI) can interpret
the properties and values.
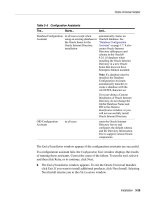
Table 5-1. MSI Properties for Silently Installing View Connection Server in a Standard Installation
MSI Property Description Default Value
INSTALLDIR The path and folder in which the View Connection Server software
is installed.
For example: INSTALLDIR=""D:\abc\my folder""
The sets of two double quotes that enclose the path permit the MSI
installer to ignore the space in the path.
%ProgramFiles
%\VMware\VMware
View\Server
VDM_SERVER_
INSTANCE_TYPE
The type of View Connection Server installation:
n
1. Standard installation
n
2. Replica installation
n
3. Security server installation
n
4. View Transfer Server installation
For example, to perform a standard installation, define
VDM_SERVER_INSTANCE_TYPE=1
1
FWCHOICE The MSI property that determines whether to configure a firewall
for the View Connection Server instance.
A value of 1 sets a firewall. A value of 2 does not set a firewall.
For example: FWCHOICE=1
1
VMware View Installation Guide
40 VMware, Inc.