Microsoft introducing windows server 2008 Resource Kit phần 4 docx
Bạn đang xem bản rút gọn của tài liệu. Xem và tải ngay bản đầy đủ của tài liệu tại đây (619.54 KB, 49 trang )
Chapter 6 Windows Server Core 135
Other Common Management Tasks
There are lots of other common management tasks you might need to perform on a Windows
server core server. The following is just a sampling of some of these tasks.
First, you can add new hardware to your server. Windows server core servers include support
for Plug and Play. So if your new device is PnP and there’s an in-box driver available for your
device, you can just plug the device in and the server will recognize it and automatically install
a driver for it. But we did mention earlier that the Windows server core server installation
option of Windows Server 2008 does not include that many in-box drivers. So what do you do
if your device is not supported by an in-box driver because of its date of manufacture? In that
case, follow this procedure:
1. Copy the driver files from the driver media for the device to a temporary directory on
your server.
2. Change your current directory to this temporary directory, and type pnputil –i –a
<driver>.inf at the command prompt.
3. Reboot your server if prompted to do so.
Note that if you want to find what drivers are currently installed on your server, you can type
sc query type= driver at a command prompt.
What if you want to install some application on your server? First of all, beware—any
application that has a GUI might not function properly when you install it. Obviously, that
means we can’t install Microsoft Exchange Server, Microsoft SQL Server, or other Windows
Server System products on a Windows server core server, because these products all have
GUI management tools (and more importantly, a Windows server core server is missing a lot
of components needed by these products such as the .NET Framework for running managed
code).
What kinds of applications might you want to install on a Windows server core server? The
usual stuff—antivirus agents, network backup agents, system management agents, and so on.
Most agents like this are GUI-less and should install fine and work properly on a Windows
server core server. And the Windows Installer service is yet another feature that’s still present
on a Windows server core server—and if you need to install an agent manually, you should try
and do so in quiet mode using msiexec.exe with the /qb switch to display the basic UI only.
For example, you can do this by typing msiexec /qb <package> at the command prompt.
If you need to configure Windows Firewall, the NAP client, or your server’s IPSec configura-
tion, you can use netsh.exe to do this. I won’t go into all the details here, as you can just check
TechNet for the proper netsh.exe syntax to use for each task.
What about patch management? We already described how to enable Automatic Updates on
the server, and if you have Windows Server Update Service (WSUS) deployed, you can man-
age patches for your server using that as well. For Windows server core servers that you want
136 Introducing Microsoft Windows Longhorn Server
to manually perform patch management on, however, you can use the wusa.exe command to
install and remove patches from the command prompt. To do this, first download the patch
from Windows Update and expand to get the .msu file. Then copy the .msu file to your server,
and type wsua <patch>.msu /quiet at the command prompt to install the patch. You can also
remove installed patches from your server by typing pkgmgr /up /m:<package>.cab /quiet at
the command prompt.
Let’s hear more about patch management on a Windows server core installation of Windows
Server 2008 from one of our experts:
From the Experts: Servicing Windows Server Core
When using Windows server core, the new minimal installation option for Windows
Server 2008, a common topic of discussion is servicing. First a little background and
then some methods to make dealing with patches easier.
With Windows Server 2008, each patch that is released contains a set of applicability
rules. When a patch is sent to a server, either by Windows Update or another automated
servicing tool, the servicing infrastructure examines the patch to determine if it applies
to the system based on the applicability rules. If not, it is ignored and nothing is changed
on the server.
If you have already downloaded a set of patches and want to determine if they apply to
a Windows server core installation, you can do the following:
1. Run wusa <patch_name>.
2. If the dialog box that appears asks if you want to apply the patch, click No. This
means that the patch applies, and you should move on to the next step. Otherwise,
the dialog box will state that the patch doesn’t apply and you can ignore the patch.
3. Run wusa <patch_name> /quiet to apply the patch.
After applying patches, you can run either the wmic qfe command or systeminfo.exe to
see what patches are installed.
–Andrew Mason
Program Manager, Windows Server
What else can you do in terms of managing your Windows server core installation of
Windows Server 2008? Lots! For example, if you need to manage your disks and file system
on your server, you can use commands such as diskpart, defrag, fsutil, vssadmin, and so on.
And if you need to manage permissions and ownership of files, you can use icacls.
You can also manage your event logs from the command line using the wevtutil.exe
command, which is new in Windows Vista and Windows Server 2008. This
powerful command can be used to query your event logs for specific events and to export,
Chapter 6 Windows Server Core 137
archive, clear, and configure your event logs as well. For example, to query your System log for
the most recent occurrence of a shutdown event having source USER32 and event ID 1074,
you can do this:
C:\Windows\system32>wevtutil qe System /c:1 /rd:true /f:text /
q:*[System[(EventID=1074)]]
Event[0]:
Log Name: System
Source: USER32
Date: 2007-03-20T22:26:36.000
Event ID: 1074
Task: N/A
Level: Information
Opcode: N/A
Keyword: Classic
User: S-1-5-21-3620207985-2970159875-1752314906-500
User Name: DNSSRV\Administrator
Computer: DNSSRV
Description:
The process C:\Windows\system32\shutdown.exe (DNSSRV) has initiated the restart of
computer DNSSRV on behalf of user DNSSRV\Administrator for the following reason: No
title for this reason could be found
Reason Code: 0x840000ff
Shutdown Type: restart
Comment:
To create and manage data collectors for performance monitoring, you can use the
logman.exe command. You can also use the relog.exe command to convert a performance
log file into a different format or change its sampling rate. And you can use the tracerpt.exe
command to create a remote from a log file or a real-time stream of performance-monitoring
data.
To manage services, you can use the sc command, which is a very powerful command that
provides even more functionality than the Services.msc snap-in.
What else can you do? Lots. Let’s move on now to remote management.
Remote Management Using Terminal Services
You can also manage Windows server core servers from another computer using Terminal
Services. To do this, you first have to enable Remote Desktop on your server, and because we
can’t right-click on Computer and select Properties to do this, we’ll have to find another way.
Here’s how—use the scregedit.wsf script we looked at previously. The syntax for performing
this task is cscript scregedit.wsf /ar 0 to enable Remote Desktop and cscript scregedit.wsf /
ar 1 to disable it again. To view your current Remote Desktop settings, type cscript
scregedit.wsf /ar /v at a command prompt. Note that in order to allow pre-Windows Vista
138 Introducing Microsoft Windows Longhorn Server
versions of the TS client to connect to a Windows server core installation, you need to disable
the enhanced security by running the cscript scregedit.wsf /cs 0 command.
Once you’ve enabled Remote Desktop like this, you can connect to your Windows server core
server from another machine using Remote Desktop Connection (mstsc.exe) and manage it as
if you were logged on interactively at your server’s console. In this figure I’m logged on to a full
installation of Windows Server 2008 and have a Terminal Services session open to my remote
Windows server core server to manage it.
There’s more! Later in Chapter 8, “Terminal Services Enhancements,” we’ll describe a new
feature of Terminal Services in Windows Server 2008 that lets you remote individual applica-
tion windows instead of entire desktops. Let’s hear now from one of our experts concerning
how this new Terminal Services functionality can be used to make managing Windows server
core servers easier.
Chapter 6 Windows Server Core 139
From the Experts: Enabling Remote Command Line Access on
Server Core
There are several ways to administer a Windows server core installation, ranging from
using the local console to remote administration from a full Windows Server 2008 server
using MMC. A really cool mechanism is to manage the Windows server core installation
using Terminal Services RemoteApp to make the command line console available. This
allows command-line administration without having to be physically present at the box,
and without having a full-blown terminal server session. (After all, a Windows server
core installation does not need the full desktop; it just needs the console, and Terminal
Services RemoteApp is perfect for this.) A full Windows Server 2008 machine is neces-
sary, along with the Windows server core installation that is to be administered.
On the Windows Server 2008 machine, add the Terminal Server Role using the Server
Manager administrative tool. Only the Terminal Server role itself is needed, not the TS
Licensing role, TS Session Broker role, TS Gateway role, or TS Web Access role. After the
TS role is installed, start MMC and add the TS RemoteApp Manager snap-in, providing
the name of the Windows server core machine to the snap-in. Once the snap-in is
installed, connect to the Windows server core machine and click Add Remote Apps. Nav-
igate to the %SYSTEMROOT%\System32 folder using the administrative share, select
cmd.exe, and complete the wizard. Select the cmd.exe entry in the RemoteApp pane,
click Create .rdp File, and follow the wizard to save the RDP file. Ensure that TS is
enabled on the Windows server core machine. (Use the scregedit.wsf script.) You can
now copy the RDP file to any client machine and connect to the Windows server core
installation through it. The console will be integrated into the task bar of the client, like
a local application. For more information on Terminal Services and TS RemoteApp,
please see Chapter, “Terminal Services Enhancements.”
–Rahul Prasad
Software Development Engineer, Windows Core Operating System Division
And here’s another expert from the product team at Microsoft sharing some additional tips on
managing Windows server core servers using Terminal Services:
From the Experts: Tips for Using Terminal Services with Windows
Server Core
When you’re using Terminal Services in a Windows server core server without the GUI
shell, some common tasks require you to do things a little differently.
Logging off of a Terminal Services Session
On a Windows server core server, there is no Start button and therefore no GUI option
to log off. Clicking the X in the corner of the Terminal Services window disconnects your
140 Introducing Microsoft Windows Longhorn Server
session, but the session will still be using resources on the server. To log off, you need to
use the Terminal Services logoff command. While in your Terminal Services session, you
simply run logoff. If you disconnect your session, you can either reconnect and use
logoff, use the logoff command remotely, or use the Terminal Services MMC to log off
the session.
Restarting the Command Prompt
When logged on locally, if you accidentally close the command prompt you can either
log off and log on, or press CTRL+ALT+DEL, start Task Manager (or just press
CTRL+SHIFT+ESC), click file, and run cmd.exe to restart it. You can also configure the
Terminal Services client to have the Windows keys pass to the remote session when not
maximized so that you can use CTRL+SHIFT+ESC to start task manager and run
cmd.exe.
Working with Terminal Services Sessions
If you ever need to manage Terminal Services sessions from the command line, the query
command is the tool to use. Running query sessions (which can also be used remotely)
will tell you what Terminal Services sessions are active on the box, as well as who is
logged in to them. This is handy if you need to restart the box and want to know if any
other administrators are logged on. Query has some other useful options, and there are
a variety of other Terminal Services command-line tools.
–Andrew Mason
Program Manager, Windows Server
Remote Management Using the Remote Server Administration Tools
Although you can manage file systems, event logs, performance logs, device drivers, and other
aspects from the command line, there’s no law that says you have to. For example, the syntax
for wvetutil.exe is quite complex to learn and understand, especially if you want to use this
tool to query event logs for specific types of events. It would be nice if you could just use Event
Viewer to display, query, and filter your event logs on a Windows server core server. You can!
But you have to do it remotely from another computer running either Windows Vista or
Windows Server 2008 and with the appropriate Remote Server Administration Tools (RSAT)
installed on it.
We talked about RSAT earlier in Chapter 4, “Managing Windows Server 2008,” and it’s basi-
cally the Windows Server 2008 equivalent of the Adminpak.msi server tools on previous ver-
sions of Windows Server. So if you want to use MMC snap-in tools to administer a Windows
server core server from a Windows Vista computer or a machine running a full installation of
Windows Server 2008, you might or might not need to install the RSAT on this machine
because both Windows Vista and full installations of Windows Server 2008 already include
many MMC snap-in tools that can be accessed from the Start menu using Administrative
Chapter 6 Windows Server Core 141
Tools. Event Viewer is one such built-in tool, and here it is running on a full installation of
Windows Server 2008, showing the previously mentioned shutdown event in the System
event log on our remote Windows server core server.
Remote Administration Using Group Policy
Another way of remotely administering Windows server core servers is by using Group Policy.
For example, although the netsh advfirewall context commands can be used to configure
Windows Firewall, doing it this way can be tedious. It’s much easier to use the following
policy setting:
Computer Configuration\Windows Settings\Security Settings\Windows Firewall With
Advanced Security
By creating a GPO that targets your Windows server core servers, either by placing these
servers in an OU and linking the GPO to that OU or by using a WMI filter to target the GPO
only at Windows server core servers, you can remotely configure Windows Firewall on these
machines using Group Policy. For example, you can use the OperatingSystemSKU property of
the Win32_OperatingSystem WMI class to determine whether a given system is running a
Windows server core installation of Windows Server 2008 by checking for the following
return values:
■ 12 – Datacenter Server Core Edition
■ 13 – Standard Server Core Edition
■ 14 – Enterprise Server Core Edition
142 Introducing Microsoft Windows Longhorn Server
You can use this property in creating a WMI filter that causes a GPO to target only Windows
server core servers.
Remote Management Using WinRM/WinRS
Finally, you can also manage Windows server core servers remotely using the Windows
Remote Shell (WinRS) included in Windows Vista and the full installation of Windows Server
2008. WinRS uses Windows Remote Management (WinRM), which is Microsoft’s implemen-
tation of the WS-Management protocol developed by the Desktop Management Task Force
(DMTF). WinRM was first included in Windows Server 2003 R2 and has been enhanced in
Windows Vista and Windows Server 2008.
To use the Windows Remote Shell to manage a Windows server core server, log on to the
Windows server core server you want to remotely manage and type WinRM quickconfig at
the command prompt to create a WinRM listener on the machine:
C:\Windows\System32>WinRM quickconfig
WinRM is not set up to allow remote access to this machine for management.
The following changes must be made:
Create a WinRM listener on HTTP://* to accept WS-Man requests to any IP on this
machine.
Make these changes [y/n]? y
WinRM has been updated for remote management.
Created a WinRM listener on HTTP://* to accept WS-Man requests to any IP on this
machine.
Now on a different machine running either Windows Vista or the full installation of Windows
Server 2008, type winrs –r:<server_name> <command>, where <server_name> is your Win-
dows server core server and <command> is the command you want to execute on your remote
server. Here’s an example of the Windows Remote Shell at work:
C:\Users\Administrator>winrs -r:DNSSRV "cscript C:\Windows\System32\slmgr.vbs -dli"
Microsoft (R) Windows Script Host Version 5.7
Copyright (C) Microsoft Corporation. All rights reserved.
Name: Windows(TM) Server Windows Server 2008, ServerEnterpriseCore edition
Description: Windows Operating System - Windows Server 2008, RETAIL channel
Partial Product Key: XHKDR
License Status: Licensed
You can also run WinRM quickconfig during unattended installation by configuring the
appropriate answer file setting for this service.
Chapter 6 Windows Server Core 143
Windows Server Core Installation Tips and Tricks
Finally, let’s conclude this chapter with a list of 101 things (well, not really 101) you might
want to know about or do with a Windows server core installation of Windows Server 2008.
Some of these are tips or tricks for configuring or managing a Windows server core server;
others are just things you might want to make note of. They’re all either interesting, useful, or
both. Here goes
First, if you want quick examples of a whole lot of administrative tasks you can perform from
the command line, just type cscript scregedit.wsf /cli at the command prompt:
C:\Windows\System32\>cscript scregedit.wsf /cli
Microsoft (R) Windows Script Host Version 5.7
Copyright (C) Microsoft Corporation. All rights reserved.
To activate:
Cscript slmgr.vbs –ato
To use KMS volume licensing for activation:
Configure KMS volume licensing:
cscript slmgr.vbs -ipk [volume license key]
Activate KMS licensing
cscript slmgr.vbs -ato
Set KMS DNS SRV record
cscript slmgr.vbs -skma [KMS FQDN]
Determine the computer name, any of the following:
Set c
Ipconfig /all
Systeminfo
Rename the Server Core computer:
Domain joined:
Netdom renamecomputer %computername% /NewName:new-name
/UserD:domain-username /PasswordD:*
Not domain joined:
Netdom renamecomputer %computername% /NewName:new-name
Changing workgroups:
Wmic computersystem where name="%computername%" call
joindomainorworkgroup name="[new workgroup name]"
Install a role or optional feature:
Start /w Ocsetup [packagename]
Note: For Active Directory, run Dcpromo with an answer file.
View role and optional feature package names and current installation state:
oclist
Start task manager hot-key:
ctrl-shift-esc
144 Introducing Microsoft Windows Longhorn Server
Logoff of a Terminal Services session:
Logoff
To set the pagefile size:
Disable system pagefile management:
wmic computersystem where name="%computername%" set
AutomaticManagedPagefile=False
Configure the pagefile:
wmic pagefileset where name="C:\\pagefile.sys" set
InitialSize=500,MaximumSize=1000
Configure the timezone, date, or time:
control timedate.cpl
Configure regional and language options:
control intl.cpl
Manually install a management tool or agent:
Msiexec.exe /i [msipackage]
List installed msi applications:
Wmic
product
Uninstall msi applications:
Wmic product get name /value
Wmic product where name="[name]" call uninstall
To list installed drivers:
Sc query type= driver
Install a driver that is not included:
Copy the driver files to Server Core
Pnputil –i –a [path]\[driver].inf
Determine a file’s version:
wmic datafile where name="d:\\windows\\system32\\ntdll.dll" get version
List of installed patches:
wmic qfe list
Install a patch:
Wusa.exe [patchame].msu /quiet
Configure a proxy:
Netsh winhttp proxy set [proxy_name]:[port]
Add, delete, query a Registry value:
reg.exe add /?
reg.exe delete /?
reg.exe query /?
Now here are a bunch of random insights into and tips for running a Windows server core
installation of Windows Server 2008:
The SMS 2005 and MOM 2005 agents should run fine on Windows server core servers, but
for best systems management functionality you probably want to use the upcoming Microsoft
System Center family of products instead.
Chapter 6 Windows Server Core 145
You can deploy the Windows server core installation option using Windows Deployment
Services (WDS) just like the full installation option of Windows Server 2008. It’s the same
product—just a different setup option to choose.
To install the Windows server core installation option on a system, the system needs a
minimum of 512 MB RAM. That’s not because Windows server core servers need that much
RAM, however—in fact, they need just over 100 MB of RAM to run with no roles installed.
But the setup program for installing Windows Server 2008 requires 512 MB or more of mem-
ory or setup will fail. You can install the Windows server core installation option on a box with
512 MB RAM and then after installation pull some of the RAM, but at the time of this writing,
this procedure is not supported.
The Windows server core installation option uses much less disk space than a full installation
of Windows Server 2008. We’re talking roughly 1 MB vs. 5 MB here, and that shows you how
much stuff has been pulled out of Windows server core to slim it down.
When patching Windows server core servers, you actually don’t need to presort patches into
those that apply to the Windows server core installation option and those that don’t apply.
Instead, you can just go ahead and patch, and only updates that apply to Windows server core
servers will actually be applied.
You can manage Windows server core servers remotely using the RSAT, but you can’t install
the RSAT on Windows server core to manage the server locally.
The Windows server core installation option does support Read Only Domain Controllers
(RO DC). This support makes Windows server core servers ideal for branch office scenarios,
especially with BitLocker installed as well.
You won’t get any User Account Control (UAC) prompts if you log on to a Windows server
core server as a nonadministrator and try to perform an administrative task. Why not? UAC
needs the desktop shell to function.
One way of seeing how slimmed-down Windows server core is is to compare the number of
installed and running services on the two platforms. Table 6-3 shows a rough comparison,
assuming no roles have been installed.
If you’re trying to run the Windows Remote Shell from another machine and use it to manage
a Windows server core server and it doesn’t work, you might not have the right credentials on
the Windows server core server to manage it. If this is the case, first try connecting to the
Ta b l e 6 - 3 Comparison of default number of services for server core installation
vs. full installation
Feature compared Server core Server
Number of services installed by default ~40 ~75
Number of services running by default ~30 ~50
146 Introducing Microsoft Windows Longhorn Server
Windows server core server from your machine using the net use \\<server_name>\ipc$ /
u:<domain>\<user_name> command using a user account that has local admin privileges on
the Windows server core server. Then try running your WinRS commands again. Note that
this tip also applies to using MMC admin tools to remotely manage a Windows server core
installation since the MMC doesn’t let you specify different credentials for connecting
remotely.
If you’re trying to use Computer Management on another machine to manage the disk
subsystem on your Windows server core server using Disk Management and you can’t, type
net start vds at the command prompt on your Windows server core server to start the Virtual
Disk Service on the server. Then you should be able to manage your server’s disks remotely
using Disk Management.
If you’ve enabled Automatic Updates on your Windows server core server and you want to
check for new software updates immediately, type wuauclt /detectnow at the command
prompt.
And yes, the Windows server core installation option does support clustering. A clustered
file server running on Windows server core servers would be cool.
Our last tip will be provided by one of our experts:
From the Experts: What Time Is It?
Here is a flash back to the old MS-DOS days. Because Windows server core does not have
the system tray, there is no clock. If you are used to having the time available on the
screen, you can add it to your prompt in the command prompt window.
Entering the following:
prompt [$t]$s$p$g
will display:
[14:27:06.28] C:\users\default>
–Andrew Mason
Program Manager, Windows Server
Chapter 6 Windows Server Core 147
Conclusion
We’re used to Microsoft piling features into products, not stripping features out of them.
The Windows server core installation option of Windows Server 2008 is a new direction
Microsoft is pursuing in its core product line, but it’s a direction being driven by customer
demand. When I said that Microsoft listened to their customers, I was serious. And Windows
server core is a good example of this.
Additional Resources
You’ll find a brief description of the Windows server core installation of Windows Server 2008
at Server 2008/evaluation/overview.mspx.
By the time you read this chapter, this page will probably be expanded or the URL will
redirect you to somewhere that has a lot more content on the subject.
If you have access to the Windows Server 2008 beta program on Microsoft Connect (http://
connect.microsoft.com), you can get some great documentation from there, including these:
■ Microsoft Windows Server Code Name 2008 Server Core Step-By-Step Guide
■ Live Meeting on Server Core
■ Live Chat on Server Core
There’s also a TechNet Forum where you can ask questions and help others trying
out the Windows server core installation option of Windows Server 2008. See
for this
forum. (Windows Live registration is required.)
There’s a Windows server core blog on TechNet that is definitely something you won’t want
to miss. See
Finally, be sure to turn to Chapter 14, “Additional Resources,” for more sources of
information concerning the Windows server core installation option, and also for links to
webcasts, whitepapers, blogs, newsgroups, and other sources of information about all
aspects of Windows Server 2008.
149
Chapter 7
Active Directory Enhancements
In this chapter:
Understanding Identity and Access in Windows Server 2008 . . . . . . . . . . . . . . . .149
Active Directory Domain Services. . . . . . . . . . . . . . . . . . . . . . . . . . . . . . . . . . . . . . . .158
Active Directory Lightweight Directory Services . . . . . . . . . . . . . . . . . . . . . . . . . . .172
Active Directory Certificate Services . . . . . . . . . . . . . . . . . . . . . . . . . . . . . . . . . . . . .176
Active Directory Federation Services . . . . . . . . . . . . . . . . . . . . . . . . . . . . . . . . . . . . .182
Active Directory Rights Management Services . . . . . . . . . . . . . . . . . . . . . . . . . . . . .186
Conclusion . . . . . . . . . . . . . . . . . . . . . . . . . . . . . . . . . . . . . . . . . . . . . . . . . . . . . . . . . . .187
Additional Resources. . . . . . . . . . . . . . . . . . . . . . . . . . . . . . . . . . . . . . . . . . . . . . . . . . .187
Active Directory and its related services form the foundation for enterprise networks running
Microsoft Windows, and the new features and enhancements to Active Directory and its
related services in Windows Server 2008 are numerous. This chapter takes a look at these
enhancements and at the direction in which Active Directory and its related services are
heading as an integrated identity and access platform for enterprises—that is, as a platform
for provisioning and managing network identity.
Understanding Identity and Access in Windows
Server 2008
Before we jump in and examine the various enhancements to Active Directory and its related
services in Windows Server 2008, however, let’s first step back a bit and get the big picture of
how Active Directory and its related services have been evolving since they were first intro-
duced in Windows 2000 Server and what these services are becoming in Windows Server
2008 and beyond. It’s important to understand this big picture, as otherwise the many
improvements to Active Directory and related services in Windows Server 2008 might seem
like a miscellaneous grab-bag of changes without much in common. But they have a lot in
common as we’ll shortly see.
Understanding Identity and Access
So why is identity and access (IDA) important to enterprises? Think for a moment about what
goes on when a user on your network needs access to confidential business information
stored on a server. Tony is in the Marketing department, and he needs access to a product
150 Introducing Windows Server 2008
specification so that he can work on a marketing presentation for a customer. The document
containing the specification is stored on a server on the company’s network, and Tony tries to
open the document so that he can cut and paste information contained in it into his presen-
tation. To safeguard such specifications, you’d like your IDA infrastructure to do the following:
1. Determine who the user is who wants to use the document.
2. Grant the user the appropriate level of access to the document.
3. Protect confidential information contained in the document.
4. Maintain a record of interaction concerning the user’s accessing of the document.
For example, you might want to restrict access to product specifications to full-time employees
(FTEs) only and provide read-only access to users in the Marketing department so that they
can view but not modify specifications. You might also want to prevent Marketing department
users from copying and pasting text from specifications into other documents. And you might
want an audit trail showing the day and time that the user accessed the specification.
The challenge of implementing an IDA solution that can do all of this becomes even greater
once you start extending the boundaries of your enterprise with “anywhere access” devices,
Web services, and collaboration tools like e-mail and instant messaging. It becomes even more
complicated once you have to start applying the IDA process not just to FTEs but also to con-
tractors, temps, customers, and external partners. The challenge is to build an IDA solution
that can handle all these different scenarios, and Microsoft has steadily been working toward
this goal since Active Directory was first released with Windows 2000 Server. Let’s briefly
summarize the evolution of Microsoft’s IDA solution, beginning with Windows 2000 Server
and working up to the current platform for Windows Server 2003 R2 and then to Windows
Server 2008 and beyond.
Identity and Access in Windows 2000 Server
Active Directory directory service is a Windows-based directory service that was first intro-
duced in Windows 2000 Server. Active Directory directory service stores information about
various kinds of objects on a network—such as users, groups, computers, printers, and shared
folders—and it makes this information available to users who need to access these resources
and administrators who need to manage them. Active Directory provides network users with
controlled access to permitted resources anywhere on the network using a single logon pro-
cess. Active Directory directory service also provides administrators with an intuitive, hierar-
chical view of the network and its resources, and it provides a single point of administration
for all network objects.
Windows 2000 Server also included a separate component, called Certificate Services, that
can be used to set up a certificate authority (CA) for issuing digital certificates as part of a
Public Key Infrastructure (PKI). These certificates can be used to provide authentication for
users and computers on your network to secure e-mail, provide Web-based authentication,
Chapter 7 Active Directory Enhancements 151
and support smart-card authentication. Certificate Services also provides customizable
services for issuing and managing certificates for your enterprise. What’s important to under-
stand here is that in Windows 2000 Server, Active Directory directory service and Certificate
Services are two separate components that are not integrated together. In other words, the
two services are managed separately and have policy implemented differently.
In addition to these two built-in IDA services, Microsoft also released an out-of-band service
for Windows 2000 Server called Microsoft Metadirectory Services (MMS). In its final version,
MMS 2.2 was an enterprise metadirectory that enterprises could use to integrate all their var-
ious directories together into a single consolidated central repository. MMS 2.2 consisted of
one or more metadirectory servers, management agents, and the connected directories, and it
provided users with access to this consolidated information via Lightweight Directory Access
Protocol (LDAP). The goal of MMS 2.2 was to provide enterprises with a provisioning solution
that could be used to effectively provide consistent identity management across many differ-
ent databases and directories. For example, if you had both an Active Directory directory ser-
vice infrastructure and a Lotus Notes infrastructure and you wanted Active Directory
directory service users to be able to look up e-mail addresses from the Lotus Notes directory,
MMS 2.2 could make this possible. MMS 2.2 could also simplify the deployment of Active
Directory directory service for enterprises that already had information about employees or
customers stored in other directories by enabling real-time synchronization of information
from these directories into Active Directory directory service. Finally, MMS 2.2 could also be
used to simplify the migration and consolidation of multiple directories into Active Directory
directory service.
Identity and Access in Windows Server 2003
Although these Windows 2000 Server offerings did meet the needs of some enterprises, they
were still provided as separate services and MMS was even a totally separate product. Custom-
ers wanted something more integrated, and they also wanted additional IDA features, such as
document rights protection and role-based authorization. In addition to making improve-
ments to how Active Directory directory service and Certificate Services work and how they
are managed, Microsoft added a new feature called Authorization Manager to Windows 2003
Server that provided role-based authorization for users of line-of-business applications.
Although Active Directory directory service by itself provides object-based access control
using ACLs, the role-based access control (RBAC) provided by Authorization Manager enables
permissions to be managed in terms of the different job roles users might have. Authorization
Manager works by providing a set of COM-based runtime interfaces that enables an applica-
tion to manage and verify a client’s requests to perform operations using the application.
Authorization Manager also includes an MMC snap-in that application administrators can use
to manage different user roles and permissions.
Another IDA service that Microsoft released for Windows Server 2003 is Windows Rights
Management Service (RMS), an information-protection technology that works with RMS-
enabled applications to help businesses safeguard valuable digital information from
152 Introducing Windows Server 2008
unauthorized use whether online or offline and whether inside the firewall or outside the
firewall. Windows RMS was also designed to help organizations comply with a growing
number of regulatory requirements that mandated information protection, including the U.S.
Sarbanes-Oxley Act, the Gramm-Leach-Bliley Act, the Health Insurance Portability and
Accountability Act (HIPAA), and others. To use Windows RMS, enterprises can create central-
ized custom usage policy templates, such as “Confidential – Read Only,” that can work with
any RMS-enabled client and can be directly applied to sensitive business information such as
financial reports, product specifications, or e-mail messages. Implementing Windows RMS
requires an Active Directory directory service infrastructure, a PKI, and Internet Information
Services—all of which are included in Windows Server 2003. In addition, RMS-enabled client
applications such as Microsoft Office 2003 and Internet Explorer are needed, plus Microsoft
SQL Server to provide the underlying database for the service.
While these additional IDA services and add-ons for Active Directory directory service were
being released, Microsoft also released a follow-up to MMS 2.2 called Microsoft Identity Inte-
gration Server (MIIS) 2003, which provides a centralized service that stores and integrates
identity information for organizations with multiple directories. It also provides a unified view
of all known identity information about users, applications, and resources on a network. MIIS
2003 is designed for life-cycle management of identity and access to simplify the provisioning
of new user accounts, strong credentials, access policies, rights management policies, and so
on. MIIS 2003 is available in two versions. First, there’s Microsoft Identity Integration Server
2003 SP1, Enterprise Edition, which includes support for identity integration/directory syn-
chronization, account provisioning/deprovisioning, and password synchronization and man-
agement. And second, there’s Identity Integration Feature Pack 1a for Microsoft Windows
Server Active Directory, a free download that provides the same functionality as Microsoft
Identity Integration Server 2003 SP1, Enterprise Edition (identity integration/directory syn-
chronization, account provisioning/deprovisioning, and password synchronization) but only
between Active Directory directory service, Active Directory Application Mode (ADAM), and
Microsoft Exchange Server 2000 and later. Enterprises that need to interface with repositories
other than Active Directory, ADAM, or Exchange Server, however, must use MIIS 2003,
Enterprise Edition, rather than the free Feature Pack version.
Identity and Access in Windows Server 2003 R2
With the R2 release of Windows Server 2003, Microsoft added two more IDA services to the
slate of various services already available on Windows Server 2003 either as in-box services,
downloadable add-ons, or separate server products built upon Active Directory directory ser-
vices. These two new IDA services are Active Directory Application Mode and Active Directory
Federation Services.
Active Directory Application Mode (ADAM) is essentially a standalone version of Active
Directory directory service that is designed specifically for use with directory-enabled
Chapter 7 Active Directory Enhancements 153
applications. ADAM does not require or depend upon Active Directory forests or domains, so
you can use it in a workgroup scenario on standalone servers if desired—you don’t have to
install it on a domain controller. In addition, ADAM stores and replicates only application-
related information and does not store or replicate information about network resources, such
as users, groups, or computers. And because ADAM is not an operating system service, you
can even run multiple instances of ADAM on a single computer, with each instance of ADAM
supporting a different directory-enabled application and having its own directory store,
assigned LDAP and SSL ports, and application event log. ADAM is provided as an optional
component of Windows Server 2003 R2, but there’s also a downloadable version that can
be installed on either Windows Server 2003 or Windows XP.
Active Directory Federation Services (ADFS) is another optional component of Windows
Server 2003 R2 that provides Web single sign-on (SSO) functionality to authenticate a user to
multiple Web applications over the life of a single online session. ADFS works by securely
sharing digital identity and entitlement rights across security and enterprise boundaries, and
it supports the WS-Federation Passive Requestor Profile (WS-F PRP) Web Services protocol.
ADFS is tightly integrated with Active Directory, and it can work with both Active Directory
directory services and ADAM. Using ADFS, an enterprise can extend its existing Active Direc-
tory infrastructure to the Internet to provide access to resources that are offered by trusted
partners across the Internet. These trusted partners can be either external third parties or
additional departments or subsidiaries within the enterprise.
Identity and Access in Windows Server 2008
Looking back over this evolution of Active Directory–based IDA services since Windows 2000
Server, we have the following IDA solution for the current platform Windows Server 2003 R2:
■ Active Directory directory services and Certificate Services—two core services that can be
deployed separately or together.
■ Authorization Manager, ADAM, and ADFS—separate optional components that require
Active Directory directory services. (Authorization Manager also requires Certificate
Services.)
■ MIIS 2003, which is available both as a separate product or as a free Feature Pack
(depending on whether or not you need to synchronize with non-Microsoft directory
services).
■ Windows Rights Management Service (RMS), which is available as an optional
download from the Microsoft Download Center.
Microsoft’s vision with Windows Server 2008 (and beyond) is to consolidate all these
various IDA capabilities into a single, integrated IDA solution built upon Active Directory.
This consolidation picture as of Beta 3 of Windows Server 2008 is as follows.
154 Introducing Windows Server 2008
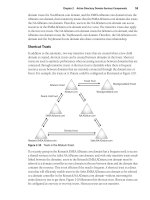
As shown in the following diagram, there are four key integrated IDA components present in
Windows Server 2008:
■ Active Directory Domain Services (AD DS) and Active Directory Lightweight Directory
Services (AD LDS), which provide the foundational directory services for domain-based
and standalone network environments.
■ Active Directory Certificate Services (AD CS), which provides strong credentials using
PKI digital certificates.
■ Active Directory Rights Management Services (AD RMS), which protects information
contained in documents, e-mails, and so on.
■ Active Directory Federation Services (AD FS), which eliminates the need for creating and
maintaining multiple separate identities.
Note the following rebranding of IDA services in Windows Server 2008:
■ Active Directory directory services is now known as Active Directory Domain Services
(AD DS).
■ Active Directory Application Mode is now called Active Directory Lightweight Directory
Services (AD LDS).
■ Certificate Services is now called Active Directory Certificate Services (AD CS).
■ Windows Rights Management Services is now named Active Directory Rights
Management Services (AD RMS).
■ Finally, Active Directory Federation Services (ADFS) is still called Active Directory
Federation Services (AD FS) but now includes an extra space in the abbreviation.
And for identity life-cycle management, Microsoft also plans on releasing a follow-up to MIIS
2003 called Identity Lifecycle Manager (ILM) 2007 in mid-2007. Initially, ILM 2007 will run
on Windows Server 2003, Enterprise Edition. ILM 2007 builds on the metadirectory and
user-provisioning capabilities in MIIS 2003 by adding new capabilities for managing strong
credentials such as smart cards and by providing an integrated approach that pulls together
metadirectory, digital certificate and password management, and user provisioning across
Microsoft Windows platforms and other enterprise systems. Microsoft is also working on the
next version of ILM, which is codenamed Identity Lifecycle Manager “2.” This version is
planned for release around the same time as Windows Server 2008, but it will install sepa-
rately. Before we go any further, let’s hear from one of our experts at Microsoft concerning
plans for ILM “2” as an identity-management solution for Windows Server 2008:
AD DS/LDS
AD CS
AD RMS
AD FS
Chapter 7 Active Directory Enhancements 155
From the Experts: Identity Lifecycle Manager “2”
Identity Lifecycle Manager “2” is the codename for Microsoft’s identity management
solution for Windows Server 2008. The principles behind Identity Lifecycle Manager “2”
are that identity is everywhere and it can be managed how you want it to be.
Identity Is Everywhere
Identity Lifecycle Manager “2” provides a plethora of ready-to-deploy self-service identity
and access solutions. Users can manage their own information and that of their staff,
and navigate through the organizational hierarchy. They can reset their own passwords,
provision their own smart cards, and retrieve their certificates. They can create security
groups and distribution lists, request access to one another’s groups, and manage
approval.
Best of all, they can do all of this right from within their Office applications and
Windows desktops. So, with Identity Lifecycle Manager “2,” if you want to request to join
a group, you can do that right within Outlook. And when you are asked to approve an
action by another user, the Approve and Reject buttons are right there in the approval
request mail. And if you forget your password and need to reset it, you can do so right
where you are most likely to find that you have forgotten it: at the Windows log-in
prompt. All the facilities of Identity Lifecycle Manager “2” are also available from a central
portal, hosted within Windows SharePoint Services.
Identity Is Managed How You Want It to Be
Identity Lifecycle Manager “2” lets you manage identity your way by allowing you to
accurately model your business processes and attach them to identity and access events.
Modeling your unique business procedures around identity and access management
processes is meant to be something that each staff member can do for themselves,
without having to depend on programmers to do it for them. Thus, Identity Lifecycle
Manager “2” provides a simple graphical user interface for modeling your business pro-
cedures—the Identity Lifecycle Manager “2” Process Designer. Moreover, you don’t have
to deploy any special software onto your user’s desktops for them to be able to use the
Process Designer. The Process Designer is fully incorporated within the Identity Lifecy-
cle Manager “2” portal, which is a Windows SharePoint Services 3 application. So all that
users of the Process Designer need to access the designer is their browser.
The three fundamental types of processes that you can model in Microsoft Identity
Lifecycle Manager “2” are authentication processes, approval processes, and action
processes. Indeed, within Identity Lifecycle Manager “2,” processing proceeds by first
executing your authentication processes, then your approval processes, and finally your
action processes.
Authentication processes are for confirming a user’s identity. The steps in
an authentication process challenge the user for credentials. This process can also
include several steps to define a multifactor authentication process required for more
156 Introducing Windows Server 2008
sensitive operations. Both the built-in authentication activities and your custom ones
can leverage the Windows GINA and Windows Vista Credential Provider technologies
to challenge users for their credentials at the Windows log-in prompt. This is a desirable
option, because then users are challenged to prove their identity precisely where they
expect to be challenged.
A second core type of process in the process model of Microsoft Identity Lifecycle
Manager “2” is the approval process. Approval processes are for confirming that a user
has permission to perform a requested operation. Typically, an approval process
involves sending an e-mail message to the owner of a resource asking them to confirm
that a user has permission to perform some requested operation on that resource.
Identity Lifecycle Manager “2” allows users to respond to those approval requests right
from within Outlook, which is precisely where a user would naturally want to be able to
do so. Another type of activity in an approval process is one that requires users to submit
a business justification for an operation they want to perform. In Identity Lifecycle Man-
ager “2,” approval processes can involve any activities that a user might have to complete
before being allowed to proceed with an operation. The enabling power of Identity Life-
cycle Manager “2” is that it gives you the freedom to determine how you want to gather
approvals for users’ actions. Then it surfaces the approvals on the end users’ desktops,
inside an appropriate application context where they would expect to find them—saving
the user from having to go elsewhere to manage permissions.
The third and final core type of process in the process model of Microsoft Identity
Lifecycle Manager “2” is the action process. Action processes define what happens as a
consequence of an operation. A simple example is just having a notification sent to the
owner of a resource to inform the owner of a change. A more interesting and, indeed,
more common type of activity to perform as a consequence of an identity management
operation is an entitlement activity. Thus, you might define a process that, as a conse-
quence of assigning a user to a particular group, allocates a parking permit in the correct
lot and issues the appropriate card key for the user’s building. The point is that Identity
Lifecycle Manager “2” action processes are truly a blank slate. On that blank slate, you
get to define how actions on objects within Identity Lifecycle Manager “2” propagate out
to the identity stores and resources of your enterprise.
We’ve said that the principal idea is that you get to define processes that model the
identity management procedures of your enterprise and that you get to attach those pro-
cesses to identity and access events. Up to this point, we have discussed quite a lot about
the processes. Now let us turn to the subject of attaching those processes to events.
Chapter 7 Active Directory Enhancements 157
Events are the triggers that cause Identity Lifecycle Manager “2” processes to be
executed. So, in attaching a process to an event, you are defining the circumstances
under which the process will be executed. In the nomenclature of Identity Lifecycle
Manager “2,” we refer to this as mapping a process to an event. We provide a simple user
interface for accomplishing it. You identify the process that you have created using the
Process Designer, and then you specify the event to which you want to attach the
process.
So what is an event in Identity Lifecycle Manager “2?” Well, an event is something that
happens to a set of one or more objects. For example, you might update the cost center
assigned to a particular team of people, or you might update the office telephone num-
ber of a single individual. Both constitute examples of events. Another example is the
addition of a person to a team—in that case, there is an event for the person being added,
as well as an event for the team that the person is joining.
Because an event is something that happens to a set of one or more objects, when you
map a process to an event, you must identify the set of objects to which the event is
expected to occur. Identity Lifecycle Manager “2” gives you considerable power to iden-
tify the sets of objects. You get to define the rules by which objects are included in sets.
Those rules can be as rich and complex or as bare and simple as you want them to be.
You can define them so as to include any number of objects in a set, and any variety of
types of objects as well. Once you have defined rules to identify a set of objects, you can
select the events on those objects that you want to serve as triggers for your processes.
There are two types of events in Identity Lifecycle Manager “2” that can trigger your
processes: request events and transition events.
Request events are events by which the data of an object or set of objects is retrieved or
manipulated. So, included in the category of request events are create, read, update, and
delete events. Transition events occur when an object moves in or out of a set of objects.
So, in the earlier example of a person joining a team, there is a transition for that person
in being included in the group and a transition for the group in having that person join.
All in all, the authentication, approval, and action processes that you compose using
approval actions, notification actions, and entitlement actions in the Process Designer
can be mapped to any request or transition event on any set of objects that you identify
via your rules. We believe that this simple model of designing processes and then map-
ping those processes to events gives you tremendous power to manage the identity life
cycle of your organization. Whatever identity-related occurrences that you can imagine
happening in your enterprise can be represented as events within Identity Lifecycle
Manager “2,” and then you can describe processes to handle those events—processes
that confirm the identity of the person initiating the event, that confirm the person’s per-
mission to initiate the event, or that define the consequences. Crucially, you get to define
158 Introducing Windows Server 2008
those processes as models representing the business policies and procedures that
uniquely govern the identity-related assets of your enterprise.
Microsoft Identity Lifecycle Manager “2” is built on the Windows Communication
Foundation, Windows Workflow Foundation, and Windows SharePoint Services 3
technologies, and it exposes a thoroughly standards-based API that implements
WS-Transfer, WS-ResourceTransfer, WS-Enumeration, and WS-Trust.
–Donovan Follette
Identity and Access Developer Evangelist, Windows Server Evangelism
After reading all this, you hopefully understand now the big picture of what Microsoft’s
vision is for identity and access, and how Active Directory in Windows Server 2008 fits into
this picture. Now it’s time to look at each piece of this picture and learn about the new features
and enhancements to Active Directory in Windows Server 2008. We’ll begin with core
improvements to AD DS/LDS.
Active Directory Domain Services
Let’s look at four enhancements to Active Directory in Windows Server 2008:
■ AD DS auditing enhancements
■ Read-only domain controllers
■ Restartable AD DS
■ Granular password and account lockout policies
There are other improvements as well, including some changes to the user interface for
managing Active Directory and also to the Active Directory Installation Wizard. But we’ll focus
here on the three enhancements just mentioned, as they’re big gains for many enterprises.
AD DS Auditing Enhancements
The first enhancement we’ll look at is AD DS auditing. In the current platform, Windows
Server 2003 R2 (and in Windows Server 2008 also), you can enable a global audit policy
called Audit Directory Service Access to log events in the Security event log whenever certain
operations are performed on objects stored in Active Directory. Enabling logging of objects in
Active Directory is a two-step process. First, you open the Default Domain Controller Policy in
Group Policy Object Editor and enable the Audit Directory Service Access global audit policy
found under Computer Configuration\Windows Settings\Security Settings\Local
Policies\Audit Policy.
Chapter 7 Active Directory Enhancements 159
Then you configure the system access control list (SACL) on the object or objects you want
to audit. For example, to enable Success auditing for access by Authenticated Users to User
objects stored within an organizational unit (OU), you do the following:
1. Open Active Directory Users and Computers, and make sure Advanced Features is
selected from the View menu.
2. Right-click on the OU you want to audit, and select Properties.
3. Select the Security tab, and click Advanced to open the Advanced Security Settings for
the OU.
4. Select the Audit tab, and click Add to open the Select User, Computer or Group dialog.
5. Type Authenticated Users, and click OK. An Auditing Entry dialog opens for the OU.
6. In the Apply Onto list box, select Descendant User Objects.
7. Select the Write All Properties check box in the Select column.
160 Introducing Windows Server 2008
8. Click OK to return to Advanced Security Settings for the OU, which should now show
the new SACL you configured.
9. Close all dialog boxes by clicking OK as needed.