MCITP Windows Server 2008 Server Administrator Study Guide phần 4 doc
Bạn đang xem bản rút gọn của tài liệu. Xem và tải ngay bản đầy đủ của tài liệu tại đây (1.79 MB, 53 trang )
116
Chapter 3
N
Using Windows Server 2008 Management Tools
EXERCISE 3.4
(continued)
6. Launch the command prompt by pressing Windows logo key+R, entering cmd, and
then pressing the Enter key.
7. At the command prompt, enter the following command:
Wecutil qc
8. When prompted to proceed, press Y and then Enter.
9. Still at the collector computer, launch Event Viewer by clicking Start Administrative
Tools Event Viewer.
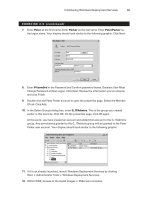
10. Right-click Subscriptions, and select Create Subscription.
11. In the Subscription Properties box, enter MCITP2 Events, as shown in the following
graphic. (You could enter the name of your source computer instead of MCITP2.) You
can also access this properties dialog box after the subscription is created.
12. Accept the default destination log of Forwarded Events.
13. In the Subscription Type and Source Computers section, click Select Computers.
14. In the Computers dialog box, click the Add Domain Computers button.
15. In the Select Computer dialog box, enter the name of the computer you configured as
the source computer. I am using the computer named MCITP2. Click OK.
16. In the Computers dialog box, verify your computer is identified with the fully
qualified name. For example, my source computer (MCITP2) is identified as MCITP2
.mcitpsuccess.hme since it is in the domain of
mcitpsuccess.hme.
93157c03.indd 116 8/7/08 7:03:51 PM
Server-Monitoring Tools
117
EXERCISE 3.4
(continued)
17. Click Test. A dialog box should appear indicating the connectivity test succeeded. Click
OK in the test dialog box, and click OK again in the Computers dialog box.
If this test fails, verify the source computer is accessible on your network and it has
been configured with the
WinRM quickconfig command.
18. Click the Select Events button.
19. Click the check boxes next to Critical, Warning, and Error. Verify By Log is selected,
and click the drop-down arrow to the right of the Event Logs field. In the drop-down,
check the Windows Logs box. Click OK.
This will cause all the events for all the Windows logs to be selected.
20. Click the Advanced button.
21. In the Advanced Subscription Settings dialog box, select specify user. Click the User
and Password button. Enter the name of a user account with administrative permis-
sions in the format of domain\user. Enter the user’s password. Click OK in the creden-
tials dialog box. Click OK in the Advanced Subscription Settings box.
22. In the Subscription Properties dialog box, click OK.
This will create the MCITP2 events subscription to be created.
23. Select the Forwarded Events log. You won’t see events in the log immediately, but
after as long as 15 minutes, you can refresh the display, and you will see events
begin to appear. The following graphic shows events that have come from the server
named MCITP2.
93157c03.indd 117 8/7/08 7:03:51 PM
118
Chapter 3
N
Using Windows Server 2008 Management Tools
Event Tasks
Another new feature available in Windows Server 2008 is the ability to configure event
tasks. This allows you to configure your system to perform something specific in response
to specific events.
The simplest way to attach a task to an event is by right-clicking the event in Event
Viewer and selecting Attach Task to This Event, as shown in Figure 3.10. This will launch
the Create a Basic Task Wizard.
FIGURE 3.10 Attaching a task to an event
You can also attach a task by using the Actions pane located on the right. Two links are
available: Attach a Task to This Log and Attach Task to This Event.
Once created, tasks are added to the Task Scheduler. To view or modify the properties of
any task, launch the Task Scheduler (Start Administrative Tools Task Scheduler), and
select Event Viewer Tasks.
Three actions are possible when attaching tasks:
Start a program Any executable program can be launched from here in response to the
event. This includes compiled programs (such as those with an
.exe or .com extension),
batch files (
.bat), and scripts (such as .vbs).
Send an email Using the Send an Email option, you can forward an email to any SMTP
server, which will then send it to the email address identified in the To section. The email page
allows you to add a From address, a To address, a subject, the text of your email, attachments,
and the name of the SMTP server.
93157c03.indd 118 8/7/08 7:03:51 PM
Server-Monitoring Tools
119
Display a message By selecting Display a Message, you can add the title and text of a mes-
sage box that will appear when the event is triggered.
Exercise 3.5 shows you how you can schedule a task to respond when a service stops or
starts. Although you can schedule a task for any event, stopping or starting a service is an
event that is easy to re-create. Once configured, you will stop the service and verify your
task has completed.
EXERCISE 3.5
Configuring an Event Task to Respond to an Event
1. Launch the Services applet. Select Start Administrative Tools Services.
2. Browse to the DHCP Client service.
3. Right-click the DHCP Client service, and select Stop. Leave the Services applet open.
4. Launch the Event Viewer. Select Start Administrative Tools Event Viewer.
5. Select the System log. If the System log was already selected, right-click the System
log, and select Refresh.
6. Find the system event with an event ID of 7036.
Event ID 7036 reports the stopping and starting of any service. Although this exercise
focuses on the DHCP service, the event will respond with any services stopping or
starting. After the event is created with the wizard, the trigger of the event can be fine-
tuned to meet just about any need (such as fire only when a specific service stops,
instead of when any service stops or starts).
7. Right-click the event with an event ID of 7036, and select Attach Task to This Event.
8. On the Create a Basic Task page, enter Monitors the starting and stopping of
any service in the Description box. Click Next.
9. On the When an Event Is Logged page, review the information. Note that this informa-
tion cannot be changed through the wizard but can be changed later by manipulating
the properties of the event task. Click Next.
10. On the Action page, select Display a Message, and click Next.
11. On the Display a Message page, enter You said you wanted to know… in the title
box. In the Message box, enter A service has stopped or started. Click Next.
12. Your display will look similar to the following graphic. Click Finish to create the task.
93157c03.indd 119 8/7/08 7:03:51 PM
120
Chapter 3
N
Using Windows Server 2008 Management Tools
EXERCISE 3.5
(continued)
13. In the Event Viewer dialog box informing you the task has been created, click OK.
14. Return to the Services applet. Right-click the DHCP Client service, and click Start. A
dialog box will appear with the title and text you specified in this exercise. The mes-
sage box may not appear on top of other windows. However, if you look at the task-
bar, you’ll see an instance of your message box there.
While the previous exercise shows the process of displaying a message box in response
to an event, don’t think that’s all you can do. You can get much more sophisticated in your
tasks than just displaying a message box. By selecting Run a Program, you can execute a
complex script that launches other programs, sends emails, and displays message boxes.
After you’ve completed a task, you can view and manipulate the task’s properties
through the Task Scheduler. To launch the Task Scheduler, select Start Administrative
Tools Task Scheduler.
Task properties are shown in a smaller pane in the Task Scheduler, but you can also view
them by right-clicking the task and selecting Properties. The properties of any task include
six tabs.
Figure 3.11 shows the properties of a task. In the figure, the General tab is selected; it
displays general properties. By selecting other tabs, you can view and manipulate other
properties.
General The General tab shows the name and description of the task and the name of the
account that was used to create it.
93157c03.indd 120 8/7/08 7:03:51 PM
Server-Monitoring Tools
121
FIGURE 3.11 Task properties
Using the Security Options section, you can change the context of how the task is run.
Tasks generally need to run under the context of an account with administrator privileges.
Although this task was originally created with the administrator account, you may want to
change it to a service account.
The Run with Highest Privileges check box is related to User Account Control (UAC). If
checked, the UAC elevated permissions will be used to run the task. If not checked, the UAC
least privileges token will be used. If the task is set to run with an account in the Administra-
tors group, ensure this box is checked.
Triggers The Triggers tab identifies what will cause this task to run and how the task will
run once it’s fired. Figure 3.12 shows the Edit Trigger screen that appears when you select a
trigger and click the Edit button on the Triggers tab.
By editing the trigger, you can modify the event to fire based on a different log, different
source, and different event ID. Using the Custom setting, you can get pretty specific about
exactly what event you’re interested in and even modify the task so that it responds to multiple
tasks. For example, if you want to modify a task to run any time any critical event was logged
in the Forwarded Events log, you could do so on the Triggers tab.
The advanced settings allow you to modify how the task is executed. This includes delaying
the execution of the task, repeating the task, stopping task after a period of time, setting
activate and expiration dates, and even enabling or disabling the task.
Actions The Actions tab defines what the event does once the trigger fires. By selecting the
action and clicking Edit, you can modify what the trigger does. You may have originally had
it display a message. You can use this screen to modify what the message says or change it to
execute a program or send an email.
93157c03.indd 121 8/7/08 7:03:51 PM
122
Chapter 3
N
Using Windows Server 2008 Management Tools
FIGURE 3.12 Modifying the task trigger
For example, when the task executes, you may want it to copy a directory tree. You can use
the
robocopy (Robust File Copy) command to copy a directory tree to a directory of your
choice, the
cscript command to execute a script, the NET command to start or stop a ser-
vice, the
defrag command defragment a hard drive, or just about any other program you
can run normally.
Conditions The Conditions tab allows you to limit the execution of task. In other words,
once the trigger fires, the conditions are examined, and as long as all the conditions are
met, the task will execute. If the conditions are not met, the task will not execute (even
though the trigger fired).
Figure 3.13 shows the default settings for the Conditions tab. Three categories of condi-
tions can be selected: Idle, Power, and Network.
Settings The Settings tab allows you to specify additional settings that affect the behavior
of the task such as how it can be started and how it can be stopped.
For example, you can allow the task to be run on demand (manually) and force it to be
stopped if the task doesn’t stop when requested.
History The History tab shows a history of the event and can be useful when trouble-
shooting the execution of the event. The history includes when a task is registered, when
a task is triggered, when it’s told to start, when the action starts, and when the action
completes.
93157c03.indd 122 8/7/08 7:03:52 PM
Server-Monitoring Tools
123
For example, you may have expected an email notification when a service was stopped, but
the email didn’t arrive. There could be several reasons for the failure. Checking the history
log, you can verify the task was triggered and observe the results for the action. I entered
the name of a nonexistent SMTP server, and the history log showed the action failed. The
next step would be to examine the Action tab of the task.
FIGURE 3.13 Modifying the task conditions
Windows System Resource Manager
The Windows System Resource Manager (WSRM) tool allows administrators to limit the
amount of CPU and memory resources that any individual application is using. Addition-
ally, WSRM can be used to manage multiple users on a single computer (such as multiple
users accessing a single server using Terminal Services).
In addition to managing the total amount of CPU with WSRM, it’s also possible to
specify the processor affinity. Processor affinity is used to link a specific process with a
specific processor.
For example, you could have a system with four processors and you want to ensure that
an application uses only the fourth processor. This can get complex, so using WSRM with
processor affinity should be done sparingly.
The following are some of the goals of WSRM:
Ensuring a critical application has enough resources WSRM can be used to ensure that a
single application always has enough resources at its disposal. For example, if you’re run-
ning IIS as an intranet server and also using the same server as a file and print server, you
may want to ensure that IIS always has enough resources.
93157c03.indd 123 8/7/08 7:03:52 PM
124
Chapter 3
N
Using Windows Server 2008 Management Tools
Preventing an application from consuming excessive resources WSRM can be used to
ensure an application doesn’t get greedy and try to consume too many resources. This can be
useful when faced with problems such as an application with a memory leak. A memory leak
in a faulty application steadily takes more and more memory until no more memory exists. By
using WSRM, you can ensure that a memory leak in one application does not take memory
from other applications.
Preventing a user from consuming excessive resources When multiple users are using
the same server, such as in a Terminal Services application, users can be prevented from
taking more resources than allocated to them. This provides all users with an equal
amount of resources.
Identifying a customer’s usage WSRM includes an accounting capability that allows you
to identify specifically how many resources any individual user is consuming. Data can
be fed into a Microsoft SQL Server database and be used to identify how much users are
charged based on usage.
When WSRM senses that a process is exceeding its allocated resources, it first tries to
change the resource usage by changing the priority of the process. If this doesn’t succeed,
than WSRM uses a complex algorithm to adjust the resources that the process can use.
This works similarly to how a governor works on a car. Some taxi companies want to
ensure that taxi drivers don’t exceed a certain speed, so a governor is installed on the car,
preventing the car from exceeding the desired speed.
The difference is that while the governor prevents the car from exceeding the speed,
WSRM goes into action after the threshold is exceeded. When a process or user exceeds
a given threshold, WSRM takes action to throttle the process or user back to below the
threshold.
Resource Allocation Policies
WSRM uses policies to manage resource allocation. The policies are applied to matched
processes. In other words, the policies are applied to the specific user or specific applications
that are selected by the policy. The basic policies are as follows:
Equal per process The available CPU bandwidth is divided evenly between all the
matched processes. For example, if four processes are included in the policy and the system
has 100 percent of the available CPU bandwidth, WSRM will throttle down any process
that exceeds 25 percent usage.
Equal per process is the default policy for managing resources. This is also referred to as
process-based management.
Equal per user The available bandwidth used for a given process is divided evenly
between users. This is also referred to a user-based management.
For example, consider two users who are both running App1 on the same server and the
server has a total of 100 percent of the available CPU bandwidth. If the total bandwidth
used by one of the users exceeds 50 percent, then APP1 used by that user will be throttled
back so that it doesn’t exceed 50 percent.
93157c03.indd 124 8/7/08 7:03:52 PM
Remote Management
125
Equal per session The available bandwidth used for different users in Terminal Services
sessions is divided evenly between the sessions. This also referred to as session-based
management.
For example, consider two users who are both running multiple applications on the same
server and the server has a total of 100 percent of the available CPU bandwidth. If the total
bandwidth used by one of the users exceeds 50 percent, then individual applications by that
user will be throttled back so the total doesn’t exceed 50 percent.
It’s also possible to create your own resource allocation policy to meet specific needs
in your environment. For example, if you have a line-of-business application that needs to
always have at least 50 percent of the CPU’s processing capability, you can create a policy
to meet that need.
Adding Windows System Resource Manager
You can add WSRM to your system using the Server Manager tool. Select Add Features,
and then select the Windows System Resource Manager feature. You will be prompted to
also add the Windows internal database.
After the wizard finishes installing WSRM, you may be prompted to reboot the system.
Once installed, you can access WSRM by selecting Start Administrative Tools Win-
dows System Resource Manager. You will be prompted to connect to a computer. You can
connect to the local computer or any computer in Active Directory.
Remote Management
It’s highly unlikely that you work in the same place as your servers, even when you’re working
on the server. Instead, as an IT professional, you typically have a desk in a corner office with
a beautiful view of the pond….
Well, maybe your desk isn’t that glamorous, but it’s highly unlikely you do all your work
in the server room. The server room is usually much colder to ensure good airflow and reduce
heat-related problems. Additionally, server rooms generally have much more physical security
than regular office spaces.
But that doesn’t mean you have to break out your winter parka each time you need to
work on your server. Instead, you use one or more of the available tools that allow you
to remotely manage the server.
Accessing the Desktop Remotely
Two tools allow you to access the desktop of the remote computer from somewhere else:
Remote Desktop Connection (RDC)
ÛN
Remote Desktop
ÛN
93157c03.indd 125 8/7/08 7:03:52 PM
126
Chapter 3
N
Using Windows Server 2008 Management Tools
The tools have many similarities.
Both use Terminal Services Terminal Services will be explored in greater depth in
Chapter 7, “Planning Terminal Services Servers,” but in short, it allows multiple users to
access a remote server and run programs on the remote server. Administrators can use
Terminal Services to remotely connect to servers for administration purposes, and users
can use it to centrally deploy applications. When used for administration, a maximum of
three administrators can connect at the same time.
Both allow only two active sessions Whether you are using Remote Desktop Connection
or Remote Desktop, or one of each, only two active sessions are allowed. This includes the
console session. In other words, if one user is connected remotely and one user is connected
at the server, a third session is not allowed. Similarly, if two users are connected remotely, a
third session is not allowed.
For example, if both Sally and Joe connected to Srv2 via Remote Desktop and then you tried
to connect to Srv2 via Remote Desktop, you would see a display similar to Figure 3.14. It
informs you that too many users are logged on, but it also gives you the ability to disconnect
one of the users.
FIGURE 3.14 Too many users logged on
If you select one of the users (such as Joe), Joe will be sent a message saying you are trying
to log on. If Joe is active, he can deny your request. However, if he isn’t at the computer, the
request will time out, Joe will be disconnected, and you will be able to log on.
Only users in the Administrators group will have the ability to force a user to disconnect. If
you selected the check box Force Disconnect of This User, Joe would automatically be dis-
connected without any warning.
There’s a slight technicality here. Notice that I’m not saying you can’t have three sessions,
only that you can’t have three active sessions. If Joe is disconnected, his session changes
from active to disconnected. If Joe logs back in later when an active session is available,
Joe’s original session will be just as it was when he was disconnected.
93157c03.indd 126 8/7/08 7:03:52 PM
Remote Management
127
Both are enabled via System Properties To enable Remote Desktop, click Start, right-click
Computer, and select Properties. From the System Properties page, click Remote Settings.
Figure 3.15 shows the System Properties page accessed from the Computer property page
(after clicking Remote Settings).
FIGURE 3.15 Enabling Remote Desktop
Three choices are available. The default is Don’t Allow Connections to This Computer. The
legacy setting (allowing versions of Remote Desktop older than Remote Desktop Connec-
tion 6.0) is for Windows XP and Windows Server 2003. The most secure setting is Net-
work Level Authentication.
Both have compatibly issues with Windows XP and Server 2003 Security with Remote
Desktop has been improved in Windows Server 2008. Network Level Authentication (NLA)
is used to authenticate the user, the client machine, and the server before a Terminal Services
session is even begun. NLA provides a more secure environment since a session isn’t started
immediately as it was in previous versions of Remote Desktop.
To support NLA, you must be using at least Windows XP with SP2 or Windows Server
2003 with SP1. With NLA support enabled, you can install the Remote Desktop Client 6.0
Upgrade. The Remote Desktop Client version 6.0 is the default installation for Windows Vista
and Windows Server 2008.
93157c03.indd 127 8/7/08 7:03:53 PM
128
Chapter 3
N
Using Windows Server 2008 Management Tools
The Terminal Services features that are enabled on Server 2008 and
Windows Vista are not available in the RDC client available by default
on Windows XP or Windows Server 2003. To enjoy the advanced security
features (such as NLA) of RDC 6.0 from Windows XP or Server 2003, you
need to download and install the Remote Desktop Connection 6.0 client
update. Additionally, Windows XP must have at least SP2, and Windows
Server 2003 must have at least SP1 to install the client. Although not rec-
ommended, it is possible to configure the server with weakened security,
allowing remote connections using the legacy RDC client.
Both have similar permission requirements Administrators are automatically granted
permissions to remotely access a server (as long as Remote Desktop has been enabled on
the server). Additional users can be granted permission to access the server using a Remote
Desktop connection by adding them to the Remote Desktop Users group.
Remote Desktop Connection
Remote Desktop Connection 6.0 is an application that allows you to connect to a remote
computer and access the desktop just as if you were sitting in front of the remote computer.
The term remote computer is used loosely. In the classroom, I use RDC all the time to
connect to a computer three feet away from me. You could also use it to connect to a com-
puter in the server room three floors above you or even connect to a server at work from
your computer at home. Physical distance is irrelevant.
When using Remote Desktop, you can connect to a remote server and do just about
anything remotely that you could do locally. I say “just about” because the one big thing
to watch out for is if a reboot causes the remote server to power down. Although it’s easy to
walk three feet to power up a computer, it’s not so easy to press the power button on a server
that may be located miles away.
To launch Remote Desktop Connection from a Windows Server 2008 computer, select
Start All Programs Accessories Remote Desktop Connection. Figure 3.16 shows
Remote Desktop Connection being launched.
The Remote Desktop Connection dialog box has six tabs that can be used to modify
properties of your connection. The tabs are available when you click the Options button.
General The General tab shows the computer you will connect to and the username to be
used to connect. Once all the connection settings are set as you desire for a specific connec-
tion, you can save the connection settings in an RDP file (
.rdp) and then use the RDP file
the next time you want to connect.
Display Using the Display tab, you can control the size and colors of the remote desk-
top. Remote Desktop Connection supports a resolution size of 4096
×2048 if you’re lucky
enough to have a monitor that big.
Local Resources You have the capability of bringing any resources on your local com-
puter with you in your remote session and playing sounds from the remote computer to
93157c03.indd 128 8/7/08 7:03:53 PM
Remote Management
129
your local computer. Resources you can bring with you to the remote session include print-
ers, the clipboard, smart cards, serial ports, drives, and any plug-and-play devices you may
add to your local system.
FIGURE 3.16 Remote Desktop Connection
Figure 3.17 shows the choices available from the Local Resources tab. By clicking the
More button, you can also include smart cards, serial ports, drives, and supported plug-
and-play devices.
FIGURE 3.17 Remote Desktop Connection’s Local Resources tab
93157c03.indd 129 8/7/08 7:03:53 PM
130
Chapter 3
N
Using Windows Server 2008 Management Tools
Additionally, you can identify how Windows key combinations will be interpreted. For
example, when you press Ctrl+Alt+Esc, Task Manager is launched. You can select whether
Task Manager will be launched on the local computer, the remote computer, or the remote
computer only when you are in full-screen mode.
Programs RDC allows you to start a program as soon as you connect. Once you select
the check box to start the program, you can then give the path and filename of the program
and the starting path for the application. For example, Word starts in My Documents, but
you may want it to start in
d:\WordDocs instead.
Experience The user experience is directly related to the connection speed. For a LAN
connection (10Mbps), you can afford to send a lot of data back and forth to enhance the
user experience. However, for a modem connection of 56.6Kbps, you may want to mini-
mize the data sent over the connection.
All of the following user experience options can be selected or deselected: Desktop Back-
ground, Font Smoothing, Desktop Composition, Show Contents of Window While Drag-
ging, Menu and Window Animation, Themes, and Bitmap Caching. All the options are
selected by default for a LAN connection.
Advanced The Advanced tab allows you to configure both server authentication and the
ability to connect from anywhere using TS Gateway.
Server authentication can be used to verify you are connected to the intended remote com-
puter. The three options for server authentication are Connect and Don’t Warn Me, Warn
Me, and Do Not Connect. Windows Server 2003 SP1 or earlier servers cannot provide
identification information. If using these servers, the option should be either Warn Me or
Do Not Connect.
Remote Desktops
Remote Desktops is similar to Remote Desktop Connection. It uses Terminal Services and
gives you access to the desktop just as if you were sitting in front of the remote server.
To launch Remote Desktops, select Start Administrative Tools Terminal Services
Remote Desktops.
Remote Desktops is available in server products (such as Windows Server
2003 and Windows Server 2008), but it is not available in desktop products
(such as Windows XP and Windows Vista).
A significant difference between RDC and Remote Desktops is in how the desktops are
displayed. Figure 3.18 shows Remote Desktops being used to connect to a remote server
named MCITP2.
Notice that the remote server (MCITP2) is displayed in a pane of the Remote Desktops
console. If I wanted to connect to the server named MCITP1, I could select it and connect
to MCITP1 quite easily.
93157c03.indd 130 8/7/08 7:03:53 PM
Remote Management
131
FIGURE 3.18 Remote Desktops console
Remote Desktops is useful if you are responsible for a group of servers and want to manage
them all from a single console. For example, you could be responsible for a web farm composed
of five IIS servers. You could add all the IIS servers into your Remote Desktops console and
easily connect to any server in the web farm.
Another difference between Remote Desktops and Remote Desktop Connection is that
Remote Desktops includes the ability to connect with the
/admin option. This is selectable
in the properties of the connection, as shown in Figure 3.19.
You can launch the Remote Desktop Connection tool with the /admin option,
but it doesn’t include a check box within the GUI to do so. Instead, you can
launch Remote Desktop Connection at the Run line or the command line
using the following command:
mstsc /admin.
If the /admin option is used, then a connection does not consume a Terminal Services
Client Access License (TS CAL).
This is meaningful only if the Terminal Services role is installed on the server. You are
still limited to only two administrative sessions, but these sessions do not count against the
total number of Terminal Services CALs available on the server.
Admittedly, you can connect to multiple servers using RDC. However, with RDC, you’d
have to create a separate instance for each connection. With Remote Desktops, you have
the capability of using one instance, instead of several instances.
Some people like RDC. Others like Remote Desktops. Feel free to pick your favorite.
93157c03.indd 131 8/7/08 7:03:53 PM
132
Chapter 3
N
Using Windows Server 2008 Management Tools
FIGURE 3.19 Remote Desktops connection properties
Remote Server Administration Tools
The Remote Server Administration Tool (RSAT) pack includes tools that can be used in
addition to the previously discussed tools to remotely administer both Windows Server
2003 and Windows Server 2008 servers. They can only run on Windows Vista with at least
SP1 installed.
In past versions of Windows Server, the adminpak.msi file has been used to install admin-
istration tools on desktop computers. By installing the adminpak.msi file, any desktop com-
puter could be used to remotely administer servers within a domain. The RSAT pack is the
replacement of adminpak.msi.
RSAT includes remote management tools that can be used to remotely manage several
different server roles using Microsoft Management Console (MMC) snap-ins. Snap-ins are
added for many different uses including:
Active Directory roles (such as Active Directory Domain Services, Active Directory
ÛN
Certificate Services, Active Directory Lightweight Directory Services, and Active
Directory Management Services)
Network infrastructure roles (including DNS, DHCP, and Network Policy and Access)
ÛN
File and Print server roles
ÛN
Group Policy Management Console (GMPC)
ÛN
93157c03.indd 132 8/7/08 7:03:53 PM
Remote Management
133
You can add the RSAT pack using the Server Manager Add Features wizard to a Windows
Server 2008 server. You can also download and install it on a Windows Vista system. You
can find links for the download in Knowledge Base article 94134 (
rosoft
.com/kb/941314).
Server Core
In Chapter 2, “Planning Server Deployments,” I covered Server Core and the methods of
remote management that can be used with Server Core. As a reminder, they are as follows:
Access Server Core with Remote Desktop Connection Configure the server using the
Server Core Registry Editor Windows script file (
scregedit.wsf) as follows:
Cscript c:\windows\system32\scregedit.wsf /AR 0
Manage Server Core remotely using a MMC snap-in Configure using the NetShell (netsh)
command to manipulate the firewall settings. The following NetShell command will properly
configure it:
Netsh advfirewall firewall set rule group = “Remote Administration” new
enable = yes
Manage Server Core with Windows Remote Shell Use the WinRm command to create a
WinRM listener on the server, and the
WinRS command on the client will remotely connect
to the server. The
WinRM command that you’d run on the Server Core server is as follows:
WinRM quickconfig
For the client accessing the server, run this command:
Winrs -r:computername command
Using Terminal Services Gateway Servers
Although I’ll explain Terminal Services in greater depth in Chapter 7, for this section I’ll tie
in how you can use it for remote management.
To access a Remote Desktop connection inside a private network from the Internet,
you’d have to open port 3389 at the firewall. That sounds easy enough until you try to get
your firewall experts to open a firewall port. Their goal is to keep the network protected,
and generally the way to do that is to open as few ports as possible. Every open port repre-
sents a potential vulnerability.
However, some ports are already open. For example, HTTP uses port 80, and HTTPS
uses port 443. Both ports are already open on almost any firewall allowing Internet traffic
(secure on port 443 and nonsecure on port 80). If you could use a port that’s already open,
you don’t need to add a vulnerability to your network.
A Terminal Services Gateway is used to transfer Remote Desktop Protocol traffic over an
HTTPS session. In other words, the RDP traffic goes through port 443 instead of port 3389.
Figure 3.20 shows the big picture of how TS Gateway works.
93157c03.indd 133 8/7/08 7:03:54 PM
134
Chapter 3
N
Using Windows Server 2008 Management Tools
FIGURE 3.20 Remote Desktops connection properties
Internet
TS gateway
running IIS
Remote
Server
The client would connect to the TS Gateway (running Internet Information Services) via
the Internet using the HTTPS protocol. Since the connectivity is with HTTPS, the traffic
goes through the firewall using port 443, which is typically already open and secured with
Secure Sockets Layer (SSL).
The TS Gateway strips off the HTTPS protocol and uses RDP to connect to the internal
server. With the session established, the client can now use the session to remotely adminis-
ter the server.
Windows Server Update Services
Operating systems and applications are never released in a perfect state. Even after extensive
testing, bugs and flaws appear that need to be corrected before the next version. Updates
come in the form of patches.
Windows Server Update Services (WSUS) provides an automated method for an organi-
zation to manage patches. Instead of servers and clients receiving patches from the Micro-
soft Update site, you can use WSUS to control which patches are deployed to clients.
Windows Server Update Services started as Software Update Services
(SUS), which provided only operating system updates and patches. With
the release of WSUS 2.0, the name was changed from Software to Server
and significantly expanded updates to include updates and patches to a
wide range of software from a central server.
Figure 3.21 shows the typical hierarchy of a WSUS server within a network. The
WSUS server would be configured to receive all the updates from the Microsoft Update
site. Internal servers and clients will be configured to receive all of their updates from the
WSUS server.
93157c03.indd 134 8/7/08 7:03:54 PM
Windows Server Update Services
135
FIGURE 3.21 WSUS within a network
Internal
Servers
Microsoft
Update Site
WSUS
Server
Internal
Clients
Although the list of products that are updated with WSUS frequently changes, here’s a
fairly comprehensive list of products that can be kept up-to-date with WSUS.
Operating systems:
ÛN
Windows Server 2008
ÛN
Windows Server 2003
ÛN
Windows 2000
ÛN
Windows Vista
ÛN
Windows XP
ÛN
Windows Small Business Server
ÛN
Server applications:
ÛN
SQL Server
ÛN
Exchange Server
ÛN
Internet Security and Acceleration (ISA) Server
ÛN
Microsoft Data Protection Manager
ÛN
Desktop applications:
ÛN
Microsoft Office
ÛN
Visual Studio
ÛN
Windows Live
ÛN
Microsoft Forefront
ÛN
Windows Defender
ÛN
As you can see, it’s not just the operating system that is being updated. Windows Update
and WSUS also update server and desktop applications.
WSUS is not installed as a role or a feature of Windows Server 2008 but instead is
installed as a separate application. WSUS is free and can be found rather easily with an
Internet search for download WSUS.
For more detailed information on the deployment of WSUS, check out the WSUS 3.0
Deployment Guide available from Microsoft. You can get the deployment guide from the
WSUS home page (
At 154 pages, it has a
whole lot more in-depth information on WSUS than I was able to put into this section.
93157c03.indd 135 8/7/08 7:03:54 PM
136
Chapter 3
N
Using Windows Server 2008 Management Tools
Windows Update History
Years ago, I was one of several administrators who shared responsibility for a Windows
2000 network. None of us were full-time administrators, and no one had specific defined
responsibilities, but instead each of us did what needed to be done as our primary job
responsibilities allowed.
We had an IIS server hosting an intranet site. About three weeks before we were hit by
the Nimda worm, Microsoft released a patch for IIS that would have prevented the dam-
age from Nimda. All we had to do was go to the Microsoft site, check for updates, and
download and install the patch. Unfortunately, none of us did so.
Ultimately we were hit, and we all spent a lot of extra hours fighting Nimda.
At the time, I remember thinking there must be a better way to keep servers updated.
Apparently people at Microsoft were thinking the same thing. They soon came up with
Automatic Updates that could be used for both servers and desktop systems.
Automatic Updates is still in existence. It allows you to set up individual systems (or mul-
tiple systems with Group Policy) to automatically check Microsoft’s Windows Update site
for relevant patches, download them, and automatically install them.
However, there is a drawback with Automatic Updates. Although most updates are benign,
occasionally an update can cause problems with the operating system, hardware, or appli-
cations running on a server. In a worst-case scenario, an update can break the server.
To prevent this, Microsoft released Software Update Services (SUS, the precursor to
WSUS). This allowed administrators to set up an SUS server to download the updates.
Administrators could test the updates and approve or disapprove the updates as desired.
Clients would be configured to receive updates from the SUS server, instead of Micro-
soft’s Windows Update site.
SUS was improved with WSUS 2.0 and then WSUS 3.0.
The process of updates has gone through several iterations over the years. Each method
was designed to improve the previous method. The following are the update methods in
recent years:
Manually connecting to Microsoft site and download required updates
ÛN
Automatic Updates
ÛN
Software Update Services (SUS)
ÛN
Windows Server Update Services (WSUS) 2.0
ÛN
Windows Server Update Services (WSUS) 3.0
ÛN
93157c03.indd 136 8/7/08 7:03:55 PM
Windows Server Update Services
137
WSUS Prerequisites
Before you can install WSUS, you need to have the following prerequisites installed:
Windows Server 2003 SP1 or Windows Server 2008
ÛN
Internet Information Services 6.0 or later
ÛN
Microsoft Management Console 3.0
ÛN
Windows Installer 3.1
ÛN
Microsoft .NET Framework v2.0
ÛN
Background Intelligent Transfer Service (BITS) 2.0
ÛN
Microsoft Report Viewer 2005 Redistributable
ÛN
With the prerequisites installed, you can then launch the WSUS executable downloaded
from Microsoft’s site and follow the wizard.
When following the wizard, you’ll have to decide whether WSUS will use the default
website. If it uses the default website, it will use port 80. If another website will be hosted
on this web server as the default site, then WSUS will assign port 8530. Additionally, you’ll
need to identify the location for the WSUS updates and the WSUS database.
Downloading and Deploying Updates
The steps involved in receiving and deploying updates are as follows:
Step 1: Synchronize Synchronization is the process or connecting to the public Micro-
soft Update site or another WSUS server and downloading updates. Synchronization can
be scheduled or done manually. When set to manual, an administrator must initiate the
synchronization.
When set to synchronize according to a schedule, you have the option of setting the starting
time and the number of synchronizations each day. For example, you can choose to start at
1 a.m. and specify four synchronizations a day. Synchronizations will occur at 1 a.m.,
7 a.m., 1 p.m., and 7 p.m.
Step 2: Approve After synchronization, an administrator must approve the updates before
they are deployed.
Updates should be tested before being approved. By configuring computer groups, you can
approve and deploy updates to your test systems first. Then, after testing, you can approve
the updates to other computer groups in your production environment.
After an update is approved, it will be deployed to all the computers in the computer group
where it was approved.
WSUS also allows you to set some updates to Auto Approve. This can be done with critical
updates and certain classes of updates.
93157c03.indd 137 8/7/08 7:03:55 PM
138
Chapter 3
N
Using Windows Server 2008 Management Tools
Step 3: Verify Deployment WSUS clients are configured to check in with the WSUS server
every 22 hours by default. (You can configure this in Group Policy.) After checking in with
the WSUS server, approved updates are deployed to the WSUS client.
You can use the WSUS console to verify the status of updates, the status of computer
groups, or the status of individual clients.
WSUS in a Distributed Environment
When deploying WSUS in a distributed environment, you can have your WSUS servers work
together to make the best use of available resources. A distributed environment is one where
you have more than one physical site connected via a wide area network (WAN) link.
Each WSUS server can be configured in either autonomous or replica mode. The primary
difference between the two is in where they get their updates.
Autonomous mode WSUS servers using autonomous mode receive their updates from
the public Microsoft Update site. They can still be configured to report summary status
information to a parent server. You would use autonomous mode when you have enough IT
support at the location to synchronize, analyze, and approve all of the necessary updates. A
primary benefit of autonomous mode is that the branch office is able to approve and deploy
the updates that are appropriate for the branch office.
In Figure 3.22, both headquarters and the larger branch office are configured in autonomous
mode. Both sites receive their updates directly from the Microsoft Update site. All of the
internal clients and servers at the larger branch office receive their updates from WSUS2. All
of the internal clients and servers at headquarters receive their updates from WSUS1.
Replica mode WSUS servers using replica mode receive their updates from an upstream
server (typically over a WAN link). In addition to receiving updates from the upstream server,
they also report detailed status information to any server designated as a parent.
In Figure 3.22, the smaller branch office WSUS server (WSUS3) is receiving its updates
from WSUS1. In this example, WSUS1 would be considered an upstream server, and
WSUS3 would be considered a downstream server.
One of the primary reasons to configure the smaller branch office in replica mode is because
of a lack of enough IT support at the smaller branch office. Instead of requiring IT personnel
at the branch office to regularly synchronize, analyze, and approve the updates, the replica
server inherits the approved update approvals.
Configuring Clients
When configuring clients to use WSUS, two important concepts must be examined: Group
Policy objects and targeting.
Group Policy is used to configure clients to receive their updates from the WSUS server.
Targeting is used to populate the WSUS server with the names of the clients that will be
targeted and managed by the WSUS server.
93157c03.indd 138 8/7/08 7:03:55 PM
Windows Server Update Services
139
FIGURE 3.22 Multiple-site enterprise using WSUS in both autonomous and
replica modes
Internal
Servers
Microsoft
Update Site WSUS1
Server
Internal
Clients
Internal
Servers
WSUS2
Autonomous
Mode
Internal
Clients
Internal
Servers
WSUS3
Replica Mode
Internal
Clients
Larger Branch
Office
Smaller Branch
Office
Headquarters
WSUS can also be used to deploy updates to nondomain clients, though it’s not as simple
as setting a single Group Policy object for all the clients. Instead, you’ll need to either set
local group policy or modify the registry on each of the clients.
Group Policy Configuration
The magic of Group Policy is that it allows you make one or more settings within a
Group Policy object (GPO) and have it apply to many objects (computers and users)
within your domain.
In other words, you can cause all your computers in the entire domain to receive their
updates from a WSUS server by creating a GPO and applying it at the domain level. This
single GPO changes the settings for all the computers in your domain to receive their
updates from your WSUS server.
A minor problem with this configuration is that it would also cause your WSUS server to
receive updates from itself, which simply wouldn’t work.
By creating an organizational unit (OU) for your WSUS server, you can create a separate
OU for your WSUS server and either block inheritance of all inherited Group Policy objects
(which makes things much more complex) or create a separate OU and configure the GPO
to receive the updates from the Windows Update site.
93157c03.indd 139 8/7/08 7:03:55 PM
140
Chapter 3
N
Using Windows Server 2008 Management Tools
Figure 3.23 shows the latter choice. You’d configure the domain-level GPO (named Updates
from WSUS Server) so that all computers within your domain receive their updates from
the WSUS server. You’d then configure the GPO (named Updates from the Windows Update
site) within the WSUS Servers OU so that any servers in this OU receive their updates from
the Windows Update site. Of course, you’d also make sure the WSUS computer object is in the
WSUS OU.
FIGURE 3.23 Using two Group Policy objects for WSUS
The order of precedence of Group Policy is as follows:
Local
ÛN
Site
ÛN
Domain
ÛN
OU
ÛN
If there are any conflicts, the last one applied wins. In other words, since the OU GPO
(named Updates from Windows Update site in the WSUS Servers OU) is applied after the
Domain GPO (named Updates from WSUS Server in the domain
mcitpsuccess.hme), the OU
GPO would take precedence for any objects in the WSUS Servers OU.
Admittedly, you can apply the Group Policy in other ways. Instead of apply-
ing the updates from WSUS Server at the domain level, you could apply at
each of the high-level OUs in your domain (except for the OU holding the
WSUS server). A drawback from this method is that GPOs cannot be linked
to the computer container since it’s not an OU. You’d need to take addi-
tional steps to ensure computer objects are not placed into the computer
container. Capped Group Policy. This refers to back to the figure. The GPO
is named Updates from WSUS server. The OU holding the WSUS servers is
“WSUS Servers.”
With the GPOs created, you then need to configure them. The GPO settings you want to
modify are in Computer Configuration Administrative Templates Windows Compo-
nents Windows Updates.
93157c03.indd 140 8/7/08 7:03:56 PM