Microsoft Press Windows Server 2008 Networking and Network Access Protection (NAP) phần 9 pps
Bạn đang xem bản rút gọn của tài liệu. Xem và tải ngay bản đầy đủ của tài liệu tại đây (2.63 MB, 84 trang )
646 Windows Server 2008 Networking and Network Access Protection (NAP)
To Configure the Network Policy and Access Services Role on an HRA Computer
1. Run Server Manager on the HRA computer.
2. Under Roles Summary, click Add Roles.
3. On the Select Server Roles page, select the Network Policy And Access Services check
box, and then click Next twice.
4. On the Select Role Services page, select the Health Registration Authority check box,
click Add Required Role Services in the Add Roles Wizard window that appears, and
then click Next.
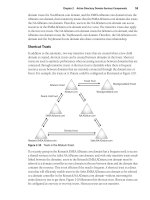
5. If you have not previously installed the Web Server role, you are prompted with the
Choose The Certificate Server To Use With The Health Registration Authority page.
Choose the appropriate option, and then click Next. Figure 16-5 shows an example.
Figure 16-5 Example of choosing a certificate server
6. On the Choose Authentication Requirements For The Health Registration Authority
page, choose either Yes, Require Requestors To Be Authenticated As Members Of A
Domain (for authenticated health certificates) or No, Allow Anonymous Requests For
Health Certificates (for anonymous certificate support), and then click Next. By
enabling anonymous certificates, non–domain-joined computers can receive health
certificates.
C16624221.fm Page 646 Wednesday, December 5, 2007 5:19 PM
Chapter 16: IPsec Enforcement 647
7. On the Choose A Server Authentication Certificate for SSL Encryption page, do one of
the following:
❑ Click Choose An Existing Certificate For SSL Encryption, and then select the
previously installed computer certificate.
❑ Click Create A Self-Signed Certificate For SSL Encryption if you are using a very
small-scale deployment of NAP or for a test lab. This option requires that you also
install the self-signed certificate on all your NAP clients.
❑ Click Don’t Use SSL Or Choose A Certificate For SSL Encryption Later if you do
not want to use SSL or if the computer certificate that you plan to use for SSL
encryption has not yet been installed.
HTTPS between NAP clients and HRAs is recommended but not required. Figure 16-6
shows an example.
Figure 16-6 Example of choosing a certificate for SSL encryption
8. Click Next.
9. If you have not previously installed the Web Server (IIS) role, you are prompted with the
Web Server (IIS) and Select Role Services pages. HRAs require only the default Web
Server (IIS) role services. Click Next on both pages.
10. On the Confirm Installation Selections page, verify your configuration selections, and
then click Install.
C16624221.fm Page 647 Wednesday, December 5, 2007 5:19 PM
648 Windows Server 2008 Networking and Network Access Protection (NAP)
Configuring the NAP CAs with HRA Permissions
The NAP CAs must be configured with permissions to allow the HRA computers to request
certificates. The HRA computers can also be granted permission to manage the CA so that it
can automatically remove expired certificates from the NAP CA certificate database.
To Configure the NAP CA Permissions
1. In the console tree of the Certification Authority snap-in, right-click the NAP CA name,
and then click Properties.
2. Click the Security tab, and then click Add.
3. Click Object Types, select the Computers check box, and then click OK.
4. Under Enter The Object Names To Select, type the names of the HRA computers, and
then click OK.
5. Click the name of an HRA computer, or if the NAP CA and HRA are on the same com-
puter, select Network Service. Then select the Request Certificates and Issue And Man-
age Certificates check boxes. If you are using automatic CA database management, select
the Manage CA check box.
6. Click OK.
7. Repeat steps 5 and 6 for all the HRA computers in the list on the Security tab.
Note
Selecting the Manage CA permissions is optional. If you do not want to grant the HRA
computers the ability to manage the NAP CA database, you should use a manual method to
periodically remove the entries of the NAP CA database. For more information, see “Ongoing
Maintenance” later in this chapter.
Configuring the Properties of the HRA
Each HRA computer must now be configured with the ordered list of NAP CAs from which it
will request health certificates for NAP clients.
To Configure an HRA Computer
1. In the console tree of the Health Registration Authority snap-in, click Certification
Authority. Depending on your choice on the Choose The Certificate Server To Use With
The Health Registration Authority page when installing the Network Access and Policy
Services role, a NAP CA might already be listed in the details pane.
2. To add a NAP CA, right-click Certification Authority, and then click Add Certification
Authority.
3. Type the name of the NAP CA, or click Browse to select the NAP CA.
4. Click OK. Repeat steps 2 and 3 as needed to add the complete list.
C16624221.fm Page 648 Wednesday, December 5, 2007 5:19 PM
Chapter 16: IPsec Enforcement 649
5. In the details pane, verify that the ordered list of NAP CAs reflects the correct list for this
HRA. Reorder the NAP CAs as needed.
6. In the console tree, right-click Certification Authority, and then click Properties.
7. On the Settings tab, specify the appropriate settings such as the lifetime of the health
certificates that are requested by the HRA and whether the HRA is using standalone or
enterprise CAs.
Repeat this procedure for each HRA computer.
Direct from the Source: Configuring the HRA for an Enterprise CA
The HRA is set by default to use standalone CA mode, which is not compatible with an
enterprise issuing CA. When you use an enterprise CA to issue NAP health certificates,
or if you use both enterprise and standalone CAs with a single HRA, you must configure
CA properties in HRA to use the enterprise operational mode by selecting Use Enter-
prise Certification Authority in the HRA snap-in properties dialog box or by running the
netsh nap hra set opmode=1 command.
When you enable HRA to use an enterprise CA, you are required to select certificate tem-
plates for authenticated and anonymous client requests. The anonymous compliant
certificate template must be selected even if you did not choose to enable anonymous
certificate requests when installing the HRA. Selecting an anonymous template does not
enable anonymous health certificate requests, and it is not required that you select a
different template for authenticated and anonymous requests. Unless your deployment
includes a requirement that non–domain-joined clients be issued health certificates, you
should select the same certificate template for anonymous and authenticated requests.
The authenticated template that you select determines which certificate will be issued to
compliant clients with a trusted server group configuration set to use the DomainHRA
Web site URL. The anonymous template selected determines the certificate issued in
response to requests made to the NonDomainHRA URL.
Greg Lindsay, Technical Writer
Windows Server User Assistance
Configuring the NPS Service on the HRA as a RADIUS Proxy
If the NAP health policy server is located on a different server than the HRA computer, you
must configure the NPS service on the HRA computer as a RADIUS proxy. This allows the
HRA computer to act as a RADIUS client and send RADIUS-based requests to a NAP health
policy server.
C16624221.fm Page 649 Wednesday, December 5, 2007 5:19 PM
650 Windows Server 2008 Networking and Network Access Protection (NAP)
To Configure the NPS Service on an HRA Computer as a RADIUS Proxy
1. In the console tree of the Network Policy Server snap-in, expand the RADIUS Clients
And Servers node.
2. Right-click Remote RADIUS Server Groups, and then click New.
3. In the New Remote RADIUS Server Group dialog box, in the Group Name box, type the
name of the group (for example, NAP Health Policy Servers), and then click Add.
4. On the Address tab, type the DNS FQDN, IPv4 address, or IPv6 address of a NAP health
policy server.
5. On the Authentication/Accounting tab, in the Shared Secret and Confirm Shared Secret
boxes, type the RADIUS shared secret. Do not change the authentication or accounting
ports.
6. On the Load Balancing tab, specify the weight and priority for RADIUS traffic to this
RADIUS server and failover and failback settings as needed, and then click OK.
7. In the New Remote RADIUS Server Group dialog box, click Add, and then repeat
steps 4–6 for each NAP health policy server that this HRA will use to perform health
validation for NAP clients.
8. In the console tree of the Network Policy Server snap-in, expand the Policies node.
9. Right-click Connection Request Policies, and then click New.
10. On the Specify Connection Request Policy Name And Connection Type page, type the
name of the connection request policy (such as RADIUS Proxy to NAP Health Policy
Servers), in the Type Of Network Access Server drop-down list, select Health Registra-
tion Authority, and then click Next.
11. On the Specify Conditions page, click Add.
12. In the Select Condition dialog box, double-click Day And Time Restrictions.
13. In the Time Of Day Constraints dialog box, click Permitted, click OK and then click
Next.
14. On the Specify Connection Request Forwarding page, select Forward Requests To The
Following Remote RADIUS Server Group For Authentication, and select the remote
RADIUS server group created in step 3. Click Accounting, select Forward Accounting
Requests To This Remote RADIUS Server Group, select the remote RADIUS server
group created in step 3 from the drop-down list, and then click Next.
15. On the Configure Settings page, click Next.
16. On the Completing Connection Request Policy Wizard page, click Finish.
Configuring IIS for SSL
If you are using HTTPS between NAP clients and HRAs, you must configure IIS on the HRA
computer to require SSL encryption for the HRA Web sites.
C16624221.fm Page 650 Wednesday, December 5, 2007 5:19 PM
Chapter 16: IPsec Enforcement 651
To Configure IIS on an HRA
1. In the console tree of the Internet Information Services (IIS) Manager snap-in, expand
the HRA computer name, then Sites, and then Default Web Site.
2. Click DomainHRA, and then in the details pane, double-click SSL Settings.
3. In the details pane, select Require SSL and optionally, Require 128-bit SSL. The require-
ment for 128-bit SSL encryption depends on your SSL security requirements. If you
do not enable 128-bit SSL, SSL encryption between NAP clients and the HRA will use a
40-bit encryption key.
4. In the Actions pane, click Apply to save the changes.
5. If you have enabled anonymous certificates and want to enable SSL encryption between
non–domain-joined NAP clients and the HRA, in the console tree, click NonDomain-
HRA, and then in the details pane, double-click SSL Settings.
6. In the details pane, select Require SSL and optionally, Require 128-bit SSL.
7. In the Actions pane, click Apply to save the changes.
Configuring NAP Health Policy Servers
To configure a NAP health policy server, perform the following tasks:
■ Add the Network Policy and Access Services Role.
■ Install SHVs.
■ Configure RADIUS server settings.
■ Configure health requirement policies for IPsec enforcement.
Adding the Network Policy and Access Services Role
To add the Network Policy and Access Services role on a NAP health policy server, you must
do the following:
1. On the NAP health policy server computer, run Server Manager.
2. Under Roles Summary, click Add Roles.
3. On the Select Server Roles page, select the Network Policy and Access Services check
boxes, and then click Next twice.
4. On the Select Role Services page, click Network Policy Server, and then click Next.
5. On the Confirm Installation Selections page, click Install.
Repeat this procedure for each NAP health policy server.
C16624221.fm Page 651 Wednesday, December 5, 2007 5:19 PM
652 Windows Server 2008 Networking and Network Access Protection (NAP)
Installing SHVs
The SHVs that you are using must be installed on each NAP health policy server to be
included in the health policy evaluation. The Network Policy and Access Services role
includes the Windows Security Health Validator SHV to specify the settings of the Windows
Security Center on Windows Vista–based and Windows XP–based NAP clients.
The exact method of installation of additional SHVs will depend on the SHV vendor and can
include downloading the SHV from a vendor Web page or running a setup program from
a vendor-supplied CD-ROM. Check with your SHV vendor for information about the method
of installation.
Configuring RADIUS Server Settings
Each NAP health policy server is a RADIUS server, which might need to be configured with
the following RADIUS server settings:
■ UDP ports for RADIUS traffic This step is typically needed only if the NAP health
policy server is also being used as a RADIUS server for other purposes and other
RADIUS clients are using different UDP ports than those defined in the RADIUS RFCs.
The default UDP ports used by NAP health policy servers are the same ports as used by
the HRAs.
■ RADIUS logging You can configure the NPS service to log incoming requests and
accounting information in local files or a Microsoft SQL Server database. For more infor-
mation, see Chapter 9.
You must configure each NAP health policy server with HRAs as RADIUS clients.
To Add a RADIUS Client Corresponding to an HRA
1. In the console tree of the Network Policy Server snap-in, expand RADIUS Clients and
Servers, right-click RADIUS Clients, and then click New RADIUS Client.
2. In the New RADIUS Client dialog box, in the Name and Address section, in the Friendly
Name box, type a name for the HRA computer. In the Client Address (IP Or DNS) box,
type the IPv4 address, IPv6 address, or DNS domain name of the HRA computer. If
you type a DNS domain name, click Verify to resolve the name to the correct IP address
for the HRA computer.
3. In the Shared Secret section, in the Shared Secret and Confirm Shared Secret boxes,
type the shared secret for this combination of NPS server and HRA computer, or click
Generate to have the NPS service generate a strong RADIUS shared secret.
4. Select the RADIUS Client Is NAP-Capable check box, and then click OK.
Repeat this procedure for every HRA that will be sending health evaluation requests to the
NAP health policy server.
C16624221.fm Page 652 Wednesday, December 5, 2007 5:19 PM
Chapter 16: IPsec Enforcement 653
Configuring Health Requirement Policies for IPsec Enforcement
You can create your health requirement policies for IPsec enforcement manually or with the
Configure NAP Wizard. Because of the amount of automated configuration being done by the
Configure NAP Wizard, this method is recommended and is described in this chapter.
To Create a Set of Policies for IPsec Enforcement
1. In the Network Policy Server snap-in, in the console tree, click NPS.
2. In the details pane, under Standard Configuration, in the drop-down list, select Network
Access Protection (NAP), and then click Configure NAP.
3. On the Select Network Connection Method For Use With NAP page, under Network
Connection Method, select IPsec With Health Registration Authority (HRA); in the
Policy Name box, type a name (or use the name created by the wizard); and then click
Next.
4. On the Specify NAP Enforcement Servers Running HRA page, click Next. Because we
already added the RADIUS clients corresponding to the HRAs of this NAP health policy
server, we do not need to add RADIUS clients.
5. On the Configure User Groups and Machine Groups page, configure computer groups
as needed, and then click Next.
6. On the Define NAP Health Policy page, on the Name list, select the SHVs that you want
to have evaluated for IPsec enforcement, select the Enable Auto-Remediation Of Client
Computers check box if needed, and then click Next.
7. On the Completing NAP Enforcement Policy And RADIUS Client Configuration page,
click Finish.
The NAP Wizard creates the following:
■ A health policy for compliant NAP clients based on the SHVs selected in the NAP
Wizard
■ A health policy for noncompliant NAP clients based on the SHVs selected in the NAP
Wizard
■ A connection request policy for IPsec enforcement requests
■ A network policy for compliant NAP clients that allows full access
■ A network policy for noncompliant NAP clients that allows limited access
Because the default network policy for NAP clients allows only limited access (enforcement
mode), we must modify the network policy for noncompliant NAP clients to allow full access
for reporting mode.
C16624221.fm Page 653 Wednesday, December 5, 2007 5:19 PM
654 Windows Server 2008 Networking and Network Access Protection (NAP)
To Configure Reporting Mode
1. In the console tree of the Network Policy Server snap-in, expand Policies, and then click
Network Policies.
2. In the contents pane, double-click the network policy for noncompliant NAP clients that
was created by the NAP Wizard. For example, if you specified “IPsec Enforcement” as
the name on the Select Network Connection Method For Use With NAP page of the
NAP Wizard, the network policy for noncompliant NAP clients would have the name
“IPsec Enforcement Noncompliant.”
3. Click the Settings tab, and then select NAP Enforcement.
4. In the network policy properties dialog box, in the details pane, select Allow Full
Network Access, and then click OK.
The next step is to ensure that the SHVs that you are using have the correct settings that
reflect your health requirements.
To Configure the SHVs for the Required Health Settings
1. In the console tree of the Network Policy Server snap-in, expand Network Access Protec-
tion, and then select System Health Validators.
2. In the details pane, under Name, double-click your SHVs, and then configure each SHV
with your requirements for system health.
For example, double-click Windows Security Health Validator, and then click Config-
ure. In the Windows Security Health Validator dialog box, configure system health
requirements for Windows Vista–based and Windows XP–based NAP clients.
The next step is to ensure that your health policies are configured for the correct SHVs and
conditions to reflect your health requirements.
To Configure the Health Policy Conditions for the Required Health Settings
1. In the console tree of the Network Policy Server snap-in, expand Policies, and then
Health Policies.
2. In the details pane, double-click the health policies for compliant and noncompliant
NAP clients, and make changes as needed to the health evaluation conditions and the
selected SHVs.
Configuring Remediation Servers on the Boundary Network
The first task in configuring remediation servers on the boundary network is to identify the
set of servers that noncompliant NAP clients must be able to access. As described in Chapter
14, remediation servers can consist of the following types of computers:
■ DHCP servers
■ DNS and WINS servers
C16624221.fm Page 654 Wednesday, December 5, 2007 5:19 PM
Chapter 16: IPsec Enforcement 655
■ Active Directory domain controllers
■ Internet proxy servers
■ Troubleshooting URL Web servers
■ Health update servers
The next step is to place the computer accounts for the remediation servers in the following:
■ The IPsec exemption group (so that they can obtain a long-lived health certificate)
■ The boundary network OU or security group (so that they can receive boundary
network IPsec policy settings)
Depending on the SHAs that your NAP clients are using, you might need to configure
your health update servers to provide updates or services to noncompliant NAP clients.
See the vendors for your SHAs for information about what needs to be installed and
configured.
Configuring NAP Clients
To configure your NAP clients, perform the following tasks:
■ Install SHAs.
■ Configure NAP clients through Group Policy.
■ Configure DNS discovery of HRAs (if needed).
■ Add NAP clients to the secure network.
Installing SHAs
Windows Vista–based and Windows XP SP3–based NAP clients include the Windows
Security Health Agent SHA. If you are using additional SHAs from third-party vendors, you
must install them on your NAP clients. The exact method of installation of additional SHAs
will depend on the SHA vendor and can include downloading the SHA from a vendor Web
page or running a setup program from a vendor-supplied CD-ROM. Check with your SHA
vendor for information about the method of installation.
On an enterprise network, you can use the following methods:
■ Network management software such as Microsoft Systems Management Server (SMS)
or System Center Configuration Manager 2007 to install software across an
organization.
■ Login scripts that execute the setup program for the SHA.
C16624221.fm Page 655 Wednesday, December 5, 2007 5:19 PM
656 Windows Server 2008 Networking and Network Access Protection (NAP)
Configuring NAP Clients Through Group Policy
Although you can configure NAP clients individually, the best way to centralize the configura-
tion of NAP clients in an Active Directory domain environment is through Group Policy
settings, which consists of the following tasks:
■ Configuring NAP client settings
■ Enabling Windows Security Center
■ Configuring the Network Access Protection Agent service for automatic startup
Configuring NAP Client Settings To configure NAP client settings in Group Policy (equiv-
alent to using the NAP Client Configuration snap-in on an individual Windows Vista–based
computer), do the following:
1. Open the Group Policy Management snap-in. In the console tree, expand Forest, expand
Domains, and then click your domain. On the Linked Group Policy Objects pane, right-
click the appropriate Group Policy Object (the default object is Default Domain Policy),
and then click Edit.
2. In the console tree of the Group Policy Management Editor snap-in, expand Computer
Configuration\Windows Settings\Security Settings\Network Access Protection\NAP
Client Configuration.
3. In the console tree, click Enforcement Clients.
4. In the details pane, double-click the IPsec Relying Party enforcement client.
5. On the General tab, select the Enable This Enforcement Client check box, and then
click OK.
6. If you want to specify an image that appears in the NAP client user interface (UI), in the
console tree, click User Interface Settings, and then in the details pane, double-click
User Interface Settings.
7. On the General tab, type the title and description for the text that appears in the NAP
client UI, and then type the path to an image file that appears in the UI, or click Browse
and specify its location.
8. If you are using trusted server groups as the method by which NAP clients locate HRAs,
in the console tree, expand Health Registration Settings.
9. To add a trusted server group, right-click Trusted Server Groups, and then click New.
10. On the Group Name page, type the name for the group, and then click Next.
11. On the Add Servers page, add the URLs for the HRAs that will be used by the NAP
clients to which this Group Policy Object applies.
For authenticated health certificates using HTTP over SSL, the URL must be in the
following form:
https://HRA_FQDN/domainhra/hcsrvext.dll
C16624221.fm Page 656 Wednesday, December 5, 2007 5:19 PM
Chapter 16: IPsec Enforcement 657
in which HRA_FQDN is the FQDN of the HRA computer (or example, HRA1.corpnet
.contoso.com).
For authenticated health certificates using HTTP, the URL must be in the following
form:
http://HRA_FQDN/domainhra/hcsrvext.dll
For anonymous health certificates using HTTP over SSL, the URL must be in the
following form:
https://HRA_FQDN/nondomainhra/hcsrvext.dll
For anonymous health certificates using HTTP, the URL must be in the following form:
http://HRA_FQDN/nondomainhra/hcsrvext.dll
If you want all the URLs to be SSL-based (contain https://), select the Require Server
Verification (https:) For All Servers In The Group check box. If any of the URLs are not
SSL-based (that is, they contain http://), clear the Require Server Verification (https:)
For All Servers In The Group check box. Figure 16-7 shows an example of when all the
URLs are SSL-based.
Figure 16-7 Example of configuring SSL-based URLs
12. Verify that all the URLs in the list have the correct syntax.
13. Verify that the URLs in the list are in the correct order.
14. Click Finish to complete the process of adding HRA trusted server groups.
C16624221.fm Page 657 Wednesday, December 5, 2007 5:19 PM
658 Windows Server 2008 Networking and Network Access Protection (NAP)
Enabling the Windows Security Center To use Group Policy to enable the Windows
Security Center on NAP clients, do the following:
1. In the console tree of the Group Policy Management Editor snap-in, expand Computer
Configuration\Administrative Templates\Windows Components, and then click
Security Center.
2. In the details pane, double-click Turn On Security Center (Domain PCs Only).
3. On the Setting tab, click Enabled, and then click OK.
Configuring the Network Access Protection Agent Service for Automatic Startup To
use Group Policy to enable automatic startup of the Network Access Protection Agent service
on NAP client settings, do the following:
1. In the Group Policy Management Editor snap-in, in the console tree, expand Computer
Configuration\Windows Settings\Security Settings\System Services.
2. In the details pane, double-click Network Access Protection Agent.
3. On the Security Policy Setting tab, select the Define This Policy Setting check box, click
Automatic, and then click OK.
Configuring DNS Discovery of HRAs
To configure NAP clients to discover HRAs using DNS SRV records when they are also using
Group Policy for NAP client settings, do the following:
1. Remove all existing trusted server group configuration from your NAP client Group
Policy settings. If these settings are present, the NAP client will not attempt to discover
HRAs using DNS SRV records.
2. On your NAP client computers, create and set the HKLM\SOFTWARE\Policies\
Microsoft\NetworkAccessProtection\ClientConfig\Enroll\HcsGroups\EnableDiscov-
ery registry value (DWORD type) to 1.
Adding NAP Clients to the Secure Network
If you are not using the Computers OU as the OU for your secure network, use the Active
Directory Users And Computers snap-in to place the computer accounts of your NAP clients
in the secure network OU or security group.
IPsec Enforcement Deployment Checkpoint for Reporting Mode
At this point in the IPsec enforcement deployment, NAP clients on your network have their
health state evaluated. Because the IPsec enforcement deployment is in reporting mode,
both compliant and noncompliant NAP clients receive health certificates, and the users of
C16624221.fm Page 658 Wednesday, December 5, 2007 5:19 PM
Chapter 16: IPsec Enforcement 659
noncompliant NAP clients receive no message in the notification area of their desktop warning
that their computers do not meet system health requirements. Because you have not yet
deployed IPsec policy settings that request or require IPsec protection and authentication
with a health certificate, lack of a health certificate will not impair the ability of computers to
initiate communications with compliant NAP clients.
While the IPsec enforcement deployment is in reporting mode, you can do the following:
■ Using the Windows Event Viewer snap-in and the Windows Logs\Security event log,
perform an analysis of the NPS events on the NAP health policy server to determine
which NAP clients are not compliant. Take the appropriate actions to remedy their
health state, such as installing missing SHAs or providing health update resources on
remediation servers.
■ Check the computer certificate stores of NAP clients to ensure that they are receiving
a short-lived health certificate. If not, see the “Troubleshooting” section later in this
chapter to determine and correct the problem.
■ Verify that all your remediation servers are being issued long-lived health certificates
through autoenrollment.
Configuring and Applying IPsec Policies
After you have verified that the NAP clients are receiving short-lived health certificates and
that the remediation servers have received a long-lived health certificate, you can begin config-
uring and applying IPsec policies to the computers in the boundary and secure networks.
This should be done by performing the following steps:
1. Configure and apply IPsec policy settings for the boundary network.
2. Test clear text and protected communication with the computers in the boundary
network.
3. Configure and apply IPsec policy settings for a subset of computers in the secure
network.
4. Test clear text and protected communication with the subset of computers in the secure
network.
5. Configure the network policy for noncompliant NAP clients for deferred enforcement
mode.
6. Configure and apply IPsec policy settings for all the computers in the secure network.
7. Configure the network policy for noncompliant NAP clients for enforcement mode.
The following sections describe these steps in detail.
C16624221.fm Page 659 Wednesday, December 5, 2007 5:19 PM
660 Windows Server 2008 Networking and Network Access Protection (NAP)
Configuring and Applying IPsec Policy Settings for the Boundary
Network
In this step, you create a GPO containing the IPsec policy settings that requests but does
not require IPsec protection for both inbound and outbound communication attempts for
computers on the boundary network.
To Configure Boundary Network IPsec Policy Settings
1. On a computer running Windows Server 2008 with the Group Policy Management
feature installed, create an MMC containing the Group Policy Management Editor snap-
in. In the Select Group Policy Object dialog box, click the Create New Group Policy
Object icon, type the name of the new Group Policy Object for the boundary network,
and then click OK.
2. In the console tree, under BoundaryGPOName [domain controller name] Policy, expand
Computer Configuration\Windows Settings\Security Settings\Windows Firewall With
Advanced Security\Windows Firewall With Advanced Security—LDAP.
3. In the console tree, right-click Windows Firewall With Advanced Security—LDAP, and
then click Properties. On the Domain Profile tab, select On (Recommended) in the
Firewall State drop-down list, select Block (Default) in the Inbound Connections drop-
down list, and select Allow (Default) in the Outbound Connections drop-down list. On
the Private Profile tab, select On (Recommended) in the Firewall State drop-down list,
select Block (Default) in the Inbound Connections drop-down list, and select Allow
(Default) in the Outbound Connections drop-down list. On the Public Profile tab, select
On (Recommended) in the Firewall State drop-down list, select Block (Default) in the
Inbound Connections drop-down list, select Allow (Default) in the Outbound Connec-
tions drop-down list, and then click OK.
4. In the console tree, under Windows Firewall With Advanced Security—LDAP, right-click
Connection Security Rules, and then click New Rule.
5. In the New Connection Security Rule Wizard, on the Rule Type page, verify that Isola-
tion is selected, and then click Next.
6. On the Requirements page, select Request Authentication For Inbound And Outbound
Connections, and then click Next.
7. On the Authentication Method page, select Computer Certificate, select the Only Accept
Health Certificates check box, and then click Browse.
8. Click the name of your root CA, click OK, and then click Next.
9. On the Profile page, verify that the Domain, Private, and Public check boxes are selected,
and then click Next.
10. On the Name page, in the Name box, type the name of this rule (for example, Boundary
Network Rule), and then click Finish.
C16624221.fm Page 660 Wednesday, December 5, 2007 5:19 PM
Chapter 16: IPsec Enforcement 661
After the boundary network GPO has been created, apply it to the boundary network OU or
security group. For more information, see the Windows Group Policy Resource Kit: Windows
Server 2008 and Windows Vista by Derek Melber, Group Policy MVP, with the Windows Group
Policy Team (Microsoft Press, 2008).
Testing Communication with the Computers in the Boundary Network
After you have applied the boundary GPO to the boundary network security group or OU, do
the following:
■ Ensure that the remediation servers in the boundary network have received the bound-
ary network GPO settings and have a connection security rule that requests but does
not require IPsec protection for both inbound and outbound traffic. For example, you
can use the Monitoring node in the console tree of the Windows Firewall with
Advanced Security snap-in on a remediation server running Windows Server 2008.
■ If the remediation servers have received the boundary network GPO setting, ensure that
the remediation servers can initiate communication with NAP clients and non–domain-
joined computers and that NAP clients and non–domain-joined computers can initiate
communication with the remediation servers.
Communication between NAP clients, non–domain-joined computers, and remediation
servers at this stage should be clear text. The IPsec policy on the remediation servers will
attempt to negotiate IPsec protection, but it allows fallback to clear for both inbound and
outbound communication attempts.
Configuring and Applying IPsec Policy Settings for a Subset
of Computers in the Secure Network
Before applying the secure network GPO to all the domain member computers on your
network, you should test the secure network GPO and the resulting communication behavior
on a subset of your domain member computers by using one of the following:
■ A secure test network OU containing test computers. In this case, you can apply the
secure network GPO directly to the secure test network OU without affecting other
computers on your network.
■ A secure test network security group containing test computers. In this case, you must
filter the scope of the GPO for just the secure test network security group and apply the
secure network GPO to the secure network OU. Because of the scope filtering, the
secure network GPO will be applied only to the members of the secure test network
security group.
Use the Active Directory Users And Computers snap-in to create either a secure test network
OU or a secure test network security group.
C16624221.fm Page 661 Wednesday, December 5, 2007 5:19 PM
662 Windows Server 2008 Networking and Network Access Protection (NAP)
Next, create the GPO containing the IPsec policy settings that require IPsec protection for
inbound communication attempts and request IPsec protection for outbound communication
attempts for computers on the secure network.
To Configure Secure Network IPsec Policy Settings
1. On a computer running Windows Server 2008 with the Group Policy Management
feature installed, create a Microsoft Management Console (MMC) containing the Group
Policy Management Editor snap-in. Click Browse, and then in the Browse For A Group
Policy Object dialog box, click the Create New Group Policy Object icon, type the name
of the new Group Policy Object for the secure network, click OK, and then click Finish.
Click OK.
2. In the console tree, under SecureGPOName [domain controller name] Policy, expand
Computer Configuration\Windows Settings\Security Settings\Windows Firewall With
Advanced Security\Windows Firewall With Advanced Security—LDAP.
3. In the console tree, right-click Windows Firewall With Advanced Security—LDAP, and
then click Properties. On the Domain Profile tab, select On (Recommended) in the
Firewall State drop-down list, select Block (Default) in the Inbound Connections drop-
down list, and select Allow (Default) in the Outbound Connections drop-down list. On
the Private Profile tab, select On (Recommended) in the Firewall State drop-down list,
select Block (Default) in the Inbound Connections drop-down list, and select Allow
(Default) in the Outbound Connections drop-down list. On the Public Profile tab, select
On (Recommended) in the Firewall State drop-down list, select Block (Default) in the
Inbound Connections drop-down list, select Allow (Default) in the Outbound Connec-
tions drop-down list, and then click OK.
4. In the console tree, under Windows Firewall With Advanced Security—LDAP, right-click
Connection Security Rules, and then click New Rule.
5. In the New Connection Security Rule Wizard, on the Rule Type page, verify that
Isolation is selected, and then click Next.
6. On the Requirements page, select Require Authentication For Inbound Connections
and Request Authentication For Outbound Connections, and then click Next.
7. On the Authentication Method page, select Computer Certificate, select the Only Accept
Health Certificates check box, and then click Browse.
8. Click the name of your root CA, click OK, and then click Next.
9. On the Profile page, verify that the Domain, Private, and Public check boxes are selected,
and then click Next.
10. On the Name page, in the Name box, type the name of this rule (for example, Secure
Network Rule), and then click Finish.
C16624221.fm Page 662 Wednesday, December 5, 2007 5:19 PM
Chapter 16: IPsec Enforcement 663
For NAP clients that are running Windows XP SP3, you must use the Group Policy Editor
snap-in and the IP Security Policies on Active Directory extension at Computer Configura-
tion\Windows Settings\Security Settings to configure and enable an equivalent IPsec policy.
Additionally, you must set the HKLM\SYSTEM\CurrentControlSet\Services\PolicyAgent\
Oakley\IKEFlags registry value to 0x1c. You can do this with a variety of methods including
login scripts, through desktop management software such as SMS or Microsoft System Center
Configuration Manager 2007, or through Group Policy by using a customized administration
(ADM) file.
After the secure network GPO has been created, either apply it to the secure test network
OU or filter the scope of GPO for the secure test network security group and apply it to the
secure network OU. For more information, see the Windows Group Policy Resource Kit:
Windows Server 2008 and Windows Vista.
Testing Clear Text and Protected Communication with the Subset
of Computers in the Secure Network
After the secure network GPO has been configured and applied to either the secure test
network OU or security group, you must test the following types of communications:
■ Ensure that the computers in the secure test network received the secure network GPO
settings and have a connection security rule that requires IPsec protection for inbound
traffic and requests IPsec protection for outbound traffic. For example, you can use
the Monitoring node in the console tree of the Windows Firewall with Advanced Secu-
rity snap-in on a secure test network computer running Windows Vista or Windows
Server 2008.
■ If the computers in the secure test network have received the secure network GPO
setting, verify the following communication behavior:
❑ Communication initiated by a computer that is not in the secure test network to a
computer in the secure test network is blocked.
❑ Communication initiated by a computer in the secure test network to another
computer in the secure test network is protected.
❑ Communication initiated by a computer in the secure test network to a computer
that is not in the secure test network is allowed but not protected.
Communication initiated by computers in the secure test network to all other computers that
are not in the secure test network—such as NAP clients, non–domain-joined computers, and
remediation servers—at this stage should be clear text. The IPsec policy on the computers in
the secure test network will attempt to negotiate IPsec protection, but it allows fallback to
clear for outbound communication attempts.
C16624221.fm Page 663 Wednesday, December 5, 2007 5:19 PM
664 Windows Server 2008 Networking and Network Access Protection (NAP)
Configuring the Network Policy for Noncompliant NAP Clients
for Deferred Enforcement
After testing boundary and secure test network communications, determine the date for
deferred enforcement mode (the date for which you will configure the noncompliant NAP
client network policy for enforcement mode). On this date, noncompliant NAP clients will not
receive a health certificate and will not be able to initiate communications with compliant
NAP clients. In deferred enforcement mode for IPsec enforcement, noncompliant NAP clients
will still receive a health certificate, but the user will now see a message in the notification area
indicating that the computer does not comply with system health requirements.
To Configure Deferred Enforcement Mode
1. In the console tree of the Network Policy Server snap-in, expand Policies, and then click
Network Policies.
2. In the contents pane, double-click the network policy for noncompliant NAP clients that
was created by the NAP Wizard.
3. Click the Settings tab, and then select NAP Enforcement.
4. In the network policy properties dialog box, in the details pane, select Allow Full Net-
work Access For A Limited Time, specify the date and time that enforcement mode will
be configured on the NAP health policy servers, and then click OK.
Perform this procedure on each of your NAP health policy servers.
Configuring IPsec Policy Settings for All of the Computers
in the Secure Network
After thorough testing and validation of outbound and inbound communication on the
computers in the secure test network as described in the “Testing Clear Text and Protected
Communication with the Subset of Computers in the Secure Network” section earlier in this
chapter, you can now apply the secure network GPO to all the computers in your secure
network. To apply the secure network GPO to the security network OU or group that contains
all the domain-joined NAP clients and to ensure that the computers in the security test net-
work OU or group are properly migrated, do one of the following:
■ If you are using a secure test network OU and a secure network OU that contains all the
domain-joined NAP clients, apply the secure network GPO to the secure network OU,
and move the computers in the secure test network OU to the secure network OU.
■ If you are using a secure test network OU and a secure network security group that
contains all the domain-joined NAP clients, apply the secure network GPO to the secure
network OU, and ensure that the computers in the secure test network OU are members
of the secure network OU.
■ If you are using a secure test network security group and a secure network OU that
contains all the domain-joined NAP clients, apply the secure network GPO to the secure
C16624221.fm Page 664 Wednesday, December 5, 2007 5:19 PM
Chapter 16: IPsec Enforcement 665
network OU, and ensure that the computers in the secure test network security group
are members of the secure network OU.
■ If you are using a secure test network security group and a secure network security
group that contains all the domain-joined NAP clients, change the scope filtering on
the secure network GPO so that it applies to the secure network security group, and
ensure that the computers in the secure test network security group are members of the
secure network security group.
Configuring the Network Policy for Noncompliant NAP Clients
for Enforcement Mode
On the date for enforcement mode, configure enforcement mode on your NAP health policy
servers.
To Configure Enforcement Mode
1. In the console tree of the Network Policy Server snap-in, expand Policies, and then click
Network Policies.
2. In the contents pane, double-click the network policy for noncompliant NAP clients.
3. Click the Settings tab, and then select NAP Enforcement.
4. In the network policy properties dialog box, in the details pane, select Allow Limited
Access, and then click OK.
At this point, the deployment of IPsec enforcement is complete; noncompliant NAP clients
will not receive health certificates, and now computers in the secure network require IPsec
protection and health certificate–based authentication for inbound connection attempts.
Ongoing Maintenance
The areas of maintenance for an IPsec enforcement deployment are the following:
■ Adding a NAP client
■ Adding a new SHA and SHV
■ Managing NAP CAs
■ Managing HRAs
Adding a NAP Client
To add a NAP client, do the following:
1. Join the NAP client computer to the domain.
2. Install the SHAs on the NAP client computer.
3. Add the computer account of the NAP client to the secure network OU or security group.
C16624221.fm Page 665 Wednesday, December 5, 2007 5:19 PM
666 Windows Server 2008 Networking and Network Access Protection (NAP)
For a Windows XP SP3–based NAP client, you must also set the HKLM\SYSTEM\
CurrentControlSet\Services\PolicyAgent\Oakley\IKEFlags registry value to 0x1c.
For a new non–domain-joined NAP client, follow the steps in “Configuring NAP Client
Settings” earlier in this chapter.
Adding a New SHA and SHV
To add a new SHA and SHV to your IPsec enforcement deployment, you must do the
following:
1. If needed, install the software or components on your remediation servers for automatic
remediation required by the new SHA.
2. Install the required software and SHA on your NAP clients. For more information, see
“Configuring NAP Client Settings” earlier in this chapter.
3. Install the SHV on your NAP health policy servers.
4. If needed, on the NAP health policy servers, in the Network Access Protection\System
Health Validators node of the NPS snap-in, configure the settings of the SHV for your
system health requirements.
5. On the NAP health policy servers, modify the health policies for compliant and non-
compliant NAP clients to include the new SHV in its evaluation.
Managing NAP CAs
You must manage NAP CAs when adding or removing a NAP CA from your IPsec enforcement
deployment or renewing the NAP CA certificate.
Adding a NAP CA
To add a NAP CA to your IPsec enforcement deployment, do the following:
1. Determine the role of the NAP CA in your IPsec enforcement deployment to provide
load distribution and failover to your HRAs.
2. Add the NAP CA to the issuing CA level of your PKI. For more information, see Win-
dows Server 2008 Help and Support or the resources on />3. Use the Health Registration Authority snap-in on your HRAs, and configure them to use
the new NAP CA as appropriate for its role in the IPsec enforcement deployment.
Removing a NAP CA
To remove a NAP CA from your IPsec enforcement deployment, do the following:
1. Determine how the removal of the NAP CA will affect the load distribution and failover
scheme for your HRAs.
C16624221.fm Page 666 Wednesday, December 5, 2007 5:19 PM
Chapter 16: IPsec Enforcement 667
2. Use the Health Registration Authority snap-in on your HRAs, and configure them to no
longer use the NAP CA and to use the remaining NAP CAs for the new load distribution
and failover scheme for health certificates.
3. Remove the NAP CA from the issuing CA level of your PKI. For more information,
see Windows Server 2008 Help and Support or the resources on rosoft
.com/pki.
Manually Removing Database Entries on a NAP CA
If you have decided not to grant HRA computers the permission to manage the CA database
of NAP CAs to periodically remove the entries in the NAP CA database, you have two options
for manually removing the entries:
■ Use the Certutil tool to delete CA database entries You can use the Certutil tool to
remove CA database entries and purge the CA database log files at a Windows command
prompt, or for NAP CA maintenance, create a scheduled task to periodically run the
certutil command as a script. The advantage to this method is that the Certification
Authority service does not need to be stopped to perform the CA database maintenance.
To prevent CA database fragmentation, run the certutil script every five or ten minutes.
■ Delete the NAP CA database file In this method, you stop the Certification Authority
service, delete the NAP CA database file, and then restart the Certification Authority ser-
vice. You can also use a script and execute the script periodically by using a scheduled
task. The disadvantage to this method is that NAP CA cannot issue health certificates
while the Certification Authority service is stopped. This might cause your HRAs to
switch to a different NAP CA, which can affect your health certificate load distribution.
You can use either of these methods or a combination of methods. For example, you can
create a certutil script that performs ongoing database maintenance every 10 minutes and a
different script to delete the NAP CA database every month.
Renewing the NAP CA Certificate
The certificate assigned to the NAP CA will eventually need to be renewed. You can renew the
certificate through autoenrollment or by manual renewal. For the details of these procedures,
certificate renewal best practices, and the issues associated with timing issues of an issuing
CA certificate and the certificates that it issues, see Windows Server 2008 Help and Support
or the resources on />Managing HRAs
You might need to manage HRAs when adding or removing an HRA from your IPsec enforce-
ment deployment.
C16624221.fm Page 667 Wednesday, December 5, 2007 5:19 PM
668 Windows Server 2008 Networking and Network Access Protection (NAP)
Adding an HRA
To add a new HRA to your IPsec enforcement deployment, do the following:
1. Determine the role of the new HRA in your IPsec enforcement deployment to provide
load distribution and failover for your NAP clients, NAP CAs, and NAP health policy
servers.
2. Join the HRA computer to the domain.
3. Add the HRA computer account to the IPsec exemption group.
4. Install a computer certificate (for HTTPS).
5. Configure the Network Policy and Access Services Role for an HRA.
6. Configure the properties of the new HRA to use the appropriate NAP CAs based on your
determined load distribution and failover scheme between HRAs and NAP CAs.
7. Configure the NPS service on the new HRA as a RADIUS proxy to send RADIUS
messages to your NAP health policy servers based on your determined load distribution
and failover scheme between HRAs and NAP health policy servers.
8. Configure IIS on the new HRA to use SSL for the HRA Web sites (as needed).
9. Configure the appropriate NAP CAs with HRA permissions to request and issue or
optionally, to manage the NAP CA database.
10. Configure your NAP health policy servers with a NAP-capable RADIUS client corre-
sponding to the new HRA.
For the details of new HRA configuration, see the “Configuring HRAs” section earlier in this
chapter. For the details of configuring the NAP CA, see “Configuring PKI” earlier in this
chapter. For the details of configuring NAP health policy servers with a RADIUS client corre-
sponding to the new HRA, see “Configuring NAP Health Policy Servers” earlier in this chapter.
To configure your NAP clients to use the new HRA, add the URLs to the HRA to the appropri-
ate trusted server groups based on your determined load distribution and failover scheme
between NAP clients and HRAs. For the details of using Group Policy to configure trusted
server groups, see “Configuring NAP Client Settings” earlier in this chapter.
If you are using HRA discovery with DNS, add SRV records to the appropriate DNS zones
based on your determined load distribution and failover scheme between NAP clients and
HRAs.
Removing an HRA
To remove an HRA from your IPsec enforcement deployment, do the following:
1. Determine how the removal of the HRA will affect the load distribution and failover
scheme for your NAP clients, NAP CAs, and NAP health policy servers.
C16624221.fm Page 668 Wednesday, December 5, 2007 5:19 PM
Chapter 16: IPsec Enforcement 669
2. From your trusted server groups, delete the URLs to the HRA that is being removed,
and modify the remaining URLs in the trusted server groups based on your new load
distribution and failover scheme between NAP clients and HRAs.
3. If you are using HRA discovery with DNS, remove the SRV records for the HRA being
removed, and modify other SRV records for HRAs based on your new load distribution
and failover scheme between NAP clients and HRAs.
4. On all the NAP CAs that the HRA being removed is configured to use, remove all
permissions for the computer account of the HRA.
5. On your NAP health policy servers, remove the RADIUS client corresponding to the
HRA.
6. Remove the HRA computer.
Troubleshooting
Because of the different components and processes involved, troubleshooting an IPsec
enforcement deployment can be a difficult task. This section describes the tools that are
provided with Windows Server 2008 and Windows Vista to troubleshoot IPsec enforcement
and how to troubleshoot IPsec enforcement starting from the NAP client.
Troubleshooting Tools
Microsoft provides the following tools to troubleshoot IPsec enforcement:
■ TCP/IP troubleshooting tools
■ The Netsh tool
■ The Certification Authority snap-in
■ The Certificates snap-in
■ NAP client event logging
■ HRA event logging
■ NPS event logging
■ NPS authentication and accounting logging
■ IPsec audit logs
■ Netsh NAP tracing
■ NAP tracing
■ Network Monitor 3.1
C16624221.fm Page 669 Wednesday, December 5, 2007 5:19 PM
670 Windows Server 2008 Networking and Network Access Protection (NAP)
TCP/IP Troubleshooting Tools
The Ipconfig tool displays the state of a NAP client. At a command prompt on a NAP client,
run the ipconfig /all command. In the Windows IP Configuration section (the first section in
the results display), the state of the NAP client is listed as the System Quarantine State. The
System Quarantine State is designated as either Not Restricted or Restricted.
Additional standard TCP/IP troubleshooting tools are Ping and Nslookup to test reachability
and name resolution.
The Netsh Tool
Beyond the state of the NAP client as shown in the results of the ipconfig /all command, you can
gather additional NAP client configuration information by running the following commands:
■ netsh nap client show configuration Displays the local NAP client configuration
including cryptographic service providers (CSPs), hash algorithms, the list of NAP
enforcement clients and their state (enabled or disabled), and the state of NAP client
tracing
■ netsh nap client show grouppolicy Displays the same NAP client settings as the netsh
nap client show configuration command for the settings obtained through Group
Policy
■ netsh nap client show state Displays detailed NAP client state, enforcement client
state, and SHA state
■ netsh nap client show trustedservergroup Displays the list of configured trusted
server groups
Note
The display for the netsh nap client show configuration and netsh nap client show
grouppolicy commands does not show which set of settings, local or Group Policy–based, is
currently active on the NAP client. If any NAP client settings are obtained through Group
Policy, the entire set of NAP client settings are specified by Group Policy and all local NAP client
settings are ignored.
The Certification Authority Snap-in
Use the Certification Authority snap-in on your NAP CAs to view the list of certificates in the
Issued Certificates, Pending Requests, and Failed Requests folders. For example, you can
verify that the HRA is removing expired certificates by sorting issued certificates by their
expiration date. If the HRA has permission to perform this function, no certificates should
be expired for longer than the certificate database cleanup interval (5 minutes by default).
Failed requests provide information about certificate requests that reached the CA but did not
succeed due to a CA configuration problem. If there are pending requests, health certificates
might not be configured to be issued automatically.
C16624221.fm Page 670 Wednesday, December 5, 2007 5:19 PM