mcts training kit 70 - 652 server virtualization phần 2 doc
Bạn đang xem bản rút gọn của tài liệu. Xem và tải ngay bản đầy đủ của tài liệu tại đây (1.24 MB, 65 trang )
Lesson 3: Implementing Windows Server 2008 for Hyper-V CHAPTER 1 43
REQUIREMENT DESCRIPTION
Virtual Hard Disks Fixed and dynamically expanding virtual hard disks are limited in size
to 2,040 GB each. The total amount of storage per VM using virtual
hard disks is 512 terabytes.
The size of pass-through disks—physical disks that are directly linked
to virtual machines—is only limited by the operating system running
in the VM.
Virtual Storage
Controllers
Up to four IDE connections per VM. At least one IDE device must be
assigned to each VM to boot.
Up to 4 SCSI connections per VM and up to 64 devices per SCSI
connection for a total of 256 possible disk connections.
Virtual Machine
Snapshots
Each VM can have up to 50 snapshots.
Virtual CD/DVD Up to three virtual CD/DVD devices can be assigned to each VM. One
IDE controller must be reserved for the boot device.
Only one VM can access the physical or pass-through CD/DVD device
at a time for security reasons.
Hyper-V can also access .iso files as virtual CD/DVD devices.
Virtual Serial
(COM) Ports
Each VM can access up to 2 virtual COM ports to communicate with
physical devices either locally or remotely through a serial named pipe.
Virtual floppy
drive
Each VM supports up to 1 virtual floppy drive. Hyper-V does not
support access to physical floppy devices. Floppy devices must be in
the form of .vfd files.
Resource pool Resource pools link host servers together to provide high availability
for the VMs they run. Because Hyper-V relies on Windows Server
2008 to create resource pools, the maximum number of hosts in a
given resource pool is 16 or 16 nodes in a cluster.
exaM tIp HYPER-V CHARACTERISTICS
Pay close attention to the items in Table 1-6—they are definitely part of the exam.
Update alert HYPER-V CHARACTERISTICS
Microsoft is constantly updating Hyper-V and other virtualization offerings as they
compete with other virtualization vendors. Because of this, many of the values in Table 1-6
have been updated to reflect current Hyper-V capabilities. Yet the exam was created based
on the original features of Hyper-V. Pay special attention to the original values cited in this
table. For example, the number of supported logical processors and the maximum number
of concurrent running VMs are both values that have changed since the creation of the
exam and these values have also changed with Hyper-V R2.
44 CHAPTER 1 Implementing Microsoft Hyper-V
More Info
HYPER-V RAM CALCULATOR
Aidan Finn, an MVP in System Center Configuration Manager, put together a handy
spreadsheet outlining how to calculate RAM for host servers running Hyper-V. Find it at
/>Note that although there is a significant performance difference between SCSI and
IDE disks on physical systems, there is little difference in a virtual environment running on
Hyper-V. The VSC running in enlightened guest operating systems provides highly similar
throughput for both storage protocols. Therefore, you can configure virtual machines to boot
and operate through virtual IDE drives and expect a higher level of performance than on a
physical machine configuration.
Keep the information in Table 1-6 in mind when selecting host hardware. Ideally, you will
configure your hosts so that they will support an appropriate number of virtual machines.
Although this number is difficult to determine under most circumstances, you can rely on the
rule of thumb that many organizations aim for up to 10 VMs per host; or, you can rely on an
assessment tool to assist you in determining how many VMs you should assign to each host
server. Using this assessment tool is the next topic in this lesson.
Host Server Resource Usage
Given the various characteristics of Hyper-V and given the results of your MAP assessments,
you can begin to plan for resource usage of your Hyper-V systems. Although Hyper-V can
run up to 192 single-processor virtual machines on a host server configuration that includes
24 logical processors, it is highly unlikely that you will actually do so. This is because you
must take into consideration the potential overhead of the parent partition. Remember that
the parent partition acts as the coordinating orchestrator for all child partition operations
and because of this, it has some resource usage overhead of its own. Table 1-7 outlines
considerations for the resource overhead of the parent partition.
TABLE 1-7 Potential Parent Partition Overhead
RESOURCE REQUIREMENT
Logical
processor core
You should reserve at least one logical processor core per host
server for the operation of the parent partition. This way, the parent
partition will not have to content for processor resources with the
child partitions it manages. After all, Hyper-V’s parent partition runs
Windows Server 2008 and this operating system actually runs best
with two logical processor cores when
managing other server roles.
Lesson 3: Implementing Windows Server 2008 for Hyper-V CHAPTER 1 45
RESOURCE REQUIREMENT
Memory You should reserve at least 512 MB of RAM for the operation of the
parent partition if it is running a Server Core installation of Windows
Server 2008. 512 MB of RAM is the bare minimum RAM required for
Windows Server 2008.
If your parent partition is running the full installation, you should
allocate between 768 and 1,024 MB of RAM. Once again, you do
not want the parent partition to compete for resources with child
partitions.
However, Microsoft recommends allocating a minimum of 2 GB of
RAM for the parent partition because it also hosts drivers and agents
and may require more base RAM to operate.
In addition, each child partition you run will require 32 MB of
overhead memory as well as 8 MB of RAM for any additional
memory it has access to.
As a rule of thumb, allocate 2 GB of RAM to the parent partition plus
40 MB for each child partition. This will provide the best operation
for your Hyper-V host. Hyper-V R2 can rely on Second Level Address
Translation (SLAT) which allows it to leverage new processor features
to improve performance and reduce the hypervisor load. This will
reduce the hypervisor load to about 1 percent of total system
memory, letting you allocate more RAM to VMs.
Network adapters You should reserve one network adapter for management
operations. The parent partition must be connected to this network.
A second NIC is required to support virtual machine networking.
A third is required if you rely on shared storage for VM storage and
you use the iSCSI protocol to access this storage.
In addition, if you create a failover cluster, you will need two NICs for
the cluster itself: one for public traffic and one for private heartbeat
traffic. The public traffic NIC can double as the VM networking NIC.
Storage The parent partition is installed as the boot operating system for a
Hyper-V server. You can choose from two strategies here. If you use
DAS, you should at least mirror two local hard disks to provide a
first line of protection for the parent partition. Using DAS,
however,
means that you must use traditional installation procedures to
prepare a new server.
With Windows Server 2008, you can also boot the parent partition
from remote storage. In this case, you can use your remote storage’s
utilities to generate new parent partitions—through duplication
technologies—when a new host server is required.
46 CHAPTER 1 Implementing Microsoft Hyper-V
Keep the considerations in Table 1-7 in mind when you plan for resource usage on your
Hyper-V hosts. Reserving some core resources for the parent partition is a good practice that
will hold in good stead over time. Host server operation is critical if you want your VMs to
remain stable and in good operational health.
Hardware, Software, and Driver Compatibility
Ideally, your host server hardware will be listed in the Windows Server Hardware Catalog
(). In fact, one of your first preoccupations should be whether
you intend to run fault-tolerant host servers to ensure virtual machine availability. If so, you
should look to hardware that has been validated for the Failover Clustering service in Windows
Server 2008. Fortunately, Microsoft has introduced the Failover Cluster Configuration Program
(FCCP) with Windows Server 2008. This program changes the way customers procure hardware
for clustering solutions. In this case, manufacturers list validated cluster configurations on their
own sites instead of on the Windows Server Catalog site. This helps customers more easily
access configurations that have already been completely validated to run Windows Server 2008.
A list of partners with validated configurations can be found at />windowsserver2008/en/us/clustering-partners.aspx. Partner configurations range from low-cost
two-node clusters to more expensive multi-node datacenter configurations.
In addition, Windows has historically had instability issues related to driver and software
design. In an effort to ensure that Windows Vista and Windows Server 2008 are even more
stable than any previous releases of Windows, Microsoft has tightened the driver and
software signing requirements for this operating system. Driver and software signing ensures
the quality of the components administrators install on their servers and workstations. In fact,
the following Windows components now require digital signatures:
n
x64 versions of Windows Vista and Windows Server 2008 require all components that
are loaded into the operating system kernel—the core part of the operating system
that runs at ring 0—to include Kernel Mode Code Signing. This ensures that when
components operate in the core of the operating system, they are known to behave
properly.
n
Boot start drivers or drivers that load at boot time must all contain an embedded
signature.
n
Any components that are downloaded through Internet Explorer for installation must
also be digitally signed.
n
Any unsigned component requires administrative approval—read operating system
procedure override—to install. Therefore, when you choose to install unsigned and
potentially unstable software or drivers, you become responsible for making this
choice.
Digital signing relies on Public Key Infrastructure (PKI) certificates that are embedded
within the component. These certificates must originate from a trusted publisher or a
publisher that is included in the default Windows and Internet Explorer list of trusted entities.
Self-signed and potentially untrusted certificates are not supported.
Lesson 3: Implementing Windows Server 2008 for Hyper-V CHAPTER 1 47
Because Hyper-V runs on x64 hardware, it benefits from trusted kernel and other
components. Therefore, host servers running Hyper-V should provide stable and robust
operation, but only as long as you comply with the guidelines Windows Server 2008
provides. If you opt to install unsigned drivers on your host servers, you can destabilize your
host servers. You’ll agree that with host servers running multiple VMs in child partitions,
introducing any element that can potentially destabilize them is a pointless exercise.
exaM tIp DIGITAL SIGNATURES
Watch out for questions related to driver and software signing in the exam. Creating
potentially unstable host servers is a pitfall that should be avoided at all costs.
Installing Windows Server 2008
As an IT professional focused on Microsoft technologies, you are already familiar with the
Windows installation process, and if you have experience with installing Windows Vista, you
are also familiar with the installation process for Windows Server 2008. Both use the same
installation engine. Windows Server installations are based on the Windows Preinstallation
Environment (Windows PE) engine, which is a scaled-down version of Windows that can boot
from removable media—CDs, DVDs, or USB disks—and load into RAM to perform bare-metal
installation operations.
In addition to moving the installation process to integrate with Windows PE, Microsoft
has modified the Windows Vista and Windows Server 2008 installation to remove all barriers
to installation completion. In previous versions of Windows, administrators were required to
provide input into the installation at various stages of the process. Today all input is provided
at the beginning of the installation. As soon as all input data is provided, the installation
completes on its own. Administrators only need to provide very basic information:
n
Language to install
n
Time and currency format
n
Keyboard or input method
Then, after you’ve selected Install Now, you provide the product key for the installation.
This product key determines which product will be selected for installation. You then
select whether you want to perform a full installation or a Server Core installation, choose
the location of the installation—you may have to use advanced functions to create disk
partitions—and you’re off and running.
Windows now uses an image-based setup (IBS) that copies an installation image to
the system disk and then decompresses it to begin the actual configuration based on the
discovered devices on the system. Then, when the operating system is installed, you proceed
to the actual system configuration: changing administrative passwords, setting firewall
configurations, and much more.
48 CHAPTER 1 Implementing Microsoft Hyper-V
Identifying Deployment Options
As you can see, this installation process is fairly basic. But as a resource pool administrator,
you need to delve deeper into the installation process. Basically, resource pool administrators
need to determine which process they intend to rely on to create host servers when they are
required. In the dynamic datacenter, host servers are provisioned on an as-needed basis when
the existing pool of servers can no longer provide adequate resources for the virtual machines
you run. Because of the dynamic nature of the datacenter, this provisioning process must be
as smooth and as efficient as possible. It may be adequate for a small organization to create
new host servers manually because the need seldom arises, but it is unacceptable to do so in
larger datacenters.
Dynamic systems provisioning must rely on some form of automation. Windows Server
2008 supports four different installation modes:
n
Manual installation, which must be used at least once to discover how the installation
process actually works. This process is then followed with a manual post-installation
system configuration.
n
Unattended installation through automated response files. Windows now relies on a
single Unattend.xml file for input into all automated installations. This file can be edited
and prepared through the Windows System Image Manager which is part of the Windows
Automated Installation Kit (WAIK), a downloadable installation support tool. The
advantage of using answer files is that they can provide both pre- and post-installation
input and configuration settings, making the process simpler for administrators.
n
Disk imaging with the System Preparation Tool (SysPrep.exe). This process relies on the
creation of a reference computer that is completely configured, then depersonalized
through the SysPrep tool. Then, you capture an image of this computer. This image
is then used as the installation point for other servers. This process relies on the new
Windows image-based installation, but in this case, you use a custom image instead of
the default image included in the Windows distribution DVDs. Once again, you rely on
the WAIK to create the custom image and an Unattend.xml file or a manual process to
customize it each time you deploy it.
n
Remote installation through the Windows Deployment Services (WDS), one of the
17 default server roles in Windows Server 2008. WDS also relies on custom images,
but can remotely deploy them to bare-metal systems. WDS also relies on Windows
PE to boot into the installation process for any server that does not already include
an operating system. WDS includes several additional features, such as multicast
image deployment, distributed deployment structures for complex environments, and
granular distribution control, but in most cases, these features are not required for
resource pool creation.
One additional deployment option is available. If the parent partition for a server is hosted
on a SAN and the system is configured to boot remotely from SAN, you can use the SAN’s
logical unit duplication tools to create and depersonalize an image of this parent partition.
Lesson 3: Implementing Windows Server 2008 for Hyper-V CHAPTER 1 49
Then, when you need to add a new host server, you create a copy of this image, attach it to
the new host, customize it, and you have a new host server. In large organizations, this may
be the best method to use because it can provide very fast host server provisioning.
Resource pool administrators therefore need to identify which process works best for
their environments. Smaller organizations may work well with the Unattended installation
process, but medium-sized and larger organizations have to look to either the system image
or remote deployment process because of the speed of the deployment.
Identifying Required Host Server Configurations
Resource pool administrators also need to determine how they intend to configure their
host servers. Traditionally, host servers are configured in resource pools—or in the case of
Windows Server 2008, in failover clusters—so that they can provide high availability for
the virtual machines they run. It makes sense: If your host servers run 10 or more virtual
machines, you want to make sure that the virtual machines continue to operate no matter
what happens to the host server. Using failover clusters, you can move all of these VMs from
one cluster node to another through Hyper-V’s Quick Migration feature. Some downtime is
associated with this move, but it is better to have a few seconds of downtime than to have all
virtual machine services fail.
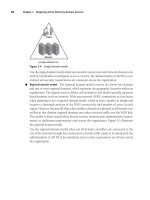
The Windows Server 2008 Failover Cluster service supports two modes (see Figure 1-15):
n
Single-site clusters Failover clusters use shared storage in a single site to provide
high availability. Because all nodes of the cluster are tied to the same shared storage
containers, they can provide failover for each other in the event of a hardware failure
on a cluster node.
n
Multi-site clusters Failover cluster nodes are located in different sites and provide
multi-site failover services for each other. In this case, each node hosts its own copy of
the data and relies on this copy to provide continuity services. Because of this, there
is no requirement for shared storage and each node can in fact rely on DAS to host
data. Because each node in the cluster must have duplicate data, multi-site clusters
must also rely on a replication engine to ensure that all node data is synchronized at all
times. This replication engine must be able to duplicate data while it is being used and
must therefore be able to replicate open data objects. Right now, multi-site clusters
must rely on third-party replication tools.
Multi-site clusters can provide better failover support than single-site clusters because
if an entire site fails, your services will continue to operate. In addition, multi-site clusters
provide simpler host server configuration designs because they can rely on DAS instead of
shared storage. DAS is faster and much easier to implement than shared storage. However,
multi-site clusters also require the acquisition and implementation of a third-party replication
tool and therefore may be cost-prohibitive for certain organizations.
50 CHAPTER 1 Implementing Microsoft Hyper-V
Single-Site Cluster
Multi-Site Cluster
Cluster VLAN
Direct-Attached Storage
Witness File Share
Third-Party Replication
Engine
Shared Storage
FIGURE 1-15 Single- versus multi-site cluster configurations.
note LIVE MIGRATION
The first iteration of Hyper-V requires downtime to move a VM from one node of the
cluster to another. In Windows Server 2008 R2, Microsoft introduces Cluster Shared
Volumes (CSV) which will provide support for live migration, or the ability to move a virtual
machine from one node to another without downtime. CSVs are a function of shared
storage, which means that they will only support single-site clusters.
However, resource pool administrators must also take into consideration the support
policy for the product they intend to virtualize. Many products find it quite acceptable to rely
on host server clustering to provide high availability for the services running in the virtual
machine, but some do not. For example, the Microsoft Exchange Server team has posted
its official support policy for configuring high availability in virtual machine environments.
Remember that virtual machines emulate all of the features of a physical machine and
because of this, Windows Server workloads such as Exchange Server can also take advantage
of failover clustering within the virtual machines themselves. This is the strategy the Exchange
Server team has opted for. They do provide support for both Hyper-V and validated server
virtualization platforms, but they do not provide support for host server clustering, nor do
they provide support for live migration features. Instead, they provide support for creating a
combination of a multi-site cluster in a single site through the Cluster Continuous Replication
(CCR) feature of Exchange. CCR provides the replication engine required for the multi-site
cluster and all failover processes are maintained by Exchange itself. This strategy limits the
Lesson 3: Implementing Windows Server 2008 for Hyper-V CHAPTER 1 51
possibility of losing e-mail data. Host clusters that perform a failover are never aware of the
state of an application contained in a VM during the transfer and therefore may cause some
data loss. When you rely on Exchange to perform the failover, it will always be aware of the
latest state of the Exchange mailbox database.
More Info SUPPORTED VIRTUALIZATION FOR EXCHANGE SERVER
For more information on the supported Exchange virtualization strategy, look up
/>Because of these support policies, resource pool administrators will find that they need to
create and maintain three different types of host server configurations:
n
Stand-alone hosts will be required to support certain products when virtualized.
n
Single-site clusters will be the most common host server configuration.
n
Multi-site clusters can provide entire site failure protection.
Take the time to analyze the support policy for the products you want to virtualize before
you make your final recommendations on host server configurations. If you decide—as you
should—that you want to create single-site clusters for some of your host server configurations,
keep in mind that single-site clusters must use shared storage and that clusters in general must
be designed to have spare resources so that they can provide failover for other nodes in the
event of a hardware malfunction (see Figure 1-16). In addition, take the time to determine the
best method to automate Hyper-V deployment given the needs of your organization.
Quorum Disk
(Q:)
Volume 1
(Service 1)
Volume 2
(Service 2)
Resources
Service 1 Service 2
Service 1
Resources
Workloads
Service 2
Node 1 Node 2
Workloads
FIGURE 1-16 Single-site clusters rely on shared storage. Clusters in general require spare resources in
order to provide failover services.
52 CHAPTER 1 Implementing Microsoft Hyper-V
More Info CLUSTERING HOST SERVERS AND VIRTUAL MACHINES
Fault-tolerance strategies for host servers are covered in Chapter 3, “Completing Resource
Pool Configurations,” as you finalize your host server infrastructure. Fault-tolerance strategies
for virtual machines are covered in Chapter 10, “Ensuring Virtual Machine High Availability,”
as you look to business continuity strategies for your virtualization environment.
Practice Prepare for Hyper-V Deployment
This practice consists of two exercises. The first exercise looks at the full installation of Windows
Server 2008 in preparation for the installation and configuration of the Hyper-V role. The
second exercise looks at the installation of Server Core on another server in preparation of the
installation and configuration of Hyper-V in a Server Core environment. You will rely on these
two machines to perform further exercises as you move through the lessons in this guide.
exerc ise 1 Install Windows Server 2008
In this exercise you will install Windows Server 2008 as a full, graphical installation on a
host machine. The host machine should be a physical machine and should be configured
according to the recommendations outlined in the Introduction.
1. Obtain an installation DVD for Windows Server 2008. Insert this DVD into the drive of
your computer system. Ideally, no pre-existing operating system will be found on this
server, but if there is one, use the installation to replace it. Note: You can download an
evaluation version of Windows Server 2008 from />windowsserver2008/en/us/trial-software.aspx.
2. Boot the server and select to boot from the DVD at the prompt.
3. When the Windows Setup screen appears, select English as the language to install,
English (United States) as the time and currency format, and US as the keyboard or
input method. Click Next.
4. Click Install Now.
5. Do not enter a product key at the product key page. This will let you evaluate Windows
Server for up to 60 days and can be extended to 240 days, which should be sufficient
for the purposes of preparing for the exam. Click Next. Answer No to the product key
insertion prompt.
6. Select Windows Server 2008 Enterprise (Full Installation) and select I Have Selected The
Edition Of Windows That I Have Purchased. Click Next.
7. Select I Accept The License Terms and click Next.
8. Choose Custom (Advanced).
9. The next screen lets you prepare custom partitions to host the installation. Because this
machine should be linked to shared storage, you can use the entire local partition for
the installation. Click Next.
10. The installation proceeds and will reboot the server until the installation is complete.
Lesson 3: Implementing Windows Server 2008 for Hyper-V CHAPTER 1 53
exerc ise 2 Install Windows Server 2008 Server Core
In this exercise you will install Windows Server 2008 as a Server Core installation on a host
machine. The host machine should be a physical machine and should be configured according
to the recommendations outlined in the Introduction.
1. Obtain an installation DVD for Windows Server 2008. Insert this DVD into the drive of
your computer system. Ideally, no pre-existing operating system will be found on this
server, but if there is one, use the installation to replace it.
2. Boot the server and select to boot from the DVD at the prompt.
3. When the Windows Setup screen appears, select English as the language to install,
English (United States) as the time and currency format, and US as the keyboard or
input method. Click Next.
4. Click Install Now.
5. Do not enter a product key at the product key page. This will let you evaluate Windows
Server for up to 60 days and can be extended to 240 days, which should be sufficient
for the purposes of preparing for the exam. Click Next. Answer No to the product key
insertion prompt.
6. Select Windows Server 2008 Enterprise (Server Core) and select I Have Selected The
Edition Of Windows That I Have Purchased. Click Next.
7. Select I Accept The License Terms and click Next.
8. Choose Custom (Advanced).
9. The next screen lets you prepare custom partitions to host the installation. Because this
machine should be linked to shared storage, you can use the entire local partition for
the installation. Click Next.
10. The installation proceeds and will reboot the server until the installation is complete.
Quick Check
1. Which hardware component is an absolute requirement for Hyper-V and how
can you verify that it is enabled before performing a Hyper-V installation?
2. How many single-processor virtual machines can Hyper-V run and how many
logical processors can a host server include?
3. What is recommended in terms of memory for the parent partition if it is
running on a Server Core installation? If it is running on a Windows Server 2008
full installation?
Quick Check Answers
1. The server processor must support hardware-assisted virtualization, such as Intel
VT or AMD-V, and this setting must be enabled in the BIOS before performing
a Hyper-V installation.
54 CHAPTER 1 Implementing Microsoft Hyper-V
2. Hyper-V can run up to 192 single-processor virtual machines on a host server
configuration that includes 24 logical processors. However, because each
machine requires access to its own memory, it is highly unlikely that you would
ever use such a configuration.
3. You should reserve at least 512 MB of RAM for the operation of the parent
partition if it is running on a Server Core installation of Windows Server 2008.
If your parent partition is running on a full installation, you should allocate at
least 768 to 1,024 MB of RAM to the parent partition.
Case Scenario: Preparing for Server Virtualization CHAPTER 1 55
Case Scenario: Preparing for Server Virtualization
In the following case scenario, you will apply what you’ve learned about implementing
Hyper-V. You can find answers to these questions in the “Answers” section on the companion
CD which accompanies this book.
You have been designated as the resource pool administrator for Lucerne Publishing, a
medium-sized organization that has offices in New York, Los Angeles, San Remo, Philadelphia,
Newark, and Dallas. As part of your first activities, the IT department has asked you to look
into Hyper-V as a virtualization platform and to examine the process required to move to a
Hyper-V infrastructure. In addition, they have asked you to plan out the configuration of a
typical host server. In particular, they want you to outline the number of CPUs, number and
type of hard disks, and amount of memory required in a host server that would run up to five
virtual machines running various networked services. To facilitate the process, the department
has provided you with a table outlining the requirements for the host server as well as the
requirements for each of the five virtual machines. Table 1-8 outlines these requirements.
TABLE 1-8 Parent and Child Partition Requirements
PARTITION REQUIREMENT
Parent partition CPU: 1 logical processor
RAM: 1 GB
Disk Space: 40 GB
Child Partition 1 CPU: 2 logical processors
RAM: 4 GB
Disk Space: 40 GB
Child Partition 2 CPU: 2 logical processors
RAM: 2 GB
Disk Space: 40 GB
Child Partition 3 CPU: 4 logical processors
RAM: 4 GB
Disk Space: 100 GB
Child Partition 4 CPU: 1 logical processor
RAM: 1 GB
Disk Space: 40 GB
Child Partition 5 CPU: 1 logical processor
RAM: 2 GB
Disk Space: 40 GB
56 CHAPTER 1 Implementing Microsoft Hyper-V
1. What type of system would you recommend?
2. How many CPUs and how many CPU cores are required?
3. What type of storage would you recommend for this host server?
4. How much memory should the host server include?
5. How does your recommendation change if you want to include fault tolerance for the
host server?
Suggested Practices
You can perform several practices to prepare for this section of the exam. First, you should
review some reference information to complement what you have seen in this chapter.
Second, you should take a practice test. Do not take the entire test. Instead, concentrate on
the objective in this chapter.
Windows Server 2008 Installation
n
Practice 1 You should take the time to become familiar with both installations of
Windows Server 2008—full installation and Server Core.
n
Practice 2 Take a look at the automated deployment mechanisms for Windows
Server. If you have taken other IT Pro exams on Windows Server 2008, look up the
sections on deployment automation and review the approaches that are available.
This will help you better understand how you can deploy Hyper-V servers in your own
environment.
Microsoft Assessment and Planning Tool
n
Practice 1 You should also practice performing assessments with the Microsoft
Assessment and Planning tool. MAP is a great addition to any Hyper-V implementation
because it provides so much input into the process. Play with various lengths of time
for performance assessments. Use different values in your host server configurations
in the virtualization assessment. Closely examine the results of each assessment to
gain a better understanding of how this information can provide input into your own
virtualization projects.
Server Hardware Configurations
n
Practice 1 Finally, it is a good idea to look up the systems your hardware
manufacturer of choice suggests for the operation of Hyper-V. Most systems range
widely in price from very low-cost systems to systems that cost tens of thousands
of dollars. Determine which would best suit your organization’s needs and become
familiar with their potential configurations.
Chapter Summary CHAPTER 1 57
Chapter Summary
n
The fully functional Hyper-V role can be found in Windows Server 2008 Standard,
Enterprise, and Datacenter x64 editions. This role must run on a 64-bit system with
both hardware-assisted virtualization and Data Execution Prevention (DEP) enabled.
n
The Hyper-V role can be run on the full installation or the Server Core installation of
Windows Server 2008.
n
The Hyper-V architecture uses a Virtual Service Provider/Virtual Service Client (VSP/VSC)
or client architecture to provide hypervisor services to the virtual machines it supports.
n
Microsoft offers a free version of Hyper-V named Microsoft Hyper-V Server 2008.
This version is based on the Standard edition of Windows Server 2008 and it is limited
to 32 GB of RAM. Hyper-V Server relies on the Server Core interface. Microsoft
recommends using this version in test and development environments, for basic server
consolidation, or in branch office consolidation scenarios.
n
To move to a server virtualization infrastructure you should rely on a process that
includes several activities: determining the possible scenarios, preparing and deploying
the host servers, preparing the host server and VM management infrastructure, securing
and protecting the host servers, and moving on to resource pool and virtual machine
administration.
n
Before installing Hyper-V you need to select the right hardware based on assessed
requirements. In addition, the host server hardware should be listed in the Windows
Server Hardware Catalog to provide the very best stability.
CHAPTER 2 59
C H A P T E R 2
Configuring Hyper-V Hosts
T
he next step in the resource pool planning and deployment process is to configure
Hyper-V and prepare it for remote administration. As you saw in Chapter 1, “ Implementing
Microsoft Hyper-V,” the Hyper-V installation is a multi-part process. Hyper-V was in beta
when it shipped with Windows Server 2008, and as such it needs to be updated before
you can run the release to manufacturing (RTM) version of the product. This will no longer
be necessary when Service Pack 2 for Windows Server 2008 is released, but for any copies
of the original, RTM version of Windows Server 2008 released in February 2008, the Hyper-V
update is critical.
Update alert SERVICE PACK 2
If you use Windows Server 2008 installation media that includes Service Pack 2, you
will not need to apply several of the updates mentioned here. Verify the service pack
description to make sure the updates mentioned in this chapter are included. Find this
information at />The update process is simple:
n
Install Windows Server 2008, either with the full or the Server Core installation.
n
Download and install the update.
n
Enable the Hyper-V role.
n
Configure Hyper-V for operation.
n
Configure virtual networks for Hyper-V.
The last step deals with both the configuration of Hyper-V’s local settings—such
as libraries for storing virtual hard drives and CD/DVD ISO source images—as well
as configuration of the virtual networks Hyper-V uses to support child partition
communications. Then, once these elements are configured, you configure Hyper-V
for remote administration. Remote administration is an important part of the Hyper-V
configuration because as a resource pool administrator, you’ll most likely need to centrally
manage all Hyper-V host servers as a resource pool. To do so, each Hyper-V host must
be configured to allow remote administration—especially remote access to the Windows
Management Instrumentation extensions available in Hyper-V. This is the focus of
this chapter.
C o n t e n t s
CHAPTER 2 59
Configuring Hyper-V Hosts 59
Before You Begin . . . . . . . . . . . . . . . . . . . . . . . . . . . . . . . . . . . . . . . . . . . . . . . . . 60
Lesson 1: Installing the Hyper-V Role . . . . . . . . . . . . . . . . . . . . . . . . . . . . . . . 61
Performing the Initial Server Configuration 61
Performing the Hyper-V Role Installation 72
Installing Hyper-V Updates 79
Hyper-V and Active Directory Domain Services 80
Installing Windows Hyper-V Server 81
Lesson 2: Configuring Windows Server Hyper-V . . . . . . . . . . . . . . . . . . . . . . 91
Working with the Hyper-V Management Tools 91
Understanding Hyper-V Settings 93
Lesson 3: Configuring Virtual Networking . . . . . . . . . . . . . . . . . . . . . . . . . .104
Working with Virtual Network Types in Hyper-V 104
Configuring Hyper-V on Full vs. Server Core Installations 107
Using the Virtual Network Manager Tool 111
Case Scenario: Networking Virtual Machines . . . . . . . . . . . . . . . . . . . . . . . 117
Suggested Practices . . . . . . . . . . . . . . . . . . . . . . . . . . . . . . . . . . . . . . . . . . . . . 117
Windows Server 2008 Configuration 117
Hyper-V Role Installation 118
Virtual Network Configuration 118
Chapter Summary . . . . . . . . . . . . . . . . . . . . . . . . . . . . . . . . . . . . . . . . . . . . . . .118
60 CHAPTER 2 Configuring Hyper-V Hosts
Exam objectives in this chapter:
n
Configure Windows Server 2008 for Hyper-V.
n
Configure virtual networking.
Before You Begin
To complete this chapter, you must have:
n
Access to a setup as described in the Introduction. At least two computers are required:
one running a full installation of Windows Server 2008 and the other running Server
Core. You prepared these computers in Lesson 3 of Chapter 1. In this chapter, you will
continue the build process and finalize the configuration of these computers.
Lesson 1: Installing the Hyper-V Role CHAPTER 2 61
Lesson 1: Installing the Hyper-V Role
Chapter 1 outlined the requirements for Hyper-V servers as well as some tools, notably the
Microsoft Assessment and Planning tool, which can help you better understand the
requirements of your host servers. In addition, you performed the basic installation of
Windows Server 2008 in preparation for the Hyper-V role. Now you can proceed to the initial
configuration of the servers as well as the installation of the Hyper-V role.
After this lesson, you will be able to:
n
Perform the initial configuration of Windows Server 2008. This configuration
must address both the full and the Server Core installation.
n
Obtain the Hyper-V update.
n
Install and enable the Hyper-V role.
This lesson also covers the installation and initial configuration of Hyper-V
Server, although this topic is not part of the exam.
Estimated lesson time: 30 minutes
Performing the Initial Server Configuration
Each server you deploy requires configuration before use. For example, Windows Server 2008
is installed by default with an Administrator account and a Guest account. The Guest
account is disabled and the Administrator account has no password. As part of the initial
configuration of your server, you must provide a password to the Administrator account.
In fact, this password change is performed at the first logon. Other activities must also be
performed before a server is deemed ready to host the Hyper-V role. These activities differ
slightly depending on the installation type—full or Server Core—but in general, you must do
the following:
n
Set the Administrator password at first logon.
n
Set the time zone for the server.
n
Configure networking.
n
Provide a computer name and join a domain.
n
Configure automatic updates and update the server.
n
Enable the Remote Desktop.
n
Configure the Firewall and enable remote administration.
n
Add additional features if required. For example, it’s a very good idea to use BitLocker
full drive encryption on the system drive for host servers that are in unsecured areas.
Note, however, that when BitLocker is enabled on a remote server, you may require
physical interaction with the server during reboots.
62 CHAPTER 2 Configuring Hyper-V Hosts
All of these initial tasks are available in a single interface in the full installation, the Initial
Configuration Tasks (ICT) screen, which appears at first logon (see Figure 2-1). The ICT screen
provides a single interface for the most common initial configuration tasks.
FIGURE 2-1 The Initial Configuration Tasks screen
note SERVER CORE INSTALLATIONS
Because there is no graphical interface in Server Core, there is no correspond interface to
the ICT screen. You must, however, perform the same basic configuration tasks on Server
Core installations, but all tasks are manual. Note that you can automate this process
through the use of answer files during the Server Core installation and thereby reduce the
amount of manual configuration required on a Server Core computer.
Although the ICT screen offers a great way to perform some basic configuration tasks, it
does not necessarily provide access to all of the interfaces you need to finalize an initial server
configuration. Tasks you may want to perform but that are not included in ICT can include the
following:
n
Server activation.
n
Renaming the default Administrator account.
n
Creating a backup administrator account if your internal policies allow it or even request it.
n
Setting the operating system display time to accelerate the reboot process.
Lesson 1: Installing the Hyper-V Role CHAPTER 2 63
n
Setting default recovery options for the parent partition.
n
Configuring the page file.
n
Performing other required host server configurations. For example, you might need to
install the Windows Recovery Environment (WinRE) on the system to simplify server
recovery.
n
You may also want to add additional administration tools on the server. Note, however,
that the Windows Server Remote Server Administration Tools (RSAT) will only work on
a full installation.
n
Finally, to simplify the use of this system by other users, you might want to configure
the user interface and the default user profile. Once again, this activity is only
performed on the full installation.
You must perform each of these operations before you are ready to install and enable the
Hyper-V role on the server.
Configuring the Full Installation for Hyper-V
Performing these initial configuration tasks on the full installation of Windows Server 2008 is
relatively easy because you have access to a graphical interface for each option. At first logon,
the system will present the Administrator account and request a password change. By default,
the original Administrator password is blank. Log on with this blank password. The system
will prompt for a password change (see Figure 2-2). Once the password has been set, you will
be allowed to log on to the system and as soon as the logon process is complete, the Initial
Configuration Tasks interface will open. Note that you can also create a password reset disk
when the system allows you to change the password. Do so only if this is part of your internal
security policy.
FIGURE 2-2 Setting the default Administrator password
64 CHAPTER 2 Configuring Hyper-V Hosts
Proceed as follows:
n
Set the time zone for the server by using the link provided on the ICT.
n
Configure networking. Once again, rely on the link in the ICT. Configure each of the
network adapters on the server. Providing static IP addresses is a good practice on
host servers because they manage so many virtual machines. Determine whether you
want to use only IPv4 or whether you also want to use IPv6.
n
Provide a computer name and join a domain. Once again, use the provided link. It is
good practice to join host servers to a domain because domains support central
security management for all servers. This facilitates host server access and simplifies
role-based administration of the host systems. A reboot is required to complete
this change.
note RESOURCE POOL FORESTS
In medium to large organizations, you might consider using a utility forest for the host
servers in the resource pool. Using a separate Active Directory Domain Services (AD DS)
forest isolates the host servers from the production systems that are running in virtual
machines. This limits host server access to resource pool administrators. End users do
not need to interact with host servers in any way.
n
Configure automatic updates and update the server. Once again, use the link provided
in the ICT to perform these tasks. Make sure you enable additional updates and install
all required updates.
n
Enable the Remote Desktop. Remote Desktop is one of the best administration tools
in Windows Server 2008. Enabling it facilitates server administration from any location
in your network. Make sure you use the most secure settings for your Remote Desktop
connections.
n
Configure the firewall and enable remote administration. The Windows Firewall is an
important part of the security settings of a host server. It must be enabled and you
must make sure that remote server administration is allowed to pass through the
firewall; otherwise you will not be able to use remote administration tools such as
System Center Virtual Machine Manager 2008 with this host server. Once again, use
the link in ICT to make this change.
n
Add additional features if required. Keep the additional features on host servers to a
minimum. For example, you will need to install and enable Windows Server Backup
unless you plan to use a different backup tool. Use the links on the ICT to perform
this task.
As soon as all of the tasks that are accessible through the ICT are complete, select the Do
Not Show This Window At Logon check box and close the ICT. Proceed to the completion of
the tasks that are not available in the ICT interface. As soon as you close the ICT, the Server
Manager interface will be launched (see Figure 2-3).
Lesson 1: Installing the Hyper-V Role CHAPTER 2 65
FIGURE 2-3 Using the Server Manager console
You can perform additional activities from this console:
n
Server activation is one of the only activities that is not performed through Server
Manager. Instead, it is performed in Control Panel by clicking System And Maintenance
and then clicking System. This interface lets you both activate your server and change
the product key.
Most other activities are performed through the Server Manager console:
n
Renaming the default Administrator account is performed under the Configuration
| Local Users and Groups | Users node of the Server Manager Tree pane. Use the
shortcut menu on the Administrator account object to rename the account. Rename
the account according to your organization’s requirements.
n
While you’re in this section of Server Manager, you can create a backup administrator
account if your internal policies allow it. The backup account is useful for updating
the default user profile but it can also be used if for some reason the system
administrator account is locked out. Make sure you make this account part of the local
administrators’ group.
n
Set the operating system display time to accelerate the reboot process as well as the default
recovery options for the parent partition. Both settings are found under the Change System
Properties link in the Details pane of the home page of Server Manager. Once the System
Properties page is open, click the Settings button under the Startup And Recovery section
of the Advanced tab. Set the System Failure settings to your organizational standards.
66 CHAPTER 2 Configuring Hyper-V Hosts
n
Use the same tab in System Properties to configure the page file. Click Settings under
the Performance section. Click the Advanced tab and select Change. A good practice is
to set the page file to an initial size of twice the amount of RAM on the system and set
the maximum size to four times the RAM. In host servers that have a very large amount
of memory, it is good practice to store page files on separate disk spindles to improve
performance. Note that a minimal page file must be located on the system disk.
n
Perform other required host server configurations. For example, you might need to
install the WinRE on the system to simplify server recovery. This depends on your
internal policy for server recovery. In many cases, organizations simply reinstall servers
when they use an automated server deployment strategy, and in this case WinRE is not
required. However, if you run virtual machines on direct attached storage on the server
and you do not have backups or replicated copies of the VMs, a server repair will be
essential. This is one more reason why VM placement on remote storage is a good
practice. Note that to install WinRE on a host server you need two different partitions
on the system drive.
n
You may also want to add additional administration tools on the server. These tools are
part of the Windows Server 2008 features. Add each feature as required.
note RSAT FOR WINDOWS VISTA SERVICE PACK 1
To run the Remote Server Administration Tools on Windows Vista, you need the RSAT
download, which was updated when Hyper-V was released to RTM. The RSAT download
is available as part of article number 941314 from the Microsoft Knowledge Base.
Download the RSAT update from
apply it to your system, and then add the feature.
n
The last step in the configuration is to customize the user interface and update
the default user profile. This activity can only be performed on the full installation.
Make sure your server interface is updated as you need it, log off of the Administrator
profile, and log on to the backup user account you created. Using the Change System
Properties link on the Server Manager home page, click the Advanced tab and then click
Settings under User Profiles. Copy the Administrator profile to the Default User profile.
Accept the change. You can test the change by logging off of the backup administrator
account, logging on to Administrator, using the same dialog box to delete the old
backup administrator profile, and logging on to the backup administrator account
again. It should be using the new profile. This last logon can be performed through the
Switch User option instead of logging off of your administrator profile.
The server configuration is now complete. If you created this server as a reference
server and intend to use it as a source for disk imaging and further server operating system
distributions, it is ready for the system preparation command. Back up the server and keep
the image in a safe place.
Lesson 1: Installing the Hyper-V Role CHAPTER 2 67
If this server is intended for production, you are ready to move on to the Hyper-V role
installation.
Configuring the Server Core Installation for Hyper-V
The same configuration steps are required for Server Core installations, but because of
the very nature of this installation version, the entire process for configuring the server
is completely different. Everything is performed through the command line. Although
you cannot configure Server Core with the same commands as the full installation,
you can configure the full installation with the same commands as you would with
Server Core.
More Info SCREENCAST ON HYPER-V CONFIGURATION ON SERVER CORE
To view a screencast on how to configure Hyper-V on a Server Core installation, go to
/>You should primarily use Server Core installations for Hyper-V as they guarantee better
performance than the full installation. Remember that each child partition must communicate
through the parent partition for any response from hardware devices through the VMBus.
If the root partition is running the full installation, responses may be delayed. Because Server
Core provides a reduced footprint and a minimal set of services as compared to the full
installation, its operation is optimized. In addition, because it includes fewer components,
there are fewer components to update, providing a simpler and more stable platform for the
root partition.
However, because Server Core configuration is performed solely through the command
line, it is essential to enable remote administration of the server. This simplifies system
administration and lets you control Hyper-V operations through the graphical Hyper-V
administration tool.
Although the installation of Server Core is almost identical to that of a full installation, the
post-installation configuration differs significantly. After the final reboot during setup, Server
Core will ask you to log on and await input. Click Other User, type in Administrator as the
user name, and use a blank password. The system will now ask you to change the password
(see Figure 2-4). In this case, you must provide the old password, which is blank. As always,
use a strong password. Once you are logged on, you are ready to proceed to the server
configuration.
Each configuration operation requires the use of a different command-line script.
Remember that Windows PowerShell does not work in Server Core because it relies on the
Microsoft .NET Framework, which cannot be installed on Server Core because it has GUI
dependencies. Note that Microsoft is changing this for Windows Server 2008 R2, but for
now, Windows PowerShell can only perform remote operations on Server Core.