mcts training kit 70 - 652 server virtualization phần 5 pot
Bạn đang xem bản rút gọn của tài liệu. Xem và tải ngay bản đầy đủ của tài liệu tại đây (1.47 MB, 65 trang )
238 CHAPTER 4 Creating Virtual Machines
DISK TYPE DESCRIPTION
Differencing disks are used in a wide number of situations. For example,
Microsoft Learning uses the differencing disk concept to create all
of the training machines used in the courses they deliver. In the case
of a course requiring several machines working together, such as a
Microsoft Windows SharePoint course, one parent disk is created with
a core installation of Windows Server 2008 and multiple child disks are
created with the required server roles such as one for Active Directory
Domain Services, one for Exchange Server, one for SQL Server, one for
SharePoint Server, and so on. When the entire environment runs, each
server role boots from the core parent disk and then the child disks run
to create the required environment.
Because differencing disks are based on a single parent, performance
can be very poor unless you run differencing disks on the fastest
spindles you have access to. However, because of the parent-child
relationship, differencing disks can save significant amounts of
actual disk space because the parent disk is the disk that requires
the largest amount of space and the child disks only store actual
differences or changes made beyond the base parent disk. In the case
of the MS Learning disk example, you can often create very complex
environments with only a few gigabytes of used space.
A parent can have multiple different and unrelated child disks such
as in the case of installing different products on different child disks
or it can have a hierarchical relationship to child disks, with each
child becoming the parent of the next child disk as new child disks
are created. The latter is what happens when you use the Hyper-V
Snapshot feature because you automatically turn the existing VHD into
a set of differencing disks. Each time you create a snapshot, you create
a new parent-child relationship between the VHDs.
Differencing disks are often best used in training, testing, or
development environments because they always allow you to go back
in time by breaking the parent-child relationship and return to a given
state of the VM.
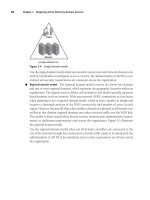
The three disk types listed in Table 4-3 make up the different types of disks you will
normally work with in Hyper-V (see Figure 4-10).
More Info VIRTUAL HARD DISKS
For more information on working with virtual hard disks, look up the screen cast Working
with VHDs at
Lesson 2: Working Virtual Hard Drives CHAPTER 4 239
Dynamically
Expanding Fixed Size Differencing
Legend
Parent Disk
Child Disk
Allocated Disk Size
Used Disk Space
FIGURE 4-10 Hyper-V VHD types
Update alert HOT ADD VHDS
VHDs are now a standard part of Windows Server 2008 R2 and Windows 7. For example,
when you add a new disk in Disk Manager, you can create, format and consume VHDs
directly from the interface. Because of this, you can now dynamically add or remove VHDs
to running VMs. Note however that VHDs must be tied to SCSI controllers to use this
feature. You can also add or remove pass-through disks to running VMs so long as the
disks are tied to SCSI controllers. Windows Server 2008 R2 and Windows 7 can also boot
from VHDs making it easier to consume this powerful disk format directly from the OS.
You can store any of the three VHD types on physical hard disk volumes that can be in
either direct-attached storage (DAS), network-attached storage (NAS), or storage area network
(SAN) in nature. However, you must store them on partitions that are formatted with NTFS. You
cannot store Hyper-V VHDs in folders that use the Encrypting File System (EFS) because EFS is
an encrypting system that is usually tied to particular users, and storing VHDs in user profiles
does not make them highly available because they must run in a single user’s context.
If security is an issue, you can store VHDs on partitions that use the BitLocker full drive
encryption system. However, note that BitLocker adds some overhead to disk operations, which
may impact VHD I/O operations and therefore virtual machine performance. Use BitLocker
encryption only in highly secure environments or in environments where the possibility of theft
240 CHAPTER 4 Creating Virtual Machines
is present. The latter could occur in remote sites or in branch office locations where access to
host servers cannot be secured because of the lack of a lockable storage room for servers.
Ideally, your VHDs will be stored on a high-speed shared storage container that is accessible
by multiple Hyper-V hosts. Using this strategy ensures virtual machine fault tolerance because
the VM can run on any of the hosts that have access to the shared storage LUN without having
to actually duplicate or replicate the VHDs from one location to another. VHD replication can
take considerable time because they can range in size from 40 to many hundreds of gigabytes.
Note that the maximum size of a VHD in Hyper-V is almost 2 terabytes and is set at 2,040 GB.
exaM tIp MAXIMUM VHD SIZE
Remember that the maximum VHD size in Hyper-V is actually 8 GB short of 2 terabytes and
is set to 2,040 GB instead of 2,048 GB. This item will definitely be in the questions you’ll
find on the exam.
Avoid running VHDs on system disks that are used to run the parent partition.
Working with Pass-through Disks
A fourth type of disk you can use in support of virtual machines in Hyper-V is the
pass-through disk. Pass-through disks are physical disk partitions that are assigned to a
virtual machine. Instead of using a virtual hard disk, you assign an actual physical partition
to the VHD. Pass-through disks have the following features:
n
Performance Pass-through disks will give your VMs the utmost performance because
Hyper-V does not need to manage the virtual disk during the operation of the virtual
machine. When a VM runs, Hyper-V is only responsible for the actual operation of the
VM and only needs to assign processor, memory, and networking resources to the VM.
n
Hybrid VMs When you use pass-through disks, you can create a hybrid VM using a
VHD as the system disk and using pass-through disks for the data disks. For example,
if you created a VM to host Exchange Mailbox Server, you might store the operating
system on a small VHD tied to the IDE controller, then install all Exchange services
on a second drive that is a pass-through disk. You could then assign additional
pass-through disks for the messaging database and the transaction logs, ensuring the
best performance for the Exchange Mailbox Service.
n
Pass-through Disk Connections Hyper-V VMs must boot from an IDE drive.
Fortunately, you can assign a pass-through disk to a VM’s IDE controller. You can also
assign pass-through disks to both SCSI and iSCSI controllers, but they must be for disks
other than the boot or system disk.
n
Locked-in VMs Using pass-through disks locks the VM into the physical configuration
you use to create it. The whole point of a virtual machine is that it is nothing but a set of
files in a folder. When this is the case, you can create a VM in London, copy its files to New
York, and then run the VM in New York. But when you use pass-through disks, you limit
Lesson 2: Working Virtual Hard Drives CHAPTER 4 241
the VM’s mobility in much the same way you limit the mobility of a physical machine when
you install an operating system physically. You must then find a way to move the contents
of the physical disks the VM is composed of to another location to move the VM. To do
this, you will often have to re-create the VM in its destination location or at the very least
change its disk connections in the VM settings because they will no longer be the same.
n
Hybrid Pass-through Disks You can also create hybrid pass-through disks. For
example, you cannot boot a VM from an iSCSI controller, but you can boot a VM from
an IDE controller that is tied to an iSCSI pass-through disk. Here’s how:
1. Create a LUN in your shared storage container to host the boot and system
partitions for the VM.
2. Use iSCSI to attach the LUN to the parent partition of a Hyper-V host. To avoid
contention for the disk between the host and the VM, make sure the new LUN is
offline on the host server.
3. Create your new VM and choose to create the disk drives that will run it after the
VM is created.
4. Move to the VM’s settings and select IDE Controller 0 and Location 0 (In Use) and
assign it to a Physical Hard Disk. Select the disk you attached through the iSCSI LUN.
5. Save your changes and boot the VM. The VM will boot from the iSCSI LUN. You
can then install an operating system and run it from the iSCSI LUN.
n
Enlightened or Legacy Guests Both enlightened and legacy guest operating systems
can use pass-through disks; however, legacy guests are limited to IDE functionality and
cannot use SCSI pass-through disks.
As you can see, pass-through disks can provide a viable option for several system
configurations, but they limit VM functionality and do not give you access to any of the VHD
capabilities that make VMs so much more exciting than physical machines.
exaM tIp MAXIMUM PASS-THROUGH DISK SIZE
Remember that the maximum pass-through disk size in a VM is limited only by the
limitations of the operating system running in the VM, not by Hyper-V’s limitations.
Using IDE or SCSI Disks
When you attached disks to VMs, you must select how to attach the disk to the VM. Three
possibilities exist:
n
Integrated Drive Electronics (IDE) When you attach a disk—either VHD or
pass-through—to a VM through an IDE controller, you attach a virtual Advanced
Technology Attachment (ATA) disk to the VM. You can attach up to four virtual IDE
disks to a VM. Note that IDE controllers are created automatically when you create a
VM. Both enlightened and legacy guest operating systems can use IDE controllers in
Hyper-V. Also note that Hyper-V VMs must boot from a virtual IDE disk.
242 CHAPTER 4 Creating Virtual Machines
n
Small Computing System Interface (SCSI) When you attach a disk to a VM through
the SCSI controller, you attach a virtual SCSI disk to the VM. However, because SCSI
controllers are not created automatically during VM creation, you must create them
after the VM has been generated through the New Machine Wizard in Hyper-V. This
is done through the VM’s Settings dialog box under Add Hardware and then SCSI
Controller. You can attach up to four SCSI controllers to a VM. Each SCSI controller can
support 64 disks for a maximum of 256 virtual SCSI disks on a guest operating system.
Note, however, that SCSI controllers are only available to enlightened guest operating
systems that have Integration Services installed.
exaM tIp LINUX INTEGRATION COMPONENTS
Remember that LIC contain support for SCSI controllers just as the Integration Services do
for Hyper-V–aware Windows guest operating systems, but do not include graphics drivers.
n
Internet SCSI (iSCSI) You can also attach disks directly to VMs through iSCSI initiators.
For example, Windows Server 2008 includes the iSCSI initiator directly within the operating
system. You can use this initiator to bypass the host operating system completely and
expose a disk only to the VM it runs. You do this by loading the iSCSI initiator directly
within the guest operating system and correctly configuring the target disk.
The disk controller used in VMs does not have to correspond to the disk controller used in
the host computer. For example, you can use Serial-Attached SCSI (SAS) devices on the host
server and expose them as virtual IDE devices to VMs. You can also use both virtual IDE and
virtual SCSI devices in a VM at the same time. However, because both devices are virtual and
use the same optimizations in Hyper-V, their performance is similar even though IDE and SCSI
performance in the physical realm is considerably different.
Keep the following rules in mind when you work with disk controllers in Hyper-V VMs:
n
Use IDE only if you need four or fewer drives in the VM.
n
Use IDE to boot legacy VMs from VHDs or VMs that do not include Integration
Services yet.
n
Use IDE and SCSI if your VM boots from a VHD, but you need more than four virtual
drives in your VM.
n
Use pass-through disks to boot from iSCSI within the guest operating system. Make
sure the disk is set to offline on the host’s parent partition.
These guidelines will help you determine which method to use to connect a VM based on
the requirements of that VM.
More Info DISK CONNECTIONS IN VMs
For more information on disk connections within VMs, look up Windows Server Hyper-V
Storage at />2008-hyper-v-storage.aspx.
Lesson 2: Working Virtual Hard Drives CHAPTER 4 243
More Info
iSCSI INITIATOR CONFIGURATION
For instructions on how to perform iSCSI connections in Hyper-V, go to
/>iscsi-software-target-with-hyper-v-standalone-full-vhd.aspx. For more information on iSCSI
and Windows Server 2008, go to
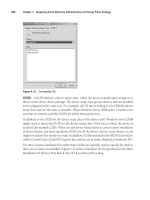
Working with the Virtual Hard Disk Wizard
Disk operations are performed through several different Hyper-V Manager interfaces.
The first interface that gives you access to disk creation is the New Virtual Machine Wizard.
Disk creation comes on the fifth page of this wizard, the Connect Virtual Hard Disk page
(see Figure 4-11). The available options are:
n
Create A Virtual Hard Disk This lets you generate a new VHD. The VHD will be a
dynamically expanding VHD by default.
n
Use An Existing Virtual Hard Disk This lets you connect to a previously created VHD.
This VHD can be any of the three VHD types.
n
Attach A Virtual Hard Disk Later This lets you create the VM without a hard disk and
attach it later by editing the VM’s settings. For example, you use this option when you
want to connect the VM to a pass-through disk.
FIGURE 4-11 Creating a VHD during VM creation
VHD creation is performed through the New Hard Disk Wizard. This wizard gives you
several options and lets you create disks in a wide variety of styles, choosing any one of the
three VHD types (see Figure 4-12). The wizard can be accessed either through the Actions pane
in Hyper-V Manager or through the VM Settings dialog box under the controller sections.
244 CHAPTER 4 Creating Virtual Machines
FIGURE 4-12 Creating a new VHD
If you choose a dynamically expanding or a fixed size disk, the wizard prompts you to name
the disk, choose a location for it, and then identify the size of the disk to create. It also gives
you the option to copy the contents of a physical hard drive into the newly created VHD (see
Figure 4-13). In this case, the size of the disk will be the same size as the disk you are copying.
FIGURE 4-13 Copying a physical disk into a new VHD
Lesson 2: Working Virtual Hard Drives CHAPTER 4 245
If you choose to create a differencing disk in the New Virtual Disk Wizard, you will have to
specify the location of the parent disk you want to use (see Figure 4-14). Remember that as
soon as you identify a disk as a parent disk, it should be locked and used as read-only from
that point on because if the parent disk changes, the parent-child relationship will be broken.
FIGURE 4-14 Specifying the location of a parent disk for a new differencing VHD
Another interface you can use to work with VHDs and pass-through disks is the Virtual
Machine Settings dialog box (see Figure 4-15). In this case, you must begin by adding a
new hard disk. You do this by selecting the controller you want to connect the disk to,
choosing Hard Drive, and then choosing Add. After the hard drive has been connected to the
controller—which can be either IDE or SCSI—you can configure the type of hard drive you
want to connect. In this case you are given several choices:
n
You can control both the controller and the location the virtual hard disk will be
connected to.
n
You can select the media type:
•
When you select Virtual hard disk (.vhd) file, you can either create the disk by
clicking New or connect to an existing disk by either typing the path to the VHD file
or clicking Browse to locate the existing VHD file. Clicking New launches the New
Virtual Hard Disk Wizard.
•
When you select Physical hard disk, you must select the disk from a list of available
partitions. Disks are listed as Disk 2, Disk 3, and so on. Disk 1 is usually assigned to the
parent partition. Remember that the disk should be offline in the parent partition to
avoid contention for disk reads and writes between the parent and the child partitions.
246 CHAPTER 4 Creating Virtual Machines
n
You can also use this interface to remove a disk from a VM’s configuration. Note that
this does not delete the VHD from the host’s hard drives; it only removes the VHD
from the VM’s configuration.
FIGURE 4-15 Attaching disks to a VM
You use the same interface to attach and create DVD drives to VMs (see Figure 4-16).
This interface also gives you several options:
n
You can control both the controller and the location the DVD will be connected to.
n
You can select the media type:
•
New DVDs are connected to None by default.
•
You can also connect the media to an ISO image file. ISO is a special, non- proprietary
archive format used to represent the integral contents of a hard drive, CD, or DVD.
For example, many software vendors deliver their software products in ISO format.
You can use a DVD creation tool or a tool such as WinImage to convert the ISO image
into another medium such as a DVD, but vendors are relying on the ISO more and
more because it is one of the best mediums for populating virtual machines.
Lesson 2: Working Virtual Hard Drives CHAPTER 4 247
•
You can connect the virtual DVD to the Physical CD/DVD drive.
n
You can also use this interface to remove a DVD from a VM’s configuration.
FIGURE 4-16 Attaching a DVD to a VM
More Info WINIMAGE
Obtain WinImage from Gilles Volant Software at .
The VM Settings dialog box is also used to add or remove SCSI connectors to the VM’s
configuration. In this case, you move to the Add Hardware option at the top of the left pane
in the dialog box, select SCSI Controller, and click Add. As soon as you add the SCSI controller,
the new SCSI controller is highlighted and you are given the option to add a hard drive to the
VM’s configuration (see Figure 4-17).
248 CHAPTER 4 Creating Virtual Machines
FIGURE 4-17 Adding a SCSI Controller to a VM
IMportant NETWORK ADAPTERS AND VIRTUAL NETWORK ADAPTERS
Note that you also use the Add Hardware option in the VM Settings dialog box to
add either network adapters or legacy network adapters. Remember that you can
add up to 8 network adapters and 4 legacy network adapters for a total of
12 adapters per VM.
After the hard drive is added, you are given the same choices as when you add a hard
drive to a virtual IDE controller. The only difference is the amount of possible locations for
the drive because Hyper-V’s virtual SCSI controllers support up to 64 locations each
(see Figure 4-18).
Lesson 2: Working Virtual Hard Drives CHAPTER 4 249
FIGURE 4-18 Choosing the location for a hard drive on a SCSI Controller
Editing a Virtual Hard Disk
Virtual hard disks are much more malleable than physical hard disks or even pass-through
disks because they are captured and stored within the VHD file format. The best way to find
this out is to use the Edit Disk command in the Actions pane of Hyper-V Manager. Edit Disk is
once again a wizard that gives you complete control over a VHD. The wizard’s operation will
differ based on the type of VHD you are working with. Its operation is simple:
1. Click Edit Disk in the Action pane.
2. Click Next after reading the information on the Before You Begin page.
3. In the Locate Virtual Hard Disk page, type the path to the disk you want to edit or
click Browse to select it. Note the warning on this page concerning parent hard disks
(see Figure 4-19). As you know, parent hard disks should never be modified or the
parent-child relationship will be broken.
250 CHAPTER 4 Creating Virtual Machines
FIGURE 4-19 Parent hard disk modification warning
When you select the type of disk you want to modify, the wizard inspects the selected disk
and provides various options based on the results of this inspection. The available options
(see Figures 4-20 through 4-24, see pages 252-254) are outlined in Table 4-4.
TABLE 4-4 Edit VHD Options
VHD TYPE OPTION DESCRIPTION
Dynamically
Expanding
Disk
Compact Shrinks a VHD file by removing blank space that is not
removed when you delete content within the disk file.
VHDs are much like database files and do not remove
space used by deleted data when the data is removed;
therefore, you must compact the disk to recover empty
space within the VHD file.
Convert This converts the VHD file from dynamically expanding
to fixed disk size. You must specify the location of the
new fixed disk, then Hyper-V copies the contents of the
dynamically expanding disk to the new fixed size disk.
Note that you must have enough space to store both
disks during the conversion.
Expand Increases the size of the VHD by a given amount. You
must specify the new disk size. By default, Hyper-V sets
the new size at 1 GB greater than the current disk size.
Lesson 2: Working Virtual Hard Drives CHAPTER 4 251
VHD TYPE OPTION DESCRIPTION
Fixed Size Convert This converts the VHD file from fixed size to a
dynamically expanding disk. You must specify the
location of the new dynamically expanding disk.
Hyper-V then copies the contents of the fixed size disk
to the new dynamically expanding disk. Note that you
must have enough space to store both disks during the
conversion.
Expand Increases the size of the VHD by a given amount. You
must specify the new disk size. By default, Hyper-V sets
the new size at 1 GB greater than the current disk size.
Differencing Compact Shrinks a VHD file by removing blank space that is not
removed when you delete content within the disk file.
By default, all child disks are dynamically expanding
disks and therefore support the compacting action.
Merge Captures the changes from the child disk and merges
them into the parent disk or another disk.
Changes can be merged to the parent disk, expanding
the size of the parent disk.
Changes can also be merged to a new, third disk. In
this case, you must specify the name and the location
of the new disk as well as the type of disk: dynamically
expanding or fixed size. Note that you must have
enough space to store all three disks during the merge
operation.
Reconnect
(see Figure 4-24)
Appears only when a parent-child relationship is
broken and lets you reconnect the child with the
parent. You must specify the location of the parent
VHD during the reconnection.
IMportant COMPACTING NON-NTFS DISKS
When you compact a disk that is in NTFS format, compacting is performed without
advanced preparation. But when you compact a disk that uses a format other than NTFS,
such as FAT or FAT32, you must use a non-Microsoft disk utility to replace the blank space
in the VHD with zeros. The zeros are then removed during compaction. Virtual Server 2005
R2 SP1 includes such a utility even though Hyper-V does not. You can download Virtual
Server, uncompress the Virtual Server files, and extract the PreCompact.ISO file from the
Virtual Server installation files. Then attach this file to your non-NTFS VHD and run the
pre-compaction tool on your hard drive before compacting it. Obtain Virtual Server from
Microsoft at
252 CHAPTER 4 Creating Virtual Machines
FIGURE 4-20 Available actions for dynamically expanding VHDs
FIGURE 4-21 Available actions for fixed size VHDs
Lesson 2: Working Virtual Hard Drives CHAPTER 4 253
FIGURE 4-22 Available actions for differencing VHDs
FIGURE 4-23 Choosing merge options
254 CHAPTER 4 Creating Virtual Machines
FIGURE 4-24 Reconnecting an orphan child disk
Inspecting a Virtual Hard Disk
In addition to editing VHDs, you have access to a VHD inspection tool. Inspecting VHDs is
relatively simple. Note that inspecting can only be used to identify the status of a disk, not
to determine whether the disk is working correctly or whether it is possible to repair damage
on the disk. To repair a disk, you must use the operating system’s own repair tools within the
guest operating system in the VM.
Inspection can be performed through the Actions pane in Hyper-V Manager or through
the VM Settings dialog box when the VHD is highlighted. The results of the inspection tell you
what kind of disk it is and where it is located (see Figure 4-25).
FIGURE 4-25 Inspecting a VHD
Lesson 2: Working Virtual Hard Drives CHAPTER 4 255
Despite the fact that inspection only gives you information about a disk, it is still quite a
useful tool because it allows you locate virtual hard disks and identify their status. In resource
pools of all sizes, you will find that this tool is very useful when:
n
You forget what the original size was of a dynamically expanding VHD file.
n
You forget where a VHD is located, especially if it wasn’t stored with the VM
configuration file.
n
You want to know how much space has been used in a dynamically expanding VHD file.
n
You want to know to which parent disk a child disk is tied.
In all of these cases, Inspect Disk is often the only answer to your questions.
Working with Hyper-V Snapshots
Virtual machine snapshots are a new feature of Window Server 2008 Hyper-V, as you saw
in Chapter 1. As you know, a snapshot is a point-in-time version of a VM. You can take VM
snapshots when a VM is running, when it is saved, or when it is stopped. Note that you
cannot generate a Hyper-V snapshot of a VM when it is in a paused state.
exaM tIp CREATING SNAPSHOTS
Remember that you cannot capture a snapshot when a VM is in a paused state.
Each time you take a snapshot, you capture a specific point in time for a VM. For example,
when a developer is working with new code and testing the operation of the code, he or she
can take snapshots of the VMs running the new application whenever a result is positive. This
way, the developer can return to a stable machine state in the event that a test does not work.
Another excellent example of a snapshot process is when an IT professional is performing
a complex configuration in a VM. For example, when you install Windows Server 2008, Active
Directory Domain Services, Exchange Server, SQL Server, and SharePoint Server in the same
VM, you can take snapshots of the VM each time you finish installing and configuring a given
component. This way, you can always go back to a given state if configuration errors occur
during the process. And then, when the configuration is complete, you can merge all of the
changes into a single VHD to have an operating VHD including all of the installed components.
When you revert back to a given snapshot, you revert to an exact point in time for the VM.
This means that memory contents, virtual hardware, processes, machine state, and so forth
are exactly the same as when you took the snapshot. When a snapshot is generated, it creates
a specific set of files, including:
n
A copy of the virtual machine configuration .xml file.
n
Any save state files (.vsv and .bin).
n
A differencing disk—a file with an .avhd extension—which becomes a child to the
original VHD for the VM, which in turn becomes the parent for the child disk. The new
AVHD file becomes the working disk for all future writes to the VM.
256 CHAPTER 4 Creating Virtual Machines
When you create snapshots one after the other without ever applying them, you create a
snapshot hierarchy, which is a snapshot tree with a single branch. When you apply a snapshot
within this hierarchy to revert to a given state in the VM and then generate new snapshots
once again, you generate a new branch to the snapshot tree (see Figure 4-26).
FIGURE 4-26 Working with a complex snapshot hierarchy
Snapshots are stored within the Snapshots folder that is created when you generate a new
VM in a specific folder. Each snapshot is stored within a folder named after the GUID assigned
to the snapshot (see Figure 4-27). Remember that the original XML configuration file for
the VM is stored within the Virtual Machines folder that is also created when you generate
a VM. Once again, the configuration file is named with a unique GUID and saved state files
are stored within a subfolder of the Virtual Machines folder that uses the same GUID as the
original VM configuration filename.
FIGURE 4-27 Examining snapshot file locations
Lesson 2: Working Virtual Hard Drives CHAPTER 4 257
Creating VM Snapshots
You can create a snapshot in two ways: when the virtual machine is running and when the
virtual machine is turned off or in a saved state.
When you create a new VM, two subfolders are created in the VM’s folder. For example, if
you created a VM called VMOne on the D: drive and stored it in a folder named D:\VMOne,
the process will create two subfolders to D:\VMOne—D:\VMOne\Snapshots and D:\VMOne\
Virtual Machines. D:\VMOne\Snapshots is an empty folder, but D:\VMOne\Virtual Machines
contains the original XML configuration file saved with a GUID name and a directory using
the same GUID name that will contain potential save state files (.vsv and .bin), which are
in-memory files.
Now if you create a snapshot when VMOne is turned off, the following process occurs:
1. Two folders are created in the D:\VMOne\Snapshots folder:
n
VM GUID: a folder that will store all the .avhd files for all the snapshots. Note that
this folder creation only occurs for the first snapshot because all future AVHD
files will be stored here. These .avhd files are named with the machine name, plus
another GUID in the format of MachineName_OtherGUID.avhd.
n
New GUID: a folder that will store the memory save state for this snapshot. In this
case, the New GUID folder will be empty since the VM is powered off and there is
no memory state.
2. A copy of the VM’s .xml configuration file is saved with the New GUID name.
3. An .avhd file is created and is stored in the D:\VMOne\Snapshots\VM GUID folder.
This becomes the working .avhd file. This file is named with the machine name, plus
another GUID in the format of MachineName_OtherGUID.avhd.
4. A pointer is added to the VM’s original .xml configuration file to indentify the other
GUID .avhd file as the current VHD for the VM.
When you create a snapshot with the VM powered on or if the machine is in a saved
state, the exact same process occurs, except that the VM’s in-memory state is captured
to .vsv and .bin files. These two files are stored within the folder named after the
snapshot’s GUID.
If you take another snapshot of the VM, the same process occurs except that a new AVHD
file is created and this new AVHD file becomes the child to the latest running AVHD and the
latest running AVHD becomes its parent. This process is repeated each time a new snapshot is
created (see Figure 4-28).
When you choose to apply a snapshot to a VM, the VM reverts to the state captured
within the snapshot and a new AVHD file is created. This new AVHD file becomes the child of
the .AVHD file you applied and future changes are stored within this AVHD file.
258 CHAPTER 4 Creating Virtual Machines
2
3
4
1
In Hyper-V Manager
In Windows Explorer
In Hyper-V Manager
In Hyper-V Manager
In Hyper-V Manager
In Windows Explorer
In Windows Explorer
In Windows Explorer
Create a new virtual machine and choose Store in a different location.
Start VM and Save the state.
D:\VMOne\VMOne.VHD
D:\VMOne\VMOne.VHD
D:\VMOne\VMOne.VHD
D:\VMOne\VMOne.VHD
\Snapshots\GUID\VMOne_GUIDE02.AVHD
\Snapshots\GUID\VMOne_GUIDE02.AVHD
\GUID03\GUID03.BIN
\GUID03\GUID03.BIN
\GUID05\GUID05.BIN
\GUID03.VSV
\GUID03.VSV
\GUID05.VSV
\GUID05.XML
\VMOne_GUID04.AVHD
\GUID03.XML
\GUID03.XML
\Virtual Machines\GUID.XML
\Virtual Machines\GUID.XML
\GUID\GUID.BIN
\GUID.VSV
Child VHD
Parent VHD
Child VHD
\GUID\GUID.BIN
\GUID.VSV
Create a first snapshot while the machine is in a saved state.
Create a second snapshot while the machine is in a saved state.
\Virtual Machines\GUID.XML
\Virtual Machines\GUID.XML
\GUID
\GUID\GUID.BIN
\GUID.VSV
Parent VHD
Legend
Item in Bold/Italic are newly created or updated during the operation.
FIGURE 4-28 The snapshot process in Hyper-V
When you revert to the original VM state through the Revert command, the current
AVHD file is deleted and a new one is created to capture all changes moving forward. If the
snapshot was captured when the machine was running, the saved state files are applied to the
VM and the VM is restarted using these files. If the VM was stopped when the snapshot was
captured, the VM would remain in a turned off state.
Lesson 2: Working Virtual Hard Drives CHAPTER 4 259
More Info HYPER-V SNAPSHOTS
For more information on working with Hyper-V snapshots, look up the screen cast Working
with Snapshots at
IMportant APPLICATIONS AND SNAPSHOTS
Some applications do not support Hyper-V snapshots. In addition, each time you take
a snapshot, your VHD is turned into a differencing disk and you can no longer directly
modify the parent disk.
PRACTICE Working with VM Disks
In this practice you will work with virtual hard disks. This practice consists of three exercises.
In the first, you create a dynamically expanding disk. In the second, you expand the size of
this disk to make it larger. In the third, you attach a physical disk to a VM as a pass-through
disk. All of the exercises are performed on ServerFull01. You log on with domain
administrator credentials to facilitate the exercise even though all you need is Hyper-V
administration rights.
EXERCISE 1 Create a Dynamically Expanding Virtual Disk
In this exercise you will create a dynamically expanding disk. This exercise is performed on
ServerFull01.
1. Begin by logging on to ServerFull01. Move to Server Manager and then to the Hyper-V
Manager node. Select ServerFull01.
2. Move to the Actions pane, select New, and then select Hard Disk. Click Next.
3. Choose Dynamically Expanding and click Next.
4. Name the virtual hard disk Dynamic.vhd and store it in a new folder in the root of
the C: drive called VHDFiles. Use the Browse button to move to the C: drive, click New
Folder, type VHDFiles, and press Enter. Click Select Folder and click Next.
5. Set the VHD size to 10 GB and click Finish.
Your new dynamically expanding VHD has been created. Note how little time it takes
the wizard to close. Open Windows Explorer (click Start and right-click Computer to select
Explore), move to the C:\VHDFiles folder, and examine the size of the new VHD. It should be
approximately 82 KB in size. This disk is very small because all it contains is the placeholder
for the disk and does not yet contain data.
EXERCISE 2 Expand a Hard Disk
In this exercise you will choose the disk you created in Exercise 1 and expand it. Once again,
you perform this exercise on ServerFull01.
260 CHAPTER 4 Creating Virtual Machines
1. Return to Server Manager and then to the Hyper-V Manager node. Select ServerFull01.
2. Move to the Actions pane and select Edit Disk. Click Next.
3. Click the Browse button to select the Dynamic.vhd file in C:\VHDFiles. Click Open and
then click Next. The system inspects the disk to discover its properties.
4. Click Expand and then click Next.
5. Note that the wizard adds 1 GB to the disk size by default. Change the value to 40 GB
and click Finish.
The wizard closes very quickly once again. Open Windows Explorer (click Start and
right-click Computer to select Explore), move to the C:\VHDFiles folder, and examine the size
of the modified VHD. It should be approximately 322 KB in size. More data about the disk was
added to the file, but it still does not contain any actual data, which is why it is so small.
EXERCISE 3 Connect a Pass-through Disk
In this exercise you will connect an external hard drive to ServerFull01 and use it to create
a pass-through disk for one of your VMs. Perform this exercise on ServerFull01. To perform
this exercise, you need the second external USB disk as outlined in the requirements in
the Introduction.
1. Begin by plugging in your USB disk into a USB port on ServerFull01. Cancel the
Autoplay dialog box if it opens.
2. Move to Server Manager and go to the Storage, Disk Management node and click Disk
Management. If a dialog box appears to initialize the new volume, click OK.
3. The new disk should appear as Disk 2 and should be online. Right-click Disk 2, not
on its partition, and choose Offline. The result should be a blank disk that is offline
(see Figure 4-29). The disk is ready to be used in Hyper-V. You set the disk offline to
make sure the parent partition does not try to access it while a VM is using it.
4. Move to the Hyper-V Manager node in Server Manager. Make sure ServerFull01 is selected.
5. Select WS08_Full in the Details pane and make sure it is turned off. If not, click Shut
Down in the VM section of the Actions pane.
6. Make sure WS08_Full is selected and click Settings in the VM section of the Actions
pane. This opens the Settings dialog box.
7. Make sure Add Hardware is selected in the left pane and SCSI Controller is selected in
the right pane and click Add. This adds a virtual SCSI controller and moves you to the
SCSI Controller section.
8. Click Add to add a new hard drive.
9. Make sure SCSI Controller and 0 (In Use) are selected in the Controller and Location
sections of the right pane and click Physical hard disk to select Disk 2 (see Figure 4-30).
Click OK to apply your changes. This adds the physical hard drive to the WS08_Full
virtual machine as a physical disk connected to the virtual SCSI controller.
10. The disk will appear in the VM when you launch the VM. You can then use the VM’s
internal tools to format and partition the disk.
Lesson 2: Working Virtual Hard Drives CHAPTER 4 261
FIGURE 4-29 Setting the disk as offline
FIGURE 4-30 Attaching a physical hard disk
262 CHAPTER 4 Creating Virtual Machines
You have now attached a physical drive to a virtual machine.
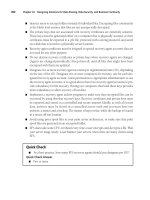
Quick Check
1. Into which hard disk partition formats can you store a virtual hard disk?
a. FAT format.
b. Encrypting File System.
c. NTFS format.
d. The partition does not need to be formatted.
2. Is it possible to store VHDs in folders that use the Encrypting File System? If not,
why?
3. What are the possibilities that you can select to attach disks to VMs?
4. What are the options available when you edit a dynamically expanding virtual
hard disk?
5. Which VM state does not allow you to take a snapshot of a virtual machine?
Quick Check Answers
1. The correct answer is C. The partition that stores a virtual hard disk should be
formatted with NTFS.
2. You cannot store VHDs in folders that use EFS because EFS is tied to particular
users and does not provide high availability because VMS stored within user
profiles must run in a single user’s context.
3. Three possibilities exist when you want to attach disks to VMs: Integrated Drive
Electronics (IDE), Small Computing System Interface (SCSI), and Internet SCSI
(iSCSI).
4. When you edit a dynamically expanding virtual hard disk, you have three
options: compact, convert, and expand.
5. You cannot take a snapshot when the virtual machine is in a paused state.