Creative Suite 5 Motion Graphics with Adobe phần 3 ppt
Bạn đang xem bản rút gọn của tài liệu. Xem và tải ngay bản đầy đủ của tài liệu tại đây (18.28 MB, 46 trang )
ptg
76
Chapter 3 Typography for the Screen
of the circle. Once the type is at the bottom of the circle,
choose Type > Type on a Path to open the options and
change the Align to Path setting to Ascender (Figure 3.33).
Now the ascenders of the type will align to the path instead
of the bottom of the letters as usual.
Creating Custom Type with Illustrator
Having the ability to create custom type is the number
one reason a motion graphics designer would create title
designs in Illustrator. It’s easy to create a customized title
starting with a basic typeface. You can then modify individ-
ual letters by manipulating the paths. This technique lets
you create a totally unique type treatment, moving the title
design from stock to custom (Figure 3.34).
Figure 3.34 Convert type to outlines to change it into a fully editable vector shape.
You‘ll first need to convert type to outlines. It’s impor-
tant to note that the type will no longer be editable after
converting it to outlines, so save the file under a different
Figure 3.33 Type on a Path Options.
Download from WoweBook.com
ptg
77
II: Design Essentials
filename or make an extra copy before converting the
type. Convert the type layer into outlines by selecting the
type and then choosing Type > Create Outlines or pressing
Command+Shift+O (Ctrl+Shift+O).
When the type is converted, it is made up of paths just like
any other shapes in Illustrator. Now you’re free to use the full
set of tools in Illustrator to push, pull, brush, effect—well, you
get the idea. Mix it up and see what you can come up with.
This is one area where experimentation is worth pursuing.
Setting Type in Photoshop
Setting type in Photoshop is efficient for motion designers
because you can always convert type originally created in
Photoshop into type that is native in After Effects. Layer
styles also make animation easier because After Effects
supports their import as editable (and in turn animation
ready) effects. Type with Repoussé has taken Photoshop to
new heights with 3D type and shiny new materials.
Paragraph and Area Type
When setting paragraph type in Photoshop, you can set
type in a rectangular shape by selecting the Type tool and
dragging to draw out the bounding box. This is a great way
to keep text inside the title safe and action safe zones. Just
drag your box inside the guides.
But what if you want to set type within a specific shape, just
like Illustrator? Easy; in Photoshop, you don’t even have to
switch tools. With the Type tool selected, move your cursor
directly over any vector shape in the project and wait for
the two dotted brackets to appear around the text cursor
(Figure 3.35). Once those brackets appear, click in the
shape and type away.
To sav e t ime s wit chi ng be twe en
tools in the Tools panel, use the
Command (Ctrl) key to switch
between tools on the fly.
Select the Convert Point tool
from the Tools panel, and use it
to change the Bézier handles and
change the overall shape of the
paths. When you just need to move
anchor points, press Command
(Ctrl) to switch to the Direct Selec-
tion tool. Use the Direct Selection
tool to click and drag directly on
anchor points to reposition them;
use the Convert Point tool to adjust
the vector tangent handles.
Type Conversion in Photoshop
In Photoshop, you can switch your type between
point text and area text or even change the orien-
tation between horizontal and vertical at any time.
To co nv er t ty pe be twe en po int t ext a nd are a tex t,
the menu will contextually change between para-
graph and point depending on what kind of type
is selected at the time. To convert type, choose
Layer > Type > Convert to Paragraph (Point) Text.
To ch ang e ty pe or ien tat io n, c hoo se Lay er >
Type > Horizontal or Vertical.
Download from WoweBook.com
ptg
78
Chapter 3 Typography for the Screen
Figure 3.35 Placed type inside a custom vector shape in Photoshop. You can finesse the placement with the options in
the Paragraph panel.
Setting Type Along a Path
Type along a path works in a similar fashion to Illustra-
tor. The main difference is how Photoshop automatically
switches to the Type tool to recognize the edge of a path.
Place your text on the path by placing the cursor directly
over the path, or in the shape if the cursor is inside a spe-
cific vector shape (Figure 3.36).
If you are typesetting in a document that already contains other layers and graphics,
sometimes those other elements may become distracting. To avoid this, you may
want to solo the visibility of the text layer as you make the final kerning, tracking,
and leading adjustments. Option-click (Alt-click) the layer eye icon to view that layer
and turn off all other layers. You can then apply the adjustments to that layer; as
long as you haven’t changed the visibility of any of the other layers, just Option-click
(Alt-click) the eye again to return all layers to their previous state of visibility. This
works in Photoshop and Illustrator. You can solo layers in After Effects as well, but
it has its own set of custom options. We’ll cover those in the “Type in After Effects”
section later in this chapter.
Once you’ve created type along
a path in Photoshop, the original
path created is not directly linked
to the text. You can delete the
original path layer if it’s not in use.
To ch ang e the p ath th e ty pe laye r
is using, select the type layer and
then select any of the vector tools
like the Path/Direct Selection tools
or the Convert Point tool to move
the path handles.
Download from WoweBook.com
ptg
79
II: Design Essentials
Figure 3.36 Use the Direct Selection or Path Selection tool to position type along a path in Photoshop.
Using the Direct Selection or Path Selection tool makes
placing type along a path a truly interactive, visual experi-
ence. The functions are the same as in Illustrator; however,
the brackets along the path in Photoshop are not visible
until you hover your mouse over the three anchor points.
The functions of each anchor point are the same as they
are in Illustrator.
For animation, we recommend setting type on a path in
Photoshop instead of Illustrator because the type and the
path will import as fully editable objects within After Ef-
fects. Wondering why we just don’t start creating path text
directly in After Effects? It’s just about time. It’s faster to
storyboard and create the effect in Photoshop. Plus, when
it’s approved, all the work from Photoshop will import
directly into After Effects.
To se e t he pa th an d t yp e in Af ter
Effects, import the Photoshop
document as a composition. Open
the composition, select the layer
that should be type, and choose
Layer > Convert to Editable Text.
Download from WoweBook.com
ptg
80
Chapter 3 Typography for the Screen
Creating 3D with Repoussé
One of the best new features in Adobe Photoshop CS5
has to be Repoussé. Repoussé allows you to create actual
3D objects out of type with full control over the materials
applied to the front, side, back, and different bevel faces
(Figure 3.37). Before converting any type through Repous-
sé, make sure you’ve saved an extra copy should you need
to go back and make any changes to the original type. Re-
poussé will rasterize any type into one solid object, so you’ll
no longer have individual character control.
If you want to find out more about Repoussé and all other
things 3D, check out Chapter 8, “Designing and Working
in 3D.”
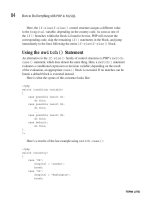
Figure 3.37 This “wood” type treatment was created in Repoussé. It has true 3D dimension, materials, and lighting.
Using Layer Styles with Type
Layer styles can add depth and dimension to your type with
bevels, drop shadows, and glows. But, as I’m sure some of
you may know, misuse of layer styles can cause flashbacks—
Download from WoweBook.com
ptg
81
II: Design Essentials
to 1998. So remember that more often than not less is more.
We’ve found layer styles extremely useful in specific situations:
. If your type is competing with the background, try a
subtle shadow or glow (Figure 3.38).
. To add some dimension to your type, tr y using some
layer styles (Figure 3.39).
One of the biggest reasons we like layer styles in Photoshop
has to be their integration with After Effects. On import,
you’ll have the choice to merge the layer styles into the foot-
age or leave them editable. By all means leave them editable
(Figure 3.40). If you still can’t see the editable layer styles in
the Timeline panel, choose Layer > Layer Styles > Convert
to Editable Styles (Figure 3.41). The layer styles will then ap-
pear in After Effects in the Timeline panel ready to animate.
Figure 3.38 A soft outer glow of
black can help create just enough
separation from the background to
make your type stand out.
Figure 3.39 To illustrate just how
many layer styles will seamlessly
import into After Effects, we’ve gone a
little overboard to create this 3D look
for the text.
Download from WoweBook.com
ptg
82
Chapter 3 Typography for the Screen
Figure 3.41 If you don’t see editable layer styles appearing in the Timeline, convert them to editable styles in the Layer menu.
Figure 3.40 After Effects supports
the import of most layer styles from
Photoshop, creating more sources
for effects that can be keyframed and
animated.
Download from WoweBook.com
ptg
83
II: Design Essentials
Type in After Effects
After Effects has a robust set of tools to set the type directly
within the application. Although we set our fair share of
type starting in After Effects, we usually prefer to create
our initial type designs and layouts in Photoshop and then
import those layouts into After Effects for animation.
Text Tool
Setting point type and paragraph type in After Effects is
the same process as we covered in Photoshop. However,
setting type along a path is a slightly different process.
Once you’re familiar with the text animators in After
Effects, setting up text on a path is a breeze.
Text Animator Possibilities
The animation tools for text in After Effects are nothing
short of amazing. You can layer different animations and
moves onto the type to create some flexible and complex
animations in a very short amount of time. To get familiar
with the capabilities within After Effects, let’s look at some
of the preset animations. Choose Animation > Browse Pre-
sets and double-click on the Text folder in Bridge. Open
any of the folders to browse through the different presets.
Navigate through a few more folders to get the full effect
of just how many different kinds of text animators and ef-
fects are possible in After Effects.
Creating a Text Animator
A text animator is almost identical to any other kind of
animation possible in After Effects. With any layer in After
Effects, there are properties that can be animated, posi-
tioned, scaled, rotated, and more. With text animators, you
can apply those same animation properties directly to the
text, as a kind of “subcategory.” The process is very similar
to parenting one layer to control another except this time
it’s all within the same layer.
To apply a text animator, twirl down the parameters for
your text layer. In the column for switches, click the button
next to Animate and select a parameter to animate. Using
Download from WoweBook.com
ptg
84
Chapter 3 Typography for the Screen
animators is a twofold process. First, make the change to
the parameter. Second, animate the selectors that deter-
mine exactly which characters are affected by the param-
eter change.
To see a finished example, open the project YouNever-
Know.aep. You can see that one animator has been applied
to the type layer called you never know (Opacity). The only
parameter that has keyframes is the offset. The values in
the range selector determine how much of that text will
be affected by the animator. Since the range starts at 0 and
ends at 100, 100 percent of the type will be affected by the
values in the animator. The Opacity value is set to 0, which
means that any type that is currently selected will have an
Opacity value set to 0. When the offset is animated, the
length of the selected area will not change, it will just slide
the selection, and any type that ends up falling outside of
the selected area will be revealed (Figure 3.42).
Figure 3.42 Animating the offset is almost like sliding a stencil over a light to reveal different patterns and shapes based on the settings
of the stencil.
Download from WoweBook.com
ptg
85
II: Design Essentials
Once an animator’s range is applied and animated, click
the Add button to continue to add more parameters to
that animator. Because the settings are loaded into the
same animator, the selected area and its offset will be the
same for every parameter loaded into that animator. If
you want to animate a different parameter with different
timing, click the Animate button and add another anima-
tor. Every animator can have its own timings because every
animator has its own Range Selector.
Creating Type on a Path
Since we just discussed how to create a text animator, you
already know how to animate type on a path. It’s just a
question of tying the type to the path. You can do that in
three steps:
1. Create a path.
2. Twirl open the layer properties and expand the Path
Options.
3. Click the Path menu and choose Path 1 (or the name
of any other path in the composition).
Now that the type is tied to the path, you can animate the
type along the path just like you’d apply any other anima-
tion to an animation group using animators.
Download from WoweBook.com
ptg
This page intentionally left blank
Download from WoweBook.com
ptg
CHAPTER
4
Logo Animation
Download from WoweBook.com
ptg
88
A pessimist sees the difficulty in every opportunity;
an optimist sees the opportunity in every difficulty.
—Winston Churchill
Logo Animation
I
f you’ve been in motion graphics for any amount of
time, most likely you’ve been asked to animate a logo.
Often, this is a kind of “right of passage” for young motion
graphics artists. Unfortunately, so is dealing with not receiv-
ing the most optimum file formats to work with. Even if the
stars align and we somehow end up with the proper files in
their preferred format, logos also come with rules. Usually
supplied by the original logo designer, these rules specify
how the logo is to appear to best represent its brand. In
this chapter we’ll examine various workflows to help you
find those opportunities where others might find difficulty.
Preparing Your Files
Where do you start? Do you begin in Adobe Illustrator,
Adobe Photoshop, or Adobe After Effects? Well, there is
no right or wrong answer. Each application and file format
has its own advantages and disadvantages. By the end of
this chapter, you’ll learn how to move seamlessly between
these applications and begin to develop your own personal
animation workflows, no matter where you start.
Logos Have Rules
Whether it’s a large corporation or a small business, ev-
erything from the color to the placement of that logo says
something about that business. With this knowledge, most
companies will create a style guide to go along with their
logo. The style guide is created to ensure that the logo
will always be used and seen in the best possible light. It
has a direct impact on what exactly can and can’t be done
when animating the logo. For example, some style guides
Download from WoweBook.com
ptg
89
II: Design Essentials
will specify that the logo can only appear on a solid white
background. Many guides will specify exact color values,
specific fonts, text placement, and its respective point size.
Figure 4.1 shows an example of a style guide so you see
what we mean.
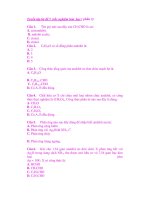
Figure 4.1 Some style guides are very detailed; others are short and to the point. This is an example of a “one sheet” style
guide. Smaller guides like this are often found in digital form along with the logo.
Every logo should have a style guide to help define precise-
ly how the logo is to be used. Sadly, we’ve found that most
style guides only account for print or Web usage. If there
are no specifications for video, Web specifications are often
the best place to start for help. They both use RGB color
space and have lower-resolution requirements.
Should you ever receive a logo without a style guide, the
Web is a great place to go for guidance. Use the company
website as a rough reference for placement and usage; that
way you’ll always have a fallback if questions arise.
If the logo you’re using has a lot
of rules and regulations about its
appearance, it’s always a safe bet
to animate the background that
will appear behind a logo rather
than manipulating the actual logo.
Yo u c a n l ea r n m o re a b o ut ba c k-
grounds in Chapter 7, “Designing
Backgrounds.”
Download from WoweBook.com
ptg
90
Chapter 4 Logo Animation
Best Files for Animation
When you’re getting ready to animate a logo, some file
formats are more preferable than others. Unfortunately, all
too often you’ll end up with a “less-than-preferred” file for-
mat. When this happens, it’s usually time to consider how
much extra work will be required just to get the logo ready
for animation. Don’t accept your first dead end as being
the end of the road. Make a right turn and keep looking
and asking. Even if you sometimes end up re-creating the
logo from scratch, we’ve found that double-checking with
clients will often give them that extra push required to dig
up a better solution.
We follow some general rules when it comes to file formats
for animation. Vector files such as those created from Illus-
trator are always best because they allow you to scale your
logo up to any size without losing quality (thanks to the
After Effects Continuously Rasterize option).
Layered vector files are even better. If each element resides
on its own layer in Illustrator, you can easily import the
layered Illustrator file as a composition directly into After
Effects for animation. Because layers are preserved on im-
port, they are ready for animation. Even if the original logo
doesn’t have layers, it’s often possible to split the file.
If you can only get a bitmap version of the logo, focus
on the measurements for width and height, and make
sure they are least twice the resolution of your final video
format. For example, when working at a resolution of
1280x720, we would want a file that’s at least 2560 pixels
across or 1440 pixels high. This way there is some flexibility
to scale up the logo in the animation. We often refer to this
as the “200% rule” for preparing stills for video. Of course
a layered file would be best, like a PSD or a TIFF for the
same reasons we mentioned earlier.
Preparing Logos in Illustrator
With its vector tools and ability to customize type using
OpenType, Illustrator has long been the preferred applica-
tion for designers when creating a logo. It is quite common
to receive logos as Illustrator files. Usually, preparing these
files for animation is pretty painless, but here are a few
gotchas to watch out for.
If you can’t get the client’s logo as
a vector file, there’s a great website
to check out. Brands of the World
(www.BrandsoftheWorld.com) of-
fers several well-known and even
obscure logos. While you’re there,
be sure to check out its free font
section as well.
In Illustrator, sublayers will be
flattened to their corresponding
parent layer upon import into After
Effects. Make sure any separate
elements live on layers at the top
of the layer hierarchy.
Even if a logo file isn’t a native
Illustrator file, it can easily be con-
verted. Just choose File > Open and
select a supported vector format
(like EPS or SVG). You can then split
the file into layers and save it as an
Illustrator file.
Download from WoweBook.com
ptg
91
II: Design Essentials
Color Space
Because most logos were originally created for use in print
materials, the files will most likely be in CMYK. And because
video is RGB, you’ll want to convert any CMYK documents
to RGB before animation. Converting a file from CMYK to
RGB is not nearly as problematic as the other way around.
This is because CMYK has a narrower range of colors, also
called a gamut. You should see little to no shifting in colors
when you convert from a CMYK to RGB color space. To
convert your Illustrator document to RGB, choose File >
Document Color Mode > RGB Color. To better understand
how the two spaces overlap, take a look at the color gamut
chart in Figure 4.2.
You might find it interesting that RGB and CMYK at their
core are designed to function quite differently. RGB is an
additive color model. RGB starts with black (no colors at
all) as a base color, and as you add more colors, eventu-
ally you will get to white (a mix of all colors) (Figure 4.3).
CMYK works through subtraction. An image starts with
white as the background color. As colors are “added,” they
actually subtract from each other as they mix together. So,
if you mix all colors in the spectrum together in a CMYK
document, the result is black (Figure 4.4).
Figure 4.3 Red, green, and blue are
added together to create white.
Figure 4.4 Cyan, magenta, and yellow
are subtracted from each other to
create black.
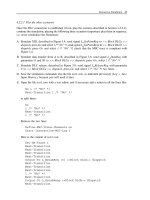
Figure 4.2 As you can see, RGB
colors include more colors than CMYK
except for some very small areas. It’s
really only when you have a color
value that’s outside the range of your
desired color space that you end up
with a color shift.
When changing color space in
Illustrator, the colors loaded in the
swatches palette are determined
upon document creation and
will not be converted with your
document settings. To change color
space, it is best to copy and paste
your logo into a new document
created with any of the Video and
Film presets.
Download from WoweBook.com
ptg
92
Chapter 4 Logo Animation
Preparing the Artboard
If your document is CMYK, its artboard dimensions are most
likely also set for print dimensions. Because Illustrator works
with vectors, converting the artboard to different dimen-
sions doesn’t technically change any of the artwork within
the document. However, when you start moving that file
between applications, the artboard dimensions have an im-
pact. For example, when importing a layered Illustrator file
into After Effects as a composition, the dimensions of the
composition will be determined by the size of the artboard.
To change the size of an artboard, choose File > Document
Setup and click the Edit Artboards button at the top of the
dialog box (Figure 4.5). However, you’ll find it faster to re-
size the artboard and convert color space by using the copy
and paste technique we outlined in a previous note.
Figure 4.5 Changing artboards to the
dimensions of their intended video
format will help you preview the size
of the logo in relation to the screen.
We’ll explore using artboards
in greater depth in Chapter 10,
“Designing with Vectors.” You’ll
learn how and when to use mul-
tiple artboards in one Illustrator
document.
Download from WoweBook.com
ptg
93
II: Design Essentials
Release to Layers
If you’re starting with a flattened file in Illustrator, the
Release To Layers option is a quick way to have Illustra-
tor create layers from the elements that make up the
logo. You have two options when using Release To Layers
(Figure 4.6):
. Release to Layers (Sequence). Places each object onto
its own layer.
. Release to Layers (Build). Creates a sequential build
with all the objects, starting with the bottommost object
on the bottom layer and then duplicating each layer
and adding objects until the topmost object is added to
the top layer.
Figure 4.6 On the left, layers are created using Sequence. On the right, layers are created using Build.
Once you’ve released to layers, it’s quite common to end
up with too many layers. To fix this, you’ll need to group
layers together by selecting their corresponding targets in
the Layers panel and pressing Command+G (Ctrl+G). Don’t
forget to name your layers as you group objects together. A
random name like “Layer 56” won’t be very helpful when
animating in After Effects. In addition to the organizational
benefits, the group command also helps make selecting
objects in your canvas easier as well (Figure 4.7).
Yo u c a n q u i c k l y c r e at e a s to r y b o a r d
from your sequential build. Export
your Illustrator file to Photoshop,
making sure to select Write Layers.
Open the newly created Photoshop
document and choose File >
Scripts > Export Layers to Files.
Choose a destination folder and click
the Run button. With each frame of
the build saved as an individual file,
it’s easy to place these frames into a
storyboard template.
Download from WoweBook.com
ptg
94
Chapter 4 Logo Animation
A B C
Figure 4.7 To quickly select a group in the canvas, use the Selection tool (A). If you want to select one element within that
group, use the Group Selection tool (B). If you need to select the individual anchor points of an object, use the Direct Selec-
tion tool (C).
Working with Template Layers
You can manually trace over an image by changing its layer
into a template layer. Usually, we use template layers in Il-
lustrator to allow us to trace more artistic interpretations of
an image directly overtop of the original image (Figure 4.8).
Unlike painting in Photoshop, Illustrator creates brush
strokes with fully editable vector paths. This is amazingly
helpful when you need to go back and adjust a brush stroke
that might just be a little off.
Figure 4.8 Fully editable brush
strokes created with Artistic Water-
color brushes are traced directly over
the template layer.
Download from WoweBook.com
ptg
95
II: Design Essentials
There are three ways to create a template layer in Illustra-
tor (Figure 4.9):
. When placing an image, select the Template option in
the pop-up window.
. Double-click a layer and select Template.
. Choose Template in the Layers menu.
Using template layers in Illustrator is also a great way to create
extra elements to use in the animation. As motion designers,
we have the benefit of time (don’t laugh). Even if the anima-
tion needs to end on the original logo, that doesn’t mean we
can’t play with it along the way. In the Timeline for an anima-
tion, we can cut between treated versions of a logo or just use
some of the elements to help highlight and add accents to
different parts of the animation (Figure 4.10).
Figure 4.10 Creating multiple versions of a logo gives you flexibility when it comes time to animate. Just using a simple jump cut
between the traced and untraced version can spice up the animation without having to use a single keyframe.
Figure 4.9 It’s always easy to spot a
template layer because the layer will
lock, the image will dim its opacity,
and the eye icon in the Layers panel
will change. Converting a layer to a
template layer allows you to trace
over the layer without worrying about
accidentally moving the image as
you work.
Does painting look interesting?
Don’t worry; we cover Illustrator’s
extensive paint and drawing tools
in Chapter 10. You’ll learn how to
create realistic brush strokes with
the Bristle brush; create custom
brushes; and use the Blob brush,
Path tool, and erasers, to name just
a few tools.
Download from WoweBook.com
ptg
96
Chapter 4 Logo Animation
Live Trace
If you want to create some stylized versions of a bitmap image,
Live Trace can save you loads of time tracing (Figure 4.11).
It will automatically trace a bitmap image, creating a vector
graphic. Several settings control the amount of detail as well
as the colors used after tracing.
1. To activate Live Trace, simply place or open a bitmap
image in Illustrator. When placing an image in Illustra-
tor, the adjustments will appear at the top of the screen
in the Control panel.
2. Click the arrow button between the Trace button and
the Mask button, and choose a preset from the list to
apply your Live Trace.
Live Trace with Layers
Live Trace as a function is very powerful because of its
presets and ability to quickly deliver some very accurate
tracings, but sometimes you’ll want more—more detail and
more control over individual areas of an image. When it
comes to selecting and isolating specific parts of an image,
there’s nothing better than Photoshop. So go ahead and
use Photoshop to separate the different sections of the im-
age onto their own layers.
Figure 4.11 You can create mul-
tiple styles quickly by using the Live
Trace Presets.
Yo u c a n h ave m or e c on t ro l o ve r
Live Trace by selecting the Tracing
Options at the bottom of the Preset
list. Use Tracing Options to experi-
ment with multiple settings with
Preview selected.
We’ll explore the Live Trace com-
mand in greater depth in Chapter 5.
Yo u ’l l l e a r n h o w t o c o nv er t a f o o t a g e
clip into a vector animation.
Download from WoweBook.com
ptg
97
II: Design Essentials
When you’re ready to use Live Trace in Illustrator, choose
File > Open and select your new layered PSD document.
Choose Convert Layers to Objects in the Options area
(Figure 4.12). All the layers are imported just as they were
in Photoshop.
Preparing Logos in Photoshop
Because video is not vector based, we use Photoshop a lot
when preparing files for animation. If you’re starting with a
flattened bitmap image file, Photoshop makes it easy to re-
move the background or separate your logo into multiple
layers for easy animation.
Color Space
As discussed earlier in the chapter, RGB color space is very
important for maintaining color accuracy when creating
and converting artwork for use in video. If your logo was
delivered in CMYK, choose Image > Mode > RGB Color to
convert your file.
Even if you’re placing an external file into your Photoshop
document, it’s always wise to make sure that document is
already converted to RGB before placement.
Figure 4.12 Layered Photoshop files
work well for import into Illustrator.
Download from WoweBook.com
ptg
98
Chapter 4 Logo Animation
Resolution
As you learned earlier, follow the 200% rule for the best
resolution results, and be sure to consider the overall pixel
count determined by pixel height and width.
Pixel Aspect Ratio
There are so many different dimensions, frame rates, and
codecs that remembering the exact settings, workflow,
limitations, and or advantages can get confusing to say
the least. When you add nonsquare pixels into the mix,
there’s yet another detail to consider. Using the Film and
Video project presets found throughout the Creative Suite
can help lend some organization to the specifics of each
format. The Creative Suite offers many options that allow
you to preview nonsquare pixel footage throughout many
of its applications.
When we design for large projects, we’ve often found it
easiest to actually convert any nonsquare pixel footage into a
square pixel composition so there is one less detail to think
about. Once everything is square pixel, we no longer have to
worry about pixels being distorted, interpreted, or displayed
improperly. Again, because large motion graphics projects
have so many files moving between various applications, one
less item to worry about really can make a difference.
Keep in mind that nonsquare pixel assets can be easily
converted into a corresponding square pixel resolution.
For example, if you had a project in an Adobe Photoshop
Extended document that was created with the DVCPRO
HD 1080p preset (1280x1080 nonsquare pixels), you could
use one of three ways to convert that to the HDTV 1080p
preset (1920x1080 square pixels) (Figure 4.13):
. Choose File > Place and place the DVCPRO HD
1280x1080 footage into a project with correspond-
ing square pixel dimensions, in this case, HDTV
1920x1080.
. Copy and paste the layers between the two projects.
. Drag and drop the layers into the proper project.
Changing the Pixel Aspect Ratio
of a Photoshop document using
the View menu does not actually
change anything in the document.
This setting only creates a preview
of what the document will look
like once the pixels are stretched.
Download from WoweBook.com
ptg
99
II: Design Essentials
Figure 4.13 If you use any of the three conversion methods listed, Photoshop will automatically properly resize the footage
to fit the square canvas settings. To preview a document with nonsquare pixels, choose View > Pixel Aspect Ratio and select
the desired ratio. Photoshop will then distort the document to simulate its final dimensions.
Removing a Background Using Channels
Consider a typical “worst-case” scenario: Let’s say we have
clients with time constraints, and the only version of a logo
they can get us quickly is embedded in a video clip. Before
Photoshop Extended, we’d usually ask the video editor to
quickly save out a still frame. Either way, as a still or video
file, once our logo is open in Photoshop we can separate
the logo from the background.
With newer tools like the Quick Selection tool and the
Refine Edge command, separating an object from its back-
ground isn’t nearly the challenge it used to be. However,
sometimes it might just be faster to use an “old-school”
technique using channels. Before many of the selection
tools were created in Photoshop, channels were often the
easiest and fastest way to select specific areas in an image.
To view the channels of a Photoshop document, navigate
to the Channels panel (Figure 4.14).
When you’re using channels, look for the most contrast
between the logo and the background (Figure 4.15). You
want to create a selection using the luminance values from
one of the channels. To have more options for animation,
don’t worry about keeping the drop shadow as a part of
the logo. You can always add that back in later.
When you’re trying to view differ-
ent channels in the Channels panel,
don’t click on the eye icons. Click
directly on the name of the chan-
nel to view that channel. Be sure to
activate all the channels again by
selecting the RGB channel before
you return to the Layers panel.
Download from WoweBook.com
ptg
100
Chapter 4 Logo Animation
Figure 4.14 Each channel shows the luminance values for each color channel that makes up that image.
Figure 4.15 The Blue channel looks like a good starting point.
To create a selection from a channel, drag the desired
channel down to the Layer button in the Channels panel
to create a duplicate (Figure 4.16). This new copy is now
an alpha channel. If you were to save this document right
now, this new alpha channel would control the transpar-
ency for all the channels combined. To be honest, in this
example it’s hard to see one channel that works better
than another. Since there is no clear winner, this is the
perfect time to use more than one channel. Let’s mix it
up with Calculations!
Download from WoweBook.com