photoshop CS2 essential skills phần 6 pptx
Bạn đang xem bản rút gọn của tài liệu. Xem và tải ngay bản đầy đủ của tài liệu tại đây (11.97 MB, 36 trang )
168
essential skills: photoshop CS
essential skills
>>>>>>
PHOTOSHOP CS
>>>
Advantages and disadvantages of 16-bit editing
When the highest quality images are required there are major advantages to be gained by using
‘Adobe Photoshop’ to edit an image fi le in ‘16 bits per channel’ mode. In 16 bits per channel there
are trillions, instead of millions, of possible values for each pixel. Spikes or comb lines, which are
quick to occur whilst editing in 8 bits per channel, rarely occur when editing in 16 bits per channel
mode. Photoshop 8 now has the ability to edit an image in 16 bits per channel mode using layers
and all of the editing tools. The disadvantages of editing in 16 bits per channel are:
• Not all scanning devices are capable of scanning in 16 bits per channel mode.
• The size of fi le is doubled when compared to an 8 bits per channel image of the same output
size and resolution.
• Many fi lters do not work in 16 bits per channel mode.
• Only a small selection of fi le formats support the use of 16 bits per channel.
Choosing your bit depth
It is still preferable to make major changes in tonality or color in 16-bit mode before converting
the fi le to 8-bit mode. Images can be converted from 8 bit (Image > Mode > 16 Bit/Channel)
or captured in 16 bit (the preferred choice). Most of the better scanners that are now available
(fl atbed and fi lm) now support 16 bits per channel image capture. Many scanners refer to 16 bits
per channel scanning as 48-bit RGB scanning. Some scanners offer 14 bits per channel scanning
but deliver a 48-bit image to Photoshop. Remember, you need twice as many megabytes as the
equivalent 8-bit image, e.g. if you typically capture 11 megabytes for an A4 image (A4 @ 200ppi)
you will require 22 megabytes when scanning in 16 bits per channel.
169
advanced retouching
essential skills
>>>>>>
PHOTOSHOP CS
>>>
Target values – using the eyedroppers
To make sure the highlights do not ‘blow out’ and the shadows do not print too dark it is possible
to target, or set specifi c tonal values, for the highlight and shadow tones within the image using the
eyedroppers
(found in the levels and curves dialog boxes).
The tones that should be targeted are
the lightest and darkest areas in the image with detail. The default settings of these eyedroppers are
set to 0 (black) and 255 (white). These settings are only useful for targeting the white paper or black
fi lm edge. After establishing the darkest and lightest tones that will print using a step wedge (see
‘Digital printing’ page 67) these target levels can be assigned to the eyedroppers.
Setting a target value
1. Double-click the black or white eyedropper tool to display the Color Picker.
2. Enter a value in the ‘Brightness’ fi eld (part of the hue, saturation and brightness or ‘HSB’
controls) and select OK.
3. Carefully view the image to locate the brightest highlight or shadow with detail. Be careful
to select representative tones, e.g. for the target highlight do not select a specular highlight
such as a light source or a refl ection of the light source which should register a value of 255.
4. Using the black and white eyedropper tools, with the altered values, click on the appropriate
image detail to assign their target values.
Note > When setting the target values of a color image it is very important to select neutral
highlight or shadow tones, otherwise a color cast may be introduced into the image. If no
neutral highlight or shadow tones are present it is advised that the tones are targeted by
pegging them on an adjustment curve, using the master RGB channel.
170
essential skills: photoshop CS
essential skills
>>>>>>
PHOTOSHOP CS
>>>
Controlling tones using the Shadow/Highlight feature
Both the Curves and Levels features provide a method of altering the brightness and contrast
in our pictures. In the hands of skilled Photoshop workers these tools can be used to perform
miracles beyond simple contrast and exposure changes. But many users fi nd the relationship
between how their picture appears and a curve or histogram graph to be a little obscure. With this
in mind, and in conjunction with the release of Photoshop CS, the engineers at Adobe added a
new tool to the ‘tone-tweakers’ arsenal.
Called the Shadow/Highlight feature it is located in the Image > Adjustments menu. The tool
provides a slider-based control of complex tonal correction in the highlights, shadows and to a
lesser extent the midtones. When fi rst opened the feature displays two slider controls, one for
highlights and the other for shadows. Moving the Shadow control to the right lightens the darker
regions of the image without changing midtones or highlights. Adjusting the Highlight slider to the
right darkens the lighter parts of the picture or as my old photography lecturer used to say, ‘crushes
the highlights’. Similarly highlight changes occur independent of other areas of the photograph.
Extra options
Now for most simple tasks this two slider approach
gets the job done but for the really problematic
photographs fi ner control is needed. Checking the
Show More Options setting reveals several other
sliders which provide just such control.
Tonal Width – This setting allows you to adjust how
the highlight or setting changes alter the midtone
areas of the picture. Low values concentrate the
alterations to just highlight or shadows. Higher
values spread the changes to other tones in the
picture.
Radius – Unlike the Tonal Width setting Radius
alters the effect based on the values of neighboring
pixels. High Radius settings use more pixels to
determine the type of changes and so result in
broader effects. Too high a value and the highlight
or shadow changes will alter tones across the whole
Simple mode
Show More Options mode
171
advanced retouching
essential skills
>>>>>>
PHOTOSHOP CS
>>>
picture. Low values tend to result in more detailed
and local changes.
Color Correction – This option adjusts the saturation
or vividness of the colour in altered areas of the
picture. Low or negative values result in low
saturated or almost monochrome images whereas
high settings create vibrant changes.
With monochrome pictures this slider is used to
adjust brightness.
Midtone Contrast – The Midtone Contrast slider
governs the contrast of the altered areas in your
picture. Low values result in low contrast results
whereas a high setting will increase the contrast
dramatically.
This simple slider provides a level of control that is
very diffi cult to replicate with curves and/or levels
controls. With either of these two features lightening
the shadows, or darkening the highlights, can result
in a low contrast or fl at looking picture. This feature
allows the user to restore a sense of the original
contrast into the changed areas.
Black and White Clip – These two values are used
to determine how much of the shadow or highlight
tones are converted to pure white (255) or pure
black (0). High values result in images with greater
contrast but less detail in highlight and shadow
areas.
Shadow/Highlight workfl ow
1. Start your Tonal Width and Radius settings
about midway along the scale then make a rough
adjustment moving the Amount sliders for shadow
and then highlight.
2. Fine-tune the changes to each of the areas using
the Tonal Width and Radius sliders.
3. Next adjust the Midtone Contrast setting to
ensure that the changed areas are not too fl at.
4. Finally alter the Color Correction control to
increase or decrease the vibrancy of the picture’s
colors.
Original
Shadow
(50,50,30)
Highlights
(50,50,30)
Adjustments
(20,0)
Shadow
(65,80,50)
Highlights
(0,9,30)
Adjustments
(20,39)
Shadow
(100,90,60)
Highlights
(0,50,20)
Adjustments
(75,35)
172
essential skills: photoshop CS
essential skills
>>>>>>
PHOTOSHOP CS
>>>
Dust and scratches
Clone Stamp and Healing Brush
The primary tools for localized retouching are the ‘Rubber Stamp Tool’ and the ‘Healing Brush
Tool’. The Clone Stamp or Rubber Stamp is able to paint with pixels selected or ‘sampled’ from
another part of the image. The Healing Brush also matches the texture and characteristics of the
sampled pixels to those of the pixels surrounding the damage. The Healing Brush tool allows for a
more seamless repair where the damage is surrounded by pixels of a similar value. If the damage
is close to pixels of a very different hue, saturation or brightness a selection of the damaged area
should fi rst be made that excludes the different pixels.
• Choose a brush size from the brushes palette.
• Select a sampling point by Option/Alt-clicking on a color or tone (this sample point is the location
from where the pixels are sampled).
• Drag the tool over the area to be modifi ed (a cross hair marks the sampling point).
Note > Deselect ‘Aligned’ to return to the initial sampling point each time you start to paint.
If a large area is to be repaired with the Clone Stamp tool it is advisable to take samples
from a number of different points with a reduced opacity brush.
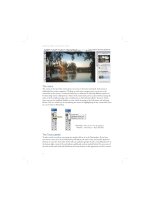
Cloning entire objects
With care it is possible to
duplicate an entire subject
within the image. The image
above demonstrates how a
landscape composition has
been manipulated to fi t a
portrait format. This has
been achieved by cloning
the sign and the life-ring
and moving them to the
right. The original life-ring
is then removed.
173
advanced retouching
essential skills
>>>>>>
PHOTOSHOP CS
>>>
Dust and Scratches fi lter
Ideally if the original image and scanning equipment are clean the scanning process introduces
only the occasional dust mark or scratch. If on closer inspection of the digital fi le it appears that
the dust and/or scratches cover an extensive area of the image it is often quicker to resort to the
Dust & Scratches fi lter rather than use the Rubber Stamp tool. Choose Filters > Noise > Dust &
Scratches. Set the threshold to zero and choose the lowest pixel radius that eliminates the dust
and scratches problem. Then increase the threshold gradually for optimum image quality. The
drawback to applying the Dust & Scratches fi lter to the entire digital image is that it also has the
effect of blurring the image.
Limitation of effect
It is important to reduce or limit the fi lter to areas of the image that do not contain fi ne detail, e.g.
areas of featureless or blurred background. This can be achieved by using any of the selection
tools. Only those pixels that are part of a selection can be modifi ed or adjusted using global
actions such as the Image Adjust or Filter commands. This technique will reduce the amount of
manual retouching (using the Rubber Stamp tool) to just those areas containing fi ne detail.
174
essential skills: photoshop CS
essential skills
>>>>>>
PHOTOSHOP CS
>>>
The History Brush technique
The History Brush can also be used to remove dust and scratches. This technique is especially
useful when removing dust and scratches from the more detailed areas of the image. Pixels
are painted over the damaged areas from an image state or ‘snapshot’ that has had the Dust &
Scratches fi lter applied (back from the future).
1. Set the correct image size and mode before creating a snapshot (ensure that the
background layer is selected in the layers palette).
2. Apply the Dust & Scratches fi lter to the entire image and create another new snapshot.
3. Click on the previous state or ‘snapshot’ in the histories palette. This will go back to the
point where the dust and scratches are still visible. Set the source for the History Brush as
the dust and scratches snapshot (see the illustration above).
4. Select the History Brush in the tools palette and select the appropriate blend mode in the
Options bar (‘Lighten’ for dark blemishes and ‘Darken’ for light blemishes).
5. Proceed to paint with the History Brush over the areas to be repaired using an
appropriate sized brush selected from the brushes palette.
Note > This technique is used in the second activity of this chapter.
175
advanced retouching
essential skills
>>>>>>
PHOTOSHOP CS
>>>
Correcting perspective
You know the story, you’re visiting a
wonderful city on holiday wanting to capture
as much of the local scenes and architecture
as possible. You enter the local square and
point your camera towards an impressive
three-spired building on the other side of
the road only to fi nd that you must tilt your
camera upwards to get the peaks into the
picture. At the time you think nothing of it
and you move onto the next location. It is
only when you are back at home about to
print your photograph that you realize that
the innocent ‘tilt’ has caused the edges of
the building to lean inwards.
Now to a certain extent this isn’t a problem,
even though it is not strictly accurate, we all
know that most buildings have parallel walls
and the majority of people who look at your
picture will take this into account – won’t
they?
Apart from a return trip and a reshoot is there anyway to correct these converging verticals? Well,
I’m glad you asked. Armed with nothing except Photoshop and the steps detailed here, you can now
straighten all those leaning architectural shots without the cost of the return journey.
1. After opening the offending image turn on the display grid (View > Grid). This will place a non-
printing grid over the surface of the picture and will act as a guide for your adjustments. In most
cases we need to move the two upper corners of the picture further apart to make them parallel.
To achieve this we will use the Perspective feature built into the Photoshop Crop tool.
176
essential skills: photoshop CS
essential skills
>>>>>>
PHOTOSHOP CS
>>>
2. Select the Crop tool from the toolbox. Click and drag a rough cropping marquee around the
picture. Tick the Perspective option in the tool’s Option bar. This option changes the way that the
tool functions. It is now possible to use the corner handles of the crop marquee to manipulate the
photograph’s perspective.
3. In our case we need to select both the top left and right handles and drag them inwards.
Continue dragging until the crop marquee edges align with the building sides, or a part of the
picture that is meant to be vertical. Double-click on the picture, or select the Tick button in the tool’s
Option bar, to apply the perspective transformation. Check to see that the building’s edges now
align with the grid lines. If this isn’t the case, undo the perspective change (Edit > Undo Crop) and
then reapply the crop with slightly different settings.
4. To complete the correction we need to make the building a little taller as the tilted camera has
artifi cially shortened the spires. The picture needs to be a layer before we can apply the height
transformation so double-click onto the background layer in the layers palette.
177
advanced retouching
essential skills
>>>>>>
PHOTOSHOP CS
>>>
5. If we stretch the picture upwards without providing some canvas space for the extra height
then the top or bottom of the building will be cropped. So before extending the height we need
to increase the vertical size of the canvas. Choose Canvas Size from the Resize menu (Image
> Resize > Canvas Size) and input a new value into the height box. Here I have used a value of
130% and anchored the bottom part of the picture so that the extra canvas is added to the top.
6. Now we can select the Scale feature from the Resize section of the Image menu (Edit >
Transform > Scale) and click and drag the top handles to stretch the picture bigger. As a fi nal step
use the Crop tool to trim the unused sections of the canvas away from the corrected image.
178
essential skills: photoshop CS
essential skills
>>>>>>
PHOTOSHOP CS
>>>
ACTIVITY 1
www.photoshopessentialskills.com/retouching.html
A localized adjustment can be created using the ‘Fill’ command. Selecting a layer mask and fi lling
an active selection with either the foreground or background color will create a mask that limits
adjustments or visibility in a localized area of the image. This allows the Selection tools to be used
in addition to the Paint tools for the creation of masks. The fi ll shortcuts ‘Command/Ctrl + delete’
(to fi ll with the foreground color) and ‘Option/Alt + delete’ (to fi ll with the background color) speed
up the masking process.
The Himalayas image demonstrates how an adjustment layer can be used to effect global
changes to tonality and color whilst a second adjustment layer affects only the foreground due to
the presence of a layer mask limiting its effect.
1. Open the image fi le ‘Himalayas.jpg’.
2. In the layers palette click on the ‘New
fi ll or adjustment layer’ icon and select a
‘Curves’ adjustment layer from the fl y-out
menu.
3. From the ‘Channel’ menu select the ‘Red’
channel. Click on the line in the center of
the curves box. Drag upwards until the line
becomes a curve. Observe the changes to
the color in the image window. Increase the
level of the red in the image until you feel
that the overall color has been corrected.
179
advanced retouching
essential skills
>>>>>>
PHOTOSHOP CS
>>>
4. Using the ‘Lasso Tool’ (with a 2-pixel feather entered in the Options bar) select the fi elds in the
foreground of the landscape.
Note > Feather selections to soften the transition between the adjusted and non-adjusted
pixels. If you create a mask with a hard edge it can be softened by applying a small amount
of ‘Gaussian Blur’ (Filter > Blur > Gaussian Blur).
5. Click on the channels palette (grouped with the layers palette) and then click on the ‘Save
selection as channel’ icon to save the selection as an alpha channel. This will ensure the selection
is saved when the fi le is closed.
6. Return to the layers palette. With the selection active create another new adjustment layer.
Choose ‘Curves’ from the menu. The selection automatically limits the adjustment to the selected
area by fi lling the rest of the layer mask with black.
7. In the Curves dialog box select the ‘Green’ channel. Pull the curve down to reduce the level of
green in the foreground of the image and click OK to complete the tonal and color adjustments.
Double-click the thumbnail on either adjustment layer to reopen the Curves dialog box in order to
further modify the color or tonality.
Note > Drag an adjustment layer to the
‘Delete layer’ icon (trash can) to discard the
adjustment.
8. To retain the adjustment layers when
saving the image it is important to save the
document as a Photoshop fi le (PSD) or a TIFF
fi le with layers.
180
essential skills: photoshop CS
essential skills
>>>>>>
PHOTOSHOP CS
>>>
ACTIVITY 2
www.photoshopessentialskills.com/retouching.html
In this activity specifi c highlight, shadow and midtone values are targeted on an adjustment curve.
The color cast is corrected using the ‘Set Gray Point’ eyedropper in the Curves dialog box and the
color of the man’s turban is selectively altered.
1. Open the fi le ‘Market.jpg’ and select the
‘Eyedropper Tool’ in the tools palette. Set the
sample size of the eyedropper to a 5 by 5 Average
in the Options bar to ensure general tonal values
are sampled rather than individual pixel values.
2. Create a curves adjustment layer by clicking
on the ‘Create new fi ll or adjustment layer’ icon at
the foot of the layers palette.
3. Move the mouse cursor outside of the Curves
dialog box into the image window. The cursor
will change to an eyedropper tool whatever tool
was selected previously. Hold the mouse clicker
down as you move around the image and note
the ‘Input’ readout in the Curves dialog box.
Move to a bright highlight in the image (a bright
section of the shirt).
181
advanced retouching
essential skills
>>>>>>
PHOTOSHOP CS
>>>
4. Select a tone that registers an input level
that is approximately 235. Command/Ctrl-click
whilst the pointer is over the image area to set an
adjustment point on the curve.
5. Move the cursor to an object with a dark tone
(the rim of the man’s spectacles). Select a tone
that registers an input level that is approximately
15 to 20. Set an adjustment point as before.
6. Move the cursor to a part of the image that
you would like to adjust to a midtone (the skin
on the back of the man’s hand would be ideal).
Select a tone that registers an input level that is
approximately 95. Set an adjustment point as
before.
7. In the Curves dialog box drag the highlight adjustment point until the output value reads 245.
Select and drag the shadow adjustment point until the output value reads 10. Select and drag the
midtone adjustment point until the output value reads 127.
8. Select the ‘Set Gray Point’ eyedropper in the Curves dialog box (between the black and white
point eyedroppers). Click on a suitable tone you wish to desaturate in an attempt to remove the
color cast present in the image (the metal tray holding produce to the left of the man’s shoulder
would be ideal). The neutral tone selected to be the ‘Gray Point’ can be a dark or light tone within
the image. If the tone selected is not representative of a neutral tone the color cast cannot be
rectifi ed effectively.
9. Fine-tune any color correction by selecting an individual channel from the pull-down menu in the
Curves dialog box. Create an adjustment point or use the adjustment point created by the Gray
Point eyedropper to perfect the color adjustment. Select OK to apply the curves adjustment.
182
essential skills: photoshop CS
essential skills
>>>>>>
PHOTOSHOP CS
>>>
10. Create a ‘Hue/Saturation’ adjustment layer.
Move the ‘Hue’ slider until the man’s turban shifts
to an orange/red hue. Decrease the saturation
slightly.
Note > All colors will be modifi ed towards red
as the adjustments are made at this stage.
11. Fill the layer mask that accompanies the Hue/
Saturation adjustment layer with black (Edit > Fill).
Note > If the default colors are set in the tools
palette the keyboard shortcuts ‘Command/
Ctrl + Delete’ and ‘Option/Alt + Delete’ can be
used to fi ll or clear a layer mask quickly.
12. Select the ‘Brush Tool’ and make the
foreground color white. In the Options bar set
the opacity to between 80 and 100%. Select an
appropriate brush size and paint the turban in the
image to reveal the hue adjustment. If you paint
over the edge simply switch the foreground color to
black and paint to remove the previous adjustment.
Save the image as a PSD fi le.
183
advanced retouching
essential skills
>>>>>>
PHOTOSHOP CS
>>>
ACTIVITY 3
www.photoshopessentialskills.com/retouching.html
This activity takes you through the complete series of steps required to retouch a digital fi le of poor
quality. It is dirty, crooked and the color and tone are a long way from being correct. The process
includes sharpening, which is the last step prior to printing.
1. Open the fi le ‘Temple.jpg’.
2. Select the ‘Measure Tool’ from the tools
palette (behind the ‘Eyedropper Tool’). Click
and drag along the edge of the step beneath the
man’s feet to draw a line parallel with the step.
3. Go to Image > Rotate Canvas > Arbitrary.
The angle of rotation required to straighten the
image will automatically be entered in the ‘Angle’
text fi eld. Click OK to rotate the canvas.
184
essential skills: photoshop CS
essential skills
>>>>>>
PHOTOSHOP CS
>>>
4. Set the output dimensions and resolution in the ‘Options’ bar (7in × 4.5in @ 200 ppi). Drag the
cropping marquee over the image to select an area that removes the black border and shaded
lines at the base of the image.
5. Check the ‘Enable perspective cropping’ box in the Options bar. Drag the top two corner handles
of the bounding box inwards until the edges of the bounding box align with the verticals of the
image. Press the tick or ‘Commit current crop option’ icon in the Options bar to crop the image to
the required specifi cations.
Note > The keyboard shortcuts for cropping are ‘return/enter’ to commit the crop and ‘esc’
to cancel the crop.
185
advanced retouching
essential skills
>>>>>>
PHOTOSHOP CS
>>>
6. In the history palette create a new ‘snapshot’ of the cropped image. This snapshot will enable
the use of the History Brush in the selective removal of the dust and scratches that cover much of
the image.
Note > The ‘Dust & Scratches’ fi lter cannot normally be applied globally to the whole image
without removing excessive amounts of detail.
7. From the ‘Filters’ menu apply the ‘Dust
& Scratches’ fi lter (‘Filters > Noise > Dust &
Scratches’). Use the smallest ‘Radius’ and
‘Threshold’ settings possible to remove the large
majority of the damage.
Note > Do not worry if the Dust & Scratches fi lter removes important detail as well as the
dust and scratches. You will revert to a previous ‘History State’ and use the ‘History Brush’
for selectively cleaning the image.
8. Create another new snapshot and set the
source for the History Brush on this latest
snapshot by clicking in the window next to the
snapshot thumbnail. Snapshots can be named
by double-clicking on the snapshot name and
typing in something more memorable than the
default name.
186
essential skills: photoshop CS
essential skills
>>>>>>
PHOTOSHOP CS
>>>
9. Change the current history state to the previous snapshot (‘Snapshot 1’) by clicking on it.
Note > The History Brush will be used to paint from the future state (minus dust and
scratches) to the current state. The fi lter is limited to a localized adjustment.
10. Select the ‘History Brush’ from the tools palette. Select the ‘Lighten’ paint mode in the History
Brush options.
Note > Set the paint mode to darken if the marks or blemishes are lighter than the
surrounding image.
11. Paint out the damage using an appropriate brush size (just larger than the damage being
retouched). Zoom in on the image when required and navigate by pressing the spacebar (to
access the Hand tool) and dragging to move the image within the window.
12. Create a new adjustment layer and select ‘Curves’ from the menu. Use the RGB curve to
adjust the tonality of the image. Select a sample highlight from the sunlight striking the stonework
to the right of the step and move it to a value of 245. Select a midtone from the shadow side of the
man’s forehead and move it to a value of 127. Select a dark tone above the man’s head and move
it to a value below 10. Remove the color caste by moving the curves in the individual Red, Green
and Blue channels. Alternatively use the ‘Set Gray Point’ eyedropper and select the neutral gray
from the man’s hair.
187
advanced retouching
essential skills
>>>>>>
PHOTOSHOP CS
>>>
13. Create a ‘Hue/Saturation’ adjustment layer. Select ‘Reds’ from the pull-down menu. Increase
the saturation by dragging the ‘Saturation’ slider to the right. As the warm tones in the image are
restricted to the red scarves emerging from the temple and the man’s skin, the rest of the image
remains relatively unaffected. Click OK to apply the adjustment.
14. To limit the adjustment to just the scarves,
paint into the adjustment layer’s layer mask with
black (set to 100% opacity) to conceal the increase
in saturation to the man’s skin. Alternatively fi ll
the mask with black and paint with white to reveal
the saturation adjustment to the scarves.
15. Prior to sharpening the image duplicate the
fi le (Image > Duplicate).
16. View image at 100% (View > Actual Pixels).
From the ‘Filters’ menu select ‘Sharpen >
Unsharp Mask’. Average settings are Amount:
80 to 180, Radius: 1.0, Threshold 3 for a scan
destined for a full-page print.
17. Save the duplicate image as a TIFF fi le for printing. Save the master fi le with adjustment
layers as a Photoshop fi le (PSD). If minor adjustments are required they should be made to the
master fi le and a new duplicate created before printing a second time.
188
essential skills: photoshop CS
essential skills
>>>>>>
PHOTOSHOP CS
>>>
ACTIVITY 4
www.photoshopessentialskills.com/retouching.html
The glamor portrait offers an excellent opportunity to test the effectiveness of a variety of image
editing skills. The portrait is an unforgiving canvas that will show any heavy-handed or poor
technique that may be applied. Start with a color portrait that has been captured using a soft
diffused light source.
Start with a 20 megabyte 16 bits per channel image fi le that has a good histogram and that has been
color corrected. The objective of this project is to perfect various characteristics and not to make
such changes that the character of the sitter is lost to the technique. Care should be taken not to
excessively smooth skin texture and thereby create an artifi cial or plastic appearance. Fading fi lters
and reducing opacity of brushes will help to smooth imperfections and not totally eliminate them.
Photography by Michael Wennrich
189
advanced retouching
essential skills
>>>>>>
PHOTOSHOP CS
>>>
Adjust the tonality
1. To brighten the dark shadows a luminosity mask is created from the channels palette. The
luminosity mask will help to isolate the shadows for adjustment and leave the highlights relatively
unaffected. To select the luminosity from the channels Command/Ctrl-click the master RGB
channel. The resulting selection must be inverted before creating a curves adjustment layer in the
layers palette.
Reduce shadows near the
jaw line and under the lip.
Modify the shape of lower
lip and close the small gap
between the lips
Reduce small lines underneath
eyes. Brighten the iris of each
eye. Remove skin blemishes.
Reduce the density of the
shadows
Narrow the shape of the face
around the jaw line, desaturate
color values and apply the
Unsharp Mask selectively
190
essential skills: photoshop CS
essential skills
>>>>>>
PHOTOSHOP CS
>>>
2. With the luminosity selection active create a
curves adjustment layer and open the shadows
by raising the curve to reveal any detail present.
It is not necessary to peg the highlights as these
values are being masked. The mask can be further
enhanced to limit the adjustment layer’s impact
on the midtones and shadows by increasing its
contrast (click on the layer mask thumbnail and
use an adjustment from the ‘Image’ menu).
Remove blemishes from the skin
3. Always duplicate the background layer before
starting to work directly on the pixels. Use
the Healing Brush to remove fi ne lines from
underneath the eyes. Care must be taken when
selecting the size and hardness of the brush. If an
overly large soft edged brush is used it can draw
in color values from the eyelashes or eyelids that
can contaminate the skin tone (a selection can be
made prior to using the Healing Brush to isolate
the healing area from different colors or tones).
If the brush is too hard the edges of the healing
area will be visible. Sometimes it is better to use
a smaller brush and make several passes rather
than trying to complete the section with a single
pass. The Healing Brush, with its protection of
surface texture, is a superior alternative to using
the Rubber Stamp tool at a reduced opacity.
191
advanced retouching
essential skills
>>>>>>
PHOTOSHOP CS
>>>
The Healing Brush in some respects behaves like a fi lter, and as such can be ‘faded’ from the Edit
menu. The ability to fade the Healing Brush in conjunction with the application of a blend mode
from the Fade menu can often disguise and blend the edges to create an undetectable patch.
The Patch tool can occasionally be used as a quick-fi x solution to repairing a large area where the
surrounding tone is similar and large enough to support the patch. The Feather Radius is critical to
the success of the patch technique. If ‘Source’ is selected in the patch options the damaged area
must fi rst be selected and then dragged to an area with a similar texture value that is undamaged.
Small blemishes can be removed by either spotting with the Healing Brush or using the History
Brush technique as described earlier.
192
essential skills: photoshop CS
essential skills
>>>>>>
PHOTOSHOP CS
>>>
Liquify
4. Ensure the ‘Background copy’ layer is selected before experimenting with the ‘Liquify’ fi lter. The
Liquify fi lter can be used to modify the shape or line of various features. The ‘Pucker Tool’ is used
to contract an area of the lip that is asymmetrical whilst the ‘Push Left Tool’ with the brush pressure
set to 10% is used to move the edge of the face inwards. It is important to exercise great restraint
when using these tools, as the face can quickly become a cartoon caricature of itself when taken
too far. The tools also soften detail which becomes obvious when overdone.
Selective color adjustment
5. The lips have been selected using a Lasso tool and the selection feathered. A curves adjustment
layer is then applied to increase the depth of tone on the lighter side of the lips. A gradient mask
is then applied (foreground to transparent) to hide the adjustment from the darker side of the lips.
This evens out the lip color.
Note > The lips were later retouched again using the Rubber Stamp at a reduced opacity to
close the small gap and lighten the lines and irregularities in the lip surface.