photoshop CS2 essential skills phần 8 potx
Bạn đang xem bản rút gọn của tài liệu. Xem và tải ngay bản đầy đủ của tài liệu tại đây (10.88 MB, 36 trang )
240
essential skills: photoshop CS
essential skills
>>>>>>
PHOTOSHOP CS
>>>
ACTIVITY 10
www.photoshopessentialskills.com/effects.html
1. Start by converting a color picture to grayscale using Image > Mode > Grayscale function. Apply
any contrast and brightness adjustments necessary to redistribute the picture’s tones. Switch the
picture’s mode to Duotone (Image > Mode > Duotone).
2. Once inside the Duotone Options dialog change the Type setting from Monotone to Duotone.
This automatically adds the possibility of a second ink color to the document. The Tritone option
uses three inks and the Quadtone setting four.
3. To select the second ink color, double click in the Ink 2 color area of the dialog. This will open
the color palette, from which you can select the other color to be mixed with black.
4. By double clicking the Curve thumbnail in the Duotone dialog, you can adjust the prominence
of each ink color across the tonal scale.
241
special effects
essential skills
>>>>>>
PHOTOSHOP CS
>>>
Creating digital depth of
fi eld (DOF) effects
Photographers have long considered
control over the amount of sharpness in
their images as a sign of their skill and
expertise. Almost all shooters display their
DOF agility on a regular basis. Whether
it be when making landscape images that
have sharpness from the very foreground
objects through to the distant hills, or the
selective focus style that is so popular in
food and catalog shots today. Everyone
from the famed Ansel Adams and his
mates in the F64 group to today’s top
fashion and commercial photographers
makes use of changes in ‘areas of focus’
to add drama and atmosphere to their
images.
In this digital age the new millennium
photographer can add a new DOF control technique to the traditional camera-based ones. Unlike
silver-based imaging, where once the frame is exposed the depth of sharpness present is fi xed,
pixel-based imaging allows the selection of focused and defocused areas after the shooting stage.
In short, a little Photoshop trickery can change an image with sharpness from the foreground to the
background to one that displays all the characteristics normally associated with a shallow DOF.
ACTIVITY 11
www.photoshopessentialskills.com/effects.html
Basic defocusing of the pixels
1. Choose an image that has a large DOF. This way you will have more choice when selecting
which parts of the image to keep sharp and which parts to defocus. The example I have used,
in it’s original form, has a large DOF and has sharpness throughout. Use one of Photoshop’s
selection tools to isolate the part of the image that you want to remain sharp. Here I made an oval
selection using the Ellipse Marquee tool. Then inverse the selection (Select > Inverse) so that the
areas that you want to defocus (make blurry) are now selected.
242
essential skills: photoshop CS
essential skills
>>>>>>
PHOTOSHOP CS
>>>
2. Add some feathering (Select > Feather) to the edge of the selection so that the transition points
between focused and defocused picture elements are more gradual. This step can be omitted if
you want sharp edged focal points that contrast against a blurry background.
3. Filter the selected area using the Gaussian Blur fi lter (Filter > Blur > Gaussian Blur) set at a low
setting to start with. Make sure the preview option is selected, this way you can get an immediate
idea about the strength of the effect. Hide the marching ants (Ctrl + H) that defi ne the selection
area so that you can assess the defocusing effect. Re-fi lter the selection if the effect is not obvious
enough. As we have already seen in other techniques that make use of the Gaussian Blur fi lter
a little noise can now be added (Filter > Noise > Add Noise) to the picture to counteract the
smoothing effect of the fi lter.
The new Lens Blur fi lter
This technique provides a simple in-
focus and out-of-focus effect. It does
mean that our attention is drawn to a
single part of the frame and in a basic
way this does refl ect a camera-based
shallow DOF technique. But it would be
hard to say that the results are totally
convincing. To achieve a DOF effect
that is more realistic and believable, the
basic idea of this technique needs to be
coupled with a new feature in Photoshop
CS – the Lens Blur fi lter.
Photoshop’s Lens Blur fi lter is a dedicated feature designed to
create realistic DOF effects in your pictures
243
special effects
essential skills
>>>>>>
PHOTOSHOP CS
>>>
If realism is your goal then it is necessary to look a little closer at how camera-based DOF works,
and more importantly, how it appears in our images. Imagine an image shot with a long lens using
a large aperture. The main subject situated midway into the image is pin sharp. Upon examination
it is possible to see that those picture elements closest to the main subject are not as ‘unsharp’ as
those further away. In effect the greater the distance from the point of focus the more blurry the
picture elements become.
This fact, simple though it is, is the key to a more realistic digital DOF effect. The application of
a simple one step blurring process does not refl ect what happens with traditional camera-based
techniques. The new Lens Blur fi lter (Filter > Blur > Lens Blur) in Photoshop CS is designed
specifi cally to help replicate this gradual change in sharpness. The fi lter uses selections or masks
created before entering the feature to determine which parts of the picture will be blurred and
which areas will remain sharp. In addition, if you use a mask that contains areas of graduated gray
(rather than just black and white) the fi lter will adjust the degree of sharpness according to the
level of gray in the mask.
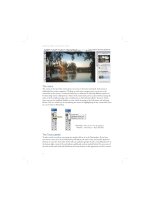
The Lens Blur fi lter uses a mask or selection to determine which parts of the picture will remain sharp and which areas will
be blurred. In addition, the level of sharpness is directly related to the density of the mask. Graduated masks will produce
graduated sharpness similar to that found in photographs with camera-based shallow DOF techniques. Image courtesy of
www.ablestock.com.
Mask
Resultant picture
244
essential skills: photoshop CS
essential skills
>>>>>>
PHOTOSHOP CS
>>>
Lens Blur DOF effects
The Lens Blur fi lter can be used with both sharp edged selections (which equate to sharp edged
masks) as well as graded masks. The white area of the mask receives the most blurring, the
black parts no defocusing effect and the gray areas proportional fi ltering. To create a realistic
shallow DOF effect you will often need to combine both mask types together. The following tutorial
demonstrates a process for achieving just such a combination.
ACTIVITY 12
www.photoshopessentialskills.com/effects.html
1. Start by making a selection of the image parts that are to remain sharp in the picture. Here I
selected the two jugs towards the front of the frame. The selection was feathered (Select > Feather)
by 1 pixel before being saved (Select > Save Selection) as a new channel (alpha channel mask).
245
special effects
essential skills
>>>>>>
PHOTOSHOP CS
>>>
2. Next, switch to the Quick Mask mode and using the Gradient tool set to Refl ective Gradient,
draw a selection at the base of the table area that equates to the gradual defocusing of the picture
moving from the foreground to the background.
3. Switch back to Selection mode (Standard mode) and save (Select > Save Selection) the graded
selection to the same channel (‘jugs’) as the fi rst selection. This time instead of making a new
channel mask choose the Add to Channel option in the Save Selection dialog. This will combine
the two selections into one channel mask.
Lens Blur fi lter options >>
Preview – Faster to generate quicker previews. More accurate to display the fi nal version of the image.
Iris Shape – Determines the way the blur appears. Iris shapes are controlled by the number of blades
they contain.
Invert – Select this option to inverse the alpha channel mask or selection.
Gaussian or Uniform – Select one of these options to add noise to the picture to disguise the smoothing
and loss of picture grain that is a by-product of applying the Lens Blur fi lter.
Depth Map Source - Select from the drop-down list the mask or selection that you will use for the fi lter.
246
essential skills: photoshop CS
essential skills
>>>>>>
PHOTOSHOP CS
>>>
4. Make sure that the RGB combined channel is selected in the channels palette and then open
the Lens Blur fi lter. Choose a preview option. Select the pre-made mask (‘jugs’) from the Depth
Map Source drop-down list. Set a low focus distance and choose an Iris shape from the Shape
pop-up. To add specular highlights to the picture drag the Threshold slider to set the brightness
cut-off point. Select Gaussian or Uniform to add noise back to the smoothed parts of the picture.
Click OK to process the picture.
Digital Polaroid transfer effect
Most readers will probably be familiar with Polaroid
instant picture products – you push the button and the
print is ejected and develops right before your eyes.
For many years professional image-makers have
been using the unique features of this technology
to create wonderfully textured images. The process
involved substituting watercolor paper for the
printing surface supplied by Polaroid. As a result the
image is transferred onto the roughly surfaced paper
and takes on a distinctly different look and feel to a
standard Polaroid print.
Much acclaimed for its artistic appeal, the technique
was not always predictable and much to the
frustration of a lot of photographers, it was often
diffi cult to repeat the success of previous results.
There were three main problems – dark areas of an
image often didn’t transfer to the new surface, colors
and image detail would bleed unpredictably and it
was diffi cult to control how dark or light the fi nal print
would be. I know these problems intimately as it
once took me 16 sheets of expensive instant fi lm to
produce a couple of acceptable prints.
247
special effects
essential skills
>>>>>>
PHOTOSHOP CS
>>>
A digital solution
This success ratio is not one that my budget or my temperament can afford. So I started to play
with a digital version of the popular technique. I wanted to fi nd a process that was more predictable,
controllable and repeatable. My fi rst step was to list the characteristics of the Polaroid transfer print
so that I could simulate them digitally. To me it seemed that there were four main elements:
~ Desaturated colors
~ Mottled ink
~ Distinct paper texture and color and
~ The Polaroid fi lm frame.
To duplicate these characteristics on the desktop would mean that I could capture the essence of
the Polaroid process.
ACTIVITY 13
www.photoshopessentialskills.com/effects.html
1. The Polaroid technique requires the watercolor paper to be slightly wet at the time of transfer.
The moisture, whilst helping the image movement from paper to paper, tends to desaturate the
colors and cause fi ne detail to be lost. These characteristics are also the result of the coarse
surface of the donor paper.
So the fi rst step of the digital version of the process is to desaturate the color of our example
image. In Photoshop this can be achieved by using the Image > Adjustments > Hue/Saturation.
With the dialog open carefully move the Saturation slider to the left. This action will decrease the
intensity of the colors in your image.
2. The distinct surface and image qualities of Polaroid transfer prints combine both sharpness
and image break-up in the one picture. To reproduce this effect digitally, I copied the original
image onto a second layer. My idea was to manipulate one version so that it displayed the mottled
effect of the transfer print whilst leaving the second version untouched. Then using the blending
modes or opacity features of Photoshop’s layers I could adjust how much sharpness or mottle was
contained in the fi nal result.
248
essential skills: photoshop CS
essential skills
>>>>>>
PHOTOSHOP CS
>>>
In practice, I started by duplicating the image layer. This can be achieved by selecting the layer
to be copied and then using the Duplicate Layer command located under the Layers menu.
Alternatively you can drag the layer to the New Layer button at the bottom of the layers palette.
3. With the upper most layer selected, I then needed to fi nd a method to simulate the mottle of the
transfer print. Though not exactly right, I found that by combining the effects of the Paint Daubs
and Palette Knife fi lters I could produce reasonable results. When using these fi lters yourself
keep in mind that the settings used will vary with the style and size of your image. Use the ones
in the example as a starting point only. This part of the process is not an exact science. Play and
experimentation is the name of the game. You might also want to try other options in the Artistic,
Sketch or Texture selections of the Filter menu.
4. The last step in this texture stage is to combine the characteristics of the two layers. This can be
achieved by either changing the blending mode of the uppermost layer or by adjusting its opacity,
or both. For the example image a simple opacity change was all that was needed, but don’t be
afraid to try a few different blend/opacity combinations with your own work.
249
special effects
essential skills
>>>>>>
PHOTOSHOP CS
>>>
5. The paper color and texture is a critical part of the appeal of the transfer print. These two
characteristics extend throughout the image itself and into the area that surrounds the picture. For
this to occur in a digital facsimile it is necessary to provide some space around the image using
Photoshop’s Canvas Size feature (Image > Canvas Size).
Unlike Image Size, this option allows the user to increase the size of the canvas that all image
layers (including the background layer) are sitting upon without changing the image itself. In the
example the canvas width was increased by 120% and the height by 140%.
6. To add the texture to both image and surround I fl attened (Layer > Flatten Image) the two image
layers and the white background into a single layer. Next, I photographed a section of watercolor
paper to use as a customized texture with the Texturizer fi lter (Filter > Texture > Texturizer). You
can download and use this very fi le from the book’s web site or pick one of the other options from
the Texture pop-up list.
250
essential skills: photoshop CS
essential skills
>>>>>>
PHOTOSHOP CS
>>>
7. With the texture complete, I played with the overall color of the image using the Levels
feature (Image > Adjustments > Levels). I altered the blue and red channels independently and
concentrated on the lighter tones of the image so that rather than the paper being stark white it
took on a creamy appearance.
8. The last part of the process involves combining the fi nal image with a scan of a Polaroid fi lm
edge. You can make your own by scanning a Polaroid print and then removing the image or
you can download the edge I used for the example from the book’s web site. Open the edge
fi le as a separate document. Click onto the edge picture and drag it onto your picture. The edge
will automatically become a new layer on top of the existing image layer. With the edge layer
selected change the layer’s blend mode to Multiply. Notice that the white areas of the layer are
now transparent allowing the picture beneath to show through. Finally use the Scale command to
adjust the size of the edge to fi t the image.
~ Apply fi lter effects to a picture.
~ Use the Filter Gallery feature to apply several fi lters cumulatively.
~ Using fi lters with text and shape layers.
~ Filtering a section of a picture.
~ Painting with a fi lter effect.
~ Installing and using third party fi lters.
fi lters
essential skills
252
essential skills: photoshop CS
essential skills
>>>>>>
PHOTOSHOP CS
>>>
Filtering in Photoshop
Okay, hand's up all of you who have a range of 'Cokin' fi lters in your camera kit bag. If your arm is
raised in timid salute then you are not alone, I too admit to buying a few of these pieces of colored
gelatine in an attempt to add drama and interest to my images. Ranging from the multi-image split
prism to the keyhole mask for that all important wedding shot, these photographic 'must haves'
seem to be less popular now than they were in the eighties.
It’s not that these handy ‘end of lens add-ons’ are essentially bad, it’s just that I think that we have
all seen too many hideous examples of their use to risk adding our own images to this infamous
group. In fairness though, I still would not leave home without a good set of color correction fi lters,
and I am sure that my landscape colleagues would argue strongly for the skillful use graduated
fi lters to add theater to distant vistas.
As much as anything the fi lter’s decline can be attributed to changes in visual fashion and just
as we thought that ‘fl ares’ would never return to the streets, digital effects fi lters of the seventies
have also made a comeback. This time they don’t adorn the end of our lenses but are almost
hidden from the unsuspecting user, sometimes in their hundreds, underneath the Filter menu of
Photoshop.
I think just the association with day’s past and images best
forgotten has caused most of us to overlook, no let’s be
honest, run away from, using any of the myriad of fi lters that
are available. These memories coupled with a host of ‘garish’
and ‘look at this effect’ type examples in the weekly computing
magazines have overshadowed the creative options available
to any image-maker with the careful use of the digital fi lter.
To encourage you to get started I have included a variety of
examples from the range that comes free with Photoshop. I
have not shown Gaussian Blur or any of the sharpening fi lters
as most people seem to have overcome their fi lter phobia and
made use of these to enhance their imagery, but I have tried to
sample a variety that, to date, you might not have considered
using.
253
essential skills
>>>>>>
PHOTOSHOP CS
>>>
If you are unimpressed by the results of your fi rst digital fi lter foray, try changing some of the
variables. An effect that might seem outlandish at fi rst glance could become usable after some
simple adjustments of the in-built sliders contained in most fi lter dialog boxes.
New for Photoshop CS – the Filter Gallery
Some Photoshop fi lters can now be applied using the new Filter Gallery feature. Designed to allow
the user to apply several different fi lters to a single image it can also be used to apply the same
fi lter several times. The dialog consists of a preview area, a collection of fi lters that can be used
with the feature, a settings area with sliders to control the fi lter’s effect and a list of fi lters that are
currently being applied to the image.
Filters are arranged in the sequence that they are
applied. Filters can be moved to a different spot in
the sequence by click-dragging up or down the stack.
Click the ‘eye’ icon to hide the effect of the selected
fi lter from preview. Filters can be deleted from the list
by dragging them to the dustbin icon at the bottom of
the dialog.
Most of the fi lters that can’t be used with the Filter
Gallery feature are either applied directly to the picture
with no user settings or make use of a fi lter preview
and settings dialog specifi c to that particular fi lter.
Preview area
Gallery fi lters
Filters
applied to
the picture
Filter
settings
The Spherize fi lter does not work
with the Filter Gallery but has its
own preview and settings dialog
fi lters
254
essential skills: photoshop CS
essential skills
>>>>>>
PHOTOSHOP CS
>>>
Fade Filter command
The opacity, or strength, of the fi lter effect can be controlled by selecting the Edit > Fade command
when selected directly after the fi lter is applied. With a value of 0% the fi lter changes are not
applied at all, whereas a setting of 100% will apply the changes fully. As well as controlling opacity
the Fade dialog also provides the option to select a different blend mode for the fi lter changes.
Improving fi lter performance
A lot of fi lters make changes to the majority of the pixels in a picture. This level of activity can
take considerable time, especially when working with high resolution pictures or underpowered
computers. Use the following tips to increase the performance of applying such fi lters:
~ Free up memory by using the Edit > Purge command before fi ltering.
~ Allocate more memory to Photoshop via the Edit > Preferences > Memory and Image
Cache option before fi ltering.
~ Try out the fi lter effect on a small selection before applying the fi lter to the whole picture.
~ Apply the fi lter to individual channels separately rather than the composite image.
Third party fi lters are generally installed automatically into the Photoshop Plug-Ins > Filter folder. The
program then attaches the extra plug-in to the bottom of the Filter menu the next time Photoshop is
opened. Here the Applied Science Fiction Digital SHO fi lter is installed with other fi lters from the group’s
suite of enhancement fi lters.
255
essential skills
>>>>>>
PHOTOSHOP CS
>>>
Installing and using third party fi lters
Ever since the early versions of Photoshop Adobe provided the opportunity for third party developers
to create small pieces of specialist software that could plug into Photoshop. The modular format
of the software means that Adobe and other software manufacturers can easily create extra fi lters
that can be added to the program at any time. In fact, some of the plug-ins that have been released
over the years have became so popular that Adobe themselves incorporated their functions into
successive versions of Photoshop. This is how the Drop Shadow layer effect came into being.
Most plug-ins register themselves as extra options in the Filter menu where they can be accessed
just like any other Photoshop feature. The Digital SHO fi lter from Applied Science Fiction is a great
example of plug-in technology. Designed to automatically balance the contrast and enhance the
shadow detail in digital photographs, when installed it becomes part of a suite of fi lters supplied by
the company that are attached to the Filter menu.
Filtering a shape or text (vector) layer
Filters work with bitmap or pixel-based layers. As text, vector masks and custom shapes are all
created with vector graphics and these layers need to be converted to bitmap before a fi lter effect
can be applied to them. Photoshop uses a Rasterize function to make this conversion. Simply
select the text or shape layer and then choose the Layer > Rasterize option.
Alternatively if you inadvertently try to fi lter a vector layer Photoshop will display a warning dialog
that notifi es you that the layer needs to be converted before fi ltering and offers to make the
conversion before proceeding.
Filters 101
The fi lter examples are grouped according to the menu heading that they fall under in Photoshop.
Each of the fi lter’s effects has been compared using a common ‘crayons’ image and the associated
dialog box for controlling these effects is displayed alongside.
fi lters
256
essential skills: photoshop CS
essential skills
>>>>>>
PHOTOSHOP CS
>>>
ARTISTIC FILTERS
Colored Pencil – Sketchy pencil outlines on a variable paper background.
Variables: Pencil Width, Stroke Pressure, Paper Brightness
Cutout – Graded colors reduced to fl at areas much like a screen print.
Variables: Number of Levels, Edge Simplicity, Edge Fidelity
Fresco – Black edged painterly effect using splotches of color.
Variables: Brush Size, Brush Detail, Texture
257
essential skills
>>>>>>
PHOTOSHOP CS
>>>
Paint Dabs – Edges and tones defi ned with daubs of paint like color.
Variables: Brush Size, Sharpness, Brush Type
Plastic Wrap – Plastic-like wrap applied to the surface of the image area.
Variables: Highlight Strength, Detail, Smoothness
Rough Pastel – Coarsely applied strokes of pastel-like color.
Variables: Stroke Length and Detail, Texture, Scaling, Relief, Light Direction
fi lters
258
essential skills: photoshop CS
essential skills
>>>>>>
PHOTOSHOP CS
>>>
BRUSH STROKES FILTERS
Accented Edges – Image element edges are highlighted until they appear to
glow. Variables: Edge Width, Edge Brightness, Smoothness
Cross Hatch – Colored sharp ended pencil-like cross hatching to indicate edges
and tones. Variables: Stroke Length, Sharpness, Strength
Ink Outlines – Black ink outlines and some surface texture laid over the top
of the original tone and color. Variables: Stroke Length, Dark Intensity, Light
Intensity
259
essential skills
>>>>>>
PHOTOSHOP CS
>>>
Sumi-e – Black outlines with subtle changes to image tone.
Variables: Stroke Width, Stroke Pressure, Contrast
DISTORT FILTERS
Pinch – Image is squeezed in or out as if it is being stretched on a rubber surface.
Variable: Amount
Shear – Image is distorted in middle in one direction whilst the edges remain fi xed.
Variable: Undefi ned Areas
fi lters
260
essential skills: photoshop CS
essential skills
>>>>>>
PHOTOSHOP CS
>>>
Twirl – Spin and stretch image to look as if it is being sucked down a drain hole
Variable: Angle
Wave – Image is rippled in a wave-like motion. Variables: Number of
Generators, Type, Wavelength, Amplitude, Scale, Undefi ned Areas, Randomize
PIXELATE FILTERS
Color Halftone – Similar to a close-up of a printed color magazine image.
Variables: Maximum Radius, Screen Angles for channels 1–4
261
essential skills
>>>>>>
PHOTOSHOP CS
>>>
Mezzotint – Adjustable stroke types used to give tone to the image.
Variables: Type
Mosaic – The image is broken into pixel-like blocks of fl at color.
Variable: Cell Size
Pointillize – Random irregular dot shapes fi lled with colors drawn from the original
image. Variable: Cell Size
fi lters
262
essential skills: photoshop CS
essential skills
>>>>>>
PHOTOSHOP CS
>>>
RENDER FILTERS
Lens Flare – Creation of a lens fl are effect that is then superimposed on the
original image. Variables: Brightness, Lens Type
SKETCH FILTERS
Bas Relief – Color reduced image with cross lighting that gives the appearance
of a relief sculpture. Variables: Detail, Smoothness, Light direction
Chalk and Charcoal – Black and white version of the original color image
made with a charcoal-like texture. Variables: Charcoal Area, Chalk Area, Stroke
Pressure
263
essential skills
>>>>>>
PHOTOSHOP CS
>>>
Graphic Pen – Stylish black and white effect made with sharp edged pen strokes.
Variables: Stroke Length, Light/Dark balance, Stroke Direction
Stamp – Just broad fl at areas of black and white.
Variables: Light/Dark Balance, Smoothness
STYLIZE FILTERS
Extrude – The ‘building block’ fi lter creating colored and stacked three
dimensional blocks out of your original image.
Variables: Type, Size, Depth, Solid Front Faces, Mask Incomplete Blocks
fi lters
264
essential skills: photoshop CS
essential skills
>>>>>>
PHOTOSHOP CS
>>>
Wind – Parts of the image are blurred in the direction of the prevailing wind.
Variables: Method, Direction
TEXTURE FILTERS
Craquelure – Cracks imposed on the surface of the original image.
Variable: Crack Spacing, Crack Depth, Crack Brightness
Stained Glass – Image broken up into areas of color which are then bordered
by a black line similar to stained glass.
Variables: Cell Size, Border Thickness, Light Intensity