Beginning Android PHẦN 4 potx
Bạn đang xem bản rút gọn của tài liệu. Xem và tải ngay bản đầy đủ của tài liệu tại đây (1.16 MB, 38 trang )
92
CHAPTER 9
■ GETTING FANCY WITH LISTS
We simply subclass ListView and override setAdapter() so we can wrap the supplied
ListAdapter in our own RateableWrapper.
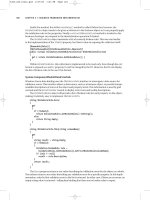
Visually, the results are similar to the RateListDemo, albeit without top-rated words appearing
in all caps (see Figure 9-5).
Figure 9-5. The RateListViewDemo sample application
The difference is in reusability. We could package RateListView in its own JAR and plop it
into any Android project where we need it. So while RateListView is somewhat complicated to
write, we have to write it only once, and the rest of the application code is blissfully simple.
Of course, this RateListView could use some more features, such as programmatically
changing states (updating both the float[] and the actual RatingBar itself), allowing other
application logic to be invoked when a RatingBar state is toggled (via some sort of callback), etc.
Murphy_2419-8C09.fm Page 92 Friday, April 10, 2009 3:35 PM
93
■ ■ ■
CHAPTER 10
Employing Fancy Widgets
and Containers
The widgets and containers covered to date are not only found in many GUI toolkits (in one
form or fashion), but also are widely used in building GUI applications, whether Web-based,
desktop, or mobile. The widgets and containers in this chapter are a little less widely used,
though you will likely find many to be quite useful.
Pick and Choose
With limited-input devices like phones, having widgets and dialogs that are aware of the type
of stuff somebody is supposed to be entering is very helpful. It minimizes keystrokes and screen
taps, plus reduces the chance of making some sort of error (e.g., entering a letter someplace
where only numbers are expected).
As previously shown, EditText has content-aware flavors for entering in numbers,
phone numbers, etc. Android also supports widgets (DatePicker, TimePicker) and dialogs
(DatePickerDialog, TimePickerDialog) for helping users enter dates and times.
The DatePicker and DatePickerDialog allow you to set the starting date for the selection,
in the form of a year, month, and day of month value. Note that the month runs from 0 for
January through 11 for December. Most importantly, each let you provide a callback object
(OnDateChangedListener or OnDateSetListener) where you are informed of a new date selected
by the user. It is up to you to store that date someplace, particularly if you are using the dialog,
since there is no other way for you to get at the chosen date later on.
Similarly, TimePicker and TimePickerDialog let you:
• set the initial time the user can adjust, in the form of an hour (0 through 23) and a minute
(0 through 59)
• indicate if the selection should be in 12-hour mode with an AM/PM toggle, or in 24-hour
mode (what in the US is thought of as “military time” and in the rest of the world is
thought of as “the way times are supposed to be”)
• provide a callback object (OnTimeChangedListener or OnTimeSetListener) to be notified
of when the user has chosen a new time, which is supplied to you in the form of an hour
and minute
Murphy_2419-8C10.fm Page 93 Monday, April 13, 2009 5:56 PM
94
CHAPTER 10
■ EMPLOYING FANCY WIDGETS AND CONTAINERS
The Fancy/Chrono sample project, found along with all other code samples in this chapter
in the Source Code area of , shows a trivial layout containing a label and two
buttons—the buttons will pop up the dialog flavors of the date and time pickers:
<?xml version="1.0" encoding="utf-8"?>
<LinearLayout
xmlns:android=" /> android:orientation="vertical"
android:layout_width="fill_parent"
android:layout_height="fill_parent"
>
<TextView android:id="@+id/dateAndTime"
android:layout_width="fill_parent"
android:layout_height="wrap_content"
/>
<Button android:id="@+id/dateBtn"
android:layout_width="fill_parent"
android:layout_height="wrap_content"
android:text="Set the Date"
/>
<Button android:id="@+id/timeBtn"
android:layout_width="fill_parent"
android:layout_height="wrap_content"
android:text="Set the Time"
/>
</LinearLayout>
The more interesting stuff comes in the Java source:
public class ChronoDemo extends Activity {
DateFormat fmtDateAndTime=DateFormat.getDateTimeInstance();
TextView dateAndTimeLabel;
Calendar dateAndTime=Calendar.getInstance();
DatePickerDialog.OnDateSetListener d=new DatePickerDialog.OnDateSetListener() {
public void onDateSet(DatePicker view, int year, int monthOfYear,
int dayOfMonth) {
dateAndTime.set(Calendar.YEAR, year);
dateAndTime.set(Calendar.MONTH, monthOfYear);
dateAndTime.set(Calendar.DAY_OF_MONTH, dayOfMonth);
updateLabel();
}
};
Murphy_2419-8C10.fm Page 94 Monday, April 13, 2009 5:56 PM
CHAPTER 10 ■ EMPLOYING FANCY WIDGETS AND CONTAINERS
95
TimePickerDialog.OnTimeSetListener t=new TimePickerDialog.OnTimeSetListener() {
public void onTimeSet(TimePicker view, int hourOfDay,
int minute) {
dateAndTime.set(Calendar.HOUR_OF_DAY, hourOfDay);
dateAndTime.set(Calendar.MINUTE, minute);
updateLabel();
}
};
@Override
public void onCreate(Bundle icicle) {
super.onCreate(icicle);
setContentView(R.layout.main);
Button btn=(Button)findViewById(R.id.dateBtn);
btn.setOnClickListener(new View.OnClickListener() {
public void onClick(View v) {
new DatePickerDialog(ChronoDemo.this,
d,
dateAndTime.get(Calendar.YEAR),
dateAndTime.get(Calendar.MONTH),
dateAndTime.get(Calendar.DAY_OF_MONTH)).show();
}
});
btn=(Button)findViewById(R.id.timeBtn);
btn.setOnClickListener(new View.OnClickListener() {
public void onClick(View v) {
new TimePickerDialog(ChronoDemo.this,
t,
dateAndTime.get(Calendar.HOUR_OF_DAY),
dateAndTime.get(Calendar.MINUTE),
true).show();
}
});
dateAndTimeLabel=(TextView)findViewById(R.id.dateAndTime);
updateLabel();
}
Murphy_2419-8C10.fm Page 95 Monday, April 13, 2009 5:56 PM
96
CHAPTER 10
■ EMPLOYING FANCY WIDGETS AND CONTAINERS
private void updateLabel() {
dateAndTimeLabel.setText(fmtDateAndTime
.format(dateAndTime.getTime()));
}
}
The “model” for this activity is just a Calendar instance, initially set to be the current date
and time. We pour it into the view via a DateFormat formatter. In the updateLabel() method, we
take the current Calendar, format it, and put it in the TextView.
Each button is given a OnClickListener callback object. When the button is clicked, either
a DatePickerDialog or a TimePickerDialog is shown. In the case of the DatePickerDialog, we
give it a OnDateSetListener callback that updates the Calendar with the new date (year, month,
day of month). We also give the dialog the last-selected date, getting the values out of the
Calendar. In the case of the TimePickerDialog, it gets a OnTimeSetListener callback to update
the time portion of the Calendar, the last-selected time, and a true indicating we want 24-hour
mode on the time selector.
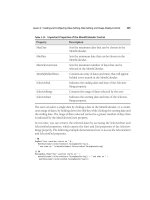
With all this wired together, the resulting activity is shown in Figures 10-1, 10-2, and 10-3.
Figure 10-1. The ChronoDemo sample application, as initially launched
Murphy_2419-8C10.fm Page 96 Monday, April 13, 2009 5:56 PM
CHAPTER 10 ■ EMPLOYING FANCY WIDGETS AND CONTAINERS
97
Figure 10-2. The same application, showing the date picker dialog
Figure 10-3. The same application, showing the time picker dialog
Murphy_2419-8C10.fm Page 97 Monday, April 13, 2009 5:56 PM
98
CHAPTER 10
■ EMPLOYING FANCY WIDGETS AND CONTAINERS
Time Keeps Flowing Like a River
If you want to display the time, rather than have users enter the time, you may wish to use the
DigitalClock or AnalogClock widgets. These are extremely easy to use, as they automatically
update with the passage of time. All you need to do is put them in your layout and let them do
their thing.
For example, from the Fancy/Clocks sample application, here is an XML layout containing
both DigitalClock and AnalogClock:
<?xml version="1.0" encoding="utf-8"?>
<RelativeLayout xmlns:android=" /> android:orientation="vertical"
android:layout_width="fill_parent"
android:layout_height="fill_parent"
>
<AnalogClock android:id="@+id/analog"
android:layout_width="fill_parent"
android:layout_height="wrap_content"
android:layout_centerHorizontal="true"
android:layout_alignParentTop="true"
/>
<DigitalClock android:id="@+id/digital"
android:layout_width="wrap_content"
android:layout_height="wrap_content"
android:layout_centerHorizontal="true"
android:layout_below="@id/analog"
/>
</RelativeLayout>
Without any Java code other than the generated stub, we can build this project (see
Figure 10-4).
Murphy_2419-8C10.fm Page 98 Monday, April 13, 2009 5:56 PM
CHAPTER 10 ■ EMPLOYING FANCY WIDGETS AND CONTAINERS
99
Figure 10-4. The ClocksDemo sample application
Making Progress
If you need to be doing something for a long period of time, you owe it to your users to do
two things:
• Use a background thread, which will be covered in Chapter 15
• Keep them apprised of your progress, or else they think your activity has wandered away
and will never come back
The typical approach to keeping users informed of progress is some form of progress bar
or “throbber” (think the animated graphic towards the upper-right corner of many Web browsers).
Android supports this through the ProgressBar widget.
Murphy_2419-8C10.fm Page 99 Monday, April 13, 2009 5:56 PM
100
CHAPTER 10
■ EMPLOYING FANCY WIDGETS AND CONTAINERS
A ProgressBar keeps track of progress, defined as an integer, with 0 indicating no progress
has been made. You can define the maximum end of the range—what value indicates progress
is complete—via setMax(). By default, a ProgressBar starts with a progress of 0, though you can
start from some other position via setProgress().
If you prefer your progress bar to be indeterminate, use setIndeterminate(), setting it to true.
In your Java code, you can either positively set the amount of progress that has
been made (via setProgress()) or increment the progress from its current amount (via
incrementProgressBy()). You can find out how much progress has been made via getProgress().
Since the ProgressBar is tied closely to the use of threads—a background thread doing
work, updating the UI thread with new progress information—we will hold off demonstrating
the use of ProgressBar until Chapter 15.
Putting It on My Tab
The general Android philosophy is to keep activities short and sweet. If there is more informa-
tion than can reasonably fit on one screen, albeit perhaps with scrolling, then it most likely
belongs in another activity kicked off via an Intent, as will be described Chapter 24. However,
that can be complicated to set up. Moreover, sometimes there legitimately is a lot of informa-
tion that needs to be collected to be processed as an atomic operation.
In a traditional UI, you might use tabs to accomplish this end, such as a JTabbedPane in
Java/Swing. In Android, you now have an option of using a TabHost container in much the
same way—a portion of your activity’s screen is taken up with tabs which, when clicked, swap
out part of the view and replace it with something else. For example, you might have an activity
with a tab for entering a location and a second tab for showing a map of that location.
Some GUI toolkits refer to “tabs” as being just the things a user clicks on to toggle from one
view to another. Some toolkits refer to “tabs” as being the combination of the clickable button-ish
element and the content that appears when that tab is chosen. Android treats the tab buttons
and contents as discrete entities, so we will call them “tab buttons” and “tab contents” in
this section.
The Pieces
There are a few widgets and containers you need to use in order to set up a tabbed portion of
a view:
• TabHost is the overarching container for the tab buttons and tab contents.
• TabWidget implements the row of tab buttons, which contain text labels and optionally
contain icons.
• FrameLayout is the container for the tab contents; each tab content is a child of the
FrameLayout.
This is similar to the approach that Mozilla’s XUL takes. In XUL’s case, the tabbox element
corresponds to Android’s TabHost, the tabs element corresponds to TabWidget, and tabpanels
corresponds to the FrameLayout.
Murphy_2419-8C10.fm Page 100 Monday, April 13, 2009 5:56 PM
CHAPTER 10 ■ EMPLOYING FANCY WIDGETS AND CONTAINERS
101
The Idiosyncrasies
There are a few rules to follow, at least in this milestone edition of the Android toolkit, in order
to make these three work together:
•You must give the TabWidget an android:id of @android:id/tabs.
• You must set aside some padding in the FrameLayout for the tab buttons.
• If you wish to use the TabActivity, you must give the TabHost an android:id of
@android:id/tabhost.
TabActivity, like ListActivity, wraps a common UI pattern (activity made up entirely of
tabs) into a pattern-aware activity subclass. You do not necessarily have to use TabActivity—a
plain activity can use tabs as well.
With respect to the FrameLayout padding issue, for whatever reason, the TabWidget does
not seem to allocate its own space inside the TabHost container. In other words, no matter what
you specify for android:layout_height for the TabWidget, the FrameLayout ignores it and draws
at the top of the overall TabHost. Your tab contents obscure your tab buttons. Hence, you need
to leave enough padding (via android:paddingTop) in FrameLayout to “shove” the actual tab
contents down beneath the tab buttons.
In addition, the TabWidget seems to always draw itself with room for icons, even if you do
not supply icons. Hence, for this version of the toolkit, you need to supply at least 62 pixels of
padding, perhaps more depending on the icons you supply.
For example, here is a layout definition for a tabbed activity, from Fancy/Tab:
<?xml version="1.0" encoding="utf-8"?>
<LinearLayout xmlns:android=" /> android:orientation="vertical"
android:layout_width="fill_parent"
android:layout_height="fill_parent">
<TabHost android:id="@+id/tabhost"
android:layout_width="fill_parent"
android:layout_height="fill_parent">
<TabWidget android:id="@android:id/tabs"
android:layout_width="fill_parent"
android:layout_height="wrap_content"
/>
<FrameLayout android:id="@android:id/tabcontent"
android:layout_width="fill_parent"
android:layout_height="fill_parent"
android:paddingTop="62px">
<AnalogClock android:id="@+id/tab1"
android:layout_width="fill_parent"
android:layout_height="fill_parent"
android:layout_centerHorizontal="true"
/>
Murphy_2419-8C10.fm Page 101 Monday, April 13, 2009 5:56 PM
102
CHAPTER 10
■ EMPLOYING FANCY WIDGETS AND CONTAINERS
<Button android:id="@+id/tab2"
android:layout_width="fill_parent"
android:layout_height="fill_parent"
android:text="A semi-random button"
/>
</FrameLayout>
</TabHost>
</LinearLayout>
Note that the TabWidget and FrameLayout are immediate children of the TabHost, and the
FrameLayout itself has children representing the various tabs. In this case, there are two tabs: a
clock and a button. In a more complicated scenario, the tabs are probably some form of container
(e.g., LinearLayout) with their own contents.
Wiring It Together
The Java code needs to tell the TabHost what views represent the tab contents and what the tab
buttons should look like. This is all wrapped up in TabSpec objects. You get a TabSpec instance
from the host via newTabSpec(), fill it out, then add it to the host in the proper sequence.
The two key methods on TabSpec are:
• setContent(), where you indicate what goes in the tab content for this tab, typically the
android:id of the view you want shown when this tab is selected
• setIndicator(), where you provide the caption for the tab button and, in some flavors of
this method, supply a Drawable to represent the icon for the tab
Note that tab “indicators” can actually be views in their own right, if you need more control
than a simple label and optional icon.
Also note that you must call setup() on the TabHost before configuring any of these TabSpec
objects. The call to setup() is not needed if you are using the TabActivity base class for your
activity.
For example, here is the Java code to wire together the tabs from the preceding layout
example:
package com.commonsware.android.fancy;
import android.app.Activity;
import android.os.Bundle;
import android.widget.TabHost;
public class TabDemo extends Activity {
@Override
public void onCreate(Bundle icicle) {
super.onCreate(icicle);
setContentView(R.layout.main);
Murphy_2419-8C10.fm Page 102 Monday, April 13, 2009 5:56 PM
CHAPTER 10 ■ EMPLOYING FANCY WIDGETS AND CONTAINERS
103
TabHost tabs=(TabHost)findViewById(R.id.tabhost);
tabs.setup();
TabHost.TabSpec spec=tabs.newTabSpec("tag1");
spec.setContent(R.id.tab1);
spec.setIndicator("Clock");
tabs.addTab(spec);
spec=tabs.newTabSpec("tag2");
spec.setContent(R.id.tab2);
spec.setIndicator("Button");
tabs.addTab(spec);
tabs.setCurrentTab(0);
}
}
We find our TabHost via the familiar findViewById() method, then have it call setup().
After that, we get a TabSpec via newTabSpec(), supplying a tag whose purpose is unknown at this
time. Given the spec, you call setContent() and setIndicator(), then call addTab() back on the
TabHost to register the tab as available for use. Finally, you can choose which tab is the one to
show via setCurrentTab(), providing the 0-based index of the tab.
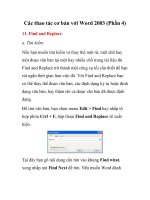
The results can be seen in Figures 10-5 and 10-6.
Figure 10-5. The TabDemo sample application, showing the first tab
Murphy_2419-8C10.fm Page 103 Monday, April 13, 2009 5:56 PM
104
CHAPTER 10
■ EMPLOYING FANCY WIDGETS AND CONTAINERS
Figure 10-6. The same application, showing the second tab
Adding Them Up
TabWidget is set up to allow you to easily define tabs at compile time. However, sometimes, you
want to add tabs to your activity during runtime. For example, imagine an email client where
individual emails get opened in their own tab for easy toggling between messages. In this case,
you don’t know how many tabs or what their contents will be until runtime, when the user
chooses to open a message.
Fortunately, Android also supports adding tabs dynamically at runtime.
Adding tabs dynamically at runtime works much like the compile-time tabs previously
shown, except you use a different flavor of setContent(), one that takes a TabHost.
TabContentFactory instance. This is just a callback that will be invoked—you provide an imple-
mentation of createTabContent() and use it to build and return the Let’s take a look at an
example (Fancy/DynamicTab).
First, here is some layout XML for an activity that sets up the tabs and defines one tab,
containing a single button:
<?xml version="1.0" encoding="utf-8"?>
<LinearLayout xmlns:android=" /> android:orientation="vertical"
android:layout_width="fill_parent"
android:layout_height="fill_parent">
Murphy_2419-8C10.fm Page 104 Monday, April 13, 2009 5:56 PM
CHAPTER 10 ■ EMPLOYING FANCY WIDGETS AND CONTAINERS
105
<TabHost android:id="@+id/tabhost"
android:layout_width="fill_parent"
android:layout_height="fill_parent">
<TabWidget android:id="@android:id/tabs"
android:layout_width="fill_parent"
android:layout_height="wrap_content"
/>
<FrameLayout android:id="@android:id/tabcontent"
android:layout_width="fill_parent"
android:layout_height="fill_parent"
android:paddingTop="62px">
<Button android:id="@+id/buttontab"
android:layout_width="fill_parent"
android:layout_height="fill_parent"
android:text="A semi-random button"
/>
</FrameLayout>
</TabHost>
</LinearLayout>
What we want to do is add new tabs whenever the button is clicked. That can be accomplished
in just a few lines of code:
public class DynamicTabDemo extends Activity {
@Override
public void onCreate(Bundle icicle) {
super.onCreate(icicle);
setContentView(R.layout.main);
final TabHost tabs=(TabHost)findViewById(R.id.tabhost);
tabs.setup();
TabHost.TabSpec spec=tabs.newTabSpec("buttontab");
spec.setContent(R.id.buttontab);
spec.setIndicator("Button");
tabs.addTab(spec);
tabs.setCurrentTab(0);
Button btn=(Button)tabs.getCurrentView().findViewById(R.id.buttontab);
Murphy_2419-8C10.fm Page 105 Monday, April 13, 2009 5:56 PM
106
CHAPTER 10
■ EMPLOYING FANCY WIDGETS AND CONTAINERS
btn.setOnClickListener(new View.OnClickListener() {
public void onClick(View view) {
TabHost.TabSpec spec=tabs.newTabSpec("tag1");
spec.setContent(new TabHost.TabContentFactory() {
public View createTabContent(String tag) {
return(new AnalogClock(DynamicTabDemo.this));
}
});
spec.setIndicator("Clock");
tabs.addTab(spec);
}
});
}
}
In our button’s setOnClickListener() callback, we create a TabHost.TabSpec object and
give it an anonymous TabHost.TabContentFactory. The factory, in turn, returns the View to be
used for the tab—in this case, just an AnalogClock. The logic for constructing the tab’s View
could be much more elaborate, such as using LayoutInflater to construct a view from layout XML.
In Figure 10-7 you can see that initially, when the activity is launched, we just have the one
tab whereas Figure 10-8 shows multiple tabs.
Figure 10-7. The DynamicTab application, with the single initial tab
Murphy_2419-8C10.fm Page 106 Monday, April 13, 2009 5:56 PM
CHAPTER 10 ■ EMPLOYING FANCY WIDGETS AND CONTAINERS
107
Figure 10-8. The DynamicTab application, with three dynamically-created tabs
Intents and Views
In the preceding examples, the contents of each tab were set to be a View, such as a Button. This
is easy and straight-forward, but it is not the only option. You can also integrate another activity
from your application via an Intent.
Intents are ways of specifying something you want accomplished, then telling Android to
go find something to accomplish it. Frequently, these are used to cause activities to spawn. For
example, whenever you launch an application from the main Android application launcher,
the launcher creates an Intent and has Android open up the activity associated with that Intent.
This whole concept, and how activities can be placed in tabs, will be described in greater detail
in Chapter 25.
Flipping Them Off
Sometimes, you want the overall effect of tabs (only some Views visible at a time), but you do
not want the actual UI implementation of tabs. Maybe the tabs take up too much screen space.
Maybe you want to switch between perspectives based on a gesture or a device shake. Or maybe
you just like being different.
The good news is that the guts of the view-flipping logic from tabs can be found in the
ViewFlipper container, which can be used in other ways than the traditional tab.
ViewFlipper inherits from FrameLayout, just like we used to describe the innards of a
TabWidget. However, initially, it just shows the first child view. It is up to you to arrange for the
views to flip, either manually by user interaction, or automatically via a timer.
Murphy_2419-8C10.fm Page 107 Monday, April 13, 2009 5:56 PM
108
CHAPTER 10
■ EMPLOYING FANCY WIDGETS AND CONTAINERS
For example, here is a layout for a simple activity (Fancy/Flipper1) using a Button and a
ViewFlipper:
<?xml version="1.0" encoding="utf-8"?>
<LinearLayout xmlns:android=" /> android:orientation="vertical"
android:layout_width="fill_parent"
android:layout_height="fill_parent"
>
<Button android:id="@+id/flip_me"
android:layout_width="fill_parent"
android:layout_height="wrap_content"
android:text="Flip Me!"
/>
<ViewFlipper android:id="@+id/details"
android:layout_width="fill_parent"
android:layout_height="fill_parent"
>
<TextView
android:layout_width="fill_parent"
android:layout_height="wrap_content"
android:textStyle="bold"
android:textColor="#FF00FF00"
android:text="This is the first panel"
/>
<TextView
android:layout_width="fill_parent"
android:layout_height="wrap_content"
android:textStyle="bold"
android:textColor="#FFFF0000"
android:text="This is the second panel"
/>
<TextView
android:layout_width="fill_parent"
android:layout_height="wrap_content"
android:textStyle="bold"
android:textColor="#FFFFFF00"
android:text="This is the third panel"
/>
</ViewFlipper>
</LinearLayout>
Notice that the layout defines three child views for the ViewFlipper, each a TextView with
a simple message. Of course, you could have very complicated child views, if you so chose.
To manually flip the views, we need to hook into the Button and flip them ourselves when
the button is clicked:
Murphy_2419-8C10.fm Page 108 Monday, April 13, 2009 5:56 PM
CHAPTER 10 ■ EMPLOYING FANCY WIDGETS AND CONTAINERS
109
public class FlipperDemo extends Activity {
ViewFlipper flipper;
@Override
public void onCreate(Bundle icicle) {
super.onCreate(icicle);
setContentView(R.layout.main);
flipper=(ViewFlipper)findViewById(R.id.details);
Button btn=(Button)findViewById(R.id.flip_me);
btn.setOnClickListener(new View.OnClickListener() {
public void onClick(View view) {
flipper.showNext();
}
});
}
}
This is just a matter of calling showNext() on the ViewFlipper, like you can on any
ViewAnimator class.
The result is a trivial activity: click the button, and the next TextView in sequence is displayed,
wrapping around to the first after viewing the last (see Figures 10-9 and 10-10).
Figure 10-9. The Flipper1 application, showing the first panel
Murphy_2419-8C10.fm Page 109 Monday, April 13, 2009 5:56 PM
110
CHAPTER 10
■ EMPLOYING FANCY WIDGETS AND CONTAINERS
Figure 10-10. The same application, after switching to the second panel
This, of course, could be handled more simply by having a single TextView and changing
the text and color on each click. However, you can imagine that the ViewFlipper contents could
be much more complicated, like the contents you might put into a TabView.
As with the TabWidget, sometimes, your ViewFlipper contents may not be known at compile
time. As with TabWidget, though, you can add new contents on the fly with ease.
For example, let’s look at another sample activity (Fancy/Flipper2), using this layout:
<?xml version="1.0" encoding="utf-8"?>
<LinearLayout xmlns:android=" /> android:orientation="vertical"
android:layout_width="fill_parent"
android:layout_height="fill_parent"
>
<ViewFlipper android:id="@+id/details"
android:layout_width="fill_parent"
android:layout_height="fill_parent"
>
</ViewFlipper>
</LinearLayout>
Notice that the ViewFlipper has no contents at compile time. Also note that there is no
Button for flipping between the contents—more on this in a moment.
For the ViewFlipper contents, we will create large Button widgets, each containing one of
a set of random words. And, we will set up the ViewFlipper to automatically rotate between the
Button widgets, using an animation for transition:
Murphy_2419-8C10.fm Page 110 Monday, April 13, 2009 5:56 PM
CHAPTER 10 ■ EMPLOYING FANCY WIDGETS AND CONTAINERS
111
public class FlipperDemo2 extends Activity {
static String[] items={"lorem", "ipsum", "dolor", "sit", "amet",
"consectetuer", "adipiscing", "elit",
"morbi", "vel", "ligula", "vitae",
"arcu", "aliquet", "mollis", "etiam",
"vel", "erat", "placerat", "ante",
"porttitor", "sodales", "pellentesque",
"augue", "purus"};
ViewFlipper flipper;
@Override
public void onCreate(Bundle icicle) {
super.onCreate(icicle);
setContentView(R.layout.main);
flipper=(ViewFlipper)findViewById(R.id.details);
flipper.setInAnimation(AnimationUtils.loadAnimation(this,
R.anim.push_left_in));
flipper.setOutAnimation(AnimationUtils.loadAnimation(this,
R.anim.push_left_out));
for (String item : items) {
Button btn=new Button(this);
btn.setText(item);
flipper.addView(btn,
new ViewGroup.LayoutParams(
ViewGroup.LayoutParams.FILL_PARENT,
ViewGroup.LayoutParams.FILL_PARENT));
}
flipper.setFlipInterval(2000);
flipper.startFlipping();
}
}
After getting our ViewFlipper widget from the layout, we first set up the “in” and “out”
animations. In Android terms, an animation is a description of how a widget leaves (”out”) or
enters (”in”) the viewable area. Animations are a complex beast, eventually worthy of their own
chapter but not covered in this text. For now, realize that animations are resources, stored in
res/anim/ in your project. For this example, we are using a pair of animations supplied by the
SDK samples, available under the Apache 2.0 License. As their names suggest, widgets are
“pushed” to the left, either to enter or leave the viewable area.
After iterating over the funky words, turning each into a Button, and adding the Button as
a child of the ViewFlipper, we set up the flipper to automatically flip between children (flipper.
setFlipInterval(2000);) and to start flipping (flipper.startFlipping();).
Murphy_2419-8C10.fm Page 111 Monday, April 13, 2009 5:56 PM
112
CHAPTER 10
■ EMPLOYING FANCY WIDGETS AND CONTAINERS
The result is an endless series of buttons, each appearing, then sliding out to the left after
2 seconds, being replaced by the next button in sequence, wrapping around to the first after the
last has been shown (see Figure 10-11).
Figure 10-11. The Flipper2 application, showing an animated transition
The auto-flipping ViewFlipper is useful for status panels or other situations where you
have a lot of information to display, but not much room. The key is that, since it automatically
flips between views, expecting users to interact with individual views is dicey —the view might
switch away part-way through their interaction.
Other Containers of Note
Android offers AbsoluteLayout, where the contents are laid out based on specific coordinate
positions. You tell AbsoluteLayout where to place a child in precise X,Y coordinates, and Android
puts it there, no questions asked. On the plus side, this gives you precise positioning. On the
minus side, it means your views will only look “right” on screens of a certain dimension, or it
requires you to write a bunch of code to adjust the coordinates based on screen size. Since
Android screens might run the gamut of sizes, plus have new sizes crop up periodically, using
AbsoluteLayout could get quite annoying.
Android also has a new flavor of list, the ExpandableListView. This provides a simplified
tree representation, supporting two levels of depth: groups and children. Groups contain children;
children are “leaves” of the tree. This requires a new set of adapters, since the ListAdapter
family does not provide any sort of group information for the items in the list.
Murphy_2419-8C10.fm Page 112 Monday, April 13, 2009 5:56 PM
113
■ ■ ■
CHAPTER 11
Applying Menus
Like applications for the desktop and some mobile operating systems, such as Palm OS and
Windows Mobile, Android supports activities with application menus. Some Android phones
will have a dedicated menu key for popping up the menu; others will offer alternate means for
triggering the menu to appear.
Also, as with many GUI toolkits, you can create context menus. On a traditional GUI, this
might be triggered by the right mouse button. On mobile devices, context menus typically
appear when the user taps-and-holds over a particular widget. For example, if a TextView had
a context menu and the device was designed for finger-based touch input, you could push the
TextView with your finger, hold it for a second or two, and a pop-up menu would appear for you
to choose from.
Android differs from most other GUI toolkits in terms of menu construction. While you
can add items to the menu, you do not have full control over the menu’s contents, nor of the
timing of when the menu is built. Part of the menu is system-defined, and that portion is managed
by the Android framework itself.
Flavors of Menu
Android considers application menus and context menus to be the options menu and the
context menu, respectively. The options menu is triggered by pressing the hardware Menu
button on the device, while the context menu is raised by a tap-and-hold on the widget
sporting the menu.
In addition, the options menu operates in one of two modes: icon and expanded. When
the user first presses the Menu button, the icon mode will appear, showing up to the first six
menu choices as large, finger-friendly buttons in a grid at the bottom of the screen. If the menu
has more than six choices, the sixth button will become More—clicking that option will bring
up the expanded mode, showing the remaining choices not visible in the regular menu. The
menu is scrollable, so the user can get to any of the menu choices.
Menus of Options
Rather than building your activity’s options menu during onCreate(), the way you wire up the
rest of your UI, you instead need to implement onCreateOptionsMenu(). This callback receives
an instance of Menu.
Murphy_2419-8C11.fm Page 113 Friday, April 10, 2009 3:34 PM
114
CHAPTER 11
■ APPLYING MENUS
The first thing you should do is chain upward to the superclass (super.
onCreateOptionsMenu(menu)) so the Android framework can add in any menu choices it feels
are necessary. Then you can go about adding your own options, described momentarily.
If you will need to adjust the menu during your activity’s use (e.g., disable a now-invalid
menu choice), just hold onto the Menu instance you receive in onCreateOptionsMenu() or imple-
ment onPrepareOptionsMenu(), which is called just before displaying the menu each time it
is requested.
Given that you have received a Menu object via onCreateOptionsMenu(), you add menu
choices by calling add(). There are many flavors of this method, which require some combina-
tion of the following parameters:
• A group identifier (int), which should be NONE unless you are creating a specific grouped
set of menu choices for use with setGroupCheckable() (see the following list).
• A choice identifier (also an int) for use in identifying this choice in the
onOptionsItemSelected() callback when a menu choice is selected.
• An order identifier (yet another int), for indicating where this menu choice should be
slotted if the menu has Android-supplied choices alongside your own—for now, just
use NONE.
• The text of the menu choice, as a String or a resource ID.
The add() family of methods all return an instance of MenuItem, where you can adjust
any of the menu-item settings you have already set (e.g., the text of the menu choice). You
can also set the shortcuts for the menu choice—single-character mnemonics that select that
menu choice when the menu is visible. Android supports both an alphabetic (or QWERTY)
set of shortcuts and a numeric set of shortcuts. These are set individually by calling
setAlphabeticShortcut() and setNumericShortcut(), respectively. The menu is placed into
alphabetic shortcut mode by calling setQwertyMode() on the menu with a true parameter.
The choice and group identifiers are keys used to unlock additional menu features, such
as these:
• Calling MenuItem#setCheckable() with a choice identifier to control if the menu choice
has a two-state checkbox alongside the title, where the checkbox value gets toggled
when the user chooses that menu choice
• Calling Menu#setGroupCheckable() with a group identifier to turn a set of menu choices
into ones with a mutual-exclusion radio button between them, so one out of the group
can be in the “checked” state at any time
You can also call addIntentOptions() to populate the menu with menu choices corresponding
to the available activities for an intent (see Chapter 25).
Finally, you can create fly-out sub-menus by calling addSubMenu() and supplying the same
parameters as addMenu()
. Android will eventually call onCreatePanelMenu(), passing it the choice
identifier of your sub-menu, along with another Menu instance representing the sub-menu
itself. As with onCreateOptionsMenu(), you should chain upward to the superclass, then add
Murphy_2419-8C11.fm Page 114 Friday, April 10, 2009 3:34 PM
CHAPTER 11 ■ APPLYING MENUS
115
menu choices to the sub-menu. One limitation is that you cannot indefinitely nest sub-menus—
a menu can have a sub-menu, but a sub-menu cannot itself have a sub-sub-menu.
If the user makes a menu choice, your activity will be notified via the
onOptionsItemSelected() callback that a menu choice was selected. You are given the MenuItem
object corresponding to the selected menu choice. A typical pattern is to switch() on the menu
ID (item.getItemId()) and take appropriate action. Note that onOptionsItemSelected() is used
regardless of whether the chosen menu item was in the base menu or in a sub-menu.
Menus in Context
By and large, context menus use the same guts as option menus. The two main differences are
how you populate the menu and how you are informed of menu choices.
First you need to indicate which widget(s) on your activity have context menus. To do this,
call registerForContextMenu() from your activity, supplying the View that is the widget in need
of a context menu.
Next you need to implement onCreateContextMenu(), which, among other things, is passed
the View you supplied in registerForContextMenu(). You can use that to determine which menu
to build, assuming your activity has more than one.
The onCreateContextMenu() method gets the ContextMenu itself, the View the context menu
is associated with, and a ContextMenu.ContextMenuInfo, which tells you which item in the list
the user did the tap-and-hold over, in case you want to customize the context menu based on
that information. For example, you could toggle a checkable menu choice based on the current
state of the item.
It is also important to note that onCreateContextMenu() gets called each time the context
menu is requested. Unlike the options menu (which is built only once per activity), context
menus are discarded once they are used or dismissed. Hence, you do not want to hold onto the
supplied ContextMenu object; just rely on getting the chance to rebuild the menu to suit your
activity’s needs on demand based on user actions.
To find out when a context-menu choice was selected, implement
onContextItemSelected() on the activity. Note that you get only the MenuItem instance that was
chosen in this callback. As a result, if your activity has two or more context menus, you may
want to ensure they have unique menu-item identifiers for all their choices so you can tell them
apart in this callback. Also, you can call getMenuInfo() on the MenuItem to get the ContextMenu.
ContextMenuInfo you received in onCreateContextMenu(). Otherwise, this callback behaves the
same as onOptionsItemSelected(), described in the previous section.
Taking a Peek
In the sample project Menus/Menus at you will find an amended version of
the ListView sample (List) with an associated menu. Since the menus are defined in Java code,
the XML layout need not change and is not reprinted here.
However, the Java code has a few new behaviors, as shown here:
Murphy_2419-8C11.fm Page 115 Friday, April 10, 2009 3:34 PM
116
CHAPTER 11
■ APPLYING MENUS
public class MenuDemo extends ListActivity {
TextView selection;
String[] items={"lorem", "ipsum", "dolor", "sit", "amet",
"consectetuer", "adipiscing", "elit", "morbi", "vel",
"ligula", "vitae", "arcu", "aliquet", "mollis",
"etiam", "vel", "erat", "placerat", "ante",
"porttitor", "sodales", "pellentesque", "augue", "purus"};
public static final int EIGHT_ID = Menu.FIRST+1;
public static final int SIXTEEN_ID = Menu.FIRST+2;
public static final int TWENTY_FOUR_ID = Menu.FIRST+3;
public static final int TWO_ID = Menu.FIRST+4;
public static final int THIRTY_TWO_ID = Menu.FIRST+5;
public static final int FORTY_ID = Menu.FIRST+6;
public static final int ONE_ID = Menu.FIRST+7;
@Override
public void onCreate(Bundle icicle) {
super.onCreate(icicle);
setContentView(R.layout.main);
setListAdapter(new ArrayAdapter<String>(this,
android.R.layout.simple_list_item_1, items));
selection=(TextView)findViewById(R.id.selection);
registerForContextMenu(getListView());
}
public void onListItemClick(ListView parent, View v,
int position, long id) {
selection.setText(items[position]);
}
@Override
public void onCreateContextMenu(ContextMenu menu, View v,
ContextMenu.ContextMenuInfo menuInfo) {
populateMenu(menu);
}
@Override
public boolean onCreateOptionsMenu(Menu menu) {
populateMenu(menu);
return(super.onCreateOptionsMenu(menu));
}
Murphy_2419-8C11.fm Page 116 Friday, April 10, 2009 3:34 PM