Beginning ASP.NET 2.0 E-Commerce in C# 2005 From Novice to Professional PHẦN 5 doc
Bạn đang xem bản rút gọn của tài liệu. Xem và tải ngay bản đầy đủ của tài liệu tại đây (2.6 MB, 70 trang )
CHAPTER 8 ■ CATALOG ADMINISTRATION
259
// Enter row into edit mode
protected void grid_RowEditing(object sender, GridViewEditEventArgs e)
{
// Set the row for which to enable edit mode
grid.EditIndex = e.NewEditIndex;
// Set status message
statusLabel.Text = "Editing row # " + e.NewEditIndex.ToString();
// Reload the grid
BindGrid();
}
22. While in edit mode, instead of the Edit button, the GridView places two buttons: Update and Cancel.
To make editing functional, you need to supply code that reacts when these buttons are clicked.
Let’s start with the code that deals with the Cancel button. Follow the same procedure to generate
grid_RowCancelingEdit and complete its code like this:
// Cancel edit mode
protected void grid_RowCancelingEdit(object sender,
GridViewCancelEditEventArgs e)
{
// Cancel edit mode
grid.EditIndex = -1;
// Set status message
statusLabel.Text = "Editing canceled";
// Reload the grid
BindGrid();
}
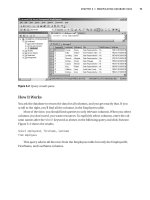
Now you have functional Edit and Cancel buttons. When the Edit button is clicked, the grid enters into
edit mode, as shown in Figure 8-21.
Figure 8-21. Editing department information
■Note The problem with automatically generated editing controls is that they aren’t configurable, unless
transformed to template columns. You’ll do this later in a separate exercise for the department description
column, where the edit text box needs to be larger than the default size.
23. When the Update button is clicked, a RowUpdating event is raised. Generate its event handler like you
did for the other two. Now add the following code for these two events:
Darie-Watson_4681C08.fm Page 259 Monday, September 19, 2005 9:55 AM
260
CHAPTER 8
■ CATALOG ADMINISTRATION
// Update row
protected void grid_RowUpdating(object sender, GridViewUpdateEventArgs e)
{
// Retrieve updated data
string id = grid.DataKeys[e.RowIndex].Value.ToString();
string name = ((TextBox)grid.Rows[e.RowIndex].Cells[0].Controls[0]).Text;
string description = ((TextBox)grid.Rows[e.RowIndex].
Cells[1].Controls[0]).Text;
// Execute the update command
bool success = CatalogAccess.UpdateDepartment(id, name, description);
// Cancel edit mode
grid.EditIndex = -1;
// Display status message
statusLabel.Text = success ? "Update successful" : "Update failed";
// Reload the grid
BindGrid();
}
24. Finally, here’s the code for the DeleteCommand event handler. Let Visual Web Developer generate its
signature for you, and then add the following code:
// Delete a record
protected void grid_RowDeleting(object sender, GridViewDeleteEventArgs e)
{
// Get the ID of the record to be deleted
string id = grid.DataKeys[e.RowIndex].Value.ToString();
// Execute the delete command
bool success = CatalogAccess.DeleteDepartment(id);
// Cancel edit mode
grid.EditIndex = -1;
// Display status message
statusLabel.Text = success ? "Delete successful" : "Delete failed";
// Reload the grid
BindGrid();
}
25. The last bit of code to write in this exercise consists of adding the addDepartmentButton_Click
event handler method. Generate its signature by double-clicking the Add button in the Design View
window and complete the code like this:
// Create a new department
protected void createDepartment_Click(object sender, EventArgs e)
{
// Execute the insert command
bool success = CatalogAccess.AddDepartment(newName.Text,
Darie-Watson_4681C08.fm Page 260 Monday, September 19, 2005 9:55 AM
CHAPTER 8 ■ CATALOG ADMINISTRATION
261
newDescription.Text);
// Display status message
statusLabel.Text = success ? "Insert successful" : "Insert failed";
// Reload the grid
BindGrid();
}
■Tip The presentation tier should do input validation when possible—for example, you can check whether
the department name and description are valid before trying to add them to the database. Later in this chapter,
you’ll learn how to implement validation using the .NET validator controls.
How It Works: DepartmentsAdmin.ascx
Be sure to test that the new features are functional. Try to add a new department, rename it, and then delete it.
This is the first exercise in which you worked with a GridView control, and it’s important to understand how this
complex control works. The GridView control is smart enough to be aware of the columns it reads from the data
source and display them to the user. Moreover, as you saw when writing the code, you just tell the grid what row you
want to enter edit mode, and it automatically transforms the labels into text boxes.
The GridView control supports a number of built-in column types: BoundField, CheckBoxField, HyperLinkField,
ButtonField, CommandField, ImageField, and TemplateField. The last one, TemplateField, really lets
you write your own HTML code for that column, whereas the others have predefined behavior. In this example, you
met some of these column types, but you’ll get to work with all of them by the end of this chapter!
BoundField is the most usual field type, simply reading the value from the database and displaying it in the grid.
Each column type has a number of options you can set that affect its behavior. The most common options are shown
in the Add New Column dialog box that you used to add your fields, but you can access more of their properties by
clicking GridView’s Smart Link and choosing the Edit Columns entry.
To change the default look of the GridView, you have three main options: You can use the Auto Format feature of
the grid (accessible by clicking the Smart Link), you can transform the columns into template columns and edit their
format manually, or you can use skins. For this case, we chose to create a default skin for the GridView, because
it offers the maximum efficiency with the least effort. Default skins apply to all controls of that kind in a web site, so
your work will also be much easier when creating other grids later in this book. If you want to have more skins for
a certain type of control, you need to create named skins by adding a SkinID property to their definition. However,
here we preferred to build a default skin to format all the grids in BalloonShop in an identical way.
The simplest way to create a skin is to create a control instance using the designer, rip the unnecessary details, and
copy what remains to the .skin file. For BalloonShop, we used styles from the CSS file in the skin, in an effort to
keep all the site’s colors in one place.
Your new C# code deals with the GridView control. For example, to enter a row into edit mode, you just need to set
the GridView’s EditItemIndex property to the index of the column you want to change in the EditCommand
event handler method:
Darie-Watson_4681C08.fm Page 261 Monday, September 19, 2005 9:55 AM
262
CHAPTER 8
■ CATALOG ADMINISTRATION
// Enter row into edit mode
protected void grid_RowEditing(object sender, GridViewEditEventArgs e)
{
// Set the row for which to enable edit mode
grid.EditIndex = e.NewEditIndex;
// Set status message
statusLabel.Text = "Editing row # " + e.NewEditIndex.ToString();
// Reload the grid
BindGrid();
}
The RowEditing event handler receives a GridViewEditEventArgs object named e, which contains, among
other details, the index of the row on which the Edit button was clicked (e.NewItemIndex). You use this value to
inform the GridView to enter in edit mode for that row. You take similar action in the CancelCommand event
handler, where you cancel edit mode by setting GridView’s EditIndex to -1. The way these two event handlers
work is fairly standard.
The methods that modify data (the event handlers for the Update and Delete buttons) need to read information from
the data grid and the ID of the item on which the action happens. Because delete and update operations are based
on departments’ IDs, you need to obtain somehow the ID of the department to be updated or deleted. The problem
is that you can’t extract DepartmentID from the visible part of the GridView, because we chose not to display it
for the user (it’s a low-level detail, useless for the user).
So, how do you know the ID associated with a GridView row? Fortunately, the designers of the GridView control
anticipated this problem and added a DataKeyNames property to the GridView, which can hold one or more keys
for each row in the grid. When creating the grid, you set its DataKeyNames property to DepartmentID, causing
the grid to retain the ID of each loaded department.
The code in grid_RowUpdating demonstrates how to get the ID of the row that is about to updated:
// Update row
protected void grid_RowUpdating(object sender, GridViewUpdateEventArgs e)
{
// Retrieve updated data
string id = grid.DataKeys[e.RowIndex].Value.ToString();
The rest of the code shows how to retrieve data from the rows of the GridView. Each row in the grid is a collection
of cells, and each cell is a collection of controls. Given that you know which control you are looking for, it becomes
a fairly easy job to get the name or description of a department. You read the first cell of the row to obtain the name
and the second cell to obtain the description. In both cases, you read the first control, which you convert to a
TextBox to be able to read the Text property.
// Retrieve updated data
string id = grid.DataKeys[e.RowIndex].Value.ToString();
string name = ((TextBox)grid.Rows[e.RowIndex].Cells[0].Controls[0]).Text;
string description = ((TextBox)grid.Rows[e.RowIndex].Cells[1].
Controls[0]).Text;
To make this functionality even clearer, take a look at the following code block, which reads the department’s name
from the grid, but in a step-by-step fashion:
Darie-Watson_4681C08.fm Page 262 Monday, September 19, 2005 9:55 AM
CHAPTER 8 ■ CATALOG ADMINISTRATION
263
protected void grid_RowUpdating(object sender, GridViewUpdateEventArgs e)
{
// Get the index of the row to be modified
int rowIndex = e.RowIndex;
// Get a reference to the row being updated
GridViewRow gridViewRow = grid.Rows[rowIndex];
// Get the first cell (one which contains the name)
TableCell tableCell = gridViewRow.Cells[0];
// Get the first control in the cell
Control control = tableCell.Controls[0];
// Access the control through a TextBox reference
TextBox textBox = (TextBox)control;
// Get the text from the TextBox
string name = textBox.Text;
After the ID, new name, and new description of the department are known, the business tier is called to apply the
changes. The CatalogAccess.UpdateDepartment method returns a Boolean value specifying whether the
update was performed successfully, and then the status label is populated based on this value:
// Execute the update command
bool success = CatalogAccess.UpdateDepartment(id, name, description);
// Cancel edit mode
grid.EditIndex = -1;
// Display status message
statusLabel.Text = success ? "Update successful" : "Update failed";
// Reload the grid
BindGrid();
}
Customizing the GridView with Template Columns
In spite of the length of the exercise that you’ve just completed, you must admit that it was so
easy to implement the editable GridView! You added columns to the GridView using Visual Web
Developer’s interface and set its layout and colors using a skin. Right now, the code of your grid
in DepartmentsAdmin.ascx looks like this:
<asp:GridView ID="grid" runat="server" DataKeyNames="DepartmentID" Width="100%"
OnRowCancelingEdit="grid_RowCancelingEdit" OnRowDeleting="grid_RowDeleting"
OnRowEditing="grid_RowEditing" OnRowUpdating="grid_RowUpdating"
AutoGenerateColumns="False">
<Columns>
<asp:BoundField DataField="Name" HeaderText="Department Name"
SortExpression="Name" />
<asp:BoundField DataField="Description" HeaderText="Department Description"
SortExpression="Description" />
<asp:HyperLinkField DataNavigateUrlFields="DepartmentID"
Darie-Watson_4681C08.fm Page 263 Monday, September 19, 2005 9:55 AM
264
CHAPTER 8
■ CATALOG ADMINISTRATION
DataNavigateUrlFormatString=" /CatalogAdmin.aspx?DepartmentID={0}"
Text="View Categories" />
<asp:CommandField ShowEditButton="True" />
<asp:ButtonField CommandName="Delete" Text="Delete" />
</Columns>
</asp:GridView>
The interesting aspect is that you can’t see any Label or TextBox controls, even though
GridView generates them when showing its data and when entering edit mode. The BoundField,
HyperLinkField, CommandField, and ButtonField columns take care of rendering themselves
without your intervention.
The problem with these automated controls is that you don’t have much flexibility with
how they show their data. Although you can use a number of techniques to format your GridView’s
styles, colors, or fonts (such as by using a skin), the only way to have complete access to the
HTML code your grid generates for a certain column is to transform that column to a template
column, instead of using predefined column types such as BoundField, HyperLinkField, and so on.
When using template columns, you need to manually supply the code for its templates.
You’ll do that in the following exercise, where you’ll enlarge the description editing TextBox
control.
■Note When transforming an existing field to a template field, its different display templates (such as the
editing template—EditItemTemplate or the normal display template—ItemTemplate) are automatically
generated for you so you won’t lose any functionality.
Exercise: Implementing a Template Column
1. Open DepartmentsAdmin.ascx in Design View, click GridView’s Smart Link and choose Edit
Columns. Select the Department Description field and click Convert this field into a TemplateField.
2. You’ll notice the panel on the right becomes empty, because now the GridView no longer takes care of
your column’s properties. Click OK.
3. Switch to Source View to see the generated code. The changes aren’t so drastic, but now instead of a
single line defining a BoundField entry, you can find a TemplateField entry containing the complete
code for the EditItemTeamplate and ItemTemplate templates. (Note that Visual Web Developer
smartly generated bound TextBox and Label controls in the two templates, so if you now execute
your project, you won’t lose any functionality.)
<asp:TemplateField HeaderText="Department Description"
SortExpression="Description">
<ItemTemplate>
<asp:Label ID="Label1" runat="server" Text='<%# Bind("Description") %>'>
</asp:Label>
</ItemTemplate>
Darie-Watson_4681C08.fm Page 264 Monday, September 19, 2005 9:55 AM
CHAPTER 8 ■ CATALOG ADMINISTRATION
265
<EditItemTemplate>
<asp:TextBox ID="TextBox1" runat="server"
Text='<%# Bind("Description") %>'>
</asp:TextBox>
</EditItemTemplate>
</asp:TemplateField>
4. While in Source View, change the name of the editing TextBox. Because you’ll need its name to access its
value from the code (when updating the departments’ details), it’s important to have a good name for it.
Change the control’s name from TextBox1 to descriptionTextBox:
<asp:TextBox ID="descriptionTextBox" runat="server"
Text='<%# Bind("Description") %>'></asp:TextBox>
5. After converting the description column to a TemplateField, you can edit its templates both in Source
View and in Design View. Switch to Design View, click GridView’s Smart Link, and choose Edit Templates.
Now, again using the Smart Link, you can choose which template to edit (see Figure 8-22).
Figure 8-22. Choosing a template to edit
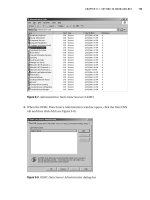
6. To modify the text box that appears when editing a department, choose EditItemTemplate from the list.
Then, select the TextBox control and modify it to suit your preferences by using the Properties window (see
Figure 8-23). For this exercise, set its TextMode property to MultiLine, Width to 350px, and Height
to 70px:
Figure 8-23. Modifying the description editing text box
7. The last step is to change the code-behind file for updating department data. Locate this line in the
grid_RowUpdating method in DepartmentsAdmin.ascx.cs:
string description = ((TextBox)grid.Rows[e.RowIndex].
Cells[1].Controls[0]).Text;
Darie-Watson_4681C08.fm Page 265 Monday, September 19, 2005 9:55 AM
8213592a117456a340854d18cee57603
266
CHAPTER 8
■ CATALOG ADMINISTRATION
8. Change this line to
string description = ((TextBox)grid.Rows[e.RowIndex].
FindControl("descriptionTextBox")).Text;
How It Works: Using Template Columns in the GridView Control
Execute the project and test the updated functionality to make sure that it still works. Template columns are useful
because they give you full control over how the column looks and behaves. In this exercise, you modified the
TextBox control used for editing the department description, but now you can use the same technique to change
any field in the table.
Because you can also change the names of the controls inside your template, you can now access them by name,
instead of by location:
string description = ((TextBox)grid.Rows[e.RowIndex].
FindControl("descriptionTextBox")).Text;
This piece of code demonstrates how to obtain a reference of the TextBox control named descriptionTextBox,
convert its Control reference to a TextBox reference, and extract its contents from there.
You’ll see some other examples of template columns later in this chapter when you’ll use CheckBox controls
instead of Labels and TextBoxes for displaying the value of True/False fields.
Administering Categories
The category administration bits are similar to what you did for departments, so we won’t need
to explain much this time. The main player in the whole categories administration part is the
CategoriesAdmin.ascx Web User Control, but first you need to write the data tier and business
tier code that will support its functionality.
Stored Procedures for Categories Administration
The three stored procedures that you need to add to your BalloonShop database are
• CreateCategory
• UpdateCategory
• DeleteCategory
The fourth stored procedure that you’ll use, GetCategories, already exists in the database.
Add these stored procedures covered in the following sections to the BalloonShop database.
CreateCategory
CreateCategory adds a new category to the database. Apart from the name and description of
the new category, you also need a DepartmentID, which specifies the department the category
belongs to. Note that you don’t need to (in fact, you can’t) specify a CategoryID because
Darie-Watson_4681C08.fm Page 266 Monday, September 19, 2005 9:55 AM
CHAPTER 8 ■ CATALOG ADMINISTRATION
267
CategoryID is an IDENTITY column in the Category table, and its value is automatically gener-
ated by the database when inserting a new record.
CREATE PROCEDURE CreateCategory
(@DepartmentID int,
@CategoryName varchar(50),
@CategoryDescription varchar(50))
AS
INSERT INTO Category (DepartmentID, Name, Description)
VALUES (@DepartmentID, @CategoryName, @CategoryDescription)
UpdateCategory
The UpdateCategory stored procedure updates the name and description of a category.
CREATE PROCEDURE UpdateCategory
(@CategoryID int,
@CategoryName varchar(50),
@CategoryDescription varchar(1000))
AS
UPDATE Category
SET Name = @CategoryName, Description = @CategoryDescription
WHERE CategoryID = @CategoryID
DeleteCategory
DeleteCategory deletes a certain category from the database. If the category has products that
belong to it, the database raises an error because the deletion affects the database integrity—
remember that you have implemented the One-to-Many relationship between Category and
Product tables using a foreign-key relationship back in Chapter 4. In this case, the error is
trapped in the business tier, which returns an error code to the presentation tier, which informs the
user that an error has occurred.
CREATE PROCEDURE DeleteCategory
(@CategoryID int)
AS
DELETE FROM Category
WHERE CategoryID = @CategoryID
Middle-Tier Methods for Categories Administration
Now you’ll write the methods of the CatalogAccess class that support the functionality required
by the CategoriesAdmin user control. These methods use the stored procedures mentioned
earlier to perform their functionality: GetCategories, CreateCategory, UpdateCategory, and
DeleteCategory.
Add these methods to your CatalogAccess class in CatalogAccess.cs:
Darie-Watson_4681C08.fm Page 267 Monday, September 19, 2005 9:55 AM
268
CHAPTER 8
■ CATALOG ADMINISTRATION
// Create a new Category
public static bool CreateCategory(string departmentId,
string name, string description)
{
// get a configured DbCommand object
DbCommand comm = GenericDataAccess.CreateCommand();
// set the stored procedure name
comm.CommandText = "CreateCategory";
// create a new parameter
DbParameter param = comm.CreateParameter();
param.ParameterName = "@DepartmentID";
param.Value = departmentId;
param.DbType = DbType.Int32;
comm.Parameters.Add(param);
// create a new parameter
param = comm.CreateParameter();
param.ParameterName = "@CategoryName";
param.Value = name;
param.DbType = DbType.String;
param.Size = 50;
comm.Parameters.Add(param);
// create a new parameter
param = comm.CreateParameter();
param.ParameterName = "@CategoryDescription";
param.Value = description;
param.DbType = DbType.String;
param.Size = 1000;
comm.Parameters.Add(param);
// result will represent the number of changed rows
int result = -1;
try
{
// execute the stored procedure
result = GenericDataAccess.ExecuteNonQuery(comm);
}
catch
{
// any errors are logged in GenericDataAccess, we ignore them here
}
// result will be 1 in case of success
return (result != -1);
}
Darie-Watson_4681C08.fm Page 268 Monday, September 19, 2005 9:55 AM
CHAPTER 8 ■ CATALOG ADMINISTRATION
269
// Update category details
public static bool UpdateCategory(string id, string name, string description)
{
// get a configured DbCommand object
DbCommand comm = GenericDataAccess.CreateCommand();
// set the stored procedure name
comm.CommandText = "UpdateCategory";
// create a new parameter
DbParameter param = comm.CreateParameter();
param.ParameterName = "@CategoryId";
param.Value = id;
param.DbType = DbType.Int32;
comm.Parameters.Add(param);
// create a new parameter
param = comm.CreateParameter();
param.ParameterName = "@CategoryName";
param.Value = name;
param.DbType = DbType.String;
param.Size = 50;
comm.Parameters.Add(param);
// create a new parameter
param = comm.CreateParameter();
param.ParameterName = "@CategoryDescription";
param.Value = description;
param.DbType = DbType.String;
param.Size = 1000;
comm.Parameters.Add(param);
// result will represent the number of changed rows
int result = -1;
try
{
// execute the stored procedure
result = GenericDataAccess.ExecuteNonQuery(comm);
}
catch
{
// any errors are logged in GenericDataAccess, we ignore them here
}
// result will be 1 in case of success
return (result != -1);
}
Darie-Watson_4681C08.fm Page 269 Monday, September 19, 2005 9:55 AM
270
CHAPTER 8
■ CATALOG ADMINISTRATION
// Delete Category
public static bool DeleteCategory(string id)
{
// get a configured DbCommand object
DbCommand comm = GenericDataAccess.CreateCommand();
// set the stored procedure name
comm.CommandText = "DeleteCategory";
// create a new parameter
DbParameter param = comm.CreateParameter();
param.ParameterName = "@CategoryId";
param.Value = id;
param.DbType = DbType.Int32;
comm.Parameters.Add(param);
// execute the stored procedure; an error will be thrown by the
// database if the Category has related categories, in which case
// it is not deleted
int result = -1;
try
{
result = GenericDataAccess.ExecuteNonQuery(comm);
}
catch
{
// any errors are logged in GenericDataAccess, we ignore them here
}
// result will be 1 in case of success
return (result != -1);
}
The CategoriesAdmin Web User Control
This exercise is very similar to the one in which you created the DepartmentsAdmin Web User
Control. The exercise mainly consists of preparing the GridView and the other constituent
controls and then implementing the code-behind functionality. Because you already have a
GridView skin, you won’t need to bother with that detail again here.
Exercise: Implementing CategoriesAdmin.ascx
1. Create a new Web User Control named CategoriesAdmin.ascx in the UserControls folder (make
sure the Place code in separate file option is checked).
2. Switch to Design View. From the toolbox, add two Label controls, a LinkButton and a GridView
control, as shown in Figure 8-24.
Darie-Watson_4681C08.fm Page 270 Monday, September 19, 2005 9:55 AM
CHAPTER 8 ■ CATALOG ADMINISTRATION
271
Figure 8-24. Creating CategoriesAdmin.ascx.
3. Set the properties for the controls as shown in Table 8-3.
4. Set the DataKeyNames property of the grid to CategoryID, the Width property to 100%, and the
AutoGenerateColumns property to False.
5. Add the controls for adding a new category manually. Switch to Source View and add the following code:
<br />
<span class="AdminPageText">Create a new category in this department:</span>
<table class="AdminPageText" cellspacing="0">.
<tr>
<td valign="top" width="100">Name:</td>
<td>
<asp:TextBox cssClass="AdminPageText" ID="newName"
Table 8-3. Setting the Properties for the Controls in CategoriesAdmin.ascx
Control Type ID Property Text Property CssClass
Property
Label statusLabel Categories Loaded AdminPageText
Label locationLabel Displaying categories for
department
AdminPageText
LinkButton goBackLink (go back to departments) AdminPageText
GridView grid
Darie-Watson_4681C08.fm Page 271 Monday, September 19, 2005 9:55 AM
272
CHAPTER 8
■ CATALOG ADMINISTRATION
Runat="server" Width="400px" />
</td>
</tr>
<tr>
<td valign="top" width="100">Description:</td>
<td>
<asp:TextBox cssClass="AdminPageText" ID="newDescription"
Runat="server" Width="400px" Height="70px" TextMode="MultiLine"/>
</td>
</tr>
</table>
<asp:Button ID="createCategory" Text="Create Category" Runat="server"
CssClass="AdminButtonText" />.
At this point, your control should look like Figure 8-25.
Figure 8-25. CategoriesAdmin.ascx in Design View
6. Click the GridView’s Smart Link and use its Add New Column command to add fields with the
properties shown in Table 8-4 (leave the other properties to their defaults). .
Darie-Watson_4681C08.fm Page 272 Monday, September 19, 2005 9:55 AM
8213592a117456a340854d18cee57603
CHAPTER 8 ■ CATALOG ADMINISTRATION
273
7. The template field from the list is the View Products link, which you’re creating as a TemplateField
because the HyperLinkField isn’t flexible enough to generate the kind of link you need to create.
Switch to Source View and modify the code of the template field like this:
<asp:TemplateField>
<ItemTemplate>
<asp:HyperLink
Runat="server" ID="link"
NavigateUrl='<%# " /CatalogAdmin.aspx?DepartmentID=" + Request
.QueryString["DepartmentID"] + "&CategoryID=" + Eval("CategoryID")%>'
Text="View Products">
</asp:HyperLink>
</ItemTemplate>
</asp:TemplateField>.
8. Transform the Category Description field into a template column, just like you did for the
description column in DepartmentsAdmin. Then, edit the column’s EditItemTemplate like this:
<asp:TemplateField HeaderText="Category Description"
SortExpression="Description">
<ItemTemplate>
<asp:Label ID="Label1" runat="server" Text='<%# Bind("Description") %>'>
</asp:Label>
</ItemTemplate>.
<EditItemTemplate>
<asp:TextBox ID="descriptionTextBox" runat="server" TextMode="MultiLine"
Text='<%# Bind("Description") %>' Height="70px" Width="350px" />
</EditItemTemplate>
</asp:TemplateField>
Switch to Design View and verify that your control looks like Figure 8-26.
Table 8-4. Setting GridView’s Field Properties
Column Type Header Text Data Field Other Properties
BoundField Category Name Name
BoundField Category Description Description
TemplateField
CommandField Select Edit/Update and
Show Cancel Button
check boxes
ButtonField Set Command Name to
Delete and set Text to
Delete
Darie-Watson_4681C08.fm Page 273 Monday, September 19, 2005 9:55 AM
274
CHAPTER 8
■ CATALOG ADMINISTRATION
Figure 8-26. CategoriesAdmin.ascx in Design View
9. Now you need to deal with the code-behind file. Use the techniques you already know to have
Visual Web Developer generate the method signatures for you, and write the following code to
CategoriesAdmin.ascx.cs:
protected void Page_Load(object sender, EventArgs e)
{
// Load the grid only the first time the page is loaded
if (!Page.IsPostBack)
{
// Load the categories grid
BindGrid();
// Get DepartmentID from the query string
string departmentId = Request.QueryString["DepartmentID"];
// Obtain the department's name
DepartmentDetails dd = CatalogAccess.GetDepartmentDetails(departmentId); .
string departmentName = dd.Name;
// Set the controls' properties
statusLabel.ForeColor = System.Drawing.Color.Red;
locationLabel.Text = "Displaying categories for department <b> "
+ departmentName + "</b>";
}
}
Darie-Watson_4681C08.fm Page 274 Monday, September 19, 2005 9:55 AM
CHAPTER 8 ■ CATALOG ADMINISTRATION
275
// Populate the GridView with data
private void BindGrid()
{
// Get DepartmentID from the query string
string departmentId = Request.QueryString["DepartmentID"];
// Get a DataTable object containing the categories
grid.DataSource = CatalogAccess.GetCategoriesInDepartment(departmentId);
// Bind the data grid to the data source
grid.DataBind();
}
// Enter row into edit mode
protected void grid_RowEditing(object sender, GridViewEditEventArgs e)
{
// Set the row for which to enable edit mode
grid.EditIndex = e.NewEditIndex;
// Set status message
statusLabel.Text = "Editing row # " + e.NewEditIndex.ToString();.
// Reload the grid
BindGrid();
}
// Cancel edit mode
protected void grid_RowCancelingEdit(object sender,
GridViewCancelEditEventArgs e)
{
// Cancel edit mode
grid.EditIndex = -1;
// Set status message
statusLabel.Text = "Editing canceled";
// Reload the grid
BindGrid();
}
// Update row
protected void grid_RowUpdating(object sender, GridViewUpdateEventArgs e)
{
// Retrieve updated data
string id = grid.DataKeys[e.RowIndex].Value.ToString();
string name = ((TextBox)grid.Rows[e.RowIndex].Cells[0].Controls[0]).Text;
string description = ((TextBox)grid.Rows[e.RowIndex].FindControl
("descriptionTextBox")).Text;
// Execute the update command
bool success = CatalogAccess.UpdateCategory(id, name, description); .
// Cancel edit mode
grid.EditIndex = -1;
Darie-Watson_4681C08.fm Page 275 Monday, September 19, 2005 9:55 AM
276
CHAPTER 8
■ CATALOG ADMINISTRATION
// Display status message
statusLabel.Text = success ? "Update successful" : "Update failed";
// Reload the grid
BindGrid();
}
// Delete a record
protected void grid_RowDeleting(object sender, GridViewDeleteEventArgs e)
{
// Get the ID of the record to be deleted
string id = grid.DataKeys[e.RowIndex].Value.ToString();
// Execute the delete command
bool success = CatalogAccess.DeleteCategory(id);
// Cancel edit mode
grid.EditIndex = -1;
// Display status message
statusLabel.Text = success ? "Delete successful" : "Delete failed";.
// Reload the grid
BindGrid();
}
// Create a new category
protected void createCategory_Click(object sender, EventArgs e)
{
// Get DepartmentID from the query string
string departmentId = Request.QueryString["DepartmentID"];
// Execute the insert command
bool success = CatalogAccess.CreateCategory(departmentId,
newName.Text, newDescription.Text);
// Display results
statusLabel.Text = success ? "Insert successful" : "Insert failed";
// Reload the grid
BindGrid();
}
// Redirect to the department's page
protected void goBackLink_Click(object sender, EventArgs e)
{
Response.Redirect(Request.ApplicationPath + "/CatalogAdmin.aspx");
}
How It Works: CategoriesAdmin.ascx
Because this exercise was so similar to the exercise for administering departments, we won’t go into many
details here.
When creating the grid, the main difference was creating the View Products column as a TemplateField rather
than as a HyperLinkField. This is because a more complex link had to be created, which needed to include both
the CategoryID (from the data source) and the DepartmentID (from the query string).
Darie-Watson_4681C08.fm Page 276 Monday, September 19, 2005 9:55 AM
CHAPTER 8 ■ CATALOG ADMINISTRATION
277
<asp:HyperLink
Runat="server" ID="link"
NavigateUrl='<%# " /CatalogAdmin.aspx?DepartmentID=" + Request
.QueryString["DepartmentID"] + "&CategoryID=" + Eval("CategoryID")%>'
Text="View Products">
</asp:HyperLink>
Note that we used the Eval function here, although the code automatically generated by Visual Web Developer uses
Bind. As far as your code is concerned, these functions have similar functionality, but in other circumstances, Bind
can be used to implement two-way data binding (we don’t use this feature in this book).
As far as the code in the code-behind file is concerned, compared to the code for administering departments, some-
times you need to read the DepartmentID parameter from the query string, which represents the ID of the
department for which you’re editing the categories.
You also have a LinkButton control that generates the link for going back to the main page. To implement its function-
ality, you composed the link to the main catalog admin page by reading the value of Request.ApplicationPath.
Administering Products
You’re now ready for the next major part of the catalog administration page: the place where
you edit the products that belong to the selected category. This one has a few more controls
than the others, as shown in Figure 8-27.
Figure 8-27. The products administration page
Darie-Watson_4681C08.fm Page 277 Monday, September 19, 2005 9:55 AM
278
CHAPTER 8
■ CATALOG ADMINISTRATION
The interface is a bit more complex, but the theory isn’t much more complicated. You just
need to display the products that belong to a selected category and allow the user to add new
products to that category. The product-deleting feature is offered via a separate page, so you
won’t see a Delete link here.
Stored Procedures for Products Administration
Three stored procedures support the user interface functionality: GetAllProductsIncategory,
CreateProduct, and UpdateProduct. The procedures are described in the following sections.
GetAllProductsInCategory
GetAllProductsInCategory is your admin stored procedure that returns the list of products in a
category and is a simplified version of GetProductsInCategory, which you created in Chapter 4.
Add the stored procedure to your BalloonShop database:
CREATE PROCEDURE GetAllProductsInCategory
(@CategoryID INT)
AS
SELECT Product.ProductID, Name, Description, Price, Image1FileName,
Image2FileName, OnDepartmentPromotion, OnCatalogPromotion
FROM Product INNER JOIN ProductCategory
ON Product.ProductID = ProductCategory.ProductID
WHERE ProductCategory.CategoryID = @CategoryID
CreateProduct
The CreateProduct stored procedure is called to create a new product and assign it to a cate-
gory. After adding the new product’s record to the Product table, you read the @@Identity value
to find out the generated ID, and then you assign this ID to the mentioned category. Add this
stored procedure to your BalloonShop database:
CREATE PROCEDURE CreateProduct
(@CategoryID INT,
@ProductName VARCHAR(50),
@ProductDescription VARCHAR(1000),
@ProductPrice MONEY,
@Image1FileName VARCHAR(50),
@Image2FileName VARCHAR(50),
@OnDepartmentPromotion BIT,
@OnCatalogPromotion BIT)
AS
Declare a variable to hold the generated product ID
DECLARE @ProductID int
Create the new product entry
Darie-Watson_4681C08.fm Page 278 Monday, September 19, 2005 9:55 AM
CHAPTER 8 ■ CATALOG ADMINISTRATION
279
INSERT INTO Product
(Name,
Description,
Price,
Image1FileName,
Image2FileName,
OnDepartmentPromotion,
OnCatalogPromotion )
VALUES
(@ProductName,
@ProductDescription,
@ProductPrice,
@Image1FileName,
@Image2FileName,
@OnDepartmentPromotion,
@OnCatalogPromotion)
Save the generated product ID to a variable
SELECT @ProductID = @@Identity
Associate the product with a category
INSERT INTO ProductCategory (ProductID, CategoryID)
VALUES (@ProductID, @CategoryID)
This line of code is of particular importance:
SELECT @ProductID = @@Identity
Identity columns are automatically generated by the database. If you’ve ever wondered
how to determine which value has been generated for an identity column, here’s the answer:
the @@Identity system value. This needs to be saved into a variable immediately after the INSERT
command because its value is reset after other SQL statements execute. After you determine
which ID was generated for the new product, you can assign it to the category you received as
a parameter:
INSERT INTO ProductCategory (ProductID, CategoryID)
VALUES (@ProductID, @CategoryID)
UpdateProduct
The UpdateProduct stored procedure updates the information of a product:
CREATE PROCEDURE UpdateProduct
(@ProductID INT,
@ProductName VARCHAR(50),
@ProductDescription VARCHAR(5000),
@ProductPrice MONEY,
@Image1FileName VARCHAR(50),
@Image2FileName VARCHAR(50),
@OnDepartmentPromotion BIT,
@OnCatalogPromotion BIT)
Darie-Watson_4681C08.fm Page 279 Monday, September 19, 2005 9:55 AM
8213592a117456a340854d18cee57603
280
CHAPTER 8
■ CATALOG ADMINISTRATION
AS
UPDATE Product
SET Name = @ProductName,
Description = @ProductDescription,
Price = @ProductPrice,
Image1FileName = @Image1FileName,
Image2FileName = @Image2FileName,
OnDepartmentPromotion = @OnDepartmentPromotion,
OnCatalogPromotion = @OnCatalogPromotion
WHERE ProductID = @ProductID
Middle-Tier Methods for Products Administration
The methods you write here, GetAllProductsInCategory, CreateProduct, and UpdateProduct,
although long, are similar to what you have done so far.
What is important to note is the different error-handling strategies implemented in these
methods. In GetAllProductsInCategory (and in all the other Get methods), we consider any
errors are important enough to be signaled to the user with an “oops” message, so we don’t
catch them in the business tier.
Errors with update- and create- type of methods are more likely due to bad input data, so
we prefer to signal with a “friendlier” error message instead of allowing the error to cause the
Oooops.aspx page to display. In these cases, we catch any potential exceptions to prevent them
from propagating, and we return the success value as a bool value. The presentation tier decides
what to tell the visitor depending on this value.
Add the following code to your CatalogAccess class:
// retrieve the list of products in a category
public static DataTable GetAllProductsInCategory(string categoryId)
{
// get a configured DbCommand object
DbCommand comm = GenericDataAccess.CreateCommand();
// set the stored procedure name
comm.CommandText = "GetAllProductsInCategory";
// create a new parameter
DbParameter param = comm.CreateParameter();
param.ParameterName = "@CategoryID";
param.Value = categoryId;
param.DbType = DbType.Int32;
comm.Parameters.Add(param);
// execute the stored procedure and save the results in a DataTable
DataTable table = GenericDataAccess.ExecuteSelectCommand(comm);
return table;
}
Darie-Watson_4681C08.fm Page 280 Monday, September 19, 2005 9:55 AM
CHAPTER 8 ■ CATALOG ADMINISTRATION
281
// Create a new product
public static bool CreateProduct(string categoryId, string name, string description,
string price, string image1FileName, string image2FileName,
string onDepartmentPromotion, string onCatalogPromotion)
{
// get a configured DbCommand object
DbCommand comm = GenericDataAccess.CreateCommand();
// set the stored procedure name
comm.CommandText = "CreateProduct";
// create a new parameter
DbParameter param = comm.CreateParameter();
param.ParameterName = "@CategoryID";
param.Value = categoryId;
param.DbType = DbType.Int32;
comm.Parameters.Add(param);
// create a new parameter
param = comm.CreateParameter();
param.ParameterName = "@ProductName";
param.Value = name;
param.DbType = DbType.String;
param.Size = 50;
comm.Parameters.Add(param);
// create a new parameter
param = comm.CreateParameter();
param.ParameterName = "@ProductDescription";
param.Value = description;
param.DbType = DbType.AnsiString;
param.Size = 5000;
comm.Parameters.Add(param);
// create a new parameter
param = comm.CreateParameter();
param.ParameterName = "@ProductPrice";
param.Value = price;
param.DbType = DbType.Decimal;
comm.Parameters.Add(param);
// create a new parameter
param = comm.CreateParameter();
param.ParameterName = "@Image1FileName";
param.Value = image1FileName;
param.DbType = DbType.String;
comm.Parameters.Add(param);
Darie-Watson_4681C08.fm Page 281 Monday, September 19, 2005 9:55 AM
282
CHAPTER 8
■ CATALOG ADMINISTRATION
// create a new parameter
param = comm.CreateParameter();
param.ParameterName = "@Image2FileName";
param.Value = image2FileName;
param.DbType = DbType.String;
comm.Parameters.Add(param);
// create a new parameter
param = comm.CreateParameter();
param.ParameterName = "@OnDepartmentPromotion";
param.Value = onDepartmentPromotion;
param.DbType = DbType.Boolean;
comm.Parameters.Add(param);
// create a new parameter
param = comm.CreateParameter();
param.ParameterName = "@OnCatalogPromotion";
param.Value = onCatalogPromotion;
param.DbType = DbType.Boolean;
comm.Parameters.Add(param);
// result will represent the number of changed rows
int result = -1;
try
{
// execute the stored procedure
result = GenericDataAccess.ExecuteNonQuery(comm);
}
catch
{
// any errors are logged in GenericDataAccess, we ignore them here
}
// result will be 1 in case of success
return (result >= 1);
}
// Update an existing product
public static bool UpdateProduct(string productId, string name, string description,
string price, string image1FileName, string image2FileName, string
onDepartmentPromotion, string onCatalogPromotion)
{
// get a configured DbCommand object
DbCommand comm = GenericDataAccess.CreateCommand();
// set the stored procedure name
comm.CommandText = "UpdateProduct";
Darie-Watson_4681C08.fm Page 282 Monday, September 19, 2005 9:55 AM
CHAPTER 8 ■ CATALOG ADMINISTRATION
283
// create a new parameter
DbParameter param = comm.CreateParameter();
param.ParameterName = "@ProductID";
param.Value = productId;
param.DbType = DbType.Int32;
comm.Parameters.Add(param);
// create a new parameter
param = comm.CreateParameter();
param.ParameterName = "@ProductName";
param.Value = name;
param.DbType = DbType.String;
param.Size = 50;
comm.Parameters.Add(param);
// create a new parameter
param = comm.CreateParameter();
param.ParameterName = "@ProductDescription";
param.Value = description;
param.DbType = DbType.AnsiString;
param.Size = 5000;
comm.Parameters.Add(param);
// create a new parameter
param = comm.CreateParameter();
param.ParameterName = "@ProductPrice";
param.Value = price;
param.DbType = DbType.Decimal;
comm.Parameters.Add(param);
// create a new parameter
param = comm.CreateParameter();
param.ParameterName = "@Image1FileName";
param.Value = image1FileName;
param.DbType = DbType.String;
param.Size = 50;
comm.Parameters.Add(param);
// create a new parameter
param = comm.CreateParameter();
param.ParameterName = "@Image2FileName";
param.Value = image2FileName;
param.DbType = DbType.String;
param.Size = 50;
comm.Parameters.Add(param);
Darie-Watson_4681C08.fm Page 283 Monday, September 19, 2005 9:55 AM