Beginning C# 2008 Databases From Novice to Professional phần 3 doc
Bạn đang xem bản rút gọn của tài liệu. Xem và tải ngay bản đầy đủ của tài liệu tại đây (1.61 MB, 52 trang )
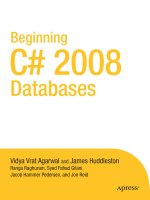
Figure 5-2. Query results pane
How It Works
You ask the database to return the data for all columns, and you get exactly that. If you
scroll to the right, you’ll find all the columns in the Employees table.
Most of the time, you should limit queries to only relevant columns. When you select
columns you don’t need, you waste resources. To explicitly select columns, enter the col-
umn names after the
SELECT keyword as shown in the following query and click Execute.
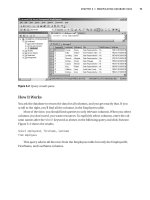
Figure 5-3 shows the results.
Select employeeid, firstname, lastname
from employees
This query selects all the rows from the Employees table but only the EmployeeID,
FirstName, and LastName columns.
CHAPTER 5 ■ MANIPULATING DATABASE DATA 75
9004ch05final.qxd 12/13/07 4:17 PM Page 75
Figure 5-3. Selecting specific columns
Using the WHERE Clause
Queries can have WHERE clauses. The WHERE clause allows you to specify criteria for select-
ing rows. This clause can be complex, but we’ll stick to a simple example for now. The
syntax is as follows:
WHERE <column1> <operator> <column2 / Value>
Here, <operator> is a comparison operator (for example, =, <>, >, or <). (Table 5-1, later in
the chapter, lists the T-SQL comparison operators.)
Try It Out: Refining Your Query
In this exercise, you’ll see how to refine your query.
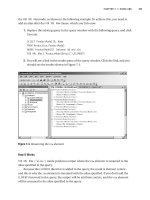
1. Add the following WHERE clause to the query in Figure 5-3.
Where country = 'USA'
2. R
un the quer
y b
y pressing F5, and you should see the results shown in Figure 5-4.
CHAPTER 5 ■ MANIPULATING DATABASE DATA76
9004ch05final.qxd 12/13/07 4:17 PM Page 76
Figure 5-4. Using a WHERE clause
■Caution SQL keywords and table and column names aren’t case sensitive, but string literals (enclosed
in single quotes) are. This is why we use 'USA', not 'usa', for this example.
How It Works
The new query returns the data for columns Emplo
yeeID, FirstName, and LastName
from the Employees table, but only for rows where the Country column value equals
“USA”.
CHAPTER 5 ■ MANIPULATING DATABASE DATA 77
9004ch05final.qxd 12/13/07 4:17 PM Page 77
Using Comparison Operators in a WHERE Clause
You can use a number of different comparison operators in a WHERE clause (see Table 5-1).
Table 5-1. Comparison Operators
Operator Description Example
= Equals EmployeeID = 1
<
Less than EmployeeID < 1
> Greater than EmployeeID > 1
<=
Less than or equal to EmployeeID <= 1
>= Greater than or equal to EmployeeID >= 1
<> Not equal to EmployeeID <> 1
!=
Not equal to EmployeeID != 1
!< Not less than EmployeeID !< 1
!> Not greater than EmployeeID !> 1
■Tip As mentioned earlier, every database vendor has its own implementation of SQL.This discussion is
specific to T-SQL; for example, standard SQL doesn’t have the
!= operator and calls <> the not equals oper-
ator
. In fact, standard SQL calls the expressions in a WHERE clause predicates; we’ll use that term because
predicates are either true or false, but other expressions don’t have to be. If you work with another version
of SQL, please refer to its documentation for specifics.
In addition to these operators, the LIKE operator (see Table 5-2) allows you to match
patter
ns in character data. As with all SQL character data, strings must be enclosed in
single quotes (
'). (Chapter 4 co
vers the
LIKE oper
ator in more detail.)
T
able 5-2.
The LIKE O
perator
Operator Description Example
LIKE Allows you to specify a pattern WHERE Title LIKE 'Sales%' selects all rows
where the Title column contains a value that
star
ts with the wor
d
“Sales” followed by zero or
more characters.
CHAPTER 5 ■ MANIPULATING DATABASE DATA78
9004ch05final.qxd 12/13/07 4:17 PM Page 78
You can use four different wildcards in the pattern. Chapter 4 covers these wildcards
in detail, but to briefly review, we list them here in Table 5-3.
Table 5-3. Wildcard Characters
Wildcard Description
% Any combination of characters. Where FirstName LIKE 'Mc%' selects all rows where
the FirstName column equals McDonald, McBadden, McMercy, and so on.
_ Any one character. WHERE Title LIKE '_ales' selects all rows where the Title column
equals Aales, aales, Bales, bales, and so on.
[ ] A single character within a range [a-d] or set [abcd]. WHERE Title LIKE '[bs]ales'
selects all rows where the Title column equals either the bales or sales.
[^] A single character not within a range [^a-d] or set [^abcd].
Sometimes it’s useful to select rows where a value is unknown. When no value has
been assigned to a column, the column is
NULL. (This isn’t the same as a column that con-
tains the value
0 or a blank.) To select a row with a column that’s NULL, use the IS [NOT]
NULL operator (see Table 5-4).
Table 5-4. The IS [NOT] NULL Operator
Operator Description Example
IS NULL Allows you to select r
ows where
WHERE Region IS NULL returns all r
ows where
a column has no value Region has no value.
IS NOT NULL Allows you to select rows where WHERE Region IS NOT NULL returns all rows
a column has a value where Region has a value.
■Note You must use the IS NULL and IS NOT NULL operators (collectively called the null predicate in
standard SQL) to select or exclude
NULL column values, respectively. The following is a valid query but
al
ways produces zero rows:
SELECT * FROM employees WHERE Region = NULL.
If you change
= to IS,
the quer
y will read as
SELECT * FROM employees WHERE Region IS NULL,
and it will return ro
ws where
regions have no value.
To select values in a range or in a set, you can use the BETWEEN and IN operators (see
Table 5-5). The negation of these two is
NOT BETWEEN and NOT IN.
CHAPTER 5 ■ MANIPULATING DATABASE DATA 79
9004ch05final.qxd 12/13/07 4:17 PM Page 79
Table 5-5. The BETWEEN and IN Operators
Operator Description Example
BETWEEN True if a value is within a range. WHERE extension BETWEEN 400 AND 500 returns
the rows where Extension is between 400 and
5
00, inclusive.
IN True if a value is in a list. The list WHERE city IN ('Seattle', 'London') returns
can be the result of a subquery. the rows where City is either Seattle or London.
Combining Predicates
Quite often you’ll need to use more than one predicate to filter your data. You can use the
logical operators shown in Table 5-6.
Table 5-6. SQL Logical Operators
Operator Description Example
AND Combines two expressions, HERE (title LIKE 'Sales%' AND lastname
evaluating the complete ='Peacock')
expression as true only if both
are true
NOT Negates a Boolean value WHERE NOT (title LIKE 'Sales%' AND lastname
='Peacock')
OR Combines two expressions, WHERE (title = 'Peacock' OR title = 'King')
evaluating the complete
expression as true if either
is true
When you use these operators, it’s often a good idea to use parentheses to clarify the
conditions. In complex queries, this may be absolutely necessary.
Sorting Data
After you’ve filtered the data you want, you can sort the data by one or more columns and
in a certain direction. Since tables are by definition unsorted, the order in which rows are
r
etr
ieved by a query is unpredictable. To impose an ordering, you use the
ORDER BY clause
.
ORDER BY <column> [ASC | DESC] {, n}
CHAPTER 5 ■ MANIPULATING DATABASE DATA80
9004ch05final.qxd 12/13/07 4:17 PM Page 80
The <column> is the column that should be used to sort the result. The {, n} syntax
means you can specify any number of columns separated by commas. The result will be
sorted in the order in which you specify the columns.
The following are the two sort directions:
•
ASC: Ascending (1, 2, 3, 4, and so on)
•
DESC: Descending (10, 9, 8, 7, and so on)
If you omit the
ASC or DESC keywords, the sort order defaults to ASC.
The following is the basic syntax for queries:
SELECT <column>
FROM <table>
WHERE <predicate>
ORDER BY <column> ASC | DESC
Now that you’ve seen it, you’ll put this syntax to use in an example.
Try It Out:
Writing an Enhanced Query
In this example, you’ll code a query that uses the basic syntax just shown. You want to do
the following:
• Select all the orders that have been handled by employee 5.
• Select the orders shipped to either France or Brazil.
• Display only OrderID, EmployeeID, CustomerID, OrderDate, and ShipCountry.
• Sort the orders by the destination country and the date the order was placed.
Does this sound complicated? Give it a try. Open a New Query window in SQL Server
Management Studio. Enter the following query and click Execute. You should see the
results shown in Figure 5-5.
select orderid,employeeid,customerid,orderdate,shipcountry
from orders
where employeeid = 5 and shipcountry in ('Brazil', 'France')
order by shipcountry asc,orderdate asc
CHAPTER 5 ■ MANIPULATING DATABASE DATA 81
9004ch05final.qxd 12/13/07 4:17 PM Page 81
Figure 5-5. Filtering and sorting data
How It Works
Let’s look at the clauses individually. The SELECT list specifies which columns you want
to use.
select orderid,employeeid,customerid,orderdate,shipcountry
The FROM clause specifies that you want to use the Orders table.
from orders
The WHERE clause is a bit mor
e complicated. I
t consists of two predicates that individ-
ually state the follo
wing:
• EmployeeID must be 5.
• ShipCountry must be in the list Brazil or France.
CHAPTER 5 ■ MANIPULATING DATABASE DATA82
9004ch05final.qxd 12/13/07 4:17 PM Page 82
As these predicates are combined with AND, they both must evaluate to true for a row
to be included in the result.
w
here employeeid = 5 and shipcountry in ('Brazil', 'France')
The ORDER BY clause specifies the order in which the rows are sorted. The rows will be
sorted by ShipCountry first and then by OrderDate.
order by shipcountry asc,orderdate asc
Using SELECT INTO Statements
A SELECT INTO statement is used to create a new table containing or not containing the
result set returned by a
SELECT query. SELECT INTO copies the exact table structure and
data into another table specified in the
INTO clause. Usually, a SELECT query returns result
sets to the client application.
Including the
# (hash) symbol before table name results in creating a temporary
table, which ends up in the tempdb system database, regardless of which database you
are working in. Specifying the table name without the
# symbol gives you a permanent
table in your database (not in tempdb).
The columns of the newly created table inherit the column names, their data types,
whether columns can contain null values or not, and any associated
IDENTITY property
from the source table. However, the
SELECT INTO clause does have some restrictions: it
will not copy any constraints, indexes, or triggers from the source table.
Try It Out: Creating a New Table
In this exercise, you’ll see how to create a table using a SELECT INTO statement. Open a
New Query window in SQL Server Management Studio Express (remember to make
Northwind your query context). Enter the following query and click Execute. You should
see the results shown in Figure 5-6.
select orderid,employeeid,customerid,orderdate,shipcountry
into #myorder
from orders
CHAPTER 5 ■ MANIPULATING DATABASE DATA 83
9004ch05final.qxd 12/13/07 4:17 PM Page 83
Figure 5-6. Creating a new table
How It Works
In the following statement:
select orderid,employeeid,customerid,orderdate,shipcountry
into #myorder
from orders
you define the SELECT list, the INTO clause with a table name prefixed by #, and then the
FROM clause. This means that you want to retrieve all the specified columns from the
Orders table and insert them into the #myorder table.
E
v
en though y
ou write the query in Northwind, the #myorder table gets created
inside tempdb because of the pr
efixed
# symbol (see F
igur
e 5-7).
A tempor
ar
y table can reside in the tempdb database as long as you have the query
windo
w open. I
f you close the query window from which you created your temporary
table
, and r
egardless of whether you saved the query, the temporary table will be auto-
matically deleted fr
om tempdb
.
O
nce the table is cr
eated, you can use it like any other table (see Figure 5-8).
Tempor
ary tables will also be deleted if you close SQL Server Management Studio
Express, because the tempdb database gets rebuilt every time you close and open SQL
Server Management Studio Express again.
CHAPTER 5 ■ MANIPULATING DATABASE DATA84
9004ch05final.qxd 12/13/07 4:17 PM Page 84
Figure 5-7.Viewing the newly created table in tempdb
Figure 5-8. Retrieving data from your temporary table
CHAPTER 5 ■ MANIPULATING DATABASE DATA 85
9004ch05final.qxd 12/13/07 4:17 PM Page 85
Try It Out: Using SELECT INTO to Copy Table Structure
Sometimes you will want to copy only the table structure, not the data inside the table
(e.g., you only need an empty copy of the table). To do so, you need to include a condition
that must not return true. In this case, you are free to insert your own data.
To try this out, enter the following query, and you should get the results shown in
Figure 5-9.
select orderid,employeeid,customerid,orderdate,shipcountry
into #myemptyorder
from orders
where 0=1
Figure 5-9. Creating an empty table
How It Wor
ks
The magic condition where 0=1, which is a false condition, has done all the work for you,
and only table structure has been copied into the tempdb database.
To view this table, you can navigate to the tempdb database in Object Explorer,
expand the Temporary Tables node if it isn’t already expanded, select the node, right-click
it, and select Refresh to refresh the tables list. You should see the newly created
#myemptyorder table as shown in Figure 5-10.
CHAPTER 5 ■ MANIPULATING DATABASE DATA86
9004ch05final.qxd 12/13/07 4:17 PM Page 86
Figure 5-10. Viewing a newly created empty table in tempdb
As you can see, the table has structure but not data, the false condition you included.
If you were to run a
SELECT query on the #myemptyorder table as shown in
Figure 5-11, the query would return nothing, clearly demonstrating that only the
table structure has been copied because only field names are displayed.
Figure 5-11. W
riting a
SELECT quer
y on an empty table in tempdb
CHAPTER 5 ■ MANIPULATING DATABASE DATA 87
9004ch05final.qxd 12/13/07 4:17 PM Page 87
Inserting Data
The next important task you need to be able to do is add data (e.g., add rows) to a table.
You do this with the
I
NSERT
statement. The I
NSERT
statement is much simpler than a
query, particularly because the
W
HERE
and O
RDER BY
clauses have no meaning when insert-
ing data and therefore aren’t used.
A basic
INSERT statement has these parts:
INSERT INTO <table>
(<column1>, <column2>, , <columnN>)
VALUES (<value1>, <value2>, , <valueN>)
Using this syntax, let’s add a new row to the Shippers table of the Northwind data-
base. Before you insert it, let’s look at the table. In the SQL Server Management Studio
Express Object Explorer, select the Northwind database, right-click the Shippers table,
and click Open Table. The table has three rows, which are displayed in a tabbed window
(see Figure 5-12).
Figure 5-12. The Shippers table before adding a row
Try It Out: Inserting a New Row
To insert a new row into a table, open a New Query window in SQL Server Management
Studio Express. Enter the following query and click Execute.
CHAPTER 5 ■ MANIPULATING DATABASE DATA88
9004ch05final.qxd 12/13/07 4:17 PM Page 88
insert into shippers ( companyname, phone )
values ('GUIPundits', '+91 9820801756')
Executing this statement in the query pane should produce a Messages window
reporting “(1 row(s) affected)”. You should see the results shown in Figure 5-13.
Figure 5-13. Inserting a new row into the Shippers table
How It Works
The first column, ShipperID, is an identity column, and you can’t insert values into it
explicitly—SQL Server database engine will make sure that a unique and SQL server–
gener
ated v
alue is inserted for the ShipperID field. So, the
INSERT statement needs to be
wr
itten in such a way that y
ou specify the column list you want to insert values for explic-
itly
; though the S
hippers table contains three fields, ShipperID is an identity column, and
it does not expect any v
alue to be inser
ted from the user. But by default, an
INSERT state
-
ment cannot judge whether the column y
ou ar
e not passing a value for is an identity
column.
Thus, to prevent errors, you specify the column list and then pass the respective
v
alues to these fields as shown in the following query:
insert into shippers( companyname, phone )
values ('GUIPundits', '+91 9820801756')
CHAPTER 5 ■ MANIPULATING DATABASE DATA 89
9004ch05final.qxd 12/13/07 4:17 PM Page 89
■Note INSERT statements have a limitation. When you try to insert data directly into a foreign key table,
and the primary key table has no related parent record, you will receive an error because that value needs to
be available in the primary key table before you insert it into the foreign key table. For example, the Shippers
table is the PK table for the Orders table, which has an FK column named ShipVia that references the PK col-
umn ShipperID of Shippers table. In this scenario, you can’t insert a row until you have inserted it into the
Shippers table.
After inserting the row, return to the dbo.Shippers table in Object Explorer, right-
click, and open the table again. You’ll see that the new row has been added, as shown in
Figure 5-14.
Figure 5-14. The Shippers table after adding a row
Be careful to insert data of the correct data type. In this example, both the columns
are of character type, so you inserted strings. If one of the columns had been of integer
type, you would have inserted an integer value instead.
CHAPTER 5 ■ MANIPULATING DATABASE DATA90
9004ch05final.qxd 12/13/07 4:17 PM Page 90
Updating Data
Another important task you need to be able to do is change data. You do this with the
U
PDATE
statement. When coding U
PDATE
statements, you must be careful to include a W
HERE
clause, or you’ll update all the rows in a table. So, always code an appropriate W
HERE
clause, or you won’t change the data you intend to change.
Now that you’re aware of the implications of the
UPDATE statement, let’s take a good
look at it. In essence, it’s a simple statement that allows you to update values in one or
more rows and columns.
UPDATE <table>
SET <column1> = <value1>, <column2> = <value2>, , <columnN> = <valueN>
WHERE <predicate>
As an example, imagine that the company you added earlier, GUIPundits, has
realized that, though (unfortunately) accurate, its name isn’t good for business, so it’s
changing its name to Pearl HR Solution. To make this change in the database, you first
need to locate the row to change. More than one company could have the same name,
so you shouldn’t use the CompanyName column as the key. Instead, look back at
Figure 5-10 and note the ShipperID value for GUIPundits.
Try It Out: Updating a Row
To change a row’s value, open a New Query window in SQL Server Management Studio
Express. Enter the following query and click Execute.
update shippers
set companyname = 'PearlHRSolution'
where shipperid = 4
How It Works
The ShipperID is the primary key (unique identifier for rows) of the Shippers table, so
you can use it to locate the one row we want to update. Running the query should pro-
duce a Messages pane reporting “(1 row(s) affected)”. Switch back to Object Explorer and
open the Shippers table, and you’ll see that CompanyName has changed, as shown in
Figure 5-15.
CHAPTER 5 ■ MANIPULATING DATABASE DATA 91
9004ch05final.qxd 12/13/07 4:17 PM Page 91
Figure 5-15. The Shippers table after updating a row
When you update more than one column, you still use the SET keyword only once,
and separate column names and their respective values you want to set by comma. For
example, the following statement would change both the name and the phone of the
company
:
update shippers
set companyname = 'PearlHRSolution',
phone = '+91 9819133949'
where shipperid = 4
If you were to switch back to Object Explorer and open the Shippers table, you would
see that the time value for Phone has also changed, as shown in Figure 5-16.
CHAPTER 5 ■ MANIPULATING DATABASE DATA92
9004ch05final.qxd 12/13/07 4:17 PM Page 92
Figure 5-16. The Shippers table after updating multiple columns of a row
Deleting Data
The final important task you need to be able to do that we’ll discuss in this chapter is
remo
ve data. You do this with the
DELETE statement. The DELETE statement has the same
implications as the
UPDATE statement. I
t’s all too easy to delete every row (not just the wrong
rows) in a table by for
getting the
WHERE clause, so be careful. The DELETE statement removes
entire rows, so it’s not necessary (or possible) to specify columns. Its basic syntax is as fol-
lo
ws (r
emember, the
WHERE clause is optional, but without it
all
rows will be deleted):
DELETE FROM <table>
WHERE <predicate>
I
f y
ou need to r
emo
v
e some records from the Shippers table, you need to determine
the pr
imar
y key of the r
o
w y
ou want to remove and use that in the
DELETE statement.
delete from shippers
where shipperid = 4
This should produce a Messages pane reporting “(1 row(s) affected)”. Navigate to the
Table – dbo.Shippers pane, right-click, and select Execute SQL, and you’ll see that the
company has been removed, as shown in Figure 5-17.
CHAPTER 5 ■ MANIPULATING DATABASE DATA 93
9004ch05final.qxd 12/13/07 4:17 PM Page 93
Figure 5-17. The Shippers table after deleting a row
If you try to delete one of the remaining three shippers, you’ll get a database error. A
foreign-key relationship exists from Orders (FK) to Shippers (PK), and SSE enforces it,
preventing deletion of Shippers’ rows that are referred to by Orders rows. If the database
were to allow you to drop records from the PK table, the records in the FK table would be
left as orphan records, leaving the database in an inconsistent state. (Chapter 3 discusses
keys.)
Sometimes you do need to remove every row from a table. In such cases, the
TRUNCATE
TABLE statement may be pr
eferable to the
DELETE statement, since it per
forms better. The
TRUNCATE TABLE statement is faster because it doesn’t do any logging (saving each row in a
log file before deleting it) to support recovery, while
DELETE logs every row removed.
Summary
In this chapter, you saw how to use the following T-SQL keywords to perform data manip-
ulation tasks against a database:
SELECT INTO, SELECT, INSERT, UPDATE, and DELETE. You also
saw how to use comparison and other operators to specify predicates that limit what
rows are retrieved or manipulated.
In the next chapter, you will see how stored procedures work.
CHAPTER 5 ■ MANIPULATING DATABASE DATA94
9004ch05final.qxd 12/13/07 4:17 PM Page 94
Using Stored Procedures
Stored procedures are SQL statements that allow you to perform a task repeatedly.
You can create a procedure once and reuse it any number of times in your program.
This can improve the maintainability of your application and allow applications to
access the database in a uniform and optimized manner. The goal of this chapter is to
get you acquainted with stored procedures and understand how C# programs can
interact with them.
In this chapter, we’ll cover the following:
• Creating stored procedures
• Modifying stored procedures
• Displaying definitions of stored procedures
• Renaming stored procedures
• Working with stored procedures in C#
• Deleting stored procedures
Creating Stored Procedures
Stored procedures can have parameters that can be used for input or output and single-
integer
return values (that default to zero), and they can return zero or more result sets.
They can be called from client programs or other stored procedures. Because stored
procedures are so powerful, they are becoming the preferred mode for much database
programming, particularly for multitier applications and web services, since (among
their many benefits) they can dramatically reduce network traffic between clients and
database servers.
95
CHAPTER 6
9004ch06final.qxd 12/13/07 4:16 PM Page 95
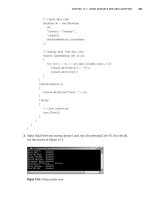
Try It Out:Working with a Stored Procedure in SQL Server
Using SQL Server Management Studio Express, you’ll create a stored procedure that pro-
duces a list of the names of employees in the Northwind database. It requires no input
and doesn’t need to set a return value.
1. Open SQL Server Management Studio Express, and in the Connect to Server dia-
log box, select <ServerName>\SQLEXPRESS as the server name and then click
Connect.
2. In Object Explorer, expand the Databases node, select the Northwind database,
and click the New Query button. Enter the following query and click Execute. You
should see the results shown in Figure 6-1.
create procedure sp_Select_All_Employees
as
select
employeeid,
firstname,
lastname
from
employees
Figure 6-1. Creating a stored procedure using SQL Server Management Studio Express
CHAPTER 6 ■ USING STORED PROCEDURES96
9004ch06final.qxd 12/13/07 4:16 PM Page 96
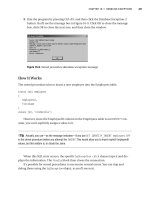
3. To execute the stored procedure, enter the following query and click Execute. You
should see the results shown in Figure 6-2.
execute sp_Select_All_Employees
Figure 6-2. Executing the stored procedure
How It Works
The CREATE PROCEDURE statement creates stored procedures. The AS keyword separates the
signature (the procedure’s name and parameter list, but here you define no parameters)
of the stored procedure from its body (the SQL that makes up the procedure).
create procedure sp_Select_All_Employees
as
After AS, the procedure body has just one component, a simple query.
Select
employeeid,
firstname,
lastname
from
employees
CHAPTER 6 ■ USING STORED PROCEDURES 97
9004ch06final.qxd 12/13/07 4:16 PM Page 97
SQL Server Management Studio Express submitted the CREATE PROCEDURE statement,
and once the stored procedure is created, you run it from the query window by writing
the statement
e
xecute sp_Select_All_Employees
That’s it. There’s nothing complicated about creating stored procedures. The chal-
lenge is coding them when they’re nontrivial, and stored procedures can be quite compli-
cated and can do very powerful things, but that’s well beyond the scope of this book.
■Note The prefix sp_ is a T-SQL convention that typically indicates the stored procedure is coded in SQL.
The prefix
xp_ (which stands for extended procedure) is also used to indicate that the stored procedure isn’t
written in SQL. (However, not all
sp_ stored procedures provided by SQL Server are written in SQL.) By the
way, hundreds of
sp_ (and other) stored procedures are provided by SQL Server 2005 to perform a wide
variety of common tasks.
Although w
e use
sp_ for the purposes of these examples
, it is a best practice not to
create a stored procedure prefixed with
sp_; doing so has a dramatic effect on the search
mechanism and the way the SQL Server database engine starts searching for that partic-
ular procedure in order to execute.
The SQL Server follows this search order if you are executing a stored procedure that
begins with
sp_:
1. SQL Server will search the master database for the existence of the procedure, if it
is available, and then it will call the procedure.
2. If the stored procedure is not available in the master database, SQL Server
searches inside either the database from which you are calling it or the database
whose name you provide as qualifier (
database_name.stored_procedure_name).
Therefore, although a user-created stored procedure prefixed with
sp_ may exist in
the current database, the
master database, which is where the sp_ prefixed stored proce-
dures that come with SQL Server 2005 are stored, is always checked first, even if the
stored procedure is qualified with the database name.
It is also important to note that if any user-defined stored procedure has the same
name as a system stor
ed pr
ocedur
e
, and y
ou tr
y calling the user-defined stored proce-
dur
e
, it will nev
er be executed, ev
en if y
ou call it fr
om inside the database where you have
just cr
eated it. O
nly the master database
’
s v
ersion will be called.
CHAPTER 6 ■ USING STORED PROCEDURES98
9004ch06final.qxd 12/13/07 4:16 PM Page 98
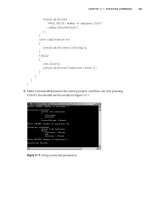
Try It Out: Creating a Stored Procedure with an Input Parameter
Here you’ll create a stored procedure that produces a list of orders for a given employee.
You’ll pass the employee ID to the stored procedure for use in a query.
1. Enter the following query and click Execute. You should see the message “Com-
mand(s) completed successfully” in the results window.
create procedure sp_Orders_By_EmployeeId
@employeeid int
as
select orderid, customerid
from orders
where employeeid = @employeeid;
2. To execute the stored procedure, enter the following command along with the
value for the parameter, select it, and then click Execute. You should see the
results shown in Figure 6-3.
execute sp_Orders_By_EmployeeId 2
Figure 6-3. Using an input parameter
CHAPTER 6 ■ USING STORED PROCEDURES 99
9004ch06final.qxd 12/13/07 4:16 PM Page 99