Beginning ASP.NET 2.0 E-Commerce in C# 2005 From Novice to Professional PHẦN 6 docx
Bạn đang xem bản rút gọn của tài liệu. Xem và tải ngay bản đầy đủ của tài liệu tại đây (2.72 MB, 70 trang )
CHAPTER 9 ■ CREATING A CUSTOM SHOPPING CART
329
// create a new parameter
DbParameter param = comm.CreateParameter();
param.ParameterName = "@CartID";
param.Value = shoppingCartId;
param.DbType = DbType.String;
param.Size = 36;
comm.Parameters.Add(param);
// return the result table
return Decimal.Parse(GenericDataAccess.ExecuteScalar(comm));
}
Implementing the Presentation Tier
Okay, now that the foundation functionality is in place, you can add the presentation tier bits.
Building the user interface for the shopping cart functionality involves the following major steps:
• Creating Add to Cart buttons (refer to Figure 9-2)
• Showing shopping cart summary information in catalog pages (refer to Figure 9-2)
• Creating the actual shopping cart page (refer to Figure 9-1)
• Allowing the visitor to update product quantities in the shopping cart
• Implementing “Continue Shopping” functionality
Let’s deal with these tasks one by one.
Creating the Add to Cart Buttons
You can choose to have Add to Cart buttons only in the products details pages (Product.aspx),
in the product listings (ProductsList.ascx), or in both. Follow the steps in the following exercise
to add your buttons.
Exercise: Creating the Add to Cart Buttons
1. If you implemented the PayPal shopping cart in Chapter 7, you now need to remove the PayPal Add to
Cart buttons from Product.aspx. Open the file in HTML View and remove the following code:
<a runat="server" id="addToCartLink">
<IMG src="Images/AddToCart.gif" border="0">
</a>
Then remove the associated code from the PopulateControls method in Product.aspx.cs:
// Create the "Add to Cart" PayPal link
string link =
"JavaScript: OpenPayPalWindow(\" />Darie-Watson_4681C09.fm Page 329 Tuesday, September 20, 2005 7:28 AM
330
CHAPTER 9
■ CREATING A CUSTOM SHOPPING CART
cgi-bin/webscr" +
"?cmd=_cart" + // open shopping cart command
"&business=" + // your PayPal account
"&item_name=" + pd.Name + // product name
"&amount=" + String.Format("{0:0.00}", pd.Price) + // product price
"¤cy=USD" + // currency
"&add=1" + // quantity to add to the shopping cart
"&return=www.yourwebsite.com" + // return address
"&cancel_return=www.yourwebsite.com\")"; // cancel return address)
// Encode the link characters to be included in HTML file
string encodedLink = Server.HtmlEncode(link);
// Set the link of the HTML Server Control
addToCartLink.HRef = encodedLink;
2. Add the following style to BalloonShop.css. You’ll use it for your Add to Cart buttons.
.SmallButtonText
{
color: Black;
font-family: Verdana, Helvetica, sans-serif;
font-size: 10px;
}
3. Add a button to the ItemTemplate of the DataList in ProductsList.ascx, just below the product
price. You can see the HTML code in the following snippet, but keep in mind that you can use the Edit
Template feature in Design View to generate at least part of the code. In any case, make sure you have
this button in the ItemTemplate:
<span class="ProductDescription">
<%# Eval("Description") %>
<br/><br/>
Price:
</span>
<span class="ProductPrice">
<%# Eval("Price", "{0:c}") %>
</span>
<br />
<asp:Button ID="addToCartButton" runat="server" Text="Add to Cart"
CommandArgument='<%# Eval("ProductID") %>' CssClass="SmallButtonText"/>
</td>
■Note Clicking a button in a DataList fires the DataList’s ItemCommand event. In the event handler,
you read the CommandArgument of the button, which contains the ID of the product that needs to be added
to the shopping cart.
Darie-Watson_4681C09.fm Page 330 Tuesday, September 20, 2005 7:28 AM
CHAPTER 9 ■ CREATING A CUSTOM SHOPPING CART
331
4. Switch ProductsList.ascx to Design View, select the DataList control, and use the Properties
window to add the list’s ItemCommand event handler. Complete the generated code with the following code:
// fires when an Add to Cart button is clicked
protected void list_ItemCommand(object source, DataListCommandEventArgs e)
{
// The CommandArgument of the clicked Button contains the ProductID
string productId = e.CommandArgument.ToString();
// Add the product to the shopping cart
ShoppingCartAccess.AddItem(productId);
}
5. Now add the same functionality to Product.aspx. Open Product.aspx and add the following button
at the bottom of the page (note that this new button doesn’t have the CommandArgument property
set—this button isn’t part of a DataList, so you don’t need that kind of functionality this time).
<br />
<asp:Button ID="addToCartButton" runat="server" Text="Add to Cart"
CssClass="SmallButtonText" />
</asp:Content>
6. Switch to Design View and double-click the button to have its Click event handler generated by Visual
Web Developer. Complete the method signature with the following code:
// Add the product to cart
protected void addToCartButton_Click(object sender, EventArgs e)
{
// Retrieve ProductID from the query string
string productId = Request.QueryString["ProductID"];
// Add the product to the shopping cart
ShoppingCartAccess.AddItem(productId);
}
How It Works: The Add to Cart Buttons
After making the changes, build the project (Ctrl+Shift+B) and then load the site to make sure the buttons appear
okay. Now click the Add to Cart button on one of the products on the site. If you don’t get any errors, the product was
probably successfully added to the shopping cart; right now, you can’t see this in the web site, because you still
need to implement functionality for viewing the shopping cart.
The ItemCommand event is raised by the DataList when one of its buttons is clicked. The CommandArgument
parameter of the Add to Cart buttons is populated with the product ID from the database. This ID is read from the
ItemCommand event handler, which passes it to ShoppingCart.AddProduct to have it added to the database.
Showing the Shopping Cart Summary
The shopping cart summary is implemented as a Web User Control named CartSummary.ascx.
You’ll use this control in the BalloonShop.master Master Page, so it shows up in every page that
implements it. However, you’ll write a bit of code in your control to make sure it doesn’t also
Darie-Watson_4681C09.fm Page 331 Tuesday, September 20, 2005 7:28 AM
332
CHAPTER 9
■ CREATING A CUSTOM SHOPPING CART
appear in the shopping cart page, because you don’t want to show both the cart and its summary
on the same page.
Exercise: Showing the Shopping Cart Summary
1. Let’s start with the simple details. Add the following styles to BalloonShop.css:
.CartSummary
{
border-right: #0468a4 2px solid;
border-top: #0468a4 2px solid;
border-left: #0468a4 2px solid;
border-bottom: #0468a4 2px solid;
background-color: snow;
font-family: Arial;
font-size: 9pt;
color: Navy;
padding-top: 3px;
padding-left: 2px;
padding-bottom: 5px;
}
a.CartLink
{
color: Black;
font-family: Arial;
text-decoration: none;
font-size: 12px;
}
a.CartLink:hover
{
color: Red;
}
2. Add a new Web User Control to your UserControls folder, named CartSummary.ascx. Make sure
the language is Visual C# and that the Place code in separate file check box is checked.
3. Add the following code to CartSummary.ascx:
<table border="0" cellpadding="0" cellspacing="1" width="200">
<tr>
<td class="CartSummary">
<b><asp:Label ID="cartSummaryLabel" runat="server" /></b>
<asp:HyperLink ID="viewCartLink" runat="server"
NavigateUrl=" /ShoppingCart.aspx"
CssClass="CartLink" Text="(view details)" />
<asp:DataList ID="list" runat="server">
<ItemTemplate>
<%# Eval("Quantity") %> x <%# Eval("Name") %>
Darie-Watson_4681C09.fm Page 332 Tuesday, September 20, 2005 7:28 AM
CHAPTER 9 ■ CREATING A CUSTOM SHOPPING CART
333
</ItemTemplate>
</asp:DataList>
<img "99%" height="1" />
Total:
<span class="ProductPrice">
<asp:Label ID="totalAmountLabel" runat="server" />
</span>
</td>
</tr>
</table>
4. Go to the control’s code-behind file (ShoppingCart.ascx.cs) and add the Page_Prerender function,
along with its PopulateControls helper function, like this:
// fill cart summary contents in the PreRender stage
protected void Page_PreRender(object sender, EventArgs e)
{
PopulateControls();
}
// fill the controls with data
private void PopulateControls()
{
// get the items in the shopping cart
DataTable dt = ShoppingCartAccess.GetItems();
// if the shopping cart is empty
if (dt.Rows.Count == 0)
{
cartSummaryLabel.Text = "Your shopping cart is empty.";
totalAmountLabel.Text = String.Format("{0:c}", 0);
viewCartLink.Visible = false;
list.Visible = false;
}
else
// if the shopping cart is not empty
{
// populate the list with the shopping cart contents
list.Visible = true;
list.DataSource = dt;
list.DataBind();
// set up controls
cartSummaryLabel.Text = "Cart summary ";
viewCartLink.Visible = true;
// display the total amount
decimal amount = ShoppingCartAccess.GetTotalAmount();
totalAmountLabel.Text = String.Format("{0:c}", amount);
}
}
Darie-Watson_4681C09.fm Page 333 Tuesday, September 20, 2005 7:28 AM
334
CHAPTER 9
■ CREATING A CUSTOM SHOPPING CART
5. Because you’ll include the shopping cart summary control in the Master Page, normally it will show up
in every page of your web site. If you don’t want your shopping cart summary to show up when the
visitor is viewing the shopping cart page, add the following code to the CartSummary class in
CartSummary.ascx.cs:
// we don't want to display the cart summary in the shopping cart page
protected void Page_Init(object sender, EventArgs e)
{
// get the current page
string page = Request.AppRelativeCurrentExecutionFilePath;
// if we're in the shopping cart, don't display the cart summary
if (String.Compare(page, "~/ShoppingCart.aspx", true) == 0)
this.Visible = false;
else
this.Visible = true;
}
6. The tough part’s over now. Build the project to ensure everything compiles okay.
7. Open BalloonShop.master in Source View and remove the code of the OpenPayPalWindow JavaScript
function, which is no longer necessary:
<script language="JavaScript">
<!
</script>
8. Also in BalloonShop.master, remove the code that generates the PayPal View Cart button:
<p align="center">
<a href="JavaScript: OpenPayPalWindow(' ')">
<IMG </a>
</p>
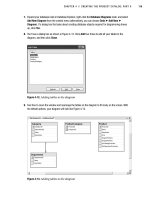
9. Switch BallonShop.master to Design View and then drag CartSummary.ascx from the Solution
Explorer to BalloonShop.master as shown in Figure 9-7.
10. Execute the project to ensure the shopping cart summary shows up as expected. Just don’t expect the
view details link to work, because you haven’t implemented the ShoppingCart.aspx file yet.
Darie-Watson_4681C09.fm Page 334 Tuesday, September 20, 2005 7:28 AM
CHAPTER 9 ■ CREATING A CUSTOM SHOPPING CART
335
Figure 9-7. Adding the shopping cart summary control to the Master Page
How It Works: The Shopping Cart Summary
The important bit to understand here is the way we used the Page_PreRender method to populate the control
with data.
We used Page_PreRender instead of the Load event, because Load fires before the Click event of the Add to
Cart buttons, so the summary is updated before—not after—the cart is updated. PreRender, on the other hand,
fires later in the control life cycle, so we used it to ensure that the cart summary is properly updated.
To learn more about the life cycle of ASP.NET controls, see an advanced ASP.NET book.
Displaying the Shopping Cart
Finally, you’ve arrived at the shopping cart, your primary goal for this chapter. The shopping
cart is a Web Form named ShoppingCart.aspx, based on the BalloonShop.master Master Page.
Follow the steps in the next exercise to build your shopping cart page.
Darie-Watson_4681C09.fm Page 335 Tuesday, September 20, 2005 7:28 AM
8213592a117456a340854d18cee57603
336
CHAPTER 9
■ CREATING A CUSTOM SHOPPING CART
Exercise: Implementing the Shopping Cart
1. Before starting to work on the shopping cart, let’s deal with a simple detail first. Add this style to your
BalloonShop.css file.
.ShoppingCartTitle
{
color: Red;
font-family: Verdana, Helvetica, sans-serif;
font-size: 16px;
}
2. Right-click the project name in Solution Explorer and click Add New Item.
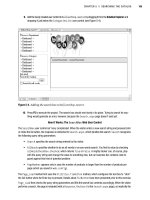
3. Select the Web Form template, write ShoppingCart.aspx for its name, make sure the language is
Visual C#, and select the two check boxes (Place code in separate file and Select master page),
as shown in Figure 9-8. Click Add.
Figure 9-8. Creating the ShoppingCart.aspx Web Form
4. Choose the BalloonShop.master file in the dialog box that opens and click OK.
5. If you prefer to work in Design View, create a form as shown in Figure 9-9, and set the controls’
properties as shown in Table 9-1.
Darie-Watson_4681C09.fm Page 336 Tuesday, September 20, 2005 7:28 AM
CHAPTER 9 ■ CREATING A CUSTOM SHOPPING CART
337
Figure 9-9. ShoppingCart.aspx in Design View
6. Feel free to play with the control’s look to customize it according to your preferences. The source code
of your page should look something like this:
<%@ Page Language="C#" MasterPageFile="~/BalloonShop.master"
AutoEventWireup="true" CodeFile="ShoppingCart.aspx.cs" Inherits="ShoppingCart"
Title="Untitled Page" %>
<asp:Content ID="Content1" ContentPlaceHolderID="contentPlaceHolder"
Table 9-1. Control Properties in ShoppingCart.ascx
Control Type ID Property Text Property CssClass Property
Label titleLabel Your Shopping Cart ShoppingCartTitle
Label statusLabel (empty) AdminPageText
GridView grid
Label totalAmountLabel ProductPrice
Button updateButton Update Quantities ButtonText
Button continueShoppingButton Continue Shopping ButtonText
Darie-Watson_4681C09.fm Page 337 Tuesday, September 20, 2005 7:28 AM
338
CHAPTER 9
■ CREATING A CUSTOM SHOPPING CART
Runat="Server">
<asp:Label ID="titleLabel" runat="server"
Text="Your Shopping Cart" CssClass="ShoppingCartTitle" />
<br />
<asp:Label ID="statusLabel" CssClass="AdminPageText"
ForeColor="Red" runat="server" />
<br />
<asp:GridView ID="grid" runat="server">
</asp:GridView>
<table width="100%">
<tr>
<td>
<span class="ProductDescription">
Total amount:
</span>
<asp:Label ID="totalAmountLabel" runat="server"
Text="Label" CssClass="ProductPrice" />
</td>
<td align="right">
<asp:Button ID="updateButton" runat="server"
Text="Update Quantities" CssClass="SmallButtonText" />
</td>
</tr>
</table>
<br />
<asp:Button ID="continueShoppingButton" runat="server"
Text="Continue Shopping" CssClass="SmallButtonText" />
<br /><br />
</asp:Content>
7. Now it’s time to deal with the GridView control. Set its AutoGenerateColumns property to false,
DataKeyNames to ProductID, Width to 100%, and BorderWidth to 0px.
8. In Design View, select the GridView, click the Smart Link, and choose Add New Column to add the
grid columns listed in Table 9-2.
Table 9-2. Setting the Properties of the GridView Control
Column Type Header Text Data Field Other Properties
BoundField Product Name Name Read Only
BoundField Price Price Read Only
TemplateField Quantity
BoundField Subtotal Subtotal Read Only
ButtonField Command name: Delete
Text: Delete
Button type: Button
Darie-Watson_4681C09.fm Page 338 Tuesday, September 20, 2005 7:28 AM
CHAPTER 9 ■ CREATING A CUSTOM SHOPPING CART
339
■Note The Product Name, Price, and Subtotal columns are marked as read-only. If you transform them to
template fields, Visual Web Developer won’t generate their EditItemTemplate but only their
ItemTemplate. Also, they won’t be editable if the GridView enters edit mode (we don’t use this feature
here, however, but you know the functionality from Chapter 8, the administration chapter).
9. Click GridView’s Smart Link and choose Edit Columns. From the Selected Fields list, select Price
and set its DataFormatString property to {0:c}.
10. Do the same (set the DataFormatString to {0:c}) for the Subtotal field.
11. The Quantity field is a template field, so you need to fill its contents manually. Switch to Source View
and add the following TextBox to the ItemTemplate:
<asp:TemplateField HeaderText="Quantity">
<ItemTemplate>
<asp:TextBox ID="editQuantity" runat="server" CssClass="GridEditingRow"
Width="24px" MaxLength="2" Text='<%#Eval("Quantity")%>' />
</ItemTemplate>
</asp:TemplateField>
12. We want to use the SmallButtonText class for the Delete button. Switch to Design View, click the
grid’s Smart Link, and select Edit Columns. In the dialog box that opens, select the Delete field, expand
its ControlStyle property, and set the CssClass to SmallButtonText, as shown in Figure 9-10.
Figure 9-10. Choosing a style for the Delete button
13. Click OK to close the dialog box. Verify that the content area of your Web Form looks like Figure 9-11.
Darie-Watson_4681C09.fm Page 339 Tuesday, September 20, 2005 7:28 AM
340
CHAPTER 9
■ CREATING A CUSTOM SHOPPING CART
Figure 9-11. The content area of ShoppingCart.aspx in Design View
14. The visual part is ready. Open the code-behind file now (ShoppingCart.aspx.cs) and complete its
Page_Load method to populate the controls, as shown in the following code listing:
public partial class ShoppingCart : System.Web.UI.Page
{
protected void Page_Load(object sender, EventArgs e)
{
// populate the control only on the initial page load
if (!IsPostBack)
PopulateControls();
}
// fill shopping cart controls with data
private void PopulateControls()
{
// set the title of the page
this.Title = BalloonShopConfiguration.SiteName + " : Shopping Cart";
// get the items in the shopping cart
DataTable dt = ShoppingCartAccess.GetItems();
// if the shopping cart is empty
if (dt.Rows.Count == 0)
{
titleLabel.Text = "Your shopping cart is empty!";
grid.Visible = false;
updateButton.Enabled = false;
totalAmountLabel.Text = String.Format("{0:c}", 0);
}
else
// if the shopping cart is not empty
{
Darie-Watson_4681C09.fm Page 340 Tuesday, September 20, 2005 7:28 AM
CHAPTER 9 ■ CREATING A CUSTOM SHOPPING CART
341
// populate the list with the shopping cart contents
grid.DataSource = dt;
grid.DataBind();
// setup controls
titleLabel.Text = "These are the products in your shopping cart:";
grid.Visible = true;
updateButton.Enabled = true;
// display the total amount
decimal amount = ShoppingCartAccess.GetTotalAmount();
totalAmountLabel.Text = String.Format("{0:c}", amount);
}
}
}
How It Works: The ShoppingCart User Control
The steps in this exercise are probably familiar to you by now. You created a new Web Form and then added a
number of controls to it, including a GridView control, to which you added and formatted columns afterwards.
Feel free to execute the project, add a few products to the cart, and then click the (view details) link in the cart
summary. Your shopping cart should display your products nicely. It takes a couple of more exercises to make the
Update Quantities and Continue Shopping buttons functional.
Editing Product Quantities
You learned how to work with editable GridView controls in Chapter 9. However, this time you
won’t use GridView’s editing functionality, because you want to allow the visitor to update
several product quantities at once, not only record by record. Of course, if you prefer, you can
always implement the editing functionality just like you learned in Chapter 8, but in this chapter,
you’ll learn a new way of doing things.
Exercise: Editing Product Quantities
1. Open ShoppingCart.aspx in Design View, select the GridView, and use Visual Web Developer to
generate the RowDeleting event handler.
2. Complete the code as shown in the following code listing:
// remove a product from the cart
protected void grid_RowDeleting(object sender, GridViewDeleteEventArgs e)
{
// Index of the row being deleted
int rowIndex = e.RowIndex;
// The ID of the product being deleted
string productId = grid.DataKeys[rowIndex].Value.ToString();
// Remove the product from the shopping cart
bool success = ShoppingCartAccess.RemoveItem(productId);
Darie-Watson_4681C09.fm Page 341 Tuesday, September 20, 2005 7:28 AM
342
CHAPTER 9
■ CREATING A CUSTOM SHOPPING CART
// Display status
statusLabel.Text = success ? "<br />Product successfully removed!<br />" :
"<br />There was an error removing the product!<br />";
// Repopulate the control
PopulateControls();
}
3. In ShoppingCart.aspx, double-click the Update Quantities button and complete the automatically
generated code like this:
// update shopping cart product quantities
protected void updateButton_Click(object sender, EventArgs e)
{
// Number of rows in the GridView
int rowsCount = grid.Rows.Count;
// Will store a row of the GridView
GridViewRow gridRow;
// Will reference a quantity TextBox in the GridView
TextBox quantityTextBox;
// Variables to store product ID and quantity
string productId;
int quantity;
// Was the update successful?
bool success = true;
// Go through the rows of the GridView
for (int i = 0; i < rowsCount; i++)
{
// Get a row
gridRow = grid.Rows[i];
// The ID of the product being deleted
productId = grid.DataKeys[i].Value.ToString();
// Get the quantity TextBox in the Row
quantityTextBox = (TextBox)gridRow.FindControl("editQuantity");
// Get the quantity, guarding against bogus values
if (Int32.TryParse(quantityTextBox.Text, out quantity))
{
// Update product quantity
success = success && ShoppingCartAccess.UpdateItem(productId, quantity);
}
else
{
// if TryParse didn't succeed
success = false;
}
Darie-Watson_4681C09.fm Page 342 Tuesday, September 20, 2005 7:28 AM
8213592a117456a340854d18cee57603
CHAPTER 9 ■ CREATING A CUSTOM SHOPPING CART
343
// Display status message
statusLabel.Text = success ?
"<br />Your shopping cart was successfully updated!<br />" :
"<br />Some quantity updates failed! Please verify your cart!<br />";
}
// Repopulate the control
PopulateControls();
}
How It Works: Editing Product Quantities
Yep, this was interesting all right. Allowing the visitor to edit multiple GridView entries at once is certainly very
useful. Take a close look at the code and make sure you understand how the GridView is parsed, how the proper
TextBox controls is found, and how its value is read. Then, the ShoppingCartAccess class is simply used to
update the product quantities.
When reading the values from the TextBox controls and converting them to integers, you use a new .NET 2.0
feature called TryParse. This static method of the Int32 class (you can find it in other similar classes, too) is
similar to Parse, but doesn’t throw an exception if the conversion cannot be done—which can easily happen if the
visitor enters a letter instead of a number in the quantity box, for example.
TryParse returns a bool value representing the success of the operation and returns the converted value as an
out parameter:
// Get the quantity, guarding against bogus values
if (Int32.TryParse(quantityTextBox.Text, out quantity))
The ShoppingCartAccess.UpdateItem method also returns a bool value specifying whether the update completed
successfully or not. Should either this method or TryParse return false, you set the value of the success
variable to false. If after processing all rows, the value of success is false, you inform the visitor that at least
one of the rows couldn’t be updated.
If ShoppingCartAccess.UpdateItem generates a database error for some reason, the error is logged using the
log mechanism that you implemented in Chapter 4 —if you enabled the error-handling routine, that is—because it
can be disabled by changing an option in web.config.
Adding “Continue Shopping” Functionality
Although you have the Continue Shopping button, at this point, it doesn’t do much. The steps
to make it work are presented in the next exercise.
Exercise: Implementing the Continue Shopping Button
1. Start editing ShoppingCart.ascx in Design View and double-click the Continue Shopping button.
This automatically creates the continueShoppingButton_Click method. Modify it like this:
Darie-Watson_4681C09.fm Page 343 Tuesday, September 20, 2005 7:28 AM
344
CHAPTER 9
■ CREATING A CUSTOM SHOPPING CART
// Redirects to the previously visited catalog page
// (an alternate to the functionality implemented here is to
// Request.UrlReferrer, although that way you have no control over
// what pages you forward your visitor back to)
protected void continueShoppingButton_Click(object sender, EventArgs e)
{
// redirect to the last visited catalog page, or to the
// main page of the catalog
object page;
if ((page = Session["LastVisitedCatalogPage"]) != null)
Response.Redirect(page.ToString());
else
Response.Redirect(Request.ApplicationPath);
}
2. Open BalloonShop.master.cs and modify it to save the current page location to the visitor’s session:
public partial class BalloonShop : System.Web.UI.MasterPage
{
// Website pages considered to be "catalog pages" that the visitor
// can "Continue Shopping" to
private static string[] catalogPages = { "~/Default.aspx", "~/Catalog.aspx",
"~/Search.aspx" };
// Executes when any page based on this master page loads
protected void Page_Load(object sender, EventArgs e)
{
// Don't perform any actions on postback events
if (!IsPostBack)
{
/* Save the latest visited catalog page into the session
to support "Continue Shopping" functionality */
// Get the currently loaded page
string currentLocation = Request.AppRelativeCurrentExecutionFilePath;
// If the page is one we want the visitor to "continue shopping"
// to, then save it to visitor's Session
for (int i = 0; i < catalogPages.GetLength(0); i++)
if (String.Compare(catalogPages[i], currentLocation, true) == 0)
{
// save the current location
Session["LastVisitedCatalogPage"] = Request.Url.ToString();
// stop the for loop from continuing
break;
}
}
}
}
Darie-Watson_4681C09.fm Page 344 Tuesday, September 20, 2005 7:28 AM
CHAPTER 9 ■ CREATING A CUSTOM SHOPPING CART
345
3. Open Product.aspx and add a Continue Shopping button next to the existing Add to Cart button,
with the following properties:
4. In Design View, double-click the button to have its Click event handler generated for you, and complete its
code just as you did for the other Continue Shopping button:
// Redirects to the previously visited catalog page
protected void continueShoppingButton_Click(object sender, EventArgs e)
{
// redirect to the last visited catalog page
object page;
if ((page = Session["LastVisitedCatalogPage"]) != null)
Response.Redirect(page.ToString());
else
Response.Redirect(Request.ApplicationPath);
}
5. Execute the project and test your new Continue Shopping buttons!
How It Works: The Continue Shopping Button
Let’s take a good look at the functionality you’ve added to the Master Page. Because the BalloonShop.master
Master Page is used in all catalog pages, you can rely on it being called every time the visitor accesses a new
catalog page. When this happens, if the accessed page is from a list of predefined page names, this location is
saved to a session variable.
The list of predefined pages must contain the pages that the Continue Shopping button redirects the visitor to, and
they must not be pages that contain Continue Shopping buttons. Otherwise, the Continue Shopping button would
redirect the visitor to the page he or she is already visiting.
Note that instead of implementing this functionality, you can choose to use the value from Request.
UrlReferrer, which contains the page the visitor was previously browsing. This technique is simpler to imple-
ment because it doesn’t require you to add any code to the Master Page, but it doesn’t offer much control over what
page you are redirecting the visitor to. For example, if the visitor comes to BalloonShop from an external page, with
the implemented solution, the Continue Shopping button will redirect her to the main BalloonShop page.
Property Name Property Value
ID continueShoppingButton
CssClass SmallButtonText
Text Continue Shopping
Darie-Watson_4681C09.fm Page 345 Tuesday, September 20, 2005 7:28 AM
346
CHAPTER 9
■ CREATING A CUSTOM SHOPPING CART
Administering the Shopping Cart
Now that you’ve finished writing the shopping cart, you need to take two more things into
account, and both are related to administration issues:
• How to delete from the product catalog a product that exists in shopping carts.
• How to remove old shopping cart elements by building a simple shopping cart adminis-
tration page. This is important, because without this feature, the ShoppingCart table
keeps growing.
Deleting Products that Exist in Shopping Carts
The catalog administration pages offer the possibility to completely delete products from the
catalog. Before removing a product from the Product table, however, you need to remove
related records from the related tables first (otherwise, the foreign-key constraints in the data-
base won’t allow the action).
For example, look at the DeleteProduct stored procedure that first deletes all related
records from ProductCategory before deleting the Product record:
DELETE FROM ProductCategory WHERE ProductID=@ProductID
DELETE FROM Product where ProductID=@ProductID
Now the problem reappears with the ShoppingCart table: The Product and ShoppingCart
tables are tied through a FOREIGN KEY constraint on their ProductID fields. The database doesn’t
allow deleting products from Product that have related ShoppingCart records.
The solution is to update the DeleteProduct stored procedure to also remove all the refer-
ences to the product from the ShoppingCart table before attempting to delete it from the database.
Update the DeleteProduct stored procedure by executing this command (you can use the
same screen as the one where you create new procedures, or you can use SQL Express Manager):
ALTER PROCEDURE DeleteProduct
(@ProductID int, @CategoryID int)
AS
DELETE FROM ShoppingCart WHERE ProductID=@ProductID
DELETE FROM ProductCategory WHERE ProductID=@ProductID
DELETE FROM Product where ProductID=@ProductID
This way, the site administrators can (once again) remove products from the database.
Removing Old Shopping Carts
The second problem with the shopping cart is that at this moment no mechanism exists to
delete the old records from the ShoppingCart table. On a high activity web site with many users
and many shopping carts, the ShoppingCart table can grow very large.
With the default setting in web.config, shopping cart IDs are stored at the client browser
for ten days. As a result, you can assume that any shopping carts that haven’t been updated in
the last ten days are invalid and can be safely removed.
Darie-Watson_4681C09.fm Page 346 Tuesday, September 20, 2005 7:28 AM
CHAPTER 9 ■ CREATING A CUSTOM SHOPPING CART
347
In the following exercise, you’ll quickly implement a simple shopping cart administration
page, where the administrator can see how many old shopping cart entries exist and can delete
them if necessary.
The most interesting aspect you need to understand is the logic behind the database
stored procedure that calculates the records that need to be deleted. The goal is to delete all
shopping carts that haven’t been updated in a certain amount of time.
This isn’t as simple as it sounds—at first sight, you might think all you have to do is delete
all the records in ShoppingCart whose DateAdded value is older than a specified date. However,
this strategy doesn’t work with shopping carts that are modified over time (say, the visitor has
been adding items to the cart each week in the past three months). If the last change to the
shopping cart is recent, none of its elements should be deleted, even if some are very old. In
other words, you should either remove all elements in a shopping cart or none of them. The age
of a shopping cart is given by the age of its most recently modified or added product.
■Tip If you look at the ShoppingCartUpdateItem stored procedure, you’ll notice it also updates the
DateAdded field of a product each time the quantity changes.
For the shopping cart admin page, you’ll build two stored procedures (ShoppingCart➥
RemoveOldCarts and ShoppingCartCountOldCarts), but they both work using the same logic to
calculate the shopping cart elements that are old and should be removed. First, you should
learn a little bit about the SQL logic that retrieves the old shopping cart elements.
Take a look at the following query, which returns how many days have passed since the
day the last cart item was added or modified for each cart ID:
SELECT CartID,
MIN(DATEDIFF(dd,DateAdded,GETDATE())) as DaysFromMostRecentRecord
FROM ShoppingCart
GROUP BY CartID
The DATEDIFF function returns the difference, in days (because of the dd parameter),
between the date specified by DateAdded and the current date (specified by GETDATE). GROUP BY
groups the results by CartID, and for each CartID, the MIN aggregate function calculates the
most recent record.
To select all the elements from the carts that haven’t been modified in the past ten days,
you need a query like this:
SELECT CartID
FROM ShoppingCart
GROUP BY CartID
HAVING MIN(DATEDIFF(dd,DateAdded,GETDATE())) >= 10
You’ll implement the shopping cart administration page in the next exercise. You’ll imple-
ment everything, starting from the stored procedures and finishing with the presentation tier,
in a single exercise.
Darie-Watson_4681C09.fm Page 347 Tuesday, September 20, 2005 7:28 AM
348
CHAPTER 9
■ CREATING A CUSTOM SHOPPING CART
Exercise: Implementing the Cart Admin Page
1. Add the ShoppingCartRemoveOldCarts stored procedure to the database. It receives as a parameter the
maximum number of days for a shopping cart age. All shopping carts older than that are deleted.
CREATE PROCEDURE ShoppingCartDeleteOldCarts
(@Days smallint)
AS
DELETE FROM ShoppingCart
WHERE CartID IN
(SELECT CartID
FROM ShoppingCart
GROUP BY CartID
HAVING MIN(DATEDIFF(dd,DateAdded,GETDATE())) >= @Days)
2. Add ShoppingCartCountOldCarts, which returns the number of shopping cart elements that would
be deleted by a ShoppingCartCountOldCarts call:
CREATE PROCEDURE ShoppingCartCountOldCarts
(@Days smallint)
AS
SELECT COUNT(CartID)
FROM ShoppingCart
WHERE CartID IN
(SELECT CartID
FROM ShoppingCart
GROUP BY CartID
HAVING MIN(DATEDIFF(dd,DateAdded,GETDATE())) >= @Days)
3. Add these methods to the ShoppingCartAccess class (located in ShoppingCartAccess.cs). They
are used to interact with the two stored procedures you wrote earlier.
// Counts old shopping carts
public static int CountOldCarts(byte days)
{
// get a configured DbCommand object
DbCommand comm = GenericDataAccess.CreateCommand();
// set the stored procedure name
comm.CommandText = "ShoppingCartCountOldCarts";
// create a new parameter
DbParameter param = comm.CreateParameter();
param.ParameterName = "@Days";
param.Value = days;
param.DbType = DbType.Byte;
comm.Parameters.Add(param);
Darie-Watson_4681C09.fm Page 348 Tuesday, September 20, 2005 7:28 AM
CHAPTER 9 ■ CREATING A CUSTOM SHOPPING CART
349
// execute the procedure and return number of old shopping carts
try
{
return Byte.Parse(GenericDataAccess.ExecuteScalar(comm));
}
catch
{
return -1;
}
}
// Deletes old shopping carts
public static bool DeleteOldCarts(byte days)
{
// get a configured DbCommand object
DbCommand comm = GenericDataAccess.CreateCommand();
// set the stored procedure name
comm.CommandText = "ShoppingCartDeleteOldCarts";
// create a new parameter
DbParameter param = comm.CreateParameter();
param.ParameterName = "@Days";
param.Value = days;
param.DbType = DbType.Byte;
comm.Parameters.Add(param);
// execute the procedure and return true if no problem occurs
try
{
GenericDataAccess.ExecuteNonQuery(comm);
return true;
}
catch
{
return false;
}
}
4. Create a new Web Form at the root of the BalloonShop project, named ShoppingCartAdmin.aspx,
based on the Admin.master Master Page.
5. While in Source View, add this code to the first place holder:
<asp:Content ID="Content1" ContentPlaceHolderID="ContentPlaceHolder1"
Runat="Server">
<span class="AdminTitle">Shopping Cart Admin</span>
</asp:Content>
6. Add the following content to the second place holder:
Darie-Watson_4681C09.fm Page 349 Tuesday, September 20, 2005 7:28 AM
8213592a117456a340854d18cee57603
350
CHAPTER 9
■ CREATING A CUSTOM SHOPPING CART
<asp:Content ID="Content2" ContentPlaceHolderID="ContentPlaceHolder2"
runat="Server">
<asp:Label ID="countLabel" runat="server" CssClass="AdminPageText">
Hello!
</asp:Label><br />
<span class="AdminPageText">How many days?</span>
<asp:DropDownList ID="daysList" runat="server">
<asp:ListItem Value="0">All shopping carts</asp:ListItem>
<asp:ListItem Value="1">One</asp:ListItem>
<asp:ListItem Value="10" Selected="True">Ten</asp:ListItem>
<asp:ListItem Value="20">Twenty</asp:ListItem>
<asp:ListItem Value="30">Thirty</asp:ListItem>
<asp:ListItem Value="90">Ninety</asp:ListItem>
</asp:DropDownList><br />
<br />
<asp:Button ID="countButton" runat="server" Text="Count Old Shopping Carts"
CssClass="Button" />
<asp:Button ID="deleteButton" runat="server" Text="Delete Old Shopping
Carts" CssClass="Button" />
</asp:Content>
Now if you switch to Design View, you should see a form like the one shown in Figure 9-12.
Figure 9-12. ShoppingCartAdmin.aspx in Design View
Darie-Watson_4681C09.fm Page 350 Tuesday, September 20, 2005 7:28 AM
CHAPTER 9 ■ CREATING A CUSTOM SHOPPING CART
351
7. Double-click the Delete Old Shopping Carts button, and complete its Click event handler with the
following code:
// deletes old shopping carts
protected void deleteButton_Click(object sender, EventArgs e)
{
byte days = byte.Parse(daysList.SelectedItem.Value);
ShoppingCartAccess.DeleteOldCarts(days);
countLabel.Text = "The old shopping carts were removed from the database";
}
8. Double-click the Count Old Shopping Carts button and complete its Click event handler with the fol-
lowing code:
// counts old shopping carts
protected void countButton_Click(object sender, EventArgs e)
{
byte days = byte.Parse(daysList.SelectedItem.Value);
int oldItems = ShoppingCartAccess.CountOldCarts(days);
if (oldItems == -1)
countLabel.Text = "Could not count the old shopping carts!";
else if (oldItems == 0)
countLabel.Text = "There are no old shopping carts.";
else
countLabel.Text = "There are " + oldItems.ToString() +
" old shopping carts.";
}
9. Add this code to Page_Load:
protected void Page_Load(object sender, EventArgs e)
{
// Set the title of the page
this.Title = BalloonShopConfiguration.SiteName +
" : Shopping Cart Admin";
}
10. To restrict this page to administrator-only access, open web.config and add the following block, after
the one that deals with CatalogAdmin.aspx:
<! Only administrators are allowed to access ShoppingCartAdmin.aspx >
<location path="ShoppingCartAdmin.aspx">
<system.web>
<authorization>
<allow roles="Administrators" />
<deny users="*" />
</authorization>
</system.web>
</location>
Darie-Watson_4681C09.fm Page 351 Tuesday, September 20, 2005 7:28 AM
352
CHAPTER 9
■ CREATING A CUSTOM SHOPPING CART
11. Finally, add a link to this new page. Open UserInfo.ascx in Source View and add a link to the shopping
cart admin page for the Administrators role group, just after the link to the catalog admin page:
<tr>
<td>
»
<a class="UserInfoLink" href="CatalogAdmin.aspx">Catalog Admin</a>
«
</td>
</tr>
<tr>
<td>
»
<a class="UserInfoLink" href="ShoppingCartAdmin.aspx">Shopping Cart
Admin</a>
«
</td>
</tr>
</ContentTemplate>
How It Works: The Shopping Cart Admin Page
Congratulations, you’re done! Your new shopping cart admin page should work as expected.
Summary
In this chapter, you learned how to store the shopping cart information in the database, and
you learned a few things in the process as well. Probably the most interesting was the way you
can store the shopping cart ID as a cookie on the client, because you haven’t done anything
similar so far in this book.
When writing the code for the user interface, you learned how to allow the visitor to update
multiple GridView records with a single click, and you also implemented a clever strategy for
the Continue Shopping functionality.
At the end, you updated the administrative part of the web site to deal with the new challenges
implied by your custom-created shopping cart.
You’ll complete the functionality offered by the custom shopping cart in the next chapter
with a custom checkout system. You’ll add a Place Order button to the shopping cart, which
allows you to save the shopping cart information as a separate order in the database.
See you in the next chapter!
Darie-Watson_4681C09.fm Page 352 Tuesday, September 20, 2005 7:28 AM
353
■ ■ ■
CHAPTER 10
Dealing with Customer Orders
The good news is that your brand-new shopping cart looks good and is fully functional. The
bad news is that it doesn’t allow the visitor to actually place an order, making it totally useless
in the context of a production system.
You’ll deal with that problem in this chapter, in two separate stages. In the first part of the
chapter, you’ll implement the client-side part of the order-placing mechanism. More precisely,
you’ll add a Proceed to Checkout button onto the shopping cart control, which will allow the
visitor to order the products in the shopping cart.
In the second part of the chapter, you’ll implement a simple orders administration page
where the site administrator can view and handle pending orders.
The code for each part of the site is presented in the usual way, starting with the database
tier, continuing with the business tier, and finishing with the user interface.
Implementing an Order-Placing System
The entire order-placing system is related to the Proceed to Checkout button mentioned
earlier. Figure 10-1 shows how this button will look after you update the ShoppingCart.aspx
control in this chapter.
Looking at the figure, the button looks boring for something that is the center of this
chapter’s universe. Still, a lot of logic is hidden behind it, so let’s consider what you want to
happen when the customer clicks that button. Remember that at this stage, it doesn’t matter
who places the order, but it’s important to store information in the database about the products
that were ordered.
Basically, two things need to happen when the customer clicks the Proceed to Checkout
button:
• First, the order must be stored somewhere in the database. You’ll save the shopping cart’s
products to an order named BalloonShop Order nnn and then clear the shopping cart.
• Secondly, the customer must be redirected to a PayPal payment page where the
customer pays the necessary amount for the order.
Darie-Watson_4681C10.fm Page 353 Tuesday, September 20, 2005 4:52 AM