Beginning Hibernate From Novice to Professional phần 8 doc
Bạn đang xem bản rút gọn của tài liệu. Xem và tải ngay bản đầy đủ của tài liệu tại đây (324.07 KB, 35 trang )
6935ch10_final.qxd 8/2/06 9:41 PM Page 224
Filtering the Results
of Searches
Your application will often need to process only a subset of the data in the database tables.
In these cases, you can create a Hibernate
filter to eliminate the unwanted data. Filters pro-
vide a way for your application to limit the results of a query to data that passes the filter’s
criteria. Filters are not a new concept—you can achieve much the same effect using SQL
database views—but Hibernate offers a centralized management system for them.
Unlike database views, Hibernate filters can be enabled or disabled during a Hibernate
session. In addition, Hibernate filters can be parameterized, which is particularly useful when
you are building applications on top of Hibernate that use security roles or personalization.
When to Use Filters
As an example, consider a web application that manages user profiles. Currently, your appli-
cation presents a list of all users through a single web interface, but you receive a change
request from your end user to manage active users and expired users separately. For this
example, assume that the status is stored as a column on the user table.
One way to solve this problem is to rewrite every HQL
SELECT query in your application,
adding a
WHERE clause that restricts the result by the user’s status. Depending on how you built
your application, this could be an easy undertaking or it could be complex, but you still end
up modifying code that y
ou have already tested thoroughly, potentially changing it in many
different places.
With Hibernate 3, you can create a filter restriction for the user status. When your end
user selects the user type (active or expired), your application activates the user status filter
(with the proper status) for the end user’s Hibernate session. Now, any
SELECT queries will
return the correct subset of results, and the relevant code for the user status is limited to two
locations: the Hibernate session and the user status filter.
The advantage of using Hibernate filters is that you can programmatically turn filters on
or off in your application code, and your filters are defined in your Hibernate mapping docu-
ments for easy maintainability. The major disadvantage of filters is that you cannot create new
filters at run time. Instead, any filters your application requires need to be specified in the
proper Hibernate mapping document. Although this may sound somewhat limiting, the fact
that filters can be parameterized makes them pretty flexible. For our user status filter example,
only one filter would need to be defined in the mapping document (albeit in two parts). That
225
CHAPTER 11
■ ■ ■
6935ch11_final.qxd 8/2/06 9:39 PM Page 225
filter would specify that the status column must match a named parameter. You would not
need to define the possible values of the status column in the Hibernate mapping docu-
ment—the application can specify those parameters at run time.
Although it is certainly possible to write applications with Hibernate that do not use fil-
ters, we find them to be an excellent solution to certain types of problems—notably security
and personalization.
Defining Filters
Your first step is to define filters in your application’s Hibernate mapping documents, using
the
<filter-def> XML element. These filter definitions must contain the name of the filter
and the names and types of any filter parameters. Specify filter parameters with the
<filter-param> XML element. Filter parameters are similar to named parameters for HQL
queries. Both require a
: before the parameter name. Here is an excerpt from a mapping docu-
ment with a filter called
latePaymentFilter defined:
<?xml version='1.0' encoding='utf-8'?>
<!DOCTYPE hibernate-mapping
PUBLIC "-//Hibernate/Hibernate Mapping DTD//EN"
" /><hibernate-mapping>
<class
</class>
<filter-def name="latePaymentFilter">
<filter-param name="dueDate" type="date"/>
</filter-def>
</hibernate-mapping>
Once you have created the filter definitions, you need to attach the filters to class or col-
lection mapping elements. You can attach a single filter to more than one class or collection.
To do this, you add a
<filter> XML element to each class and/or collection. The <filter>
XML element has two attributes: name and condition. The name references a filter definition
(for instance:
latePaymentFilter). The condition represents a WHERE clause in HQL. Here’s an
example:
<class
<filter name="latePaymentFilter" condition=":dueDate = paymentDate"/>
</class>
Each <filter> XML element must correspond to a <filter-def> element. You may have
mor
e than one filter for each filter definition, and each class can hav
e mor
e than one filter.
This is a little confusing—the extra level of abstraction allows you to define all the filter
parameters in one place and then refer to them in the individual filter conditions.
CHAPTER 11 ■ FILTERING THE RESULTS OF SEARCHES226
6935ch11_final.qxd 8/2/06 9:39 PM Page 226
Using Filters in Your Application
Your application programmatically determines which filters to activate or deactivate for a
given Hibernate session. Each session can have a different set of filters with different parame-
ter values. By default, sessions do not have any active filters—you must explicitly enable filters
programmatically for each session. The
Session interface contains several methods for work-
ing with filters, as follows:
•
public Filter enableFilter(String filterName)
• public Filter getEnabledFilter(String filterName)
• public void disableFilter(String filterName)
These are pretty self-explanatory—the enableFilter(String filterName) method activates
the specified filter, the
disableFilter(String filterName) method deactivates the method, and
if you have already activated a named filter,
getEnabledFilter(String filterName) retrieves that
filter.
The
org.hibernate.Filter interface has six methods. You are unlikely to use validate();
Hibernate uses that method when it processes the filters. The other five methods are as follows:
•
public Filter setParameter(String name, Object value)
• public Filter setParameterList(String name, Collection values)
• public Filter setParameterList(String name, Object[] values)
• public String getName()
• public FilterDefinition getFilterDefinition()
The setParameter() method is the most useful. You can substitute any Java object for the
parameter, although its type should match the type you specified for the parameter when you
defined the filter. The two
setParameterList() methods are useful for using IN clauses in your fil-
ters. If you want to use
BETWEEN clauses, use two different filter parameters with different names.
Finally, the
getFilterDefinition() method allows you to retrieve a FilterDefinition object rep-
resenting the filter metadata (its name
, its parameters’ names, and the parameter types).
Once you have enabled a particular filter on the session, you do not have to do anything
else to your application to take advantage of filters, as we demonstrate in the following example.
A Basic Filtering Example
B
ecause filters are v
ery straightforward, a basic example allows us to demonstrate most of the
filter functionality, including activating filters and defining filters in mapping documents.
In the following Hibernate XML mapping document (
User.hbm.xml), we created a filter
definition called
activatedFilter.
The par
ameters for the filter must be specified with
<filter-param> XML elements (as shown in Listing 11-1), which use the <activatedParam>
XML element. You need to specify a type for the filter parameter so that Hibernate knows how
CHAPTER 11 ■ FILTERING THE RESULTS OF SEARCHES 227
6935ch11_final.qxd 8/2/06 9:39 PM Page 227
to map values to parameters. Once you have defined your filter, you need to attach the filter
definition to a class. At the end of our
User class definition, we specify that it uses a filter
named
activatedFilter. We then need to set a condition corresponding to an HQL WHERE
clause for the attached filter. In our case, we used :activatedParam = activated, where
:activatedParam is the named parameter specified on the filter definition, and activated is
the column name from the user table. You should ensure that the named parameter goes on
the left-hand side so that Hibernate’s generated SQL doesn’t interfere with any joins.
Listing 11-1. Hibernate XML Mapping for User
<?xml version='1.0' encoding='utf-8'?>
<!DOCTYPE hibernate-mapping
PUBLIC "-//Hibernate/Hibernate Mapping DTD//EN"
" /><hibernate-mapping>
<class name="com.hibernatebook.filters.User">
<id name="id" type="int">
<generator class="native"/>
</id>
<property name="username" type="string" length="32"/>
<property name="activated" type="boolean"/>
<filter name="activatedFilter" condition=":activatedParam = activated"/>
</class>
<filter-def name="activatedFilter">
<filter-param name="activatedParam" type="boolean"/>
</filter-def>
</hibernate-mapping>
With the filter definition created and attached to a class with a suitable condition, we
need to activate the filter. The next class,
SimpleFilterExample, inserts several user records
into the database, and then immediately displays them to the screen. The class uses a very
simple HQL query (
from User) to obtain the result set from Hibernate. The displayUsers()
method writes the usernames and activation status out to the console. Before you have
enabled any filters on the database, this method will return the full list of users. Once you
hav
e enabled the first filter (
activatedFilter) to sho
w only activated users
, call the same
displayUsers() method—the results of the quer
y are the same as if y
ou had added a
WHERE
clause containing an "activated=true" clause. You can just as easily change the filter’s
par
ameter value to show inactive users, as shown in Listing 11-2.
CHAPTER 11 ■ FILTERING THE RESULTS OF SEARCHES228
6935ch11_final.qxd 8/2/06 9:39 PM Page 228
Listing 11-2. Invoking Filters from Code
p
ackage com.hibernatebook.filters;
import java.util.Iterator;
import org.hibernate.Filter;
import org.hibernate.Query;
import org.hibernate.Session;
import org.hibernate.SessionFactory;
import org.hibernate.Transaction;
import org.hibernate.cfg.Configuration;
public class SimpleFilterExample {
public static void main (String args[]) {
SessionFactory factory =
new Configuration().configure().buildSessionFactory();
Session session = factory.openSession();
//insert the users
insertUser("ray",true,session);
insertUser("jason",true,session);
insertUser("beth",false,session);
insertUser("judy",false,session);
insertUser("rob",false,session);
//Show all users
System.out.println("===ALL USERS===");
displayUsers(session);
//Show activated users
Filter filter = session.enableFilter("activatedFilter");
filter.setParameter("activatedParam",new Boolean(true));
System.out.println("===ACTIVATED USERS===");
displayUsers(session);
//Show nonactivated users
filter.setParameter("activatedParam",new Boolean(false));
System.out.println("===NON-ACTIVATED USERS===");
displayUsers(session);
CHAPTER 11 ■ FILTERING THE RESULTS OF SEARCHES 229
6935ch11_final.qxd 8/2/06 9:39 PM Page 229
s
ession.close();
}
p
ublic static void displayUsers(Session session) {
session.beginTransaction();
Query query = session.createQuery("from User");
Iterator results = query.iterate();
while (results.hasNext())
{
User user = (User) results.next();
System.out.print(user.getUsername() + " is ");
if (user.isActivated())
{
System.out.println("activated.");
}
else
{
System.out.println("not activated.");
}
}
session.getTransaction().commit();
}
public static void insertUser(String name, boolean activated, Session session) {
session.beginTransaction();
User user = new User();
user.setUsername(name);
user.setActivated(activated);
session.save(user);
session.getTransaction().commit();
}
}
The output of SimpleFilterExample is as follo
ws:
===ALL USERS===
ray is activated.
jason is activated.
beth is not activated.
judy is not activated.
rob is not activated.
CHAPTER 11 ■ FILTERING THE RESULTS OF SEARCHES230
6935ch11_final.qxd 8/2/06 9:39 PM Page 230
=
==ACTIVATED USERS===
ray is activated.
jason is activated.
=
==NON-ACTIVATED USERS===
beth is not activated.
judy is not activated.
rob is not activated.
Listing 11-3 gives the User class used for this chapter’s examples. The only fields it con-
tains are
id, username, and activated.
Listing 11-3. The Source Code for the User Class
package com.hibernatebook.filters;
public class User {
private int id;
private String username;
private boolean activated;
public boolean isActivated() {
return activated;
}
public void setActivated(boolean activated) {
this.activated = activated;
}
public int getId() {
return id;
}
public void setId(int id) {
this.id = id;
}
public String getUsername() {
return username;
}
public void setUsername(String username) {
this.username = username;
}
}
CHAPTER 11 ■ FILTERING THE RESULTS OF SEARCHES 231
6935ch11_final.qxd 8/2/06 9:39 PM Page 231
Because filters do not use any database-specific functionality beyond the Hibernate config-
uration, you should not encounter any difficulty running this example on databases other than
HSQLDB. The Hibernate configuration file defines the database configuration and connection
information, along with the XML mapping document for the
User class (see Listing 11-4).
Listing 11-4. The Hibernate XML Configuration File for the Example
<?xml version='1.0' encoding='utf-8'?>
<!DOCTYPE hibernate-configuration PUBLIC
"-//Hibernate/Hibernate Configuration DTD//EN"
" /><hibernate-configuration>
<session-factory>
<property name="hibernate.connection.driver_class">
org.hsqldb.jdbcDriver
</property>
<property name="hibernate.connection.url">
jdbc:hsqldb:file:filterdb;SHUTDOWN=true
</property>
<property name="hibernate.connection.username">sa</property>
<property name="hibernate.connection.password"></property>
<property name="hibernate.connection.pool_size">0</property>
<property name="dialect">
org.hibernate.dialect.HSQLDialect
</property>
<! Mapping files >
<mapping resource="com/hibernatebook/filters/User.hbm.xml"/>
</session-factory>
</hibernate-configuration>
The source code for this chapter includes the schema we used for the HSQL database to
create the table for the
filterdb database.
Summary
Filters are a useful way to separate some database concerns from the rest of your code. A set
of filters can cut back on the complexity of the HQL queries used in the rest of your applica-
tion, at the expense of some r
untime flexibility. I
nstead of using views (which must be created
at the database level), your applications can take advantage of dynamic filters that can be acti-
vated as and when they are required.
CHAPTER 11 ■ FILTERING THE RESULTS OF SEARCHES232
6935ch11_final.qxd 8/2/06 9:39 PM Page 232
More Advanced Features
In this appendix, we discuss some of the features that, strictly speaking, lie outside the scope
of this book, but that you should be aware of if you go on to use Hibernate in more depth.
EJB 3 and the EntityManager
The third version of the Enterprise Java Beans specification, generally known as EJB 3, has
recently been finalized. Among other features, EJB 3 includes a standard ORM technology that
was significantly influenced by the design of Hibernate.
You encountered this close relationship in Chapter 6 when we discussed Hibernate’s use
of the EJB 3 annotations for creating entity mappings. Annotations can be used throughout
your EJB 3 applications to denote various settings. They are also used to mark for injection of
resources from the container in a manner very like that of Spring’s dependency injection (see
Appendix C). HQL, which was discussed in Chapter 9, is very similar to the EJB QL used in
EJB 3 environments—generally speaking, your HQL queries can be used as EJB QL queries
without change.
Given these similarities, a Hibernate application can be converted into a portable EJB 3
application with surprisingly few changes. EJB 3 now supports both J2SE environments and
those hosted within J2EE application servers; so even a stand-alone application can be writ-
ten to take advantage of the EJB 3 features.
The standard way to access the ORM components of an EJB 3 application is through the
EntityManager.
The Hibernate team provides appropriate libraries for download on their
EntityManager site at
.
The
EntityManager is configured through a standard file called persistence.xml, which
must be provided in a
META-INF directory accessible from the classpath (or, in a J2EE environ-
ment, from the root of the deployed archive). This file serves the same purpose as a conventional
Hibernate configuration file (
hibernate.cfg.xml), although its syntax is somewhat different. An
example file is given in Listing A-1.
Listing A-1. A
n EJB 3
persistence.xml Configur
ation File
<persistence xmlns=" />xmlns:xsi=" />xsi:schemaLocation="
/>version="1.0">
233
APPENDIX A
■ ■ ■
6935appA_final.qxd 8/2/06 9:18 PM Page 233
<
persistence-unit name="
s
ampleManager
"
transaction-type="RESOURCE_LOCAL">
<class>com.hibernatebook.advanced.Sample</class>
<properties>
<
property name="hibernate.connection.driver_class"
value="org.hsqldb.jdbcDriver"/>
<property name="hibernate.connection.url"
value="jdbc:hsqldb:file:/advanced/db/advanceddb;SHUTDOWN=true"/>
<property name="hibernate.connection.username" value="sa"/>
<property name="hibernate.connection.password" value=""/>
<property name="hibernate.connection.pool_size" value="0"/>
<property name="hibernate.show_sql" value="false"/>
<property name="hibernate.dialect"
value="org.hibernate.dialect.HSQLDialect"/>
</properties>
</persistence-unit>
</persistence>
The configuration file can contain multiple named <persistence-unit> elements, each
corresponding to a different configuration of the ORM environment. In the example in
Listing A-1, we have created a single annotation-mapped entity. The
<properties> element
then configures the implementation-specific (i.e., Hibernate-specific) properties. In
Listing A-1, we have configured a database connection and dialect. When configuring a J2EE
environment, the connection would usually be provided through generic elements of the
persistence unit; Listing A-2 shows a configuration that takes advantage of this approach.
Listing A-2. An EJB 3 persistence.xml Configuration File Using a JTA Data Source
<persistence xmlns=" />xmlns:xsi=" />xsi:schemaLocation="
/>version="1.0">
<persistence-unit name="
sampleManager" transaction-type="JTA">
<jta-data-source>java:comp/env/jdbc/advanced</jta-data-source>
<class>com.hibernatebook.advanced.Sample</class>
<properties>
<property name="hibernate.dialect"
value="org.hibernate.dialect.HSQLDialect"/>
</properties>
</persistence-unit>
</persistence>
Listing A-2 shows that the configuration file requires very little Hibernate-specific infor-
mation. In a J2EE environment, it is possible at deployment time to substitute alternative
EJB 3 pr
o
viders for the providers indicated in the application’s metadata.
In a J2SE environment, the configuration information is accessed by creating an
EntityManagerFactory class by calling the createEntityManagerFactory() method of the
Persistence class
, with the configur
ed name of the persistence unit (sho
wn in bold in
APPENDIX A ■ MORE ADVANCED FEATURES234
6935appA_final.qxd 8/2/06 9:18 PM Page 234
Listings A-1 and A-2) containing the appropriate configuration information. From the
EntityManagerFactory class, you can request EntityManager instances that are used to access
the entities. You have probably already spotted that the EJB 3
Persistence class corresponds
roughly to
Configuration, that EntityManagerFactory is a dead ringer for SessionFactory, and
that
EntityManager is the analog of Session.
The example code in Listing A-3 pushes this point home. The
EntityManager instance is
used in a very similar way to the
Session class shown throughout this book (although some of
the method names are slightly different—
persist() in this example corresponds to Session’s
save() method).
Listing A-3. Using EJB 3 Persistence in J2SE Code
package com.hibernatebook.advanced;
import java.util.List;
import javax.persistence.EntityManager;
import javax.persistence.EntityManagerFactory;
import javax.persistence.Persistence;
import javax.persistence.Query;
public class Ejb3Example {
@SuppressWarnings("unchecked")
public static void main(String[] args) {
EntityManagerFactory factory =
Persistence.createEntityManagerFactory("
sampleManager");
EntityManager manager = factory.createEntityManager();
manager.getTransaction().begin();
manager.persist(new Sample("FAQ"));
manager.persist(new Sample("RTFM"));
manager.persist(new Sample("PDQ"));
manager.persist(new Sample("ASAP"));
manager.getTransaction().commit();
Query query = manager.createQuery("from Sample");
manager.getTransaction().begin();
List<Sample> list = (List<Sample>)query.getResultList();
manager.getTransaction().commit();
for(Sample sample : list) {
System.out.println(sample.getContent());
}
APPENDIX A ■ MORE ADVANCED FEATURES 235
6935appA_final.qxd 8/2/06 9:18 PM Page 235
m
anager.close();
factory.close();
}
}
W
hile the configuration of an EJB 3 application server falls well outside the scope of this
book (which is a shame, because the topic is interesting—see
Pro EJB: Java Persistence API, by
Mike Keith and Merrick Schincariol (Apress, 2006), for a good introduction to the subject), the
use of an EntityManager deployed into an EJB 3 application server is straightforward. Typically
in such an environment, the container manages the
EntityManager. Listing A-4 demonstrates
how to obtain a reference to an
EntityManager in such an environment—only very simple
changes would be necessary in Listing A-3 to support this. Note that in this environment,
there is no need to interact with the
EntityManagerFactory—the container manages the
appropriate interaction with the factory in a way that is transparent to the user code.
Listing A-4. Obtaining an EntityManager from the Container by Injection
public class Ejb3Example {
@PersistenceContext(unitName="sampleManager",type=EXTENDED)
EntityManager manager;
// …
}
As Listing A-4 demonstrates, the combination of container-managed EntityManagers, anno-
tations, and resource injection makes the acquisition of an
EntityManager object trivially simple
(and remember, the
EntityManager is essentially the same as a Hibernate Session object).
Hibernate provides a couple of additional features to facilitate the transition of
Hibernate 3 code to EJB 3. Where your application uses a
Configuration (or an
AnnotationConfiguration) object to programmatically configure the Hibernate application,
there is now an alternative
Ejb3Configuration class that can be used in a similar manner to
provide the configuration information for the EJB 3 objects without the need for a
configuration.xml file.
The
<jb3configuration> element of the Hibernate Tools Ant task conversely allows the
configuration of the tasks to be drawn from the classpath’s
META-INF/configuration.xml file,
instead of from an explicitly identified Hibernate configuration or properties file.
Managed Versioning and Optimistic Locking
While we have saved versioning for this appendix’s discussion of advanced features, it is
actually quite straightforward to understand and apply. Consider the following scenario:
• Client A loads and edits a record.
• Client B loads and edits the same record.
• Client A commits its edited record data.
• Client B commits its differently edited record data.
While the scenar
io is simple
, the pr
oblems it pr
esents ar
e not. If Client A establishes
a transaction, then Client B may not be able to load and edit the same r
ecor
d.
Y
et in a w
eb
APPENDIX A ■ MORE ADVANCED FEATURES236
6935appA_final.qxd 8/2/06 9:18 PM Page 236
environment, it is not unlikely that Client A will close a browser window on the open record,
never committing or canceling the transaction, so that the record remains locked until the
session times out. Clearly this is not a satisfactory solution. Usually, you will not want to
permit the alternative scenario, in which no locking is used, and the last person to save a
record wins!
The solution, versioning, is essentially a type of optimistic locking (see Chapter 8).
When any changes to an entity are stored, a version column is updated to reflect the fact
that the entity has changed. When a subsequent user tries to commit changes to the same
entity, the original version number will be compared against the current value—if they dif-
fer, the commit will be rejected.
The Hibernate/EJB 3 annotation mappings and the Hibernate XML-based mappings both
provide a simple syntax for indicating which field should be used for storing the managed ver-
sion information. The annotation for this field is shown in Listing A-5.
Listing A-5. Marking the Version Attribute Using Annotations
@Version
protected int getVersionNum() {
return versionNum;
}
The default optimistic locking strategy for Hibernate is versioning, so if you provide a
<version> element in your XML configuration, this will be used as long as you have enabled
dynamic updates (as shown in Listing A-6).
Listing A-6. Marking the Version Attribute Using XML Mappings
<class dynamic-update="version" optimistic-lock="version" >
<version name="versionNum"/>
</class>
The version attribute is defined in a very similar way to the normal property attribute
configuration. The version can be of type
long, integer, short, timestamp, or calendar (note
that using the
<timestamp /> element is an equiv
alent alternative to the use of the
<version type="timestamp" /> element syntax).
The
<class> element’s optimistic-lock attribute can be used to override the default
v
ersioning-based optimistic locking strategy
.
You can disable it entirely (despite the pres-
ence of a version field) using a value of
none. You can explicitly state that versioning should
be used with a value of
version. You can elect to use dirty checking, with the dirty and all
options
.
If you elect not to use versioning, dirty checking offers an alternative form of optimistic
locking. Here, the values of the entities are themselves checked to see if they have changed
since the entity was or
iginally obtained. As with v
ersioning-based optimistic locking, the
check against the database is carried out when the changes are committed. If an optimistic
lock type of
dirty is selected, then only those fields that have changed since the persistent
entity was obtained will be checked (the
Session keeps tr
ack of the appr
opr
iate state informa-
tion). If an optimistic lock type of
all is selected, then all the fields comprising the entity will
APPENDIX A ■ MORE ADVANCED FEATURES 237
6935appA_final.qxd 8/2/06 9:18 PM Page 237
be checked for changes. If the fields being checked have changed prior to the commit, then
the commit will fail.
Versioning is generally a simpler and more reliable approach, so we suggest that you use
this whenever you need optimistic locking features.
XML Relational Persistence
Hibernate provides a feature that allows XML data to be mapped into the entity model for
access using the normal session methods. This functionality is provided primarily so that
data can be imported into and exported from the underlying relational data store—it is not
intended as a replacement for relational databases!
The feature can be used for various purposes—archiving data, implementing SOAP
interfaces, and so on—but the most common use is for the purposes of processing (and
providing) external data feeds such as product catalogs. We show here how the example
application in Chapter 3 (an advertisements database) can be configured to read and write
appropriate XML feeds for the mapped entities.
Hibernate requires the use of Dom4J as the API for XML access because Hibernate’s inter-
nals already rely upon Dom4J to read configuration and mapping files.
Adding Node Information to Mappings
Two attributes are used to add all the XML-specific information to your existing mapping files:
node and embed-xml.
The
node attribute applies to most tags that correspond to tables or columns in the data-
base. The value can be a single string, in which case it represents an element name in the XML
markup; or it can be preceded by a commercial at symbol (
@), in which case it represents the
attribute of an element. Paths can be indicated using forward slashes. This is the standard
XPath syntax for identifying elements in an XML document.
If set to
true, the embed-xml attribute indicates that the property or entity referenced
should be included inline as XML. If set to
false, it indicates that a reference to the primary
key should be substituted instead. This is necessary because the DOM generation does not
perform reference handling automatically—so loops in the entity model references would
result in infinite loops in XML generation if this option could not be set to
true.
N
ote that if
embed-xml is set to false for a
n association, generating XML output that refer-
ences another entity will
not automatically include a representation of the entity elsewhere in
the generated document. This is your responsibility. Listing A-7 shows how our example
Advert
class fr
om Chapter 3 might be marked up with
node and embed-xml attr
ibutes.
Listing A-7. The Advert E
xample Classes fr
om Chapter 3 M
ar
ked U
p for XML Persistence
<?xml version='1.0' encoding='utf-8'?>
<!DOCTYPE hibernate-mapping
PUBLIC "-//Hibernate/Hibernate Mapping DTD//EN"
" />APPENDIX A ■ MORE ADVANCED FEATURES238
6935appA_final.qxd 8/2/06 9:18 PM Page 238
<
hibernate-mapping>
<class name="sample.entity.User" table="aduser"
node="user">
<id name="id" type="long" column="id"
node="@id">
<generator class="native"/>
</id>
<property name="name" column="name" type="string" unique="true"
node="@name"/>
<property name="password" column="password" type="string"
node="@password"/>
</class>
<class name="sample.entity.Category" table="category"
node="category">
<id name="id" type="long" column="id"
node="@id">
<generator class="native"/>
</id>
<property name="title" column="title" type="string" unique="true"
node="@name"/>
<set name="adverts" table="link_category_advert"
node="." embed-xml="true">
<key column="category" foreign-key="fk_advert_category"/>
<many-to-many class="sample.entity.Advert"
column="advert" foreign-key="fk_category_advert"
embed-xml="false" node="advert"/>
</set>
</class>
<class name="sample.entity.Advert" table="advert"
node="advert">
<id name="id" type="long" column="id"
node="@id">
<generator class="native"/>
</id>
APPENDIX A ■ MORE ADVANCED FEATURES 239
6935appA_final.qxd 8/2/06 9:18 PM Page 239
<
property name="message" column="message" type="string"
node="content"/>
<
property name="title" column="title" type="string"
node="title"/>
<many-to-one name="user" column="aduser"
class="sample.entity.User" not-null="true"
foreign-key="fk_advert_user"
node="@user" embed-xml="false"/>
</class>
</hibernate-mapping>
Exporting XML Entities
With the entity mappings marked up for XML relational persistence, the generation of output
from an existing set of persistent entities is fairly simple. By obtaining a session with the entity
mode configured for Dom4J, the entity proxies retrieved from that session will be
org.dom4j.Node
instances that can be manipulated with the normal Dom4J API.
To access a
Session object in this mode, you first open a conventional session, and then
invoke the
getSession() method on it, passing EntityMode.DOM4J as the sole parameter thus:
Session = sessionFactory.openSession();
Session xmlSession = session.getSession(EntityMode.DOM4J);
Once an appropriate Dom4J document has been populated with the entities (extracted
from Hibernate in the normal way), the session can be closed, and the Dom4J document can
be treated as a self-contained entity, as shown in Listing A-8.
Listing A-8. Exporting the Advert Entities Using Dom4J
package sample.xml;
import java.io.*;
import java.util.*;
import org.dom4j.*;
import org.hibernate.*;
import org.hibernate.cfg.Configuration;
public class ExportXML {
private static final SessionFactory sessionFactory = new Configuration()
.configure().buildSessionFactory();
public static void main(String[] args)
throws Exception
{
System.out.println("Preparing the DOM Document");
Document document = DocumentHelper.createDocument();
Element root = document.addElement("catalog");
APPENDIX A ■ MORE ADVANCED FEATURES240
6935appA_final.qxd 8/2/06 9:18 PM Page 240
S
ystem.out.println("Preparing the Session objects");
Session session = sessionFactory.openSession();
Session xmlSession = session.getSession(EntityMode.DOM4J);
S
ystem.out.println("Reading the catalog from the database");
session.beginTransaction();
export(xmlSession,root,"from User");
export(xmlSession,root,"from Advert");
export(xmlSession,root,"from Category");
session.getTransaction().commit();
session.close();
System.out.println("Dumping the catalog to a file");
BufferedWriter writer = new BufferedWriter(new FileWriter("catalog.xml"));
document.write(writer);
writer.flush();
writer.close();
System.out.println("Done.");
}
public static void export(Session xmlSession,Element root,String hql) {
Query query = xmlSession.createQuery(hql);
List categories = query.list();
Iterator cit = categories.iterator();
while(cit.hasNext()) {
Element element = (Element)cit.next();
root.add(element);
}
}
}
The code in Listing A-8 generates the catalog.xml file shown in Listing A-9. Note how the
node attributes in the mapping file correspond to the positions of the elements and attributes
in the exported XML file. Note also how setting the
embed-xml attribute to false substitutes the
id value for the generated XML in the elements at the catalog/category/advert path.
Listing A-9. The XML Exported by Hibernate
<?xml version="1.0" encoding="UTF-8"?>
<catalog>
<user id="1" name="dave" password="dodgy"/>
<advert id="1" user="1">
<content>48k original box and packaging</content>
<title>Sinclair Spectrum for sale</title>
</advert>
APPENDIX A ■ MORE ADVANCED FEATURES 241
6935appA_final.qxd 8/2/06 9:18 PM Page 241
<
category id="1" name="retro">
<advert>1</advert>
<advert>3</advert>
<
/category>
</catalog>
Importing XML Entities
The session in Dom4J entity mode can be used to import data into Hibernate as well as export
it. The process is really just the export process in reverse—although there is one gotcha to be
aware of: by default, the entity names will be assumed to be the same as the element nodes
that you attempt to persist from the Dom4J document. Unless your
node attributes in the
mapping files correspond exactly with the entity names used in the mapping files, calls to the
session will need to include the explicit entity name being saved.
Listing A-10 shows an example of a workaround for this issue, in which a hard-coded map
translates short element names into full entity names, and the version of the
save() method
that takes an entity name string is invoked. When the class elements’
node attributes corre-
spond exactly with entity names, this sort of approach becomes unnecessary.
Listing A-10. Importing Entities from an XML Document
package sample.xml;
import java.util.*;
import org.dom4j.*;
import org.dom4j.io.SAXReader;
import org.hibernate.*;
import org.hibernate.cfg.Configuration;
public class ImportXML {
private static final SessionFactory sessionFactory = new Configuration()
.configure().buildSessionFactory();
public static void main(String[] args) throws Exception {
System.out.println("Preparing the DOM Document");
SAXReader reader = new SAXReader();
Document document = reader.read("catalog.xml");
System.out.println("Preparing the Session objects");
Session session = sessionFactory.openSession();
Session xmlSession = session.getSession(EntityMode.DOM4J);
System.out.println("Importing the catalog from the document");
session.beginTransaction();
APPENDIX A ■ MORE ADVANCED FEATURES242
6935appA_final.qxd 8/2/06 9:18 PM Page 242
M
ap names = new HashMap();
names.put("user","sample.entity.User");
names.put("advert","sample.entity.Advert");
n
ames.put("category","sample.entity.Category");
List entities = document.getRootElement().content();
Iterator eit = entities.iterator();
while(eit.hasNext()) {
Node item = (Node)eit.next();
String entityName = (String)names.get(item.getName());
xmlSession.save(entityName,item);
}
session.getTransaction().commit();
session.close();
System.out.println("Done.");
}
}
Unfortunately, the default value for the node attribute, if it is not explicitly applied to the
class elements in the mapping files, is the short (unqualified) name of the class—not the entity
name, which defaults to the long (fully qualified) class name.
Other Considerations When Using XML Entities
The objects retrieved from Hibernate in the EntityMode.DOM4J session mode are Dom4J objects,
but they are
still Hibernate persistence entities. You can therefore manipulate these entities
through the Dom4J API and persist these changes to the database without needing to access
the entity as a POJO.
Tools and APIs that process an XML document can therefore be applied to a Dom4J docu-
ment extracted from Hibernate, and as long as it is still associated with the originating session,
changes made to the document will be reflected in the database when the session is flushed or
the transaction is committed.
Hibernate and EJB 3 annotations do not provide support for the use of XML relational
persistence. If you want to use this feature to import or export data for an annotated applica-
tion, you will first need to gener
ate appr
opr
iate XML-based mapping files from the annotated
classes.
Maps
In addition to the default mode (POJO) and the XML mode (Dom4J) described previously,
the Hibernate session can be accessed in one more way: as a map of name/value pairs. This
mode is accessed by calling the
getSession() method with a parameter of EntityMode.MAP
(see Listing A-11).
APPENDIX A ■ MORE ADVANCED FEATURES 243
6935appA_final.qxd 8/2/06 9:18 PM Page 243
Listing A-11. Accessing a Hibernate Session in Map Mode
p
ackage sample.map;
import java.util.*;
i
mport org.hibernate.EntityMode;
import org.hibernate.*;
import org.hibernate.cfg.Configuration;
public class AccessAsMap {
private static final SessionFactory sessionFactory = new Configuration()
.configure().buildSessionFactory();
public static void main(String[] args) throws Exception {
System.out.println("Preparing the Session objects");
Session session = sessionFactory.openSession();
Session mapSession = session.getSession(EntityMode.MAP);
System.out.println("Reading the map entries for XXX");
session.beginTransaction();
Map entity = (Map)mapSession.get("sample.entity.Category",new Long(2));
System.out.println("Category Title: " + entity.get("title"));
System.out.println("Contains Adverts:");
Set adverts = (Set)entity.get("adverts");
Iterator adIt = adverts.iterator();
while(adIt.hasNext()) {
Map advert = (Map)adIt.next();
System.out.println(advert.get("title"));
}
session.getTransaction().commit();
session.close();
System.out.println("Done.");
}
}
This mode works much the same as the Dom4J mode—changes written to the Map objects
will be persisted exactly as if a nor
mal persistent POJO object had been updated. Note that
only the entities themselves will be represented as
Maps—not any of their attributes having a
value type, or associations using
Collection types. For example, in Listing A-11, the Category
entity is r
epr
esented as a
Map, but its title attr
ibute is r
epr
esented as a
String and its adverts
attribute is represented as a Set—however, the Set itself contains Advert entities represented
as
Maps.
APPENDIX A ■ MORE ADVANCED FEATURES244
6935appA_final.qxd 8/2/06 9:18 PM Page 244
Limitations of Hibernate
First and foremost, Hibernate wants every entity to be identifiable with a primary key. Ideally, it
would like this to be a
surrogate key (a single column distinct from the fields of the table). Hiber-
nate will accept a primary key that is not a surrogate key. For example, the username column
might be used to uniquely identify an entry in the user table. Hibernate will also accept a com-
posite key as its primary key, so that the username and hostname might be used to form the
primary key if the username alone does not serve to identify the row.
In the real world, things do not really work like that. Any database that has been around
the block a few times is likely to have at least one table for which the primary key has been
omitted. For instance, the contents of the table may not have needed to be involved in any
relations with other tables. While this is still bad database design, the error is only exposed
when H
ibernate tries to map objects to data. It may be that adding a suitable surrogate key
column is an option—when this is the case, we urge you to do so. In practice, however, the
fundamental schema may not be under the developer’s control, or other applications may
break if the schema is radically changed.
In most scenarios, a developer will be able to arrange the creation of views or stored pro-
cedures. It may be possible to create the appearance of a suitable primary key using these if no
other options present themselves, but you should consult with your database administrators,
since a table for which no true primary key can be obtained is likely to cause long-term cor-
ruption of your data.
Finally, if you can neither change a broken schema nor add views or stored procedures
to ameliorate its effects, you have the option of obtaining a pure JDBC connection (see
Listing A-12) from the session to the database, and carrying out traditional connected data-
base access. This is the option of last resort, and is only truly of value when you anticipate
being able to correct the faulty schema at some future time.
Listing A-12. Obtaining a JDBC Connection from Hibernate
SessionFactory factory =
new Configuration().configure().buildSessionFactory();
Session session = factory.openSession();
Connection connection = session.getConnection();
Hand-Rolled SQL
While Hibernate cannot operate upon entities that lack primary keys, it is also extremely awk-
ward to use Hibernate when there is a poor correspondence between the tables and the
classes of your object model.
Using a Direct Mapping
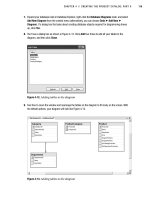
F
igur
e A-1 pr
esents a fairly typical example of a valid database model that may be painful to
represent in our mapping files
.
APPENDIX A ■ MORE ADVANCED FEATURES 245
6935appA_final.qxd 8/2/06 9:18 PM Page 245
Here, the product table represents a product (for example, a flashlight). The color table
represents the colors in which it is sold. The link table named
product_color then allows us to
identify a product by stock keeping unit (SKU), and identify the colors in which it is available.
If we do not mind the
Product object retaining a set of colors (representing the colors in
which it can be sold), then we have no problem; but if we want to distinguish between a red
flashlight and a green one, things become more difficult (see Listing A-13).
Listing A-13. A Fairly Direct Representation of the Product
<class name="com.hibernatebook.legacy.Product" table="product_color">
<composite-id
class="com.hibernatebook.legacy.ProductKey"
name="key">
<key-property type="int" name="id" column="product_id"/>
<key-property type="int" name="colorId" column="color_id"/>
</composite-id>
<many-to-one
name="color"
class="com.hibernatebook.legacy.Color"
column="color_id"
insert="false"
update="false"/>
<many-to-one
name="data"
class="com.hibernatebook.legacy.ProductData"
column="product_id"
insert="false"
update="false"/>
</class>
APPENDIX A ■ MORE ADVANCED FEATURES246
Figure A-1. A problematic but legal schema
6935appA_final.qxd 8/2/06 9:18 PM Page 246
There are several dissatisfying aspects to the mapping in Listing A-13. First, rather than
mapping our product table, we have mapped the link table. This makes sense when you con-
sider that the primary key formed from the two columns of this table uniquely identifies a
“colored product,” which the
product table alone cannot do.
Second, we are obliged to create a number of distinct objects to represent the class: the
Product class itself, a class to represent the primary key (inevitable where a composite id
occurs), a class to represent the other attributes of the product, and the Color class.
Last, the use of the columns more than once within the mapping requires us to flag
them so that they cannot be written—this is a
read-only mapping.
Using a View
Fortunately, most databases provide a simple mechanism for manipulating a schema so
that it better matches the business requirements. A database view will allow you to put
together a join that appears to be a table. By a suitable choice of columns from the existing
tables, you can construct a view that is much easier to map (see Listing A-14).
Listing A-14. AView on the Product Tables
create view vwProduct (ProductKey,ColorKey,Id,SKU,ColorId)
AS
select
p.id as ProductKey,
c.id as ColorKey,
p.id as Id,
p.sku as SKU,
c.id as ColorId
from
product p,
product_color pc,
color c
where
p.id = pc.product_id
and
pc.color_id = c.id;
This view effectively reformats our table so that it has a correct (composite) primary key
formed from the link table’s two columns. It makes the SKU data available directly, and it
r
etains the foreign key into the
color table
.
Listing A-15 is a much more natural mapping.
APPENDIX A ■ MORE ADVANCED FEATURES 247
6935appA_final.qxd 8/2/06 9:18 PM Page 247
Listing A-15. The Revised Mapping
<
class name="com.hibernatebook.legacy.Product" table="vwProduct">
<composite-id
class="com.hibernatebook.legacy.ProductKey"
n
ame="key">
<key-property
type="int"
name="id"
column="ProductKey"/>
<key-property
type="int"
name="colorId"
column="ColorKey" />
</composite-id>
<property
name="id"
type="int"
column="id"
insert="false"
update="false"
unique="true"/>
<property
name="SKU"
type="int"
column="sku"
insert="false"/>
<many-to-one
name="color"
class="com.hibernatebook.legacy.Color"
column="ColorId"/>
</class>
The behavior of the composite primary key is unchanged, but the SKU now becomes
a simple property. The color entity is mapped as before.
The cav
eat for this approach is the pr
oblem of writing data to the mapping. Some
databases (for example, versions 4 and lower of MySQL) do not support writable views, and
others may have only limited support for them. To avoid views in these circumstances, we
must abandon complete por
tability in favor of database-specific SQL inser
ted directly into
the mapping file.
Putting SQL into a Mapping
Hibernate provides three tags that can be used to override the default behavior when writing
to the database. Instead of accepting the SQL generated by Hibernate from the information in
APPENDIX A ■ MORE ADVANCED FEATURES248
6935appA_final.qxd 8/2/06 9:18 PM Page 248