Beginning Ajax with PHP From Novice to Professional phần 8 pptx
Bạn đang xem bản rút gọn của tài liệu. Xem và tải ngay bản đầy đủ của tài liệu tại đây (912.31 KB, 29 trang )
available functions (including details of the input parameters and returned data). For
example, the PayPal SOAP (Simple Object Access Protocol) API provides a method you
can execute called
DoDirectPayment. If you ran a website that used PayPal to process cus-
tomer transactions, you might call this method, passing in the customer’s details and
credit card number. The PayPal web server would then return data, indicating the status
of the transaction (such as whether it succeeded or failed).
Although in this example the developer connects directly to a third-party API (i.e.,
PayPal’s API), in this chapter we are going to look at creating our own web service, as well
as connecting to this service to use that data in a small Ajax application. There are several
different standards available that can be used for web services—such as SOAP and REST
(Representational State Transfer). We will be using SOAP in this chapter, and we will be
using the SOAP library that comes with PHP 5.
SOAP is a protocol that allows remote procedures to be executed. All requests to and
responses from a SOAP web service use XML. By using the SOAP library built into PHP,
the requests can easily be generated and responses can easily be interpreted.
To use the code in this chapter, your build of PHP needs to be compiled with the
SOAP library enabled. On Linux, the configuration parameter
with-soap is used, while
if you’re using Windows, you should include the following line in your
php.ini file:
extension=php_soap.dll
If you do not have this library available to you (or if you are using PHP 4), you could
also use a third-party library such as NuSOAP.
Bring in the Ajax
So, what’s nicer than being able to communicate over the Internet from client to server
using SOAP? The ability to do so asynchronously and with no page refreshes! Besides
being incredibly slick, firing asynchronous requests from your web site code to a waiting
SOAP server is incredibly functional and can allow for some powerful web functionality.
Perfect for information aggregation on the fly, combining Ajax with web services can
yield some handy and seamless results. Let’s say you are a big news buff and want to keep
up with all of the recent happenings. You can build in a panel to retrieve information
from an online source and continually update it while users are browsing your site.
It also works incredibly well for online applications such as stock price updates,
image feeds, and—as the code example I will go over in a short while dictates—sports
scores.
Let’s Code
Those of you who follow the NHL might remember a Canadian team by the name of the
Calgary Flames making a daring attempt at winning the Stanley Cup a few years ago, only
CHAPTER 9 ■ WEB SERVICES 137
6676CH09.qxd 9/27/06 11:58 AM Page 137
to lose out in the final round after a hard-fought battle. As a rabid Flames fan, I’ve long
been bothered with a busy work schedule that keeps me on the Internet, rather than
watching the latest game. What if, however, there was a way for my web site to keep me
constantly updated of the progress of my hockey game of choice? Well, by combining
Ajax with web services, that wish of mine just came true. This chapter will show you how
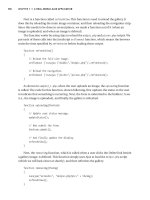
to create code to display hockey scores (as shown in Figure 9-2). Additionally, the code
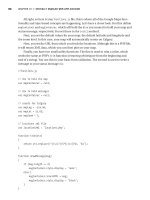
will refresh and get the latest scores every 60 seconds. Figure 9-3 shows the state of the
application while it gets the updated scores.
Figure 9-2. Hockey scores updated on the fly—perfect for us developers who (sadly) spend
more time in front of the computer than the TV
Figure 9-3. In order to keep the user informed, you can let them know of the loading process.
Consider the following example, which makes use of Ajax to submit web service
requests to a server that houses an XML document containing the scores of hockey sports
teams. Listing 9-1 holds the main application that is loaded into the web browser. The
scores are displayed and refreshed using the JavaScript code in Listing 9-2. Listings 9-3
and 9-4 show the web server (SOAP) client and server code. The web service provides the
real-time scores, while the client retrieves the scores—meaning that they can be dis-
played on the page.
Listing 9-1. The Main Script That Shows the Scores (sample 9_1.html)
<!DOCTYPE html PUBLIC "-//W3C//DTD XHTML 1.0 Transitional//EN"
" /><html xmlns=" /><head>
<title>Sample 9_1</title>
<link rel="stylesheet" type="text/css" href="style.css" />
CHAPTER 9 ■ WEB SERVICES138
6676CH09.qxd 9/27/06 11:58 AM Page 138
<script type="text/javascript" <script type="text/javascript" src="xmlhttp.js"></script>
</head>
<body onload="loadthescores('2006-01-23', 'scorescontainer')">
<div class="hockeybox">
<h2>Hockey Scores</h2>
<! Load the Ajax response data into here >
<div id="scorescontainer"></div>
</div>
</body>
</html>
Listing 9-2. The JavaScript Code That Reloads the Scores (functions.js)
//functions.js
//Function to load hockey scores in.
function loadthescores(date, container)
{
// Let the user know that the scores are loading.
document.getElementById(container).innerHTML = "<b>Loading </b>";
// Load an Ajax request into the hockey scores area.
processajax('sample9_1client.php?date=' + date, container, 'post', '');
// Then set a timeout to run this function again in 1 minute.
setTimeout("loadthescores('" + date + "', '" + container + "')", 60000);
}
Listing 9-3. The SOAP Client Code That Fetches Games from the Web Service
(sample9_1client.php)
<?php
//sample9_1client.php
// Determine the location of the SOAP service.
$location = sprintf('http://%s%s/sample9_1server.php',
$_SERVER['HTTP_HOST'],
dirname($_SERVER['SCRIPT_NAME']));
CHAPTER 9 ■ WEB SERVICES 139
6676CH09.qxd 9/27/06 11:58 AM Page 139
// Connect to the service.
try {
$soap = new SoapClient(null, array('location' => $location,
'uri' => ''));
// Run the remote procedure and get the list of games.
$games = $soap->getHockeyGames($_GET['date']);
}
catch (SoapFault $ex) {
$msg = sprintf('Error using service at %s (%s)',
$location,
$ex->getMessage());
echo $msg;
exit;
}
?>
<table>
<tr>
<th colspan="2">Home</th>
<th></th>
<th colspan="2">Away</th>
</tr>
<?php if (count($games) == 0) { ?>
<tr>
<td colspan="5">
No games were found
</td>
</tr>
<?php } else foreach ($games as $i => $game) { ?>
<tr<?php if ($i % 2 == 1) { ?> class="alt"<?php } ?>>
<td><?= $game['hometeam'] ?>
<td><?= $game['homescore'] ?>
<td>-</td>
<td><?= $game['awayscore'] ?>
<td><?= $game['awayteam'] ?>
</tr>
<?php } ?>
</table>
CHAPTER 9 ■ WEB SERVICES140
6676CH09.qxd 9/27/06 11:58 AM Page 140
Listing 9-4. The SOAP Web Service Code That Returns Game Scores (sample9_1server.php)
<?php
//sample9_1server.php
// Generate some fake game data.
$games = array();
$games[] = array('date' => '2006-01-23',
'hometeam' => 'Calgary Flames',
'awayteam' => 'Edmonton Oilers',
'homescore' => rand(1, 5),
'awayscore' => rand(1, 5));
$games[] = array('date' => '2006-01-23',
'hometeam' => 'Los Angeles Kings',
'awayteam' => 'Anaheim Mighty Ducks',
'homescore' => rand(1, 5),
'awayscore' => rand(1, 5));
$games[] = array('date' => '2006-01-24',
'hometeam' => 'Anaheim Mighty Ducks',
'awayteam' => 'Calgary Flames',
'homescore' => rand(1, 5),
'awayscore' => rand(1, 5));
// Return all of the games found for the given date.
function getHockeyGames($date)
{
$ret = array();
foreach ($GLOBALS['games'] as $game) {
if ($date == $game['date'])
$ret[] = $game;
}
return $ret;
}
// Create the SOAP server and add the getHockeyGames function to it.
$soap = new SoapServer(null, array('uri' => ''));
$soap->addFunction('getHockeyGames');
CHAPTER 9 ■ WEB SERVICES 141
6676CH09.qxd 9/27/06 11:58 AM Page 141
// Use the request to (try to) invoke the service.
if ($_SERVER['REQUEST_METHOD'] == 'POST') {
$soap->handle();
}
else {
echo "Available functions:\n";
foreach ($soap->getFunctions() as $func) {
echo $func . "\n";
}
}
}
?>
How the SOAP Application Works
OK, so you’ve had a look at the code and what it looks like in its finished format; now let’s
have a look at how the script works. The centralized page you load into your browser is
sample9_1.html.
Here you will note that the
loadthescores function is called when the page has com-
pleted loading. This will populate the page with the scores initially, and then trigger the
continual updates. We will look at how this function works shortly.
Two parameters are also passed into this function. The first is the date for which the
scores will be obtained, and the second is the name of the
div where the results will be
displayed.
<body onload="loadthescores('2006-01-23', 'scorescontainer')">
<div class="hockeybox">
<h2>Hockey Scores</h2>
<! Load the Ajax response data into here >
<div id="scorescontainer"></div>
</div>
Here is the actual loadthescores function itself (contained within the functions.js
file). The first thing to do is update the target element to display a loading message to the
user, before initiating the Ajax request.
function loadthescores(date, container)
{
// Let the user know that the scores are loading.
document.getElementById(container).innerHTML = "<b>Loading </b>";
CHAPTER 9 ■ WEB SERVICES142
6676CH09.qxd 9/27/06 11:58 AM Page 142
// Load an Ajax request into the hockey scores area.
processajax('sample9_1client.php?date=' + date, container, 'post', '');
// Then set a timeout to run this function again in 1 minute.
setTimeout("loadthescores('" + date + "', '" + container + "')", 60000);
}
Take special note of the recursive setTimeout-based loadthescores function call. Once
you initially call the function using the
onload event, the function will continue to call
itself every 60000 ms (1 minute). By changing the last argument in the
setTimeout func-
tion, you can increase or decrease the amount of time between score refreshes. Note that
this function makes use of the
runajax function that you’ve been using throughout this
book. It simply makes a request to the server (asynchronously) and then loads the results
into the element of your choice (in this case, the
loadscores div).
Now that you’ve seen how the layout works with your script, let’s have a look at the
client/server setup. First, let’s have a look at the server setup so that you can see exactly
what the client is calling. The server setup is contained within the
sample9_1server.php
file.
<?php
//sample9_1server.php
First off is the creation of some fake game data. Obviously, if this were a “real” web
service, this data would represent the actual scores in real time. This example, however,
will simply use the PHP
rand function to generate the scores.
// Generate some fake game data.
$games = array();
$games[] = array('date' => '2006-01-23',
'hometeam' => 'Calgary Flames',
'awayteam' => 'Edmonton Oilers',
'homescore' => rand(1, 5),
'awayscore' => rand(1, 5));
$games[] = array('date' => '2006-01-23',
'hometeam' => 'Los Angeles Kings',
'awayteam' => 'Anaheim Mighty Ducks',
'homescore' => rand(1, 5),
'awayscore' => rand(1, 5));
$games[] = array('date' => '2006-01-24',
'hometeam' => 'Anaheim Mighty Ducks',
CHAPTER 9 ■ WEB SERVICES 143
6676CH09.qxd 9/27/06 11:58 AM Page 143
'awayteam' => 'Calgary Flames',
'homescore' => rand(1, 5),
'awayscore' => rand(1, 5));
Now we will create the remote procedure. This is the function that users of the web
service will be able to call. As you can see, this is simply a PHP function. In other words,
because you are providing a web service, other people execute a PHP function without
even using PHP! This function simply loops over the game data just created and checks
to see if the date field matches.
// Return all of the games found for the given date.
function getHockeyGames($date)
{
$ret = array();
foreach ($GLOBALS['games'] as $game) {
if ($date == $game['date'])
$ret[] = $game;
}
return $ret;
}
Now, the PHP SOAP library must be used to create the web service. Because the
library is compiled into PHP, you can use the
SoapServer class natively without the need
to include any libraries. There are several ways to use this class, but just note for now that
null is being passed as the first parameter, which means that the uri option must be
specified in the second parameter.
Next, you tell your newly created SOAP server about the
getHockeyGames function. By
calling the
addFunction() method, you add this function to the web service so that it can
be called externally.
// Create the SOAP server and add the getHockeyGames function to it
$soap = new SoapServer(null, array('uri' => ''));
$soap->addFunction('getHockeyGames');
Finally, you need to handle a call to the web service. That is, when somebody tries
to use the service, you have to detect this and then handle it. Since SOAP requests are
submitted using
POST, you check REQUEST_METHOD to make sure that POST was used. Addi-
tionally, it is coded so that if you load the server script directly into your browser, it will
list the available methods.
CHAPTER 9 ■ WEB SERVICES144
6676CH09.qxd 9/27/06 11:58 AM Page 144
// Use the request to (try to) invoke the service.
if ($_SERVER['REQUEST_METHOD'] == 'POST') {
$soap->handle();
}
else {
echo "Available functions:\n";
foreach ($soap->getFunctions() as $func) {
echo $func . "\n";
}
}
?>
With the server in place, it is important to host it somewhere online so that you
can test it. Once the script is somewhere online, it is time to build the client script to
test the access to the web service at that URL. The client script is contained within the
sample9_1client.php file, shown here:
<?php
//sample9_1client.php
First, you must determine the full URL where the web service is loaded. Here is a
short snippet of code that will automatically detect the location of the server. You can
substitute the full location of the
sample9_1server.php file if you need to.
// Determine the location of the SOAP service
$location = sprintf('http://%s%s/sample9_1server.php',
$_SERVER['HTTP_HOST'],
dirname($_SERVER['SCRIPT_NAME']));
Now, you use the SoapClient class, another built-in class that is part of the PHP SOAP
library. Here, the location of the service to connect to is passed in, as well as the name-
space (specified by the
uri parameter. It is required to use this class, although you’re not
really using it).
Since this is a PHP 5 class, an exception is thrown if any errors occur while connect-
ing to the service or calling any of its methods. To handle these, you use
try and catch in
your code.
One of the best parts of the
SoapClient class is that any functions found in the service
that you connect can be called as though they were native PHP functions. This allows you
to directly call
getHockeyGames() on the $soap object.
CHAPTER 9 ■ WEB SERVICES 145
6676CH09.qxd 9/27/06 11:58 AM Page 145
try {
$soap = new SoapClient(null, array('location' => $location,
'uri' => ''));
// Run the remote procedure and get the list of games
$games = $soap->getHockeyGames($_GET['date']);
}
catch (SoapFault $ex) {
$msg = sprintf('Error using service at %s (%s)',
$location,
$ex->getMessage());
echo $msg;
exit;
}
Finally, you output the games returned from the service into HTML. This data is
returned via Ajax and displayed on your page. You simply loop each game and list it as a
row in the table. Additionally, you are alternating background colors on each row to make
the data easier to read. You simply check whether or not the row number is even or odd,
and change the CSS class accordingly.
<table>
<tr>
<th colspan="2">Home</th>
<th></th>
<th colspan="2">Away</th>
</tr>
<?php if (count($games) == 0) { ?>
<tr>
<td colspan="5">
No games were found
</td>
</tr>
<?php } else foreach ($games as $i => $game) { ?>
<tr<?php if ($i % 2 == 1) { ?> class="alt"<?php } ?>>
<td><?= $game['hometeam'] ?>
<td><?= $game['homescore'] ?>
<td>-</td>
<td><?= $game['awayscore'] ?>
<td><?= $game['awayteam'] ?>
</tr>
<?php } ?>
</table>
CHAPTER 9 ■ WEB SERVICES146
6676CH09.qxd 9/27/06 11:58 AM Page 146
Well, that’s all there is to it. As you might expect, you can get pretty fancy and
involved on both the client and server levels. You can deal with password-protected func-
tions, functions that talk to databases, and so on—whatever you like. The hard part isn’t
coding the functions, it’s getting your mind around the concept of a client script talking
to a server script and outputting the result to a client browser. Using Ajax, it becomes
even more complex in that the result is being searched for and displayed asynchronously
without the user being aware of the complex code that is being executed.
Summary
When all is said and done, I really enjoy the concept of web services with Ajax. The result
is so functionally powerful, allowing developers to not only share hoards of data with the
Internet community, but to display it in a very nice and convenient way for the user. The
sky is the limit when it comes to this kind of functionality, and as data becomes more and
more limitless, having a means to make use of another developer’s hard work becomes a
crucial part of online business functionality.
Since you have seen how to create and execute your own web service–based code,
you are now ready to move on to an already existing web service application. In the next
chapter, you will look at and make use of one of Google’s more fun and exciting web-
based services: its mapping API.
CHAPTER 9 ■ WEB SERVICES 147
6676CH09.qxd 9/27/06 11:58 AM Page 147
6676CH09.qxd 9/27/06 11:58 AM Page 148
Spatially Enabled Web
Applications
One of the great aspects of this wonderfully massive World Wide Web is that communi-
ties of similarly located individuals are able to come together with a common goal.
While tightly controlled solutions have long existed (MapQuest dominated the mar-
ket for years), it took Google to step up and provide a powerful, simple-to-implement
solution for web developers to use in creating spatially enabled web applications. Since
Google began, industry giants such as Microsoft and Yahoo! have come up with some
very nice solutions as well.
Google realized it was on to something big, and, in its usual sharing of wisdom, it
decided to allow web developers a simple means to deploy and use the system for their
own purposes. Since then, Google Maps has been used for everything under the sun.
Developers have been enjoying massive success in deploying Google Maps, from games
of Risk to crime locators.
Why Is Google Maps so Popular?
The concept of spatially enabled web applications has always been a popular one, due
to its potential to help communities better visualize information pertinent to their area.
By providing a means to look at your house from a satellite simply by putting in your
address, Google Maps quickly became a prominent headline simply due to its wow fac-
tor, not to mention its superb functionality. For instance, showing a map of the locations
of all the car thefts in Chicago in the last year is a good use of a spatially enabled web
application, as shown in Figure 10-1.
OK, I’ll admit that Google Maps is popular for more than just its amazing functional-
ity. Google has some great JavaScript programmers on board, and they have done
something interesting with their API—they have built Ajax functionality directly into it.
By integrating this interesting technology with the next hot web concept (Ajax), they’ve
made Google Maps extremely popular, as well as the developer’s choice for deploying
spatially enabled web applications.
149
CHAPTER 10
6676CH10.qxd 9/27/06 11:59 AM Page 149
Figure 10-1. A good example of a spatially enabled web application
(www.chicagocrime.org)
As you can see in Figure 10-2, Google’s satellite photography covers the whole world,
allowing you to zoom right in to see street level, or zoom out to see the bigger picture. You
can also get all your street maps using the interface, or even overlay the maps over the
satellite photography.
Figure 10-2. Google Maps gives you a bird’s-eye view of the world, one Ajax application at
a time.
CHAPTER 10 ■ SPATIALLY ENABLED WEB APPLICATIONS150
6676CH10.qxd 9/27/06 11:59 AM Page 150
Where to Start
Working with Google Maps is fairly simple, which is one of the reasons for its explosive
popularity. It requires a basic understanding of JavaScript and, if you want to get into
some of the more advanced features (which, if you’re reading this book, you probably
do), it requires a solid knowledge of some form of server-side programming language.
Before you get into any of the programming, though, you need to actually pay Google
a visit and ask it nicely (via a web form) to use its system. The first thing you will need to
acquire is an API key from Google. The map key can be acquired at
www.google.com/apis/
maps/signup.html.
Google is pretty lenient about the usage of its system, but it does require you to agree
to the usual terms of service. Also, those who are planning on getting 50,000 hits or more
per day will have to contact Google beforehand. Use of the system is also tied directly to a
specific URL, so when you apply for your key, you will have to designate what URL you
are planning on using. The system is intuitive enough to implement on any page found
within the specified URL, but testing from a local machine isn’t possible—you need to
test on the server designated by the URL you enter.
So, with that in mind, and your generated key in hand, it is time to build a script to
make use of Google’s fantastic API. When deciding on a web application that could make
use of this feature, I decided to build something to help feed my habit. What habit is that,
you ask? Why, I am something of a heavy video game user, and sometimes find myself in
need of a game depending on the section of the city I am currently traveling in. With this
in mind, I decided to create a video game store finder. While I have populated this ver-
sion with mostly EB Games locations, the system can be adapted to include any video
game outlet.
Now, before we get into any code, there is something you need to know about operat-
ing Google Maps. The system takes in latitude and longitude values in order to produce
markings on its map. Unfortunately, unlike postal or ZIP codes, latitude and longitude
values are not generally widely known or widely available. Until Google gets around to
supplying a postal/ZIP code parser, you are going to have to get your latitude and longi-
tude values the old-fashioned way: through Internet searches.
■Note At press time, Google released version 2 of its mapping API, which includes a geocoding feature.
Review the Google Maps API manual located at
for more informa-
tion about this feature.
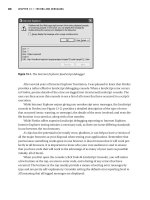
Thankfully, there are some pretty decent (and free) ways to achieve your results
(although getting a proper database version will cost you a few dollars). For postal code
conversion, I found a very nice solution at ZIPCodeWorld (
www.zipcodeworld.com/
lookup.asp), shown in Figure 10-3.
CHAPTER 10 ■ SPATIALLY ENABLED WEB APPLICATIONS 151
6676CH10.qxd 9/27/06 11:59 AM Page 151
And for the United States, take a look at , which will perform
United States ZIP code conversions.
Figure 10-3. ZIPCodeWorld showing longitude and latitude
OK, so now you have everything necessary to begin building your very own spatially
enabled web application—so let’s begin. This particular example is intended to be a
Google Maps–powered solution that will allow you to view and then add locations of
video game retailers. As in previous chapters, let’s have a look at the complete source
code, shown in Listings 10-1 through 10-7, and then go through it piece by piece. Due to
the use of PHP’s exception handling, PHP version 5 or higher is required. Also note that
you must insert your own Google Maps key into the code shown in Listing 10-1 (where it
says
[yourkey]).
Listing 10-1. The HTML Wrapper Code for the Mapping System (sample10_1.php)
<?php
if (isset($_GET['message']))
$message = trim(strip_tags(stripslashes($_GET['message'])));
else
$message = '';
?>
<!DOCTYPE html PUBLIC "-//W3C//DTD XHTML 1.0 Strict//EN"
CHAPTER 10 ■ SPATIALLY ENABLED WEB APPLICATIONS152
6676CH10.qxd 9/27/06 11:59 AM Page 152
" /><html xmlns=" /><head>
<script type="text/javascript"></script>
<script src="functions.js" type="text/javascript"></script>
<link rel="stylesheet" type="text/css" href="style.css" />
<title>Video Games Jones-ing Helper</title>
</head>
<body onload="init('map', 'messages')">
<div id="main">
<div id="map"></div>
<div id="formwrapper">
<?php if (strlen($message) > 0) { ?>
<div id="messages">
<?php echo htmlentities($message) ?>
</div>
<?php } else { ?>
<div id="messages" style="display: none"></div>
<?php } ?>
<h3>Add a New Location:</h3>
<form method="post" action="process_form.php"
onsubmit="submitForm(this); return false;">
<table>
<tr>
<td>Name:</td>
<td><input type="text" name="locname" maxlength="150" /></td>
</tr>
<tr>
<td>Address:</td>
<td><input type="text" name="address" maxlength="150" /></td>
</tr>
<tr>
<td>City:</td>
<td><input type="text" name="city" maxlength="150" /></td>
</tr>
<tr>
<td>Province:</td>
<td><input type="text" name="province" maxlength="150" /></td>
</tr>
<tr>
CHAPTER 10 ■ SPATIALLY ENABLED WEB APPLICATIONS 153
6676CH10.qxd 9/27/06 11:59 AM Page 153
<td>Postal:</td>
<td><input type="text" name="postal" maxlength="150" /></td>
</tr>
<tr>
<td>Latitude:</td>
<td><input type="text" name="latitude" maxlength="150" /></td>
</tr>
<tr>
<td>Longitude:</td>
<td><input type="text" name="longitude" maxlength="150" /></td>
</tr>
</table>
<p>
<input type="submit" value="Add Location" />
</p>
</form>
</div>
</div>
</body>
</html>
Listing 10-2. The CSS Stylings for the Application (style.css)
/* style.css */
body {
font-size: 11px;
font-family: verdana;
color: #000;
}
form { margin : 0; }
#messages {
background: #eee;
padding: 5px;
margin : 5px;
}
#main {
width: 758px;
border : 1px solid #000;
float : left;
CHAPTER 10 ■ SPATIALLY ENABLED WEB APPLICATIONS154
6676CH10.qxd 9/27/06 11:59 AM Page 154
padding-right : 5px;
}
#map {
width: 400px;
height: 400px;
float: left;
}
#formwrapper {
width : 350px;
float: right;
}
.location { width : 250px; font-size : 10px }
Listing 10-3. The JavaScript Code to Perform the Client-Side Processing (functions.js)
//functions.js
// div to hold the map
var mapContainer = null;
// div to hold messages
var msgContainer = null;
// coords for Calgary
var mapLng = -114.06;
var mapLat = 51.05;
var mapZoom = 7;
// locations xml file
var locationsXml = 'locations.php';
function trim(str)
{
return str.replace(/^(\s+)?(\S*)(\s+)?$/, '$2');
}
function showMessage(msg)
{
if (msg.length == 0)
CHAPTER 10 ■ SPATIALLY ENABLED WEB APPLICATIONS 155
6676CH10.qxd 9/27/06 11:59 AM Page 155
msgContainer.style.display = 'none';
else {
msgContainer.innerHTML = msg;
msgContainer.style.display = 'block';
}
}
function init(mapId, msgId)
{
mapContainer = document.getElementById(mapId);
msgContainer = document.getElementById(msgId);
loadMap();
}
function createInfoMarker(point, theaddy)
{
var marker = new GMarker(point);
GEvent.addListener(marker, "click",
function() {
marker.openInfoWindowHtml(theaddy);
}
);
return marker;
}
function loadMap()
{
var map = new GMap(mapContainer);
map.addControl(new GMapTypeControl());
map.addControl(new GLargeMapControl());
map.centerAndZoom(new GPoint(mapLng, mapLat), mapZoom);
var request = GXmlHttp.create();
request.open("POST", locationsXml, true);
request.onreadystatechange = function() {
if (request.readyState == 4) {
var xmlDoc = request.responseXML;
var markers = xmlDoc.documentElement.getElementsByTagName("marker");
for (var i = 0; i < markers.length; i++) {
CHAPTER 10 ■ SPATIALLY ENABLED WEB APPLICATIONS156
6676CH10.qxd 9/27/06 11:59 AM Page 156
var point = new GPoint(parseFloat(markers[i].getAttribute("longitude")),
parseFloat(markers[i].getAttribute("latitude")));
var theaddy = '<div class="location"><strong>'
+ markers[i].getAttribute('locname')
+ '</strong><br />';
theaddy += markers[i].getAttribute('address') + '<br />';
theaddy += markers[i].getAttribute('city') + ', '
+ markers[i].getAttribute('province') + '<br />'
+ markers[i].getAttribute('postal') + '</div>';
var marker = createInfoMarker(point, theaddy);
map.addOverlay(marker);
}
}
}
request.send('a');
}
function submitForm(frm)
{
var fields = {
locname : 'You must enter a location name',
address : 'You must enter an address',
city : 'You must enter the city',
province : 'You must enter the province',
postal : 'You must enter a postal code',
latitude : 'You must enter the latitude',
longitude : 'You must enter the longitude'
};
var errors = [];
var values = 'ajax=1';
for (field in fields) {
val = frm[field].value;
if (trim(val).length == 0)
errors[errors.length] = fields[field];
values += '&' + field + '=' + escape(val);
}
CHAPTER 10 ■ SPATIALLY ENABLED WEB APPLICATIONS 157
6676CH10.qxd 9/27/06 11:59 AM Page 157
if (errors.length > 0) {
var errMsg = '<strong>The following errors have occurred:</strong>';
+ '<br /><ul>\n';
for (var i = 0; i < errors.length; i++){
errMsg += '<li>' + errors[i] + '</li>\n';
}
errMsg += '</ul>\n';
showMessage(errMsg);
return false;
}
//Create a loading message.
mapContainer.innerHTML = "<b>Loading </b>";
var xmlhttp = GXmlHttp.create();
xmlhttp.open("POST", frm.action, true);
xmlhttp.setRequestHeader("Content-Type",
"application/x-www-form-urlencoded; charset=UTF-8");
xmlhttp.onreadystatechange = function() {
if (xmlhttp.readyState == 4 && xmlhttp.status == 200) {
showMessage(xmlhttp.responseText);
}
}
xmlhttp.send(values);
setTimeout("loadMap()",1000);
}
Listing 10-4. The Code to Connect to Your MySQL Database (dbconnector.php)
<?php
// dbconnector.php
$GLOBALS['host'] = 'localhost';
$GLOBALS['user'] = 'webuser';
$GLOBALS['pass'] = 'secret';
$GLOBALS['db'] = 'apress';
CHAPTER 10 ■ SPATIALLY ENABLED WEB APPLICATIONS158
6676CH10.qxd 9/27/06 11:59 AM Page 158
function opendatabase()
{
$db = mysql_connect($GLOBALS['host'], $GLOBALS['user'], $GLOBALS['pass']);
if (!$db)
return false;
if (!mysql_select_db($GLOBALS['db'], $db))
return false;
return true;
}
?>
Listing 10-5. The Code to Process the Form Submission of a New Location Entry
(process_form.php)
<?php
// process_form.php
require_once('dbconnector.php');
opendatabase();
// see whether this is being via ajax or normal form submission
$ajax = (bool) $_POST['ajax'];
$values = array('locname' => '',
'address' => '',
'city' => '',
'province' => '',
'postal' => '',
'latitude' => '',
'longitude' => '');
$error = false;
foreach ($values as $field => $value) {
$val = trim(strip_tags(stripslashes($_POST[$field])));
$values[$field] = mysql_real_escape_string($val);
CHAPTER 10 ■ SPATIALLY ENABLED WEB APPLICATIONS 159
6676CH10.qxd 9/27/06 11:59 AM Page 159
if (strlen($values[$field]) == 0)
$error = true;
}
if ($error) {
$message = 'Error adding location';
}
else {
$query = sprintf("insert into store (%s) values ('%s')",
join(', ', array_keys($values)),
join("', '", $values));
mysql_query($query);
$message = 'Location added';
}
if ($ajax)
echo $message;
else {
header('Location: sample10_1.php?message=' . urlencode($message));
exit;
}
?>
Listing 10-6. The Code to Generate the XML for the Saved Locations (locations.php)
<?php
// locations.php
require_once('dbconnector.php');
opendatabase();
$query = sprintf('select * from store');
$result = mysql_query($query);
$rowXml = '<marker latitude="%s" longitude="%s" locname="%s"'
.= ' address="%s" city="%s" province="%s" postal="%s" />';
$xml = "<markers>\n";
while ($row = mysql_fetch_array($result)) {
$xml .= sprintf($rowXml . "\n",
htmlentities($row['latitude']),
CHAPTER 10 ■ SPATIALLY ENABLED WEB APPLICATIONS160
6676CH10.qxd 9/27/06 11:59 AM Page 160
htmlentities($row['longitude']),
htmlentities($row['locname']),
htmlentities($row['address']),
htmlentities($row['city']),
htmlentities($row['province']),
htmlentities($row['postal']));
}
$xml .= "</markers>\n";
header('Content-type: text/xml');
echo $xml;
?>
Listing 10-7. Sample Output of the XML Generated by the locations.php File (locations.xml)
<markers>
<marker latitude="50.9859" longitude="-114.058"
locname="Deerfoot Meadows" address="100-33 Heritage Meadows Way SE"
city="Calgary" province="Alberta" postal="T2H 3B8" />
<marker latitude="51.0563" longitude="-114.095"
locname="North Hill S/C" address="1632-14th Ave"
city="Calgary" province="Alberta" postal="T2N 1M7" />
<marker latitude="51.0947" longitude="-114.142"
locname="Market Mall" address="RO47-3625 Shaganappi Trail NW"
city="Calgary" province="Alberta" postal="T3A 0E2" />
<marker latitude="51.0404" longitude="-114.131"
locname="Westbrook Mall" address="1200 37 St SW"
city="Calgary" province="Alberta" postal="T3C 1S2" />
<marker latitude="51.0921" longitude="-113.919"
locname="Sunridge Mall" address="2525-36TH St NE"
city="Calgary" province="Alberta" postal="T1Y 5T4" />
<marker latitude="51.0469" longitude="-113.918"
locname="Marlborough Mall" address="1240 - 3800 Memorial Dr NE"
city="Calgary" province="Alberta" postal="T2A 2K2" />
CHAPTER 10 ■ SPATIALLY ENABLED WEB APPLICATIONS 161
6676CH10.qxd 9/27/06 11:59 AM Page 161