beginning iphone 3 development exploring the iphone sdk phần 4 pps
Bạn đang xem bản rút gọn của tài liệu. Xem và tải ngay bản đầy đủ của tài liệu tại đây (2.73 MB, 58 trang )
CHAPTER 7: Tab Bars and Pickers148
Delegates and Datasources
Before we dive in and start building our application, let’s look at why pickers are so much
more complex than the other controls you’ve used so far. It’s not just a matter of there being
more configurable attributes to set in Interface Builder. In fact, the picker actually has very
few attributes that can be configured from within Interface Builder. With the exception of
the date picker, you can’t use a picker by just grabbing one in Interface Builder, dropping it
on your content view, and configuring it. You have to also provide it with both a picker del-
egate and a picker datasource.
By this point, you should be comfortable using delegates. We’ve already used application
delegates and action sheet delegates, and the basic idea is the same here. The picker defers
several jobs to its delegate. The most important of these is the task of determining what to
actually draw for each of the rows in each of its components. The picker asks the delegate for
either a string or a view that will be drawn at a given spot on a given component. The picker
gets its data from the delegate.
In addition to the delegate, pickers need to have a datasource. In this instance, the name
“datasource” is a bit of a misnomer. The datasource tells the picker how many components it
will be working with and how many rows make up each component. The datasource works
similarly to the delegate, in that its methods are called at certain, prespecified times. Without
a datasource and a delegate specified, pickers cannot do their job and, in fact, won’t even be
drawn.
It’s very common for the datasource and the delegate to be the same object, and just as
common for that object to be the view controller for the picker’s enclosing view, which is the
approach we’ll be using in this application. The view controllers for each content pane will
be the datasource and the delegate for their picker.
NOTE
Here’s a pop quiz: is the picker datasource part of the model, view, or controller portion of the application?
It’s a trick question. A datasource sounds like it must be part of the model, but in fact, it’s actually part of
the controller. The datasource isn’t usually an object designed to hold data. Though in simple applications
the datasource might hold data, its true job is to retrieve data from the model and pass it along to the
picker.
Let’s fire up Xcode and get to it.
24594ch07.indd 148 6/23/09 11:28:59 AM
Download at Boykma.Com
CHAPTER 7: Tab Bars and Pickers
149
Setting Up the Tab Bar Framework
Although Xcode does provide a template for tab bar applications, we’re going to build ours
from scratch. It’s not much extra work, and it’s good practice. So, create a new project, select-
ing the Window-based Application template again. When prompted for a name, type Pickers,
and make sure the checkbox that says Use Core Data for storage is unchecked. We’re going
to walk you through the process of building the whole application, but if, at any step of the
way, you feel like challenging yourself by moving ahead of us, by all means, go ahead. If you
get stumped, you can always come back. If you don’t feel like skipping ahead, that’s just fine.
We’d love the company.
Creating the Files
In the previous chapter, we created a root controller to manage the process of swapping our
application’s other views. We’ll be doing that again this time, but we won’t need to create
our own root controller class. Apple provides a very good class for managing tab bar views,
so we’re just going to use an instance of UITabBarController as our root controller. We will
create that instance in Interface Builder in a few minutes.
First, we need to create five new classes in Xcode: the five view controllers that the root con-
troller will swap in and out.
Expand the Classes and Resources folders in the Groups & Files pane. Next, single-click the
Classes folder, and press ⌘N or select New File… from the File menu.
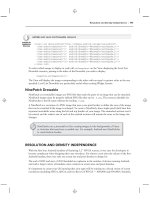
Select Cocoa Touch Classes in the left pane of the new file assistant, and then select the
icon for UIViewController subclass. In the bottom-right pane, just above the descrip-
tion of the selected template, you should see a checkbox labeled With XIB for user
interface (Figure 7-7). Make sure that’s checked before clicking Next. Name the first one
DatePickerViewController.m, making sure to check Also create “DatePickerViewController.h”.
After you click the Finish button, there will be three new files in your Classes folder:
DatePickerViewController.h, DatePickerViewController.m, and DatePickerViewController.xib.
The nib file doesn’t belong in the Classes folder, so drag DatePickerViewController.xib down
to the Resources folder.
Repeat those steps four more times, using the names SingleComponentPickerViewController.m,
DoubleComponentPickerViewController.m, DependentComponentPickerViewController.m, and
CustomPickerViewController.m.
24594ch07.indd 149 6/23/09 11:28:59 AM
Download at Boykma.Com
CHAPTER 7: Tab Bars and Pickers150
Figure 7-7. When creating a subclass of UIViewController, Xcode will create
the accompanying XIB file for you if you select “With XIB for user interface”.
Adding the Root View Controller
We’re going to create our root view controller, which will be an instance of
UITabBarController, in Interface Builder. Before we can do that, however, we should
declare an outlet for it. Single-click the PickersAppDelegate.h class, and add the following
code to it:
#import <UIKit/UIKit.h>
@interface PickersAppDelegate : NSObject <UIApplicationDelegate> {
UIWindow *window;
UITabBarController *rootController;
}
@property (nonatomic, retain) IBOutlet UIWindow *window;
@property (nonatomic, retain) IBOutlet UITabBarController *rootController;
@end
Before we move to Interface Builder to create our root view controller, let’s add the following
code to PickersAppDelegate.m:
#import "PickersAppDelegate.h"
@implementation PickersAppDelegate
24594ch07.indd 150 6/23/09 11:29:00 AM
Download at Boykma.Com
CHAPTER 7: Tab Bars and Pickers
151
@synthesize window;
@synthesize rootController;
- (void)applicationDidFinishLaunching:(UIApplication *)application {
// Override point for customization after app launch
[window addSubview:rootController.view];
[window makeKeyAndVisible];
}
- (void)dealloc {
[rootController release];
[window release];
[super dealloc];
}
@end
There shouldn’t be anything in this code that’s a surprise to you. This is pretty much the
same thing we did in the previous chapter, except that we’re using a controller class pro-
vided by Apple this time instead of one we wrote ourselves. Make sure you save both files
before continuing.
Tab bars use icons to represent each of the tabs, so we should also add the icons we’re going
to use before heading over to Interface Builder. You can find some suitable icons in the proj-
ect archive that accompanies this book in the 07 Pickers/Tab Bar Icons/ folder. The icons
should be 24 by 24 pixels and saved in .png format. The icon file should have a transparent
background. Generally, medium gray icons look the best on a tab bar. Don’t worry about try-
ing to match the appearance of the tab bar. Just as it does with the application icon, the
iPhone is going to take your image and make it look just right.
You should be comfortable adding resources to your
project by this point, so go ahead and add the five
icons we’ve provided by dragging them from the
Finder to the Resources folder of your Xcode project or
selecting Add to Project. . . from the Project menu.
Once you’ve added the icons, double-click
MainWindow.xib to open the file in Interface Builder.
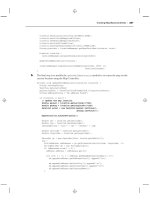
Drag a Tab Bar Controller from the library (see
Figure 7-8) over to the nib’s main window. Be sure you
drag to the window labeled MainWindow.xib and not
to the window labeled Window, which will not accept
the drag, so you’ll know when you get it right.
Figure 7-8. Tab Bar Controller in the
library
24594ch07.indd 151 6/23/09 11:29:00 AM
Download at Boykma.Com
CHAPTER 7: Tab Bars and Pickers152
Once you drop the tab bar controller onto your nib’s main window, a new window will
appear that looks like Figure 7-9. This tab bar controller will be our root controller. As a
reminder, the root controller controls the very first view that the user will see when your
program runs.
Single-click the Tab Bar Controller icon in your nib’s main window, and press ⌘1 to bring up
the attributes inspector for it. The attributes inspector for a tab bar controller will look like
Figure 7-10.
The part that we’re interested in is the top section, which is labeled View Controllers. When all
is said and done, we’ll end up with one view controller for each of our tab controller’s tabs.
Take a look back at Figure 7-2. As you can see, our program features five tabs, one for each of
our five subviews—five subviews, five view controllers.
Turn your attention back to the attributes inspector for the tab bar controller. We need to
change our tab bar controller so it has five tabs instead of two. Click the button with the plus
sign on it three times to create a total of five controllers. The attributes inspector will show
five items, and if you look over at the Tab Bar Controller window, you’ll see that it now has
five buttons instead of two.
Figure 7-9. The tab bar controller’s window Figure 7-10. The attributes inspector for
the tab bar controller
24594ch07.indd 152 6/23/09 11:29:00 AM
Download at Boykma.Com
CHAPTER 7: Tab Bars and Pickers
153
Click the tab bar at the bottom of the Tab Bar Controller
window. Be sure you click the leftmost tab. This should
select the controller that corresponds to the leftmost
tab, and the inspector should change to look like Fig-
ure 7-11. If your inspector doesn’t look like Figure 7-11,
click the second tab and then back on the first tab.
Here’s where we associate each tab’s view controller
with the appropriate nib. This leftmost tab will launch
the first of our five subviews. Leave the Title field blank.
Tab bar controllers don’t use this title for anything, though some other kinds of view control-
lers do. The checkbox labeled Wants Full Screen can be used to indicate that the view that
comes up when you press that tab will overlap and hide the tabs bar. If you check this
checkbox, you must provide an alternative mechanism for navigating off that tab. We will
leave this value unchecked for all of our tabs. Finally, specify a NIB Name of DatePickerView-
Controller. Do not include the .xib extension. Leave the Resize View From NIB checkbox
checked. This won’t apply to us, since we’ll design our views to not need resizing.
While you are here, press
⌘4. This will bring up the
identity inspector for the view controller associated
with the leftmost tab. Change the class to DatePicker-
ViewController, and press return or tab to set it.
Press
⌘1 to return to the attributes inspector. Click the
first tab in the tab bar, and click it again in the same
spot. This should cause the inspector to change again,
so it looks like Figure 7-12.
By clicking the tab bar again in the same spot, we’ve
changed the selection from the view controller associ-
ated with the tab bar item to the tab bar item itself. In
other words, the first click selected the first of the five subview’s view controllers. The second
click selects the tab bar item itself so that we can set its title and icon.
The first item on the Tab Bar Item inspector is labeled Badge. This can be used to put a red
icon onto a tab bar item, similar to the red number placed on the Mail icon that tells you
how many unread e-mails you have. We’re not going to use the badge field in this chapter,
so you can leave it blank, but we thought you’d want to know what it does.
Under that, there’s a pop-up button called Identifier. This field allows you to select from a set
of commonly used tab bar item names and icons such as Favorites and Search. If you select
one of these, then it will provide the name and icon for the item based on your selection.
We’re not using standard items, so you can ignore this one for now also.
Figure 7-11. The view controller
attributes inspector
Figure 7-12. The tab bar item attri-
butes inspector
24594ch07.indd 153 6/23/09 11:29:00 AM
Download at Boykma.Com
CHAPTER 7: Tab Bars and Pickers154
The next two fields down are where we can specify a title and custom tab icon for a tab
bar item. Change the Title from Item 1 to Date, click the Image combo box, and select the
clockicon.png image. If you are using your own set of icons, select one of the .png files you
provided instead. For the rest of this chapter, we’ll discuss the resources we provided. Make
adjustments for your own media, as necessary.
If you look over at the Tab Bar Controller window, you’ll see that the leftmost tab bar item
now reads Date and has a picture of a clock on it. We now need to repeat this process for the
other four tab bar items.
Before we do, let’s revisit what we just did. First, we single-clicked the first tab and used the
attributes inspector to specify the nib name for that first tab’s associated view controller.
Next, we opened the identity inspector and changed the underlying class of the view con-
troller associated with this tab.
We then clicked the tab again to edit the tab bar item, instead of the view controller. We
gave the tab bar item a title and an icon.
Let’s repeat this for the next four view controller/tab bar item pairings.
Click the second tab, and bring up the attributes inspector. Change the second view control-
ler’s nib name to SingleComponentPickerViewController. Switch to the identity inspector, and
change the view controller’s class to SingleComponentPickerViewController. Click the second
tab again, and return to the attributes inspector. Give the second tab bar item a title of Sin-
gle, and specify an Image of singleicon.png.
Click the third tab, and bring up the attributes inspector. Change the third view controller’s
nib name to DoubleComponentPickerViewController. Switch to the identity inspector, and
change the view controller’s class to DoubleComponentPickerViewController. Click the third
tab again, and return to the attributes inspector. Give the third tab bar item a title of Double,
and specify an Image of doubleicon.png.
Click the fourth tab, and bring up the attributes inspector. Change the fourth view control-
ler’s nib name to DependentComponentPickerViewController. Switch to the identity inspector,
and change the view controller’s class to DependentComponentPickerViewController. Click the
fourth tab again, and return to the attributes inspector. Give the fourth tab bar item a title of
Dependent, and specify an Image of dependenticon.png.
Click the fifth tab, and bring up the attributes inspector. Change the fifth view controller’s
nib name to SinglePickerViewController. Switch to the identity inspector, and change the
view controller’s class to CustomPickerViewController. Click the fifth tab again, and return to
the attributes inspector. Give the fifth tab bar item a title of Custom, and specify an Image of
toolicon.png.
24594ch07.indd 154 6/23/09 11:29:00 AM
Download at Boykma.Com
CHAPTER 7: Tab Bars and Pickers
155
NOTE
Don’t worry about the view controller Title fields. We don’t use them. They can be blank or not. We do use
the tab bar item Title fields. Don’t confuse the two.
All that we have left to do in this nib file is to control-drag from the Pickers App Delegate icon
to the Tab Bar Controller icon, selecting the rootController outlet. Save your nib, and go back
to Xcode.
At this point, the tab bar and the content views should all be hooked up and working. Com-
pile and run, and your application should launch with a toolbar that functions; clicking a tab
should select it.
There’s nothing in the content views now, so the changes won’t be very dramatic. But if
everything went OK, the basic framework for your multiview application is now set up and
working, and we can start designing the individual content views.
TIP
If your simulator bursts into flames when you click one of the tabs, don’t panic! Most likely, you’ve either
missed a step or made a typo. Go back and check all the nib file names, make sure the connections are
right, and make sure the class names are all set correctly.
If you want to make double sure everything is working, you can add a different label or some
other object to each of the content views and then relaunch the application. If everything is
working, you’ll see the content of the different views change as you select different tabs.
Implementing the Date Picker
To implement the date picker, we’ll need a single outlet and a single action. The outlet
will be used to grab the value from the date picker. The action will be triggered by a but-
ton and will throw up an alert to show the date value pulled from the picker. Single-click
DatePickerViewController.h, and add the following code:
24594ch07.indd 155 6/23/09 11:29:00 AM
Download at Boykma.Com
CHAPTER 7: Tab Bars and Pickers156
#import <UIKit/UIKit.h>
@interface DatePickerViewController : UIViewController {
UIDatePicker *datePicker;
}
@property (nonatomic, retain) IBOutlet UIDatePicker *datePicker;
-(IBAction)buttonPressed;
@end
Save this file, and double-click DatePickerViewController.xib to open the content view for this
first tab in Interface Builder. The first thing we need is to size the view correctly for the space
available. The easiest way to do that is to single-click the View icon and press ⌘1 to bring up
the attributes inspector. We can use the Simulated Interface Elements to have Interface
Builder size this view correctly by setting the Bottom Bar popup to Tab Bar. This will cause
Interface Builder to automatically reduce the view’s height to 411 pixels and show a simu-
lated tab bar.
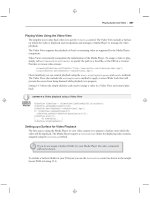
Next, we need to add a date picker to this view, so
look for Date Picker in the library (see Figure 7-13), and
drag one over to the View window. If the View window
is not open, open it by double-clicking the View icon
in the nib’s main window.
Place the date picker right at the top of the view. It
should take up the entire width of your content view
and a good portion of the height. Don’t use the blue
guidelines for the picker; it’s designed to fit snugly
against the edges of the view (see Figure 7-14).
Single-click the date picker if it’s not already selected, and press ⌘1 to bring up the attri-
butes inspector. As you can see (in Figure 7-15), a number of attributes can be configured
for a date picker. You won’t get off this easy with the rest of the pickers, so enjoy it while you
can. We’re going to leave most of the values at their defaults, though you should feel free
to play with the options when we’re done to see what they do. The one thing we are going
to do is limit the range of the picker to reasonable dates. Look for the heading that says
Constraints, and check the box that reads Minimum Date. Leave the Minimum date value at
the default of 1/1/1970. Also check the box that reads Maximum Date, and set Maximum to
12/31/2200.
Next, grab a Round Rect Button from the library, and place it below the date picker. Double-
click it, and give it a title of Select, and press ⌘2 to switch to the connections inspector. Drag
from the circle next to the Touch Up Inside event over to the File’s Owner icon, and connect
to the buttonPressed action. Then control-drag from the File’s Owner icon back to the date
picker, and select the datePicker outlet. Save, close the nib, and go back to Xcode.
Figure 7-13. The Date Picker in the
library
24594ch07.indd 156 6/23/09 11:29:00 AM
Download at Boykma.Com
CHAPTER 7: Tab Bars and Pickers
157
Figure 7-14. Place all pickers right up
against the edges of the view, either at
the top or bottom of the view.
Figure 7-15. The attributes inspector
for a date picker
Now we just need to implement DatePickerViewController, so click
DatePickerViewController.m, and first, add the following code at the top of the file:
#import "DatePickerViewController.h"
@implementation DatePickerViewController
@synthesize datePicker;
-(IBAction)buttonPressed {
NSDate *selected = [datePicker date];
NSString *message = [[NSString alloc] initWithFormat:
@"The date and time you selected is: %@", selected];
24594ch07.indd 157 6/23/09 11:29:01 AM
Download at Boykma.Com
CHAPTER 7: Tab Bars and Pickers158
UIAlertView *alert = [[UIAlertView alloc]
initWithTitle:@"Date and Time Selected"
message:message
delegate:nil
cancelButtonTitle:@"Yes, I did."
otherButtonTitles:nil];
[alert show];
[alert release];
[message release];
}
- (void)viewDidLoad {
NSDate *now = [[NSDate alloc] init];
[datePicker setDate:now animated:NO];
[now release];
}
Next, add two lines to the existing viewDidUnload: method:
- (void)viewDidUnload {
// Release any retained subviews of the main view.
// e.g. self.myOutlet = nil;
self.datePicker = nil;
[super viewDidUnload];
}
and one line to the existing dealloc method:
- (void)dealloc {
[datePicker release];
[super dealloc];
}
The first thing we did was to synthesize the accessor and mutator for our datePicker out-
let; then we added the implementation of buttonPressed and overrode viewDidLoad. In
buttonPressed, we use our datePicker outlet to get the current date value from the date
picker, and then we construct a string based on that date and use it to show an alert sheet.
In viewDidLoad, we created a new NSDate object. An NSDate object created this way will
hold the current date and time. We then set datePicker to that date, which ensures that
every time this view gets loaded from the nib, the picker will reset to the current date and
time.
Go ahead and build and run to make sure your date picker checks out. If everything went
OK, your application should look like Figure 7-2 when it runs. If you click the Select button,
an alert sheet will pop up telling you the date and time currently selected in the date picker.
24594ch07.indd 158 6/23/09 11:29:01 AM
Download at Boykma.Com
CHAPTER 7: Tab Bars and Pickers
159
Though the date picker does not allow you to specify seconds or a time zone, the alert that
displays the selected date and time displays both seconds and a time zone offset. We could
have added some code to simplify the string displayed in the alert, but isn’t this chapter long
enough already?
Implementing the Single Component Picker
Well, date pickers are easy enough, but let’s look at using pickers that let the user select from
a list of values. In this example, we’re going to create an NSArray to hold the values we want
to display in the picker. Pickers don’t hold any data themselves. Instead, they call methods
on their datasource and delegate to get the data they need to display. The picker doesn’t
really care where the underlying data is. It asks for the data when it needs it, and the data-
source and delegate work together to supply that data. As a result, the data could be coming
from a static list, as we’ll do in this section, or could be loaded from a file or a URL, or even
made up or calculated on the fly.
Declaring Outlets and Actions
As always, we need to make sure our outlets and actions are in place in our controller’s
header file before we start working in Interface Builder. In Xcode, single-click SingleCompo-
nentPickerViewController.h. This controller class will act as both the datasource and the del-
egate for its picker, so we need to make sure it conforms to the protocols for those two roles.
In addition, we’ll need to declare an outlet and an action. Add the following code:
#import <UIKit/UIKit.h>
@interface SingleComponentPickerViewController : UIViewController
<UIPickerViewDelegate, UIPickerViewDataSource> {
UIPickerView *singlePicker;
NSArray *pickerData;
}
@property (nonatomic, retain) IBOutlet UIPickerView *singlePicker;
@property (nonatomic, retain) NSArray *pickerData;
- (IBAction)buttonPressed;
@end
We start by conforming our controller class to two protocols, UIPickerViewDelegate and
UIPickerViewDataSource. After that, we declare an outlet for the picker and a pointer to
an NSArray, which will be used to hold the list of items that will be displayed in the picker.
Finally, we declare the action method for the button, just as we did for the date picker.
24594ch07.indd 159 6/23/09 11:29:02 AM
Download at Boykma.Com
CHAPTER 7: Tab Bars and Pickers160
Building the View
Double-click SingleComponentPickerViewController.xib
to open the content view for the second tab in our tab
bar. Single-click the View icon and press ⌘1 to bring
up the attributes inspector so you can set the Bottom
Bar to Tab Bar in the Simulated Interface Elements sec-
tion. Next, bring over a Picker View from the library
(see Figure 7-16), and add it to your nib’s View window,
placing it snugly into the top of the view as you did
with the date picker view.
After placing the picker, control-drag from File’s
Owner to the picker view, and select the singlePicker outlet. Next, single-click the picker if
it’s not already selected, and press ⌘2 to bring up the connections inspector. If you look at
the connections available for the picker view, you’ll see that the first two items are Data-
Source and Delegate. Drag from the circle next to DataSource to the File’s Owner icon. Then
drag again from the circle next to Delegate to the File’s Owner icon. Now this picker knows
that the instance of the SingleComponentPickerViewController class in the nib is its
datasource and delegate and will ask it to supply the data to be displayed. In other words,
when the picker needs information about the data it is going to display, it asks the
SingleComponentPickerViewController instance that controls this view for that
information.
Drag a Round Rect Button to the view, double-click it, and give it a title of Select. Press return
to commit the change. In the connections inspector, drag from the circle next to Touch Up
Inside to the File’s Owner icon, selecting the buttonPressed action. Save the nib file, close it,
and go back to Xcode.
Implementing the Controller as Datasource and Delegate
To make our controller work properly as the picker’s datasource and delegate, we are going
to have to implement a few methods that you’ve never seen before. Single-click SingleComp
onentPickerViewController.m, and add the following code at the beginning of the file:
#import "SingleComponentPickerViewController.h"
@implementation SingleComponentPickerViewController
@synthesize singlePicker;
@synthesize pickerData;
- (IBAction)buttonPressed {
NSInteger row = [singlePicker selectedRowInComponent:0];
NSString *selected = [pickerData objectAtIndex:row];
NSString *title = [[NSString alloc] initWithFormat:
@"You selected %@!", selected];
Figure 7-16. The Picker View in the
library
24594ch07.indd 160 6/23/09 11:29:02 AM
Download at Boykma.Com
CHAPTER 7: Tab Bars and Pickers
161
UIAlertView *alert = [[UIAlertView alloc] initWithTitle:title
message:@"Thank you for choosing."
delegate:nil
cancelButtonTitle:@"You're Welcome"
otherButtonTitles:nil];
[alert show];
[alert release];
[title release];
}
- (void)viewDidLoad {
NSArray *array = [[NSArray alloc] initWithObjects:@"Luke", @"Leia",
@"Han", @"Chewbacca", @"Artoo", @"Threepio", @"Lando", nil];
self.pickerData = array;
[array release];
}
These two methods should be familiar to you by now. The buttonPressed method is nearly
identical to the one we used with the date picker. Unlike the date picker, a regular picker
can’t tell us what data it holds, because it doesn’t maintain the data. It hands that job off to
the delegate and datasource. Instead, we have to ask the picker which row is selected and
then grab the corresponding data from our pickerData array.
Here is how we ask it for the selected row:
NSInteger row = [singlePicker selectedRowInComponent:0];
Notice that we had to specify which component we want to know about. We have only one
component in this picker, so we simply pass in 0, which is the index of the first component.
NOTE
Did you notice that there is no asterisk between NSInteger and row? Although on the iPhone the pre-
fix “NS” often indicates an Objective-C class from the Foundation framework, this is one of the exceptions
to that general rule. NSInteger is always defined as an integer datatype, either an int or a long. We
use NSInteger rather than int or long, because when we use NSInteger, the compiler automati-
cally chooses whichever size is best for the platform for which we are compiling. It will create a 32-bit int
when compiling for a 32-bit processor and a longer 64-bit long when compiling for a 64-bit architecture.
Currently, there is no 64-bit iPhone, but who knows? Someday in the future, there may be. You might also
write classes for your iPhone applications that you’ll later want to recycle and use in Cocoa applications for
Mac OS X, which already does run on both 32- and 64-bit machines.
In viewDidLoad, we create an array with several objects so that we have data to feed the
picker. Usually, your data will come from other sources, like a property list in your project’s
24594ch07.indd 161 6/23/09 11:29:02 AM
Download at Boykma.Com
CHAPTER 7: Tab Bars and Pickers162
Resources folder. By embedding a list of items in our code the way we’ve done here, we are
making it much harder on ourselves if we need to update this list or if we want to have our
application translated into other languages. But this approach is the quickest and easiest
way to get data into an array for demonstration purposes. Even though you won’t usually
create your arrays like this, you will almost always cache the data you are using into an array
here in the viewDidLoad method so that you’re not constantly going to disk or to the net-
work every time the picker asks you for data.
TIP
If you’re not supposed to create arrays from lists of objects in your code as we just did in viewDidLoad,
how should you do it? Embed the lists in property list files, and add those files to the Resources folder of
your project. Property list files can be changed without recompiling your source code, which means no risk
of introducing new bugs when you do so. You can also provide different versions of the list for different
languages, as you’ll see in Chapter 17. Property lists can be created using the Property List Editor applica-
tion located at /Developer/Applications/Utilities/Property List Editor.app or right in Xcode, which supports
the editing of property lists in the editor pane. Both NSArray and NSDictionary offer a method
called initWithContentsOfFile: to allow you to initialize instances from a property file, some-
thing we’ll do in this chapter when implementing the Dependent tab.
Next, insert the following new lines of code into the existing viewDidUnload and dealloc
methods:
- (void)viewDidUnload {
// Release any retained subviews of the main view.
// e.g. self.myOutlet = nil;
self.singlePicker = nil;
self.pickerData = nil;
[super viewDidUnload];
}
- (void)dealloc {
[singlePicker release];
[pickerData release];
[super dealloc];
}
One thing to notice here is that we’ve set both singlePicker and pickerData to nil. In
most cases, you’ll set only outlets to nil and not other instance variables. However, setting
pickerData to nil is appropriate here because the pickerData array will get re-created
each time the view gets reloaded, and we want to free up that memory when the view
24594ch07.indd 162 6/23/09 11:29:02 AM
Download at Boykma.Com
CHAPTER 7: Tab Bars and Pickers
163
is unloaded. Anything that gets created in the viewDidLoad method can be flushed in
viewDidUnload because viewDidLoad will fire again when the view gets reloaded.
Finally, insert the following new code at the end of the file:
#pragma mark -
#pragma mark Picker Data Source Methods
- (NSInteger)numberOfComponentsInPickerView:(UIPickerView *)pickerView {
return 1;
}
- (NSInteger)pickerView:(UIPickerView *)pickerView
numberOfRowsInComponent:(NSInteger)component {
return [pickerData count];
}
#pragma mark Picker Delegate Methods
- (NSString *)pickerView:(UIPickerView *)pickerView
titleForRow:(NSInteger)row
forComponent:(NSInteger)component {
return [pickerData objectAtIndex:row];
}
@end
At the bottom of the file, we get into the new methods required to implement the picker.
The first two methods after dealloc are from the UIPickerViewDataSource protocol, and
they are both required for all pickers (except date pickers). Here’s the first one:
- (NSInteger)numberOfComponentsInPickerView:(UIPickerView *)pickerView {
return 1;
}
Pickers can have more than one spinning wheel, or component, and this is how the picker
asks how many components it should display. We want to display only one list this time, so
we simply return a value of 1. Notice that a UIPickerView is passed in as a parameter. This
parameter points to the picker view that is asking us the question, which makes it possible
to have multiple pickers being controlled by the same datasource. In our case, we know that
we have only one picker, so we can safely ignore this argument because we already know
which picker is calling us.
The second datasource method is used by the picker to ask how many rows of data there are
for a given component:
- (NSInteger)pickerView:(UIPickerView *)pickerView
numberOfRowsInComponent:(NSInteger)component {
return [pickerData count];
}
24594ch07.indd 163 6/23/09 11:29:02 AM
Download at Boykma.Com
CHAPTER 7: Tab Bars and Pickers164
#PRAGMA WHAT?
Did you notice these lines of code from SingleComponentPickerViewController.m?
#pragma mark -
#pragma mark Picker Data Source Methods
Any line of code that begins with #pragma is technically a compiler directive, specifically, a pragmatic,
or compiler-specific, directive that won’t necessarily work with other compilers or in other environments. If
the compiler doesn’t recognize the directive, it ignores it, though it may generate a warning. In this case, the
#pragma directives are actually directives to the IDE, not the compiler, and they tell Xcode’s editor to put a
break in the pop-up menu of methods and functions at the top of the editor pane, as shown in the following
screen shot. The first one puts a divider line in the menu. The second creates a bold entry.
Some of your classes, especially some of your controller classes, are likely to get rather long, and the methods
and functions pop-up menu makes navigating around your code much easier. Putting in #pragma directives
and logically organizing your code will make that pop-up more efficient to use.
Once again, we are told which picker view is asking and which component that picker is
asking about. Since we know that we have only one picker and one component, we don’t
bother with either of the arguments and simply return the count of objects from our sole
data array.
24594ch07.indd 164 6/23/09 11:29:03 AM
Download at Boykma.Com
CHAPTER 7: Tab Bars and Pickers
165
After the two datasource methods, we implement one delegate method. Unlike the data-
source methods, all of the delegate methods are optional. The term “optional” is a bit
deceiving because you do have to implement at least one delegate method. You will usually
implement the method that we are implementing here. As you’ll see when we get to the
custom picker, if you want to display something other than text in the picker, you have to
implement a different method instead.
- (NSString *)pickerView:(UIPickerView *)pickerView
titleForRow:(NSInteger)row
forComponent:(NSInteger)component {
return [pickerData objectAtIndex:row];
}
In this method, the picker is asking us to provide the data for a specific row in a specific
component. We are provided with a pointer to the picker that is asking, along with the com-
ponent and row that it is asking about. Since our view has one picker with one component,
we simply ignore everything except the row argument and use that to return the appropri-
ate item from our data array.
Go ahead and compile and run again. When the simulator comes up, switch to the second
tab—the one labeled Single—and check out your new custom picker, which should look like
Figure 7-3.
When you’re done reliving all those Star Wars memories, come on back to Xcode and we’ll
see how to implement a picker with two components. If you feel up to a challenge, this next
content view is actually a good one for you to attempt on your own. You’ve already seen all
the methods you’ll need for this picker, so go ahead, take a crack at it. We’ll wait here. You
might want to start off with a good look at Figure 7-4, just to refresh your memory. When
you’re done, read on, and you’ll see how we tackled this problem.
Implementing a Multicomponent Picker
The next content pane will have a picker with two components or wheels, and each wheel
will be independent of the other wheel. The left wheel will have a list of sandwich fillings,
and the right wheel will have a selection of bread types. As we mentioned a moment ago,
we’ll write the same datasource and delegate methods that we did for the single component
picker; we’ll just have to write a little additional code in some of those methods to make sure
we’re returning the right value and row count for each component.
Declaring Outlets and Actions
Single-click DoubleComponentPickerViewController.h, and add the following code:
24594ch07.indd 165 6/23/09 11:29:03 AM
Download at Boykma.Com
CHAPTER 7: Tab Bars and Pickers166
#import <UIKit/UIKit.h>
#define kFillingComponent 0
#define kBreadComponent 1
@interface DoubleComponentPickerViewController : UIViewController
<UIPickerViewDelegate, UIPickerViewDataSource>
{
UIPickerView *doublePicker;
NSArray *fillingTypes;
NSArray *breadTypes;
}
@property(nonatomic, retain) IBOutlet UIPickerView *doublePicker;
@property(nonatomic, retain) NSArray *fillingTypes;
@property(nonatomic, retain) NSArray *breadTypes;
-(IBAction)buttonPressed;
@end
As you can see, we start out by defining two constants that will represent the two compo-
nents, which is just to make our code easier to read. Components are assigned numbers,
with the leftmost component being assigned zero and increasing by one each move to the
right.
Next, we conform our controller class to both the delegate and datasource protocols, and
we declare an outlet for the picker, as well as for two arrays to hold the data for our two
picker components. After declaring properties for each of our instance variables, we declare
a single action method for the button, just as we did in the last two context panes. Save this,
and double-click DoubleComponentPickerViewController.xib to open the nib file in Interface
Builder.
Building the View
Select the View icon, and use the attributes inspector to set the Bottom Bar to Tab Bar in the
Simulated Interface section.
Add a picker and a button to the View, and then make the necessary connections. We’re not
going to walk you through it this time, but you can refer to the previous section if you need
a step-by-step guide, since the two applications are identical in terms of the nib file. Here’s a
summary of what you need to do:
1. Connect the doublePicker outlet on File’s Owner to the picker.
2. Connect the DataSource and Delegate connections on the picker view to File’s Owner
(use the connections inspector).
3. Connect the Touch Up Inside event of the button to the buttonPressed action on File’s
Owner (use the connections inspector).
24594ch07.indd 166 6/23/09 11:29:04 AM
Download at Boykma.Com
CHAPTER 7: Tab Bars and Pickers
167
Make sure you save your nib and close it before you head back to Xcode. Oh, and dog-ear
this page (or use a bookmark, if you prefer). You’ll be referring to it in a bit.
Implementing the Controller
Single-click DoubleComponentPickerViewController.m, and add the following code at the top
of the file:
#import "DoubleComponentPickerViewController.h"
@implementation DoubleComponentPickerViewController
@synthesize doublePicker;
@synthesize fillingTypes;
@synthesize breadTypes;
-(IBAction)buttonPressed
{
NSInteger breadRow = [doublePicker selectedRowInComponent:
kBreadComponent];
NSInteger fillingRow = [doublePicker selectedRowInComponent:
kFillingComponent];
NSString *bread = [breadTypes objectAtIndex:breadRow];
NSString *filling = [fillingTypes objectAtIndex:fillingRow];
NSString *message = [[NSString alloc] initWithFormat:
@"Your %@ on %@ bread will be right up.", filling, bread];
UIAlertView *alert = [[UIAlertView alloc] initWithTitle:
@"Thank you for your order"
message:message
delegate:nil
cancelButtonTitle:@"Great!"
otherButtonTitles:nil];
[alert show];
[alert release];
[message release];
}
- (void)viewDidLoad {
NSArray *breadArray = [[NSArray alloc] initWithObjects:@"White",
@"Whole Wheat", @"Rye", @"Sourdough", @"Seven Grain",nil];
self.breadTypes = breadArray;
[breadArray release];
NSArray *fillingArray = [[NSArray alloc] initWithObjects:@"Ham",
@"Turkey", @"Peanut Butter", @"Tuna Salad",
@"Chicken Salad", @"Roast Beef", @"Vegemite", nil];
self.fillingTypes = fillingArray;
24594ch07.indd 167 6/23/09 11:29:04 AM
Download at Boykma.Com
CHAPTER 7: Tab Bars and Pickers168
[fillingArray release];
}
Also, add the following lines of code to the existing dealloc and viewDidUnload methods:
- (void)viewDidUnload {
// Release any retained subviews of the main view.
// e.g. self.myOutlet = nil;
self.doublePicker = nil;
self.breadTypes = nil;
self.fillingTypes = nil;
[super viewDidUnload];
}
- (void)dealloc {
[doublePicker release];
[breadTypes release];
[fillingTypes release];
[super dealloc];
}
And add the delegate and datasource methods at the bottom:
#pragma mark -
#pragma mark Picker Data Source Methods
- (NSInteger)numberOfComponentsInPickerView:(UIPickerView *)pickerView {
return 2;
}
- (NSInteger)pickerView:(UIPickerView *)pickerView
numberOfRowsInComponent:(NSInteger)component {
if (component == kBreadComponent)
return [self.breadTypes count];
return [self.fillingTypes count];
}
#pragma mark Picker Delegate Methods
- (NSString *)pickerView:(UIPickerView *)pickerView
titleForRow:(NSInteger)row
forComponent:(NSInteger)component {
if (component == kBreadComponent)
return [self.breadTypes objectAtIndex:row];
24594ch07.indd 168 6/23/09 11:29:04 AM
Download at Boykma.Com
CHAPTER 7: Tab Bars and Pickers
169
return [self.fillingTypes objectAtIndex:row];
}
@end
The buttonPressed method is a little more involved this time, but there’s very little there
that’s new to you; we just have to specify which component we are talking about when we
request the selected row using those constants we defined earlier, kBreadComponent and
kFillingComponent.
NSInteger breadRow = [doublePicker selectedRowInComponent:
kBreadComponent];
NSInteger fillingRow = [doublePicker selectedRowInComponent:
kFillingComponent];
You can see here that using the two constants instead of 0 and 1 makes our code consider-
ably more readable. From this point on, the buttonPressed method is fundamentally the
same as the last one we wrote.
viewDidLoad: is also very similar to the one we wrote for the previous section. The only
difference is that we are loading two arrays with data rather than just one. Again, we’re just
creating arrays from a hard-coded list of strings, something you generally won’t do in your
own applications.
When we get down to the datasource methods, that’s where things start to change a bit. In
the first method, we specify that our picker should have two components rather than just one:
- (NSInteger)numberOfComponentsInPickerView:(UIPickerView *)pickerView {
return 2;
}
Easy enough. This time, when we are asked for the number of rows, we have to check which
component the picker is asking about and return the correct row count for the correspond-
ing array:
- (NSInteger)pickerView:(UIPickerView *)pickerView
numberOfRowsInComponent:(NSInteger)component {
if (component == kBreadComponent)
return [self.breadTypes count];
return [self.fillingTypes count];
}
Then, in our delegate method, we do the same thing. We check the component and use the
correct array for the requested component to fetch and return the right value.
24594ch07.indd 169 6/23/09 11:29:04 AM
Download at Boykma.Com
CHAPTER 7: Tab Bars and Pickers170
- (NSString *)pickerView:(UIPickerView *)pickerView
titleForRow:(NSInteger)row
forComponent:(NSInteger)component {
if (component == kBreadComponent)
return [self.breadTypes objectAtIndex:row];
return [self.fillingTypes objectAtIndex:row];
}
That wasn’t so hard, was it? Compile and run your application, and make sure the Double
content pane looks like Figure 7-4. Notice that each wheel is completely independent of the
other one. Turning one has no effect on the other. That’s appropriate in this case. But there
are going to be times when one component is dependent on another. A good example of
this is in the date picker. When you change the month, the dial that shows the number of
days in the month may have to change because not all months have the same number of
days. Implementing this isn’t really hard once you know how, but it’s not the easiest thing to
figure out on your own, so let’s do that next.
Implementing Dependent Components
We’re picking up steam now. For this next section, we’re not going to hold your hand quite
as much when it comes to material we’ve already covered. Instead, we’ll focus on the new
stuff. Our new picker will display a list of US states in the left component and a list of ZIP
codes in the right component that correspond to the state currently selected in the left.
We’ll need a separate list of ZIP code values for each item in the left-hand component.
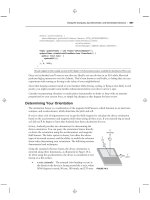
We’ll declare two arrays, one for each component, as we did last time. We’ll also need an
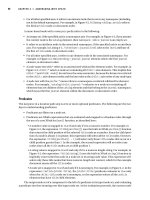
NSDictionary. In the dictionary, we’re going to have an NSArray for each state (see Fig-
ure 7-16). Later, we’ll implement a delegate method that will notify us when the picker’s
selection changes. If the value on the left changes, we will grab the correct array out of the
dictionary and assign it to the array being used for the right-hand component. Don’t worry if
you didn’t catch all that; we’ll talk about it more as we get into the code.
24594ch07.indd 170 6/23/09 11:29:04 AM
Download at Boykma.Com
CHAPTER 7: Tab Bars and Pickers
171
NSDictionary
Alabama
Alaska
Arizona
Arkansas
NSArray
NSArray
NSArray
NSArray
NSArray
12345
12346
12347
12348
NSArray
12345
12346
12347
12348
NSArray
12354
12356
12357
12358
Figure 7-17. Our application’s data: for each state there will be one entry
in a dictionary with the name of the state as the key. Stored under that key
will be an
NSArray instance containing all the ZIP codes from that state.
Add the following code to your DependentComponentPickerViewController.h file:
#import <UIKit/UIKit.h>
#define kStateComponent 0
#define kZipComponent 1
@interface DependentComponentPickerViewController : UIViewController
<UIPickerViewDelegate, UIPickerViewDataSource> {
UIPickerView *picker;
NSDictionary *stateZips;
NSArray *states;
NSArray *zips;
}
@property (retain, nonatomic) IBOutlet UIPickerView *picker;
@property (retain, nonatomic) NSDictionary *stateZips;
@property (retain, nonatomic) NSArray *states;
@property (retain, nonatomic) NSArray *zips;
- (IBAction) buttonPressed;
@end
Now move to Interface Builder, and build the content view. That process will be almost iden-
tical to the last two component views we built. If you get lost, flip back a few pages to the
24594ch07.indd 171 6/23/09 11:29:04 AM
Download at Boykma.Com
CHAPTER 7: Tab Bars and Pickers172
last Building the View section, and follow those step-by-step instructions. Here’s a hint: start
off by opening DependentComponentPickerViewController.xib. When you’re done, make sure
you save, close the nib, and then come back to Xcode.
OK, take a deep breath. Let’s implement this controller class. This implementation may seem
a little gnarly at first. By making one component dependent on the other, we have added a
whole new level of complexity to our controller class. Although the picker displays only two
lists at a time, our controller class has to know about and manage fifty-one lists. The tech-
nique we’re going to use here actually simplifies that process. The datasource methods look
almost identical to the one we implemented for the DoublePicker view. All of the additional
complexity is handled elsewhere, between viewDidLoad and a new delegate method called
pickerView:didSelectRow:inComponent:.
Before we write the code, we need some data to display, however. Up to now, we’ve created
arrays in code by specifying a list of strings. But, we’ve also told you you’re not going to do
it that way. So, because we didn’t want you to have to type in several thousand values and
because we figured we ought to show you the correct way to do this, we’re going to load the
data from a property list. As we’ve mentioned, both NSArray and NSDictionary objects can
be created from property lists. We’ve included a property list called statedictionary.plist in the
projects archive, under the 07 Pickers folder.
Add that file into the Resources area in your Xcode project. If you single-click it in the project
window, you can see and even edit the data that it contains (see Figure 7-18).
Figure 7-18. The statedictionary.plist file
24594ch07.indd 172 6/23/09 11:29:04 AM
Download at Boykma.Com