Beginning Linux Programming Third Edition phần 7 pot
Bạn đang xem bản rút gọn của tài liệu. Xem và tải ngay bản đầy đủ của tài liệu tại đây (1.26 MB, 89 trang )
work_area[0] = ‘\0’;
pthread_mutex_unlock(&work_mutex);
sleep(1);
pthread_mutex_lock(&work_mutex);
while (work_area[0] == ‘\0’ ) {
pthread_mutex_unlock(&work_mutex);
sleep(1);
pthread_mutex_lock(&work_mutex);
}
}
time_to_exit = 1;
work_area[0] = ‘\0’;
pthread_mutex_unlock(&work_mutex);
pthread_exit(0);
}
$ cc -D_REENTRANT -I/usr/include/nptl thread4.c –o thread4 -L/usr/lib/nptl -
lpthread
$ ./thread4
Input some text. Enter ‘end’ to finish
Whit
You input 4 characters
The Crow Road
You input 13 characters
end
Waiting for thread to finish
Thread joined
How It Works
We start by declaring a mutex, our work area, and this time, an additional variable: time_to_exit.
pthread_mutex_t work_mutex; /* protects both work_area and time_to_exit */
#define WORK_SIZE 1024
char work_area[WORK_SIZE];
int time_to_exit = 0;
Then we initialize the mutex.
res = pthread_mutex_init(&work_mutex, NULL);
if (res != 0) {
perror(“Mutex initialization failed”);
exit(EXIT_FAILURE);
}
Next we start the new thread. Here is the code that executes in the thread function:
pthread_mutex_lock(&work_mutex);
while(strncmp(“end”, work_area, 3) != 0) {
printf(“You input %d characters\n”, strlen(work_area) -1);
492
Chapter 12
b544977 Ch12.qxd 12/1/03 8:56 AM Page 492
work_area[0] = ‘\0’;
pthread_mutex_unlock(&work_mutex);
sleep(1);
pthread_mutex_lock(&work_mutex);
while (work_area[0] == ‘\0’ ) {
pthread_mutex_unlock(&work_mutex);
sleep(1);
pthread_mutex_lock(&work_mutex);
}
}
time_to_exit = 1;
work_area[0] = ‘\0’;
pthread_mutex_unlock(&work_mutex);
First, the new thread tries to lock the mutex. If it’s already locked, the call will block until it is released.
Once we have access, we check to see whether we are being requested to exit. If we are requested to exit,
we simply set
time_to_exit, zap the first character of the work area, and exit.
If we don’t want to exit, we count the characters and then zap the first character to a null. We use the
first character being null as a way of telling the reader program that we have finished the counting. We
then unlock the mutex and wait for the main thread to run. Periodically, we attempt to lock the mutex
and, when we succeed, check whether the main thread has given us any more work to do. If it hasn’t, we
unlock the mutex and wait some more. If it has, we count the characters and go round the loop again.
Here is the main thread.
pthread_mutex_lock(&work_mutex);
printf(“Input some text. Enter ‘end’ to finish\n”);
while(!time_to_exit) {
fgets(work_area, WORK_SIZE, stdin);
pthread_mutex_unlock(&work_mutex);
while(1) {
pthread_mutex_lock(&work_mutex);
if (work_area[0] != ‘\0’) {
pthread_mutex_unlock(&work_mutex);
sleep(1);
}
else {
break;
}
}
}
pthread_mutex_unlock(&work_mutex);
This is quite similar. We lock the work area so that we can read text into it and then unlock it to allow the
other thread access to count the words. Periodically, we relock the mutex, check whether the words have
been counted (
work_area[0] set to a null), and release the mutex if we need to wait longer. As we noted
earlier, this kind of polling for an answer is generally not good programming practice, and in the real
world, we would probably have used a semaphore to avoid this. However, the code served its purpose
as an example.
493
POSIX Threads
b544977 Ch12.qxd 12/1/03 8:56 AM Page 493
Thread Attributes
When we first looked at threads, we did not discuss the question of thread attributes. We will now do so.
There are quite a few attributes of threads that you can control. However, here we are only going to look
at those that you are most likely to need. Details of the others can be found in the manual pages.
In all of our previous examples, we had to resynchronize our threads using
pthread_join before allow-
ing the program to exit. We needed to do this if we wanted to allow one thread to return data to the
thread that created it. Sometimes we neither need the second thread to return information to the main
thread nor want the main thread to wait for it.
Suppose that we create a second thread to spool a backup copy of a data file that is being edited while
the main thread continues to service the user. When the backup has finished, the second thread can just
terminate. There is no need for it to rejoin the main thread.
We can create threads that behave like this. They are called detached threads, and we create them by modi-
fying the thread attributes or by calling
pthread_detach. Since we want to demonstrate attributes, we
will use the former method here.
The most important function that we need is
pthread_attr_init, which initializes a thread attribute
object.
#include <pthread.h>
int pthread_attr_init(pthread_attr_t *attr);
Once again, 0 is returned for success and an error code is returned on failure.
There is also a destroy function:
pthread_attr_destroy. Its purpose is to allow clean destruction of the
attribute object. Once the object has been destroyed, it cannot be used again until it has been reinitialized.
When we have a thread attribute object initialized, there are many additional functions that we can call
to set different attribute behaviors. We will list the main ones here but look closely at only two:
int pthread_attr_setdetachstate(pthread_attr_t *attr, int detachstate);
int pthread_attr_getdetachstate(const pthread_attr_t *attr, int *detachstate);
int pthread_attr_setschedpolicy(pthread_attr_t *attr, int policy);
int pthread_attr_getschedpolicy(const pthread_attr_t *attr, int *policy);
int pthread_attr_setschedparam(pthread_attr_t *attr, const struct sched_param
*param);
int pthread_attr_getschedparam(const pthread_attr_t *attr, struct sched_param
*param);
int pthread_attr_setinheritsched(pthread_attr_t *attr, int inherit);
494
Chapter 12
b544977 Ch12.qxd 12/1/03 8:56 AM Page 494
int pthread_attr_getinheritsched(const pthread_attr_t *attr, int *inherit);
int pthread_attr_setscope(pthread_attr_t *attr, int scope);
int pthread_attr_getscope(const pthread_attr_t *attr, int *scope);
int pthread_attr_setstacksize(pthread_attr_t *attr, int scope);
int pthread_attr_getstacksize(const pthread_attr_t *attr, int *scope);
As you can see, there are quite a few attributes you can use, but fortunately you will generally get by
without ever having to use most of these.
❑
detachedstate: This attribute allows us to avoid the need for threads to rejoin. As with
most of these
_set functions, it takes a pointer to the attribute and a flag to determine the
state required. The two possible flag values for
pthread_attr_setdetachstate are
PTHREAD_CREATE_JOINABLE and PTHREAD_CREATE_DETACHED. By default, the attribute
will have value
PTHREAD_CREATE_JOINABLE so that we can allow the two threads to join. If
the state is set to
PTHREAD_CREATE_DETACHED, you cannot call pthread_join to recover
the exit state of another thread.
❑
schedpolicy: This controls how threads are scheduled. The options are SCHED_OTHER,
SCHED_RP, and SCHED_FIFO. By default, the attribute is SCHED_OTHER. The other two types
of scheduling are available only to processes running with superuser permissions, as they both
have real-time scheduling but with slightly different behavior.
SCHED_RR uses a round-robin
scheduling scheme, and
SCHED_FIFO uses a “first in, first out” policy. Discussion of these is
beyond the scope of this book.
❑
schedparam: This is a partner to schedpolicy and allows control over the scheduling of
threads running with schedule policy
SCHED_OTHER. We will have a look at an example of this
a bit later in the chapter.
❑
inheritsched: This attribute takes two possible values: PTHREAD_EXPLICIT_SCHED and
PTHREAD_INHERIT_SCHED. By default, the value is PTHREAD_EXPLICIT_SCHED, which
means scheduling is explicitly set by the attributes. By setting it to
PTHREAD_INHERIT_SCHED,
a new thread will instead use the parameters that its creator thread was using.
❑
scope: This attribute controls how the scheduling of a thread is calculated. Since Linux currently
supports only the value
PTHREAD_SCOPE_SYSTEM, we will not look at this further here.
❑ stacksize: This attribute controls the thread creation stack size, set in bytes. This is part of the
“optional” section of the specification and is supported only on implementations where
_POSIX_THREAD_ATTR_STACKSIZE is defined. Linux implements threads with a large
amount of stack by default, so the feature is generally redundant on Linux.
Try It Out—Setting the Detached State Attribute
For our detached thread example, thread5.c, we create a thread attribute, set it to be detached, and
then create a thread using the attribute. Now when the child thread has finished, it calls
pthread_exit
in the normal way. This time, however, the originating thread no longer waits for the thread that it cre-
ated to rejoin. We use a simple
thread_finished flag to allow the main thread to detect whether the
child has finished and to show that the threads are still sharing variables.
495
POSIX Threads
b544977 Ch12.qxd 12/1/03 8:56 AM Page 495
#include <stdio.h>
#include <unistd.h>
#include <stdlib.h>
#include <pthread.h>
void *thread_function(void *arg);
char message[] = “Hello World”;
int thread_finished = 0;
int main() {
int res;
pthread_t a_thread;
pthread_attr_t thread_attr;
res = pthread_attr_init(&thread_attr);
if (res != 0) {
perror(“Attribute creation failed”);
exit(EXIT_FAILURE);
}
res = pthread_attr_setdetachstate(&thread_attr, PTHREAD_CREATE_DETACHED);
if (res != 0) {
perror(“Setting detached attribute failed”);
exit(EXIT_FAILURE);
}
res = pthread_create(&a_thread, &thread_attr, thread_function, (void
*)message);
if (res != 0) {
perror(“Thread creation failed”);
exit(EXIT_FAILURE);
}
(void)pthread_attr_destroy(&thread_attr);
while(!thread_finished) {
printf(“Waiting for thread to say it’s finished \n”);
sleep(1);
}
printf(“Other thread finished, bye!\n”);
exit(EXIT_SUCCESS);
}
void *thread_function(void *arg) {
printf(“thread_function is running. Argument was %s\n”, (char *)arg);
sleep(4);
printf(“Second thread setting finished flag, and exiting now\n”);
thread_finished = 1;
pthread_exit(NULL);
}
There are no surprises in the output:
$ ./thread5
Waiting for thread to say it’s finished
thread_function is running. Argument was Hello World
Waiting for thread to say it’s finished
496
Chapter 12
b544977 Ch12.qxd 12/1/03 8:56 AM Page 496
Waiting for thread to say it’s finished
Waiting for thread to say it’s finished
Second thread setting finished flag, and exiting now
Other thread finished, bye!
As you can see, setting the detached state allowed the secondary thread to complete independently,
without the originating thread needing to wait for it.
How It Works
The two important sections of code are
pthread_attr_t thread_attr;
res = pthread_attr_init(&thread_attr);
if (res != 0) {
perror(“Attribute creation failed”);
exit(EXIT_FAILURE);
}
which declares a thread attribute and initializes it, and
res = pthread_attr_setdetachstate(&thread_attr, PTHREAD_CREATE_DETACHED);
if (res != 0) {
perror(“Setting detached attribute failed”);
exit(EXIT_FAILURE);
}
which sets the attribute values to have the detached state.
The other slight differences are creating the thread, passing the address of the attributes,
res = pthread_create(&a_thread, &thread_attr, thread_function, (void
*)message);
and, for completeness, destroying the attributes when we have used them:
pthread_attr_destroy(&thread_attr);
Thread Attributes—Scheduling
Let’s take a look at a second thread attribute we might wish to change: scheduling. Changing the schedul-
ing attribute is very similar to setting the detached state, but there are two more functions that we can use
to find the available priority levels,
sched_get_priority_max and sched_get_priority_min.
Try It Out—Scheduling
Since this thread6.c is very similar to the previous example, we’ll just look at the differences.
1. First, we need some additional variables:
int max_priority;
int min_priority;
struct sched_param scheduling_value;
497
POSIX Threads
b544977 Ch12.qxd 12/1/03 8:56 AM Page 497
2. After we have set the detached attribute, we set the scheduling policy.
res = pthread_attr_setschedpolicy(&thread_attr, SCHED_OTHER);
if (res != 0) {
perror(“Setting scheduling policy failed”);
exit(EXIT_FAILURE);
}
3. Next we find the range of priorities that are allowed:
max_priority = sched_get_priority_max(SCHED_OTHER);
min_priority = sched_get_priority_min(SCHED_OTHER);
4. and set one:
scheduling_value.sched_priority = min_priority;
res = pthread_attr_setschedparam(&thread_attr, &scheduling_value);
if (res != 0) {
perror(“Setting scheduling priority failed”);
exit(EXIT_FAILURE);
}
How It Works
This is very similar to setting a detached state attribute, except that we set the scheduling policy instead.
Canceling a Thread
Sometimes, we want one thread to be able to ask another thread to terminate, rather like sending it a
signal. There is a way to do this with threads, and, in parallel with signal handling, threads get a way
of modifying how they behave when they are asked to terminate.
Let’s look first at the function to request a thread to terminate:
#include <pthread.h>
int pthread_cancel(pthread_t thread);
This is pretty straightforward: Given a thread identifier, we can request that it be canceled. On the
receiving end of the cancel request, things are slightly more complicated, but not much. A thread can set
its cancel state using
pthread_setcancelstate.
#include <pthread.h>
int pthread_setcancelstate(int state, int *oldstate);
The first parameter is either PTHREAD_CANCEL_ENABLE, which allows it to receive cancel requests, or
PTHREAD_CANCEL_DISABLE, which causes them to be ignored. The oldstate pointer allows the previ-
ous state to be retrieved. If you are not interested, you can simply pass
NULL. If cancel requests are
accepted, there is a second level of control the thread can take, the cancel type, which is set with
pthread_setcanceltype.
498
Chapter 12
b544977 Ch12.qxd 12/1/03 8:56 AM Page 498
#include <pthread.h>
int pthread_setcanceltype(int type, int *oldtype);
The type can take one of two values, PTHREAD_CANCEL_ASYNCHRONOUS, which causes cancellation
requests to be acted upon immediately, and
PTHREAD_CANCEL_DEFERRED, which makes cancellation
requests wait until the thread executes one of these functions:
pthread_join, pthread_cond_wait,
pthread_cond_timedwait, pthread_testcancel, sem_wait, or sigwait.
We have not seen all of these calls in this chapter, as not all are generally needed. As ever, more details
can be found in the manual pages.
Again, the
oldtype allows the previous state to be retrieved, or a NULL can be passed if you are not
interested in knowing the previous state. By default, threads start with the cancellation state
PTHREAD_CANCEL_ENABLE and the cancellation type PTHREAD_CANCEL_DEFERRED.
Try It Out—Canceling a Thread
Our program thread7.c is derived, yet again, from thread1.c. This time, the main thread sends a cancel
request to the thread that it has created.
#include <stdio.h>
#include <unistd.h>
#include <stdlib.h>
#include <pthread.h>
void *thread_function(void *arg);
int main() {
int res;
pthread_t a_thread;
void *thread_result;
res = pthread_create(&a_thread, NULL, thread_function, NULL);
if (res != 0) {
perror(“Thread creation failed”);
exit(EXIT_FAILURE);
}
sleep(3);
printf(“Canceling thread \n”);
res = pthread_cancel(a_thread);
if (res != 0) {
According to the POSIX standard, other system calls that may block, such as read,
wait, and so on, should also be cancellation points. At the time of this writing, Linux
does not yet support all of these being cancellation points. However, some experi-
mentation suggests that some blocked calls such as sleep do allow cancellation to
take place. To be on the safe side, you may wish to add some pthread_testcancel
calls in code that you expect to be canceled.
499
POSIX Threads
b544977 Ch12.qxd 12/1/03 8:56 AM Page 499
perror(“Thread cancelation failed”);
exit(EXIT_FAILURE);
}
printf(“Waiting for thread to finish \n”);
res = pthread_join(a_thread, &thread_result);
if (res != 0) {
perror(“Thread join failed”);
exit(EXIT_FAILURE);
}
exit(EXIT_SUCCESS);
}
void *thread_function(void *arg) {
int i, res;
res = pthread_setcancelstate(PTHREAD_CANCEL_ENABLE, NULL);
if (res != 0) {
perror(“Thread pthread_setcancelstate failed”);
exit(EXIT_FAILURE);
}
res = pthread_setcanceltype(PTHREAD_CANCEL_DEFERRED, NULL);
if (res != 0) {
perror(“Thread pthread_setcanceltype failed”);
exit(EXIT_FAILURE);
}
printf(“thread_function is running\n”);
for(i = 0; i < 10; i++) {
printf(“Thread is still running (%d) \n”, i);
sleep(1);
}
pthread_exit(0);
}
When we run this, we get the following output, showing that the thread is canceled:
$ ./thread7
thread_function is running
Thread is still running (0)
Thread is still running (1)
Thread is still running (2)
Canceling thread
Waiting for thread to finish
$
How It Works
After the new thread has been created in the usual way, the main thread sleeps (to allow the new thread
some time to get started) and then issues a cancel request.
sleep(3);
printf(“Cancelling thread \n”);
res = pthread_cancel(a_thread);
if (res != 0) {
perror(“Thread cancelation failed”);
exit(EXIT_FAILURE);
}
500
Chapter 12
b544977 Ch12.qxd 12/1/03 8:56 AM Page 500
In the created thread, we first set the cancel state to allow canceling.
res = pthread_setcancelstate(PTHREAD_CANCEL_ENABLE, NULL);
if (res != 0) {
perror(“Thread pthread_setcancelstate failed”);
exit(EXIT_FAILURE);
}
Then we set the cancel type to be deferred.
res = pthread_setcanceltype(PTHREAD_CANCEL_DEFERRED, NULL);
if (res != 0) {
perror(“Thread pthread_setcanceltype failed”);
exit(EXIT_FAILURE);
}
Finally, the thread waits around to be canceled.
for(i = 0; i < 10; i++) {
printf(“Thread is still running (%d) \n”, i);
sleep(1);
}
Threads in Abundance
Up until now, we have always had the normal thread of execution of a program create just one other
thread. However, we don’t want you to think that you can create only one extra thread.
Try It Out—Many Threads
For our final example in this chapter, thread8.c, we show how to create several threads in the same
program and then collect them again in an order different from that in which they were started.
#include <stdio.h>
#include <unistd.h>
#include <stdlib.h>
#include <pthread.h>
#define NUM_THREADS 6
void *thread_function(void *arg);
int main() {
int res;
pthread_t a_thread[NUM_THREADS];
void *thread_result;
int lots_of_threads;
for(lots_of_threads = 0; lots_of_threads < NUM_THREADS; lots_of_threads++) {
res = pthread_create(&(a_thread[lots_of_threads]), NULL, thread_function,
(void *)&lots_of_threads);
501
POSIX Threads
b544977 Ch12.qxd 12/1/03 8:56 AM Page 501
if (res != 0) {
perror(“Thread creation failed”);
exit(EXIT_FAILURE);
}
sleep(1);
}
printf(“Waiting for threads to finish \n”);
for(lots_of_threads = NUM_THREADS - 1; lots_of_threads >= 0; lots_of_threads—)
{
res = pthread_join(a_thread[lots_of_threads], &thread_result);
if (res == 0) {
printf(“Picked up a thread\n”);
}
else {
perror(“pthread_join failed”);
}
}
printf(“All done\n”);
exit(EXIT_SUCCESS);
}
void *thread_function(void *arg) {
int my_number = *(int *)arg;
int rand_num;
printf(“thread_function is running. Argument was %d\n”, my_number);
rand_num=1+(int)(9.0*rand()/(RAND_MAX+1.0));
sleep(rand_num);
printf(“Bye from %d\n”, my_number);
pthread_exit(NULL);
}
When we run this program, we get
$ ./thread8
thread_function is running. Argument was 0
thread_function is running. Argument was 1
thread_function is running. Argument was 2
thread_function is running. Argument was 3
thread_function is running. Argument was 4
Bye from 1
thread_function is running. Argument was 5
Waiting for threads to finish
Bye from 5
Picked up a thread
Bye from 0
Bye from 2
Bye from 3
Bye from 4
Picked up a thread
Picked up a thread
Picked up a thread
Picked up a thread
Picked up a thread
All done
502
Chapter 12
b544977 Ch12.qxd 12/1/03 8:56 AM Page 502
As you can see, we created many threads and allowed them to finish out of sequence. There is a subtle
bug in this program that makes itself evident if you remove the call to
sleep from the loop that starts
the threads. We have included it to show you just how careful you need to be when writing programs
that use threads. Can you spot it? We’ll explain in the following “How It Works” section.
How It Works
This time we create an array of thread IDs:
pthread_t a_thread[NUM_THREADS];
and loop around creating several threads:
for(lots_of_threads = 0; lots_of_threads < NUM_THREADS; lots_of_threads++) {
res = pthread_create(&(a_thread[lots_of_threads]), NULL,
thread_function, (void *)&lots_of_threads);
if (res != 0) {
perror(“Thread creation failed”);
exit(EXIT_FAILURE);
}
sleep(1);
}
The threads themselves then wait for a random time before exiting:
void *thread_function(void *arg) {
int my_number = *(int *)arg;
int rand_num;
printf(“thread_function is running. Argument was %d\n”, my_number);
rand_num=1+(int)(9.0*rand()/(RAND_MAX+1.0));
sleep(rand_num);
printf(“Bye from %d\n”, my_number);
pthread_exit(NULL);
}
While in the main (original) thread, we wait to pick them up, but not in the order in which we created
them.
for(lots_of_threads = NUM_THREADS - 1; lots_of_threads >= 0; lots_of_threads—)
{
res = pthread_join(a_thread[lots_of_threads], &thread_result);
if (res == 0) {
printf(“Picked up a thread\n”);
}
else {
perror(“pthread_join failed”);
}
}
If you try to run the program with no sleep, you might see some strange effects, including some
threads being started with the same argument. Did you spot why this could happen? The threads are
being started using a local variable for the argument to the thread function. This variable is updated in
the loop. The offending lines are
503
POSIX Threads
b544977 Ch12.qxd 12/1/03 8:56 AM Page 503
for(lots_of_threads = 0; lots_of_threads < NUM_THREADS; lots_of_threads++) {
res = pthread_create(&(a_thread[lots_of_threads]), NULL,
thread_function, (void *)&lots_of_threads);
If the main thread runs fast enough, it might alter the argument (lots_of_threads) for some of the
threads. Behavior like this arises when not enough care is taken with shared variables and multiple exe-
cution paths. We did warn you that programming threads required careful attention to design! To correct
the problem, we need to pass the value directly like this:
res = pthread_create(&(a_thread[lots_of_threads]), NULL, thread_function, (void
*)lots_of_threads);
and of course change thread_function:
void *thread_function(void *arg) {
int my_number = (int)arg;
Summary
In this chapter, we have seen how to create several threads of execution inside a process, where each
thread shares file scope variables. We then looked at the two ways that threads can control access to
critical code and data, using both semaphores and mutexes. After that, we moved to controlling the
attributes of threads and, in particular, how we could separate them from the main thread so that it no
longer had to wait for threads that it had created to complete. After a quick look at how one thread can
request another to finish and at how the receiving thread can manage such requests, we presented an
example of a program with many simultaneous threads executing.
We haven’t had the space to cover every last function call and nuance associated with threads, but you
should now have sufficient understanding to start writing your own programs with threads and to
investigate the more esoteric aspects of threads by reading the manual pages.
504
Chapter 12
b544977 Ch12.qxd 12/1/03 8:56 AM Page 504
13
Inter-Process
Communication: Pipes
In Chapter 11, we saw a very simple way of sending messages between two processes using signals.
We created notification events that could be used to provoke a response, but the information trans-
ferred was limited to a signal number.
In this chapter, we’ll be looking at pipes, which allow more useful data to be exchanged between
processes. By the end of the chapter, we’ll be using our newfound knowledge to reimplement the
running CD database program as a very simple client/server application.
We’ll cover the following topics in this chapter:
❑ The definition of a pipe
❑ Process pipes
❑ Pipe calls
❑ Parent and child processes
❑ Named pipes: FIFOs
❑ Client/server considerations
What Is a Pipe?
We use the term pipe when we connect a data flow from one process to another. Generally we
attach, or pipe, the output of one process to the input of another.
Most Linux users will already be familiar with the idea of linking shell commands together, so
that the output of one process is fed straight to the input of another. For shell commands, this is
entered as
cmd1 | cmd2
b544977 Ch13.qxd 12/1/03 8:56 AM Page 505
The shell arranges the standard input and output of the two commands, so that
❑ The standard input to
cmd1 comes from the terminal keyboard.
❑ The standard output from
cmd1 is fed to cmd2 as its standard input.
❑ The standard output from cmd2 is connected to the terminal screen.
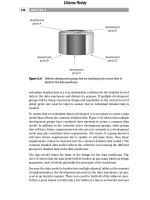
What the shell has done, in effect, is reconnect the standard input and output streams so that data flows
from the keyboard input through the two commands and is then output to the screen. See Figure 13-1 for
a visual representation of this process.
Figure 13-1
In this chapter, we’ll see how to achieve this effect in a program and how we can use pipes to connect
multiple processes to allow us to implement a simple client/server system.
Process Pipes
Perhaps the simplest way of passing data between two programs is with the popen and pclose func-
tions. These have the following prototypes:
#include <stdio.h>
FILE *popen(const char *command, const char *open_mode);
int pclose(FILE *stream_to_close);
popen
The popen function allows a program to invoke another program as a new process and either pass data
to it or receive data from it. The
command string is the name of the program to run, together with any
parameters.
open_mode must be either “r” or “w”.
If the
open_mode is “r”, output from the invoked program is made available to the invoking program
and can be read from the file stream
FILE * returned by popen, using the usual stdio library functions
for reading (for example,
fread). However, if open_mode is “w”, the program can send data to the
invoked command with calls to
fwrite. The invoked program can then read the data on its standard
input. Normally, the program being invoked won’t be aware that it’s reading data from another process;
it simply reads its standard input stream and acts on it.
Standard output
Pipe
Standard Input
Cmd 1 Cmd 2
506
Chapter 13
b544977 Ch13.qxd 12/1/03 8:56 AM Page 506
A to popen must specify either “r” or “w”; no other option is supported in a standard implementation
of
popen. This means that we can’t invoke another program and both read and write to it. On failure,
popen returns a null pointer. If you want bidirectional communication using pipes, then the normal
solution is to use two pipes, one for data flow in each direction.
pclose
When the process started with popen has finished, we can close the file stream associated with it using
pclose. The pclose call will return only when the process started with popen finishes. If it’s still run-
ning when
pclose is called, the pclose call will wait for the process to finish.
The
pclose call normally returns the exit code of the process whose file stream it is closing. If the invok-
ing process has executed a
wait statement before calling pclose, the exit status will be lost and pclose
will return -1, with errno set to ECHILD.
Try It Out—Reading Output from an External Program
Let’s try a simple popen and pclose example, popen1.c. We’ll use popen in a program to access infor-
mation from
uname. The uname -a command prints system information, including the machine type,
the OS name, version and release, and the machine’s network name.
Having initialized the program, we open the pipe to
uname, making it readable and setting read_fp to
point to the output. At the end, the pipe pointed to by
read_fp is closed.
#include <unistd.h>
#include <stdlib.h>
#include <stdio.h>
#include <string.h>
int main()
{
FILE *read_fp;
char buffer[BUFSIZ + 1];
int chars_read;
memset(buffer, ‘\0’, sizeof(buffer));
read_fp = popen(“uname -a”, “r”);
if (read_fp != NULL) {
chars_read = fread(buffer, sizeof(char), BUFSIZ, read_fp);
if (chars_read > 0) {
printf(“Output was:-\n%s\n”, buffer);
}
pclose(read_fp);
exit(EXIT_SUCCESS);
}
exit(EXIT_FAILURE);
}
When we run this program on one of the authors’ machines, we get
$ ./popen1
Output was:-
Linux gw1 2.4.20-8 #1 Thu Mar 13 17:54:28 EST 2003 i686 i686 i386 GNU/Linux
507
Inter-Process Communication: Pipes
b544977 Ch13.qxd 12/1/03 8:56 AM Page 507
How It Works
The program uses the popen call to invoke the uname command with the -a parameter. It then uses the
returned file stream to read data up to
BUFSIZ characters (as this is a #define from stdio.h) and then
prints it out so it appears on the screen. Since we’ve captured the output of
uname inside a program, it’s
available for processing.
Sending Output to popen
Now that we’ve seen an example of capturing output from an external program, let’s look at sending
output to an external program. Here’s a program,
popen2.c, that pipes data to another. Here, we’ll use
od (octal dump).
Try It Out—Sending Output to an External Program
Have a look at the following code; you can even type it if you like.
#include <unistd.h>
#include <stdlib.h>
#include <stdio.h>
int main()
{
FILE *write_fp;
char buffer[BUFSIZ + 1];
sprintf(buffer, “Once upon a time, there was \n”);
write_fp = popen(“od -c”, “w”);
if (write_fp != NULL) {
fwrite(buffer, sizeof(char), strlen(buffer), write_fp);
pclose(write_fp);
exit(EXIT_SUCCESS);
}
exit(EXIT_FAILURE);
}
When we run this program, we get the following output:
$ ./popen2
0000000 O n c e u p o n a t i m e
0000020 , t h e r e w a s . . . \n
0000037
How It Works
The program uses popen with the parameter “w” to start the od -c command, so that it can send data to
that command. It then sends a string which the
od -c command receives and processes; the od -c com-
mand then prints the result of the processing on its standard output.
From the command line, we can get the same output with the command
$ echo “Once upon a time, there was ” | od -c
508
Chapter 13
b544977 Ch13.qxd 12/1/03 8:56 AM Page 508
Passing More Data
The mechanism that we’ve used so far simply sent or received all the data in a single fread or fwrite.
Sometimes we may want to send the data in smaller pieces, or perhaps we may not know the size of the
output. To avoid having to declare a very large buffer, we can just use multiple
fread or fwrite calls
and process the data in parts.
Here’s a program,
popen3.c, that reads all of the data from a pipe.
Try It Out—Reading Larger Amounts of Data from a Pipe
In this program, we read data from an invoked ps -alx process. There’s no way to know in advance
how much output there will be, so we must allow for multiple reads of the pipe.
#include <unistd.h>
#include <stdlib.h>
#include <stdio.h>
#include <string.h>
int main()
{
FILE *read_fp;
char buffer[BUFSIZ + 1];
int chars_read;
memset(buffer, ‘\0’, sizeof(buffer));
read_fp = popen(“ps -ax”, “r”);
if (read_fp != NULL) {
chars_read = fread(buffer, sizeof(char), BUFSIZ, read_fp);
while (chars_read > 0) {
buffer[chars_read – 1] = ‘\0’;
printf(“Reading:-\n %s\n”, buffer);
chars_read = fread(buffer, sizeof(char), BUFSIZ, read_fp);
}
pclose(read_fp);
exit(EXIT_SUCCESS);
}
exit(EXIT_FAILURE);
}
The output we get, edited for brevity, is
$ ./popen3
Reading:-
PID TTY STAT TIME COMMAND
1 ? S 0:04 init
2 ? SW 0:00 [kflushd]
3 ? SW 0:00 [kpiod]
4 ? SW 0:00 [kswapd]
5 ? SW< 0:00 [mdrecoveryd]
240 tty2 S 0:02 emacs draft1.txt
Reading:-
368 tty1 S 0:00 ./popen3
369 tty1 R 0:00 ps -ax
509
Inter-Process Communication: Pipes
b544977 Ch13.qxd 12/1/03 8:56 AM Page 509
How It Works
The program uses popen with an “r” parameter in a similar fashion to popen1.c. This time, it continues
reading from the file stream until there is no more data available. Notice that, although the
ps command
takes some time to execute, Linux arranges the process scheduling so that both programs run when they
can. If the reader process,
popen3, has no input data, it’s suspended until some becomes available. If the
writer process,
ps, produces more output than can be buffered, it’s suspended until the reader has con-
sumed some of the data.
In this example, you may not see
Reading:- output a second time. This will be the case if BUFSIZ is
greater than the length of the
ps command output. Some (mostly more recent) Linux systems set BUFSIZ
as high as 8,192 or even higher.
How popen Is Implemented
The popen call runs the program you requested by first invoking the shell, sh, passing it the command
string as an argument. This has two effects, one good and the other not so good.
In Linux (as in all UNIX-like systems), all parameter expansion is done by the shell, so invoking the shell to
parse the command string before the program is invoked allows any shell expansion, such as determining
what files
‘*.c’ actually refers to, to be done before the program starts. This is often quite useful, and it
allows complex shell commands to be started with
popen. Other process creation functions, such as execl,
can be much more complex to invoke, because the calling process has to perform its own shell expansion.
The unfortunate effect of using the shell is that for every call to
popen, a shell is invoked along with the
requested program. Each call to
popen then results in two extra processes being started, which makes
the
popen function a little expensive in terms of system resources and invocation of the target command
slower than it might otherwise have been.
Here’s a program,
popen4.c, that we can use to demonstrate the behavior of popen. We can count the
lines in all the
popen example source files by cating the files and then piping the output to wc -l,
which counts the number of lines. On the command line, the equivalent command is
$ cat popen*.c | wc -l
Actually, wc -l popen*.c is easier to type and much more efficient, but the example serves to
illustrate the principle.
Try It Out—popen Starts a Shell
This program uses exactly the preceding command, but through popen so that it can read the result:
#include <unistd.h>
#include <stdlib.h>
#include <stdio.h>
#include <string.h>
int main()
{
FILE *read_fp;
char buffer[BUFSIZ + 1];
int chars_read;
510
Chapter 13
b544977 Ch13.qxd 12/1/03 8:56 AM Page 510
memset(buffer, ‘\0’, sizeof(buffer));
read_fp = popen(“cat popen*.c | wc -l”, “r”);
if (read_fp != NULL) {
chars_read = fread(buffer, sizeof(char), BUFSIZ, read_fp);
while (chars_read > 0) {
buffer[chars_read – 1] = ‘\0’;
printf(“Reading:-\n %s\n”, buffer);
chars_read = fread(buffer, sizeof(char), BUFSIZ, read_fp);
}
pclose(read_fp);
exit(EXIT_SUCCESS);
}
exit(EXIT_FAILURE);
}
When we run this program, the output is
$ ./popen4
Reading:-
93
How It Works
The program shows that the shell is being invoked to expand popen*.c to the list of all files starting
popen and ending in .c and also to process the pipe (|) symbol and feed the output from cat into wc.
We invoke the shell, the
cat program, and wc and cause an output redirection, all in a single popen call.
The program that invokes the command sees only the final output.
The Pipe Call
We’ve seen the high-level popen function, but we’ll now move on to look at the lower-level pipe func-
tion. This function provides a means of passing data between two programs, without the overhead of
invoking a shell to interpret the requested command. It also gives us more control over the reading and
writing of data.
The
pipe function has the following prototype:
#include <unistd.h>
int pipe(int file_descriptor[2]);
pipe is passed (a pointer to) an array of two integer file descriptors. It fills the array with two new file
descriptors and returns a zero. On failure, it returns
-1 and sets errno to indicate the reason for failure.
Errors defined in the Linux manual page (section 2 of the manual) are
❑ EMFILE: Too many file descriptors are in use by the process.
❑ ENFILE: The system file table is full.
❑ EFAULT: The file descriptor is not valid.
511
Inter-Process Communication: Pipes
b544977 Ch13.qxd 12/1/03 8:56 AM Page 511
The two file descriptors returned are connected in a special way. Any data written to file_descrip-
tor[1]
can be read back from file_descriptor[0]. The data is processed in a first in, first out basis,
usually abbreviated to FIFO. This means that if you write the bytes
1, 2, 3 to file_descriptor[1],
reading from
file_descriptor[0] will produce 1, 2, 3. This is different from a stack, which operates
on a last in, first out basis, usually abbreviated to LIFO.
Here’s a program,
pipe1.c, that uses pipe to create a pipe.
Try It Out—The pipe Function
Type the following code. Note the file_pipes pointer, which is passed to the pipe function as a
parameter.
#include <unistd.h>
#include <stdlib.h>
#include <stdio.h>
#include <string.h>
int main()
{
int data_processed;
int file_pipes[2];
const char some_data[] = “123”;
char buffer[BUFSIZ + 1];
memset(buffer, ‘\0’, sizeof(buffer));
if (pipe(file_pipes) == 0) {
data_processed = write(file_pipes[1], some_data, strlen(some_data));
printf(“Wrote %d bytes\n”, data_processed);
data_processed = read(file_pipes[0], buffer, BUFSIZ);
printf(“Read %d bytes: %s\n”, data_processed, buffer);
exit(EXIT_SUCCESS);
}
exit(EXIT_FAILURE);
}
When we run this program, the output is
$ ./pipe1
Wrote 3 bytes
Read 3 bytes: 123
It’s important to realize that these are file descriptors, not file streams, so we must
use the lower-level read and write calls to access the data, rather than fread and
fwrite.
512
Chapter 13
b544977 Ch13.qxd 12/1/03 8:56 AM Page 512
How It Works
The program creates a pipe using the two file descriptors file_pipes[]. It then writes data into the
pipe using the file descriptor
file_pipes[1] and reads it back from file_pipes[0]. Notice that the
pipe has some internal buffering that stores the data in between the calls to
write and read.
You should be aware that the effect of trying to write using
file_descriptor[0], or read using
file_descriptor[1], is undefined, so the behavior could be very strange and may change without
warning. On the authors’ systems, such calls fail with a –1 return value, which at least ensures that it’s
easy to catch this mistake.
At first glance, this example of a pipe doesn’t seem to offer us anything that we couldn’t have done with
a simple file. The real advantage of pipes comes when you wish to pass data between two processes. As
we saw in the Chapter 12, when a program creates a new process using the
fork call, file descriptors
that were previously open remain open. By creating a pipe in the original process and then
forking to
create a new process, we can pass data from one process to the other down the pipe.
Try It Out—Pipes across a fork
1.
This is pipe2.c. It starts rather like the first example, up until we make the call to fork.
#include <unistd.h>
#include <stdlib.h>
#include <stdio.h>
#include <string.h>
int main()
{
int data_processed;
int file_pipes[2];
const char some_data[] = “123”;
char buffer[BUFSIZ + 1];
pid_t fork_result;
memset(buffer, ‘\0’, sizeof(buffer));
if (pipe(file_pipes) == 0) {
fork_result = fork();
if (fork_result == -1) {
fprintf(stderr, “Fork failure”);
exit(EXIT_FAILURE);
}
2. We’ve made sure the fork worked, so if fork_result equals zero, we’re in the child process:
if (fork_result == 0) {
data_processed = read(file_pipes[0], buffer, BUFSIZ);
printf(“Read %d bytes: %s\n”, data_processed, buffer);
exit(EXIT_SUCCESS);
}
513
Inter-Process Communication: Pipes
b544977 Ch13.qxd 12/1/03 8:56 AM Page 513
3. Otherwise, we must be in the parent process:
else {
data_processed = write(file_pipes[1], some_data,
strlen(some_data));
printf(“Wrote %d bytes\n”, data_processed);
}
}
exit(EXIT_SUCCESS);
}
When we run this program, the output is, as before,
$ ./pipe2
Wrote 3 bytes
Read 3 bytes: 123
You may find that in practice the command prompt reappears before the last part of the output, but we
have tidied the output here to make it easier to read.
How It Works
First, the program creates a pipe with the pipe call. It then uses the fork call to create a new process.
If the
fork was successful, the parent writes data into the pipe, while the child reads data from the pipe.
Both parent and child exit after a single
write and read. If the parent exits before the child you might
see the shell prompt between the two outputs.
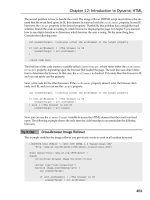
Although the program is superficially very similar to the first
pipe example, we’ve taken a big step for-
ward by being able to use separate processes for the reading and writing, as we illustrate in Figure 13-2.
Figure 13-2
Parent and Child Processes
The next logical step in our investigation of the pipe call is to allow the child process to be a different
program from its parent, rather than just a different process running the same program. We do this using
the
exec call. One difficulty is that the new execed process needs to know which file descriptor to
access. In our previous example, this wasn’t a problem because the child had access to its copy of the
file_pipes data. After an exec call, this will no longer be the case, as the old process has been replaced
by the new child process. We can get around this by passing the file descriptor (which is, after all, just a
number) as a parameter to the newly
execed program.
Parent
process
file_pipes[1] file_pipes[0]
Child
process
Pipe
514
Chapter 13
b544977 Ch13.qxd 12/1/03 8:56 AM Page 514
To show how this works, we need two programs. The first is the data producer. It creates the pipe and
then invokes the child, the data consumer.
Try It Out—Pipes and exec
1.
For the first program, we adapt pipe2.c to pipe3.c. The lines that we’ve changed are shown
shaded:
#include <unistd.h>
#include <stdlib.h>
#include <stdio.h>
#include <string.h>
int main()
{
int data_processed;
int file_pipes[2];
const char some_data[] = “123”;
char buffer[BUFSIZ + 1];
pid_t fork_result;
memset(buffer, ‘\0’, sizeof(buffer));
if (pipe(file_pipes) == 0) {
fork_result = fork();
if (fork_result == (pid_t)-1) {
fprintf(stderr, “Fork failure”);
exit(EXIT_FAILURE);
}
if (fork_result == 0) {
sprintf(buffer, “%d”, file_pipes[0]);
(void)execl(“pipe4”, “pipe4”, buffer, (char *)0);
exit(EXIT_FAILURE);
}
else {
data_processed = write(file_pipes[1], some_data,
strlen(some_data));
printf(“%d - wrote %d bytes\n”, getpid(), data_processed);
}
}
exit(EXIT_SUCCESS);
}
2. The consumer program, pipe4.c, which reads the data, is much simpler:
#include <unistd.h>
#include <stdlib.h>
#include <stdio.h>
#include <string.h>
int main(int argc, char *argv[])
{
int data_processed;
515
Inter-Process Communication: Pipes
b544977 Ch13.qxd 12/1/03 8:56 AM Page 515
char buffer[BUFSIZ + 1];
int file_descriptor;
memset(buffer, ‘\0’, sizeof(buffer));
sscanf(argv[1], “%d”, &file_descriptor);
data_processed = read(file_descriptor, buffer, BUFSIZ);
printf(“%d - read %d bytes: %s\n”, getpid(), data_processed, buffer);
exit(EXIT_SUCCESS);
}
Remembering that pipe3 invokes the pipe4 program for us, we get the following output when we run
pipe3:
$ ./pipe3
980 - wrote 3 bytes
981 - read 3 bytes: 123
How It Works
The pipe3 program starts like the previous example, using the pipe call to create a pipe and then using
the
fork call to create a new process. It then uses sprintf to store the “read” file descriptor number of
the pipe in a buffer that will form an argument of
pipe4.
A call to
execl is used to invoke the pipe4 program. The arguments to execl are
❑ The program to invoke
❑
argv[0], which takes the program name
❑
argv[1], which contains the file descriptor number we want the program to read from
❑ (char *)0, which terminates the parameters
The
pipe4 program extracts the file descriptor number from the argument string and then reads from
that file descriptor to obtain the data.
Reading Closed Pipes
Before we move on, we need to look a little more carefully at the file descriptors that are open. Up to this
point we have allowed the reading process simply to read some data and then exit, assuming that Linux
will clean up the files as part of the process termination.
Most programs that read data from the standard input do so differently than the examples we’ve seen so
far. They don’t usually know how much data they have to read, so they will normally loop—reading
data, processing it, and then reading more data until there’s no more data to read.
A
read call will normally block; that is, it will cause the process to wait until data becomes available. If
the other end of the pipe has been closed, then no process has the pipe open for writing, and the
read
blocks. Since this isn’t very helpful, a read on a pipe that isn’t open for writing returns zero rather than
blocking. This allows the reading process to detect the pipe equivalent of end of file and act appropriately.
516
Chapter 13
b544977 Ch13.qxd 12/1/03 8:56 AM Page 516