Beginning microsoft Visual Basic 2010 phần 5 pdf
Bạn đang xem bản rút gọn của tài liệu. Xem và tải ngay bản đầy đủ của tài liệu tại đây (4.19 MB, 72 trang )
254
❘
CHAPTER 8 DISPLAYING DIALOG BOXES
1. Return to the Forms Designer in the Windows Forms Dialogs project.
2. Drag another Button control from the Toolbox and drop it beneath the Open button and set its
properties as follows:
➤ Set
Name
to btnSave.
➤ Set
Anchor
to Top, Right.
➤ Set
Location
to 349, 43.
➤ Set
Text
to Save.
3. In the Toolbox, scroll down until you see the SaveFileDialog control and then drag and drop it
onto your form. The control will be added to the bottom of the workspace in the IDE.
4. Double-click the Save button to bring up its
Click
event and add the bolded code:
Private Sub btnSave_Click(ByVal sender As System.Object, _
ByVal e As System.EventArgs) Handles btnSave.Click
‘Set the Save dialog properties
With SaveFileDialog1
.DefaultExt = "txt"
.FileName = strFileName
.Filter = "Text Documents (*.txt)|*.txt|All Files (*.*)|*.*"
.FilterIndex = 1
.OverwritePrompt = True
.Title = "Demo Save File Dialog"
End With
‘Show the Save dialog and if the user clicks the Save button,
‘save the file
If SaveFileDialog1.ShowDialog = Windows.Forms.DialogResult.OK Then
Try
‘Save the file path and name
strFileName = SaveFileDialog1.FileName
Catch ex As Exception
MessageBox.Show(ex.Message, My.Application.Info.Title, _
MessageBoxButtons.OK, MessageBoxIcon.Error)
End Try
End If
End Sub
5. Right-click in the blank space inside the
Try
block statement right before the
Catch
block
statement and choose Insert Snippet from the context menu. In the drop-down menu that appears,
double-click Fundamentals-Collections, Data Types, File System, Math, and then in the new
list double-click File System-Processing Drives, Folders, and Files. Finally, scroll down the list and
double-click Write Text to a File. Your code should now look as follows, and you’ll notice that
the filename
C:\Test.txt
is bolded, as is the text string
Text
, indicating that this code needs to be
changed:
Try
‘Save the file path and name
strFileName = SaveFileDialog1.FileName
My.Computer.FileSystem.WriteAllText("C:\Test.txt", "Text", True)
Catch ex As Exception
The SaveDialog Control
❘
255
6. Modify the code in the
Try
block as shown here:
Try
‘Save the file path and name
strFileName = SaveFileDialog1.FileName
My.Computer.FileSystem.WriteAllText(strFileName, txtFile.Text, False)
Catch ex As Exception
7. At this point, you are ready to test this code, so run your project. Start with a simple test. Type
some text into the text box on the form and then click the Save button. The Save dialog box will
be displayed. Notice that the File name combo box already has the complete path and filename in
it. This is the path filename that was set in the
strFileName
variable when you declared it in the
previous Try It Out.
8. Enter a new filename but don’t put a file extension on it. Then click the Save button and the file
will be saved. To verify this, click the Open button on the form to invoke the Open File dialog
box; you will see your new file.
FIGURE 8-8
figure
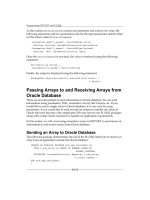
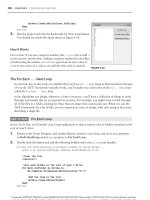
9. To test the
OverwritePrompt
property of the SaveFile-
Dialog control, enter some more text in the text box
on the form and then click the Save button. In the Save
File dialog box, choose an existing filename and then
click the Save button. You will be prompted to confirm
replacement of the existing file as shown in Figure 8-8.
If you choose Yes, the dialog box will return a
DialogResult
of
OK
, and the code inside your
If.
End If
statement will be executed. If you choose No, you will be returned to the Save File dialog
box so that you can enter another filename.
NOTE When the Open File or Save File dialog box is displayed, the context menu
is fully functional and you can cut, copy, and paste files, as well as rename and
delete them. Other options may appear in the context menu depending on what
software you have installed. For example, if you have WinZip installed, you will
see the WinZip options on the context menu.
How It Works
Before displaying the Save File dialog box, you need to set some properties to customize the dialog to
your application. The first property you set is the
DefaultExt
property. This property automatically sets
the file extension if one has not been specified. For example, if you specify a filename of NewFile with no
extension, the dialog box will automatically add .
txt
to the filename when it returns, so that you end up
with a filename of
NewFile
.
txt
.
.DefaultExt = "txt"
The
FileName
property is set to the same path and filename as that returned from the Open File dialog.
This enables you to open a file, edit it, and then display the same filename when you show the Save File
dialog box. Of course, you can override this filename in the application’s Save File dialog box.
.FileName = strFileName
256
❘
CHAPTER 8 DISPLAYING DIALOG BOXES
The next two properties are the same as in the OpenFileDialog control. They set the file extension filters to
be displayed in the Save as Type: combo box and set the initial filter:
.Filter = "Text Documents (*.txt)|*.txt|All Files (*.*)|*.*"
.FilterIndex = 1
The
OverwritePrompt
property accepts a Boolean value of
True
or
False
.Whensetto
True
, this prop-
erty prompts you with a MessageBox dialog box if you choose an existing filename. If you select Yes,
the Save File dialog box returns a
DialogResult
of
OK
; if you select No, you are returned to the Save
File dialog box to choose another filename. When the
OverwritePrompt
property is set to
False
,the
Save File dialog box does not prompt you to overwrite an existing file, and your code will overwrite it
without asking for the user’s permission.
.OverwritePrompt = True
The
Title
property sets the caption in the title bar of the Save File dialog box:
.Title = "Demo Save File Dialog"
After you have the properties set, you want to show the dialog box. The
ShowDialog
method of the Save-
FileDialog control also returns a
DialogResult
, so you can use the SaveFileDialog control in an
If
.
End If
statement to test the return value.
If the user clicks the Save button in the Save File dialog box, the dialog box returns a
DialogResult
of
OK
. If the user clicks the Cancel button in the dialog box, the dialog box returns a
DialogResult
of
Cancel
. The following code tests for
Windows
.
Forms
.
DialogResult
.
OK
:
If SaveFileDialog1.ShowDialog = Windows.Forms.DialogResult.OK Then
The first thing that you do here is save the path and filename chosen by the user in your
strFileName
variable. This is done in case the user has chosen a new filename in the dialog box:
Try
‘Save the file path and name
strFileName = SaveFileDialog1.FileName
Then you modify the code snippet generated by Visual Studio 2010 by replacing the bolded text with your
variables. First, you replace the text
"C:\Test.txt"
with your variable,
strFileName
.Thispartofthe
code opens the file for output. Then you replace the text
"Text"
with the
Text
property of the text box on
your form. This part of the code reads the contents of your text box and writes it to the file. The
False
parameter at the end of this line of code indicates whether text should be appended to the file. A value of
False
indicates that the file contents should be overwritten.
My.Computer.FileSystem.WriteAllText(strFileName,txtFile.Text, False)
The final bit of code in this
If
.
End If
block merely wraps up the
Try
.
Catch
block and the
If
.
End If
statement:
Catch ex As Exception
MessageBox.Show(ex.Message, My.Application.Info.Title, _
MessageBoxButtons.OK, MessageBoxIcon.Error)
End Try
End If
The FontDialog Control
❘
257
THE FONTDIALOG CONTROL
Sometimes you may need to write an application that allows users to choose the font in which they want
their data to be displayed or entered. Or perhaps you may want to see all available fonts installed on a
particular system. This is where the FontDialog control comes in; it displays a list of all available fonts
installed on your computer in a standard dialog that your users have become accustomed to seeing.
Like the OpenFileDialog and SaveFileDialog controls, the
FontDialog
class can be used as a control by
dragging it onto a form, or as a class by declaring it in code.
The FontDialog control is very easy to use; you just set some properties, show the dialog box, and then
query the properties that you need.
The Properties of FontDialog
Table 8-8 lists some of its available properties.
TABLE 8-8: Common FontDialog Control Properties
PROPERTY DESCRIPTION
AllowScriptChange
Indicates whether the user can change the character set specified
in the Script drop-down box to display a character set other than the
one currently displayed
Color
Indicates the selected font color
Font
Indicates the selected font
FontMustExist
Indicates whether the dialog box specifies an error condition if the
user attempts to enter a font or style that does not exist
MaxSize
Indicates the maximum size (in points) a user can select
MinSize
Indicates the minimum size (in points) a user can select
ShowApply
Indicates whether the dialog box contains an Apply button
ShowColor
Indicates whether the dialog box displays the color choice
ShowEffects
Indicates whether the dialog box contains controls that allow the
user to specify strikethrough, underline, and text color options
ShowHelp
Indicates whether the dialog box displays a Help button
The Methods of FontDialog
You will be using only one method (
ShowDialog
) of FontDialog in the following Try It Out. Other
methods available include
Reset
, which enables you to reset all the properties to their default values.
258
❘
CHAPTER 8 DISPLAYING DIALOG BOXES
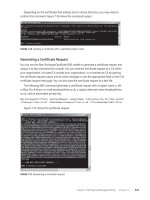
Using the FontDialog Control
You can display the FontDialog control without
setting any properties:
FontDialog1.ShowDialog()
The dialog box would then look like Figure 8-9.
FIGURE 8-9
Note that the Font dialog box contains an Effects
section that enables you to check the options for
Strikeout and Underline. However, color selec-
tion of the font is not provided by default. If you
want this, you must set the
ShowColor
property
before calling the
ShowDialog
method on the dia-
log box:
FontDialog1.ShowColor = True
FontDialog1.ShowDialog()
The
ShowDialog
method of this dialog box, like all of the ones that you have examined thus far, returns
a
DialogResult
. This will be either
DialogResult.OK
or
DialogResult.Cancel
.
When the dialog box returns, you can query for the
Font
and
Color
properties to see what font and
color the user has chosen. You can then apply these properties to a control on your form or store them
to a variable for later use.
TRY IT OUT Working with FontDialog
Code file Windows Forms Dialogs.zip available for download at Wrox.com
Now that you know what the Font dialog box looks like and how to call it, you can use it in a Try It
Out. Using the program from the last two Try It Outs to open a file, you will have the contents of the
file read into the text box on the form. You then use the FontDialog control to display the Font dialog
box, which enables you to select a font. Then you change the font in the text box to the font that you
have chosen.
1. Return to the Forms Designer in the Windows Forms Dialogs project.
2. Add another button from the Toolbox and set its properties according to the values shown
in this list:
➤ Set
Name
to btnFont.
➤ Set
Anchor
to Top, Right.
➤ Set
Location
to 349, 73.
➤ Set
Text
to Font.
3. You now need to add the FontDialog control to your project, so locate this control in the Tool-
box and drag and drop it onto the form or in the workspace below the form; the control will be
The FontDialog Control
❘
259
automatically placed in the workspace below the form if dragged onto the form. Accept all default
properties for this control.
4. You want to add code to the
Click
event of the Font button, so double-click it and add the follow-
ing bolded code:
Private Sub btnFont_Click(ByVal sender As System.Object, _
ByVal e As System.EventArgs) Handles btnFont.Click
‘Set the Font dialog properties
FontDialog1.ShowColor = True
‘Show the Font dialog and if the user clicks the OK button,
‘update the font and color in the text box
If FontDialog1.ShowDialog = Windows.Forms.DialogResult.OK Then
txtFile.Font = FontDialog1.Font
txtFile.ForeColor = FontDialog1.Color
End If
End Sub
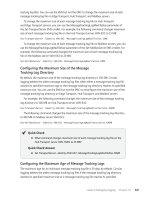
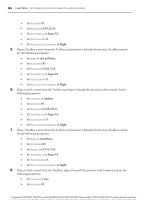
5. Run your project. Once your form has been
displayed, click the Font button to display the
Font dialog box as shown in Figure 8-10.
Choose a new font and color and then click OK.
FIGURE 8-10
figure
6. Add some text in the text box on your form. The
text will appear with the new font and color that
you have chosen.
7. This same font and color will also be applied to
the text that is loaded from a file. To demon-
strate this, click the Open button on the form
and open a text file. The text from the file is dis-
played in the same font and color that you chose
in the Font dialog box.
How It Works
You know that the Font dialog box does not show a Color box by default, so you begin by setting the
ShowColor
property of the FontDialog control to
True
so that the Color box is displayed:
‘Set the Font dialog properties
FontDialog1.ShowColor = True
Next, you actually show the Font dialog box. Remember that the
DialogResult
returns a value
of
OK
or
Cancel
, so that you can compare the return value from the FontDialog control to
Windows
.
Forms
.
DialogResult
.
OK
. If the button that the user clicked was OK, you execute the code
within the
If
.
End If
statement:
‘Show the Font dialog and if the user clicks the OK button,
‘update the font and color in the text box
If FontDialog1.ShowDialog = Windows.Forms.DialogResult.OK Then
260
❘
CHAPTER 8 DISPLAYING DIALOG BOXES
txtFile.Font = FontDialog1.Font
txtFile.ForeColor = FontDialog1.Color
End If
You set the
Font
property of the text box (
txtFile
) equal to the
Font
property of the FontDialog control.
This is the font that the user has chosen. Then you set the
ForeColor
property of the text box equal to the
Color
property of the FontDialog control, as this will be the color that the user has chosen. After these
properties have been changed for the text box, the existing text in the text box is automatically updated to
reflect the new font and color. If the text box does not contain any text, then any new text that is typed or
loaded into the text box will appear in the new font and color.
THE COLORDIALOG CONTROL
FIGURE 8-11
Sometimes you may need to allow users to customize the colors on their
form. This may be the color of the form itself, a control, or text in a text
box. Visual Basic 2010 provides the ColorDialog control for all such
requirements. Once again, the ColorDialog control can also be used as
a class — declared in code without dragging a control onto the Forms
Designer.
The ColorDialog control, shown in Figure 8-11, allows the user to choose
from 48 basic colors.
Note that users can also define their own custom colors, adding more
flexibility to your applications. When the users click the Define Custom
Colors button in the Color dialog box, they can adjust the color to suit
their needs (see Figure 8-12).
FIGURE 8-12
The ColorDialog Control
❘
261
Having this opportunity for customization and flexibility in your applications gives them a more pro-
fessional appearance, plus your users are happy because they are allowed to customize the application
to suit their own personal tastes.
The Properties of ColorDialog
Before you dive into more code, take a look at some of the available properties for the ColorDialog
control, shown in Table 8-9.
TABLE 8-9: Common ColorDialog Control Properties
PROPERTY DESCRIPTION
AllowFullOpen
Indicates whether users can use the dialog box to define custom colors
AnyColor
Indicates whether the dialog box displays all available colors in the set of
basic colors
Color
Indicates the color selected by the user
CustomColors
Indicates the set of custom colors shown in the dialog box
FullOpen
Indicates whether the controls used to create custom colors are visible when
the dialog box is opened
ShowHelp
IndicateswhetheraHelpbuttonappearsinthedialogbox
SolidColorOnly
Indicates whether the dialog box will restrict users to selecting solid colors
only
There aren’t many properties that you need to worry about for this dialog box, which makes it even
simpler to use than the other dialogs you have examined so far.
As with the other dialog box controls, ColorDialog contains a
ShowDialog
method. Because you have
already seen this method in the previous examples, it is not discussed again.
Using the ColorDialog Control
All you need to do to display the Color dialog box is to execute its
ShowDialog
method:
ColorDialog1.ShowDialog()
The ColorDialog control will return a
DialogResult
of
OK
or
Cancel
. Hence, you can use the previous
statement in an
If
.
End If
statement and test for a
DialogResult
of
OK
, as you have done in the previous
examples that you coded.
262
❘
CHAPTER 8 DISPLAYING DIALOG BOXES
To retrieve the color that the user has chosen, you simply retrieve the value set in the
Color
property
and assign it to a variable or any property of a control that supports colors, such as the
ForeColor
property of a text box:
txtFile.ForeColor = ColorDialog1.Color
TRY IT OUT Working with the ColorDialog Control
Code file Windows Forms Dialogs.zip available for download at Wrox.com
In this Try It Out, you continue using the same project and make the ColorDialog control display the Color
dialog box. Then, if the dialog box returns a
DialogResult
of
OK
, you change the background color of the
form.
1. Return to the Forms Designer in the Windows Forms Dialogs project.
2. On the form, add another Button control from the Toolbox and set its properties according to the
values shown:
➤ Set
Name
to btnColor.
➤ Set
Anchor
to Top, Right.
➤ Set
Location
to 349, 103.
➤ Set
Text
to Color.
3. Add a ColorDialog control to your project from the Toolbox. It will be added to the workspace
below the form. Accept all default properties for this control.
4. Double-click the Color button to bring up its
Click
event handler and add the following
bolded code:
Private Sub btnColor_Click(ByVal sender As System.Object, _
ByVal e As System.EventArgs) Handles btnColor.Click
‘Show the Color dialog and if the user clicks the OK button,
‘update the background color of the form
If ColorDialog1.ShowDialog = Windows.Forms.DialogResult.OK Then
Me.BackColor = ColorDialog1.Color
End If
End Sub
5. That’s all the code you need to add. Start your project to test your changes.
6. Once the form is displayed, click the Color button to display the Color dialog box. Choose any
color that you want, or create a custom color by clicking the Define Custom Colors button. After
you have chosen a color, click the OK button in the Color dialog box. The background color of
the form will be set to the color that you selected.
7. As with the Font dialog box, you do not have to set the
Color
property of the ColorDialog control
before displaying the Color dialog box again. It automatically remembers the color chosen, and
this will be the color that is selected when the dialog box is displayed again. To test this, click the
Color button again; the color that you chose will be selected.
The PrintDialog Control
❘
263
How It Works
This time you did not need to set any properties of the ColorDialog control, so you jumped right in and
displayed it in an
If
.
End If
statement to check the
DialogResult
returned by the
ShowDialog
method of
this dialog box:
If ColorDialog1.ShowDialog = Windows.Forms.DialogResult.OK Then
Within the
If
.
End If
statement, you added the code necessary to change the
BackColor
property of the
form. If the user clicks OK in the Color dialog box, the background color of the form is changed with the
following line of code:
Me.BackColor = ColorDialog1.Color
THE PRINTDIALOG CONTROL
Any application worth its salt will incorporate some kind of printing capabilities, whether it is basic
printing or more sophisticated printing, such as allowing a user to print only selected text or a range of
pages. In this section you explore basic printing, looking at several classes that help you to print text
from a file.
Visual Basic 2010 provides the PrintDialog control. It does not actually do any printing, but enables
you to select the printer that you want to use and set the printer properties such as page orientation
and print quality. It also enables you to specify the print range. You will not be using these features in
this next example, but it is worth noting that this functionality is available in the PrintDialog control,
as shown in Figure 8-13.
FIGURE 8-13
264
❘
CHAPTER 8 DISPLAYING DIALOG BOXES
Like the previous dialog boxes that you have examined, the Print dialog provides Print (corresponding
to the OK buttons in the other dialogs) and Cancel buttons; thus, its
ShowDialog
method returns a
DialogResult
of
OK
or
Cancel
. You can then use this result in an
If.End If
statement and test for
the
DialogResult
. The Apply button merely applies changes made in the Print dialog but does not
close the dialog.
The Properties of PrintDialog
Table 8-10 shows some of the properties provided in PrintDialog. Just like the other dialog boxes,
PrintDialog exposes a
ShowDialog
method.
TABLE 8-10: Common PrintDialog Control Properties
PROPERTY DESCRIPTION
AllowCurrentPage
Indicates whether the Current Page option button is enabled
AllowPrintToFile
Indicates whether the Print to File check box is enabled
AllowSelection
Indicates whether the Selection option button is enabled
AllowSomePages
Indicates whether the Pages option button is enabled
Document
Indicates the print document used to obtain the printer settings
PrinterSettings
Indicates the printer settings that the dialog box will be modifying
PrintToFile
Indicates whether the Print to File check box is checked
ShowHelp
Indicates whether the Help button is displayed
ShowNetwork
Indicates whether the Network button is displayed
Using the PrintDialog Control
The only method that you will be using is the
ShowDialog
method, which will display the Print dialog
box shown in Figure 8-13 with only the All page range option button enabled. As mentioned earlier,
the PrintDialog control merely displays the Print dialog box; it does not actually do any printing. The
following code fragment shows how you display the Print dialog box:
PrintDialog1.ShowDialog()
The PrintDocument Class
Before you can call the
ShowDialog
method of the PrintDialog control, you have to set the
Document
property of the
PrintDialog
class. This property accepts a
PrintDocument
class, which is used to obtain
the printer settings and can send output to the printer. This class requires the
System.Drawing.Printing
namespace, so you must include this namespace before attempting to define an object that uses the
PrintDocument
class.
The PrintDialog Control
❘
265
The Properties of the PrintDocument Class
Before continuing, take a look at some of the important properties of the
PrintDocument
class, listed
in Table 8-11.
TABLE 8-11: Common PrintDocument Class Properties
PROPERTY DESCRIPTION
DefaultPageSettings
Indicates the default page settings for the document.
DocumentName
Indicates the document name that is displayed while printing the
document. This is also the name that appears in the Print Status
dialog box and printer queue.
PrintController
Indicates the print controller that guides the printing process.
PrinterSettings
Indicates the printer that prints the document.
Printing a Document
The
method of the
PrintDocument
class prints a document to the printer specified in the
PrinterSettings
property. When you call the
method of the
PrintDocument
class,
the
PrintPage
event is raised for each page as it prints. Therefore, you need to create a method for that
event and add an event handler for it. The method that you would create for the
PrintPage
event does
the actual reading of the data to be printed.
Printing using the
PrintDocument
class requires a lot of coding and knowledge of how actual printing
works. Fortunately, the help documentation provides some sample code in the
PrintDocument
class.
This can be used as a starting point to help you gain an understanding of the basics of printing. Note
that the sample code in the help documentation assumes that a single line in the file to be printed does
not exceed the width of a printed page.
The sample code in the help documentation demonstrates how to print from a file.
TRY IT OUT Working with the PrintDialog Control
Code file Windows Forms Dialogs.zip available for download at Wrox.com
In this Try It Out, you’ll examine how to print the contents of a text box.
1. Return to the Forms Designer in the Windows Forms Dialogs project.
2. Drag a Button control from the Toolbox. Position it beneath the Color button and set the follow-
ing properties of the new button:
➤ Set
Name
to btnPrint.
➤ Set
Anchor
to Top, Right.
➤ Set
Location
to 349, 133.
➤ Set
Text
to Print.
266
❘
CHAPTER 8 DISPLAYING DIALOG BOXES
3. Add a PrintDialog control to the project, dragging and dropping it from the Toolbox onto the
form. It will be added to the workspace below the form. Accept all default properties for this con-
trol. You will find it under the Printing tab.
4. Switch to the Code Editor so that you can add the required namespace for printing. Add this
namespace to the top of your class:
Imports System.Drawing.Printing
Public Class Dialogs
5. Add the following variable declarations to the top of your class:
‘Declare variables and objects
Private strFileName As String
Private strPrintRecord As String
Private WithEvents DialogsPrintDocument As PrintDocument
6. Select
DialogsPrintDocument
in the Class Name combo box and the
PrintPage
event in the
Method Name combo box. Add the following bolded code to the
DialogsPrintDocument_PrintPage
event handler:
Private Sub DialogsPrintDocument_PrintPage(ByVal sender As Object, _
ByVal e As System.Drawing.Printing.PrintPageEventArgs) _
Handles DialogsPrintDocument.PrintPage
‘Declare variables
Dim intCharactersToPrint As Integer
Dim intLinesPerPage As Integer
Dim strPrintData As String
Dim objStringFormat As New StringFormat
Dim objPrintFont As New Font("Arial", 10)
Dim objPageBoundaries As RectangleF
Dim objPrintArea As SizeF
‘Get the page boundaries
objPageBoundaries = New RectangleF(e.MarginBounds.Left, _
e.MarginBounds.Top, e.MarginBounds.Width, e.MarginBounds.Height)
‘Get the print area based on page margins and font used
objPrintArea = New SizeF(e.MarginBounds.Width, _
e.MarginBounds.Height — objPrintFont.GetHeight(e.Graphics))
‘Break in between words on a line
objStringFormat.Trimming = StringTrimming.Word
‘Get the number of characters to print
e.Graphics.MeasureString(strPrintRecord, objPrintFont, objPrintArea, _
objStringFormat, intCharactersToPrint, intLinesPerPage)
‘Get the print data from the print record
strPrintData = strPrintRecord.Substring(0, intCharactersToPrint)
‘Print the page
e.Graphics.DrawString(strPrintData, objPrintFont, Brushes.Black, _
objPageBoundaries, objStringFormat)
‘If more lines exist, print another page
The PrintDialog Control
❘
267
If intCharactersToPrint < strPrintRecord.Length Then
‘Remove printed text from print record
strPrintRecord = strPrintRecord.Remove(0, intCharactersToPrint)
e.HasMorePages = True
Else
e.HasMorePages = False
End If
End Sub
7. Select
btnPrint
in the Class Name combo box and the
Click
event in the Method Name combo
box. Add the following bolded code to the
btnPrint_Click
event handler:
Private Sub btnPrint_Click(ByVal sender As System.Object, _
ByVal e As System.EventArgs) Handles btnPrint.Click
‘Instantiate a new instance of the PrintDocument
DialogsPrintDocument = New PrintDocument
‘Set the PrintDialog properties
With PrintDialog1
.AllowCurrentPage = False
.AllowPrintToFile = False
.AllowSelection = False
.AllowSomePages = False
.Document = DialogsPrintDocument
.PrinterSettings.DefaultPageSettings.Margins.Top = 25
.PrinterSettings.DefaultPageSettings.Margins.Bottom = 25
.PrinterSettings.DefaultPageSettings.Margins.Left = 25
.PrinterSettings.DefaultPageSettings.Margins.Right = 25
End With
If PrintDialog1.ShowDialog = DialogResult.OK Then
‘Set the selected printer settings in the PrintDocument
DialogsPrintDocument.PrinterSettings = _
PrintDialog1.PrinterSettings
‘Get the print data
strPrintRecord = txtFile.Text
‘Invoke the Print method on the PrintDocument
DialogsPrintDocument.Print()
End If
End Sub
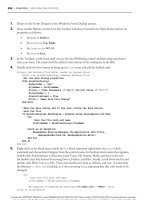
8. You are now ready to test your code, so run the project.
9. Click the Open button to open a file, and then click the Print button to display the Print dialog box
shown in Figure 8-14.
NOTE The Print to File check box as well as the Selection, Current Page, and
Pages radio buttons are disabled. This is because you set the
AllowCurrentPage
,
AllowPrintToFile
,
AllowSelection
,and
AllowSomePages
properties in the
PrintDialog control to
False
.
If you have more than one printer installed (refer to Figure 8-14), you can choose the printer name
that you want from the list.
10. Click the Print button in the Print dialog box to have your text printed.
268
❘
CHAPTER 8 DISPLAYING DIALOG BOXES
FIGURE 8-14
How It Works
You begin by importing the
System.Drawing.Printing
namespace, which is needed to support printing.
This is the namespace in which the
PrintDocument
class is defined.
You then declare a variable and object needed for printing. The
strPrintRecord
variable is a string vari-
able that will contain the data from the text box to be printed. The
DialogsPrintDocument
object will
actually be responsible for printing the text.
Notice the
WithEvents
keyword. This keyword is used to refer to a class that can raise events, and will
cause Visual Studio 2010 to list those events in the Method Name combo box at the top of the Code
Editor:
Private strPrintRecord As String
Private WithEvents DialogsPrintDocument As PrintDocument
The
DialogsPrintDocument_PrintPage
event handler handles printing a page of output. This event is
initially called after you call the
method on the object defined as the
PrintDocument
class — in this
case, the
DialogsPrintDocument
.
This event handler is where you have to provide the code for actually printing a document, and you must
determine if more pages exist to be printed. This method starts off with a number of variable declarations.
The first two variables are
Integer
data types and contain the number of characters to print to a page and
the number of lines that can be printed on a page.
The
strPrintData
variable is a
String
data type that contains all of the data to be printed on a single
page. The
objStringFormat
variable is declared as a
StringFormat
class, and this class encapsulates text
layout information used to format the data to be printed. The
StringFormat
classisusedtotrimthedata
on word boundaries so that the text does not overflow the print area of a page.
The
objPrintFont
object is defined as a
Font
class and sets the font used for the printed text, while the
objPageBoundaries
object is defined as a
RectangleF
structure. The
RectangleF
structure contains four
The PrintDialog Control
❘
269
floating-point numbers defining the location and size of a rectangle and is used to define the top and left
coordinates of a page, as well as its width and height. The
objPrintArea
object is defined as a
SizeF
structure and contains the height and width of the print area of a page. This is the actual area that you can
print in, not the actual size of the page:
Private Sub DialogsPrintDocument_PrintPage(ByVal sender As Object, _
ByVal e As System.Drawing.Printing.PrintPageEventArgs) _
Handles DialogsPrintDocument.PrintPage
‘Declare variables
Dim intCharactersToPrint As Integer
Dim intLinesPerPage As Integer
Dim strPrintData As String
Dim objStringFormat As New StringFormat
Dim objPrintFont As New Font("Arial", 10)
Dim objPageBoundaries As RectangleF
Dim objPrintArea As SizeF
The code in this method starts off by getting the page boundaries. The
PrintPageEventArgs
passed to this
method in the
e
parameter contains the top and left coordinates of the page as well as the height and width
of the page. These values are used to set the data in the
objPageBoundaries
object.
The print area of the page is contained in the
Width
and
Height
properties of the
PrintPageEventArgs
.The
actual height of the page is calculated using the
GetHeight
method of the
Font
class in the
objPrintFont
object, as each font size requires more or less vertical space on a page:
‘Get the page boundaries
objPageBoundaries = New RectangleF(e.MarginBounds.Left, _
e.MarginBounds.Top, e.MarginBounds.Width, e.MarginBounds.Height)
‘Get the print area based on page margins and font used
objPrintArea = New SizeF(e.MarginBounds.Width, _
e.MarginBounds.Height — objPrintFont.GetHeight(e.Graphics))
You now set the
Trimming
property of the
objStringFormat
object to instruct it to break the data on a
single line using word boundaries. This is done using the
StringTrimming
enumeration, which contains the
Word
constant. This ensures that a print line does not exceed the margins of a printed page.
You then need to determine the number of characters that will fit on a page based on the print area of
the page, the font size used, and the data to be printed. This is done using the
MeasureString
method
of the
Graphics
class. This method will take the data to be printed, the font used on the page, the print
area of the page and the formatting to be applied, and then determine the number of characters that can
be printed and the number of lines that will fit on a printed page. The number of print characters and the
number of lines will be set in the
intCharactersToPrint
and
intLinesPerPage
variables, which are passed
to the
MeasureString
method.
Once you know the number of characters that will fit on a page, you get that data from the
strPrintRecord
variable and set the data to be printed in the
strPrintData
variable. This is the variable that will contain
the data to actually be printed:
‘Break in between words on a line
objStringFormat.Trimming = StringTrimming.Word
‘Get the number of characters to print
e.Graphics.MeasureString(strPrintRecord, objPrintFont, objPrintArea, _
objStringFormat, intCharactersToPrint, intLinesPerPage)
270
❘
CHAPTER 8 DISPLAYING DIALOG BOXES
‘Get the print data from the print record
strPrintData = strPrintRecord.Substring(0, intCharactersToPrint)
Now that you have the appropriate data to be printed in the
strPrintData
variable, you are ready to
actually send the data to be printed to the printer. This time you are going to use the
DrawString
method
of the
Graphics
class. This method will actually format and send the data to the printer.
The parameters that you pass to the
DrawString
method are the data to be printed, the font to be used
in printing, a
Brushes
object representing the font color of the text to print, the page boundaries, and a
StringFormat
object used to format the printed output:
‘Print the page
e.Graphics.DrawString(strPrintData, objPrintFont, Brushes.Black, _
objPageBoundaries, objStringFormat)
The last section of code in this method determines if more data exists to be printed. You want to compare
the value contained in the
intCharactersToPrint
variable to the length of the
strPrintRecord
variable
using the
Length
property of the
String
class. The
Length
property returns the number of characters in the
string.
If the value contained in the
intCharactersToPrint
variable is less than the length of the
strPrintRecord
variable, then more data exists to be printed. In this case, you first want to remove the data from the
strPrintRecord
that has already been printed using the
Remove
method of the
String
class. The
Remove
method accepts the starting position from which to remove data and the amount of data to remove. The
amount of data to be removed is contained in the
intCharactersToPrint
variable, the data that has already
been printed.
Finally, you set the
HasMorePages
property of the
PrintPageEventArgs
parameter to
True
, indicating
more data exists to be printed. Setting this property to
True
will cause the
PrintPage
event of the
DialogsPrintDocument
object to be raised once more, and this event handler will be executed again to
continuing printing until all data has been printed.
If no more data exists to be printed, you set the
HasMorePages
property to
False
:
‘If more lines exist, print another page
If intCharactersToPrint < strPrintRecord.Length Then
‘Remove printed text from print record
strPrintRecord = strPrintRecord.Remove(0, intCharactersToPrint)
e.HasMorePages = True
Else
e.HasMorePages = False
End If
End Sub
The code in the
Click
event of the Print button is less complicated than the code in the
DialogsPrint
Document_PrintPage
event handler. This method starts out by instantiating a new instance of the
PrintDocument
class in the
DialogsPrintDocument
object.
You then want to set the properties of the
PrintDialog
control before showing it. Since you have only a
simple method to print all pages in a document, you want to disable the features that allow printing only
the current page, printing to a file, printing a selection of text, and printing specific pages. This is all done
by setting the first four properties in the following code to
False
.
The FolderBrowserDialog Control
❘
271
Next, you need to set
Document
property of the
PrintDialog
to your
PrintDocument
object so that the
dialog can obtain the printer settings. The printer settings are set and retrieved in the
PrintDocument
object
and can be changed through the
PrintDialog
through its
PrinterSettings
property.
Finally, you set the default margins to be used when printing a document in the
PrinterSettings
property.
This can be set before the
PrintDialog
is shown, to initially set the print margins for the printer:
‘Instantiate a new instance of the PrintDocument
DialogsPrintDocument = New PrintDocument
‘Set the PrintDialog properties
With PrintDialog1
.AllowCurrentPage = False
.AllowPrintToFile = False
.AllowSelection = False
.AllowSomePages = False
.Document = DialogsPrintDocument
.PrinterSettings.DefaultPageSettings.Margins.Top = 25
.PrinterSettings.DefaultPageSettings.Margins.Bottom = 25
.PrinterSettings.DefaultPageSettings.Margins.Left = 25
.PrinterSettings.DefaultPageSettings.Margins.Right = 25
End With
The last thing you want to do in this method is actually display the
PrintDialog
and check for a
DialogResult
of
OK
. If the user clicks the Print button, the
PrintDialog
will return a
DialogResult
of
OK
and you want to actually invoke the printing of the data.
The first thing that you do in the
If
Then
block is capture the printer settings from the
PrintDialog
and set them in the
DialogsPrintDocument
. If the user changed any of the margins or other printer settings,
you want to pass them on to the
PrintDocument
that is used to print the data.
Youalsowanttosetthedatatobeprintedfromthetextboxinthe
strPrintRecord
variable. Finally, you
call the
method on the
DialogsPrintDocument
object to start the printing process. Calling the
method will raise the
PrintPage
event on the
DialogsPrintDocument
object, thus causing your code in the
DialogsPrintDocument_PrintPage
event handler to be executed:
If PrintDialog1.ShowDialog = DialogResult.OK Then
‘Set the selected printer settings in the PrintDocument
DialogsPrintDocument.PrinterSettings = _
PrintDialog1.PrinterSettings
‘Get the print data
strPrintRecord = txtFile.Text
‘Invoke the Print method on the PrintDocument
DialogsPrintDocument.Print()
End If
THE FOLDERBROWSERDIALOG CONTROL
Occasionally, you’ll need to allow your users to select a folder instead of a file. Perhaps your application
performs backups, or perhaps you need a folder to save temporary files. The FolderBrowserDialog
control displays the Browse For Folder dialog box, which enables users to select a folder. This dialog
272
❘
CHAPTER 8 DISPLAYING DIALOG BOXES
box does not display files — only folders, which provides an
obvious way to allow users to select a folder needed by your
application.
FIGURE 8-15
Like the other dialog boxes that you have examined thus far,
the FolderBrowserDialog control can also be used as a class
declared in code. The Browse For Folder dialog box, shown
in Figure 8-15 without any customization, enables users to
browse for and select a folder. Notice that there is also a
Make New Folder button that enables users to create and
select a new folder.
The Properties of FolderBrowserDialog
Before you dive into some code, take a look at some of the
available properties for the FolderBrowserDialog control, shown in Table 8-12.
TABLE 8-12: Common FolderBrowserDialog Control Properties
PROPERTY DESCRIPTION
Description
Provides a descriptive message in the dialog box.
RootFolder
Indicates the root folder from which the dialog box should start browsing.
SelectedPath
Indicates the folder selected by the user.
ShowNewFolderButton
Indicates whether the Make New Folder button is shown in the dialog box
This is one dialog control for which you’ll want to use all of the most common properties, as shown in
the preceding table, to customize the dialog box displayed.
As with the other dialog controls, the FolderBrowserDialog contains a
ShowDialog
method. You have
already seen this method in the previous examples, and since it is the same it does not need to be
discussed again.
Using the FolderBrowserDialog Control
Before showing the Browse For Folder dialog box, you’ll want to set some basic properties. The three
main properties that you are most likely to set are shown in the following code snippet. The first of
these properties is the
Description
property. This property enables you to provide a description or
instructions for your users.
The next property is
RootFolder
, which specifies the starting folder for the Browse For Folder dia-
log box. This property uses one of the constants from the
Environment.SpecialFolder
enumeration.
Typically, you would use the
MyComputer
constant to specify that browsing should start at the My
The FolderBrowserDialog Control
❘
273
Computer level, or sometimes you may want to use to the
MyDocuments
constant to start browsing at
the My Documents level.
The final property shown in the code snippet is the
ShowNewFolderButton
property. This property has a
default value of
True
, which indicates that the Make New Folder button should be displayed. However,
if you do not want this button displayed, you need to specify this property and set it to a value of
False
:
With FolderBrowserDialog1
.Description = "Select a backup folder"
.RootFolder = Environment.SpecialFolder.MyComputer
.ShowNewFolderButton = False
End With
After you have set the necessary properties, you execute the
ShowDialog
method to display the
dialog box:
FolderBrowserDialog1.ShowDialog()
The FolderBrowserDialog control will return a
DialogResult
of
OK
or
Cancel
. Hence, you can use the
previous statement in an
If
.
End If
statement and test for a
DialogResult
of
OK
, as you have done in
the previous examples that you have coded.
To retrieve the folder that the user has chosen, you simply retrieve the value set in the
SelectedPath
property and assign it to a variable. The folder that is returned is a fully qualified path name. For
example, if you chose a folder named
Temp
at the root of your C drive, the path returned would be
C:\Temp
:
strFolder = FolderBrowserDialog1.SelectedPath
TRY IT OUT Working with the FolderBrowserDialog Control
Code file Windows Forms Dialogs.zip available for download at Wrox.com
In this Try It Out, you continue using the same Windows Forms Dialogs project and have the Folder-
BrowserDialog control display the Browse For Folder dialog box. Then, if the dialog box returns a
DialogResult
of
OK
, you’ll display the selected folder in the text box on your form.
1. Return to the Forms Designer in the Windows Forms Dialog project.
2. Add another Button control from the Toolbox to the form beneath the Print button and set its
properties as follows:
➤ Set
Name
to btnBrowse.
➤ Set
Anchor
to Top, Right.
➤ Set
Location
to 349, 163.
➤ Set
Text
to Browse.
3. Add a FolderBrowserDialog control to your project from the Toolbox. It will be added to the
workspace below the form. Accept all default properties for this control, because you’ll set the
necessary properties in your code.
274
❘
CHAPTER 8 DISPLAYING DIALOG BOXES
4. Double-click the Browse button to bring up its
Click
event handler, and add the following bolded
code:
Private Sub btnBrowse_Click(ByVal sender As System.Object, _
ByVal e As System.EventArgs) Handles btnBrowse.Click
‘Set the FolderBrowser dialog properties
With FolderBrowserDialog1
.Description = "Select a backup folder"
.RootFolder = Environment.SpecialFolder.MyComputer
.ShowNewFolderButton = False
End With
‘Show the FolderBrowser dialog and if the user clicks the
‘OK button, display the selected folder
If FolderBrowserDialog1.ShowDialog = Windows.Forms.DialogResult.OK Then
txtFile.Text = FolderBrowserDialog1.SelectedPath
End If
End Sub
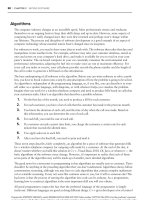
FIGURE 8-16
figure
5. That’s all the code you need to add. To test your changes to
your project, click the Start button on the toolbar.
6. When your form displays, click the Browse button, and
you’ll see a Browse For Folder dialog similar to the one
shown in Figure 8-16.
7. Now browse your computer and select a folder. When you
click the OK button, the selected folder will be displayed in
the text box on your form. Notice that the folder returned
contains a fully qualified path name.
How It Works
Before displaying the Browse For Folder dialog box, you needed to set some basic properties
of the FolderBrowserDialog control to customize the look for this dialog box. You start by setting
the
Description
property to provide some basic instructions for the user. Then you select the root
folder at which the Browse For Folder dialog box should start browsing. In this instance, you use
the
MyComputer
constant, which displayed all drives on your computer (refer to Figure 8-16). Finally,
you set the
ShowNewFolderButton
property to
False
in order to not display the Make New Folder
button:
‘Set the FolderBrowser dialog properties
With FolderBrowserDialog1
.Description = "Select a backup folder"
.RootFolder = Environment.SpecialFolder.MyComputer
.ShowNewFolderButton = False
End With
You display the dialog box in an
If
End If
statement to check the
DialogResult
returned by the
ShowDialog
method of the FolderBrowserDialog control. Within the
If
End If
statement, you add
the code necessary to display the folder selected in the text box on your form, using the
SelectedPath
property:
‘Show the FolderBrowser dialog and if the user clicks the
‘OK button, display the selected folder
Summary
❘
275
If FolderBrowserDialog1.ShowDialog = Windows.Forms.DialogResult.OK Then
txtFile.Text = FolderBrowserDialog1.SelectedPath
End If
SUMMARY
This chapter has taken a look at some of the dialog boxes that are provided in Visual Basic 2010.
You examined the MessageBox dialog box, and the OpenFileDialog, SaveFileDialog, FontDialog,
ColorDialog, PrintDialog, and FolderBrowserDialog controls. Each of these dialog boxes help you
provide a common interface in your applications for their respective functions. They also hide a lot of
the complexities required to perform their tasks, enabling you to concentrate on the logic needed to
make your application functional and feature-rich.
Although you used the controls from the Toolbox for all of these dialog boxes, except the Message-
Box dialog box, remember that these controls can also be used as normal classes. This means that the
classes that these dialog boxes expose the same properties and methods that you’ve seen, whether you
are selecting a control visually or writing code using the class. You can define your own objects and set
them to these classes, and then use the objects to perform the tasks that you performed using the con-
trols. This provides better control over the scope of the objects. For example, you could define an object,
set it to the
OpenDialog
class, use it, and then destroy it all in the same method. This uses resources only
in the method that defines and uses the
OpenDialog
class, and reduces the size of your executable.
To summarize, you should now know how to:
➤ Use the MessageBox dialog box to display messages
➤ Display icons and buttons in the MessageBox dialog box
➤ Use the OpenFileDialog control and read the contents of a file
➤ Use the SaveFileDialog control and save the contents of a text box to a file
➤ Use the FontDialog control to set the font and color of text in a text box
➤ Use the ColorDialog control to set the background color of your form
➤ Use the PrintDialog control to print text
➤ Use the FolderBrowserDialog control to get a selected folder
EXERCISES
1. To display a dialog box to the user, what method do you use?
2. What method do you call to display a message box?
3. Name the five different ways to display an icon to the user on a message box.
4. How do you determine which button was pressed on a message box?
5. If you need to write basic code, where should you look for a simple example inside of Visual
Studio?
276
❘
CHAPTER 8 DISPLAYING DIALOG BOXES
WHAT YOU HAVE LEARNED IN THIS CHAPTER
TOPIC CONCEPTS
MessageBox Howtodisplayanddeterminethebuttonclickedonamessagebox
OpenFileDialog How to use the OpenFileDialog control to find a file to open and read the
text contents.
SaveFileDialog How to use the SaveFileDialog control to save text to a file.
FontDialog Displaying the FontDialog and using the selected font to change the font
in a program.
ColorDialog Displaying the ColorDialog and using the selected font to change the
color in a program.
PrintDialog What classes to use and how to use them to print text.
FolderBrowserDialog How to setup the control to be shown and determine which folder was
selected.
9
Creating Menus
WHAT YOU WILL LEARN IN THIS CHAPTER:
➤ How to create menus
➤ How to create submenus
➤ How to create context menus
Menus are a part of every good application and provide not only an easy way to navigate within
an application but also useful tools for working with that application. Take, for example, Visual
Studio 2010. It provides menus for navigating the various windows that it displays and useful
tools for making the job of development easier through menus and context menus (also called
pop-up menus) for cutting, copying, and pasting code. It also provides menu items for searching
through code.
This chapter takes a look at creating menus in your Visual Basic 2010 applications. You explore
how to create and manage menus and submenus and how to create context menus and override
the default context menus. Visual Studio 2010 provides two menu controls in the Toolbox, and
you explore both of these.
UNDERSTANDING MENU FEATURES
The MenuStrip control in Visual Studio 2010 provides several key features. First and foremost,
it provides a quick and easy way to add menus, menu items, and submenu items to your appli-
cation. It also provides a built-in editor that enables you to add, edit, and delete menu items at
the drop of a hat.
The menu items that you create may contain images, access keys, shortcut keys, and check
marks as well as text labels.
278
❘
CHAPTER 9 CREATING MENUS
Images
Nearly everyone is familiar with the images on the menus in applications such as Microsoft Outlook
or Visual Studio 2010. In earlier versions of Visual Basic, developers were unable to create menu items
with images without doing some custom programming or purchasing a third-party control. Visual Basic
has come a long way and now provides an
Image
property for a menu item that makes adding an image
to your menu items a breeze.
Access Keys
An access key (also known as an accelerator key) enables you to navigate the menus using the Alt key
and a letter that is underlined in the menu item. When the access key is pressed, the menu appears on
the screen, and the user can navigate through it using the arrow keys or the mouse.
Shortcut Keys
Shortcut keys enable you to invoke the menu item without displaying the menus at all. Shortcut keys
usually consist of a control key and a letter, such as Ctrl+X to cut text.
Check Marks
Menu
Menu Item
Submenu Item
Check MarkAccess Key
Shortcut Key
FIGURE 9-1
A check mark symbol can be placed next to a menu
item in lieu of an image, typically to indicate that
the menu item is being used. For example, if you
click the View menu in Visual Studio 2010 and then
select the Toolbars menu item, you see a submenu
that has many other submenu items, some of which
have check marks. The submenu items that have
check marks indicate the toolbars that are currently
displayed.
Figure 9-1 shows many of the available features that
you can incorporate into your menus. As you can see,
this sample menu provides all the features that were
just mentioned plus a separator. A separator looks
like a raised ridge and provides a logical separation
between groups of menu items.
Figure 9-1 shows the menu the way it looks when the project is being run. Figure 9-2 shows how the
menu looks in design mode.
FIGURE 9-2