mcts training kit 70 - 652 70-622 Configuring Microsoft Exchange Server 2010 phần 5 pps
Bạn đang xem bản rút gọn của tài liệu. Xem và tải ngay bản đầy đủ của tài liệu tại đây (2.62 MB, 92 trang )
Lesson 2: Setting Up Message Routing Chapter 7 341
Depending on the certicates that already exist in Active Directory, you may need to
conrm this command. Figure 7-26 shows the command output.
FIGURE 7-26 Creating a certificate with a specified subject name
Generating a Certicate Request
You can use the New-ExchangeCerticate EMS cmdlet to generate a certicate request and
output it to the command-line console. You can send the certicate request to a CA within
your organization, a trusted CA outside your organization, or a commercial CA by pasting
the certicate request output into an email message or into the appropriate eld on the CA’s
certicate request web page. You can also save the certicate request to a text le.
The following EMS command generates a certicate request with a subject name c=UK,
o=Blue Sky Airlines, cn=mail.blueskyairlines.co.uk, a subject alternate name blueskyairlines.
co.uk, and an exportable private key:
New-ExchangeCertificate -GenerateRequest -SubjectName "c=UK,o=Blue Sky Airlines,cn=mail
.blueskyairlines.co.uk" -DomainName blueskyairlines.co.uk -PrivateKeyExportable $true
Figure 7-27 shows this certicate request.
FIGURE 7-27 Generating a certificate request
342 Chapter 7 Routing and Transport Rules
As Figure 7-27 demonstrates, the certicate request is lengthy and complex, and it is
advisable to automate storing this request in a request le. You can store the output of the
command to generate a certicate request in a variable and use the Set-Content PowerShell
cmdlet to generate a request le. The following two commands create the same certicate
request as before and then save it in the le CertRequest01.req in the C:\Requests folder:
$Request = New-ExchangeCertificate -GenerateRequest -SubjectName "c=UK,o=Blue
Sky Airlines,cn=mail.blueskyairlines.co.uk" -DomainName blueskyairlines.co.uk
-PrivateKeyExportable $true
Set-Content -Path "C:\Requests\CertRequest01.req" -Value $Request
MORE INFO NEW-EXCHANGECERTIFICATE AND GET-EXCHANGECERTIFICATE
For more information about the New-ExchangeCerticate EMS cmdlet, see http://technet
.microsoft.com/en-us/library/aa998327.aspx. For more information about the
Get-ExchangeCerticate EMS cmdlet, see />bb124950.aspx.
Lesson Summary
n
You can use Exchange costs on IP site links to control the route that email trafc takes
to a remote Active Directory site without affecting other intersite trafc.
n
Send connectors send email trafc to specied destinations. You can control the
characteristics of this trafc by conguring Send Connector parameters.
n
Receive connectors listen for incoming trafc from specied sources on a specic IP
address and TCP port. You can accept or reject email messages depending on how you
congure your Receive connectors.
n
You can use TLS and MTLS to encrypt and authenticate email trafc.
Lesson Review
You can use the following questions to test your knowledge of the information in Lesson 2,
“Setting Up Message Routing.” The questions are also available on the companion CD if you
prefer to review them in electronic form.
NOTE ANSWERS
Answers to these questions and explanations of why each answer choice is correct or
incorrect are located in the “Answers” section at the end of the book.
1. You want to designate the Active Directory site MySite as a hub site for the purposes
of Exchange message routing. What EMS command do you enter?
A. Get-AdSite -Identity MyADSite -HubSiteEnabled $true
B. Get-AdSiteLink -Identity MyADSite -HubSiteEnabled $true
Lesson 2: Setting Up Message Routing Chapter 7 343
C. Set-AdSite -Identity MySite -HubSiteEnabled $true
D. Set-AdSiteLink -Identity MyADSite -HubSiteEnabled $true
2. Email trafc from Active Directory site Site01 destined for Site03 currently passes
through Site02. The Active Directory cost of the route from Site01 to Site03 through
Site02 is 200. An alternative path exists through Site04, but the Active Directory cost
of this route is 300. You want to ensure that email trafc from Site01 to Site03 is routed
through Site04 rather than Site02. You do not want to affect other, non-Exchange
network trafc. You want to implement this change by conguring the IP site link
Site02-Site03. What EMS command do you use?
A. Set-AdSiteLink -Identity Site02-Site03 -ExchangeCost 100
B. Set-AdSiteLink -Identity Site02-Site03 -ExchangeCost 400
C. Set-AdSite -Identity Site03 -ExchangeCost 400
D. Set-AdSite -Identity Site02 -ExchangeCost 400
3. You are creating a Send connector to send email to a domain with which you have
established MTLS authentication. Which usage type would you specify?
A. Custom
B. Internal
C. Internet
D. Partner
4. You want to ensure that the maximum size of any email message sent to the contoso.
com domain and all its subdomains is 5 MB. You have already congured a Send
connector named ContosoSend that sends email to the *.contoso.com address space.
What command recongures this Send connector to enforce this limitation?
A. Set-SendConnector –Identity ContosoSend –MaxMessageSize 5MB
B. Set-SendConnector –Identity ContosoSend –Usage Custom –MaxMessageSize 5MB
C. Set-SendConnector –Identity ContosoSend –AddressSpace contoso.com,mail
.contoso.com –MaxMessageSize 5MB
D. Set-SendConnector –Identity ContosoSend –IsScopedConnector $true
–MaxMessageSize 5MB
5. You want to create a Receive connector named MyRC with the Custom usage type.
The connector listens for incoming SMTP connections on the IP address 10.10.123.123
and port 25. It accepts incoming SMTP connections only from the IP range 10.10.8.1
through 10.10.8.127. You want to set the authentication mechanism of the Receive
connector to be Integrated Windows authentication. What command do you use to
create this connector?
A. Set-ReceiveConnector -Name MyRC -Usage Custom -Bindings 10.10.123.123:25
-RemoteIPRanges 10.10.8.1-10.10.8.127 –AuthMechanism Integrated
B. Set-ReceiveConnector -Name MyRC -Usage Custom -Bindings 10.10.8.1-10.10.8.127
–RemoteIPRanges 10.10.123.123:25 AuthMechanism Integrated
344 Chapter 7 Routing and Transport Rules
C. New-ReceiveConnector -Name MyRC -Usage Custom -Bindings 10.10.123.123:25
-RemoteIPRanges 10.10.8.1-10.10.8.127 –AuthMechanism Integrated
D. New-ReceiveConnector -Name MyRC -Usage Custom -Bindings 10.10.8.1-
10.10.8.127 –RemoteIPRanges 10.10.123.123:25 AuthMechanism Integrated
PR AC T I C E Conguring a Disclaimer
In this practice session, you will use both the EMC and the EMS to add a disclaimer message
to email messages sent by all users in your organization.
EX E RC IS E 1 Using the EMC to Congure a Disclaimer
In this exercise, you will use the EMC to add a disclaimer to all messages sent by all users
in your Exchange organization. The disclaimer is appended to both internal and external
messages. If, for any reason, the disclaimer cannot be added to a message, this is ignored,
and the message is sent without the disclaimer. Carry out the following procedure:
1. Log on to the Hub Transport server VAN-EX1 with the Kim Akers account and start
the EMC.
2. Expand Organization Conguration in the Console pane and click Hub Transport.
3. Click New Transport Rule on the Actions pane. This starts the New Transport Rule Wizard.
4. On the Introduction page shown in Figure 7-28, type the name Disclaimer01 and the
comment “This adds a disclaimer.” Ensure that the Enable Rule check box is selected.
Click Next.
FIGURE 7-28 The Introduction page
Lesson 2: Setting Up Message Routing Chapter 7 345
5. Because you want the disclaimer to be appended to all email messages from all your
users, you should not make any changes on the Conditions page. Click Next. Click Yes
to clear the Warning dialog box.
6. On the Actions page in the Step 1. Select Actions eld, select the Append Disclaimer
Text And Fallback To Action If Unable To Apply check box.
7. In the Step 2. Edit The Rule Description By Clicking An Underlined Value eld, click
Disclaimer Text.
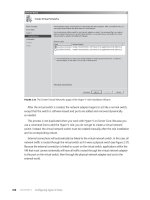
8. In the Specify Disclaimer Text dialog box, type the disclaimer text message “All email
sent by the Adatum Corporation has been checked by the latest antivirus
software.” Figure 7-29 shows this dialog box. Click OK.
FIGURE 7-29 Specifying the text for the disclaimer
9. In the Step 2. Edit The Rule Description By Clicking An Underlined Value eld,
click Wrap.
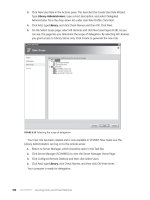
10. In the Select Fallback Action dialog box, shown in Figure 7-30, click Ignore. Click OK.
FIGURE 7-30 Specifying the fallback action
11. The Actions page should now look similar to Figure 7-31. Click Next.
12. You want to append the disclaimer to all email messages from all your users. Therefore,
you should not make any changes on the Exceptions page. Click Next.
13. Review the Conguration Summary on the Create Rule page shown in Figure 7-32.
If you are satised with the conguration of the new rule, click New.
14. On the Completion page, click Finish.
15. Optionally, use OWA to send email internally (for example, from Kim Akers to Don
Hall). Check that the disclaimer message is added to all emails.
346 Chapter 7 Routing and Transport Rules
FIGURE 7-31 Actions configured on the Actions page
FIGURE 7-32 The Create Rule page
Lesson 2: Setting Up Message Routing Chapter 7 347
EX E RC IS E 2 Using the EMS to Congure a Disclaimer
In this exercise, you will rst delete the transport rule that you created in the previous exercise
because it might affect the results of this exercise. You will then use the EMS to create a
transport rule that applies the disclaimer “The Adatum Corporation is committed to quality
and all of our products bear the appropriate kite mark.” to all messages sent outside the
Adatum organization. The transport rule sets the fallback action to Reject. Carry out the
following procedure:
1. If necessary, log on to the Hub Transport server VAN-EX1 with the Kim Akers account
and start the EMS.
2. Enter the following command:
Remove-TransportRule Disclaimer01
3. When prompted, enter Y to conrm this action.
4. Enter the following command:
New-TransportRule -Name Disclaimer02 -Enabled $true -SentToScope
'NotInOrganization' -ApplyHtmlDisclaimerText "The Adatum Corporation is
committed to quality and all of our products bear the appropriate kite mark."
-ApplyHtmlDisclaimerFallbackAction Reject
Figure 7-33 shows these commands.
FIGURE 7-33 Using the EMS to configure a disclaimer
PR AC T I C E Creating Send and Receive Connectors
In this practice session, you will use the EMC to create a Send connector and the EMS to
create a Receive connector on the Hub Transport server VAN-EX1.
EX E RC IS E 1 Using the EMC to Create a Send Connector
In this exercise, you will create a Send connector with the Custom usage type that sends email
internally within the Adatum Exchange organization. Carry out the following procedure:
1. Log on to the Hub Transport server VAN-EX1 with the Kim Akers account and start
the EMC.
2. Expand Organization Conguration in the Console pane and click Hub Transport.
348 Chapter 7 Routing and Transport Rules
3. On the Actions pane, click New Send Connector. This starts the New SMTP Send
Connector Wizard.
4. In the Name box, enter AdatumSendConnector. Ensure that the Intended Use For
This Send Connector drop-down box is set to Custom and click Next.
5. On the Address Space page, click Add. In the SMTP Address Space dialog box, enter
Adatum.com in the Address box and select the Include All Subdomains check box.
Ensure the Type is SMTP and Cost is 1. Figure 7-34 shows this dialog box. Click OK.
FIGURE 7-34 The SMTP Address Space dialog box
6. The Address Space page should look similar to Figure 7-35. Click Next.
FIGURE 7-35 The configured Address Space page
7. On the Network Settings page, select the Use DomainName System (DNS) ”MX”
Records To Route Mail Automatically option. Click Next.
8. On the Source Server page, ensure that the server VAN-EX1 is selected and click Next.
Lesson 2: Setting Up Message Routing Chapter 7 349
9. Check the settings on the New Connector page. They should be similar to Figure 7-36.
Click New.
FIGURE 7-36 Settings for the new connector
10. On the Completion page, click Finish.
EX E RC IS E 2 Using the EMS to Create a Receive Connector
In this exercise, you will use the EMS to create a Receive connector named AdatumReceiveConnector
with the Custom usage type. This connector receives internal email from within the Adatum
Exchange organization. The Receive connector listens on IP Address 10.10.0.10 and on TCP port 24,
which is the TCP port used for private mail. It accepts email messages from any source within the
address range 10.10.10.1 through 10.10.10.255. It uses Integrated Windows Authentication as its
authentication mechanism. Carry out the following procedure:
1. If necessary, log on to the Hub Transport server VAN-EX1 with the Kim Akers account
and start the EMS.
2. Enter the following command:
New-ReceiveConnector -Name AdatumReceiveConnector -Usage Custom -Bindings
10.10.10.10:24 -RemoteIPRanges 10.10.10.0/24 –AuthMechanism Integrated
Figure 7-37 shows the output of this command.
FIGURE 7-37 Creating the AdatumReceiveConnector Receive connector
350 Chapter 7 Routing and Transport Rules
Chapter Review
To further practice and reinforce the skills you learned in this chapter, you can perform the
following tasks:
n
Review the chapter summary.
n
Review the list of key terms introduced in this chapter.
n
Complete the case scenarios. These scenarios set up real-world situations involving
the topics of this chapter and ask you to create a solution.
n
Complete the suggested practices.
n
Take a practice test.
Chapter Summary
n
Transport rules and transport protection rules enable you to apply messaging
policies that both control and protect email messages. Moderated transport permits
a nominated person or group to check and approve messages sent to users and
distribution groups.
n
Exchange costs on IP site links can be used to route intersite email trafc. Send
connectors send email trafc both within your organization and to other organizations.
Receive connectors enable your Transport servers to receive trafc from specied
sources over specied TCP ports.
n
You can congure parameters on Send and Receive connectors to control the trafc
your users send and receive. TLS and MTLS can encrypt and authenticate sensitive
trafc.
Key Terms
Do you know what these key terms mean?
n
Edge rules agent
n
Information Rights Management (IRM)
n
Messaging policy
n
Moderated email
n
Mutual Transport Layer Security (MTLS)
n
Outlook protection rule
n
Receive connectors
n
Regular expression
n
Rights Management Services (RMS)
n
RMS prelicensing agent
n
Send connectors
Chapter Review Chapter 7 351
n
Simple expressions
n
Transport Layer Security (TLS)
n
Transport protection rule
n
Transport rule
n
Transport rule agent
Case Scenarios
In the following case scenarios, you will apply what you’ve learned about subjects of this
chapter. You can nd answers to these questions in the “Answers ” section at the end
of this book.
Case Scenario 1: Conguring Moderation
Kim Akers is the Exchange administrator at Margie’s Travel. Kim wants to moderate all email
sent to members of the Sales distribution group and to specify herself as the moderator. She
wants to notify internal senders if their message to the distribution group is rejected but
does not want to send any notications to senders external to the organization. Answer the
following questions:
1. What EMS command does Kim use to moderate the Sales distribution group and
specify herself as the moderator?
2. Don Hall is a member of the Sales distribution group, but Kim does not need to
moderate email sent to Don. What EMS command specically exempts Don’s email
from being moderated because of his Sales group membership?
3. Several distribution groups within the Sales distribution group, for example, OnlineSales
and InsuranceSales, are already moderated. Kim does not want members of these
groups to be moderated twice. What EMS command does she use to prevent this?
Case Scenario 2: Setting Up MTLS-Protected Email
Communication with a Partner Organization
You are the senior Exchange administrator at the Adatum Corporation. You are implementing
secure, encrypted email communications with Adatum’s partner organization Trey Research,
and you want to use MTLS for this purpose. Answer the following questions:
1. You need to obtain a TLS certicate with exportable private key and a subject name
dened by Country/Region = US, Organization = Adatum Corporation, and Common
Name = mail.adatum.com. To do this, you need to generate a certicate request. You
want to save this request in the le TreyProjectRequest.req in the C:\Requests folder
on the server on which you generate the request. You intend to post information
from this le into the website of the commercial CA from which you intend to obtain
the certicate. What EMS commands do you use to generate and store this certicate
request?
352 Chapter 7 Routing and Transport Rules
2. You intend to create a Receive and a Send connector on an Edge Transport server
specically for this encrypted trafc. What usage type of Send and Receive connector
should you specify?
3. You want to create a Send connector named TreySendConnector that sends email to
the domain treyresearch.com and all its subdomains. You do not need to specify cost,
maximum message size, or any other optional parameters. What EMS command do
you use?
4. You want to create a Receive connector named TreyReceiveConnector on an
Edge Transport server with the IP address 192.168.20.6. The connector listens on TCP
port 25. The IP addresses of the Trey Research Edge Transport servers that will send
trafc to Adatum are 10.100.10.15 and 10.100.10.16. You want to specify that the
maximum size of messages received on this connector is 15 MB. What EMS command
do you use?
Suggested Practices
To help you master the examination objectives presented in this chapter, complete the
following tasks.
Investigate the Transport Rule Cmdlets
n
Practice 1 The New-TransportRule and Set-TransportRule EMS cmdlets are very
powerful and support a large number of parameters. Practice using these cmdlets and
their parameters. Investigate the messaging policies you can congure and how these
affect internal email trafc.
n
Practice 2 Investigate the use of the Get-TransportRule EMS cmdlet. In particular,
look at how the output of commands that use this cmdlet can be piped into other
commands.
n
Practice 3 Optionally, if you are using virtual machines, congure a second Exchange
organization in a separate forest and investigate the messaging policies you can
congure for external email trafc. This practice requires a great deal of conguration
and is therefore optional.
Investigate IRM and AD RMS
n
Practice 1 Install the AD RMS role on your domain controller (VAN-DC1) and
investigate the additional RMS templates that this lets you use when conguring IRM
protection.
n
Practice 2 Optionally, if you have created a second Exchange organization, as
suggested in Practice 1, investigate the use of transport protection rules to
IRM-protect external trafc.
Take a Practice Test Chapter 7 353
Investigate the Send and Receive Connector Cmdlets
n
Practice 1 The New-SendConnector, Set-SendConnector, New-ReceiveConnector,
and Set-ReceiveConnector EMS cmdlets are very powerful. Practice using them and
their parameters.
n
Practice 2 If you have a second Exchange server congured on your test network
(VAN-EX2), install the Edge Transport role on that server (if not already installed) and
investigate conguring Send and Receive connectors on Edge and Hub Transport
servers and how these affect internal email trafc between these servers.
n
Practice 3 Optionally, if you are using virtual machines, congure a second Exchange
organization in a separate forest and congure Send and Receive connectors to send
email trafc between the two organizations. This practice requires a great deal of
conguration and is therefore optional.
Investigate TLS and MTLS
n
Practice 1 Obtain a TLS certicate from your internal CA (if this server role is not
already installed in VAN-DC1, install it). Use this certicate to encrypt internal trafc.
n
Practice 2 Optionally, if you have congured a second Exchange organization, set up
MTLS to authenticate and encrypt email trafc between the two organizations.
Take a Practice Test
The practice tests on this book’s companion CD offer many options. For example, you can test
yourself on just one exam objective, or you can test yourself on all the 70-662 certication
exam content. You can set up the test so that it closely simulates the experience of taking
a certication exam, or you can set it up in study mode so that you can look at the correct
answers and explanations after you answer each question.
MORE INFO PRACTICE TESTS
For details about all the practice test options available, see the “How to Use the Practice
Tests” section in this book’s Introduction.
Chapter 8 355
C H A P T E R 8
Conguring Transport Servers
T
ransport servers are responsible for routing messages in an Exchange 2010 organization.
There are two different types of transport server. Hub Transport servers route messages
within the organization, moving messages from site to site and delivering messages to
mailboxes. Edge Transport servers route messages sent to and received from outside the
organization, such as those sent to and from hosts on the Internet. By reading this chapter,
you will learn about the following transport server concepts: accepted domains, remote
domains, email address policies, the transport dumpster, the EdgeSync process, and address
rewrite policies.
Exam objectives in this chapter:
n
Congure hub transport.
n
Congure Edge transport.
Lessons in this chapter:
n
Lesson 1: Hub Transport Servers 357
n
Lesson 2: Edge Transport Servers 368
Before You Begin
In order to complete the exercises in the practice sessions in this chapter, you need to have
done the following:
n
Installed servers VAN-DC, VAN-EX1, and VAN-EX2 as described in the Appendix.
n
Prepare an additional server running Windows Server 2008 R2 Enterprise edition
using the default conguration. Ensure that you congure this server with two
separate network adapters. Do not join this computer to a domain. Set the
Administrator account password to Pa$$w0rd.
Conguring Transport Servers
Before You Begin
Lesson 1: Hub Transport Servers
Hub Transport Servers
Accepted Domains
Remote Domains
Email Address Policies
Transport Settings and Transport Dumpster
Lesson Summary
Lesson Review
Lesson 2: Edge Transport Servers
Edge Transport Role
EdgeSync
Clone Edge Transport Server
Address Rewriting
Lesson Summary
Lesson Review
Chapter Review
Chapter Summary
Key Terms
Case Scenarios
Suggested Practices
Further Conguration of Hub Transport Servers
Further Conguration of Edge Transport Servers
Take a Practice Test
356 Chapter 8 Conguring Transport Servers
REAL WORLD
Orin Thomas
O
ne thing that is important to remember is that when you are conguring
an Edge Transport server, ensure that you work out how you are going to
remotely manage that Edge Transport server before you deploy it. A friend of
mine was doing some work for a company based out of Alice Springs in Australia’s
Northern Territory. One team was responsible for managing the rewall, and his
team was in the process of upgrading to Exchange. When the rewall team asked
what network ports he needed open between the protected network and the
perimeter network, he replied with the standard answer involving the ports used
for Simple Mail Transfer Protocol (SMTP) and the EdgeSync process. What he forgot
was also ensuring that a port was open allowing him to RDP to the server from the
protected network so that he could actually set the EdgeSync process up. By the
time he had gured out his error, it was approaching 2:00 PM, and he couldn’t get
in contact with anyone on the rewall team. To resolve the problem, he had to drive
across to the hosting facility, which was located on the other side of Alice Springs,
and log onto the server manually to start the EdgeSync process. Now 2:00 PM is
about the hottest part of the day. and it just happened to be late January, which
is the middle of the Aussie summer. (Did I mention that Alice Springs has some
of the highest daytime temperatures in the Australian Outback?) What should
have been a quick 20-minute drive turned into a four-hour adventure after his car
broke down in the extreme heat. My friend ended up being rehydrated in an Alice
Springs hospital—all because he didn’t remember that he had to have a port open
to perform remote management tasks on a computer on the perimeter network.
So when you see an exam question asking you what ports to open between the
perimeter network, be sure to pick the answer that doesn’t leave you driving across
an Australian Outback town in the middle of a scorching summer day to undo your
mistake.
Lesson 1: Hub Transport Servers Chapter 8 357
Lesson 1: Hub Transport Servers
The core function of a Hub Transport server is to route an Exchange organization’s internal
messages. In addition to this primary task, Hub Transport servers apply transport rules,
enforce journaling policies, and deliver messages to user’s mailboxes. In this lesson, you will
learn how to congure and organize accepted and remote domains, congure appropriate
email address policies, and modify transport dumpster settings.
After this lesson, you will be able to:
n
Organize accepted domains.
n
Manage remote domains.
n
Congure email address policies.
n
Modify transport dumpster settings.
Estimated lesson time: 30 minutes
Hub Transport Servers
Hub Transport servers process all messages that transit an Exchange Server 2010
organization. Hub Transport servers deliver internal or externally sourced messages to user
mailboxes and forward messages bound for hosts on the Internet to Edge Transport servers.
A component on the Hub Transport server, called the categorizer, determines what to do
with each message based on recipient information in the message header. The categorizer
expands distribution lists, identies alternative recipients, and processes recipient forwarding
addresses. The categorizer also applies policies, routes messages, and converts content. Hub
Transport servers receive messages through the SMTP protocol from other transport servers
or by picking them up from a sender’s Outbox using the store driver. Hub Transport servers
use send and receive connectors to transmit messages to other locations. You learned about
how send and receive connectors work in Chapter 7, “Routing and Transport Rules.”
If your organization does not use an Edge Transport server, you can congure the Hub
Transport server to relay messages directly to hosts on the Internet, such as a third-party
smart host. It is also possible to enable the Edge Transport server anti-spam agents on the
Hub Transport server role as well as congure a Hub Transport server to scan messages
for malicious content by deploying antivirus protection. You will learn about antivirus and
anti-spam functionality in Chapter 12, “Message Integrity, Antivirus, and Anti-Spam.”
You must deploy a Hub Transport server in each Active Directory site that hosts an
Exchange server with the Mailbox server role. You can install the Hub Transport role on
servers that already host the Client Access and Mailbox server roles. You can deploy more
than one Hub Transport server in each site to provide redundancy without having to
congure Domain Name System (DNS) round-robin or network load balancing. You will
learn more about high availability in Chapter 13, “Exchange High-Availability Solutions.”
358 Chapter 8 Conguring Transport Servers
MORE INFO HUB TRANSPORT SERVERS
For a more detailed overview of Hub Transport servers, consult the following link on
TechNet:
Accepted Domains
An Exchange organization can accept messages for a particular email domain only if that
mail domain is set up as an accepted domain. Accepted domains are also domains for which
Exchange is able to send email. For example, if your organization needs to send and accept
email for the Contoso.com and Fabrikam.com domains, you need to congure both of these
domains as accepted domains. By default, the domain name associated with the forest in
which you install Exchange is the default accepted domain for your Exchange organization.
You can congure an email address policy, which you will learn about later in this chapter,
only for domains that are on the list of accepted domains.
When you congure an accepted domain, you need to specify whether the accepted
domain will be authoritative, an internal relay domain, or an external relay domain. Figure 8-1,
the rst page of the New Accepted Domain Wizard, displays this choice. The differences
between each of these types of accepted domain is as follows:
FIGURE 8-1 Choose between authoritative, internal, and external relay
Lesson 1: Hub Transport Servers Chapter 8 359
n
Authoritative Domains Accepted domains for which the Exchange organization
accepts and stores email messages from external locations. For example, at Contoso,
Contoso.com is an authoritative domain, as Contoso.com transport servers deliver
messages addressed to Contoso.com recipients to mailboxes hosted on Contoso
.com mailbox servers. The default authoritative domain for an organization is the fully
qualied domain name of the forest root domain.
n
Internal Relay Domains Accepted domains for which the Exchange organization will
accept email messages from an external location but forwards them to another mail
system located on the internal network. For example, a subsidiary company of Contoso
is running a third-party mail system on the internal network. The domain related to
this mail system is congured as an accepted domain, but Hub Transport servers route
messages directed to recipients at this domain to those internal mail servers rather
than delivering the messages to Exchange mailbox servers. You can also use internal
relay domains when an organization has more than one Active Directory forest or when
recipients in a single email domain are spread between Exchange and a third-party
email system. To function properly, internal relay domains require that you congure
a send connector to that domain on your organization’s Hub Transport servers.
n
External Relay Domains An accepted domain for which the Exchange organization
will accept email messages from external locations but does not process them locally
and forwards these incoming messages to an external mail server. For example,
Contoso.com transport servers might accept messages to recipients with email
addresses associated with the domain proseware.com domain, but these transport
servers automatically route these messages to a mail server that exists outside the
organization’s internal or perimeter network. To function properly, external relay
domains require that you congure a send connector to the external domain on your
organization’s Edge Transport servers.
You can create a new accepted domain by clicking on New Accepted Domain in the
Actions pane when the Organization Conguration\Hub Transport node is selected in
Exchange Management Console (EMC). Creating an accepted domain involves specifying the
domain name and a label for the name, choosing between the domain being an authoritative,
internal, or external relay domain.
You can use one of the following Exchange Management Shell (EMS) cmdlets to
manipulate accepted domains:
n
New-AcceptedDomain This cmdlet is used to create new accepted domains.
Use the DomainType parameter to specify whether the domain will function as
an authoritative, external relay, or internal relay domain.
n
Get-AcceptedDomain This cmdlet can be used to list the properties of existing
accepted domains.
n
Set-AcceptedDomain This cmdlet allows you to modify the properties of
an existing accepted domain.
n
Remove-AcceptedDomain This cmdlet allows you to remove an existing
accepted domain.
360 Chapter 8 Conguring Transport Servers
MORE INFO ACCEPTED DOMAINS
For more information on understanding accepted domains, consult the following link on
TechNet: />Remote Domains
Remote domains allow you to control the types of messages and message formats sent
from users in your organization to a specic external domain. When you install Exchange,
a default remote domain is created that has the label represented by an asterisk (*). This
default remote domain is responsible for the settings applied to all outgoing messages
except those congured for specic remote domains. You can edit the properties of a
remote domain or create new remote domains through the Organization Conguration\Hub
Transport node in the EMC.
You create a new remote domain by clicking on New Remote Domain when the Organization
Management\Hub Transport server node is selected from within the EMC and then clicking on
New Remote Domain in the Actions pane. When you create a new remote domain, you need
to provide a label and the domain name and specify whether all subdomains of that domain
will be included. You congure items such as MIME character sets and out-of-ofce message
settings after you create the remote domain by editing the properties of the remote domain.
By conguring a remote domain, you can congure whether specic external domains
receive out-of-ofce messages from recipients in your organization, as shown in Figure 8-2.
For example, you may have congured the default remote domain so that no out-of-ofce
messages are sent to external recipients but decide to congure a special remote domain for
a partner so that he or she receives out-of-ofce notications.
FIGURE 8-2 Remote domain out-of-office settings
Lesson 1: Hub Transport Servers Chapter 8 361
Remote domain message format options allow you to congure whether automatic
replies, automatic forward, delivery reports, and the sender’s name are forwarded to a
remote domain. It also allows you to specify whether Exchange rich text format is used and
which MIME and non-MIME character set is used. Figure 8-3 shows the cohovineyard.com
remote domain congured to use the Cyrillic (ISO) character set. You would congure a
specic remote domain message format when the default is appropriate. For example, there
are four separate Cyrillic MIME character sets, and when messages are sent using the wrong
character set, messages are not formatted correctly for their intended recipient. In general,
you will need to discuss which character set is appropriate for a specic remote domain with
a representative of the recipients in that domain.
FIGURE 8-3 Remote domain message format
Four EMS cmdlets allow you to congure and manage remote domains:
n
New-RemoteDomain Create a new remote domain entry
n
Set-RemoteDomain Modify an existing remote domain entry
n
Get-RemoteDomain View the properties of an existing remote domain
n
Remove-RemoteDomain Remove an existing remote domain entry
MORE INFO REMOTE DOMAINS
For more information on understanding remote domains, consult the following link
on TechNet:
362 Chapter 8 Conguring Transport Servers
Quick Check
n
What kind of accepted domain would you congure if some of your organization’s
recipients have Exchange mailboxes and others are hosted on a third-party
messaging system?
Quick Check Answer
n
You would congure an internal relay domain.
Email Address Policies
Email address policies generate the primary and secondary email addresses for recipients in
an Exchange organization based on a combination of rst name, last name, middle initial,
and accepted domain. The default email address policy for an organization involves the user’s
alias, the “at” sign (@), and the default accepted domain, which is the forest root domain’s
fully qualied domain name.
To create an email address policy, perform the following general steps:
1. Navigate to the Organization\Hub Transport node in the EMC and click on New E-Mail
Address Policy in the Actions pane.
2. Enter a name for the policy and specify which recipient types to which the policy
applies. As Figure 8-4 shows, policies can apply to all recipient types or a selection of
mailboxes, external email addresses, resource mailboxes, contacts, and mail-enabled
groups. On this screen, you can also select the recipient container, such as a specic
organizational unit, to which the policy will apply.
FIGURE 8-4 New address policy
Lesson 1: Hub Transport Servers Chapter 8 363
3. Specify the conditions under which the policy applies. This could mean that the user’s
state or province, department, or company attribute matches a certain value.
4. Specify the format of the email address and the accepted domain to which the email
address applies. You can add multiple email address formats at this point and set the
default reply to address of addresses, as shown in Figure 8-5.
FIGURE 8-5 Policy with multiple addresses
5. Specify whether the policy will apply immediately or at a specic time in the future
or whether the policy does not apply.
Each recipient can have multiple email addresses applied either through a single policy or
through the application of multiple policies. The reply-to address set in the policy with the
highest priority becomes the user’s default reply-to address. You can manually congure the
default reply address for a single user by selecting an address on the E-Mail Addresses tab
of a recipient’s properties, disabling the Automatically Update E-Mail Addressed Based On
E-Mail Address Policy, and then clicking Set-As-Reply, as shown in Figure 8-6.
To congure email address policy priority, use the Set-EmailAddressPolicy cmdlet with
the Priority parameter. The policy that has priority 1 overrides other policies. When you set
a policy to priority 1, all other policies increment their priority so that no conicts occur. For
example, the existing policy that was priority 1 becomes priority 2 and so on. You can also
select a policy in the Organization\Hub Transport node of the EMC and then click on Change
Priority.
364 Chapter 8 Conguring Transport Servers
FIGURE 8-6 Set reply-to address
You can use the following EMS cmdlets to manage email address policies:
n
New-EmailAddressPolicy This cmdlet allows you to create a new policy.
n
Get-EmailAddressPolicy This cmdlet allows you to view the properties of an existing
policy or list existing policies and their priorities.
n
Set-EmailAddressPolicy This cmdlet allows you to modify the properties of
an existing policy, including setting the policy priority.
n
Update-EmailAddressPolicy This cmdlet updates the email address policy to apply
any changes made by the Set-EmailAdressPolicy cmdlet to all recipients within the
scope of the policy.
n
Remove-EmailAddressPolicy This cmdlet removes an existing policy but does not
remove email addresses that have been applied to users through that policy.
MORE INFO EMAIL ADDRESS POLICIES
For more information on understanding email address policies, consult the following link
on TechNet: />Transport Settings and Transport Dumpster
Transport settings properties allow you to congure the maximum receive size, send size,
and maximum number of recipients that transport servers will allow for messages that they
route in your Exchange organization.
Lesson 1: Hub Transport Servers Chapter 8 365
By editing the properties of transport settings, you can also congure the properties of
the transport dumpster. The transport dumpster holds copies of messages that are replicating
to other mailbox databases in a database availability group. In the event that a mailbox
database fails before replication has occurred, messages will be kept safely in the transport
dumpster up until the specied limits. You will learn more about database availability groups
in Chapter 13, “Exchange High-Availability Solutions.”
You can access transport settings properties by selecting the Organization Conguration\
Hub Transport node and clicking on the Global Settings tab, selecting Transport Settings, and
clicking on Properties in the actions pane. Figure 8-7 shows this properties dialog box.
FIGURE 8-7 Dumpster settings
You can congure transport settings at the organizational level by using the
Set-TransportCong cmdlet. Use the Set-TransportCong cmdlet with the MaxReceiveSize,
MaxRecipientEnvelopeLimit, and MaxSendSize parameters to congure maximum receive
size, send size, and number of recipients for the organization. Use the Set-TransportCong
cmdlet with the MaxDumpsterSizePerDatabase and MaxDumpsterTime parameters to
congure transport dumpster properties.
MORE INFO TRANSPORT SETTINGS
For more information on understanding the transport settings dumpster, consult the
following link on TechNet: />EXAM TIP
Understand the difference between an accepted domain and a remote domain.