Teaching Today A Practical Guide Fourth Edition - part 4 pot
Bạn đang xem bản rút gọn của tài liệu. Xem và tải ngay bản đầy đủ của tài liệu tại đây (670.39 KB, 63 trang )
The art of explaining
181
References and further reading
Black, P. and Wiliam, D. (1999) ‘Inside the black box’, download from www.pdkintl.
org
Black, P. et al. (2003) Assessment for Learning: Putting into Practice, Maidenhead:
Open University Press.
Brown, G. and Atkins, M. (1988) Effective Teaching in Higher Education, London:
Routledge.
Brown, G. and Hatton, N. (1982) Explanations and Explaining: A Teaching Skills
Workbook, Basingstoke: Macmillan Education.
Kerry, T. (1982) Effective Questioning, London: Macmillan.
Marzano, R. J. et al. (2001) Classroom Instruction that Works: Research-Based Strate-
gies for Increasing Student Achievement, Alexandria, VA: ASCD.
Petty, G. (2006) Evidence Based Teaching, Cheltenham: Nelson Thornes.
2 How would you explain ‘communication’ or ‘irrational’ to a seven-year-old
child?
3 In your own subject, choose a concept or topic that is diffi cult to explain.
4 Look back over this chapter, and use it to prepare two alternative explana-
tions of this topic or concept.
P02a.indd 181 3/3/09 14:27:56
13
The art of showing
182
Demonstrating physical and intellectual
skills
Perhaps the most natural way to learn is by imitation. This, after all, is how children
learn to speak their fi rst language – and the method is almost 100% successful! How
can teachers make use of this method of learning?
If we accept that a demonstration is ‘showing how’ by example, then it is clear that
this method can be employed by a teacher of any subject. As we saw in Chapter 3,
it can be used to teach physical (psychomotor) skills, such as how to fi llet a fi sh or
weld mild steel; but it can also be used for intellectual skills – such as how to use
Pythagoras’ theorem, how to write an appreciation of a poem or how to analyse
critically a theory in sociology. Most demonstrations will of course be followed by
an opportunity for student practice. This chapter considers the demonstration of
physical and intellectual skills separately.
Demonstrating a physical skill or ability
Learning teachers are often terrifi ed of demonstrations; they remember the science
teachers whose experiments never worked and expect a similar humiliation. But
there is nothing to fear if you have practised in advance.
The aim of most demonstrations is to provide students with a concrete example
of good practice to copy or adapt. This provides the ‘doing-detail’ that, as Chapter
3 showed, is so vital for learning physical and intellectual skills: it shows how the
task is carried out, what the task achieves, to what standard it should be carried
out, the indicators that the task has been carried out successfully, and so on.
‘Doing-detail’ can occasionally be provided by an exemplar (i.e. a model of good
practice); for example, a typing teacher can show students a well-laid-out table of
fi gures, and a catering teacher can show a well-presented dish. Examples of bad
practice can also be useful. ‘Here are two business letters; they each have four
layout mistakes in them. See if you can fi nd them!’
Science teachers sometimes demonstrate a phenomenon by experiment. The
intention here may not be to encourage the learner to imitate the teacher; indeed,
that might be dangerous. These demonstrations should be carried out in much
the same way as is described below.
P02a.indd 182 2/3/09 16:43:33
The art of showing
183
Preparation
Make sure the students are ready: have they been introduced to the necessary
background information, and do they know what the demonstration achieves?
If the demonstration is likely to be long and involved, can it be broken down into
parts to be learned separately?
It is nearly always necessary to move students for a demonstration, but even then,
will the whole class be able to see? If not, it would be better to break it down
into smaller groups. Will you let students arrange their own positions, or will
you direct them? Whatever you decide, get them as close as is practicable. Some
teachers who often do demonstrations have a routine position for students around
the demonstration bench – for example, the students from the front row on the
teacher’s right, the second row to the left, and so on. This avoids students jostling
for position. If you are in a science laboratory, decide in advance whether some
students will be allowed to sit on top of the bench immediately in front of the
demonstration bench. If this is allowed, arrange for the front-row students to sit in
front of that bench, rather than in their usual places behind it, to avoid the other
students sitting on their folders, etc.
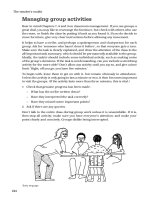
Will there be a mirror-image problem? Students will see your left hand on their
right. This is not normally a diffi culty unless you expect students to copy while you
are demonstrating, as some keep-fi t or dance teachers do. If this is the case, demon-
strate the movements in mirror image so that students see you as they would see
themselves in a mirror – see the illustration overleaf. (Are you left-handed, or are
any of your students left-handed, and if so will this make any difference?)
How will you involve your students? This can be done by asking questions, but a
student can also be asked to copy or adapt your demonstration in front of the rest
of the class, before the general student practice session. In science experiments,
students can be asked to take readings.
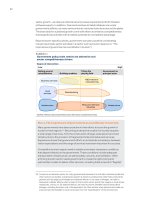
Student placement for a demonstration in a science laboratory
P02a.indd 183 2/3/09 16:43:33
The teacher’s toolkit
184
Always practise a demonstration before doing it in front of the class, and make a
note of all the equipment you need, including any extras you may need to repeat
the demonstration if this is necessary. Can you talk and work at the same time?
Does the demonstration take longer than you expected? If so, you may need to use
the Blue Peter trick: ‘Here’s one I prepared earlier.’
It is important to decide in advance on the key points you want to make during
the demonstration; these can often get lost in the welter of detail. Have a summary
ready for the board or overhead projector. Finally, are you certain that you have
considered all the safety factors carefully?
Execution
Arrange the equipment in advance, well away from any confusing clutter, so that
it is facing the students if at all possible. Once students are aware of what they are
about to see, and why, move them into their new positions. Don’t start until they
are all settled.
Explain as you demonstrate if you can, preferably using questions. ‘What should
I do next?’ ‘Why am I doing it like this?’ ‘What should I be careful of here?’ ‘What
would happen if … ?’ Make sure your students understand the purpose of each
action; they should understand the ‘why’ as well as the ‘how’. Emphasise your key
points carefully.
Do it slowly, and if necessary do it at a more realistic speed later. If there is more
than one method and you wish to demonstrate them all, it is usually better to
show only one at a time. Show the other method(s) in a separate demonstration
The demonstrator as a mirror image
P02a.indd 184 2/3/09 16:43:33
The art of showing
185
if necessary. It is very diffi cult to demonstrate, talk, question and use eye contact
with the group at the same time – but try; if you can do it, this will increase the
impact of the demonstration enormously.
Now you need some feedback. Have they learned what you have taught them? Do
they understand the how, the what and the why of the technique? To discover this,
repeat the demonstration, but ask your students to ‘talk you through one’. Follow
their instructions, asking them questions as they tell you what to do. ‘What for?’ ‘Why
must I do that fi rst?’ and so on. Without this feedback step, there is a grave danger
that any student practice which follows will be badly done, and not understood.
If necessary, repeat the demonstration a number of times, until you are sure that
they understand. If students are about to have a go themselves, ask them to look
out for particular points which will show whether or not they are doing it properly.
These ‘performance indicators’ are important: here’s a woodwork teacher fi nish-
ing off a demonstration on planing wood.
… You should hardly need to push at all; the shavings should be so thin that
you can see light through them; and there should be no score marks left
by the plane.
This is important ‘doing-detail’, because it helps students to check and correct
their own work.
If you make a mistake, laugh it off and, if possible, make a teaching point out of
it. ‘You see how important it is to do it slowly! You will have more time, so I will
expect a better job from you!’ For long or complex demonstrations, consider giving
students a demonstration observation sheet where they record relevant details,
describe the technique, record what they have learned and record what they must
remember when they do it themselves.
Learning by imitation or ‘modelling’ takes place even when you don’t intend it. It is
well known that students take more notice of what teachers do than what they say.
If you tell your students to turn off the power pack before changing their circuit, or
to wash their hands, or to be courteous to patients – then do so yourself. If you want
your students to employ safe practice, to lay out work tidily or to be thorough or
enthusiastic, you must do the same! Think carefully what a teacher in your subject
area needs to model, and make sure you set a good example.
Some techniques you might like to try are:
The silent demonstration. Here the teacher explains that the coming demonstra-
tion will be without explanation, and asks the students to watch carefully, as they
will later be asked exactly what was done, and why. This can often create intense
student concentration, especially if some aspect of the technique is unexpected
or puzzling.
The ‘how not to do it’ demonstration. We can certainly learn from deliberate
mistakes, but be careful that your students do not become confused, or learn the
wrong technique. The students are of course asked to watch out for the mistakes.
If safety is involved, this technique should be avoided. With humour, this method
can be most effective, a good example being the John Cleese videos showing how
P02a.indd 185 2/3/09 16:43:33
The teacher’s toolkit
186
not to behave at an interview. (Those videos show, incidentally, that it is not just
practical skills that we can learn by example.)
The Socratic demonstration. You ask the class to tell you how to do it right from
the start, and follow their instructions, asking questions for clarifi cation as you go.
This approach can be very amusing if their instructions don’t work. Then you can
feign tears and complain it doesn’t work!
The student demonstration. Students can demonstrate too, and not necessar-
ily before you have demonstrated yourself. This technique is fully explained in
Chapter 24.
Checklist for demonstrating a physical skill
Did you ensure that the students could all see? ❏
Did they know what they were seeing and why it was done that way? ❏
Did you involve students by question and answer? ❏
Did you do it slowly enough and a suffi cient number of times? ❏
Did you get feedback to check their understanding? ❏
Did you consider safety? ❏
Did you give performance indicators so students could self-check during ❏
their practice?
Demonstrating an intellectual skill or
ability
If you teach intellectual skills or abilities you can still teach by showing. This
method of teaching is underused and underestimated by many teachers of intel-
lectual skills. There are two main methods of ‘showing how’.
Showing by exemplar
The teacher shows a model of good practice from which students can copy, adapt
or learn technique. You can show your students good essays, intelligent critical
appreciations, well-constructed computer programs, good assignments, worked
solutions, effective designs, etc. The source of these may be the teacher, books,
former students or even peers. The exemplar is then examined carefully by the
learners, and perhaps assessed against assessment criteria, as explained in Chapter
43 on formative assessment. With care, they can learn from both good and bad
examples. (However, don’t use a student’s work as a bad – or even a good – example,
if this will cause embarrassment or offence.)
Showing the exemplar is often not enough. The student must be clear how it was
done, and understand why the exemplar is effective. Discussion and question-
ing may bring this out, but if not the teacher must provide all the information.
P02a.indd 186 2/3/09 16:43:34
The art of showing
187
Sometimes it is helpful for students to prepare checklists of criteria defi ning good
practice, based on the examples.
Give some thought to the number of examples you will show your students. Usually
it is a case of ‘the more, the better’. If the examples are very different, so much
the better, as this helps the student see what the examples have in common, and
how to use the skill in different contexts. It is particularly helpful for students to
study an exemplar solution of a task soon after completing an identical task: an
exemplar laboratory report or translation, for example; or an ‘A’ grade essay on
the same title as a recent assignment. See spoof assessment and peer assessment
in Chapter 43.
Showing by demonstrating
The skill or ability being taught can be carried out by a teacher in front of the class.
For example, a mathematics teacher might demonstrate how to solve a problem in
geometry; an English teacher might demonstrate how to write a critical appraisal
of a poem; or a doctor might carry out a diagnosis. Demonstrating an intellectual
skill like this usually requires that the teacher ‘thinks out loud’. This takes practice.
Watch a good mathematics teacher at work; not only is the correct thinking shown,
but students are warned against common errors, and the class are often involved
in the process by the careful use of questioning:
‘I bet some of you think the answer is simply 12. But it’s not! Can anybody
see why? …’
‘What should I do next? I can’t fi nd the height h, so it looks like I’m completely
stumped. Or am I? …’
After showing by demonstration, many teachers ‘do one on the board’ in a different
way – by following instructions from the students. This gives the teacher feedback
on knowledge and understanding and enables students to practise the skill under
close supervision, before a ‘solo fl ight’. Mathematics and science teachers often
do ‘worked examples’ in this way, using questioning to elicit instructions from the
students: ‘Right, so I’ve found the relative molecular mass; now what? …’
‘Learner case studies’ are excellent methods of teaching by showing.
They are commonly used in the teaching of professionals. For example,
nurses being trained in a new care technique can report back to their
study group on how their
use of the new technique is going in practice. This can
generate valuable discussion, and each student’s experience can be
used to demonstrate to the others on the course how to use, or how not
to use, the technique being studied. The nurse trainer can also offer
practical help as her students use the care technique they are studying.
Teaching by example is a most effective and inspiring way of giving students ‘doing-
detail’: what students should be able to do, and how they should best do it. But be
P02a.indd 187 2/3/09 16:43:34
The teacher’s toolkit
188
sure you do not teach the method by rote, without students really understanding
the ‘why’ as well as the what and the how.
You can of course let students work out the ‘doing-detail’ for themselves; such
‘guided discovery’ is an excellent strategy, but needs to be handled carefully (see
Chapter 29). But if you leave out the ‘doing-detail’ thoughtlessly, weak students will
fl ounder, but able students will do well, because they are bright enough to work
out what you want.
Students often spend some time discussing ‘doing-detail’ amongst themselves:
‘What does he want? … How long does it have to be? … Is this OK, do you think? …
How have you done it?’ These questions are often best answered by showing how,
or with careful use of guided discovery. They should not be left to guesswork.
Teachers of social sciences, English literature and a number of other subjects
must develop their learners’ ability to create their own informed opinion. Even
high-order cognitive skills such as this can be learned by showing. Indeed, they are
taught almost exclusively, if unconsciously, in this way. Exemplar opinions can be
studied and criticised – for example, the views of experts or peers, opinions from
a textbook, etc.
The teacher can argue out loud whether such and such an opinion is consistent
with the facts, explaining why it is or is not valid, and showing why a different view
is not tenable. From this, students can learn the characteristics of a well-argued
opinion, and so develop their ability to create their own informed opinions. Much
of this learning is done unconsciously; it is then called ‘modelling’. However, try
to make a conscious use of the technique, ‘thinking out loud’ to exemplify these
high-order thinking skills.
If you are involved with this form of teaching, it would help your students enor-
mously to explain and make explicit the criteria for a well-reasoned opinion.
Science students are not left to discover for themselves how scientifi c laws can
be induced from experimental data. Science teachers rightly regard the laws of
scientifi c reasoning as far too subtle and diffi cult to be left solely to self-discovery.
Yet humanities students are often left to divine the much more complex laws of
reasoning in their subjects completely unaided.
Showing and telling
Showing is not always necessary. If the skill or ability is a straightforward adapta-
tion of a well-practised technique, then simply telling students the ‘how’ of the skill
may be enough. If the technique is well practised, they already know the ‘doing-
detail’. (Students who are practised at algebra may be happy with ‘Divide the two
equations and then solve for the unknown’. Those less practised would like to see
one done on the board.) However, if the skill is complex, or must be developed over
an extended period of time, then ‘showing how’ is important.
Showing and telling are not really equivalent methods of giving the same informa-
tion. The two techniques involve the learner in quite different mental processes.
Showing is concrete and holistic; it involves the learner in analysis of the examples,
P02a.indd 188 2/3/09 16:43:34
The art of showing
189
and looking for similarities in the examples of good practice. It involves learning
by induction. In contrast, telling is abstract, and involves the learner in synthesis
and learning by deduction. Cognitively they are mirror images of each other; they
probably even involve different halves of the brain.
As was mentioned in the previous chapter on the art of explaining, when we are
learning a concept we like to be given examples of its use; the defi nition is not
enough. We like to be shown how to use the concept, as well as being told how.
Learning seems to require both the concrete and the abstract, both induction and
deduction (though it is possible that some learners learn better from one than
from the other).
Don’t ignore learning by imitation; it is immensely powerful. Incredibly, we can
learn complex skills such as grammar or the laws of reasoning in this way, without
being told – or even formally understanding – the rules that govern these processes!
Perhaps the reason for the power of this kind of learning is that our species learned
to imitate before it learned to speak. Have our brains perhaps evolved to learn best
in this way? Who knows; but no teacher can afford to ignore its power.
Checklist for demonstrating an intellectual
skill
Do you show your students examples of good practice? ❏
Are the examples you show numerous and varied? ❏
Do you ‘think aloud’ to your students to show the reasoning in your subject? ❏
Do you let students examine bad as well as good examples? ❏
Can you make use of case studies to show how the ideas you are teaching are ❏
used in practice?
Do you get feedback on their understanding? ❏
Further reading
Petty, G. (2006) Evidence Based Teaching, Cheltenham: Nelson Thornes.
EXERCISES
1 Work out strategies for teaching the following by demonstration:
•
How to use inverted commas or apostrophes.
•
How to write an application letter for a job.
2 Practise ‘thinking aloud’ while showing how, and then make use of the
technique in one of your classes.
P02a.indd 189 2/3/09 16:43:34
190
The advantages of questioning
Most experienced teachers use questioning a great deal, in talking to classes and
groups, as well as when talking to individual students. Questions are of course
used in both verbal and written form; but this chapter will focus on the teacher
asking questions verbally. Many experts on education, including many experienced
and effective teachers, consider verbal questioning to be one of the teacher’s most
potent tools. Why is this?
To help us answer this question, let’s compare two teachers developing the same
teaching point. They are both teaching students of catering how to display cakes
in a self-service cafeteria.
The fi rst teacher’s approach is to use teacher talk.
Teacher Now, in cafeterias it is important to make sure that the cakes on
display do not go stale over a period of time. This is particularly
important if there is a large selection of cakes, or where the cake
is kept in warm conditions. Unfortunately, warm conditions are
all too common where food is being cooked and served. So we
must pay a great deal of attention to the display of cakes in a
cafeteria environment.
When choosing a cake for cafeteria display, bear in mind that it
should be an iced cake, as these go stale less quickly. Also, it should
not be left near an oven, coffee urn or other source of heat. It
should be covered, of course, and a cake display cover like this
one could be used to good effect here. So, during your practical
this afternoon, I want to see cakes in suitable display conditions.
The second teacher uses questioning to develop the same teaching point.
Teacher Why does fruit cake go stale?
Student 1 Currants go off, sir.
Teacher Currants keep for years, actually.
Student 2 Flour goes off, sir?
Teacher No, fl our keeps for ages too! (Silence) How would you tell fresh
cake from stale cake?
Student 3 Fresh cake is nice and moist, and stale cake is all dry.
Teacher Good! So if stale cake is dried-out cake, how could we store
cakes to stop them going stale?
Student 1 Put them in a plastic bag, or an airtight tin … (Teacher nods and
smiles.)
14
Questioning
P02a.indd 190 2/3/09 16:43:34
Questioning
191
Student 2 Or use one of those glass covers.
Teacher That’s right, like this one. Now – plastic bags, air-tight tins, glass
covers … Why would these all stop the cake going stale? …
Tracy?
Student 3 Because it stops the cake drying out.
Teacher Good. And what effect would icing a cake have on the stale-
ness?
Student 1 It would stop it going stale so fast, because it covers most of it
up.
Teacher Good, so going stale means drying out. Now, in our practical
this afternoon, would you choose an iced or an un-iced cake
for display?
Students Iced.
Teacher And where would you store it?
Student 2 Away from the oven.
Student 3 Away from anything hot.
Teacher Yes, away from the oven, the heated display counter, the coffee
urn and so on. Because … ?
Student 3 Because heat dries cake out, makes it stale.
Teacher That’s right! Well done.
There is a crucial advantage to the questioning approach, and that is that the
knowledge gained in such a lesson is ‘transferable’. Imagine asking the two classes
who experienced these lessons the following question:
‘How should bread be stored overnight to prevent it going stale?’
The class who were given the ‘teacher talk’ lesson would probably say, ‘We haven’t
done bread.’ (One hopes they would not suggest icing it!) However, the class
taught to understand the process of going stale would probably have some correct
suggestions; they would be able to transfer their understanding to this unfamiliar
problem. It is important to teach for understanding, rather than just for knowing.
Questioning teaches students to think for themselves.
Does anything else strike you about the differences between these two approaches?
Most people would agree that the questioning approach would be more interest-
ing for the students; they are actively involved rather than passively listening, and
the questioning style tends to stimulate the students’ curiosity – why does cake go
stale? Moreover, the students are made to think in the questioning-style lesson; the
logic of the subject is exposed and they are encouraged to use it: ‘How could we
store cakes to stop them going stale?’
The emphasis in the questioning-style lesson tends to be on understanding rather
than simply knowing. In the teacher-talk lesson, the students were simply told what
they had to know; they were not encouraged to understand it, and are less likely
to remember it. This is constructivism again, as we saw in Chapter 1.
As a result of the questioning, the students had their assumptions and prior knowl-
edge challenged and corrected. Beforehand, some of the students had thought
that ‘going stale’ meant ‘going off ’; but in the course of the lesson they found
P02a.indd 191 2/3/09 16:43:34
192
out it means something closer to ‘drying out’. This process of having incorrect
assumptions corrected is sometimes called ‘unlearning’: as we have seen in earlier
chapters, correction is a vital part of the learning process. Many students come
to our classes with incorrect assumptions and ‘common non-sense’ notions that
need challenging. Questioning helps enormously here.
Notice also that the teacher who used questioning was being given instant feedback
on the understanding of the students, while the lesson proceeded.
There is another crucial advantage of using questioning as a teaching technique.
When we were considering motivation, it was pointed out that students need to
More teacher questioning
A history teacher has asked her students to discuss in pairs the problems
that landowners might have experienced immediately after the Black Death
(a plague that killed a high percentage of the adult population in Britain and
elsewhere). One group has realised that landowners would get less income
from their cottages because some of them would be empty, but they are now
‘stuck’; they cannot think of any other economic consequences the plague
might have had for a landowner.
Teacher What do landowners do with their land?
Paula Hunting?
Teacher Yes, anything else?
Emma Grow wheat and stuff. They would farm it.
Teacher Good. Now, what problems would farming landowners have after
the Black Death?
Paula No one would want to work on their farm, because they would catch
the plague from the other workers.
Emma No, the plague is over now.
Teacher That’s right, but Paula is half right in a way. The landowner would fi nd
it diffi cult to fi nd workers, but not for the reason that Paula gave. It’s
obvious, really.
Paula Some of them have died. There are fewer workers.
Teacher That’s right; well done, Paula. Now, what would the landowner have
to do to make sure he got workers to bring in his harvest? (Silence)
All the other farmers need workers too, but there’s a shortage.
Emma Pay good wages?
Teacher That’s it. And would the landowners be pleased about that?
Paula No!
Teacher So, what are you going to write down on your list of effects of the
plague? Get it right – I’m going to ask you to explain it to the rest
of the class in a bit.
Knowing only involves remembering – understanding requires that students
‘own’ the reasoning.
The teacher’s toolkit
P02a.indd 192 2/3/09 16:43:34
Questioning
193
know they are making a success of their learning. Nothing motivates quite as much
as the glow of satisfaction that a student gets when he or she answers a question
correctly and immediately gets warm praise from the teacher.
To summarise, then, the advantages of questioning as a teaching method are that it:
displays the ‘logic’ of the subject and passes it on, encouraging understanding •
rather than rote remembering
ensures that learning is built on prior learning in a constructivist way •
(Chapter 1)
produces transferable learning•
gives instant feedback (to teacher • and student) on whether learning is taking
place
ensures the lesson moves at the student’s pace•
is an active and interesting activity for the students•
gives students practice in • using the recently acquired ideas and vocabulary
you have been teaching
uncovers incorrect ideas and assumptions, allowing ‘unlearning’ to take place •
(i.e. it supplies the ‘check and correct’ elements of learning)
can be motivating, as it gives students a chance to demonstrate their success •
in learning
offers, in one-to-one questioning, a chance for the teacher to diagnose the •
diffi culty a ‘stuck’ student might be having
can be used to discipline a student•
allows the teacher to evaluate learning•
encourages the development of high-level thinking skills.•
The disadvantages are that it:
can be a time-consuming activity•
makes it diffi cult to involve all students in the group•
is not an easy technique for the teacher to master.•
Questioning technique
How should we use questioning? A good questioning technique should encour-
age all the students in the class to think. It should avoid an ‘I’m trying to catch you
out’ atmosphere, and should give students a chance to get some positive feedback,
demonstrating their success in learning.
After posing a question, wait; most of the students should then be trying to puzzle
out the answer. When they have had reasonable time to think, ask someone to
answer. If you nominate someone to answer before posing the question, the rest
of the class will be mentally in neutral, if not actually asleep! A helpful mnemonic
is: ‘Pose – Pause – Pounce!’ The longer you pause, the more thinking the students
do, and the longer their answers will be when they come.
Encourage responses to your questions by asking simple ones at fi rst, especially
with a new group. Without going overboard, show that you are grateful for the
responses you are offered, and always praise correct answers. If an answer is given
in a quiet voice, repeat it to the class.
P02a.indd 193 2/3/09 16:43:35
The teacher’s toolkit
194
How do you deal with incorrect responses? Re-read the example at the beginning of
this chapter, and see how the teacher involved dealt with the problem. He did not
ridicule the incorrect answers; instead, he tried to show the reasoning that would
have given the correct answer. If a response was incorrect, he simply stated why
it was wrong (without giving away the answer), and then asked another question
to get the student(s) on to the right track. He also used the incorrect answers to
correct misconceptions.
It will take practice for you to develop your questioning skills to this level. But in
time it will happen, and you will enjoy doing it.
This technique of leading students through the reasoning can also be used if they are
unable to answer a question at all. Here is a driving instructor’s response to an error
made earlier by one of her students. Look at her technique carefully. You might
like to cover this dialogue with a sheet of paper and reveal it line by line, thinking of
questions the teacher might ask before revealing what she actually says.
Teacher You started signalling too early just then. Say you wanted to turn
right, when should you start signalling?
Student (No response)
Teacher Can you signal right too early?
Student Not sure … I suppose so.
Teacher What would happen if you signalled right a mile before the
junction in a city centre?
Student Other drivers would think you were turning right before you
really were.
Teacher That’s right, so when should you start signalling if there are lots
of junctions about?
Student Just after the junction before?
Teacher That’s right!
The student’s confi dence is boosted by the praise and smile from the teacher, and
a potentially negative experience for the student is turned into a positive one. You
might not have asked the same questions, but that does not matter, as long as your
questions would make the student think out the reasoning for himself.
Distributing questions
When questioning a class, try to distribute the ques-
tions as widely as
possible:
‘How about someone on the back bench answering
this one?’
‘Have you any idea, Simon?’
‘How about someone who hasn’t answered a
question yet answering that one.’
The plan of a classroom shows what is sometimes
called the ‘arc of vision’ of the teacher. Students within
this are more likely to feel involved in the lesson, and
are therefore more likely to answer a question.
P02a.indd 194 2/3/09 16:43:35
Questioning
195
Students who do not want to participate in a lesson choose to sit out of the teacher’s
arc of vision. You may remember from your schooldays the scramble for seats at
the back of the class in the less popular lessons!
It is too easy to ignore quiet students at the back of the class. Try to include them.
Responses can often be obtained from reticent students by ‘body-pointing’ or by
eye contact. Suppose, for example, two students on your left have not yet answered
a question. If you move closer to them, and keep looking from one to the other
after you have asked the question, one of them will answer if they can.
Don’t be afraid to leave plenty of time for students to think; this is not wasted time.
Smile while you are waiting, if you are worried about putting too much pressure
on them.
Teacher Why did we go to war? As a merchant, how would you feel? And
how was your trade affected by the Napoleonic War?
What answer do you think the teacher got? I expect you guessed: he got no answer
at all. Make your questions short and simple – and ask them one at a time!
Avoid questions which are so vague that there could be any number of correct
answers. I have heard many novice teachers ask such ‘guess what I’m thinking’
questions. Here is an example. A keep-fi t teacher had asked a student to demon-
strate an exercise to the rest of the group, to review what the students had learned
the previous week. The teacher noticed that the student had her arm in the wrong
position, so she pointed vaguely to the student and asked: ‘What do you see here?’
The question was so vague that no student felt confi dent enough to answer. A better
question would have been: ‘Can anyone see anything wrong with her position?’ The
question ‘What do you see here?’ was not a genuine question at all, but an invitation
to guess what the teacher was thinking. She would have been cross if one of the
students had – correctly – answered this question with: ‘Susie in a green leotard.’
If a question leads into a conversation between you and a student, use eye contact
and body-pointing to include the other members of the class. Give your own
comments to the whole class, and repeat the student’s points if they are made too
quietly for all to hear.
If students are reluctant with their answers, then fi rst make sure your questions are
simple enough, that you wait long enough, and that you praise or thank students
for their responses. If you still have problems, use pair work as follows.
Using pair work
If your students are very unresponsive in question-and-answer sessions, or if your
questions are challenging, try the following pair-work strategy. Ask your question
and write it on the board, and then ask pairs to discuss it, giving them a time limit
of literally a minute or two. If necessary, check there is attention to task during
their discussion. Then ask for their answers, praising sensible responses. Pair
work gives students time to think, and allows them to check their answer with
their partner. This increases their confi dence and so increases their responsive-
ness to your questions.
P02a.indd 195 2/3/09 16:43:35
The teacher’s toolkit
196
The assertive questioning technique described in Chapter 24 can also hugely
increase student concentration and participation.
Experienced teachers usually pepper their teacher talk with between one and four
questions per minute. When explaining a diffi cult point that involves reasoning,
their presentation is often virtually 100% questioning.
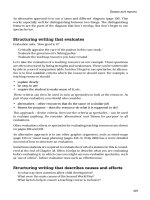
Comparing questioning strategies
The table shows six questioning strategies, and gives each a star rating for fi ve
important criteria. The exact rating will vary depending on your class and exactly
how you use each strategy – for example, how long you wait between asking a
question and getting an answer.
Imagine a weak, poorly motivated student ‘Jo’ in your class while you use ‘Q & A:
volunteers answer’. Jo will soon learn that she need do nothing during your Q &
A, just keep her hands down! She won’t participate, and you won’t know of any
diffi culty she has.
But if you habitually use ‘Buzz groups: nominees answer’, Jo will realise you might
ask her to respond for her small group. She will participate now, ensuring she can
explain her group’s answer. If after a response you often ask, ‘Why did your group
think that?’, she will also ensure she understands her group’s answer. Groups don’t
like being misrepresented, so there is peer pressure to engage with your questions,
and report the group’s answers faithfully.
Any Q & A strategy may be appropriate at some stage in your lessons. Even Q & A:
volunteers is useful sometimes. But when you are homing in on important points
and the thinking behind them, you need methods towards the bottom of the table.
Chapter 24 deals with assertive questioning, a vital questioning skill.
P02a.indd 196 2/3/09 16:43:35
Questioning
197
Which questioning strategy?
Excellent *** good ** weak * poor !!
Questioning strategy
(The scoring assumes that
the students are used to
the strategy, and expect the
teacher to use it.)
Participation rate
The proportion of
students who are
engaged in trying
to answer the
question is high.
There are few
‘passengers’.
Teacher’s
feedback
The teacher gets
representative
feedback on the
quality of students’
understanding and
reasoning.
Student’s
feedback
Each student gets
feedback on their
thinking. This can
come from
dialogue with other
students.
Thinking time
Each student
spends a good deal
of time thinking
about the question
and the quality of
their answer.
Student comfort
Students are not
‘put on the spot’.
They don’t feel
humiliated by the
teacher or by
others in the class.
Q&A: volunteers answer
Students volunteer to
answer questions.
!! !! !! !! ***
Q&A: nominees answer
Students nominated by the
teacher answer questions.
** * * * !!
Buzz groups: volunteers
answer
Students work in small
groups to answer a
thought-provoking question.
Teacher asks each group in
turn to contribute part of
the answer. A volunteer
answers for their group.
** ** ** * **
P02a.indd 197 2/3/09 16:43:35
The teacher’s toolkit
198
Questioning strategy
(The scoring assumes that
the students are used to
the strategy, and expect the
teacher to use it.)
Participation rate
The proportion of
students who are
engaged in trying
to answer the
question is high.
There are few
‘passengers’.
Teacher’s
feedback
The teacher gets
representative
feedback on the
quality of students’
understanding and
reasoning.
Student’s
feedback
Each student gets
feedback on their
thinking. This can
come from
dialogue with other
students.
Thinking time
Each student
spends a good deal
of time thinking
about the question
and the quality of
their answer.
Student comfort
Students are not
‘put on the spot’.
They don’t feel
humiliated by the
teacher or by
others in the class.
Buzz groups: nominees
answer
As above, but the teacher
nominates the student in
each group who will
contribute that group’s
answer(s).
*** ** ** ** *
Assertive questioning
Groups work on a thought-
provoking question. Teacher
asks individuals to give their
group’s answer, says ‘thank
you’ and then asks the rest
of the class to discuss and
agree a ‘class answer’. Only
then does the teacher ‘give
away’ the right answer. See
Chapter 24.
*** *** *** *** **
P02a.indd 198 2/3/09 16:43:35
Questioning
199
Pair checking
Students work alone to
answer a question. Pairs
then compare their
answers, giving their
partner one good point and
one way their answer
could be improved. The
teacher then gives the
correct answer. Pairs now
suggest another
improvement to their
partner’s answer. Teacher
looks over shoulders
throughout.
*** ** ** *** **
P02a.indd 199 2/3/09 16:43:35
The teacher’s toolkit
200
Varying the type of question you use
Open and closed questions
Closed questions have only one satisfactory answer, which is usually very short.
For example:
‘Should it be “Yours sincerely” or “Yours faithfully”?’
‘Is there a danger of the plant drying out?’
Open questions require a more detailed response, and there is often more than
one correct answer. For example:
‘What did merchants have to gain from this war?’
‘How could we improve the apparatus to make our experiment yield a more
accurate value?’
Open questions make students think, and tell the teacher much more about what
the students have learned. By contrast, closed questions, such as ‘yes/no’ ques-
tions, usually require little thought. They are likely to be guessed with at least 50%
success, and so have low ‘diagnostic power’ – that is, the teacher cannot assume
for certain that a correct answer means that successful learning has taken place.
Some students can manage a 100% success rate on ‘yes/no’ questions, without
understanding the fi rst thing about the subject of the questions. Their technique,
perhaps unconscious, is to put on a thoughtful expression after the question has
been asked, and then shake their head from side to side to give the impression they
are about to say ‘no’. Whilst doing this they look carefully at the teacher’s expres-
sion. If the teacher smiles and raises his or her eyebrows, the student completes
the answer as a ‘no’. If, however, the teacher lowers the eyebrows or shows no
expression during the student’s head-shaking, the student feigns a sudden fl ash
of insight and converts the answer to a ‘yes’!
A similar student technique is to give an immediate answer, for example a ‘no’,
and watch the teacher’s non-verbal reaction. If this is unfavourable, the answer
is immediately changed before the teacher has had a chance to respond verbally.
Most students use this second technique quite unconsciously. If you don’t believe
me, try the following. Ask students some reasonably diffi cult ‘yes/no’ questions. On
receiving a correct answer, say nothing, and make no facial expressions or other
bodily movement – just wait. Unless the student is very sure of the subject, I will
wager that within three seconds he or she will have changed the correct answer
to an incorrect one!
Questioning levels
‘What are the names of the bones in the upper arm?’
‘What would happen if human beings didn’t have a skeleton?’
Some questions simply require that students recall facts. Such questions certainly
have their uses: reinforcing earlier learning, practising recall, ‘pointing’ to the
most important facts in a topic and informing the teacher of what students can
and cannot remember.
P02a.indd 200 2/3/09 16:43:35
Questioning
201
However, there is more to learning than remembering. Even the most hard-boiled
teachers would acknowledge that most examination syllabuses award less than
half of their marks for the recall of facts. The majority of marks are awarded for
higher-order skills, such as the ability to comprehend and apply the concepts
and principles associated with the course of study. Although it is not recognised
formally, marks are, in effect, also awarded for more general ‘thinking skills’, such
as the ability to sift through the memory and choose only the information relevant
to a particular question.
Fact questions do not by themselves develop understanding, and they do not let
students apply their knowledge, let alone practise the higher-order thinking skills.
There are plenty of types of question that are more demanding.
Trevor Kerry (1982) listed a number of different question types. His suggested
categories are shown below.
Question type Example
Data recall What is the capital of France?
Naming What is the name of the bone in the thigh?
Observation What colour was the litmus paper?
Control Will you sit down, John?
Pseudo-question (An open question but the teacher expects only one answer):
What do you see here?
Higher-order question types
Speculative hypothesis What would happen if all the trees in the world were cut
down tomorrow?
Give reasons Why do people in the Third World choose to have so many
children?
Evaluation What evidence is there for and against the existence of an
afterlife?
Problem-solving How can we drill the wood without overheating the drill?
While facts are often soon forgotten, higher-order thinking skills tend to be
retained, because such skills are more generally applicable and therefore more
often used. The dates of Henry VIII’s reign, for example, will soon be forgotten
unless recalled from time to time. In a culture such as ours, the importance of
higher-order mental skills can hardly be overstated; once developed, such skills
can be applied in any fi eld of human endeavour. For the majority, who fi nd little
direct use for most of the factual knowledge gained during their education, these
skills are the main benefi t of their many years in school or college. These precious
thinking skills can only be developed by the effective use of questioning. Their use
also ensures understanding of the content.
Education is what remains when you have forgotten what you have
been taught.
P02a.indd 201 2/3/09 16:43:35
The teacher’s toolkit
202
Sadly, research shows that 70–80% of questions asked by teachers require only
factual recall. Researchers suggest that many teachers are simply not skilled
enough to ask higher-order questions. Have another look at Bloom’s taxonomy in
Chapter 1; do you use questions at every level?
The uses of questioning
In terms of the educare? elements of learning, questioning can be used to provide
students with an explanation, to let them use the knowledge you are teaching, and
of course to check and correct and indeed to evaluate their learning. It can also be
used to review or revise earlier work.
An explanation should display the logic of a subject and pass this thinking on to
the student; questioning is an excellent way to do this. Here is an example of the
use of questioning to give a student an explanation for hot air rising. The student
has already studied density and expansion.
Teacher Why does cork fl oat on water?
Student Because it’s less dense than water.
Teacher Good. Now, when you heat air, it expands. What effect does this
expansion have on the density of the air?
Student It makes it less dense.
Teacher That’s right. So, what happens to hot air when it is surrounded
by cooler air? (Silence) Well, what happened to the less dense
cork when it was surrounded by water?
Student It fl oated.
Teacher Yes, so what will happen if hot air is surrounded by cool air?
Student It will fl oat too.
Teacher Good; and why?
Student Because the hot air is less dense than the cold air.
Teacher Well done. So hot air fl oats in cold air. Can you think of an
example of this ‘convection’ happening?
Student A hot air balloon?
Teacher Exactly. And that’s why we say ‘hot air rises’.
The teacher could of course give this reasoning by teacher talk. However, there are
a number of advantages in making the student provide the steps in the logic. The
explanation is done at the student’s pace; there is an opportunity for the student to
use the ideas, and have the use checked; and when the student eventually ‘gets it
right’, the success is motivating. It also ensures that the learner creates their own
understanding and the logical links in a constructivist way.
It is important to realise that the interchange on hot air rising could have been
carried out with a class as a whole, with a group, or with an individual student.
Questioning can be used to evaluate any relevant prior learning that students
require to understand a new topic.
P02a.indd 202 2/3/09 16:43:36
Questioning
203
Questioning can also be used to wake up an inattentive student. Paul is gazing out
of the window:
Teacher So, how would you tell a good precis from a bad precis? …
Paul?
Paul What? (Some laughter in the class)
Another important use of questioning is in the diagnosis of a student’s diffi culty.
When students are ‘stuck’, how should a teacher respond? It is tempting to help
them over their diffi culty as quickly as possible by telling them what to do, but it is
better teaching to fi nd the cause of the blockage and put this right – or better still,
let the student discover how to put it right. Questioning students is perhaps the
only way of discovering the misunderstanding or knowledge gap that has caused
their diffi culty. The driving instructor dialogue we looked at earlier is an example
of this use of questioning.
Teaching by the use of questioning only is sometimes called the ‘Socratic
method’. Socrates claimed he knew nothing (this may partly explain
why he never wrote his ideas down); he simply questioned his students
in order to show up any inconsistency in their beliefs. He was not
rewarded for this humility, however, but was put to death for ‘corrupting
the young’. Moral: don’t ask questions that are too diffi cult!
Questioning does not come naturally to most people, because novice teachers
are used to thinking in terms of answers rather than questions. As a result, many
novice teachers fi nd it very diffi cult to sustain a lengthy bout of questioning, requir-
ing as it does the ability to ‘think on your feet’ in order to fi eld an unexpected
answer and turn it into the next productive question.
If you have trouble thinking up thought-provoking questions, try those which
start with ‘why’ or ‘how’. Putting one of these words in front of almost any
statement can help change it into a question. ‘What would happen if … ?’
is also a useful phrase for the start of a question. Try making the following
statements into questions:
Rain tends to fall in mountainous regions.
Thomas More was executed.
Increasing the temperature increases the rate of the chemical reaction.
This bacteria needs air to survive.
Jesus told parables.
It is often possible to make more than one question from each factual state-
ment. For example, you could ask ‘Why was Thomas More executed?’, ‘How
was Thomas More executed?’, ‘What would have happened if Thomas More
had not been executed?’, etc.
P02a.indd 203 2/3/09 16:43:36
The teacher’s toolkit
204
It is advisable to think out in advance the questions you are going to use in a lesson,
especially the thought-provoking ones. However, it does not take long before you
are able to think up questions ‘on the spot’.
Trevor Kerry (1982) thought the main faults inexperienced teachers showed when
using questioning were that their vocabulary was too complex; they did not leave
enough time for students to answer; they did not use enough reinforcement (e.g.
praise); and they were often unable to prompt a student into producing a useful
response by, for example, using a simpler question. Most learning teachers are
unaware of these faults, so it is advisable to start by over-compensating: make
your questions very clear and concise, leave more answering time than you think
necessary, and give more praise than you think necessary.
P. Groisser (1964) said that questions should be clear, purposeful, brief, stated in
a natural and simple language, thought-provoking and distributed widely; there
should be a balance between ‘fact’ and ‘thought’ questions.
Summary
Questioning is of paramount importance. It would be impossible to develop genuine
understanding, or other higher-order mental skills, without it. It teaches students
to think for themselves, and produces high-quality, transferable learning.
It allows students to practise using the concepts and principles they are being
taught, and it gives the teacher the opportunity to check immediately and correct
this use. It also gives teachers feedback on whether learning is taking place, and
ensures that they do not ‘lose’ the students.
Students tend to fi nd questioning an active and enjoyable activity, especially as
answering correctly gives them confi dence and a feeling of success. Even the
students who are not chosen to answer the question will gain in confi dence if they
are able to think of the correct answer for themselves. This confi dence and success,
along with the praise and approval which should accompany it, fuels motivation.
However, questioning is an unfamiliar technique for most of us at fi rst, though
after a little practice it soon comes quite naturally.
Questioning skills checklist: the ‘ten
commandments’
Do you ask questions which students can answer successfully?1
Do you leave time for students to think, by using pair work, for example?2
Do you use body language (eye contact, smiling, raising the eyebrows, 3
nodding, etc.) to encourage responses?
Do you always thank, praise or otherwise acknowledge responses?4
Do you avoid ridiculing students’ answers?5
P02a.indd 204 2/3/09 16:43:36
Questioning
205
If no answer comes, are you able to ask a simpler question that leads to the 6
answer to the original question?
Do you make questions short and clear, using straightforward language?7
Do you avoid using solely fact-based questions?8
Are you able to distribute questions widely around the class or otherwise get 9
all students participating?
Are you able to ask questions, say, twice a minute during teacher talk?10
References and further reading
Groisser, P. (1964) How to Use the Fine Art of Questioning, Englewood Cliffs, NJ:
Teachers Practical Press.
Kerry, T. (1982) Effective Questioning, London: Macmillan.
Marzano, R. J. et al. (2001) Classroom Instruction that Works: Research-Based Strate-
gies for Increasing Student Achievement, Alexandria, VA: ASCD.
Petty, G. (2006) Evidence Based Teaching, Cheltenham: Nelson Thornes.
EXERCISES
1
Take a simple teaching point that needs only a minute or so, and requires
reasoning, and try teaching it entirely by questioning. Prepare your ques-
tions in advance. Use ‘why ?’, ‘how ?’ and ‘what would happen if … ?’
questions.
2 Think of a process or skill you know well, which requires reasoning to explain
it – say, wiring a three-pin plug or repotting a pot plant. Think of a series of
questions that could be used to teach a student the skill.
3
Write down fi ve ways to encourage answers from reluctant or shy students.
4
Write down fi ve ways to help distribute questions widely around the class.
P02a.indd 205 2/3/09 16:43:36