LEGO MINDSTORMS - Dark Side Robots Transports and Creatures Part 2 ppsx
Bạn đang xem bản rút gọn của tài liệu. Xem và tải ngay bản đầy đủ của tài liệu tại đây (2.09 MB, 20 trang )
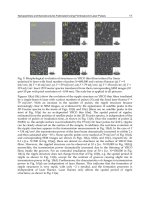
Robot 1 • Super Battle Droid
8
The Right Leg
Right Leg Step: Complete
Right Leg Step: 1
Right Leg Step: 2
Right Leg Step: 3 Right Leg Step: 4
Here is what the
right leg sub-assembly
should look like when
it is complete.
227_LEGO_DSR_01.qxd 7/23/02 4:16 PM Page 8
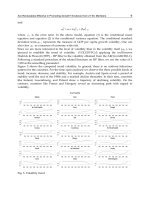
Robot 1 • Super Battle Droid
9
Right Leg Step: 5
Right Leg Step: 6 Right Leg Step: 7
227_LEGO_DSR_01.qxd 7/23/02 4:17 PM Page 9
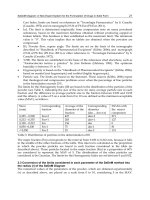
Robot 1 • Super Battle Droid
10
Right Leg Step: 8
You will now begin construction
of the foot itself.
Right Leg Step: 9
227_LEGO_DSR_01.qxd 7/23/02 4:17 PM Page 10
Robot 1 • Super Battle Droid
11
The Left Leg
Left Leg Step: Complete
Here is what the left
leg sub-assembly
should look like when
it is complete.
Left Leg Step: 1
Left Leg Step: 2
Left Leg Step: 3 Left Leg Step: 4
227_LEGO_DSR_01.qxd 7/23/02 4:17 PM Page 11
Robot 1 • Super Battle Droid
12
Left Leg Step: 5
Left Leg Step: 6
Left Leg Step: 7
227_LEGO_DSR_01.qxd 7/23/02 4:17 PM Page 12
Robot 1 • Super Battle Droid
13
Left Leg Step: 8
You will now begin construction
of the foot itself.
Left Leg Step: 9
227_LEGO_DSR_01.qxd 7/23/02 4:17 PM Page 13
Robot 1 • Super Battle Droid
14
Right Arm Step: Complete
Here is what the right arm
sub-assembly should look
like when it is complete.
Right Arm Step: 1
Right Arm Step: 2
Right Arm Step: 3
The Right Arm
Inventing…
Customizing the Arms
The arms are perhaps the easiest sub-
assembly to customize on the Super
Battle Droid. Using the pieces found in
the Dark Side Developer’s Kit and other
LEGO kits, a wide variety of different
possibilities for the arms are available.
You could try building a sword,
hands, or a variety of tools.
227_LEGO_DSR_01.qxd 7/23/02 4:17 PM Page 14
Robot 1 • Super Battle Droid
15
Left Arm Step: Complete
Here is what the left arm
sub-assembly should look like
when it is complete.
Left Arm Step: 1
Left Arm Step: 2
Left Arm Step: 3
The Left Arm
227_LEGO_DSR_01.qxd 7/23/02 4:17 PM Page 15
Robot 1 • Super Battle Droid
16
The Chest
Chest Step: Complete
Here is what the chest
sub-assembly should
look like when it is
complete.
Chest Step: 1
Chest Step: 3
Chest Step: 2
227_LEGO_DSR_01.qxd 7/23/02 4:17 PM Page 16
Robot 1 • Super Battle Droid
17
Chest Step: 4
Chest Step: 5
227_LEGO_DSR_01.qxd 7/23/02 4:17 PM Page 17
Robot 1 • Super Battle Droid
18
Final Assembly Step: Complete
Here is what the Super Battle
Droid should look like when it is
complete.
Final Assembly Step: 1
Begin the final assembly of the
Super Battle Droid. Start by taking
the body sub-assembly and
holding it with the Micro Scout
facing outwards, as shown in this
picture.
Final Assembly
You are now ready to take all of the sub-assemblies you have made (the right and left legs, the right
and left arms, and the chest), and attach them to the body sub-assembly to create the finished Super
Battle Droid.
227_LEGO_DSR_01.qxd 7/23/02 4:17 PM Page 18
Robot 1 • Super Battle Droid
19
Final Assembly Step: 3
Final Assembly Step: 2
Attach the right leg to the
body. Make sure all the
moving parts’ alignments
match this picture.
Note Alignment
227_LEGO_DSR_01.qxd 7/23/02 4:17 PM Page 19
Robot 1 • Super Battle Droid
20
Note Alignment
Final Assembly Step: 4
Now, turn the body around and attach the left leg to
the body. Since we are using the thinner, red 12t
beveled gear for this leg, make sure that the small gray
pulley goes behind the red gear, and that the gear
itself meshes with the other red 12t beveled gear
already attached to the leg. The gray pulley should be
between the red gear you just added to the axle and
the body of the Super Battle Droid. Make sure all the
moving parts’ alignments match this picture.
227_LEGO_DSR_01.qxd 7/23/02 4:17 PM Page 20
Robot 1 • Super Battle Droid
21
Final Assembly Step: 5
Final Assembly Step: 6
Attach the arms, as shown. Make sure
the guns on the ends of Super Battle
Droid’s arms are on the inside of the
arms.
227_LEGO_DSR_01.qxd 7/23/02 4:17 PM Page 21
Robot 1 • Super Battle Droid
22
Final Assembly Step: 7
Lastly, attach the chest
sub-assembly to the
body, and Super Battle
Droid is complete!
227_LEGO_DSR_01.qxd 7/23/02 4:17 PM Page 22
Robot 2
23
Orbital Defense Cannon
227_LEGO_DSR_02.qxd 7/23/02 4:29 PM Page 23
Orbital Defense Cannons are huge pieces of laser artillery that planets in the
Alliance use to defend against bombardment from orbiting ships. Their dual
laser cannons, guided by a targeting radar dish, can shoot down even the
largest Imperial Star Destroyers and Corellian Cruisers. Many planets that can’t
afford to outfit a full fleet of starships choose instead to protect themselves
from Imperial Starfleet attacks from space with Orbital Defense Cannons.
In order for the gears to work properly it is important that the Orbital
Defense Cannon is sitting on a flat surface.
Bricks & Chips…
Micro Scout Programs
The Orbital Defense Cannon works best with Micro Scout programs
#2 and #3. Program #2 will turn the Orbital Defense Cannon around
in circles and “fire” its dual laser cannons. With program #3, the
Orbital Defense Cannon will turn in circles and rotate its radar,
“firing” its dual laser cannons when you trigger the Micro Scout with
a light source (like a flashlight).
Robot 2 • Orbital Defense Cannon
24
227_LEGO_DSR_02.qxd 7/23/02 4:29 PM Page 24
Robot 2 • Orbital Defense Cannon
25
The Main Sub-Assembly
Here is what the main sub-assembly should
look like when it is complete.
Main Step: 1
Main Step: 2
Main Step: 3
Main Step: Complete
Turn the main sub-assembly
around and begin
working on the
opposite side.
227_LEGO_DSR_02.qxd 7/23/02 4:29 PM Page 25
Robot 2 • Orbital Defense Cannon
26
Main Step: 4 Main Step: 5
Main Step: 6
Main Step: 7
Turn the
main sub-
assembly over and
add these pieces as shown.
227_LEGO_DSR_02.qxd 7/23/02 4:30 PM Page 26
Robot 2 • Orbital Defense Cannon
27
Main Step: 8
Main Step: 9
Assemble
these pieces before
attaching them to the
main sub-assembly.
Main Step: 10
Main Step: 11
227_LEGO_DSR_02.qxd 7/23/02 4:30 PM Page 27