LEGO MINDSTORMS - Dark Side Robots Transports and Creatures Part 13 pot
Bạn đang xem bản rút gọn của tài liệu. Xem và tải ngay bản đầy đủ của tài liệu tại đây (1.77 MB, 17 trang )
Robot 10 • Imperial Hound
228
Head Step: 4 Head Step: 5
Head Step: 6
Head Step: 7
227_LEGO_DSR_10.qxd 7/29/02 9:52 AM Page 228
Robot 10 • Imperial Hound
229
Head Step: 8
Head Step: 9
Head Step: 10
227_LEGO_DSR_10.qxd 7/29/02 9:52 AM Page 229
Robot 10 • Imperial Hound
230
Head Step: 11 Head Step: 12
Head Step: 13
Head Step: 14
Attach the
eyes as
shown.
227_LEGO_DSR_10.qxd 7/29/02 9:53 AM Page 230
Robot 10 • Imperial Hound
231
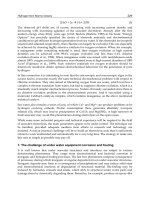
Head Step: 15
The #6 axle will only
go halfway into the angle
connectors (the light gray
pieces), but that is enough
to hold them in place.
Head Step: 16
227_LEGO_DSR_10.qxd 7/29/02 9:53 AM Page 231
Robot 10 • Imperial Hound
232
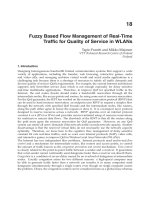
Head Step: 17
Head Step: 18
Turn the head around
and add these
pieces as shown.
Head Step: 19
227_LEGO_DSR_10.qxd 7/29/02 9:53 AM Page 232
Robot 10 • Imperial Hound
233
Head Step: 20
Head Step: 21
Add these pieces
to both sides as
shown.
227_LEGO_DSR_10.qxd 7/29/02 9:53 AM Page 233
Robot 10 • Imperial Hound
234
Head Step: 22
Add these pieces
to both sides as
shown.
Head Step: 23
Add these pieces to
both sides as shown.
227_LEGO_DSR_10.qxd 7/29/02 9:53 AM Page 234
Robot 10 • Imperial Hound
235
Head Step: 24
Add these pieces
to both sides as
shown.
Head Step: 25
Add these pieces to
both sides as shown.
227_LEGO_DSR_10.qxd 7/29/02 9:53 AM Page 235
Robot 10 • Imperial Hound
236
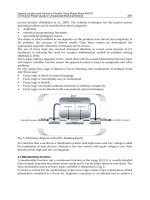
The Back Legs
The Imperial Hound raises and lowers itself on the back legs sub-assembly.
Back Legs Step: Complete
Here is what the back legs sub-assembly
should look like when it is complete.
Back Legs Step: 1
Back Legs Step: 2
227_LEGO_DSR_10.qxd 7/29/02 9:53 AM Page 236
Robot 10 • Imperial Hound
237
Back Legs Step: 3
Back Legs Step: 4
227_LEGO_DSR_10.qxd 7/29/02 9:53 AM Page 237
Robot 10 • Imperial Hound
238
Back Legs Step: 5
Back Legs Step: 6
227_LEGO_DSR_10.qxd 7/29/02 9:53 AM Page 238
Robot 10 • Imperial Hound
239
Back Legs Step: 7
Back Legs Step: 8
227_LEGO_DSR_10.qxd 7/29/02 9:53 AM Page 239
Robot 10 • Imperial Hound
240
The Front Legs
The front legs of the Imperial Hound are purely decorative.
Front Legs Step: Complete
Here is what the front legs sub-assembly
should look like when it is complete.
Front Legs Step: 1
Front Legs Step: 2
227_LEGO_DSR_10.qxd 7/29/02 9:53 AM Page 240
Robot 10 • Imperial Hound
241
Front Legs Step: 3
Front Legs Step: 4
227_LEGO_DSR_10.qxd 7/29/02 9:53 AM Page 241
Robot 10 • Imperial Hound
242
Front Legs Step: 5
Front Legs Step: 6
227_LEGO_DSR_10.qxd 7/29/02 9:53 AM Page 242
Robot 10 • Imperial Hound
243
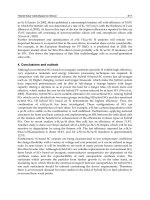
Final Assembly
You are now ready to take all of the sub-assemblies you have built (the front and back legs and the
head) and attach them to the body to create the finished Imperial Hound.
Final Assembly Step: Complete
Here is what the Imperial
Hound should look like when
it is complete.
Final Assembly Step: 1
Attach the head sub-
assembly to the body
sub-assembly as shown.
227_LEGO_DSR_10.qxd 7/29/02 9:53 AM Page 243
Robot 10 • Imperial Hound
244
Final Assembly Step: 2
Attach the back legs sub-assembly to the body
sub-assembly as shown. You will need to pull
the back legs apart to attach them.
Final Assembly Step: 3
Attach the front legs sub-assembly to
the body sub-assembly as shown and
your Imperial Hound is complete!
227_LEGO_DSR_10.qxd 7/29/02 9:53 AM Page 244