McGraw.Hill PIC Robotics A Beginners Guide to Robotics Projects Using the PIC Micro eBook-LiB Part 3 pps
Bạn đang xem bản rút gọn của tài liệu. Xem và tải ngay bản đầy đủ của tài liệu tại đây (1.82 MB, 20 trang )
CodeDesigner 27
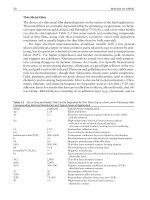
Figure 4.4 Schematic for wink program.
The Compiler Options window opens (see Fig. 4.4). In the top text field, use
the pull-down menu to select which compiler you are using, the PicBasic Pro
or PicBasic. In Fig. 4.4 the PicBasic Pro compiler is chosen.
In the second text field, you select the compiler’s pathname. The compiler
path and name (
pbpw.exe) is chosen for the PicBasic Pro compiler, in the sub-
directory of C:\PBP.
In the third text field we choose where the CodeDesigner software looks to
load and save our source code files. Hit the Browse button next to the text
field. This opens a browser window (see Fig. 4.5); select the Applics subdirec-
tory on the hard drive and click on OK.
The “Default Source Code Directory”
text field now contains the path
“C:\Applics” subdirectory (see Fig. 4.6). Click the OK button to close the
Compiler Options window .
Now we need to set the Programmer Options
.
Click on the Programmer
,
Programmer Options on the top menu (see Fig. 4.7). This opens the
Programmer Options window (see F
ig
.
4.8). Click on the Browse button next to
the Programmer Pathname text field.
A browser window opens;
select the
epicwin.exe program in the EPIC subdirectory on your computer’s hard dri-
ve (see F
ig
.
4.9). Click Open, and this brings you back to the Programmer
Options window
.
The new path you select should be in the Programmer
Pathname text field (see Fig. 4.10). Click OK to set this option.
Figure 4.5 Complete circuit built on solderless breadboard.
Figure 4.6 Selecting compiler (CodeDesigner).
28
Figure 4.7 Opening Programmer options (CodeDesigner).
Figure 4.8 Programmer options window (CodeDesigner).
Figure 4.9 Selecting epicwin.exe Programmer in EPIC subdirectory.
Figure 4.10 Hitting OK to confirm selection.
30
CodeDesigner 31
With the CodeDesigner options set, we are ready to write our first program.
First Program
Start CodeDesigner and enter the following code for the PicBasic compiler.
‘First PicBasic program to wink two LEDs connected to port b.
loop: high 0 ‘Turn on LED connected to pin rb0
low 1 ‘Turn off LED connected to pin rb1
pause 500 ‘Delay for .5 second
low 0 ‘Turn off LED connected to pin rb0
high 1 ‘Turn on LED connected to pin rb1
pause 500 ‘Delay for .5 second
goto loop ‘Go back to loop and blink & wink LEDs forever
end
The next program is identical in function (not code) to the PicBasic program
above. Start CodeDesigner and enter the following code (see Fig. 4.11):
‘Wink program
‘Blinks and winks two LEDs connected to port b
Figure 4.1
1
PicBasic Pro program written in CodeDesigner
.
32 Chapter Four
loop:
high portb.0 ‘Turn on LED connected to rb0
low portb.1 ‘Turn off LED connected to rb1
pause 500 ‘Wait 1/2 second
low portb.0 ‘Turn off LED connected to rb0
high portb.1 ‘Turn on LED connected to rb1
pause 500 ‘Wait 1/2 second
goto loop ‘Loop back repeat cycle blink & wink forever
CodeDesigner defaults to writing code for the PIC 16F84 microcontroller. This
is the microcontroller I recommend to start with. To change the microcon-
troller, simply pull down the device menu and select the appropriate micro-
controller (see Fig. 4.12).
When CodeDesigner attempts to compile a program from the Windows envi-
ronment, it automatically opens a DOS Prompt window, compiles the program,
and then ends the DOS session.
To compile the program using CodeDesigner, either select compile under the
Compile menu or hit F5. CodeDesigner automatically starts the PicBasic Pro
compiler (or PicBasic compiler) to compile the program. Before you attempt to
compile a program, make sure you have set up Compiler Options under the
Compile menu.
Figure 4.12 Pull-down menu location for selecting microcontroller.
CodeDesigner 33
Figure 4.13 Error message generated when CodeDesigner cannot find Programmer.
Once the program is compiled, we can go to the next step of loading the pro-
gram into a PIC microcontroller chip.
Connect the EPIC programming board to the printer port. If your computer
has only one printer port, disconnect the printer, if one is connected, and attach
the EPIC programming board, using a 6-ft DB25 cable.
When you connect the EPIC programming board to the computer, there
should not be any microcontroller installed onto the board. If you have an ac
adapter for the EPIC programmer board, plug it into the board. If not, attach
two fresh 9-V batteries. Connect the “battery on” jumper to apply power. The
programming board must be connected to the printer port with power applied
to the programming board before the EPIC programming software is started.
If it is not,
the software will not see the programming board connected to the
printer port and will give the error message “EPIC Programmer Not Found”
(see F
ig. 4.13).
The EPIC Programming Board Software
T
o program the 16F84 microcontroller from within CodeDesigner
,
select the
Launc
h Programmer menu item from the Programmer menu,
or hit F6.
CodeDesigner automatically starts the
epicwin.exe Windows software.
34 Chapter Four
Figure 4.14 Setting configuration switches in epicwin.exe program.
With the EPIC Windows software started, set the configuration switches one
by one under the Options menu item (see Fig. 4.14).
Device: Sets the device type. Set it for 16F84 (default).
Memory Size (K): Sets memory size. Choose 1.
OSC: Sets oscillator type. Choose XT for crystal.
Watchdog Timer: Choose On.
Code Protect: Choose Off.
P
ower Up Timer Enable:
Choose On.
After the configuration switches are set, insert the PIC 16F84 microcontroller
into the open socket on the EPIC programming board.
If you received an error
message “EPIC Programmer Not Found”
when CodeDesigner started the
EPIC Windows program (see Fig. 4.13), you have the option of either trou-
bleshooting the problem or using the EPIC DOS program.
F
or instructions on
using the EPIC software
,
DOS version,
see Chap
.5.
The schematic of the circuit needed to test the PICmicro is given in Chap. 6.
If you ha
ve successfully written, compiled, and uploaded the code into the
PICmicro chip using CodeDesigner
,
then you can skip the DOS material in
Chap. 5 and pick up at “Testing the PIC Microcontroller” in Chap. 6.
CodeDesigner 35
Parts List
CodeDesigner Lite Free
Download from Internet at: www.imagesco.com/catalog/pic/codedesigner.html.
CodeDesigner Standard $75.00
Available from Images SI Inc. (see Suppliers at end of book).
This page intentionally left blank.
5
Chapter
Using DOS to Code,
Compile, and Program
In Chap. 4 we compiled and programmed our microcontroller, using the
CodeDesigner program. If for some reason you do not wish to use or cannot use
CodeDesigner Lite, this chapter will instruct you in how to perform all the
functions for writing code, compiling the code, and programming the code in a
PICmicro chip from DOS or a DOS Prompt window.
When you start a new DOS session, use the path command (see Fig. 5.1), so
that you will not have to copy and swap files back and forth across directories.
If you have created the directory names as suggested in this book, you can use
the following command.
For PicBasic users the command is
path \;c:\pbc;c:\epic;c:\windows\command;
For PicBasic Pro users, the command is
path \;c:\pbp;c:\epic;c:\windows\command;
Now we can begin by using a standard word processor or text editor to write
the PicBasic program in DOS. Windows users can use the Notepad program.
DOS-level users can use the Edit program.
In DOS we will work from and
store our program(s) in the subdirectory we created earlier, called Applics.
Move into the Applics subdirectory
. Use the
cd (c
hange directory) command.
Enter this at the DOS prompt (see F
ig
.
5.1):
c:\> cd applics
Once in this directory, the prompt changes to
c:\applics>
Copyright © 2004 The McGraw-Hill Companies. Click here for terms of use.
37
38 Chapter Five
Figure 5.1 Entering DOS commands for path, changing directories, and starting the Edit program.
In this example I will be using the free Edit program package with Windows
to write the program. Start Edit by typing Edit at the command prompt (see
Fig. 5.1).
c:\applics> edit
This starts the Edit program (see Fig. 5.2). Enter this program in your word
processor exactly as it is written:
‘1st PicBasic program
‘Wink two LEDs connected to port b.
loop: high 0 ‘Turn on LED connected to pin rb0
low 1 ‘Turn off LED connected to pin rb1
pause 500 ‘Delay for .5 second
low 0 ‘Turn off LED connected to pin rb0
high 1 ‘Turn on LED connected to pin rb1
pause 500 ‘Delay for .5 second
goto loop ‘Go back to loop and blink & wink LEDs forever
end
See Fig. 5.3. Save the text file in the Applics directory. Use the Save func-
tion under the File menu.
Name the file
wink.bas (see F
ig
. 5.4). If by acci-
dent you saved the file as
wink.txt, don’t get discouraged.
Y
ou can do a
Using DOS to Code, Compile, and Program 39
Figure 5.2 Start screen of Edit program.
Save As from the Edit program (under File menu) and rename the file
wink.bas.
For PicBasic Pro users, enter the following text in your word processor and
save the file as wink.bas.
‘1st PicBasic Pro program
‘Winks two LEDs connected to port b
loop:
high portb.0 ‘Turn on LED connected to rb0
low portb.1 ‘Turn off LED connected to rb1
pause 500 ‘Wait 1/2 second
low portb.0 ‘Turn off LED connected to rb0
high portb.1 ‘Turn on LED connected to rb1
pause 500 ‘Wait 1/2 second
goto loop ‘Loop back repeat cycle blink & wink forever
Compile
The PicBasic compiler (or PicBasic Pro compiler) may be run from DOS or
from a DOS Prompt window within
W
indows
.
40 Chapter Five
Figure 5.3 Entering wink.bas program.
Figure 5.4 Saving wink.bas program.
Using DOS to Code, Compile, and Program 41
Figure 5.5 Entering DOS command to run PicBasic compiler program on the wink.bas program
for the 16F84 microcontroller.
We will run the PicBasic compiler from the Applics directory, type the com-
mand
pbc -p16f84 wink.bas at the DOS prompt, and hit the Enter key
(see Fig. 5.5).
c:\applics> pbc -p16f84 wink.bas
(For PicBasic Pro the command is c:/applics>pbp -p16f84 wink.bas.)
The compiler displays an initialization copyright message and begins process-
ing the Basic source code (see Fig. 5.6). If the Basic source code is without
errors (and why shouldn’t it be?), it will create two additional files. If the com-
piler finds any errors, a list of errors with their line numbers will be displayed.
Use the line numbers in the error message to locate the line number(s) in the
.bas text file where the error(s) occurred. The errors need to be corrected
before the compiler can compile the source code correctly. The most common
errors are with Basic language syntax and usage.
You can look at the files by using the
dir directory command. Type dir at
the command prompt
c:\applics> dir
and hit Enter (see F
ig. 5.7).
42 Chapter Five
Figure 5.6 Typical copyright notice and notice provided by the PicBasic compiler when it is run
successfully.
Figure 5.7 Executing DOS dir (directory) command to see the two additional files (.asm and
.hex) created by the PicBasic compiler
.
Using DOS to Code, Compile, and Program 43
The dir command displays all the files and subdirectories within the sub-
directory where it is issued. In Fig. 5.7 we can see the two additional files that
the compiler created. One file is the
wink.asm file and is the assembler source
code file that automatically initiated the macroassembler to compile the
assembly code to machine language hexadecimal code. The hex code file is the
second file created, called
wink.hex.
Programming the PIC Chip
To program the PIC chip, we must connect the EPIC programming carrier
board (see Fig. 5.8), to the computer. The EPIC board connects to the printer
port. The printer port is also called the parallel port. Either name may be used;
they are both correct. A computer may contain up to four parallel (printer)
ports. Each port is assigned a number, from 1 through 4. The computer lists
these ports as LPT1 to LPT4.
If your computer has only one printer port, disconnect the printer, if one is
connected, and attach the EPIC programming board using a 6-ft DB25 cable.
In some cases it may be necessary to temporarily remove the printer driver.
Figure 5.9 shows a typical window to disable an HP printer.
When you are connecting the programming board to the computer, make
sure there are no PIC microcontrollers installed onto the board. If you have an
ac adapter for the EPIC Programmer board, plug it into the board. If not,
attach two fresh 9-V batteries. Connect the “battery on” jumper to apply pow-
Figure 5.8 EPIC programming board and software.
44 Chapter Five
Figure 5.9 Message box window used to temporarily close printer driver to provide better access
to printer port for EPIC programmer.
er. The programming board must be connected to the printer port with power
applied to the programming board before the software is started. If not, the
software will not see the programming board connected to the printer port and
will give the error message “EPIC Programmer Not Found.”
When power is applied and it is connected to the printer port, the LED on
the EPIC Programmer board may be on or off at this point. Do not insert a PIC
microcontroller into the programming board socket until the EPIC program-
ming software is running
.
The EPIC Programming Board Software
There are two versions of the EPIC software: epic.exe for DOS and
epicwin.exe for Windows. The Windows software is 32-bit. It may be
used with Windows 95, 98, NT, and XP, but not 3.X. It has been my experi-
ence that Windows 95 and 98 printer drivers many times like to retain con-
trol of the printer (LPT1) port. If this is the case with your computer, the
Windows EPIC program may not function properly, and you may be forced
to use the DOS-level program. If you receive an error message “EPIC
Programmer Not Found” when you start the EPIC Windows program, you
Using DOS to Code, Compile, and Program 45
have the option of either troubleshooting the problem or using the EPIC
DOS program.
Using EPIC DOS version
If using Windows 95 or higher, you could either open a MS-DOS Prompt win-
dow or restart the computer in the DOS mode. Windows 3.XX users end the
Windows session.
Continuing with the wink.bas program
Assume we are still in the same DOS session and have just run the PBC com-
piler on the wink.bas program. We are still in the Applics directory. At the
DOS prompt, type EPIC and hit Enter to run the DOS version of the EPIC
software (see Fig. 5.10).
If you are operating out of a DOS window, you may get a device conflict mes-
sage box, shown in Fig. 5.11. We want MS-DOS to control the LPT port so the
EPIC programming software will work. Select the MS-DOS Prompt and hit
the OK button.
EPIC’s opening screen is shown in Fig. 5.12. Use the mouse to click on the
Open button, or press ALT-O on your keyboard. Select the
wink.hex file (see
Fig. 5.13). When the .hex file loads, you will see a list of numbers in the win-
Figure 5.10 Entering DOS EPIC command to start program.
Figure 5.11 Possible “Device Conflict” error message when DOS and Windows both try to use
printer port. Select DOS and hit OK button.
Figure 5.12 Opening screen of the EPIC programming software. Hit Open File button.
46