McGraw.Hill PIC Robotics A Beginners Guide to Robotics Projects Using the PIC Micro eBook-LiB Part 6 pps
Bạn đang xem bản rút gọn của tài liệu. Xem và tải ngay bản đầy đủ của tài liệu tại đây (3.38 MB, 20 trang )
Chapter
8
Walter’s Turtle
Behavior-Based Robotics
Behavior-based robotics were first built in the 1940s. At that time these robots
were described as exhibiting reflexive behavior. This is identical to the neural-
based approach to implementing intelligence in robots, as outlined in Chap. 7.
William Grey Walter—Robotics Pioneer
The first pioneer in the bottom-up approach to robotics is William Grey Walter.
William Grey Walter was born in Kansas City, Missouri, in the year 1910. When
he was 5, his family moved to England. He attended school in the United
Kingdom and graduated from King’s College, Cambridge, in 1931. After gradu-
ation he began doing basic neurophysiological research in hospitals.
Early in his career he found interest in the work of the famous Russian psy-
chologist Ivan Pavlov. Do you remember from your high school science classes
the famous “Pavlov’s dogs” stimulus-response experiment? In case you forgot,
Pavlov rang a bell just before providing food for dogs. After a while the dogs
became conditioned to salivate just by hearing the bell.
Another contemporary of Walter, Hans Berger, invented the EEG machine.
When Walter visited Berger’s laboratory, he saw refinements he could make
to Berger’s EEG machine. In doing so, the sensitivity of the EEG machine was
improved, and new EEG rhythms below 10 Hz could be observed in the
human brain.
Walter’s studies of the human brain led him to study the neural network
structures in the brain.
The vast complexities of the biological networks were
too overwhelming to map accurately or replicate. Soon he began working with
individual neurons and the electrical equivalent of a biological neuron. He won-
dered what type of behavior could be gathered with using just a few neurons
.
Copyright © 2004 The McGraw-Hill Companies. Click here for terms of use.
87
88 Chapter Eight
To answer this question, in 1948 Walter built a small three-wheel mobile
robot. The mobile robot measured 12 in high and about 18 in long. What is fas-
cinating about this robot is that by using just two electrical neurons, the robot
exhibited interesting and complex behaviors. The first two robots were affec-
tionately named Elmer and Elsie (electromechanical
robot, light sensitive).
Walter later renamed the style of robots Machina Speculatrix after observing
the complex behavior they exhibited.
In the early 1940s transistors had not been invented, so the electronic neu-
rons in this robot were constructed by using vacuum tubes. Vacuum tubes con-
sume considerably greater power than semiconductors do, so the original
turtle robots were fitted with large rechargeable batteries.
The robot’s reflex or nervous system consisted of two sensors connected to
two neurons. One sensor was a light-sensitive resistor, and the other sensor
was a bump switch connected to the robot’s outer housing.
The three wheels of the robot are in a triangle configuration. The front
wheel had a motorized steering assembly that could rotate a full 360° in one
direction. In addition, the front wheel contained a drive motor for propulsion.
Since the steering could continually rotate a full 360°, the drive motor’s elec-
tric power came through slip rings mounted on the wheel’s shaft.
A photosensitive resistor was mounted onto the shaft of the front wheel
steering-drive assembly. This ensured that the photosensitive resistor was
always facing in the direction in which the robot was moving.
Four Modes of Operation
While primarily a photovore (light-seeking) type of robot, the robot exhibited
four modes of operation. It should be mentioned that the robot’s steering motor
and drive motor were usually active during the robot’s operation.
Search. Ambient environment at a low light level or darkness. Robot’s
responses, steering motor on full speed, drive motor on
1
�
2
speed.
Move. Found light. Robot’s responses, steering motor off, drive motor full speed.
Dazzle. Bright light. Robot’s responses, steering
1
�
2
speed, drive motor
reversed.
Touch. Hit obstacle. Robot’s response, steering full speed, reverse drive motor.
Observed Behavior
In the 1950s
W
alter wrote two Scientific American
articles (“An Imitation of
Life,” May 1950; “A Machine That Learns,” August 1951) and a book titled
The Living Brain (Norton, New York, 1963). The interaction between the
neural system and the environment generated unexpected and complex
behaviors.
In one experiment
Walter built a hutch, where Elsie could enter and
recharge its battery. The hutch was equipped with a small light that would
Walter’s Turtle 89
draw the robot to it as its batteries ran down. The robot would enter the hutch,
and its battery would automatically be recharged. Once the battery recharged,
the robot would leave the hutch to search for new light sources.
In another experiment he fixed small lamps on each tortoise shell. The robots
developed an interaction that to an observer appears as a kind of social behav-
ior. The robots danced around each other, at times attracted and then repelled,
reminding him of a robotic mating ritual or territorial marking behavior.
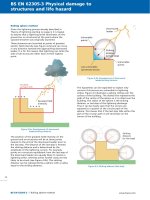
Building a Walter Tortoise
We can imitate most functions in Walter’s famous tortoise. My adaptation of
Walter’s tortoise is shown in Fig. 8.1. To fabricate the chassis, we need to do a
little metalwork. Working metal is made a lot easier with a few tools such as
a center punch, hand shears, nibbler, drill, vise, and hammer (see Fig. 8.2).
Center punch: Used to make a dimple in sheet metal to facilitate drilling.
Without the dimple, the drill is more likely to “walk” off the drill mark. Hold
the tip of the center punch in the center of the hole you need to drill. Hit the
center punch sharply with a hammer to make a small dimple in the material.
Shears: Used to cut sheet metal. I would advise purchasing 8- to 14-in metal
shears. Use as a scissors to cut metal.
Nibbler: Used to remove (nibble) small bits of metal from sheet and nibble
cutouts and square holes in light-gauge sheet metal. Note RadioShack sells
an inexpensive nibbler.
Figure 8.1 Adaptation of Walter’s turtle robot.
90 Chapter Eight
Figure 8.2 A few sheet metal tools.
Vise: Used to hold metal for drilling and bending.
Drill and hammer. Self-explanatory.
A well-stocked hardware store will carry the simple metalworking tools out-
lined. Most will also carry the light-gauge sheet metal and aluminum bar
materials needed to make the chassis.
I built the chassis out of (
1
8
-
1
2
-in) aluminum rectangle bar and 22- to 24-
gauge stainless steel sheet metal. Stainless steel is harder to work with than
cold rolled steel (CRS). And CRS is harder to work with than sheet aluminum.
If I were to do this project over, I would use aluminum extensively because it
is easier to work with than CRS or stainless steel.
Drive and Steering Motors
The robot uses servomotors for both the drive and steering. The drive servo-
motor is a HiT
ec HS-425BB 51-oz torque servomotor (see Fig. 8.3). The HS-
425BB servomotor is modified for continuous rotation. For steering the robot I
used a less expensive HiTec HS-322 42-oz torque servomotor (unmodified).
Before we go into the robot fabrication,
we must first modify the HS-425BB
servomotor for continuous rotation.
Walter’s Turtle 91
Figure 8.3 HS-425 servomotor.
Modifying the HS-425BB Servomotor
I chose the HS-425BB servomotor because I found it to be the easiest servo-
motor to modify for continuous rotation. To create a continuous rotation ser-
vomotor, it is necessary to mechanically disconnect the internal potentiometer
from the output gear.
First remove the four back screws that hold the servomotor together (see
Fig. 8-4). Keep the servomotor horn attached to the front of the servomotor.
Once the screws are removed, gently pull off the front cover of the servomotor.
The output gear will stay attached to the front cover, separating from the shaft
of the potentiometer left in the servomotor’s case (see Fig. 8.5). Sometimes the
idler gear will fall out. Don’t panic; it’s easy enough to put back in position
when you reassemble the servomotor.
Next remove the plastic clip from the servomotor shaft (see Fig. 8.6). With the
plastic clip removed, the shaft of the potentiometer will no longer follow the
rotation of the output gear. Align the potentiometer shaft so that the flat sides
of the shaft are parallel to the long sides of the servomotor case (see Fig. 8.7).
Take off the front cover of the servomotor, and remove the center screw hold-
ing the servomotor horn and output gear (see Fig. 8.8). The output gear is
92 Chapter Eight
Figure 8.4 Removing screws from back of servomotor case.
Output Gear Idler Gear
Servomotor
Horn
Plastic Clip
Figure 8.5 Inside view of HS-425 servomotor.
Walter’s Turtle 93
Figure 8.6 Removing plastic clip.
Figure 8.7 Top view of servomotor gears with plastic clip removed.
shown in Fig. 8.9. Remove the bearing from the output gear (see Fig. 8.10). The
bearing needs to be removed so that you can cut away the stop tab from the
gear. Use a hobby knife or miniature saw to cut away the stop tab. When you
are finished cutting off the tab, check that the cut surfaces are smooth. If not,
use a file to smooth out the surfaces.
Next remount the bearing onto the gear (see Fig. 8.11). Reassemble the idler
and output gears onto the servomotor’s gear train in the case (see Figs. 8.12 and
8.13). Now fit on the servomotor cover, and reattach the cover, using the four
screws.
94 Chapter Eight
Figure 8.8 Removing servomotor horn from front of case.
Bearing
Stop
Ta b
Output Gear
Figure 8.9 Output gear removed from front case
.
Walter’s Turtle 95
Stop
Ta b
Figure 8.10 Stop tab on output that must be removed.
Figure 8.11 Stop tab removed and bearing placed back on gear.
96 Chapter Eight
Idler Gear
Output Gear
Figure 8.12 Output gear fitted back onto servomotor.
Figure 8.13 Ready for reassembly of servomotor.
The output shaft of the servomotor is now free to rotate continuously. A
pulse width of 1 ms sent 50 to 60 times per second (Hz) will cause the servo-
motor to rotate in one direction.
A pulse width of 2 ms will cause the servo-
motor to turn in the opposite direction.
There are two ways we can stop the servomotor from rotating. The first
method is to simply stop sending pulses to the servomotor
.
The second method
is a little trickier. A pulse width of approximately 1.5 ms will stop the servo-
Walter’s Turtle 97
motor. The exact pulse width for each servomotor must be determined experi-
mentally. The exact pulse width required is based upon the position of the sta-
tic potentiometer shaft inside the servomotor. If you followed the directions
provided, it should be about 1.5 ms. To find the exact pulse width to stop the
servomotor, you have two options. The first is to keep manually adjusting the
pulse width until you find the correct pulse width. As you approach the pulse
width needed to stop the servomotor, you will notice that the rotational speed
of the servomotor will slow down. You can use this as a feature to create a
speed control, if you wish.
The second option is to look at the servomotor circuit described in Chap. 14 (see
Fig. 14.11). This simple circuit allows you to quickly find the correct pulse width.
Sheet Metal Fabrication
There are three pieces of sheet metal one needs to fabricate.
The U bracket, shown in Fig. 8.14, holds the front wheel and drive servomo-
tor. The U bracket may be fabricated from 22-gauge 1.25- 5-in aluminum
sheet metal. I would recommend purchasing the U bracket (see Parts List)
because the cutting required for this fabrication is extensive and precise.
The U bracket mounts the drive servomotor (see Fig. 8.15). In addition, on
the top of the U bracket are holes for mounting a servomotor horn, which is
used to connect the steering servomotor.
Figure 8.16 is a diagram of the base with a cutout for the 42-oz servomotor.
The base measures 3 in
5.5 in. The base will hold the power supply and the
electronics. Follow the servomotor diagram in removing metal from the base.
First drill the four (
1
8
-in) holes for mounting the servomotor. Next use the
same drill bit to drill holes along the inside perimeter of the servomotor
cutout. Removing metal in this way is a little easier than trying to saw or nib-
ble it away. When you have drilled as many holes as possible, use the metal
nibbler to cut the material between the holes to finish removing this material.
Then continue to nibble away at the sides of the cutout until you have the rec-
tangle shape needed. Before you mount the servomotor, file the edges of the
hole smooth.
Finish the base by drilling the other holes outlined in the drawing.
The rear axle bracket is shown in Fig. 8.17; it is made from
1
8
-
1
2
- 10-in
aluminum bar. Drill the four
1
8
-in holes in the aluminum before bending it into
shape. For the rear axle I used the wire from a metal coat hanger. Mount the
rear axle and wheels to the robot base
,
using two 6-32 mac
hine screws and nuts.
To continue, we need to mount the front drive wheel to the servomotor. The
drive wheel has a diameter of 2
3
4
in and is
1
8
in thick (see Fig. 8.18). The holes
are drilled in the wheel to accept a standard HiTec servomotor horn (see F
ig
.
8.19). The horn is secured to the wheel using four no. 2
1
4
-in sheet metal
screws (see Fig. 8.20).
Before you attach the servomotor to the U brac
ket,
secure a servomotor horn
to the top of the U bracket, using the predrilled holes (see Fig. 8.21).
Fits HS-322, HS-325,
HS-425 servomotors
5.2
5.80
1.25
2.37
3.57
.625
Hole size
5
/
32
2.97
Bend 90°
Bend 90°
Material 1.25 x 5.80 x .050
Aluminum 6061
7
/
32
dia. hole
Bracket
bent
at 90°
.224
C/L
1.53
C/L
.37
2.14
C/L
Rectangle cutout
.83 x 1.62
.29 dia.
.6
.288
.39
.8
.91
.14
.31
.625
.94
1.11
Four small shaded holes
1
/
8
dia.
All dimensions in inches
98 Chapter Eight
Figure 8.14 Drawing of U brac
ket for mounting the drive servomotor.
Walter’s Turtle 99
Figure 8.15 U bracket with drive servomotor attached.
The front of the mounting ears, both top and bottom, on the servomotor has
small tabs (see Fig. 8.22). Cut and file away these tabs so that the servomotor
can be mounted flush against the bracket (see Fig. 8.23). Next mount the ser-
vomotor to the U bracket, using 6-32 machine screws and nuts. Attach the
wheel/horn assembly to the servomotor (see Figs. 8.24 and 8.25). Put this
assembly to the side while we work on other components.
Shell
The original tortoises used a transparent plastic shell. The shell was connect-
ed to a bump switch that caused the robot to go into “avoid” mode when acti-
vated. I looked at, tried, and rejected a number of different shells. Finally I was
left with no choice other than to fabricate my own shell.
Rather than fabricate an entire shell,
I made a bumper that encompasses
the robot. The bumper is fabricated from
1
8
-
1
2
- 32-in aluminum bar (see
F
ig
. 8.26). The aluminum bar is marked at the center. Each bend required in
the bumper is also marked in pencil.
The material is placed in a vise at eac
h
pencil mark and bent to the angle required. The two ends of the aluminum bar
end up at the center bac
k of the bumper. These two ends are joined together
using a
1
8
-
1
2
- 1-in-long piece of aluminum bar
.
A
1
8
-in hole is drilled on
each end of the aluminum bar. Matching holes are drilled in the ends of the
42-oz
servo
1
/
2
Ø wire
pass-through
hole
1
/
8
- in holes to match rear axle bracket
Sheet metal 3 in x 5.5 in
Front
100 Chapter Eight
Figure 8.16 Robot base showing
cutout for 42-oz servomotor and
holes for rear axle bracket.
bumper. The bar is secured to the bumper using two 5-40 machine screws and
nuts (see Fig. 8.27).
The upper bracket used to connect the bumper to the robot is identical to the
front end of the bumper (see Fig. 8.28). The upper bracket is made from
1
8
-
1
2
- 14.5-in aluminum bar. As with the bumper, the center of the bar is
marked, and each bend required is also marked in pencil. The material is bent
in a vise the same way as the bumper.
Finding the Center of Gravity
It is important to find the center of gravity line of the bumper, because this will
mark the optimum location where the upper bracket should be attached. Rest
the bumper on a length of aluminum bar. Move the bumper back and forth
until it balances evenly on the aluminum bar. Mark the centerline positions on
each side of the bumper. Drill a
1
8
-in hole on each side. Drill matching holes on
Walter’s Turtle 101
3
/
4
in
2
3
/
4
in
1
/
8
- in hole for axle
1
/
8
- in holes
1
/
8
- in hole for axle
125°
2
3
/
4
in
3
5
/
8
in
Wheel
Wheel size
Axle
Height
2 in
10 in
Figure 8.17 Rear axle bracket detail.
the ends of the upper bracket. Then secure the upper bracket to the bumper
using 5-40 machine screws and nuts.
Attaching Bumper to Robot Base
The bumper is attac
hed to the robot body by the upper bracket. Drill three
1
�
8
-in
holes in the top of the upper bracket. One
1
�
8
-in hole is in the center, and the two
other holes are 1
1
�
8
in away from the center hole (see Fig. 8.29). Three matching
holes are drilled in the robot base behind the servomotor
.
The holes should be
placed so that the bumper (once secured to the base) has adequate clearance (
1
�
8
to
1
�
4
in) from the back wheels. The matching center hole on the base must be off-
set by moving the drilled hole forward on the base by about
1
�
4
in.
102 Chapter Eight
.575 .575
.385 .385
Center hole .300 diameter
All other holes
1
/
8
diameter
Material
1
/
8
- thick hardwood
2.75 diameter
Side view
1
/
8
All dimensions in inches
Figure 8.18 Drawing of drive wheel.
Figure 8.19 Servomotor drive wheel with holes for mounting
servomotor horn.
Walter’s Turtle 103
Figure 8.20 Drive wheel with servomotor horn attached.
Figure 8.21 U bracket before mounting of drive servomotor.
The bracket is secured to the base using two 1-in-long 6-32 machine screws,
four 6-32 nuts, and two 1-in-long 2-lb compression springs, with a
1
�
8
-in center
diameter (see Fig. 8.30). The tension and resiliency of the bumper can be
adjusted by tightening or releasing the upper 6-32 machine screw nuts. Once
assembled, the bumper will tilt back and close the bumper switch when the
robot (bumper) encounters (pushes against) an obstacle.
Ta b
Ta b
Filed
Away
104 Chapter Eight
Figure 8.22 Tab on servomotor case that needs to be filed off.
Figure 8.23 Tab files off servomotor case.
Bumper Switch
The bumper switch makes use of the center holes. Looking back at Fig. 8.30,
we see the center hole is fitted with a 6-32 machine screw held on by a stan-
dard (zinc-plated) nut, followed by a brass nut. The brass nut has a wire sol-
dered to it. The purpose of this little assembly is just to attach a wire to the
bracket-bumper assembly. Brass nuts are used because it is possible to solder
wires to brass to make electrical connections. This is in contrast to the stan-
dard zinc-plated steel nuts that are very difficult (impossible) to solder.
Walter’s Turtle 105
Figure 8.24 Attaching drive servomotor to U bracket by using plastic
screws and nuts.
Figure 8.25 Another view of drive servomotor and U bracket.
106 Chapter Eight
9
1
/
2
in
4
3
/
4
in 4
3
/
4
in
4
1
/
2
in4
1
/
2
in
3
1
/
2
in
32 in
Figure 8.26 Top dimensional view of bumper fabricated from
1
8
-in
1
2
-in
32-in aluminum bar.
Aluminum bumper
5-40 nuts
1-in-long aluminum bar
5-40 machine screws
Figure 8.27 Cutaway close-up of aluminum bracket used to secure the open ends of
the bumpers.
The second half of the tile switch is comprised of a 1-in 6-32 plastic machine
screw and three 6-32 mac
hine screw nuts. One nut must be brass with a wire
soldered to it (see F
ig
.
8.31).
F
igures 8.32 and 8.33 are close-up photographs of
the finished bumper switc
h.
The assembly is adjusted so that the brass nut on
the top of the 6-32 machine screw lies just underneath the upper aluminum
brac
ket without touc
hing
.
When the upper bracket tilts forward, contact is
made between the aluminum bracket and brass nut,
whic
h is read as a switc
h
closure.