McGraw.Hill PIC Robotics A Beginners Guide to Robotics Projects Using the PIC Micro eBook-LiB Part 7 pps
Bạn đang xem bản rút gọn của tài liệu. Xem và tải ngay bản đầy đủ của tài liệu tại đây (2.25 MB, 20 trang )
Walter’s Turtle 107
14
1
/
2
in
1 in
1 in
4
1
/
2
in4
1
/
2
in
3
1
/
2
in
Figure 8.28 Side dimensional view of upper bracket fabricated from
1
8
-in
1
2
-in 14
1
2
-in aluminum bar.
1
1
/
8
in 1
1
/
8
in
1
/
8
-in hole
Figure 8.29 Side dimensional view for hole placement in top of the upper bracket.
6-32
machine
screw
6-32
nut
6-32
nut
6-32
nut
6-32
brass nut
Soldered
wire
1-in-long
compression
spring
1-in-long
compression
spring
6-32
1
/
2
machine
screw
Figure 8.30 Side view of upper bracket detailing the mounting of the upper
bracket to the robot base using machine screws and compression springs.
Also details bracket half of the bumper switch.
Mounting the Steering Servomotor
If you haven’t done so, mount the steering servomotor to the robot base, using
four 6-32 plastic machine screws and nuts. Before you attach the U bracket to
the steering servomotor, make sure the steering servomotor spindle is in its
center position. This will ensure that the robot will steer forward right and left
108 Chapter Eight
6-32 brass nut
6-32 nuts
Upper bracket
Wire
6-32
plastic
machine
screw
Robot baseBase
Figure 8.31 Side dimensional detail (robot base side of the bump switch) of plastic screw
with top brass nut.
Figure 8.32 Close-up photograph detailing bump switch and spring mounting of upper bracket.
properly. The following short program will place a servomotor in its center
position:
start:
pulsout portb.1, 150
pause 18
goto start
The output pulse signal for the servomotor is taken as pin RB1. Once the ser-
vomotor is in its center position, attach the U bracket to the servomotor so that
the drive wheel is pointing forward.
Photoresistor
The CdS photoresistors (see Fig. 8.34) used in this robot have a dark resistance
of about 100 k�
and a light resistance of 10 k�. The CdS photoresistors have
large variances in resistance between cells. It is useful to use a pair of CdS cells
for this robot that matches, as best as one can match them, in resistance.
Since the resistance value of the CdS cells can vary so greatly, it’s a good
idea to buy a few more than you need and measure the resistances, to find a
pair whose resistances are close. There are a few ways you can measure the
resistance. The simplest method to use a volt-ohmmeter, set to ohms. Keep the
light intensity the same as you measure the resistance. Choose two CdS cells
that are closely matched within the group of CdS cells you have.
The second method involves building a simple PIC16F84 circuit connected
to an LCD display. The advantage of this circuit is that you can see the
response of the CdS cells under varying light conditions. In addition, you can
see the difference in resistance between the CdS cells when they are held
under the same illumination. This numeric difference of the CdS cells under
exact lighting is used as a fudge factor in the final turtle program. If you just
test the CdS cells with just an ohmmeter
,
you will end up using a larger fudge
factor for the robot to operate properly
.
The schematic for testing the CdS cells is shown in Fig. 8.35. The circuit,
built on a PIC Experimenter’
s Board, is shown in Fig. 8.36. The PicBasic Pro
testing program follows:
‘CdS cell test
‘PicBasic Pro program
‘Serial communication 1200 baud true
‘Serial information sent out on port b line 0
Walter’s Turtle 109
Figure 8.33 Close-up photograph detailing bump switch.
110 Chapter Eight
Figure 8.34 CdS photoresistor cell.
LCD Display
V1
100KΩ
V2
100KΩ
CdS
Cell
CdS
Cell
C2
.1µF
50V
C3
.1µF
50V
SW4
C1
.1µF
R1
4.7KΩ
U1
+5V
X1
4MHz
4
16
15
PIC 16F84
5
VSS
VDD
17
18
1
2
3
6
7
8
9
10
11
12
13
RB7
RB6
RB5
RB4
RB3
RB2
RB1
RB0/INT
RA4/TOCKI
RA3
RA2
RA1
RA0
14
MCLR'
OSC1
OSC2
Serial Line
+5V
Gnd
Figure 8.35 Electrical schematic for testing and calibrating CdS cells.
‘Read CdS cell #1 on port b line 1
‘Read CdS cell #2 on port b line 7
v1 var byte ‘Variable v1 holds CdS #1 information
v2 var byte
‘Variable v2 holds CdS #2
Walter’s Turtle 111
Figure 8.36 Test circuit built on PIC Experimenter’s Board.
information
pause 1000 ‘Allow time for LCD display
main:
pot portb.1,255,v1 ‘Read resistance of CdS #1 photocell
pot portb.7,255,v2 ‘Read resistance of CdS #2 photocell
‘Display information
serout portb.0,1,[$fe,$01] ‘Clear the screen
pause 25
serout portb.0,1,[“CdS 1 = ”]
serout portb.0,1,[#v1]
serout portb.0,1,[$fe,$C0] ‘Move to line 2
pause 5
serout portb.0,1,[“CdS 2 = ”]
serout portb.0,1,[#v2]
pause 100
goto main
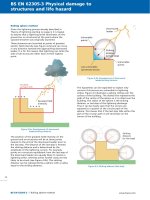
Notice in Fig. 8.36 that CdS cell 1 is reading 37 and CdS cell 2 is reading 46
under identical lighting
.
K
eep in mind that this is a closely matched pair of
CdS cells
.
W
e can use a fudge factor of
±15 points
.
This means that as long as
the readings between cells vary from each other by ±15 points, the microcon-
troller will consider them numerically equal.
112 Chapter Eight
Trimming the Sensor Array
If you are using the Experimenter’s Board, you can trim and match the CdS
cells to one another. Doing so allows you to reduce the fudge factor and pro-
duces a crisper response from the robot.
Typically one CdS cell resistance will be lower than that of the other CdS cell.
To the lower-resistance CdS cell add a 1-k
(or 4.7-k) trimmer potentiometer
in series (see Fig. 8.37). Adjust the potentiometer (trim) resistance until the out-
puts shown on the LCD display equal each other. Trim the CdS cell under the
same lighting conditions in which the robot will function. The reason for this is
that when the light intensity varies from that nominal point to which you’ve
trimmed the CdS cell, the responses of the individual CdS cells to changes in
light intensity also vary from one another and then are not as closely matched.
Once you have a pair of CdS cells to use, they need to be attached to the
robot. I soldered the CdS cells and capacitors to a small piece of perforated
board (see Fig. 8.38). Figure 8.38 shows both the front and back of the sen-
sor array.
The opposite side of the servomotor bracket that holds the continuous rota-
tion servomotor is perfect for mounting the photoresistor. I used a small piece
of transparent plastic,
1
2
in wide 6 in long
1
16
in thick (12.5 mm 152 mm
1.5 mm thick) to create an L bracket on which to mount the photoresistors
(see Fig. 8.39).
A
1
8
-in hole is drilled
1
2
in up from one end (see Fig. 8.37). The plastic is then
gently heated about 2
1
2
in up from the end (see bend point). When the plastic
softens, bend it to a 90° angle and hold it in position until the plastic hardens
again.
LCD Display
V1
100KΩ
V2
100KΩ
CdS
Cell
CdS
Cell
C2
.1µF
50V
C3
.1µF
50V
SW4
C1
.1µF
R1
4.7KΩ
U1
+5V
X1
4MHz
4
16
15
PIC 16F84
5
VSS
VDD
17
18
1
2
3
6
7
8
9
10
11
12
13
RB7
RB6
RB5
RB4
RB3
RB2
RB1
RB0/INT
RA4/TOCKI
RA3
RA2
RA1
RA0
14
MCLR'
OSC1
OSC2
Serial Line
+5V
Gnd
1KΩ
V3
Figure 8.37 Electrical schematic of testing circuit with potentiometer trimmer.
BACK
FRONT
Walter’s Turtle 113
Figure 8.38 Front and back
mounting of CdS cells and
capacitors to perforated board.
Bend
point
90°
3
1
/
2
in
6 in
1
/
2
in
2
1
/
2
in
3
1
/
2
in
Material: Plastic
Size
1
/
2
in x 6 in x
3
/
32
in
Figure 8.39 F
abrication drawing for plastic brac
ket for CdS cells.
114 Chapter Eight
Figure 8.40 CdS sensor array attached to plastic bracket.
Next I used hot glue to secure the CdS cells to the back of the plastic L (see
Fig. 8.40). Then I mounted an opaque vane on the front surface of the plastic
in between the photoresistors (see Fig. 8.41). The opaque vane is made from a
small piece of conductive foam I had lying around. I simply hot-glue one edge
to the plastic.
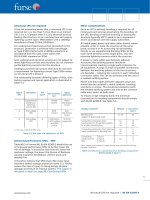
Using the opaque vane and the two CdS photosensors in this configuration
alleviates much of the computation needed to track a light source. The operation
of the sensor array is shown in Fig. 8.42. When both sensors are equally illumi-
nated, their respective resistances are approximately the same. As long as each
sensor is within ±10 points of the other, the PIC program will see them as equal
and won’t move the servomotor (steering). When the sensor array is not proper-
ly aimed at the light source, the vane’s shadow falls on one of the CdS cells. This
pushes the resistance beyond the ±10-point range. The PIC microcontroller acti-
vates the steering servomotor to bring both sensors back under even illumina-
tion. In doing so, this steers the robot straight to the light source.
If the sensors detect too great a light intensity, the robot will go into avoid mode.
Mounting the photoresistor array on the drive wheel assembly keeps the
sensors pointing in the same direction as the drive wheel (see Fig. 8.43). This
replicates the function of the original tortoise robots. The array is secured to
the U bracket by using a small plastic screw and wing nut.
Schematic
The sc
hematic for the robot is shown in Fig. 8.44. Intelligence for the robot is
provided by a single PIC 16F84 microcontroller. The forward servomotor is
Walter’s Turtle 115
SIDE VIEW
TOP VIEW
CdS Cell
CdS Cell
1
/
2
in
Vane
Plastic "L"
Perf. Board
2
1
/
2
in
Figure 8.41 Drawing showing CdS cells attached to bracket with vane.
connected to RB7, and the steering servomotor control signal is provided by
RB6. Sensor readings of the CdS cell are read off pins RB2 and RB3. The
bumper switch is read off pin RA0.
There is nothing critical about the circuit; it may be hardwired on a pro-
totyping board. I chose a simpler route. Images SI Inc. sells a four-servo-
motor controller board. This board has all the connections needed for the
sensors and servomotors. My connections to the PC board are shown in Fig.
8.45. A picture of the finished circuit is shown in Fig. 8.46. Notice in the pic-
ture I used terminal blocks to connect the sensor array and bumper switch.
Program
Upon power up
,
the drive motor is off, and the microcontroller begins scanning
for the brightest light source, using the servomotor.
If a light source is too bright, the robot jumps into avoid mode. In avoid mode
the robot bac
ks a
way from the light source by reversing the drive motor while
steering the drive wheel left or right. If the light isn’t so bright as to activate
116 Chapter Eight
AB BA
Light
source
A cell in shadow;
tracker rotates to
right.
B cell in shadow;
tracker rotates to
left.
Equal illumination;
no movement.
SIDE VIEW
Figure 8.42 Operation of sensor array for targeting light source.
the avoid mode, the robot steers in the direction of the light and activates the
drive wheel forward.
If the bumper switch is activated, the robot assumes it has hit an obstacle
and so goes into avoid mode. The robot uses avoid mode for too bright a light
and collisions. If the tilt switch is not activated (no collision), then the program
jumps to the beginning and the process continues scanning and moving to the
brightest light source.
The program is written for the PicBasic Pro compiler that is programmed
into a PIC 16F84. The program should be able to be compiled and run with
few modifications on the PicBasic version. In-group variances in CdS sensors,
drive motors
,
robot structure
, and the like can be adjusted for or modified in
the program.
‘Turtle program
‘PicBasic Pro program
‘Read CdS cell #1 on port b line 1
‘Read CdS cell #2 on port b line 7
v1 var byte ‘Variable v1 holds CdS #1 information
v2 var byte ‘Variable v2 holds CdS #2 information
v3 var byte ‘Variable for calculation
s1 var byte ‘Variable s1 holds servomotor #1 pulse width info
s2 var word ‘Variable for random function
rv var byte ‘Variable rv holds the range value
s1 = 150 ‘Initialize steering servomotor facing forward
rv = 10 ‘Adjust as needed for smooth operation
ct var byte ‘Counter
‘Drive servomotor ** continuous rotation information
‘Connected to pin portb.7 ** variable pulse width numbers
‘157 forward * 165 slow forward
‘167 stop
‘169 slow backward * 177 backward
start:
pot portb.2,255,v1 ‘Read resistance of CdS #1 photocell
pot portb.3,255,v2 ‘Read resistance of CdS #2 photocell
‘Check bumper switch “Did I hit something?”
if porta.0 = 0 then avoid ‘Hit obstacle go into avoid mode
‘Is it sleepy time?
if v1 <= 230 then skp ‘Is it dark enough to sleep?
Walter’s Turtle 117
Figure 8.43 Attaching sensory array to drive servomotor’s U bracket.
118 Chapter Eight
Figure 8.44 Schematic of robot.
if v2 > 230 then slp
‘Is it too bright to see?
skp:
if v1 >= 12 then skip2
if v2 < 12 then avoid
‘Which way do I go?
skip2:
if v1 = v2 then straight
if v1 > v2 then greater
if v1 < v2 then lesser
straight:
pulsout portb.6, s1
pulsout portb.7, 157
goto start
greater:
v3 = v1 - v2
if v3 > rv then right
goto straight
lesser:
V1
100KΩ
V2
100KΩ
CdS
Cell
CdS
Cell
C2
.1µF
50V
C3
.1µF
50V
SW4
C1
.1µF
R1
4.7KΩ
U1
+5V
X1
4MHz
4
16
15
PIC 16F84
5
VSS
VDD
17
18
1
2
3
6
7
8
9
10
11
12
13
RB7
RB6
RB5
RB4
RB3
RB2
RB1
RB0/INT
RA4/TOCKI
RA3
RA2
RA1
RA0
14
MCLR'
OSC1
OSC2
+5V
+5V +5V
R2
10KΩ
SW3
Bumper switch
Servo
Motor
1
Servo
Motor
2
‘Yes
‘No sleep––keep moving
‘Is it too bright to live?
‘Yes
‘Not so bright––should I steer?
‘Light is equal go straight
‘Check light intensity to turn right
‘Check light intensity to turn left
‘Go forward in the direction you’re facing
‘Don’t move steering
‘Go forward
‘Check numerical difference between CdS cells
‘If more than rv turn right
‘If not go straight
Walter’s Turtle 119
12 34
Images SI Inc., NY
To p
Bottom
9V
Battery
Servomotor
Connector
S+ –
Servomotor Signal
+5V
Ground
S
+
–
S
+
+
–
–
S
+
–
S
+
–
470
10K
10K
4.7K
Ser Out
Gnd
U1
16F 84
Reset
Gnd
Gnd
Gnd
12 34
Servomotor Controller
To
Bumper
Switch
To
Sensor
Array
On Off
C1
C2
C1
DC Power Jack
PJ-102B
+
–
Servomotor #1 Forward
Servomotor #2 Tur n
Figure 8.45 Using an existing PCB board for building robot’s electronics.
v3 = v2 - v1 ‘Check numerical difference between CdS cells
if v3 > rv then left
‘If more than rv turn left
goto straight ‘If not go straight
right:
‘Turn right
s1 = s1 + 1 ‘Increment variable s1 to turn right
if s1 > 225 then s1 = 225 ‘Limit s1 to 225
pulsout portb.6, s1
‘Move steering servomotor
pulsout portb.7, 165 ‘Go forward slowly
goto start
left:
‘Turn left
120 Chapter Eight
Figure 8.46 Close-up of electric circuit board.
s1 = s1 - 1
if s1 < 65 then s1 = 65
pulsout portb.6, s1
pulsout portb.7, 165
goto start
slp:
pulsout portb.6, s1
pulsout portb.7, 167
goto start
avoid:
random s2
s1 = s2 / 256
if s1 < 65 then s1 = 65
if s1 > 225 then s1 = 225
for ct = 1 to 125
pulsout portb.6, s1
pulsout portb.7, 177
pause 18
next ct
s1 = 150
‘Decrement variable s1 to turn left
‘Limit s1 to 65
‘Move steering servomotor
‘Go forward slowly
‘Go asleep
‘Don’t move steering
‘Stop drive servomotor
‘Avoid mode, send
‘Randomize s2
‘Reduce range of s1 to 1 to 255
‘Set lower limit
‘Set upper limit
‘Start counter
‘Steer (turn) in a random direction
‘Reverse drive motor (slow)
‘Pause to send instructions at 50 Hz
‘Loop
‘Steer back to center
Walter’s Turtle 121
goto start
Adding Sleep Mode
I added a sleep mode for occasions when the ambient light is very low. The
robot moves forward when both CdS sensors receive approximately the same
light intensity. The robot steers right or left when one CdS cell receives more
light than the other. If each CdS cell receives too much light or the bump
switch is activated, the robot goes into avoid mode.
Power
A 9-V battery on the PC board supplies adequate electrical power for the robot
for a short time. Although I used this power supply for testing robot function,
you will need a stronger power supply for extended use. The PCB board has a
dc voltage socket where an external power supply can be connected.
The finished robot is shown in Figs. 8.47 and 8.48.
Behavior
This robot exhibits the following behavior. In ambient light, no bright light
source, the robot travels in a straight line (or circle depending upon the last
light source target). If the ambient light is too bright, it jerks backward. With
a mediocre light source, it will aim and travel toward the light.
The program can be developed further to explore more interesting and exotic
behaviors. Before we do so, let’s first look at how the standard program functions.
Fudge Factor
The variable RV (range value) is the fudge factor. At the beginning of the pro-
gram the variable RV is assigned a value of 10. In my prototype I actually used
an RV of 2 because I had matched the resistance values of CdS cells, as dis-
cussed earlier.
Tolerance between the two CdS photoresistors may be increased or
decreased by modifying the numerical value of this variable. You may need to
adjust this variable according to how closely the resistance values of your CdS
cells matc
h.
Light Intensity
The program continually checks the light intensity received (resistance) by
eac
h CdS sensor and then makes a decision based on those readings
. The max-
imum reading from the sensor is 255 (total darkness).
If the room gets dark
enough to generate a value of 230 in each CdS cell, then the robot goes into
sleep mode
.
‘Is it sleepy time?
122 Chapter Eight
Figure 8.48 Side view of turtle robot.
Figure 8.47 Front view of turtle robot.
Walter’s Turtle 123
if v1 <= 230 then skp ‘Is it dark enough to sleep?
if v2 > 230 then slp ‘Yes
The opposite of sleep mode is the “too bright to live.” If the light becomes too
intense, this triggers the avoid mode.
‘Is it too bright to see?
skp: ‘No sleep—keep moving
if v1 >= 12 then skip2 ‘Is it too bright to live?
if v2 < 12 then avoid ‘Yes
Increasing the numerical value, in this case 12, decreases the light intensity
that puts the robot into avoid mode. Decreasing the numerical value increases
the light intensity needed to throw the robot into avoid mode. In most cases you
will want to
decrease this number. However, I would advise you not to go below
a numerical value of 9, because even at full light saturation of the CdS cell, its
resistance never drops to zero. And in my light saturation tests the sensor nev-
er yielded a value less than 5.
In this robot, intense light pushes the robot into avoid mode. If this were a
true photovore robot, high light intensity would put it into a feeding mode.
Handedness
In addition, one could create handedness in the robot (right- or left-handed) by
modifying either greater or lesser subroutines, not both. This will create a
robot that is more likely to turn in one direction than in the other.
greater:
v3 = v1 - v2 ‘Check numerical difference between CdS cells
if v3 > rv then right ‘If more than rv turn right
goto straight ‘If not go straight
For instance, if RV 10, we can substitute the value 7 like this
if v3 > 7 then right
Then in the lesser subroutine the RV is kept the same. The result of this
manipulation is that we would create a robot that is more likely to turn to the
right.
This robot offers opportunities to the robotists and experimenters for con-
tinued experimentation and development in both hardware and software.
Parts List
12-in 12-in sheet metal sheet of 22 or 24 gauge
(1) Aluminum bar
1
8
in
1
2
in 32 in long
(1) Aluminum bar
1
8
in
1
2
in 14
1
2
in long
(1)
Aluminum bar
1
8
in
1
2
in 2 in long
124 Chapter Eight
(1) 42-oz-torque hobby servomotor (HS-322)
(1) Hobby servomotor (HS-425)
(1) 2
3
4
-in-diameter drive wheel
(2) CdS photocells, 100 k
dark, 10 k light
(1) 10-k,
1
4
-W resistor
(1) 4.7-k,
1
4
-W resistor
(2) 22-pF caps
(1) 4-MHz ceramic resonator or Xtal
(1)(IC1) PIC microcontroller (16F84-04)
(1) U bracket for drive servomotor
Miscellaneous needs include perforated board,
1
16
-in-thick transparent plastic,
5-40 machine screw and nuts, plastic 6-32 1-in machine screw, 6-32 brass
nuts, 1-in-long compression springs (2 lb). Aluminum bars, machine screws,
tubing, and compression springs are available in most well-stocked hardware
stores.
Servomotors may be purchased at hobby shops or electronics distributors.
Electronic components may be purchased from RadioShack, Images SI Inc.,
Jameco Electronics, JDR Microdevices (see Suppliers at end of book).
PC board, servomotor drive wheel, and U bracket for drive servomotor may
be purchased from Images SI Inc.
9
Chapter
Braitenberg Vehicles
In 1984 Valentino Braitenberg published a book titled Vehicles—Experiments
in Synthetic Psychology. In his book Valentino describes a number of wondrous
vehicles that exhibit interesting behaviors based on the use of a few electron-
ic neurons.
Similar in concept to Walter’s seminal neural work with his robot tortoises,
Valentino’s vehicle behavior is more straightforward, making it somewhat eas-
ier to follow both theoretically and logically. This also makes it easier to imple-
ment his ideas into real designs for robots.
In this chapter we will build a few Braitenberg-type vehicles.
At the heart of Braitenberg vehicles is his description of a basic vehicle,
which is a sensor connected to a motor. Braitenberg continues to explain the
relationship between the sensor and motor. The relationship is essentially the
connection between the sensor and motor, and this connection ought to be con-
sidered as a neuron. With the connection configured as a neuron, the structure
is shown in Fig. 9.1. Instead of a vehicle we will describe the structure diagram
as a small neural network.
At the front end of the network we find a sensor, followed by the neuron
and finally the output motor. The sensor detects the intensity of light and
outputs a proportional signal to the motor. High-intensity light produces
high rpm’s (revolutions per minute) from the motor. Low-intensity light pro-
duces slow rpm’s.
Consider the sensor portion as modular and interchangeable. Other sensors
can be plugged in and incorporated to detect any number of environmental
variables, for example, heat, pressure, sound, vibration, magnetic fields (com-
pass), electrical fields, radioactivity, and gases (toxic or otherwise).
In addition,
the motor
,
like the sensor, represents a singular example of an
output module. Other output modules could include a second neuron (or neur-
al layer), electric circuit, on/off switch, light source, etc.
Copyright © 2004 The McGraw-Hill Companies. Click here for terms of use.
125
126 Chapter Nine
Figure 9.1 Basic neuron setup, sensor input, neuron, and motor output.
The neuron’s input is the output of the sensor, and the neuron’s output
activates a motor in relationship to its input. The input/output “relation-
ship” of the neuron can be made to be one of many different mathematical
functions. The relationship may also be called
connection strength or con-
nection function when you are reading the neural network literature. The
relationship is one of the most important variables we can modify when pro-
gramming our robot.
Neural I/O Relationships
When the neuron is stimulated, it generates an output. As stated, there are a
number of mathematical functions that can exist inside the neuron. These
functions act upon the neuron’s input (sensor output) and pass through the
results to the neuron’s output. Let’s examine a few of them.
Positive proportional. As input from the sensor increases, activation (rpm’s)
of the motor increases in proportion; see Fig. 9.2.
Negative proportional. As input from the sensor increases, activation (rpm’s)
of the motor decreases in proportion (see Fig. 9.3).
Digital. As input from the sensor output exceeds a predetermined
(programmed) threshold (that may be positive or negative), the motor is
activated (see Fig. 9.4).
Gaussian. As input from the sensor increases, output passes through a
gaussian function for motor activation (see Fig. 9.5).
Essentially the neuron may incorporate any mathematical function. It
would perform this function on the sensory input to generate an appropriate
output. I have provided an example of only a few of the more common func-
tions available.
Vehicles
Using the basic neural setup, we can construct a few simple vehicles that
exhibit interesting behaviors. Figure 9.6 illustrates two vehicles labeled A and
B. Both vehicles use the positive proportional neural setup with a light inten-
sity sensor.