Eyesight Associates of Middle - part 5 ppsx
Bạn đang xem bản rút gọn của tài liệu. Xem và tải ngay bản đầy đủ của tài liệu tại đây (407.21 KB, 16 trang )
52 Chapter 4
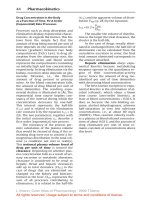
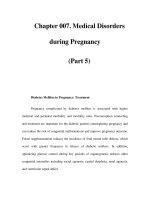
Figure 4-8B. Example of sclerotic scatter. (Photo by Val
Sanders.)
Figure 4-8A. Schematic of
sclerotic scatter. (Reprinted
with permission from Oph-
thalmic Photography, SLACK
Incorporated.)
Sclerotic Scatter
This method is useful to view the distribution of corneal pathology, making it especially
useful in contact lens evaluation (see Chapter 9). A tall, wide beam is directed onto the limbal
area. The illuminator should be slightly offset for this technique and directed from a moderate
angle. (The illuminator is almost always left in a straight-ahead position. In a horizontal prism
reflected microscope, the illuminator is offset by simply rotating the slit scanning control ring.
If your slit lamp has a vertical illumination source, turn the slit centering knob near the bottom
of the illumination arm.) When the light is properly aligned with regard to the eye, a ring of
light will appear around the cornea. The light is absorbed and scattered through the cornea
(see Figures 4-8A and 4-8B), highlighting pathology. Use 10X magnification, with the micro-
scope directed straight ahead. This technique is easiest if the patient is not dilated so that the
iris provides a contrasting dark background.
Observe: general pattern of corneal opacities
Retroillumination
Retroillumination is used to evaluate the optical qualities of a structure. The light strikes the
object of interest from a point behind the object and is then reflected back to the observer. Thus,
it is similar to a silhouette. Some professionals advocate setting the slit beam slightly off center
(via the slit scanning control ring or the slit centering knob) for these techniques. The authors pre-
fer to leave the slit beam in its usual position.
Direct Retroillumination From the Iris
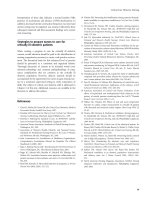
This illumination method is used to view corneal pathology. A moderately wide slit beam is
aimed toward the iris directly behind the corneal abnormality (Figures 4-9A and 4-9B). Use a
magnification of 16X to 25X, and direct the light from 45 degrees. The microscope is directed
straight ahead. The light strikes the iris, highlighting the corneal pathology on which you focus
the microscope. The beam of light must pass behind rather than striking on the pathology for this
OphT
CL
OptT
technique to be effective. Vary the beam angle slightly until you get the best detail. This technique
is best accomplished if the patient is not dilated.
Observe: cornea
Indirect Retroillumination From the Iris
The technique is performed as with direct retroillumination (above), but the beam is directed to
an area of the iris bordering the portion of the iris behind the pathology (Figures 4-10A and 4-10B).
This provides a dark background, allowing corneal opacities to be viewed with more contrast.
The angles are also evaluated with this technique. (The reason that chamber depth/angle eval-
uation is an indirect method is that you are not looking at the cornea or the iris, but at the dark
interval next to the beam.) See Chapter 3 for details on examining the chamber and angles.
Observe: cornea, angles
Illumination Techniques 53
Figure 4-9A. Schematic of
direct retroillumination from
the iris. (Reprinted with per-
mission from Ophthalmic
Photography, SLACK Incor-
porated.)
Figure 4-9B. Example of direct retroillumination from the iris.
(Photo by Val Sanders.)
Figure 4-10A. Schematic of indirect retroillumi-
nation from the iris. Note that the corneal
pathology to be viewed is not directly in the
beam. (Adapted with permission from Oph-
thalmic Photography, SLACK Incorporated.)
54 Chapter 4
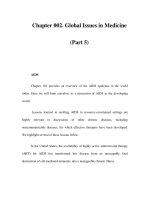
Figure 4-11B. Example of retroillumination from the retina.
(Photo by Val Sanders.)
Retroillumination From the Fundus (Red Reflex)
In this technique, you are seeking to visualize media clarity and opacities. The light is direct-
ed so that it strikes the fundus and creates a glow behind the abnormality (Figures 4-11A and
4-11B). The defect creates a shadow in the light. Use a moderate beam projected through a dilat-
ed pupil. The slit beam and microscope must be nearly coaxial; direct the illumination proximal-
ly at 2 to 4 degrees. Shorten the beam to the height of the pupil to avoid reflecting the bright light
off of the iris. If your instrument has the capability to do so, you might also adjust the beam into
a crescent so its shape will fit the pupil. (Check your user’s manual.) Focus the microscope
directly on the pathology using 10X to 16X magnification. Opacities will appear in silhouette.
This view is best accomplished if the pupil is dilated.
Observe: cornea, lens, vitreous
Figure 4-10B. Example of indi-
rect iris retroillumination (angle).
(Photo by Val Sanders.)
Figure 4-11A. Schematic of
retroillumination from the reti-
na. (Reprinted with permission
from Ophthalmic Photogra-
phy, SLACK Incorporated.)
Transillumination
In transillumination, a structure (in the eye, the iris) is evaluated by how light passes through it.
Iris Transillumination
This technique also takes advantage of the red reflex. The pupil must be at mid mydriasis (3
to 4 mm when light stimulated). Place the light source coaxial (directly in line) with the micro-
scope. Use a full circle beam of light equal to the size of the pupil. Project the light through the
pupil and into the eye (Figures 4-12A and 4-12B). If the light falls on the iris at all, your view
will be diminished. Focus the microscope on the iris. Magnification of 10X to 16X is adequate.
Observe: iris defects (they will glow with the orange light reflected from the fundus)
Illumination Techniques 55
Figure 4-12B. Example of iris transil-
lumination. (Photo by Val Sanders.)
Figure 4-12A. Schematic of iris transillumination.
(Adapted with permission from Ophthalmic Pho-
tography, SLACK Incorporated.)
56 Chapter 4
Illumination Mnemonic
To help you remember which illumination technique falls under which heading, the authors
have developed the following mnemonic:
1. Diffuse
2. Direct
Beam Beagles
Tangential Take
Pinpoint Pills
Specular Reflection Sparingly
3. Indirect
Proximal Precise
Sclerotic Scatter Scientists
Retroillumination Receive
Transillumination Training
KEY POINTS
Slit Lamp
Findings
Chapter 5
• It is usually best to record findings rather than diagnoses.
• The system of grading certain findings is subjective, or relative
to the opinion of the observer.
• Measuring the size of a lesion at the slit lamp may be accom-
plished with an external ruler, a measuring grid in the ocular, or
the slit beam itself.
• Drawing with colored pencils as a code can be a very useful tool
in documentation of certain structures or findings.
Chapters 2 through 4 have detailed the methods used in examining the eye with the slit lamp
microscope. This chapter is a list of common slit lamp findings, describing the appearance of the
abnormality along with pertinent documentation instructions (given as Documentation). The notes on
documentation are a variety of suggestions; it may not be necessary to complete each one. The word
note means merely to note in the chart that the finding exists. Remember that it is sometimes perti-
nent to document the absence of particular findings to indicate that the structure in question was
indeed examined for a particular entity. It is also worth noting that the record of the slit lamp exam
should usually give findings, not diagnoses. For example, it would be incorrect to write “2+ ble-
pharitis” as the slit lamp entry. Instead, the observer should notate the findings themselves, such as
“2+ lid edema and erythema, 1+ lash loss, 3+ crusting.” Having said that, we admit that we have
included some diagnoses in the listings. You and/or your supervisor should decide how to document
slit lamp findings and diagnoses in your particular office or clinic.
We have alphabetized the findings given in each list. It is probably best to read through the
listing once or twice before attempting to use it in the exam room. This is because, while you may
look for the word “redness,” we may have chosen to list the finding as erythema or injection.
Other terms fall into the same problem category. If you scan through the lists a time or two, you
will be able to pick out the appropriate findings when you need them. Some of the more common
diagnoses (such as blepharitis, dry eye, iritis, etc) are listed in Chapter 6. (Check the index if what
you are looking for is not listed as a finding.)
Criteria for several certification exams include “common ocular disorders” without being any
more specific than that. Candidates for these exams should probably familiarize themselves with
most of the findings listed. Icons appear beside items that are specifically mentioned or implied
as exam criteria.
The Subjective Grading System
An important but confusing part of documenting abnormalities is the subjective grading sys-
tem. Even the term “subjective” causes confusion because such grading occurs during the objec-
tive examination. Some clarification seems to be in order.
First, many of the patient’s symptoms are subjective. These are symptoms that the patient tells
us about but that we cannot see, such as pain. Other findings are objective, which do not involve
the patient’s ability to report them. We can see them ourselves when we examine the patient. Cell
and flare in the anterior chamber is an objective finding; the patient does not (and cannot) tell us
about it, but we can see it. Other findings fall into both realms. The patient may say, “My right
eye is red,” which is subjective. Through the slit lamp, we can also see the injection whether the
patient has reported it or not, which is objective. The slit lamp exam is an objective test.
Grading pathology and other findings, although they are discovered during the objective
examination, is subjective on the part of the examiner. Here, subjective means that the assignment
of a rating to a finding is dependent on the observer’s opinion. You may look at the patient and
grade her lid edema as 2+. Another clinician may rate the same finding (same patient, same day,
same time) as 1+ or 3+. The best we can advise you is that if you are auxiliary personnel, try to
learn the grading system of your employer. As you examine more and more eyes, you will get a
feel for how marked a finding is. If you are a physician, do your best to teach your grading phi-
losophy to your staff.
58 Chapter 5
With that said, we would like to offer our own opinion about how to grade your findings.
Some prefer a numbered grading system. If you use this, then 0 means that a finding is absent.
1+ would indicate that a finding is just barely perceptible. A full-blown case would be referred to
as 4+. Using this schematic, 2+ and 3+ would fall somewhere in between. This system is some-
times complicated by interjecting half steps in between, such as 2.5+. You can decide whether this
practice is truly necessary or not.
The plus sign itself can be a point of contention. To some, the “+” is used to indicate a half
step. In this book, we are generally avoiding half steps.
Instead of numbers, specific terms can be used, including “none, absent, bare trace, trace,
slight, moderate, marked, severe” and other such words. This is even more subjective than the
numbering system. If everyone uses a scale of 0+ to 4+, then we have a better chance of under-
standing what 2+ means. Who is to say what the difference really is between bare trace and
trace? The dilemma of subjective grading is not likely to be solved.
Measuring
Measuring the size of a finding can be an important part of the slit lamp examination. A
record of a lesion’s size from one exam to the next allows us to monitor for growth or resolution.
Obviously, a lesion may be measured using a hand held ruler with one hand while observing
through the slit lamp. Admittedly, this is awkward. It is far easier to use an ocular that has a ruler
built in to the reticule. A third method is possible with vertical illumination source models. First,
the slit is rotated to coincide with the axis that you want to measure. Then, the slit beam height
is reduced or lengthened to match the lesion. The measurement is read from a slit length display
window on the illumination arm. Prior to using this method, the beam should be calibrated
against a millimeter rule.
External Findings (Lids/Lacrimal)
• blepharospasm – lid twitch.
Doc: note
• bruising (hematoma) – common after lid surgery or injury.
Doc: note, grade 1+ to 4+, give location, draw
• burn – injury caused by heat.
Doc: note, give location, estimate percentage of dermis that is burned, estimate degree (first
degree, skin red and usually moist; second degree, blistering; third degree, full thickness, may be
charred, lashes and hair pull out easily), draw
• collarettes – blepharitis/granulated eyelids. Little white greasy crusty flakes surrounding
the base of the lashes.
Doc: note, grade 1+ to 4+
• coloboma – a vertical fissure in the lid where the tissues did not fuse during embryonic
development.
Doc: note
Slit Lamp Findings 59
• crusting/matting – lashes are glued together with dried matter.
Doc: note, grade 1+ to 4+
• distichia – extra row of lashes often growing from the openings of the meibomian glands.
Doc: note, give location if appropriate
• ectropion – lower lid sags out, exposing conjunctiva.
Doc: note, grade 1+ to 4+ (1+ is barely turned out, 4+ looks like a Basset hound)
• edema – swelling.
Doc: note, give location, grade 1+ to 4+ (4+ is swollen shut)
• entropion – lower lid flips in with lashes rubbing cornea.
Doc: note, grade 1+ to 4+
• erythema – redness.
Doc: note, grade 1+ to 4+ (1+ is barely pink, 4+ is fire engine red)
• froth – tiny white bubbles at lower lid or in corner of eye, an indication of overactive mei-
bomian glands.
Doc: note, grade 1+ to 4+
• laceration – cut.
Doc: note, give location, measure, draw, note other lid structures involved (such as punctum)
• lash loss – fewer lashes than normal, usually due to chronic infection or habit of picking
lashes out.
Doc: note, give location, grade 1+ to 4+
• lesion (Table 5-1) – general term for any growth on the lids/brows. Could include skin tag,
cyst, mole (nevus), wart, etc.
Doc: note, location, measure, describe (crusty, cratered center, brown, flat, etc), draw
• lid closure – whether or not the upper lid comes all the way down to the lower lid when
patient blinks or closes eye. If upper meets lower, closure is “complete.” If there is a gap
and some of the eyeball (usually the cornea) is not covered, this is termed “incomplete.”
Doc: note if complete or incomplete. If incomplete, give exposed area of globe in fractions (ie,
“lower third”)
• lid lag – the upper lid does not immediately follow the eye when the patient looks down
(Von Graefe’s sign).
Doc: note
• lid position – location of the upper and lower lid margins when the eye is opened. May
include ectropion, entropion, inferior scleral show (exposure), failure of lower punctum to
contact globe, ptosis.
Doc: note, describe, measure fissure openings (if ptosis)
• lid retraction – the upper lid margin is above or the lower lid margin is below normal when
the eye is opened. This may be marked enough to produce scleral show.
Doc: note, describe
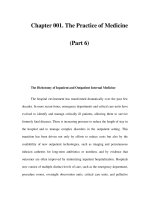
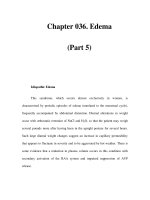
• notching (Figure 5-2) – a nick in the lid margin often associated with trauma, surgery, or
chronic blepharitis.
Doc: note, give location, draw
• packed meibomian glands (meibomian plugs) – looks like little droplets or whitish
“plugs” along the lower lid. This is oil at the opening of the glands.
Doc: note
60 Chapter 5
OptT
OphT
CL
OptT
OphT
CL
Slit Lamp Findings 61
TABLE 5-1
Common Lid Lesions
• Basal cell carcinoma (Figure 5-1): depression in center, white border, small ves-
sels, may be scaly, may bleed.
• Chalazion: swollen meibomian gland in lid. If you pull the lid back, you can see
it from the bulbar conjunctival side, too. Usually a round smooth nodule under skin.
May have a head on it. If head is visible on lid, it is termed “pointing to the skin.”
If head is on conjunctival side (the more common case), it is said to be “pointing
to the conjunctiva.” Early chalazion may have more generalized swelling with the
knot only slightly evident.
• Cyst: fluid-filled vesicle.
• Hemangioma: a congenital vascular tumor that may vary in color from bright red
to blue to violet.
• Hordeola: sty; inflamed oil gland at base of lash follicle; tender red lump at lid
margin.
• Kaposi’s sarcoma: a reddish-blue nodule associated with autoimmune disease
(AIDS).
• Melanoma: may have jagged or uneven edges; may start near a mole; may be col-
orless; may turn brown, tan, or black; may have blue or red sections.
• Milia: tiny, elevated, singular white nodules (may occur in groups).
• Mole (nevus): usually present at birth, may be pigmented or flesh-toned, symmet-
rical.
• Molluscum contagiosum: small, waxy, wartlike lesion often with a “dip” in the
center; usually found on lid margin.
• Seborrheic keratoses (senile verruca): appear in older individuals; flat, bumpy
surface, often pigmented.
• Skin tag (cutaneous horn): cylindrical, flesh-colored outgrowth.
• Squamous cell carcinoma: may start as nodules or red patches; later looks like a
wart, erodes and ulcerates.
• Wart (verruca): elevated, with a bumpy surface.
• Xanthelasma: yellow, dull, fairly flat deposits usually on the upper lids, may be on
lower lids.
• port wine stain – a congenital, flat, red area (looks like the skin was stained).
Doc: note, describe, location, draw, measure
• ptosis – lid droop.
Doc: note, measure fissure opening (this may be done with a measuring reticule in the slit lamp
ocular), draw
• reflux – purulent material that is regurgitated out of the lower punctum when you press on
the nasolacrimal area.
Doc: note as positive (present) or negative (absent)
• trichiasis – in-turned lash(es), may rub on the cornea.
Doc: note, location, number, draw
The Globe
Tears
• break up time (BUT) – see Chapter 3.
Doc: note time to break-up
62 Chapter 5
Figure 5-2. Lid notching. (Photo by
Val Sanders.)
Figure 5-1. Basal cell carcinoma of
the lower lid. (Photo by Val Sanders.)
OptT
OphT
CL
• debris – foreign matter in tear film.
Doc: note, identify source if possible (ie, mascara, ointment, etc), grade 1+ to 4+
• discharge – abnormal excretion.
Doc: note, describe (purulent, mucopurulent, serous), grade 1+ to 4+ or use words (scanty, profuse,
etc)
• epiphora – excess tearing.
Doc: note
• matter – purulent discharge.
Doc: note, describe (stringy, yellow, etc), grade 1+ to 4+ or use words (scanty, profuse, etc)
• oily – a sheen of oil can be seen on the surface of the tear film.
Doc: note, grade 1+ to 4+
Conjunctiva, Episclera, Sclera
• ciliary flush (limbal injection, Figure 5-3) – injection of the deep vessels around the lim-
bus. These vessels do not move when pushed with a cotton-tipped applicator, nor do they
bleach with phenylephrine.
Doc: note, grade 1+ to 4+
• color – the white of the eye should be white, but may be yellow in the elderly or jaundiced
and bluish in children or patients with keratoconus or high myopia.
Doc: note, describe
• conjunctival cyst – looks like a little fluid-filled translucent blister on the conjunctiva.
Doc: note, measure, draw, give location
• dryness – if the conjunctiva is dry, you will see it being dragged by the upper lid during
the blink.
Doc: note
• edema (chemosis) – swelling of the conjunctiva, looks like there is “too much” conjuncti-
va, that it is overflowing.
Doc: note, grade 1+ to 4+ (1+ is just noticeable, like a tiny extra fold of conjunctiva. 4+ looks
like a lot of fluid behind the conjunctiva, making it bulge out past the cornea.)
• follicles – smooth yellow/clear bumps on palpebral conjunctiva. Sign of viral infection. In
contrast to papillae, follicles do not have central blood vessels.
Doc: note, grade 1+ to 4+
Slit Lamp Findings 63
OptT
OphT
CL
Figure 5-3. Ciliary flush with
corneal edema (note haze). (Photo
by Val Sanders.)
64 Chapter 5
TABLE 5-2
Grading Injection*
Feature Grade
No injection present 0
Slight limbal (mild segmented), bulbar (mild regional), 1+
and/or palpebral injection
Mild limbal (mild circumcorneal), bulbar (mild diffuse), 2+
and/or palpebral injection
Significant limbal (marked segmented), bulbar 3+
(marked regional or diffuse), or palpebral injection
Severe limbal (marked circum-corneal), bulbar 4+
(diffuse episcleral or scleral), or palpebral injection
*Adapted from FDA document Premarket Notification Guidance Document for Daily Wear Contact Lenses.
Figure 5-4. Mild conjunctival injec-
tion; note blood vessels to right of
cornea. (Photo by Val Sanders.)
OptT
OphT
CL
OphT
CL
• foreign body – anything that does not naturally belong in or on the conjunctiva. (The most
interesting conjunctival foreign body I have ever seen was an ant. The insect had bitten into
the conjunctiva before it died. The doctor had to numb the eye and cut the ant out!)
Doc: note, identify (if possible), give location, draw
• injection (hyperemia; Figure 5-4) – general redness of conjunctiva. If injection is mainly
around limbus and not generalized, it is described as “limbal injection.”
Doc: graded 1+ to 4+ (1+ is just noticeably pink, 4+ is glow-in-the-dark) (Table 5-2)
• laceration – cut.
Doc: note, measure, draw, give location
• leash vessel(s) (Figure 5-5) – a prominent red blood vessel (conjunctiva is not totally
injected). If the vessel is in the conjunctiva or surface episclera, it will bleach with topical
phenylephrine. Deeper episcleral or scleral vessels will not bleach.
Doc: note location (directional or by the clock), draw
• papillae – little elevated lesions on palpebral conjunctiva that have blood vessels in the
center. Sign of infection or allergy.
Doc: note, grade 1+ to 4+
• pinguecula (Figure 5-6) – yellow or white roundish growth at the limbus nasally or tem-
porally.
Doc: note, give location by the clock, may draw and measure
• prolapsed tear gland – a yellowish mass visible under conjunctiva of the upper lid.
Doc: note
• scleral show – the lid does not cover the eye up to the cornea; some of the sclera is
exposed.
Doc: note, describe (inferior, superior), measure, draw
• scleral thinning – bluish areas where the sclera has thinned to the point that the black
choroid shows underneath (but has not broken through).
Doc: note, give location, draw
• subconjunctival hemorrhage (SCH; Figure 5-7A) – blood-red patch on the sclera, under
the conjunctiva; analogous to a bruise elsewhere on the body.
Doc: note, give location, draw
Slit Lamp Findings 65
Figure 5-5. Conjunctival leash ves-
sels. (Photo by Val Sanders.)
Figure 5-6. Pinguecula. (Photo by Val
Sanders.)
OptT
OphT
CL
OptT
OphT
CL
• uveal prolapse – a portion of the uvea protrudes through the sclera; the uvea is black and
easily visible against the white sclera.
Doc: note, give location, draw
Cornea
Documentation by Drawings
A system of documenting corneal pathology by hand-drawn illustrations has been described
by several authors. Waring and Laibson suggest the following color scheme:
• black
solid line – sutures
dotted line – contact lens
dots – guttata
• blue: edema
wavy lines – Descemet’s folds
tiny circles – epithelial edema
• brown: pigment, iris
• red: blood, rose bengal
thin solid line – superficial vessels
thick solid line – stromal vessels
dotted line – ghost vessels
• green: fluorescein, lens, vitreous
solid wavy lines – filaments
• yellow: infiltrate, hypopyon, keratitic precipitates
In addition, the location of corneal findings may be designated by a system described by
Josephson and Caffery. Zone 1 is the central 6.00 mm of the cornea. The peripheral cornea is
divided into four zones by lines at 1:30, 4:30, 7:30, and 10:30. The superior section is Zone 2,
and the numbers continue clockwise so that the section on the examiner’s right is Zone 3, inferi-
or is Zone 4, and Zone 5 is on the examiner’s left.
66 Chapter 5
Figure 5-7. Subconjunctival hemor-
rhage (A) with Hyphema (B). (Photo
by Val Sanders.)
A
B
Slit Lamp Findings 67
Figure 5-8. Corneal abrasion (hori-
zontal stained area) with striae (faint
vertical lines). (Photo by Val Sanders.)
OptT
CL
Findings
• abrasion (Figure 5-8) – scratch. Stains with fluorescein.
Doc: note give location, measure or estimate size, draw
• arcus senilis – white-gray ring just inside the limbus, may or may not extend 360 degrees.
Doc: note, draw
• band keratopathy – a white band of calcification that extends across the center of the
cornea to the limbus at 3:00 and 9:00. There may be clear gaps, giving it the appearance of
Swiss cheese.
Doc: note, grade 1+ to 4+, draw
• corneal diameter – can be measured with reticule in ocular; average is 11.00 to 12.00 mm.
Doc: measure
• dellen – depression in the corneal surface next to the limbus. Fluorescein may pool in it,
but it does not stain. May occur after muscle, pterygium, or filtration surgery.
Doc: note, draw, measure, give location
• dystrophy (Figure 5-9) – grainy textured appearance on back surface of cornea. May look
like a fingerprint on a piece of tape. May have a ground-glass, glittering appearance or an
opaque pattern (through which endothelium may not be visible).
Doc: note, grade 1+ to 4+
Figure 5-9. Corneal dystrophy. (Photo
by Val Sanders.)